
| 일 | 월 | 화 | 수 | 목 | 금 | 토 |
|---|---|---|---|---|---|---|
| 1 | 2 | 3 | 4 | 5 | ||
| 6 | 7 | 8 | 9 | 10 | 11 | 12 |
| 13 | 14 | 15 | 16 | 17 | 18 | 19 |
| 20 | 21 | 22 | 23 | 24 | 25 | 26 |
| 27 | 28 | 29 | 30 |
- aws k8s 업그레이드
- aws eks
- CNI
- Kubernetes
- Jenkins
- argocd
- aws 워크샵
- eks 업그레이드 전략
- Istio
- irsa
- vpc cni
- blue-green 업그레이드
- service mesh
- grafana
- vagrant
- inplace 업그레이드
- loadbalancer
- K8S
- docker
- WSL
- eks인증
- k8s인증
- eks auto mode
- Ingress
- CICD
- eks 모니터링
- bottlerocket
- eks autoscaling
- prometheus
- Kind
- Today
- Total
WellSpring
AEWS 7주차 - EKS Mode/Nodes (Fargate, Auto-mode) 본문
※ 본 게재 글은 gasida님의 'AEWS' 강의내용과 실습예제 및 AWS Fargate 및 AutoMode 관련 공식사이트와 Blog 등을 참고하여 작성하였습니다.
목차
[ 이론 정리 ]
◈ k8s Scheduler 에 대하여
☞ kubernetes에서 scheduling 은 Kubelet이 파드를 실행할 수 있도록 파드가 노드에 적합한지 확인하는 것을 의미한다.
1) kube-scheduler 란?
- 쿠버네티스의 기본 스케줄러이며 컨트롤 플레인의 일부로 실행된다. kube-scheduler는 원하거나 필요에 따라 자체 스케줄링 컴포넌트를 만들고 대신 사용할 수 있도록 설계되었다.
2) Scheduler 의 역할
- 새로 생성되었거나 아직 예약되지 않은(스케줄링되지 않은) 파드를 실행할 최적의 노드를 선택
- 파드가 실행 가능한 노드를 찾은 다음 실행 가능한 노드의 점수를 측정하는 기능 셋을 수행
- 실행 가능한 노드 중에서 가장 높은 점수를 가진 노드를 선택하여 파드를 실행
- 바인딩 이라는 프로세스에서 이 결정에 대해 API 서버에 알림
3) Kube-Scheduler의 노드선택 방법
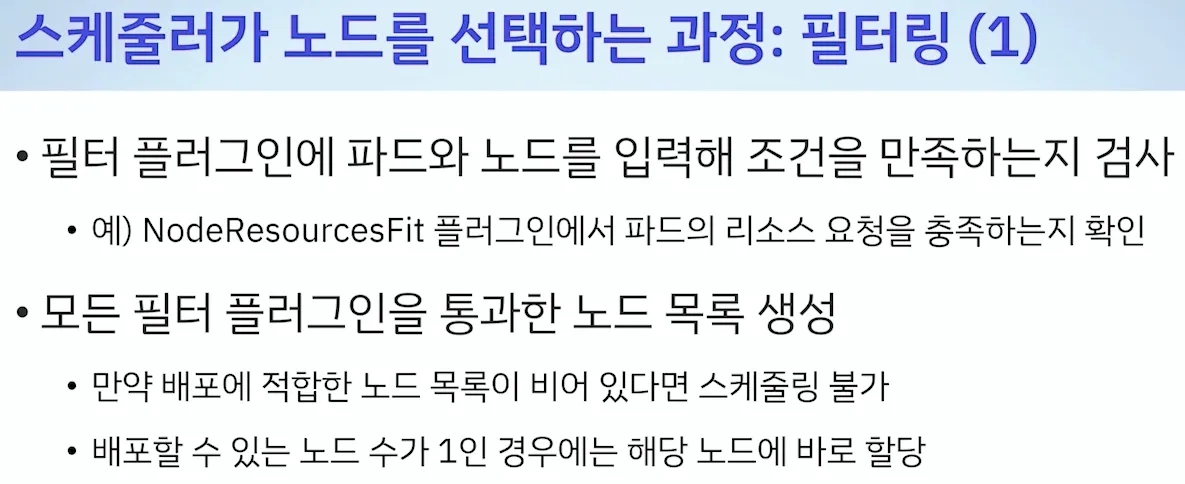
a. 필터링 : 파드를 스케줄링 할 수 있는 노드 셋을 찾아 목록을 만든다.
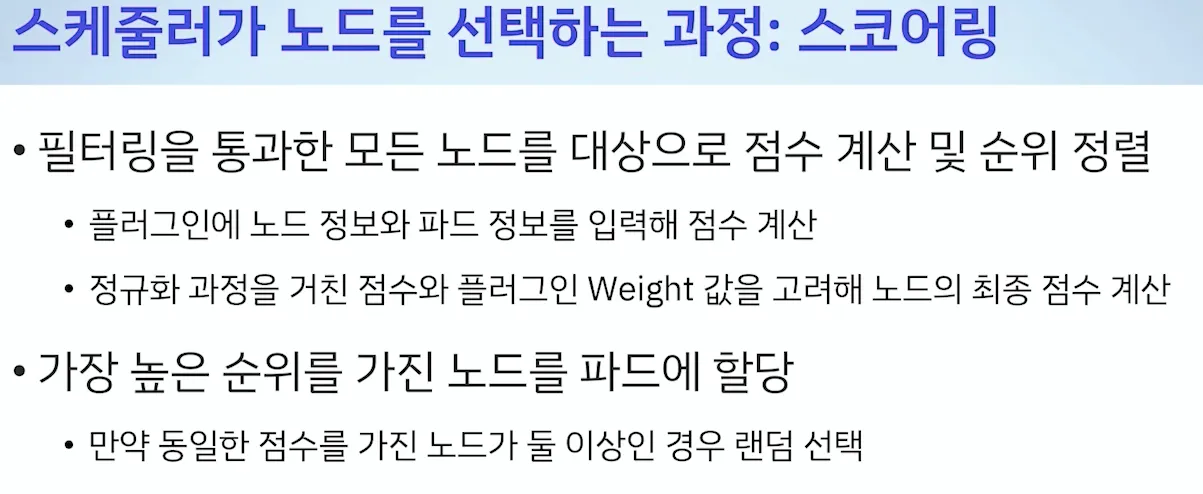
b. 스코어링 : 목록에 남아있는 노드 리스트에서 사용하는 스코어 규칙에 따라 최적의 노드를 선정한다.
[ More ... ]
[ Docs ] Scheduler
- Kubernetes Scheduler - Docs
- Assigning Pods to Nodes - Docs
- Pod Overhead - Docs , Readme
- Pod Scheduling Readiness - Docs , Readme
- Pod Topology Spread Constraints - Docs , Blog
- Taints and Tolerations - Docs
- Scheduling Framework - Docs
- Dynamic Resource Allocation - Docs
- Scheduler Performance Tuning - Docs
- Resource Bin Packing - Docs
- Pod Priority and Preemption - Docs
- Assign Pods to Nodes - Task
- Assign Pods to Nodes using Node Affinity - Task
- Control Topology Management Policies on a node - Task
[ Extention Pointing 을 사용한 Scheduling Process ]

1. queueSort:
스케줄링 대기열에서 Pending 중인 파드를 정렬하는 데 사용되는 정렬 기능을 제공.
대기열 정렬 플러그인은 한 번에 정확히 하나만 활성화할 수 있음.
2. preFilter
필터링 전에 Pod 또는 클러스터에 대한 사전 처리나 정보를 확인하는 데 사용
Pod에 unschedulable 표시를 할 수 있음.
unschedulable는 모든 Pod가 가지고 있는 속성이며, 기본 설정은 모두 true.
해당 노드에 false로 설정된 Pod가 없다는 걸 보장하는데 사용할 수 있음.
3. filter
스케줄링 정책의 Predicate와 동일하며 Pod를 실행할 수 없는 노드를 필터링하는 데 사용됨.
필터는 설정된 순서대로 호출.
모든 필터에 통과된 노드가 없으면, Pod는 unschedulable로 표시됨.
4. postFilter
Pod를 배치할 노드를 찾지 못했을 때, 구성된 순서대로 호출.
만약 어떤 postFilter 플러그인이 Pod를 schedulable로 표시한다면, 이후 플러그인들은 호출되지 않음.
5. preScore
Scoring 작업 수행 전, 사용할 수 있는 정보성 Extension Point.
6. score
필터링 단계를 통과한 각 노드에 점수를 매김.
이후 스케줄러는 가중치 합계가 가장 높은 노드를 선택.
7. reserve
지정된 Pod에 리소스가 예약된 경우, 플러그인에 알리는 정보성 Extension Point.
플러그인 구현 시, Reserve 실행 중 혹은 그 이후에 실패 시, 호출할 Unreserve 을 구현함.
8. permit
Pod 바인딩을 방지하거나 지연시킬 수 있음.
9. preBind
Pod가 바인딩되기 전, 필요한 모든 작업을 수행.
10. bind
Pod를 노드에 바인딩.
bind 플러그인은 순서대로 호출되며, 한 번 바인딩이 완료되면 나머지 플러그인은 건너 뜀.
적어도 하나 이상의 bind 플러그인 필요
11. postBind
Pod가 바인드된 후 호출되는 정보성 Extension Point
12. multiPoint
모든 적용 가능한 익스텐션 포인트에 대해, 플러그인들을 동시에 활성화하거나 비활성화할 수 있게 하는 환경 설정 전용 필드
[ 참고 자료 ]
▶ [CNKCD2024] 쿠버네티스 스케줄러는 노드를 어떻게 선택하는가? (임찬식) - Youtube , Blog1* , Blog2* , Blog3
[ HPA 동작 제어 - Blog ]

- 파드 생성 시 : 인증/인가 → Admission → ETCD ⇒ 스케줄러 동작 (노드 선택) ⇒ 이후 pod 에 nodename에 업데이트됨
https://www.youtube.com/watch?v=BMMeLgvpkWA
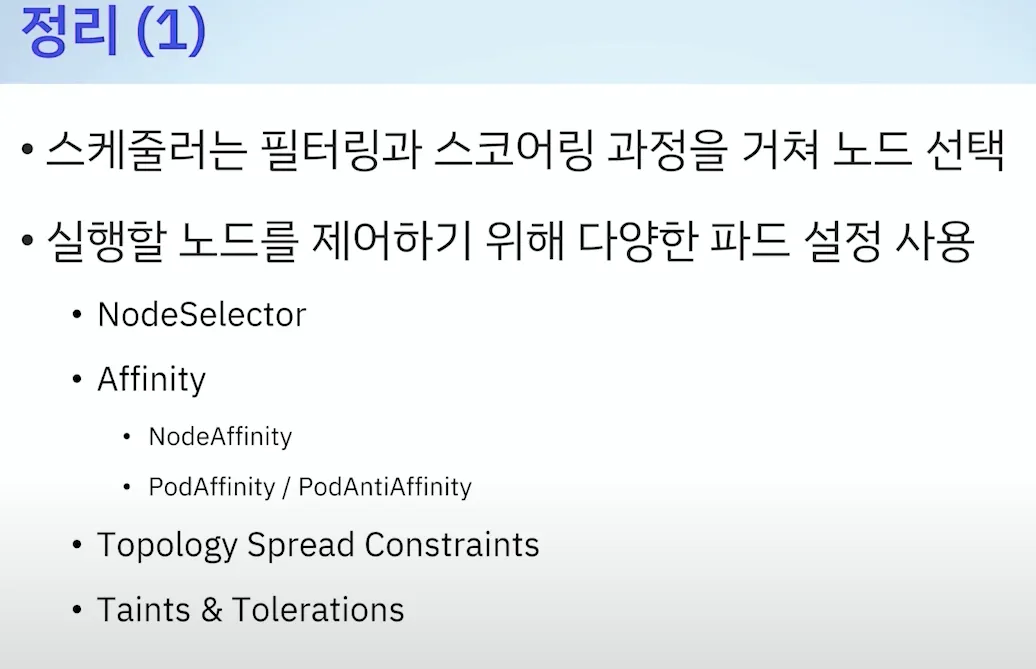
[ 요약 ]
☞ Filtering => Scoring 을 통해 Pod 배포 할 노드 선정
- 필터와 스코어 둘 다 사용되는 플러그인 있음
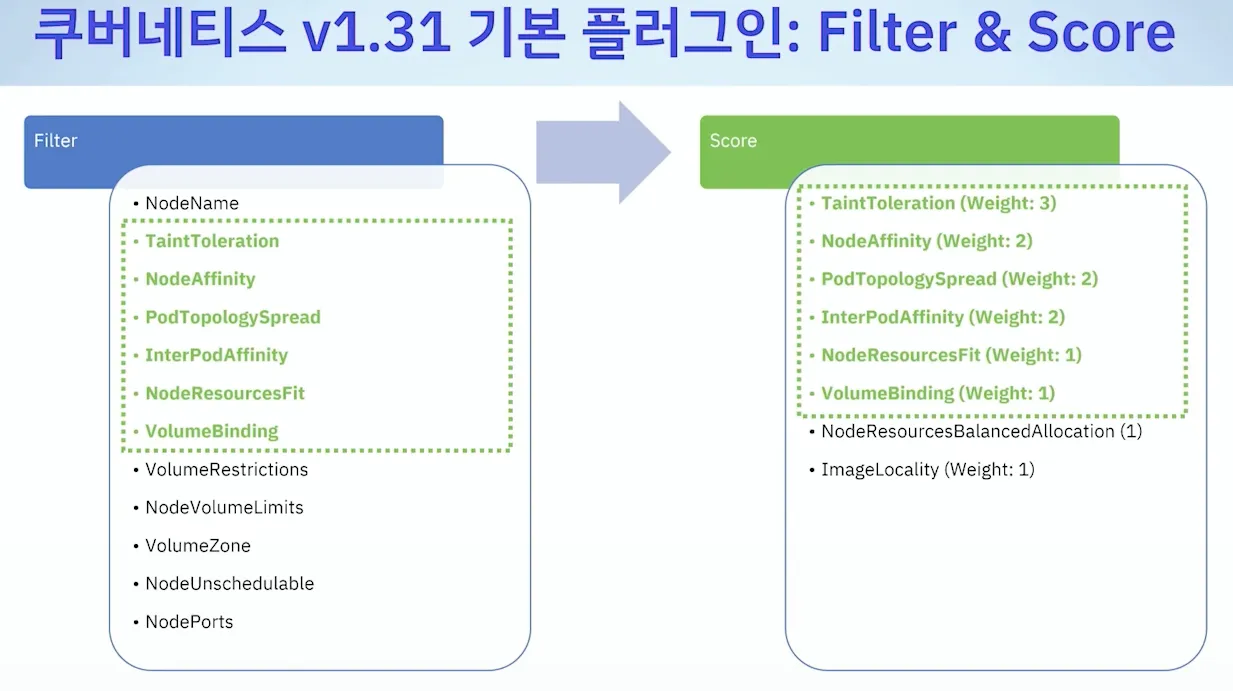
- 필터링 (1) : 모든 필터 플러그인을 통과한 노드 목록 생성
- 필터링 (2) : 클러스터 크기가 큰 경우(1000대 이상) 기본값 50% 검색 ⇒ 검색 비율 조절 가능

- 스코어링 : 가장 높은 순위 노드에 파드 할당
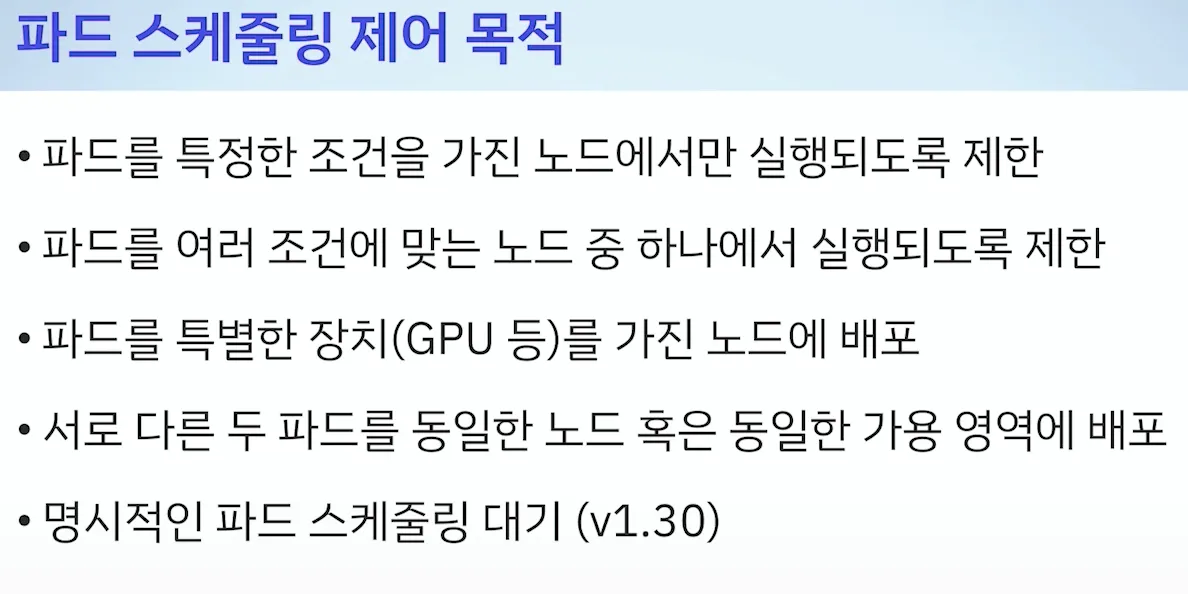
- 파드 스케줄링 제어 목적
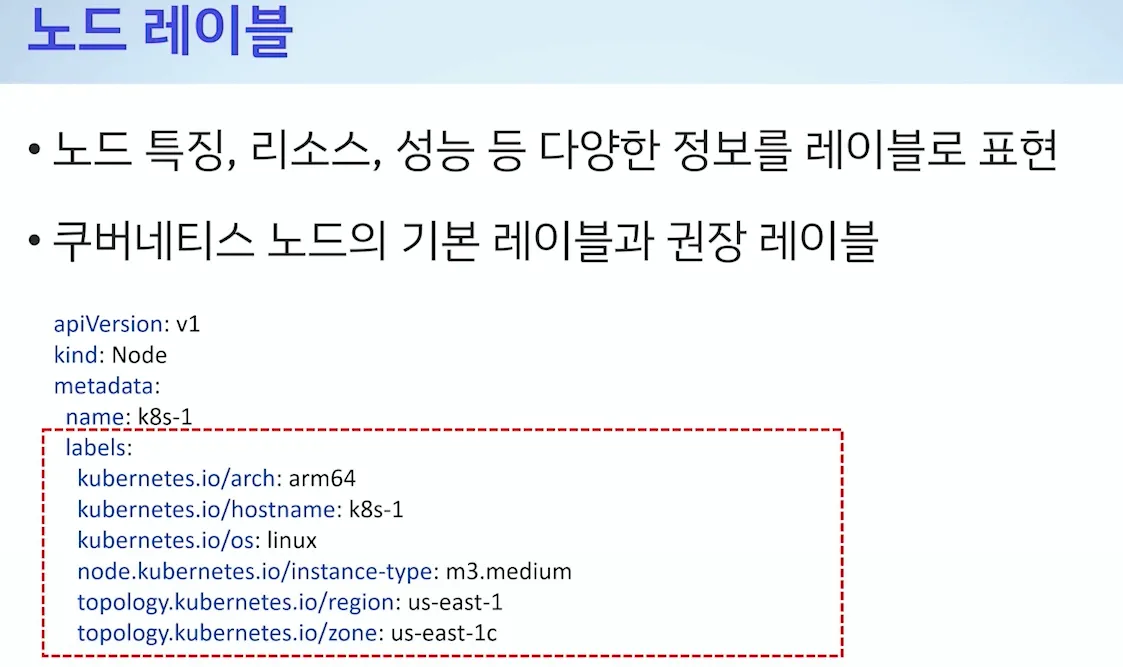
- 노드 레이블
[ POD 스케쥴링 기법 ]
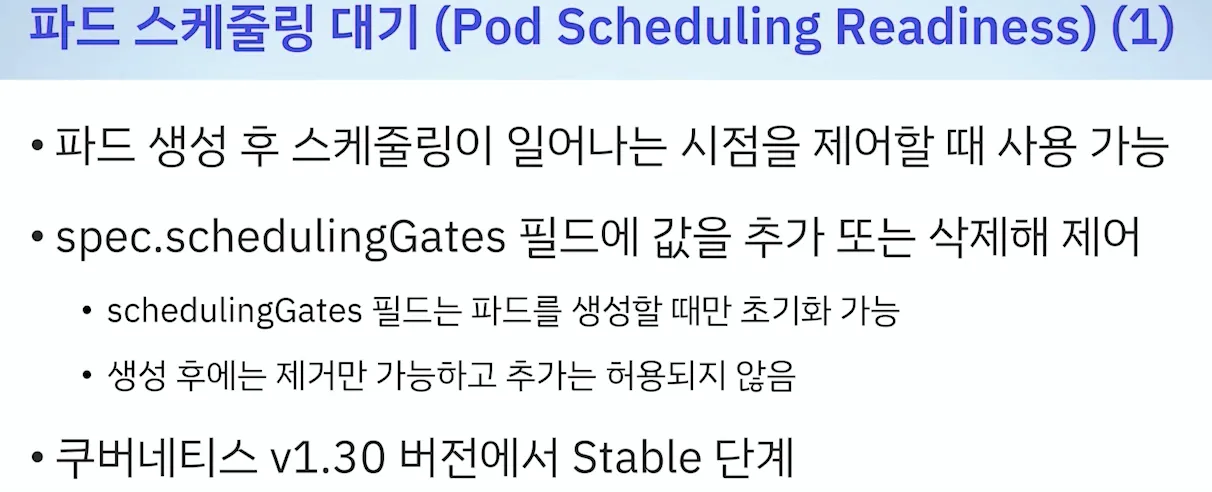
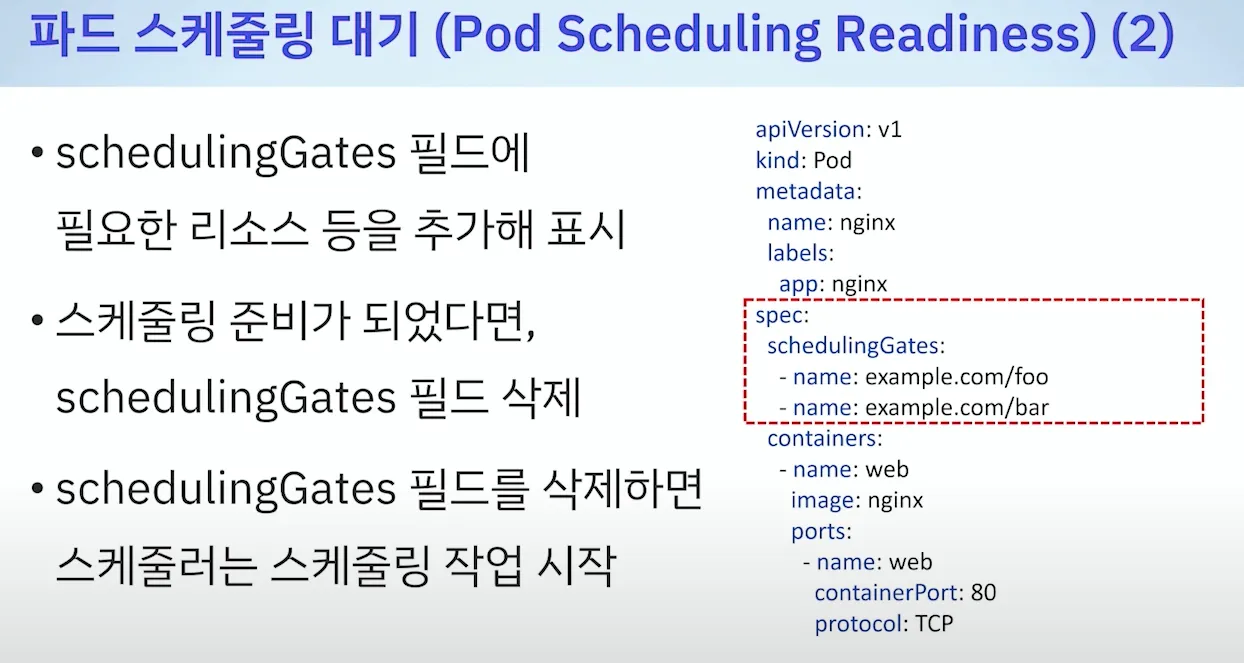
a. schedulingGates 사용
일단 파드는 생성은 해두지만, 실제 스케줄링은 하지 않음. ⇒ schedulingGates 가 모두 삭제 되면, 스케줄링 작업 시작
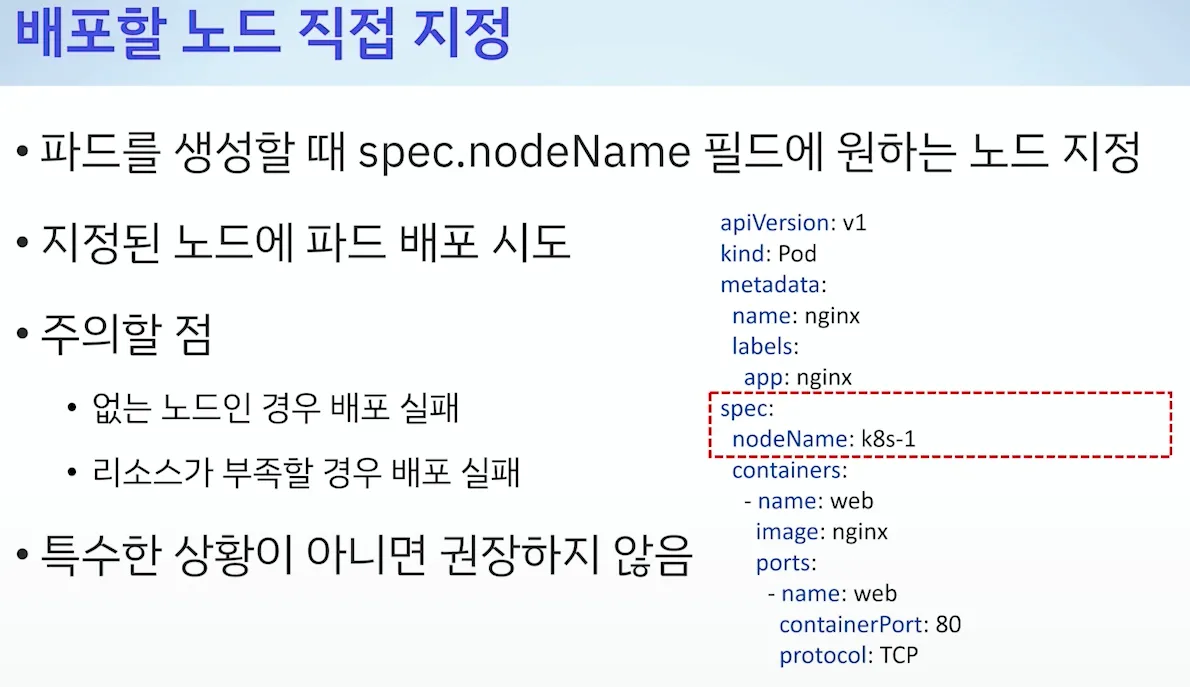
b. 배포할 노드 직접 지정
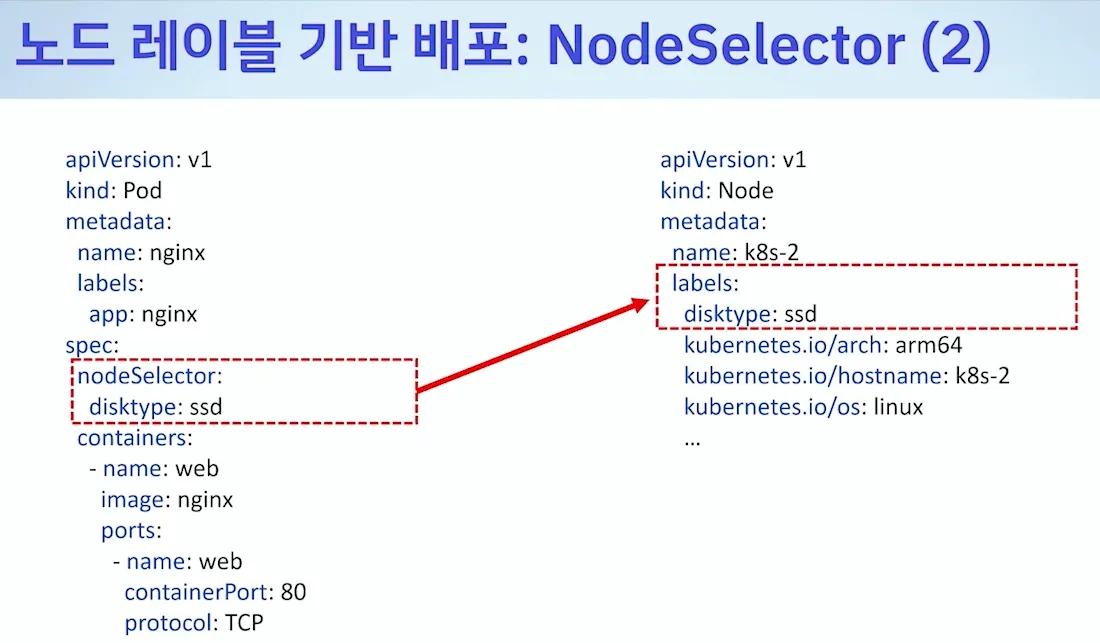
c. Node Selector 사용

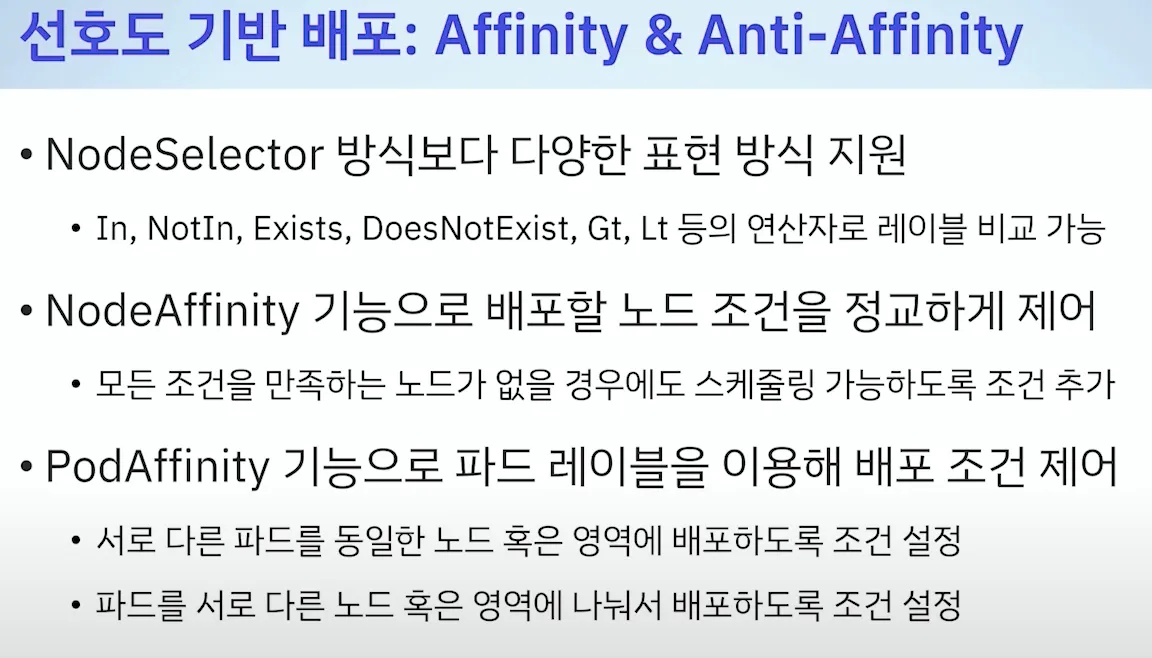
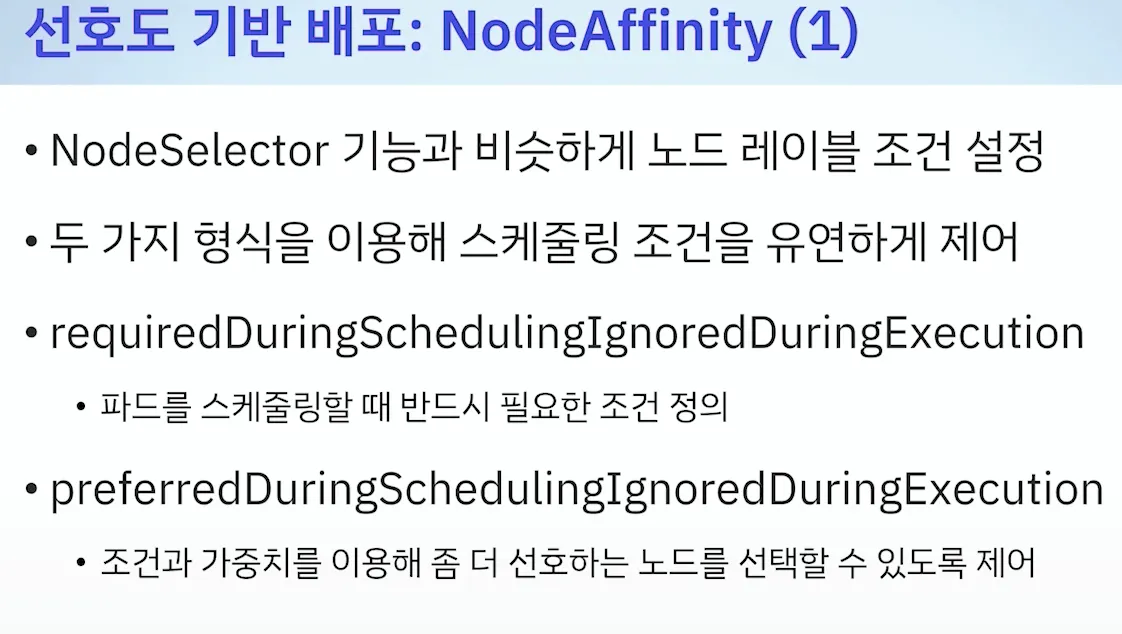
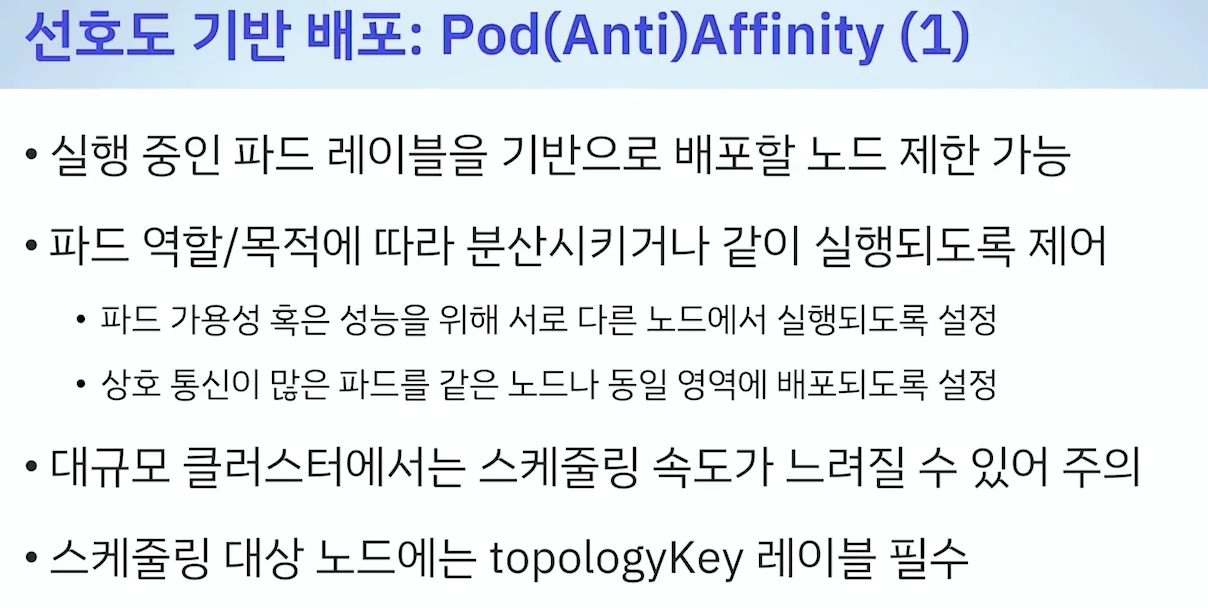
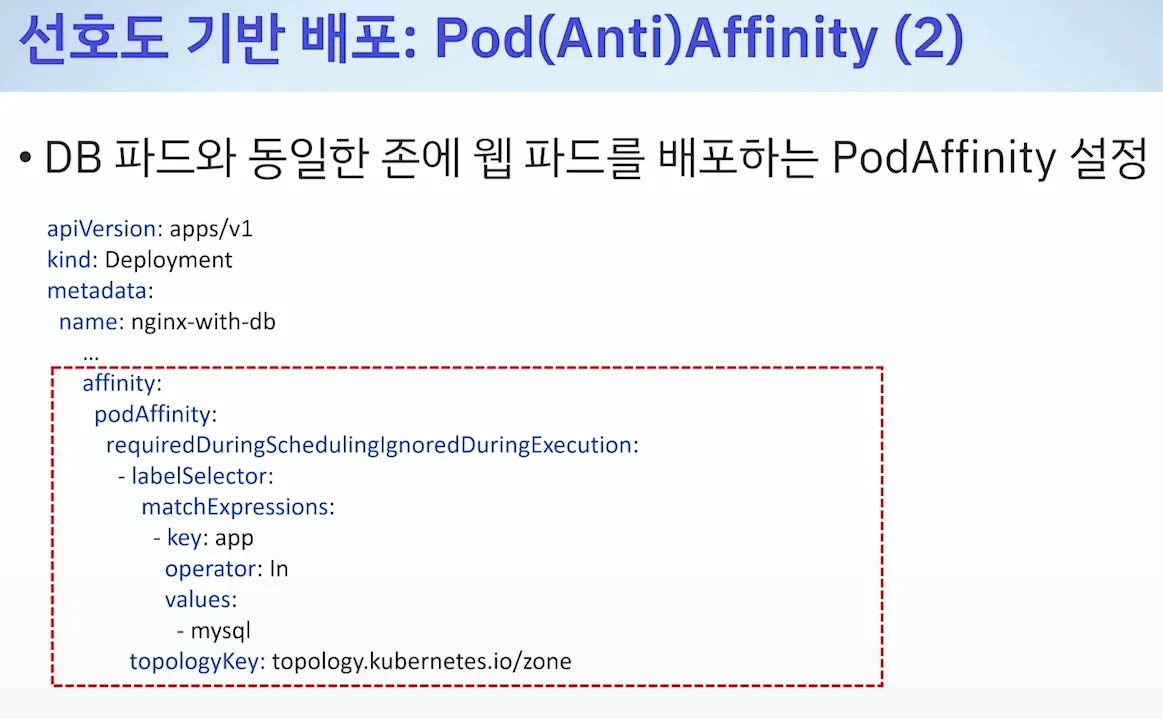
d. 선호도 기반 ( Affinity & Anti-Affinity )
* Node Affinity / Pod Affinity
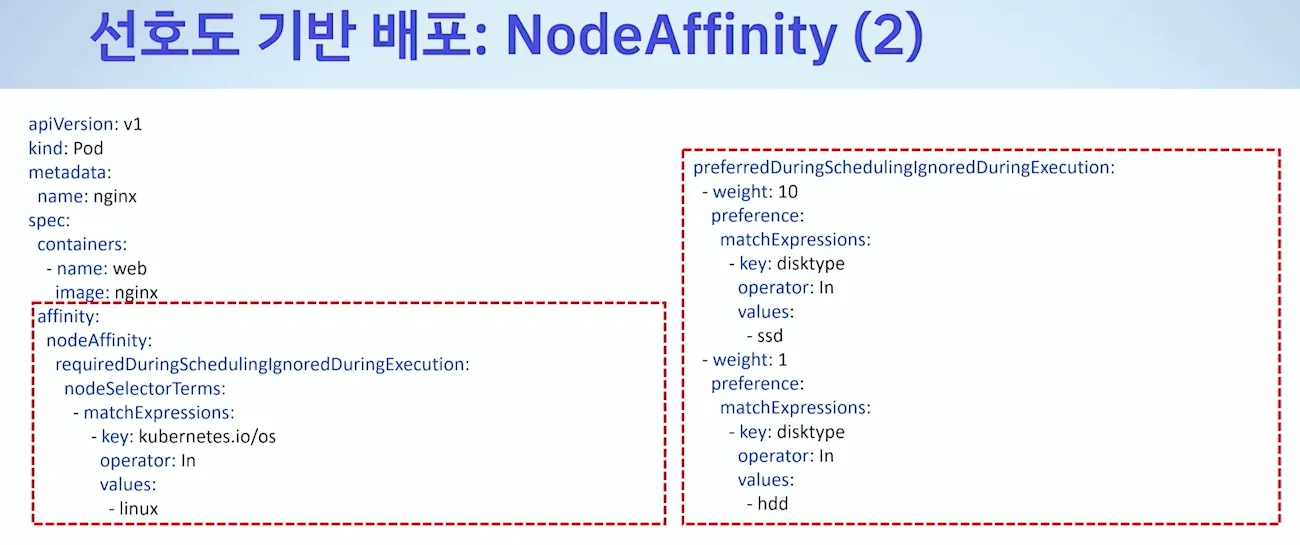
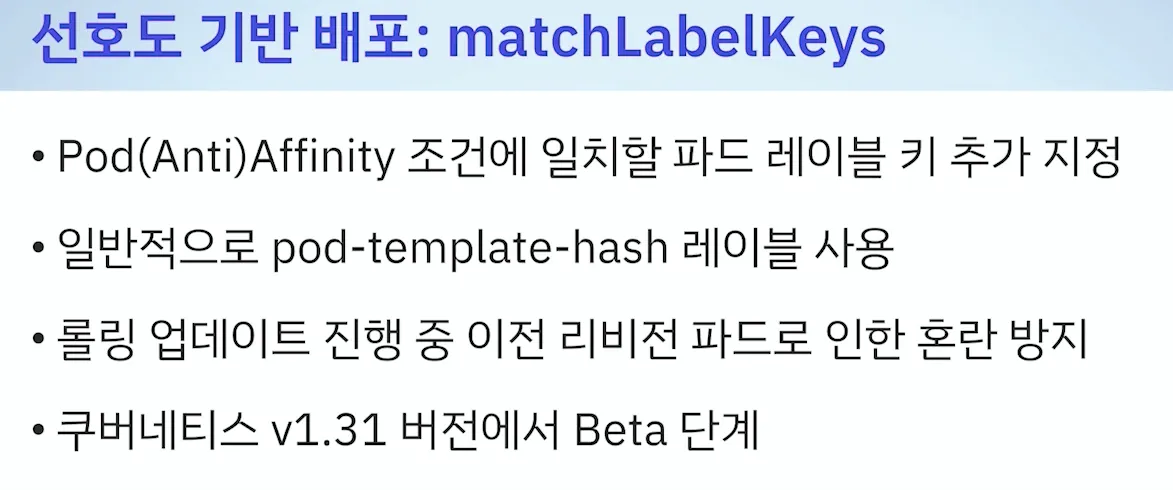
- 선호도 기반 배포 : 롤링 업데이트 기간에 레이블이 같아서, 원치않은 곳에 배포될 수 있어서 이를 해결 - 리비전 다르면 다름
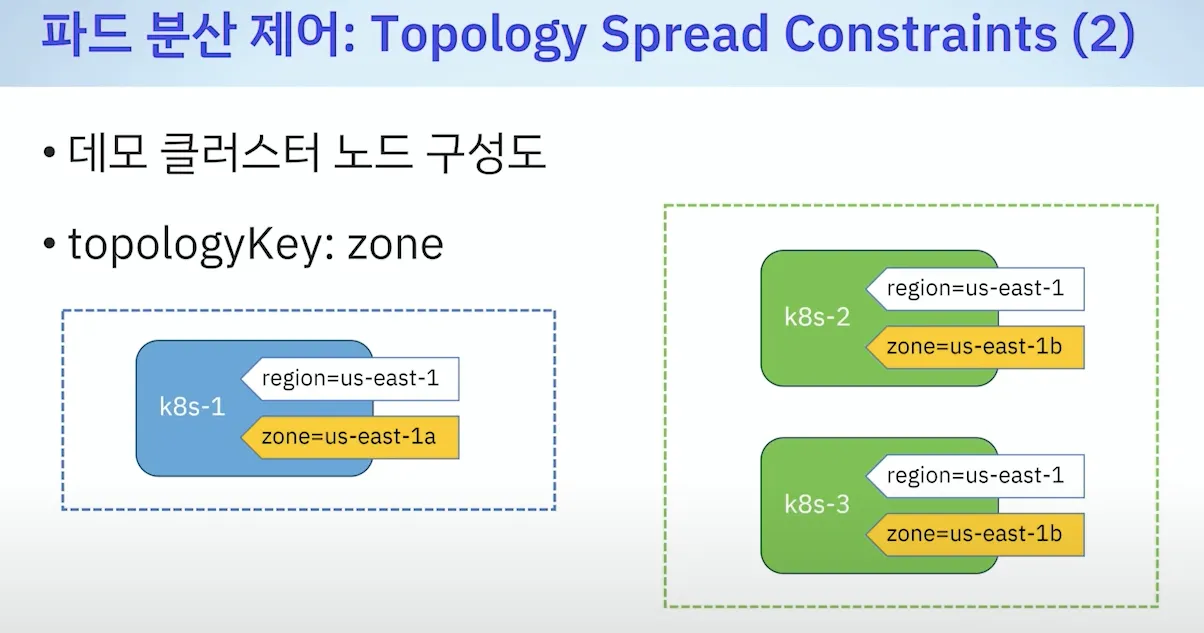
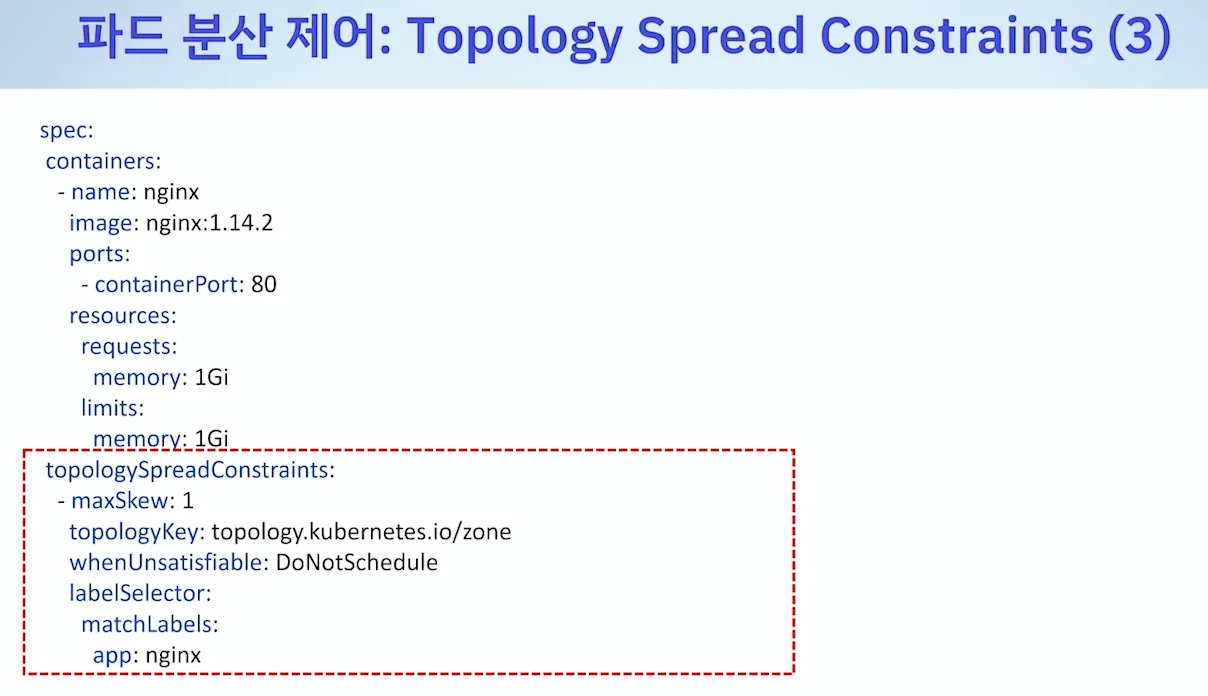
- 파드 분산 제어 : Topology Spread Constraints

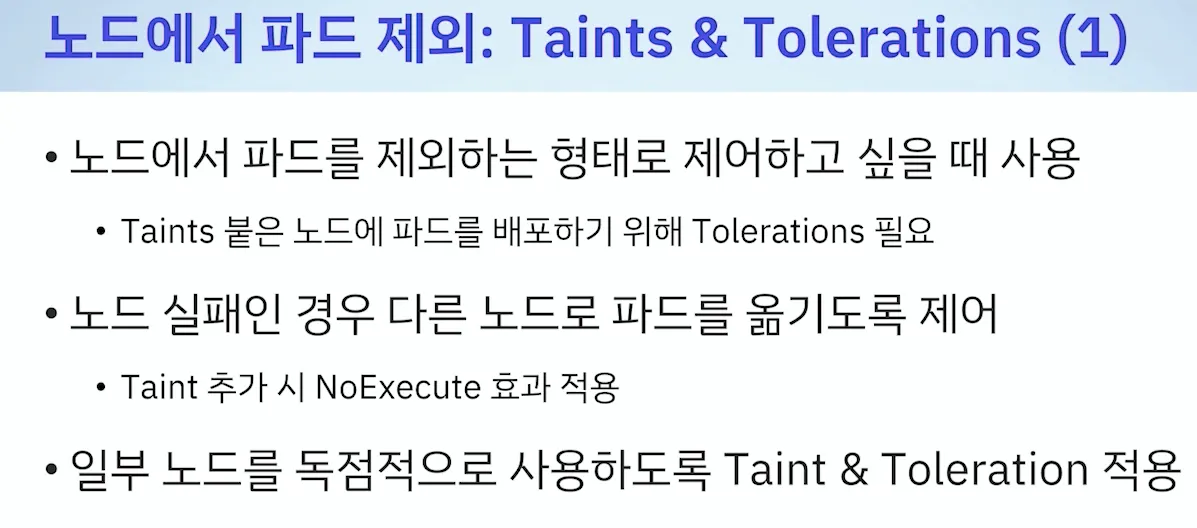
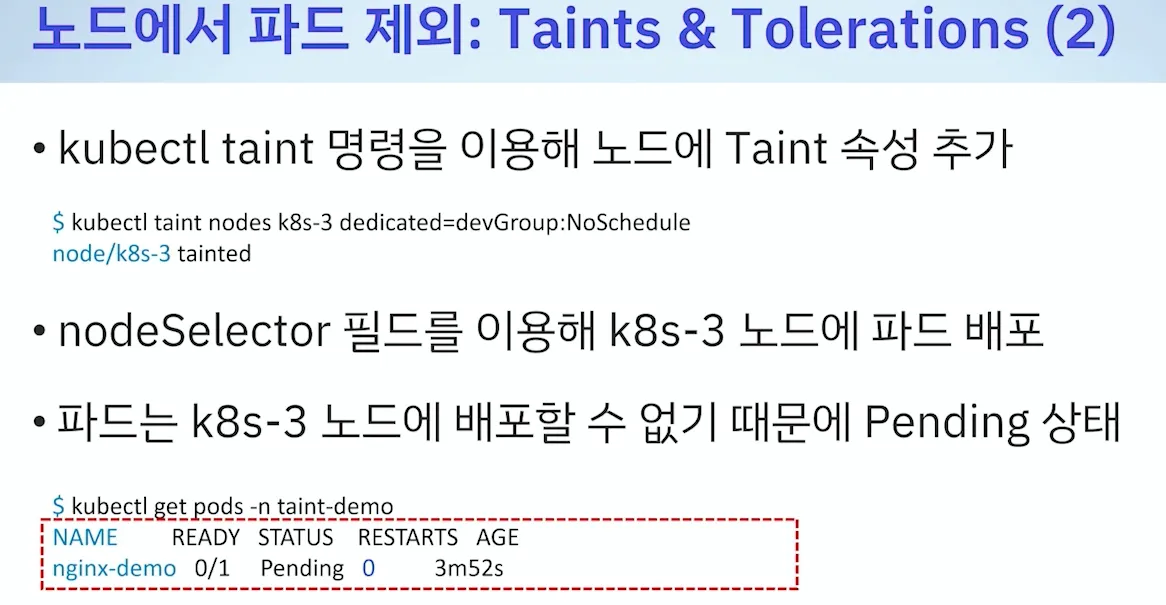
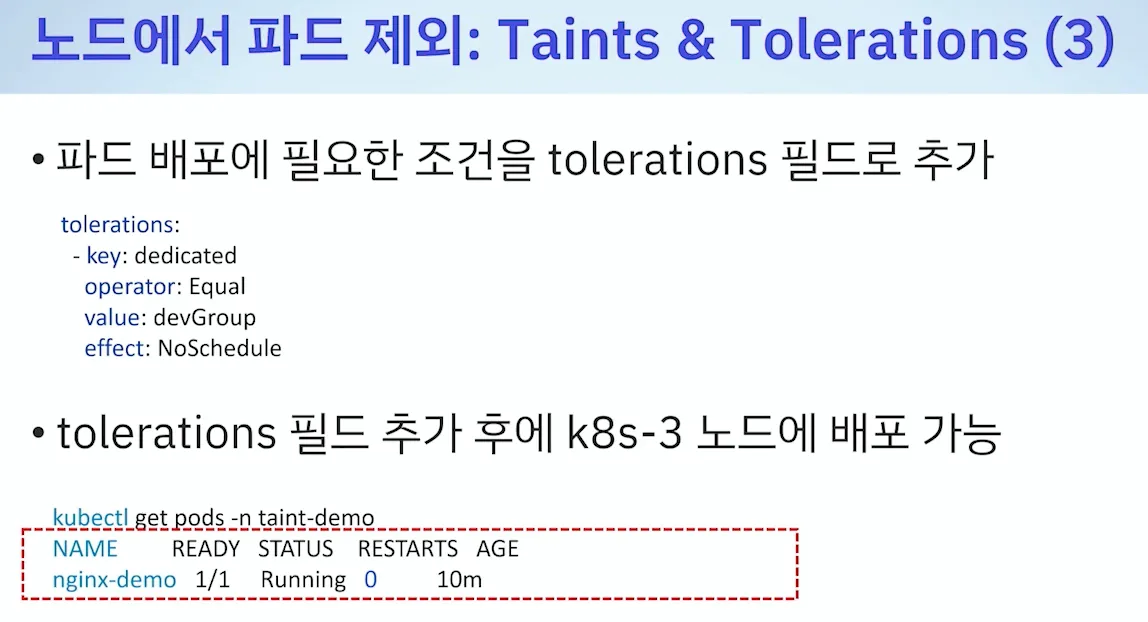
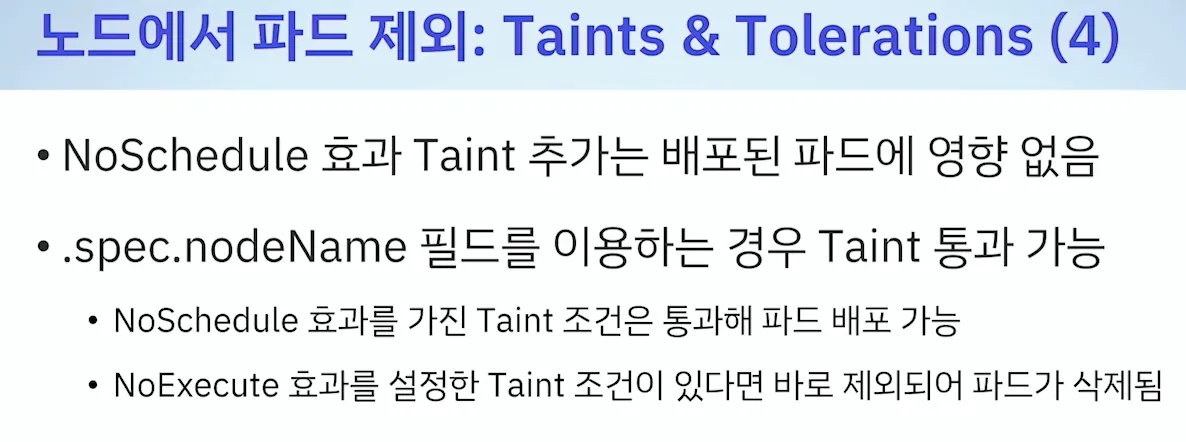
- 노드에서 파드 제외 ( Taints & Tolerations )
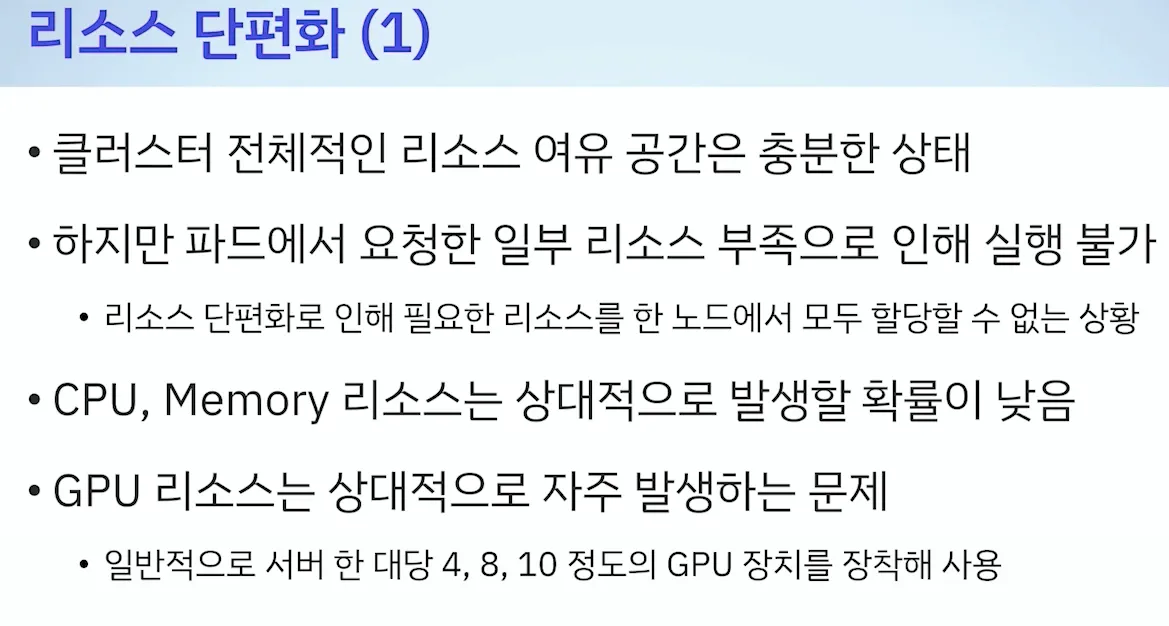
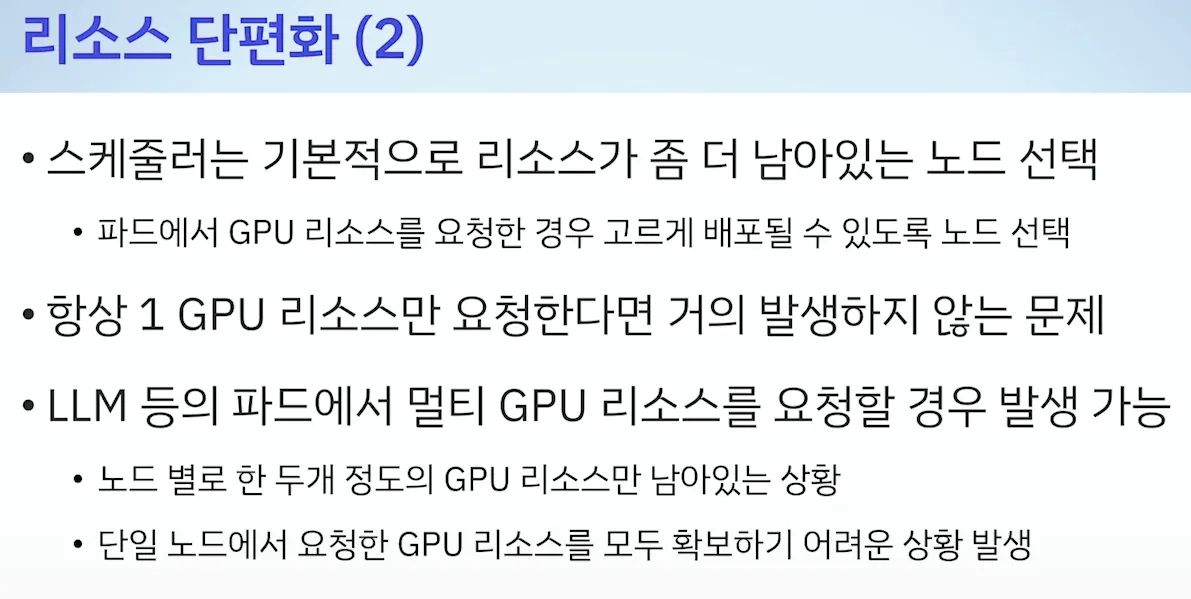
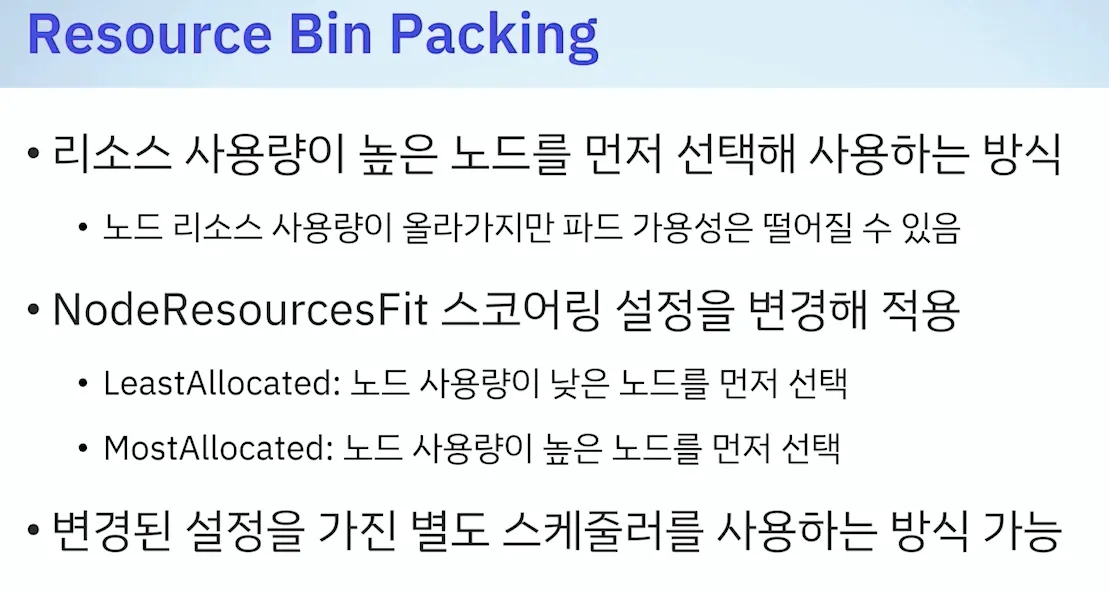
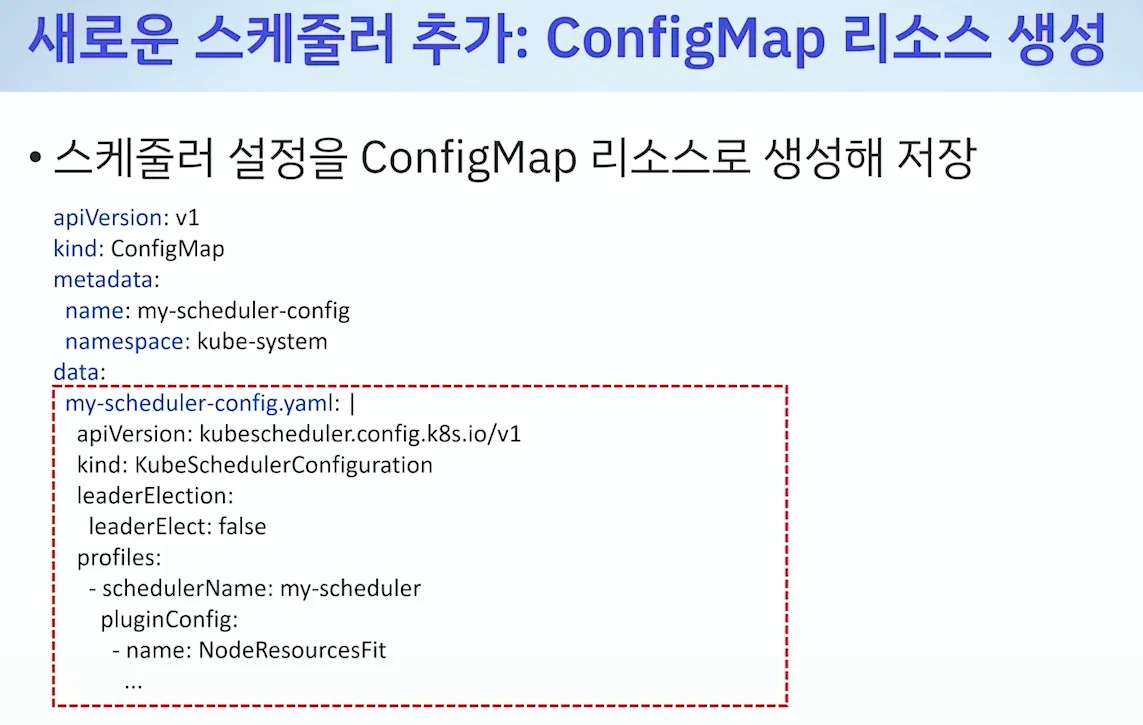
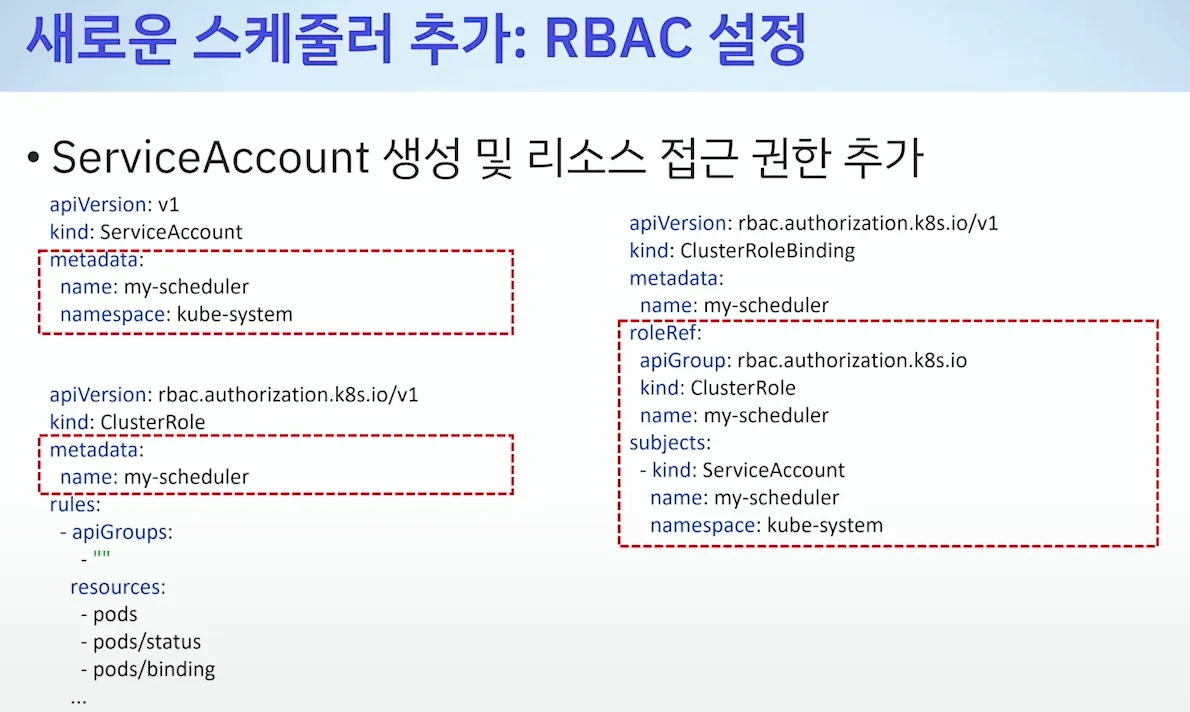
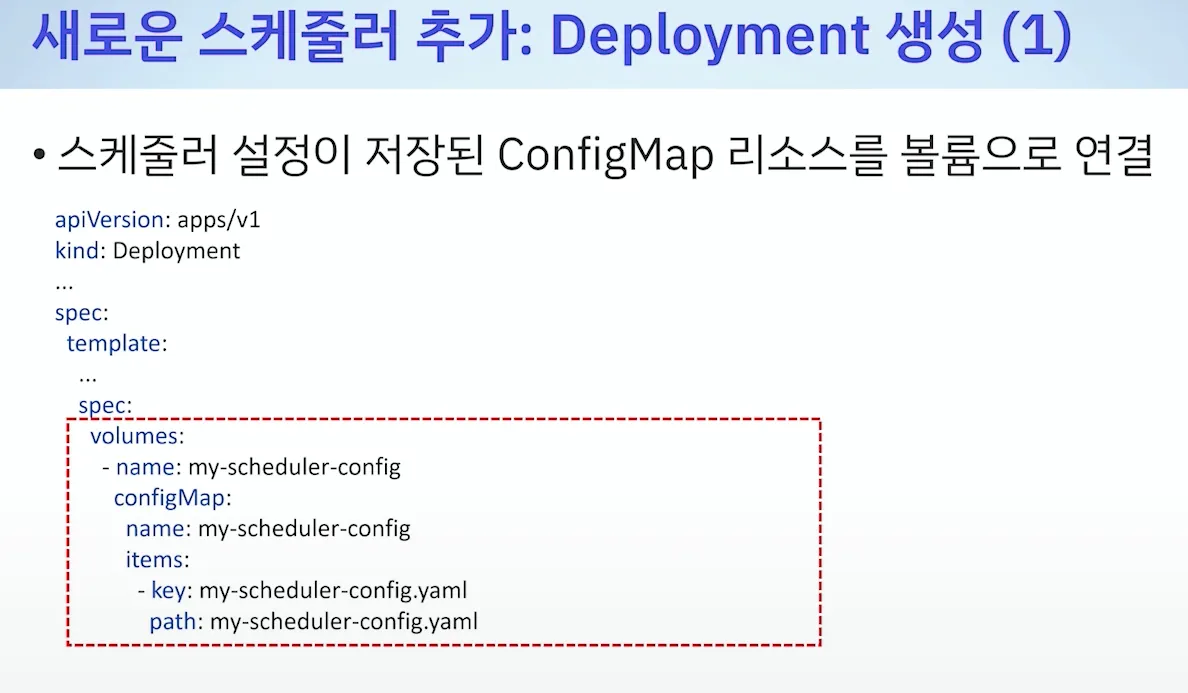
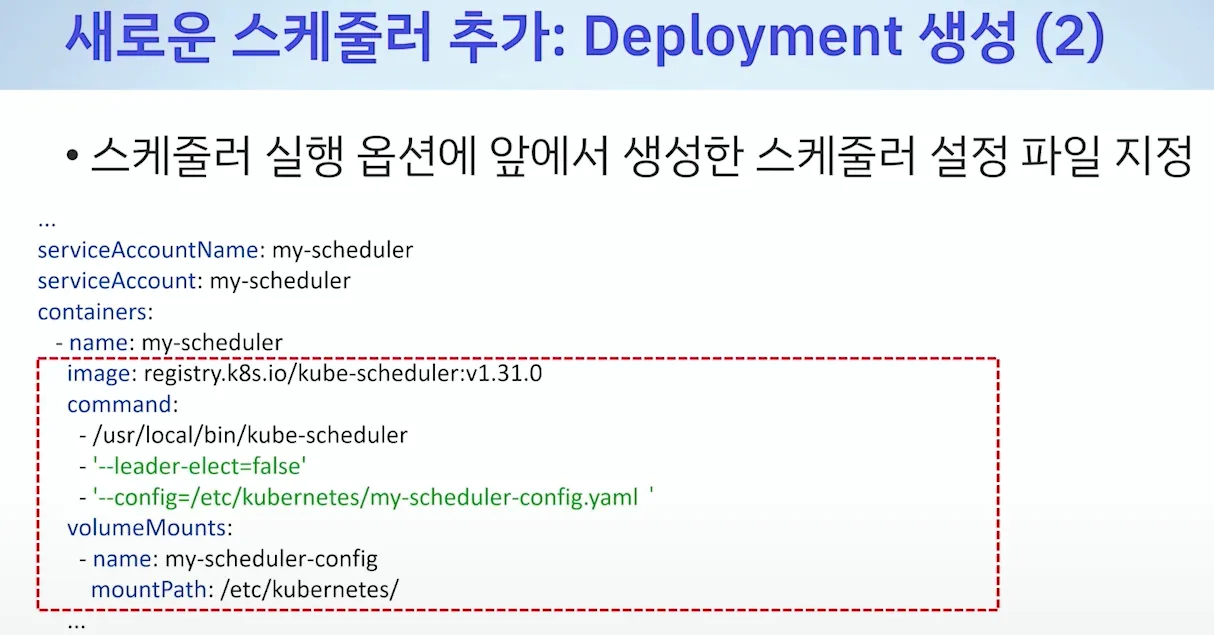
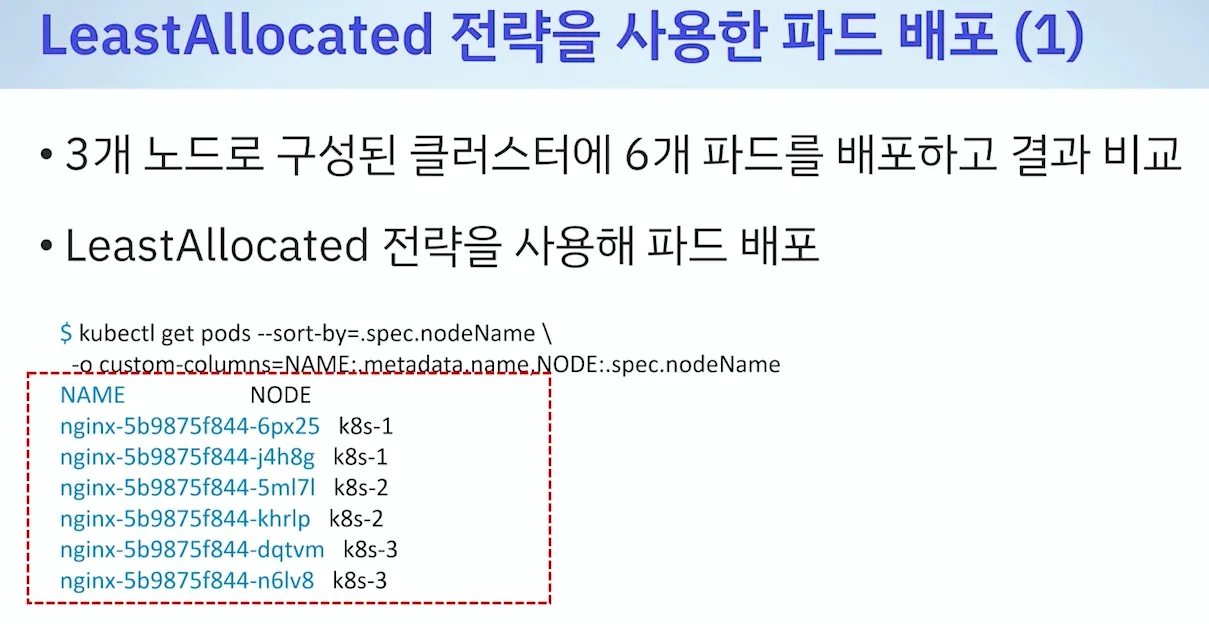
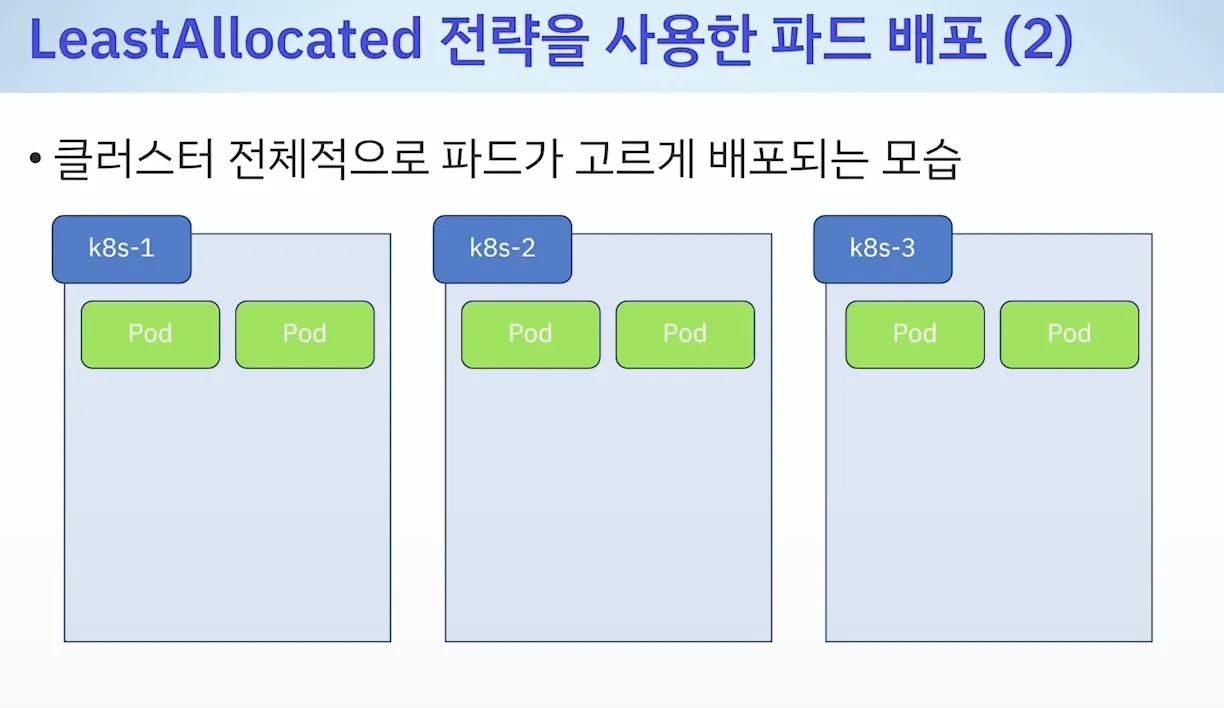
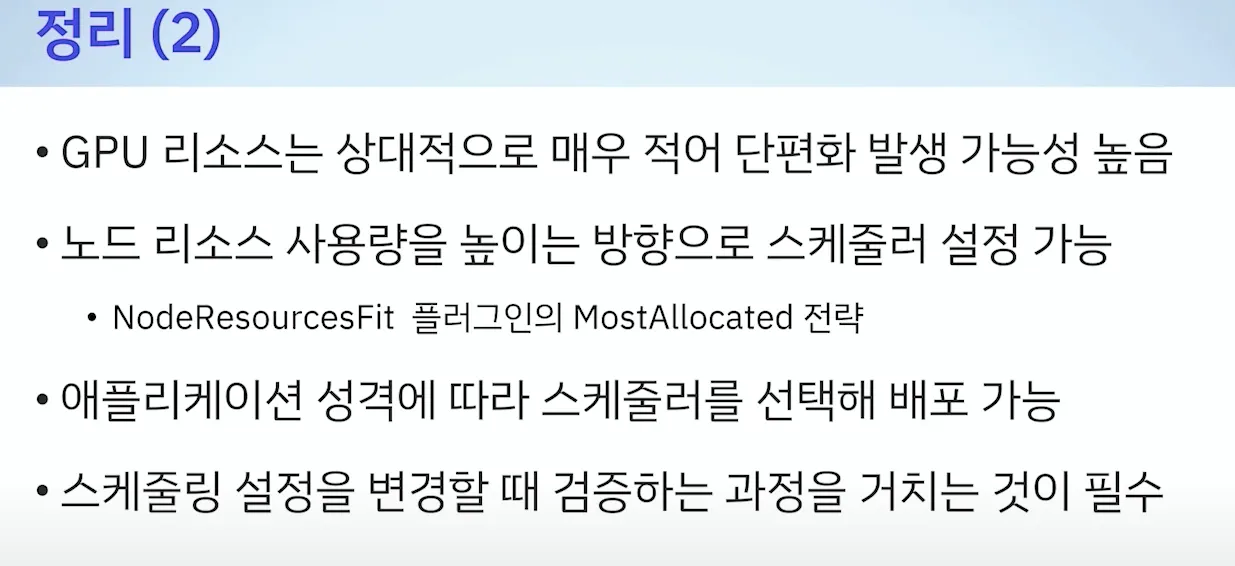
[ 리소스 단편화 ]
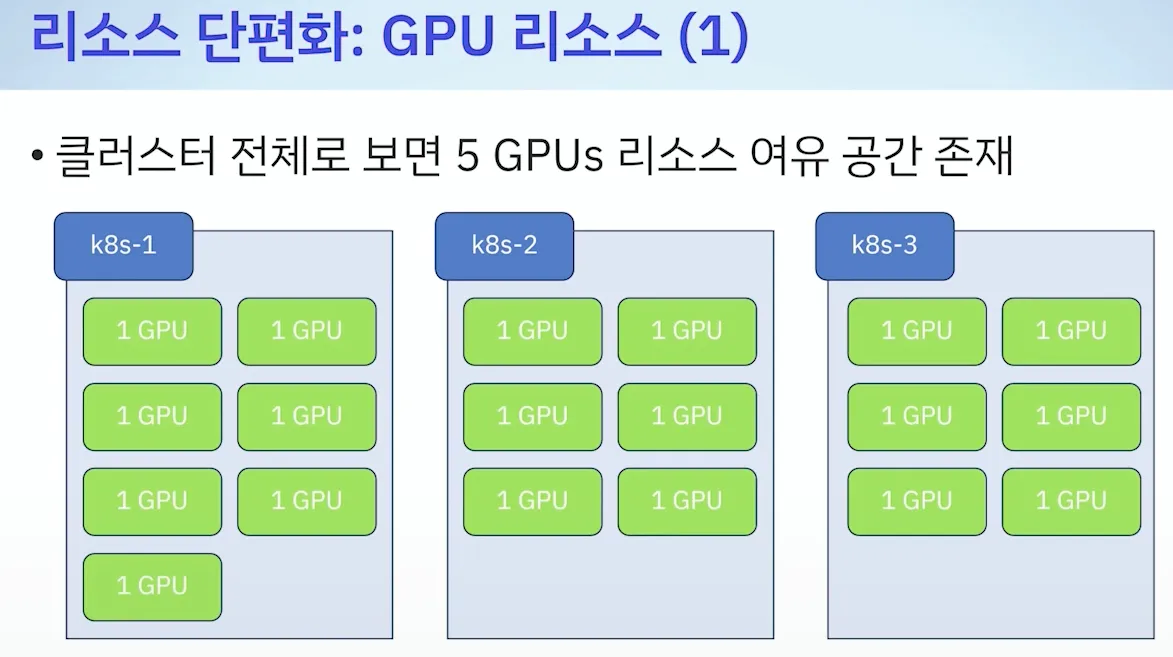
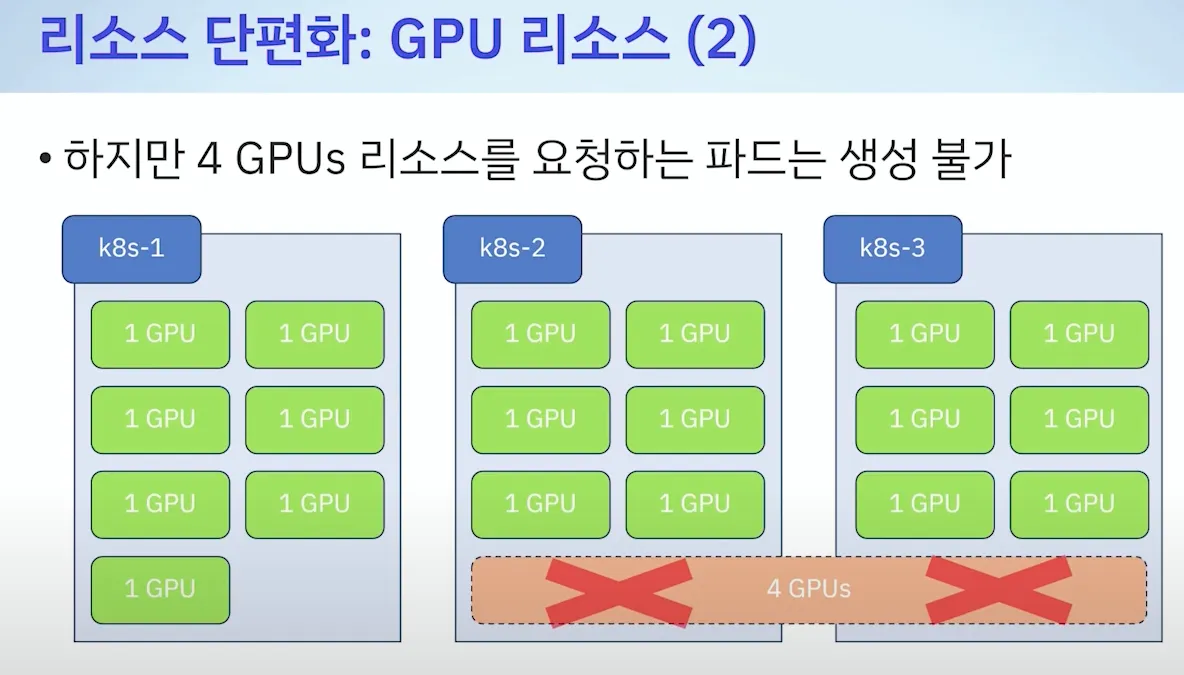
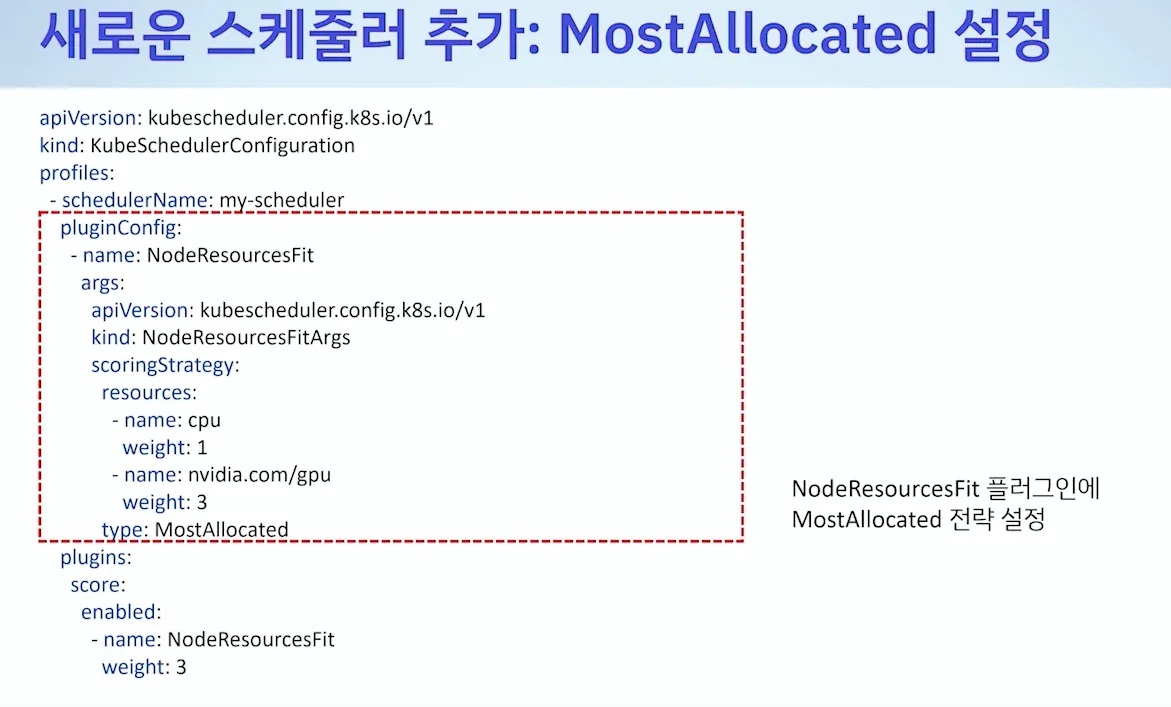
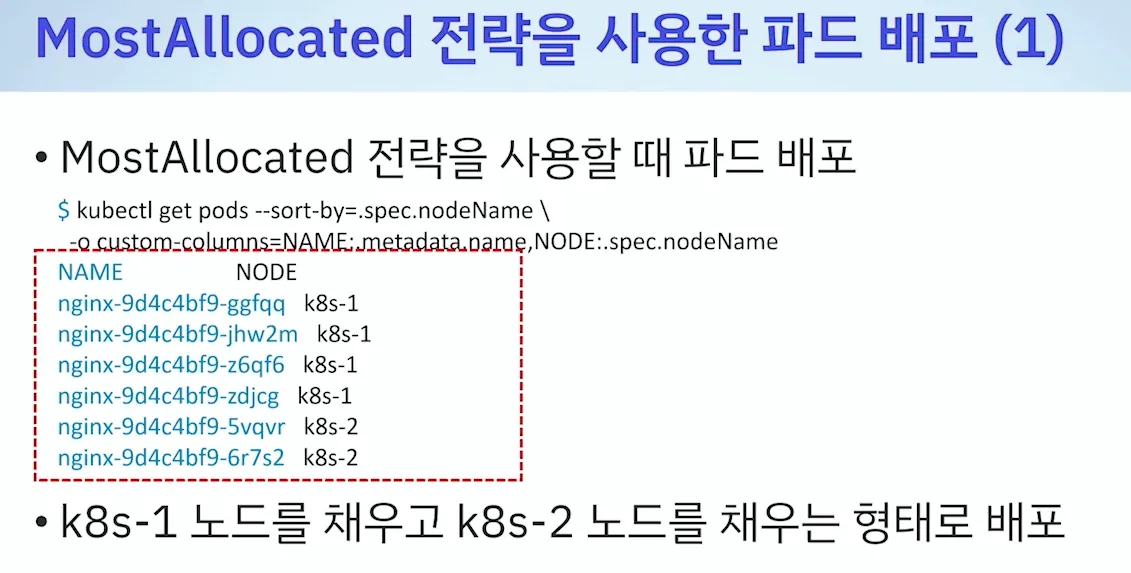
- 기본값 : LeastAllocated ⇒ 변경(MostAllocated) : 아래 처럼 새로운 스케줄러 만들자
- 설정예시
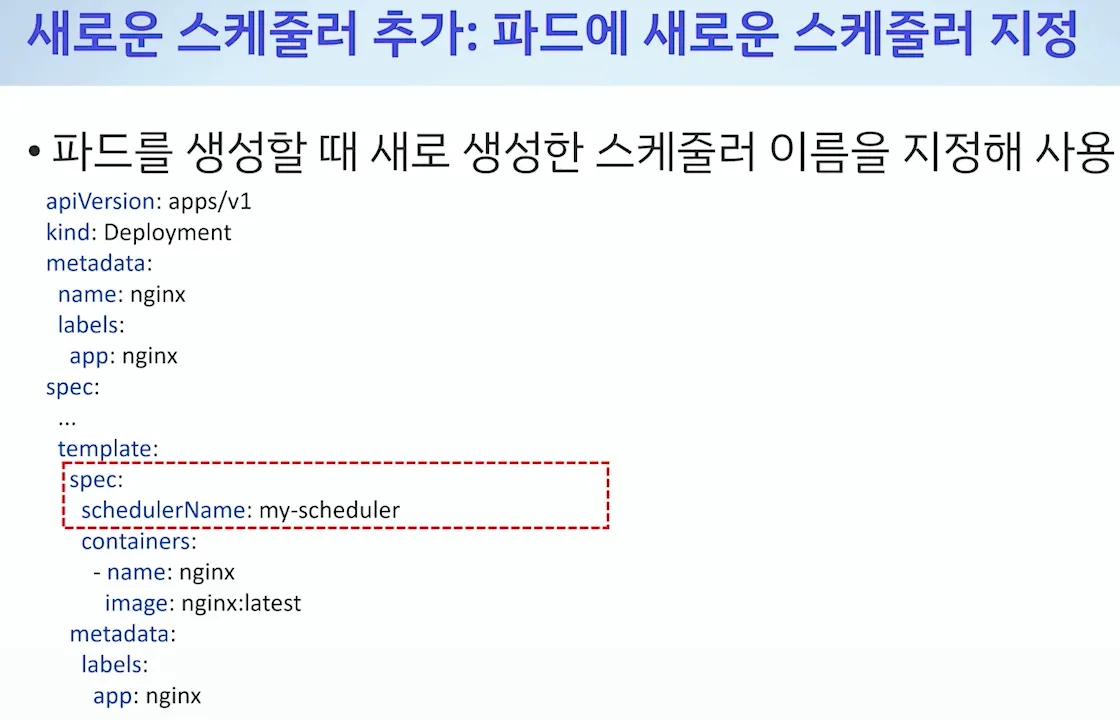
- 테스트 : 한노드를 전부 다 사용 후 다른 노드 사용 검증

[ 정리 ] - Filtering & Scoring are Enough!!!
▶ (Tip) Pod Scheduling Readiness : schedulingGates - Docs , Readme
# k8s 배포
kind create cluster --name myk8s --image kindest/node:v1.32.2 --config - <<EOF
kind: Cluster
apiVersion: kind.x-k8s.io/v1alpha4
nodes:
- role: control-plane
EOF

# 파드 생성
cat <<EOF | kubectl apply -f -
apiVersion: v1
kind: Pod
metadata:
  name: test-pod
spec:
  schedulingGates:
  - name: example.com/foo
  - name: example.com/bar
  containers:
  - name: pause
    image: registry.k8s.io/pause:3.6
  terminationGracePeriodSeconds: 0
EOF

#
kubectl get pod
NAME       READY   STATUS            RESTARTS   AGE
test-pod   0/1     SchedulingGated   0          13s

kubectl get pod test-pod -o jsonpath='{.spec.schedulingGates}'
[{"name":"example.com/foo"},{"name":"example.com/bar"}]

# 스케줄링 되기전으로 아직 node가 선택되지 않아서 nodename 없음!
kubectl get pod -o yaml | grep -i nodename

# To inform scheduler this Pod is ready for scheduling, you can remove its schedulingGates entirely by reapplying a modified manifest:
cat <<EOF | kubectl apply -f -
apiVersion: v1
kind: Pod
metadata:
  name: test-pod
spec:
  containers:
  - name: pause
    image: registry.k8s.io/pause:3.6
  terminationGracePeriodSeconds: 0
EOF

# You can check if the schedulingGates is cleared by running:
kubectl get pod test-pod -o jsonpath='{.spec.schedulingGates}'
kubectl get pod
NAME       READY   STATUS    RESTARTS   AGE
test-pod   1/1     Running   0          102s

# 노드 스케줄링되어서 아래 nodename 출력!
kubectl get pod -o yaml | grep -i nodename
    nodeName: myk8s-control-plane


# 파드 삭제
kubectl delete pod test-pod

# k8s 삭제
kind delete cluster --name myk8s
[도전과제] 스케줄러가 노드 선택하는 플러그인들 관련 실습 진행
- [K8S Docs] Assign Pods to Nodes using Node Affinity - Task
- [K8S Docs] Pod Topology Spread Constraints - Docs , Blog
- [K8S Docs] Taints and Tolerations - Docs
0. 실습환경 구성
A. Terraform 환경구성 ( macOS, Windows(WSL2) )
실행 환경 구성(3가지) :
- 미리 빌드된 바이너리(실행) 파일 다운로드
- 테라폼 소스 코드 다운로드 후 빌드
- OS 패키지 관리자 활용
버전 선택 : 가장 최선 버전 권장 - 하위 버전 호환, 기능 개선, 버그 수정
- 빌드된 바이너리 네이밍 규칙 : terraform_<버전>_<OS>_<CPU>.zip
PATH 설정 : 리눅스/macOS , 윈도우
- 리눅스 : /usr/bin
- 윈도우 : C:\\windows\\system32
[ Mac - brew, tfenv(권장) 사용 - 테라폼 버전 v1.5.6 - 링크 ]
# tfenv 설치
brew install tfenv

# 설치 가능 버전 리스트 확인
tfenv list-remote

# 테라폼 1.5.6 버전 설치
tfenv install 1.5.6

# tfenv로 설치한 버전 확인(변경 전)
tfenv list
  1.5.6
* 1.5.1 (set by /usr/local/Cellar/tfenv/3.0.0/version)

# 테라폼 1.5.6 버전 사용 설정
tfenv use 1.5.6

# tfenv로 설치한 버전 확인(변경 후)
tfenv list
* 1.5.6 (set by /usr/local/Cellar/tfenv/3.0.0/version)
  1.5.1

# 테라폼 버전 정보 확인
terraform version

# 자동완성
terraform -install-autocomplete
## 참고 .zshrc 에 아래 추가됨
cat ~/.zshrc
autoload -U +X bashcompinit && bashcompinit
complete -o nospace -C /usr/local/bin/terraform terraform
[ Windows - WSL2 : Ref. Link]
- 윈도우에 WSL2 설치
- WSL2 실행(Shell 접속)
- 테라폼 설치 및 확인 - 링크 (Linux → Ubuntu/Debian 선택)
sudo wget -O- https://apt.releases.hashicorp.com/gpg | sudo gpg --dearmor -o /usr/share/keyrings/hashicorp-archive-keyring.gpg
echo "deb [signed-by=/usr/share/keyrings/hashicorp-archive-keyring.gpg] https://apt.releases.hashicorp.com $(lsb_release -cs) main" | sudo tee /etc/apt/sources.list.d/hashicorp.list
sudo apt update && sudo apt install terraform

# 테라폼 버전 정보 확인
terraform version
▶ IDE 구성 : 비주얼 스튜디오 코드 Visual Studio Code (VS Code)를 설치 후 실습에 사용 - 링크
- Extentions (확장) 설치 : 좌측 [Extentions] 아이콘을 클릭 → HashiCorp에서 릴리즈한 HashiCorp HCL 을 검색 후 설치
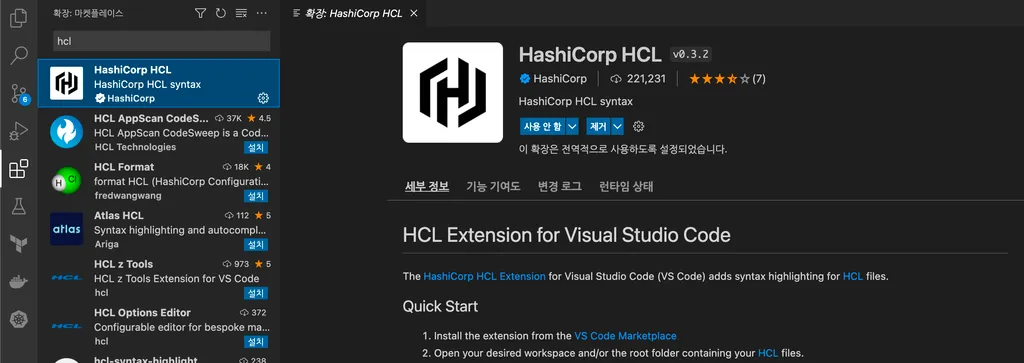
- HashiCorp HCL : syntax highlighting for HCL files - 링크
- HashiCorp Terraform : Highlighting syntax from Terraform 등 - 링크
(권장) 자동저장 설정 : 설정(Command+,) → 일반적으로 사용되는 설정 ⇒ Files: Auto Save 값을 afterDelay 선택
[ Tip ] VS Code에서 터미널 윈도우 추가(단축키: Ctrl+`)
B. 주요 Command
Step1. 실습 디렉토리 열기
# 실습 디렉터리 생성 후 이동 : workspaces 혹은 각자 편한 이름으로 생성
mkdir workspaces
cd workspaces

# 테라폼 실행
terraform
Usage: terraform [-version] [-help] <command> [args]
...
- VS Code 폴더 생성 (03.start) → 새파일 생성 (main.tf)
resource "local_file" "abc" {
content  = "abc!"
filename = "${path.module}/abc.txt"
}

Step2. help & init 초기화
- ‘help’ 옵션(참고)
# 서브커맨드 help 지원
terraform console -help
terraform init -help- init 초기화
# 테라폼 실행을 위해 코드 파일이 있는 디렉터리로 이동
# (참고) 테라폼이 실행되는 디렉터리 = 모듈(테라폼 코드 파일과 변수 파일), 기본 작업디렉터리는 '루트 모듈', 호출 모듈은 '자식 모듈'
cd 03.start/

# plan 실행 시 에러 출력 > 에러 메시지의 의미는?
terraform plan
│ Error: Inconsistent dependency lock file
│
│ The following dependency selections recorded in the lock file are inconsistent with the current configuration:
│   - provider registry.terraform.io/hashicorp/local: required by this configuration but no version is selected
│
│ To make the initial dependency selections that will initialize the dependency lock file, run:
│   terraform init

# 초기화 : 코드 사용 구문 기반으로 필요한 프로바이더 플러그인을 찾고 설치, 추가로 '프로바이더/모듈/백엔드' 구성 설정/변경 시 수행 필요
terraform init
ls -al
tree .terraform  # VS Code에서 탐색기 확인
(참고) -upgrade : 0.14 버전 이후부터 프로바이더 종속성을 고정시키는 .terraform.lock.hcl이 추가됨. 작업자가 의도적으로 버전을 변경하거나 코드에 명시한 다른 버전으로 변경하려면 terraform init -upgrade 를 수행.
Step3. validate 테라폼 구성 파일 유효성 확인 (Skip)
- -json : 서브 커맨드 옵션 중 실행 결과를 JSON 형식으로 출력
#
terraform validate -json
terraform validate -json | jq

# 결과 쿼리 예시
terraform validate -json | jq -r .valid
Step4. plan 계획 & apply 실행
- terraform plan 명령은 테라폼으로 적용할 인프라의 변경 사항에 관한 실행 계획을 생성하는 동작. 또한 출력되는 결과를 확인하여 어떤 변경이 적용될지 사용자가 미리 검토하고 이해하는데 도움을 줌.
- 변경 사항을 실제로 적용하지는 않으므로, 적용 전에 예상한 구성이 맞는지 검토
- terraform apply 는 plan 계획을 기반으로 작업을 실행.
# plan 실행 : 구성 내용을 바탕으로 어떤 리소스가 생성되는지 상세 내역 출력, 기본값 자동 입력 적용
terraform plan
Terraform used the selected providers to generate the following execution plan. Resource actions are indicated with the following symbols:
  + create

Terraform will perform the following actions:

  # local_file.abc will be created
  + resource "local_file" "abc" {
      + content              = "abc!"
      + content_base64sha256 = (known after apply)
      + content_base64sha512 = (known after apply)
      + content_md5          = (known after apply)
      + content_sha1         = (known after apply)
      + content_sha256       = (known after apply)
      + content_sha512       = (known after apply)
      + directory_permission = "0777"
      + file_permission      = "0777"
      + filename             = "./abc.txt"
      + id                   = (known after apply)
    }

Plan: 1 to add, 0 to change, 0 to destroy. # 하나의 리소스가 추가되고, 변경되거나 삭제되는 것은 없을 예정- -detailed-exitcode : plan 추가 옵션으로, 파이프라인 설계에서 활용 가능, exitcode가 환경 변수로 구성됨
- -auto-approve 자동 승인 기능 부여 옵션
# plan 결과를 시스템 코드로 출력
terraform plan -detailed-exitcode
...

# 코드 확인 : 0(변경 사항이 없는 성공), 1(오류가 있음), 2(변경 사항이 있는 성공)
echo $?
2

# (참고) apply 결과에 적용 시도
terraform apply -auto-approve -detailed-exitcode- apply
# apply 실행 : no 입력
terraform apply
...
Enter a value: no
...

# plan 결과를 지정된 파일(바이너리 형태) 이름으로 생성
terraform plan -out=tfplan
cat tfplan
file tfplan

# apply 실행 : 실행계획이 있으므로 즉시 적용됨
terraform apply tfplan
ls -al abc.txt

# apply 실행 : 어떻게 되나요?
# 테라폼은 선언적 구성 관리를 제공하는 언어로 멱등성 idempotence을 갖고, 상태를 관리하기 때문에 동일한 구성에 대해서는 다시 실행하거나 변경하는 작업을 수행하지 않음
terraform apply
...

terraform state list- 코드 파일 수정
resource "local_file" "abc" {
content = "abc!"
filename = "${path.module}/abc.txt"
}

resource "local_file" "dev" {
  content  = "def!"
  filename = "${path.module}/def.txt"
}- 실행
# apply 실행 : 변경(신규 추가) 부분만 반영 확인
terraform apply
...
# local_file.dev will be created
  + resource "local_file" "dev" {
...
Enter a value: yes

# 확인
terraform state list
tree
ls *.txt

# 변경 이전의 실행 계획 적용 시도 > 어떻게 될까요?
terraform apply tfplan
...- 다시 추가 코드 내용을 삭제
resource "local_file" "abc" {
content = "abc!"
filename = "${path.module}/abc.txt"
}- 실행 : 테라폼은 선언전으로 동작하기 때문에 현재의 코드 상태와 적용할 상태를 비교해 일치시키는 동작을 수행
# 실행 > 어떻게 되나요?
terraform apply
...
Enter a value: yes
...

# 확인
terraform state list
tree
ls *.txt- -replace : 프로비저닝이 완료 후 사용자에 필요에 의해 특정 리소스를 삭제 후 다시 생성. plan, apply 모두 적용 가능
# 현재 배포된 리소스 확인
terraform state list
local_file.abc

# 다시 생성 : 파일 생성 시간 확인
ls -l abc.txt
terraform apply -replace=local_file.abc -auto-approve
ls -l abc.txt
terraform apply -replace=local_file.abc -auto-approve
ls -l abc.txt
Step5. destroy 제거 & fmt
- 테라폼 구성에서 관리하는 모든 개체를 제거하는 명령어 ← 일부 리소스만 제거하려면 어떻게 해야 될까요?
#
terraform destroy
...
Enter a value: yes
...

# 확인
terraform state list
ls *.txt- fmt : format 또는 reformat 줄임 표시로 terraform tmt 명령어로 수행, 테라폼 구성 파일을 표준 형식과 표준 스타일로 적용. 코드 가독성 높임
# 적용 후 코드 파일 내용 확인 -> 들여쓰기 확인
terraform fmt- VS Code에서 파일 내용 확인
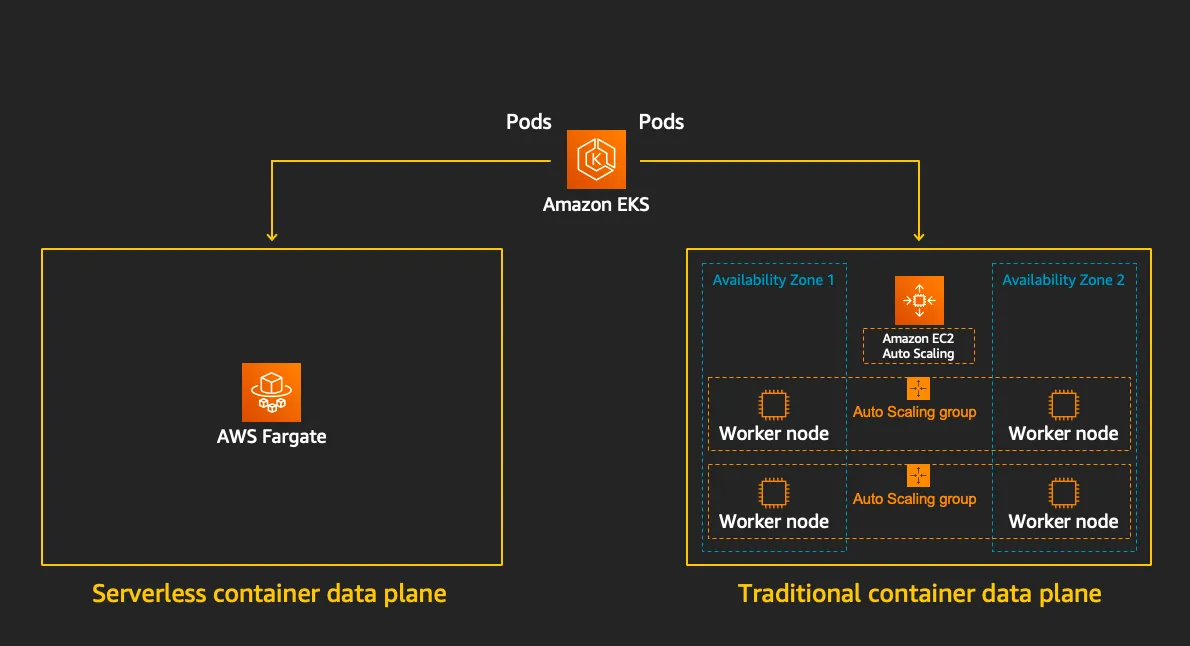
1. Fargate
☞ 별도의 EC2 서버 생성 관리 없이 docker 컨테이너를 실행 시킬 수 있는 AWS의 완전 관리형 서버리스 서비스이다.
- EKS(컨트롤 플레인) + Fargate(데이터 플레인)의 완전한 서버리스화(=AWS 관리형)
[ 핵심 개념 ]
1. 서버리스 컴퓨팅
- Fargate는 서버리스 방식을 따르기 때문에, EC2 인스턴스를 직접 배포하고 관리할 필요 없이, 컨테이너화된 애플리케이션을 실행할 수 있다. Fargate가 자동으로 리소스를 할당하고 관리하기 때문에, 사용자는 컨테이너를 정의하는 것 외에는 아무것도 신경 쓸 필요가 없다.
2. EKS와의 통합
- AWS - Elastic Kubernetes Service (EKS)는 Kubernetes 클러스터를 관리할 수 있는 서비스입니다. EKS와 Fargate를 함께 사용하면, Kubernetes 환경에서도 서버를 직접 관리하지 않고, 클러스터 내에서 자동으로 리소스를 할당하고 실행할 수 있습니다.
- Fargate 프로필을 생성하면, 해당 프로필을 통해 Kubernetes 작업을 Fargate에서 실행되도록 지정할 수 있다. 이렇게 하면 EC2 노드 없이 EKS 클러스터에서 컨테이너를 실행할 수 있게 된다.
3. 자동화된 리소스 관리
- Fargate는 애플리케이션이 필요한 리소스 (CPU, 메모리 등)를 자동으로 할당하고 관리해 준다. 따라서, 사용자는 컨테이너의 리소스 요구 사항만 정의하면, Fargate가 자동으로 필요한 리소스를 프로비저닝하고 배포한다.
- 자동 스케일링: Fargate는 수요에 따라 자동으로 확장하거나 축소할 수 있다. 예를 들어, 사용자가 설정한 CPU 및 메모리 요구 사항에 맞춰 리소스를 할당하고, 트래픽에 따라 자동으로 확장된다.
4. 비용 효율성
- 사용한 만큼만 지불: Fargate는 시간당 비용으로 청구되며, 실제로 사용하는 CPU와 메모리 용량에 대해서만 비용을 지불합니다. 즉, 인스턴스를 실행하지 않거나 중단된 상태에서는 비용이 발생하지 않습니다.
- 비용 최적화: EC2 인스턴스와 달리, Fargate에서는 사용자가 리소스를 최적으로 관리할 필요가 없고, 자동으로 리소스 크기를 조정하므로 비용을 절감할 수 있습니다.
- Cluster Autoscaler 불필요, VM 수준의 격리 가능(VM isolation at Pod Level)
https://www.eksworkshop.com/docs/fundamentals/fargate/
- 파게이트 프로파일(파드가 사용할 서브넷, 네임스페이스, 레이블 조건)을 생성하여 지정한 파드가 파게이트에서 동작하게 함
- EKS 는 스케줄러가 특정 조건을 기준으로 어느 노드에 파드를 동작시킬지 결정, 혹은 특정 설정으로 특정 노드에 파드가 동작하게 가능함
- Data Plane
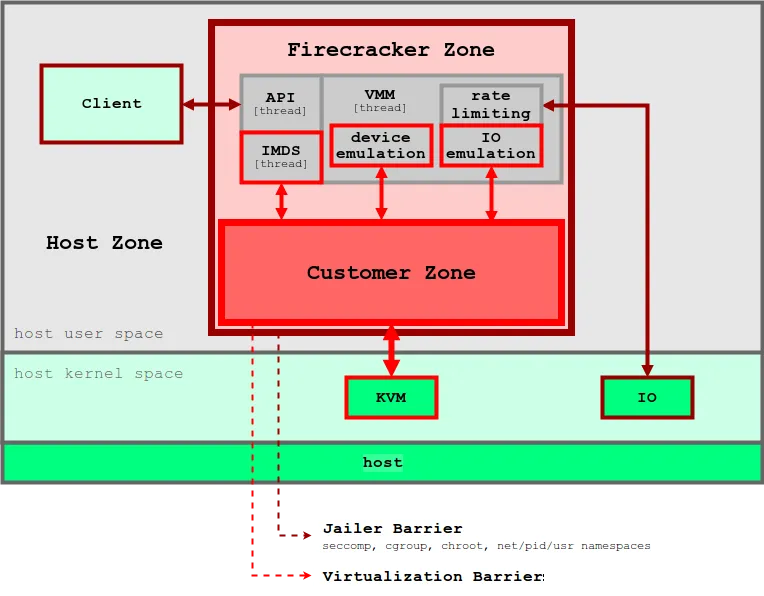
▶ Firecracker* - Github ,Install , Blog1 , Blog2 , Blog3 , AWS_Blog*
[ 아키텍쳐 구성 ]

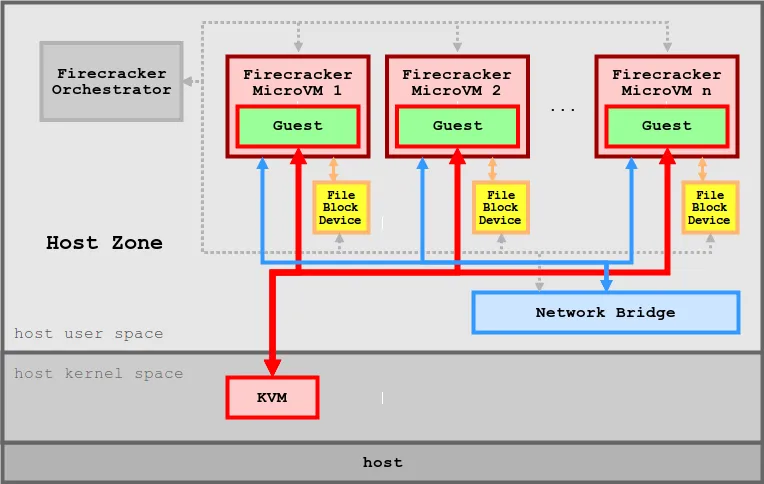
[ 주요 특징 ]
1. 경량화된 가상화 기술
- Firecracker는 기존의 KVM(Kernel-based Virtual Machine)을 기반으로 초소형 가상 머신을 실행할 수 있도록 설계되었습니다. 이 초소형 VM은 각 VM이 독립적인 운영 체제를 실행할 수 있도록 하면서도, 리소스를 최소화합니다.
Firecracker는 VM의 크기와 오버헤드를 최소화하는 것을 목표로 하여, 수천 개의 가상 머신을 매우 빠르고 효율적으로 실행할 수 있습니다.
2. 초고속 시작 시간
- Firecracker는 단 몇 밀리초 안에 가상 머신을 시작할 수 있습니다. 이는 기존의 전통적인 VM과 비교하여 매우 빠른 부팅 시간으로, 서버리스 아키텍처와 같이 빠른 리소스 할당과 실행이 필요한 환경에서 유리합니다.
- 이 빠른 시작 시간 덕분에, on-demand로 리소스를 동적으로 할당하고 사용할 수 있습니다.
3. 저자원 소비 (microVM당 약 5MiB의 메모리를 사용)
- Firecracker는 기존 VM에 비해 메모리와 CPU 자원을 크게 절약할 수 있습니다. 전통적인 가상 머신에 비해 더 적은 메모리 공간을 사용하면서도 독립적인 환경을 제공할 수 있습니다.
- 이로 인해, 수많은 가상 머신을 하드웨어 자원에 대한 부담 없이 한 시스템에서 실행할 수 있게 됩니다.
4. 컨테이너와 VM의 결합
- Firecracker는 컨테이너화된 워크로드를 위해 설계된 가상화 기술로, 컨테이너와 VM의 이점을 결합하려는 목적을 가지고 있습니다. 이는 서버리스 애플리케이션에서 유연한 리소스 할당을 가능하게 합니다.
- Firecracker는 각 VM을 독립적인 워크로드 격리를 제공하는 동시에, 가상 머신에 비해 낮은 오버헤드로 컨테이너화된 애플리케이션을 효율적으로 실행할 수 있습니다.
5. 자동화 및 확장성:
- Firecracker는 수천 개의 가상 머신 인스턴스를 동시에 실행할 수 있으며, 이를 통해 고도로 자동화된 시스템을 운영할 수 있습니다. 각 가상 머신은 독립적으로 실행되므로, 장애 격리와 같은 운영상의 장점을 제공합니다.
- 또한, Firecracker는 클라우드 환경에서 동적 확장성을 지원하여, 리소스의 수요에 맞춰 빠르게 인스턴스를 추가하거나 제거할 수 있습니다.
6. 안전성 및 격리:
- Firecracker는 KVM을 기반으로 하여, 각 가상 머신이 다른 가상 머신과 격리된 상태에서 실행됩니다. 이를 통해 보안성이 높아지고, 시스템 간의 간섭을 최소화할 수 있습니다.
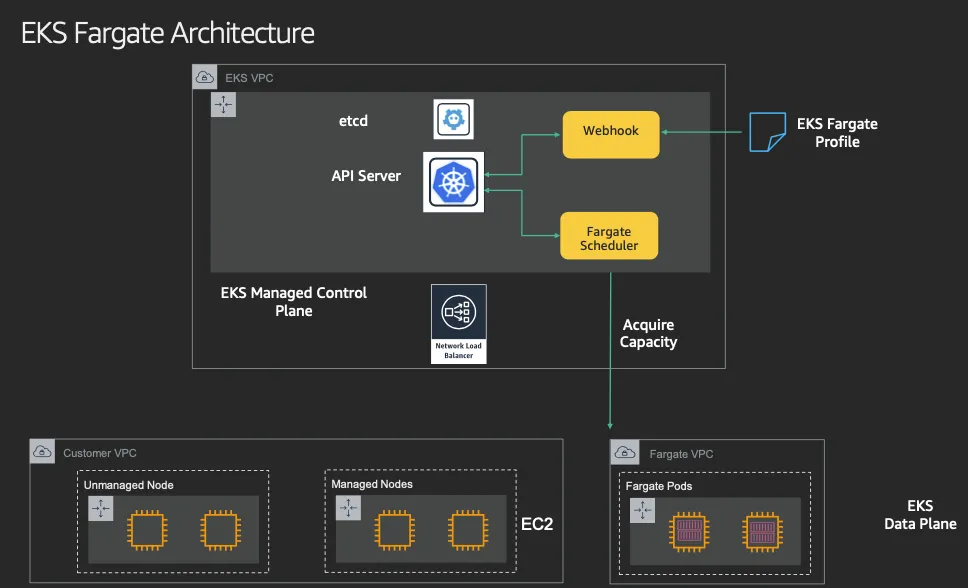
▶ 실습을 위한 AWS EKS Fargate 아키텍처 이해하기
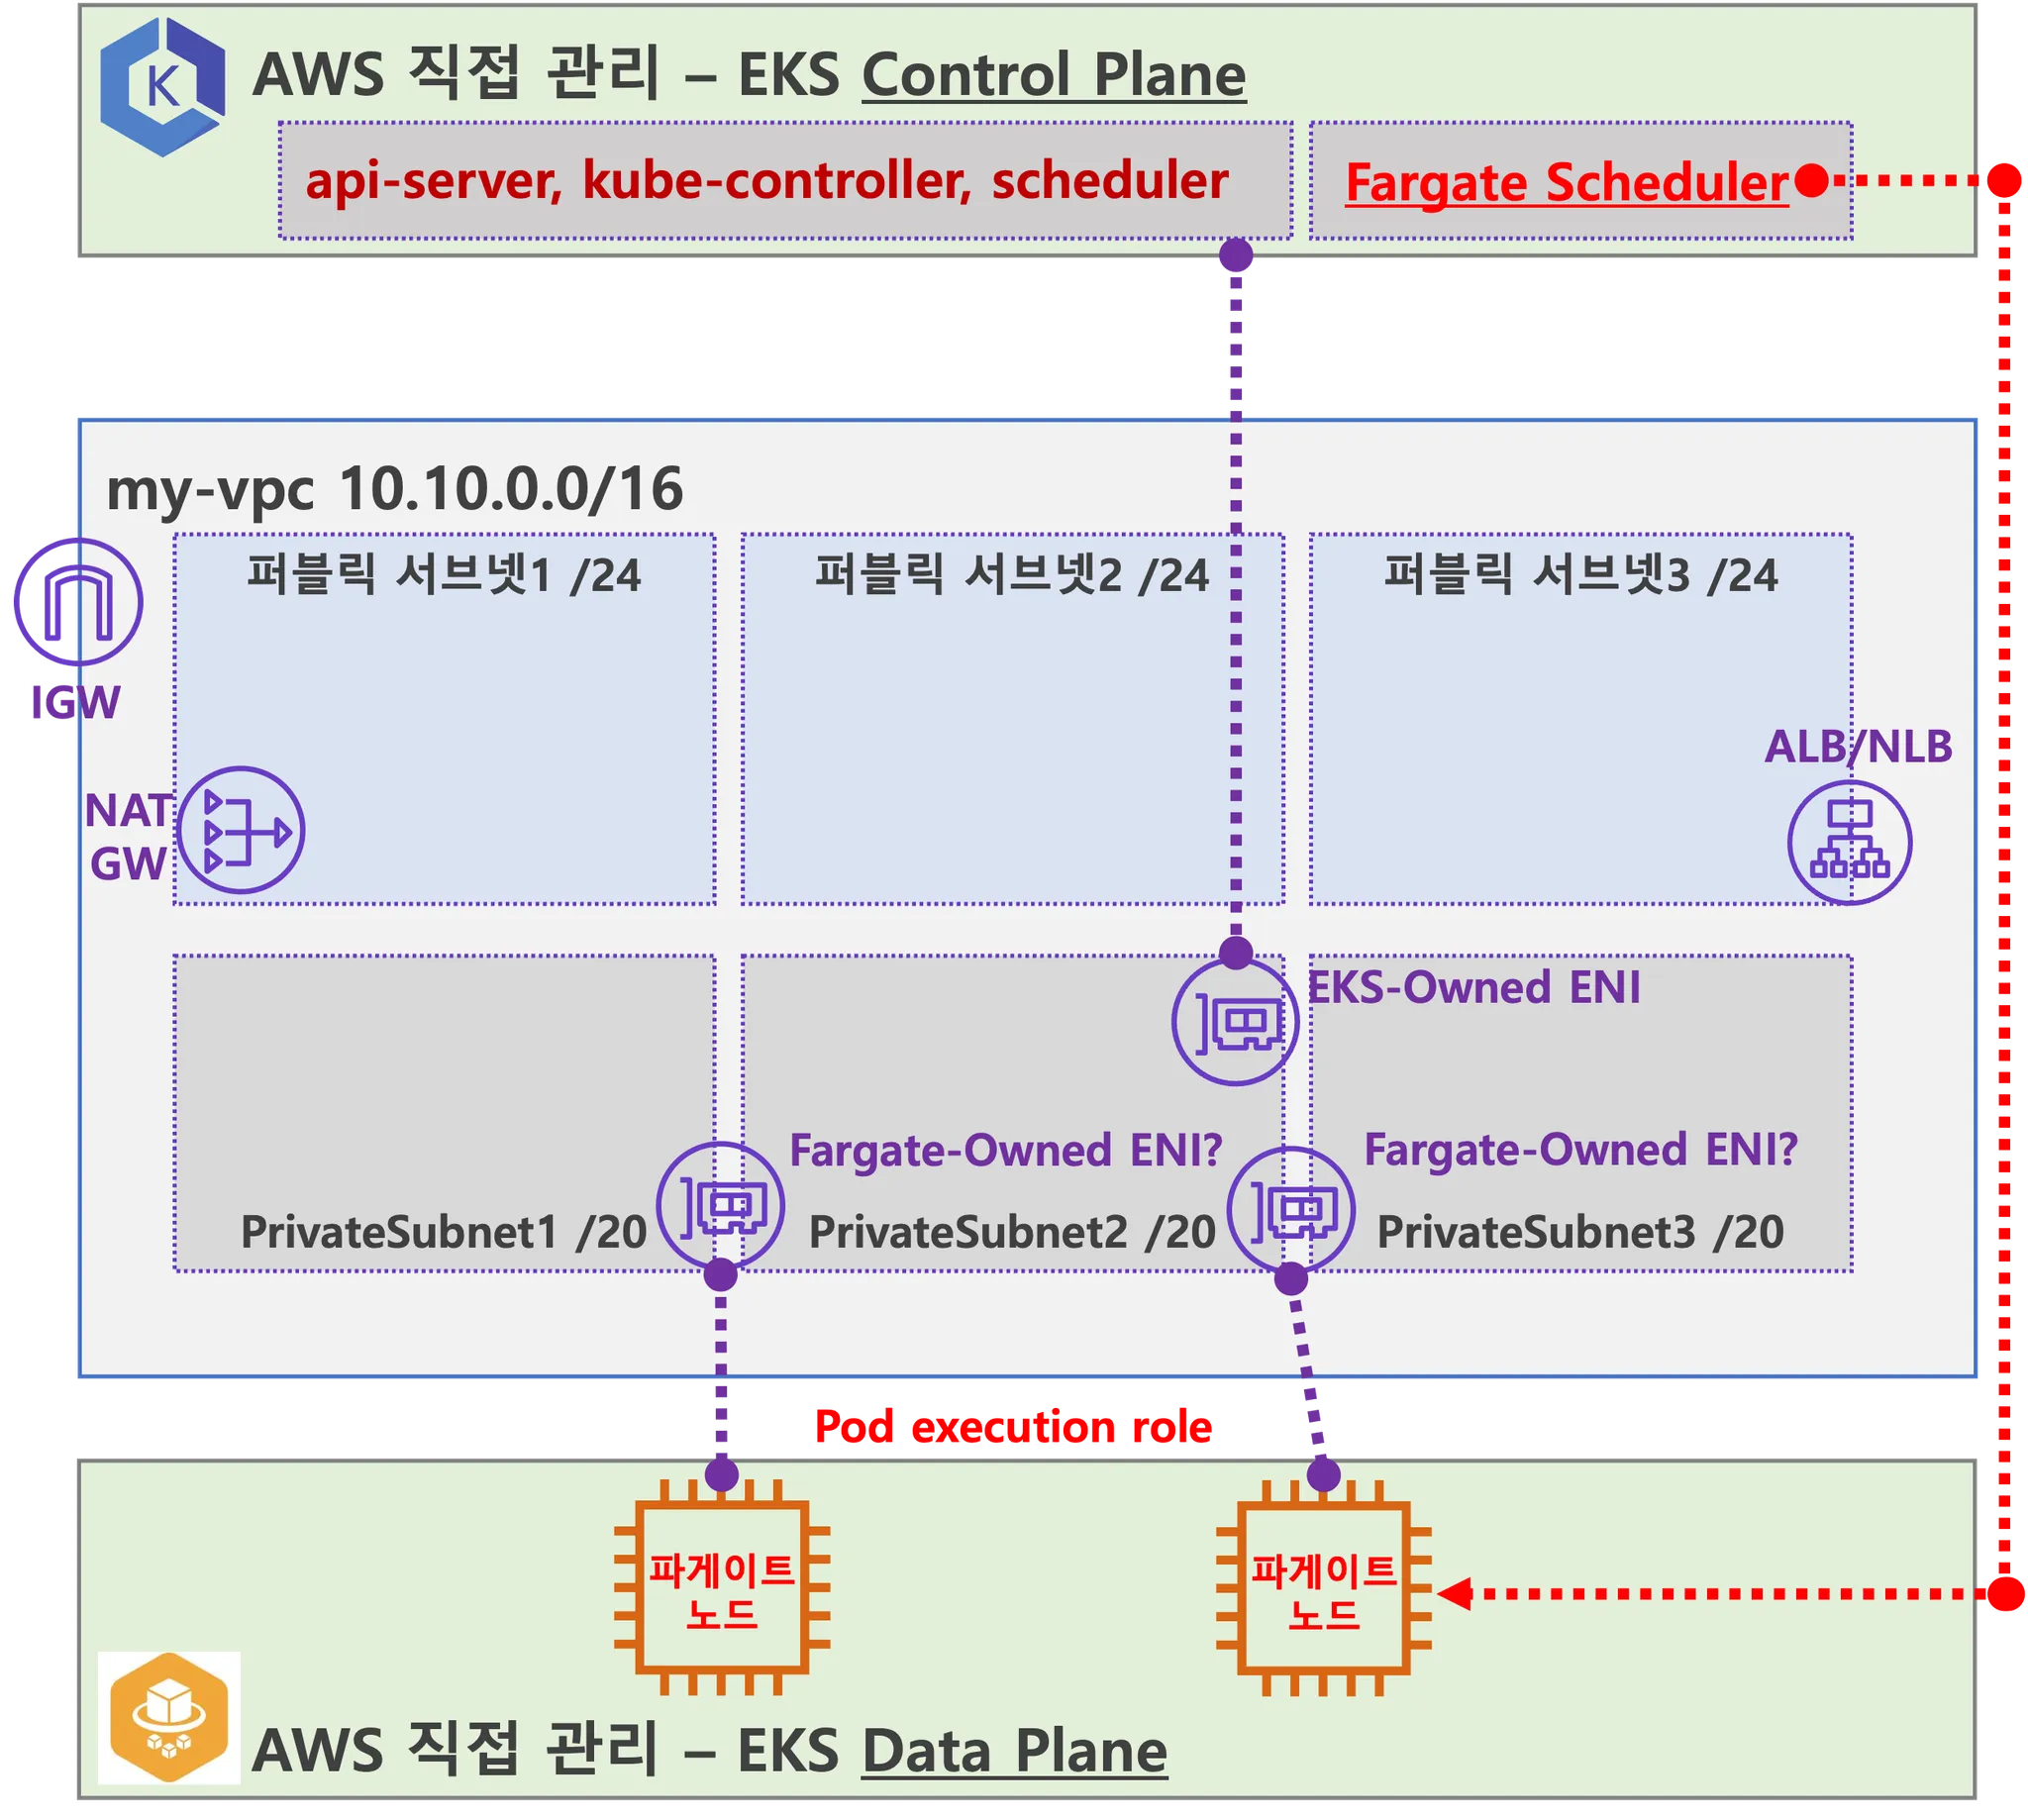
- 사용자에게 보이지 않지만, Fargate Scheduler(Controller 추정)가 EKS Control Plane 에서 동작.
- fargate Scheduler(controller) 에 필요한 IAM Role(Policy)는 AWS에서 알아서 관리 하는 것으로 보임.
설치 시에 별도 설정 없음.
- fargate Scheduler(controller) 에 필요한 IAM Role(Policy)는 AWS에서 알아서 관리 하는 것으로 보임.
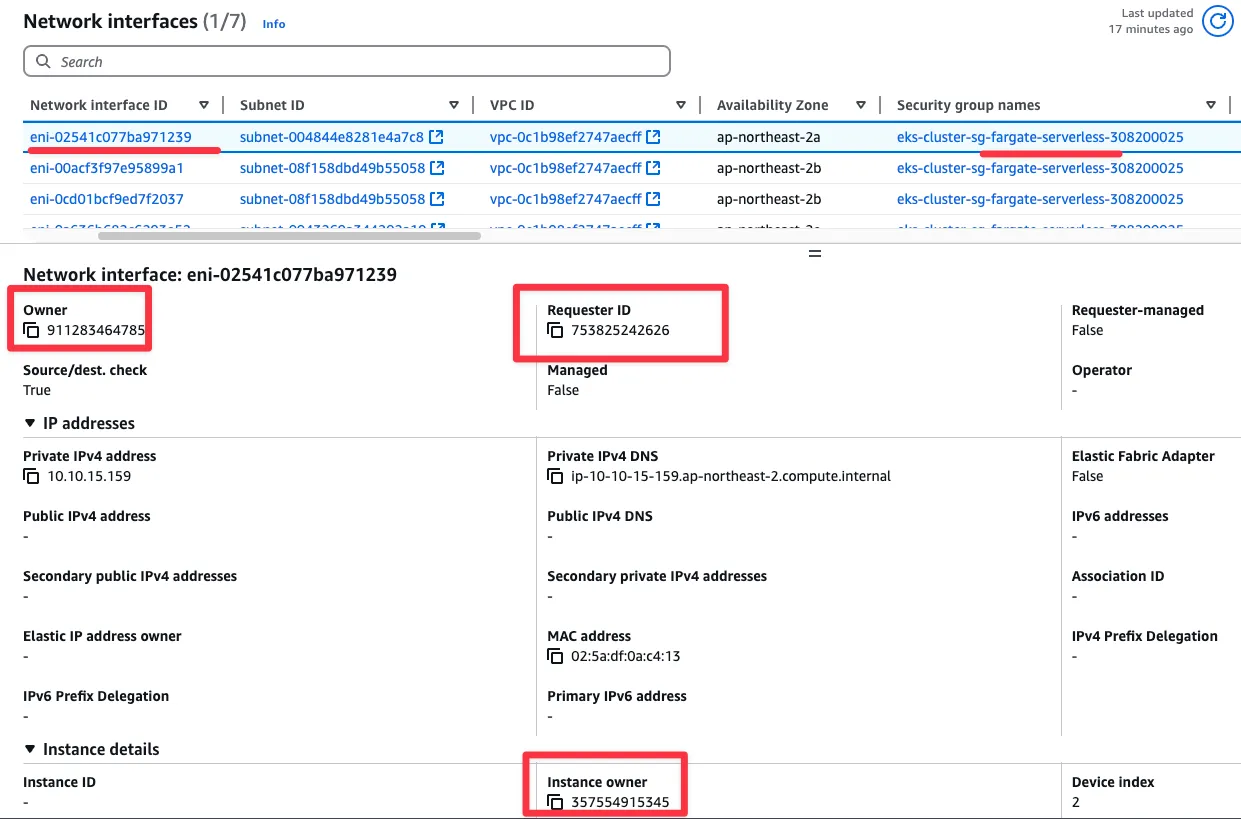
- Fargate 에 의해서 배포된 파드(노드 당 1개 파드)에 ENI는 사용자의 VPC 영역 내에 속하여, Fargate-Owned ENI 로 추정.
- 파드(노드)에 필요 IAM Role(Policy)는 Fargate 설치 시에 설정 필요함. 필요 시 파드에 IRSA 추가 설정 가능.
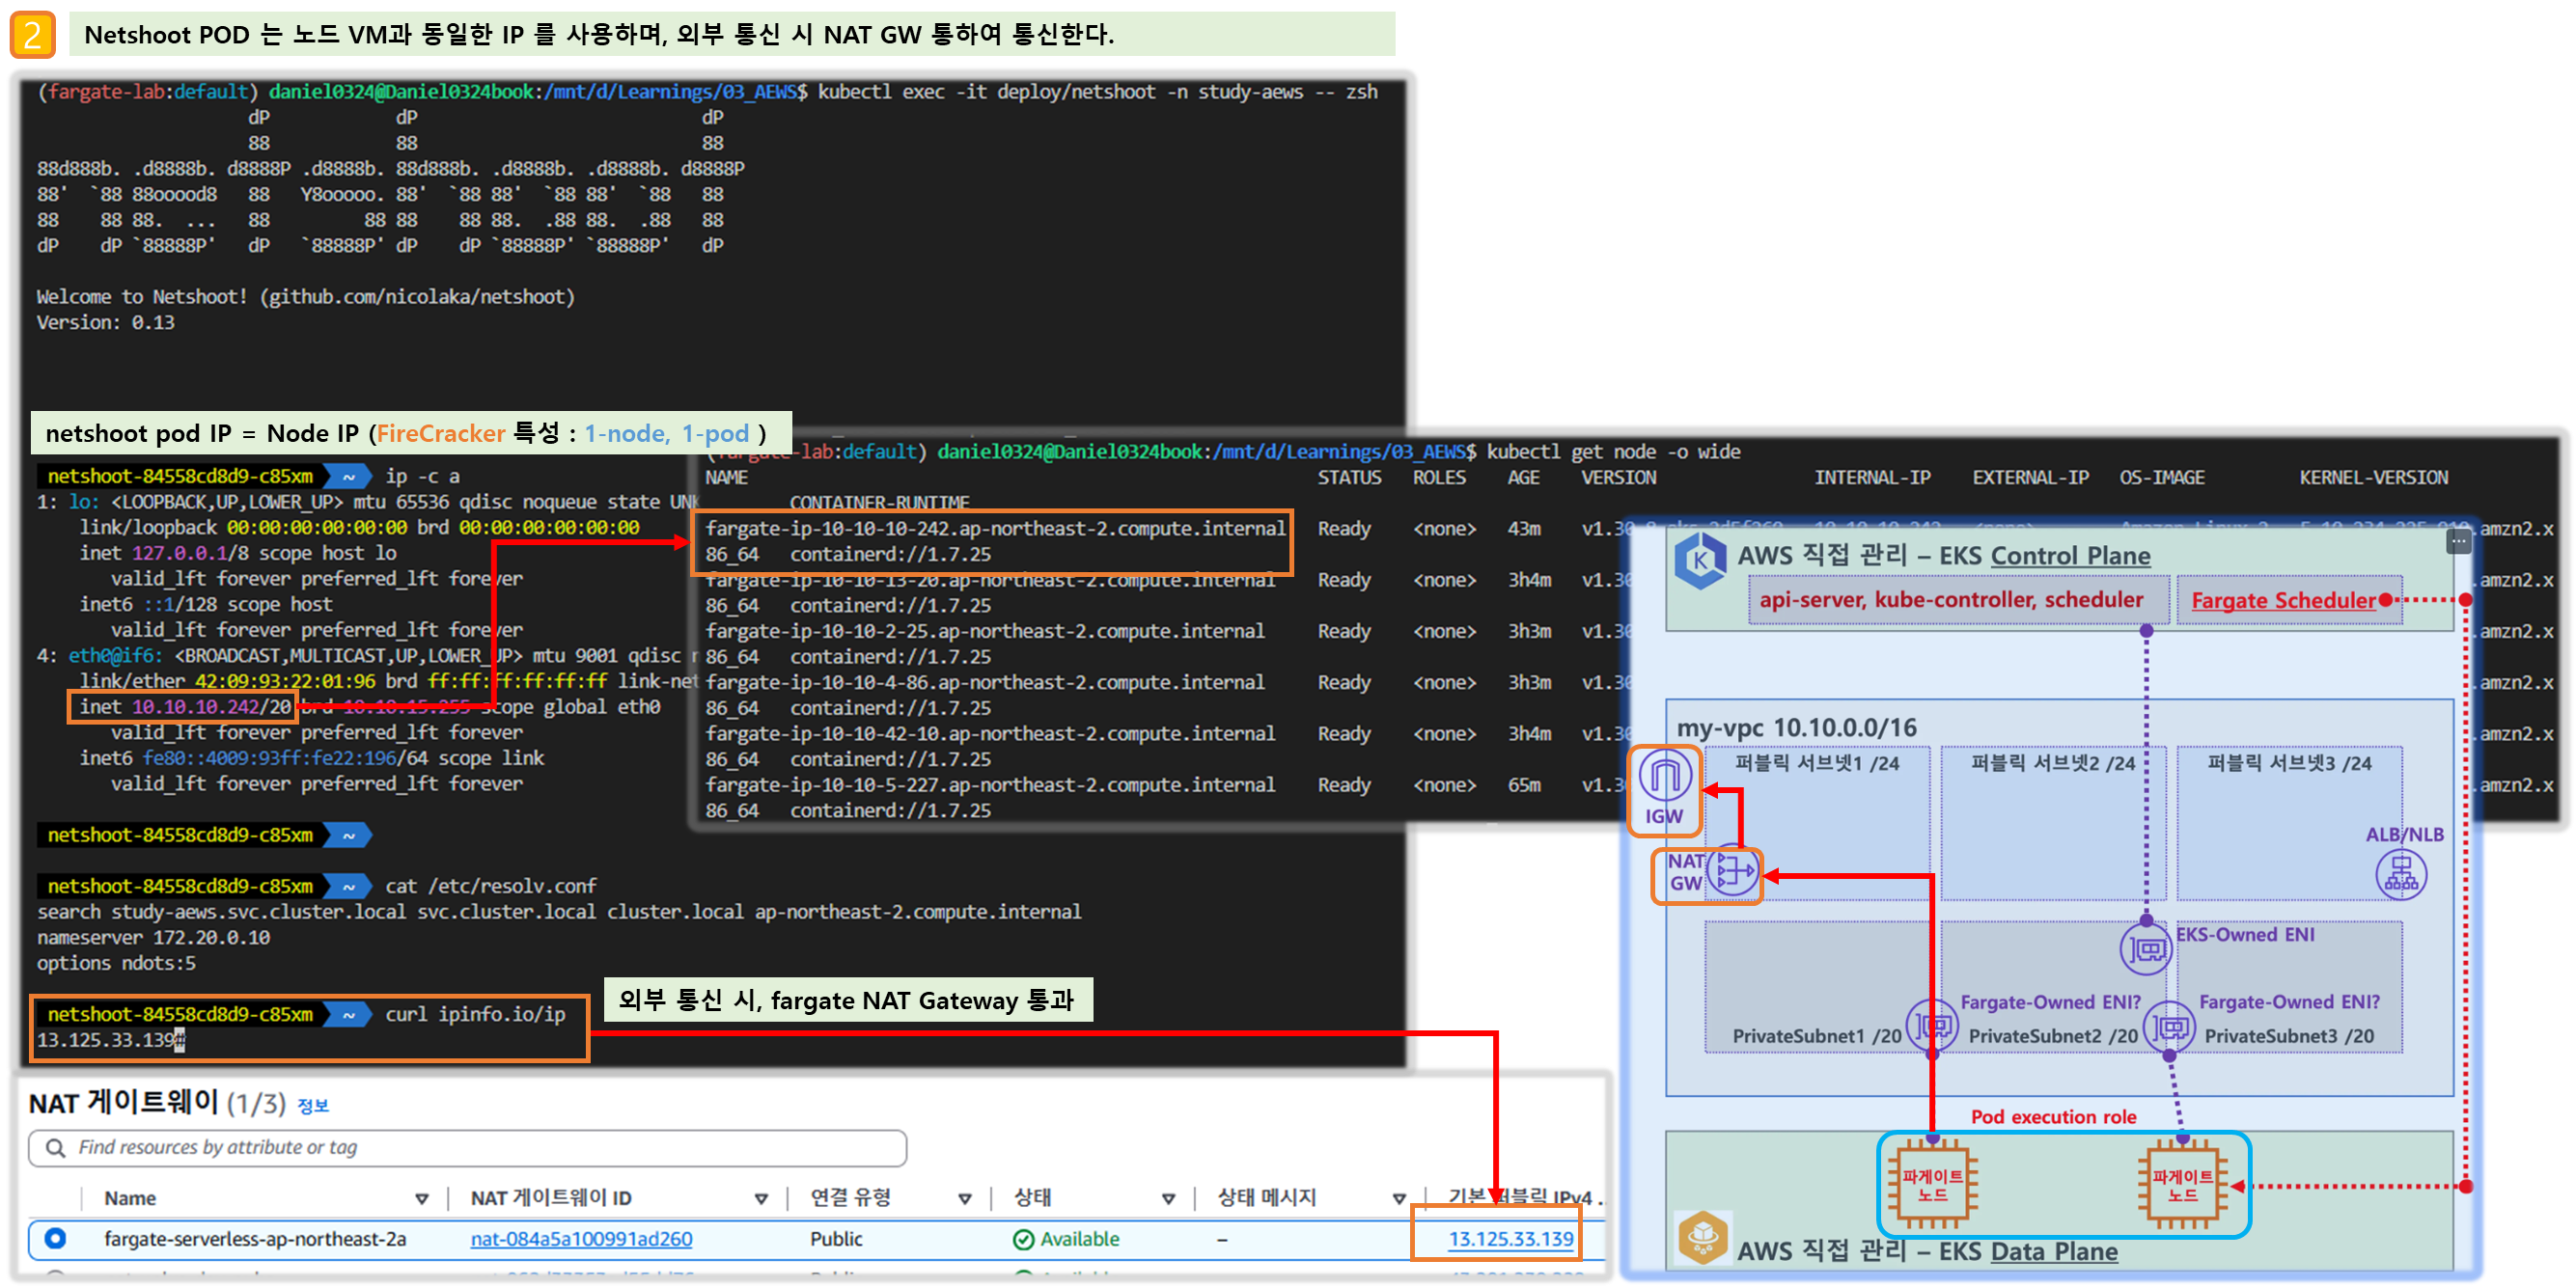
- 파드가 외부 통신 시에는 → NATGW(공인 IP로 SNAT) ⇒ IGW(외부 인터넷)
- 만약 파드가 퍼블릭 서브넷이 있을 경우 공인IP 비용 부과 및 외부 침입 시도가 빈번할듯..
- 외부에서 파드 내부로 인입 요청 시에는 → ALB/NLB ⇒ Fargate-Owned ENI 에 연결된 Fargate 파드(노드)로 전달
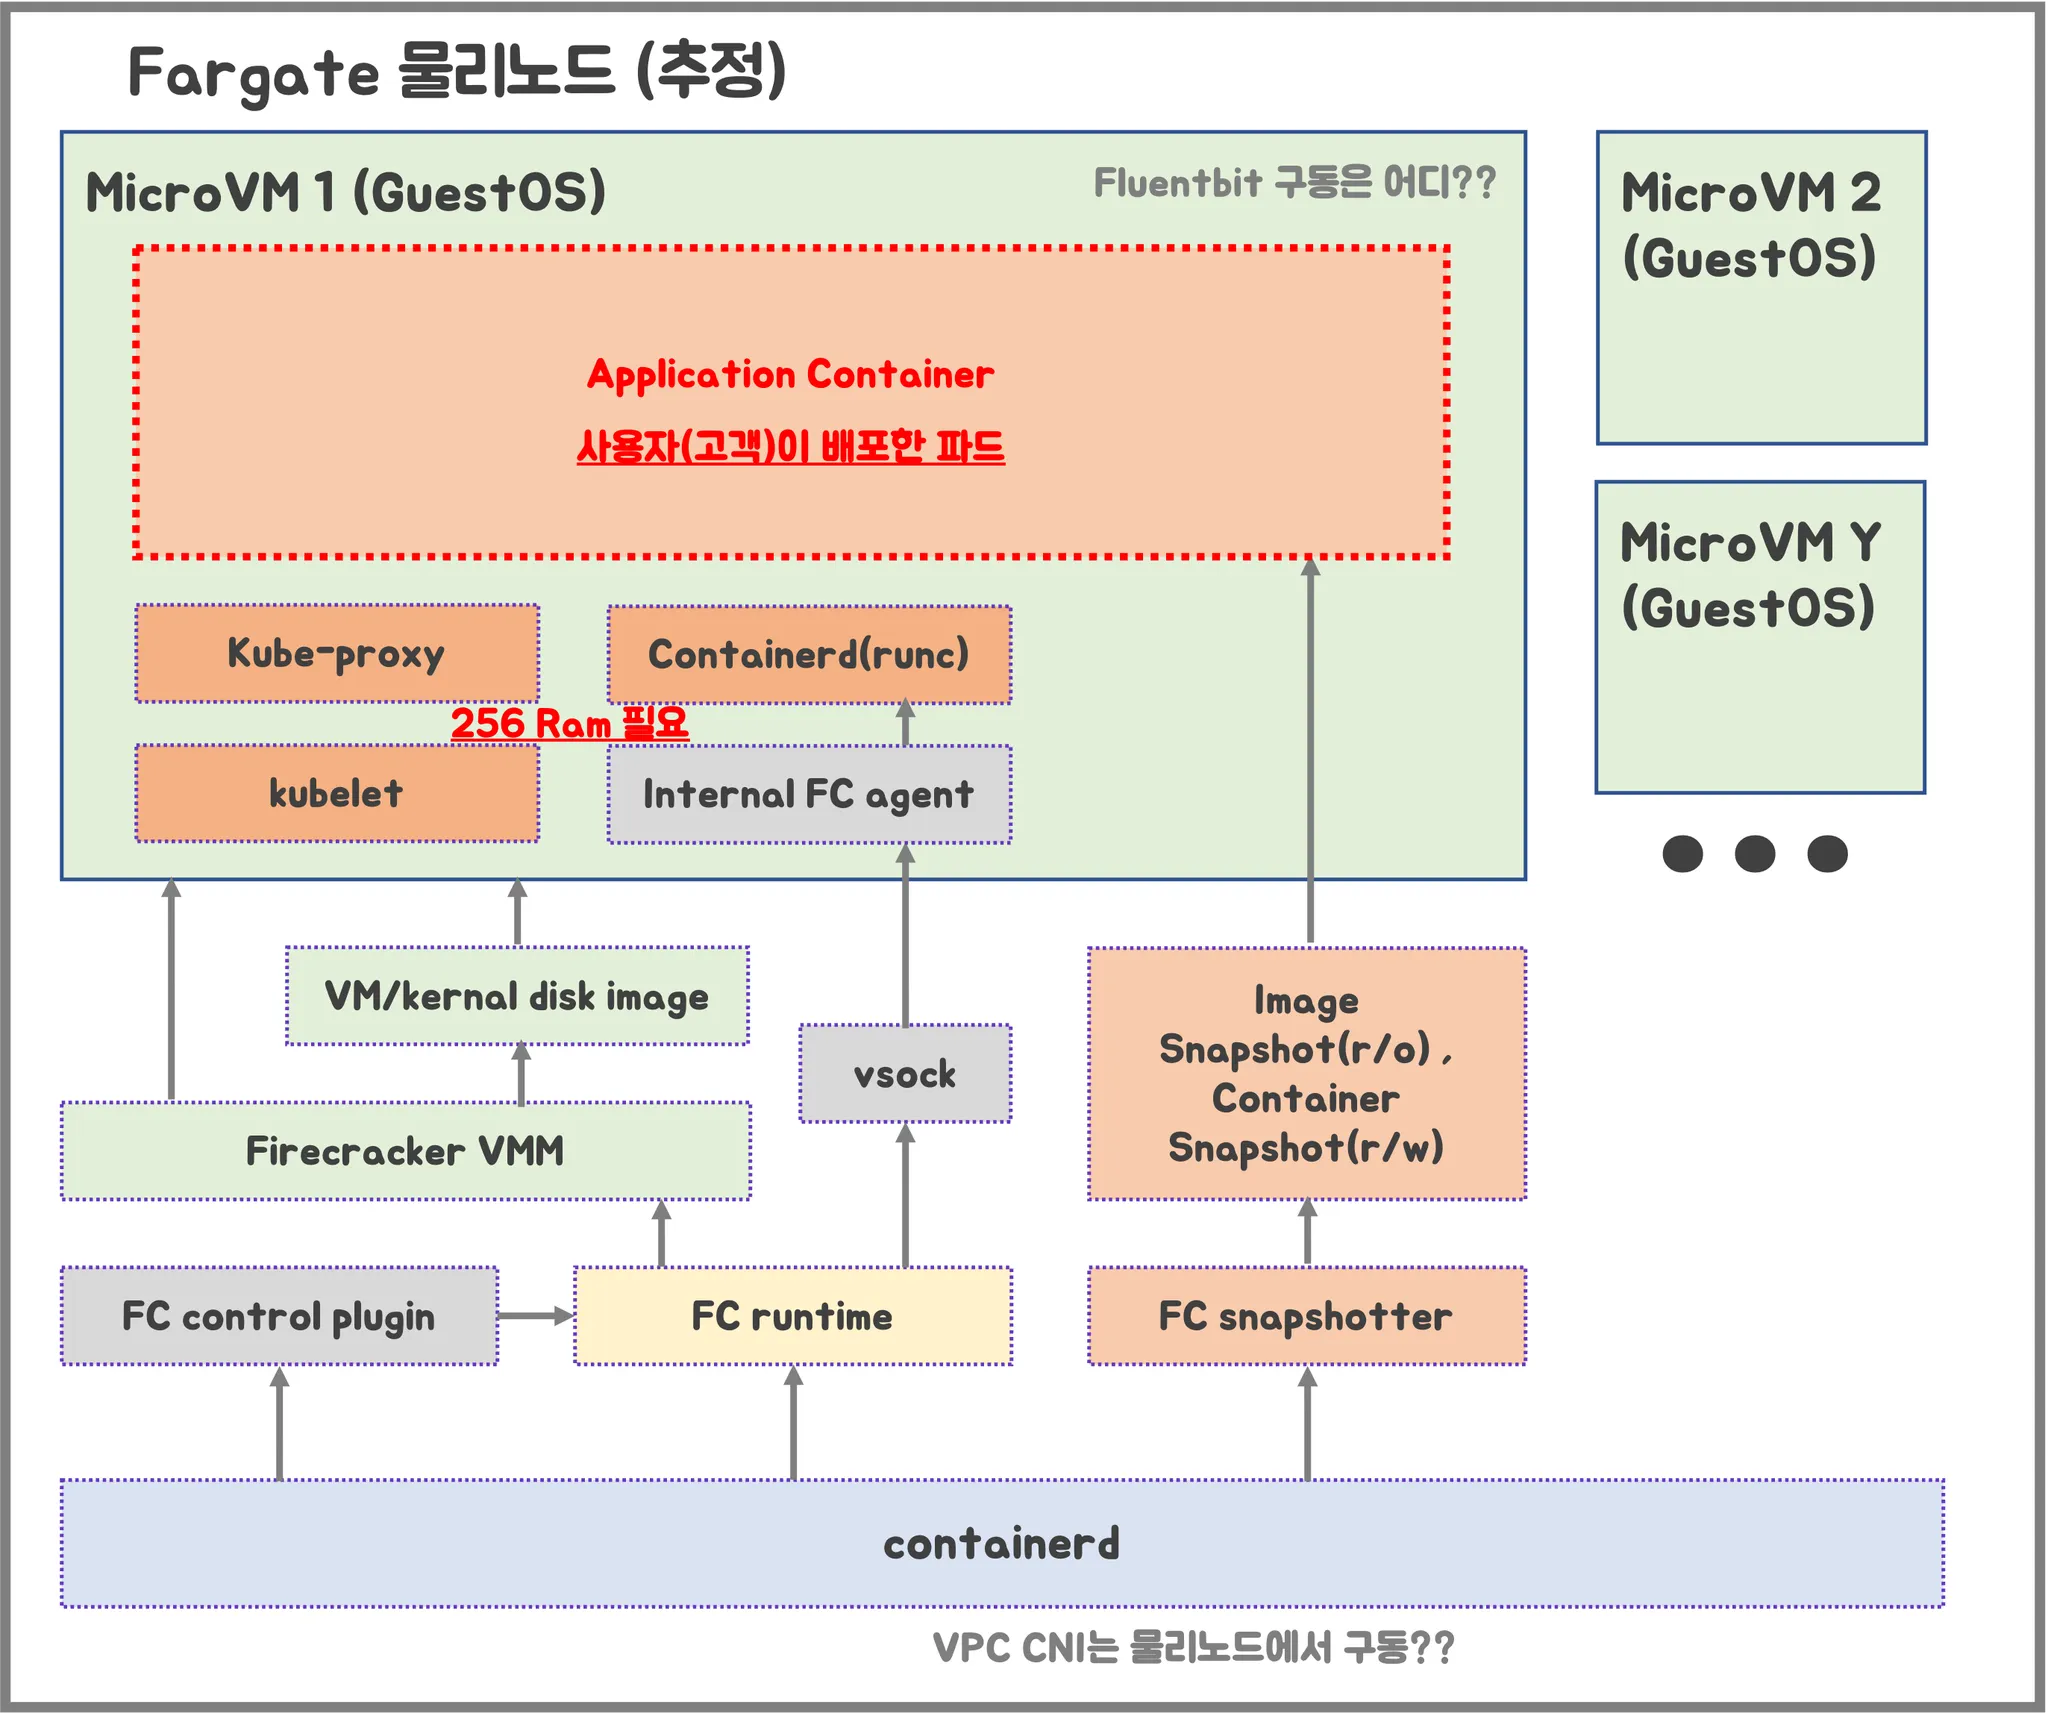
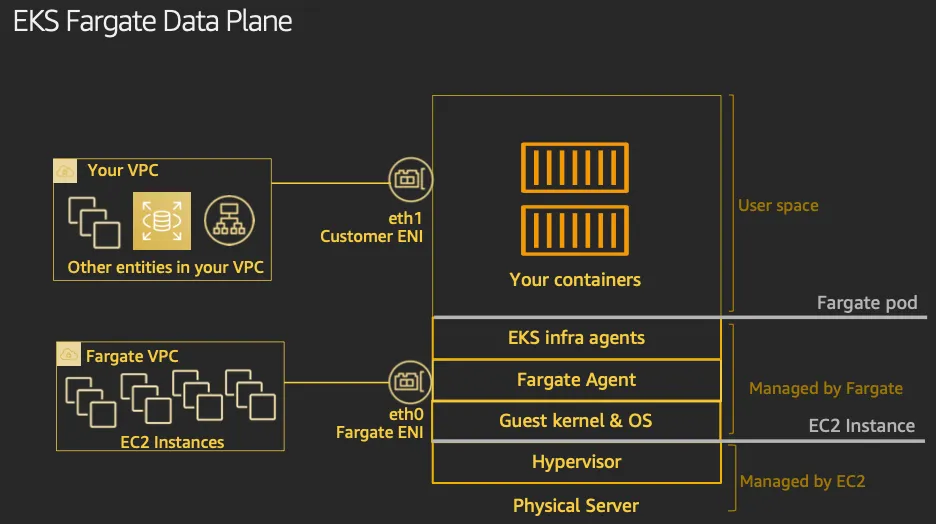
- firecracker-containerd 를 통하여 MicroVM(Application 컨테이너)를 배포.
- VMM을 통해서 MicroVM을 배포하고, FC Snapshotter 를 통해서 Application Container 의 이미지를 구현.
- MicroVM 마다 ‘Kubelet, Kube-proxy, Containerd’ 가 동작하여, 256 RAM 반드시 필요.
- 사용자에의 VPC에 보이는 ENI는 Application Containter 와 직접 매핑되어 있는 것으로 추정.
[ 참고자료 - (AWS 공식 문서) Fargate* - AWS_Docs ]
▶ Simplify compute management with AWS Fargate - Docs
들어가며
- 클러스터의 Fargate에서 파드를 배포하기 전에, Fargate 프로필을 하나 이상 정의해야 합니다.
- 관리자는 Fargate 프로필을 사용하여 Fargate에서 실행되는 포드를 선언할 수 있습니다. 프로필의 셀렉터를 통해 이 작업을 수행할 수 있습니다. 각 셀렉터에는 최대 5개의 셀렉터를 추가할 수 있습니다. 각 셀렉터에는 네임스페이스가 포함되어야 합니다. 셀렉터에는 레이블도 포함될 수 있습니다. 레이블 필드는 여러 개의 선택적 키-값 쌍으로 구성됩니다. 셀렉터와 일치하는 포드는 Fargate에서 예약됩니다.
- 포드는 네임스페이스와 셀렉터에 지정된 레이블을 사용하여 일치합니다. 네임스페이스 셀렉터가 레이블 없이 정의된 경우 Amazon EKS는 해당 네임스페이스에서 실행되는 모든 포드를 프로필을 사용하여 Fargate로 예약하려고 시도합니다. 예약할 포드가 Fargate 프로필의 셀렉터 중 하나와 일치하는 경우 해당 포드는 Fargate에서 예약됩니다.
- Pod가 여러 Fargate 프로필과 일치하는 경우, Pod 사양에 다음 Kubernetes 레이블을 추가하여 Pod가 사용하는 프로필을 지정할 수 있습니다: eks.amazonaws.com/fargate-profile : my-fargate-profile. Fargate에 예약하려면 해당 프로필의 셀렉터와 일치해야 합니다. Kubernetes 친화성/반 affinity 규칙은 적용되지 않으며 Amazon EKS Fargate Pod에는 필요하지 않습니다.
- Fargate 프로필을 생성할 때는 Pod 실행 역할을 지정해야 합니다. 이 실행 역할은 해당 프로필을 사용하여 Fargate 인프라에서 실행되는 Amazon EKS 구성 요소에 대한 것입니다. 이 역할은 승인을 위해 클러스터의 Kubernetes 역할 기반 액세스 제어(RBAC)에 추가됩니다. 이렇게 하면 Fargate 인프라에서 실행되는 kubelet이 Amazon EKS 클러스터에 등록되어 클러스터에 노드로 표시될 수 있습니다. 또한 Pod 실행 역할은 Fargate 인프라에 대한 IAM 권한을 제공하여 Amazon ECR 이미지 저장소에 대한 읽기 액세스를 허용합니다. 자세한 내용은 Amazon EKS Pod 실행 IAM 역할을 참조하세요 - Docs
- 파게이트 프로필은 변경할 수 없습니다. 그러나 기존 프로필을 대체할 새 업데이트된 프로필을 만든 다음 원본을 삭제할 수 있습니다.
- Fargate 프로필을 사용하여 실행 중인 모든 포드는 프로필이 삭제되면 중지되고 대기 상태로 전환됩니다.
- 클러스터에 있는 Fargate 프로필이 DELETTING 상태인 경우, 해당 클러스터에 다른 프로필을 만들기 전에 Fargate 프로필이 삭제될 때까지 기다려야 합니다.
- Amazon EKS와 Fargate는 Fargate 프로필에 정의된 각 서브넷에 포드를 배포합니다. 그러나 불균형한 스프레드가 발생할 수 있습니다. 균등한 스프레드가 있어야 하는 경우 두 개의 Fargate 프로필을 사용하세요. 두 개의 복제본을 배포하고 다운타임을 원하지 않는 시나리오에서는 균등한 스프레드가 중요합니다. 각 프로필에는 하나의 서브넷만 있는 것이 좋습니다.
▷ 제약사항 및 고려사항
- Fargate에서 실행되는 각 **Pod(MircoVM)**에는 고유한 격리 경계가 있습니다. 기본 커널, CPU 리소스, 메모리 리소스 또는 탄력적인 네트워크 인터페이스를 다른 Pod와 공유하지 않습니다.
- 네트워크 로드 밸런서**(NLB)** 및 애플리케이션 로드 밸런서(ALB)는 IP 타겟이 있는 Fargate에서만 사용할 수 있습니다. 자세한 내용은 네트워크 로드 밸런서 생성 및 애플리케이션 로드 밸런서와 함께 애플리케이션 및 HTTP 트래픽 라우팅을 참조하십시오.
- Fargate 노출 서비스는 대상 유형 IP 모드에서만 실행되며 노드 IP 모드에서는 실행되지 않습니다. 관리 노드에서 실행되는 서비스와 Fargate에서 실행되는 서비스의 연결성을 확인하는 권장 방법은 서비스 이름을 통해 연결하는 것입니다.
- 포드는 Fargate에서 실행될 예정인 시점에 Fargate 프로필과 일치해야 합니다. Fargate 프로필과 일치하지 않는 포드는 보류 중으로 고정될 수 있습니다. 일치하는 Fargate 프로필이 있는 경우, 생성한 보류 중인 포드를 삭제하여 Fargate로 일정을 변경할 수 있습니다.
- 데몬셋은 Fargate에서 지원되지 않습니다. 애플리케이션에 데몬이 필요한 경우 해당 데몬을 포드에서 사이드카 컨테이너로 실행하도록 재구성합니다.
- Fargate에서는 특권 컨테이너(Privileged containers)가 지원되지 않습니다.
- Fargate에서 실행되는 포드는 포드 매니페스트에서 HostPort 또는 HostNetwork를 지정할 수 없습니다.
- 기본 nofile 및 nproc 소프트 제한은 1024이고 Fargate Pods의 하드 제한은 65535입니다.
- 현재 Fargate에서는 GPU를 사용할 수 없습니다.
- Fargate에서 실행되는 포드는 AWS 서비스에 대한 NAT 게이트웨이 액세스 권한이 있는 private 서브넷에서만 지원되므로(인터넷 게이트웨이로 직접 가는 경로는 지원되지 않음), 클러스터의 VPC는 private 서브넷을 사용할 수 있어야 합니다. 아웃바운드 인터넷 액세스 권한이 없는 클러스터의 경우 인터넷 액세스가 제한된 개인 클러스터 배포를 참조하십시오.
- VPA를 사용하여 Fargate 포드의 CPU 및 메모리 크기를 초기화에 설정한 다음, HPA 스케일 포드 배포를 사용하여 해당 포드를 확장할 수 있습니다. 수직 포드 오토스케일러가 더 큰 CPU 및 메모리 조합으로 Fargate에 포드를 자동으로 다시 배포하려면 수직 포드 오토스케일러의 모드를 자동 또는 재생성으로 설정하여 올바른 기능을 보장하세요. 자세한 내용은 GitHub의 VPA 문서를 참조하세요.
- VPC에 DNS v 및 DNS hostnames을 사용하도록 설정해야 합니다. 자세한 내용은 VPC에 대한 DNS 지원 보기 및 업데이트를 참조하십시오.
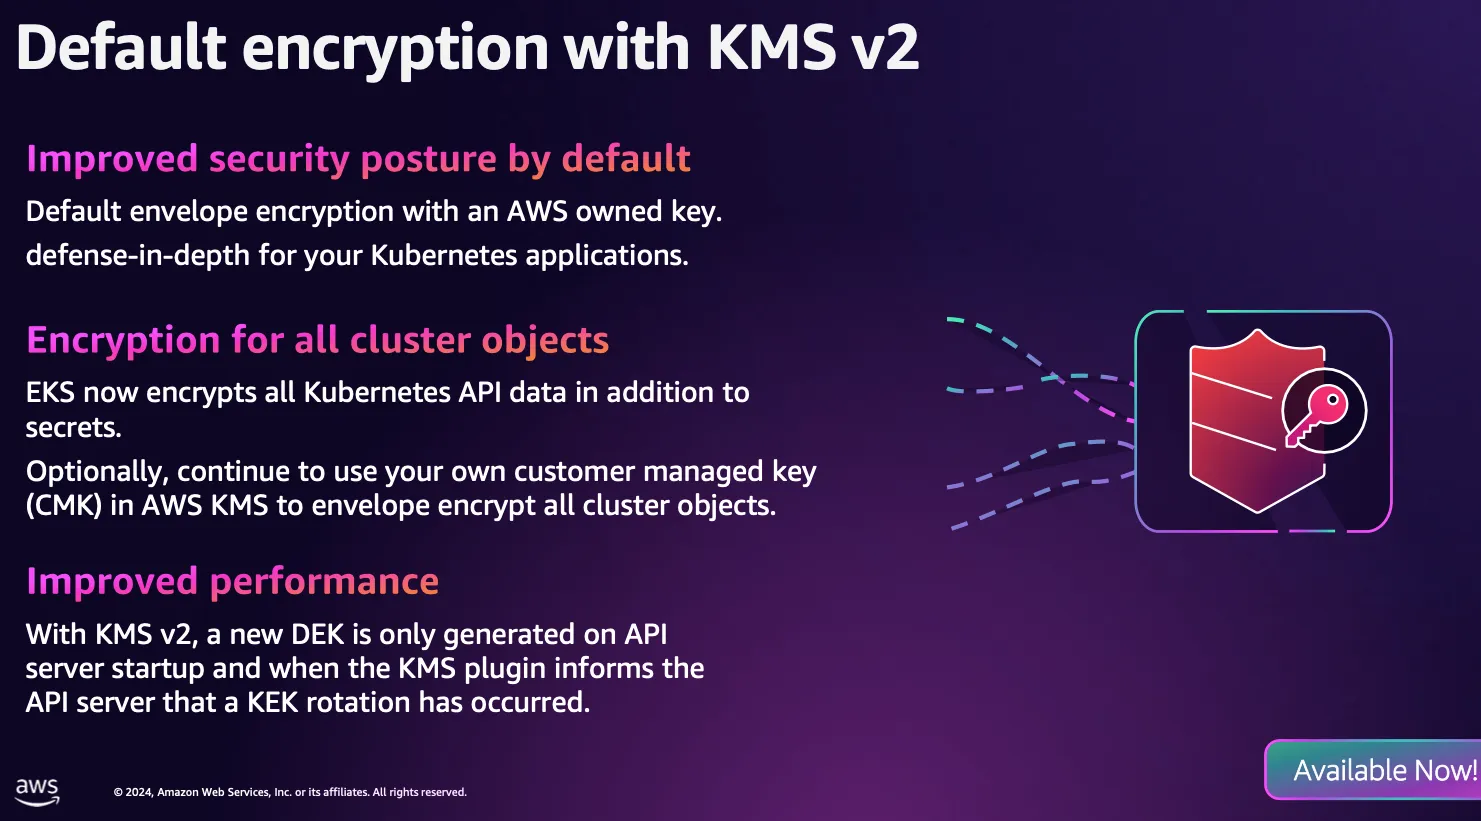
- Amazon EKS Fargate는 가상 머신(VM) 내에서 각 포드를 격리하여 Kubernetes 애플리케이션에 대한 심층 방어 기능을 추가합니다. 이 VM 경계는 컨테이너 탈출 시 다른 포드에서 사용하는 호스트 기반 리소스에 대한 액세스를 방지하며, 이는 컨테이너화된 애플리케이션을 공격하고 컨테이너 외부의 리소스에 대한 액세스를 얻는 일반적인 방법입니다.
- Amazon EKS를 사용해도 공유 책임 모델에 따른 책임은 변경되지 않습니다. 클러스터 보안 및 거버넌스 컨트롤의 구성을 신중하게 고려해야 합니다. 애플리케이션을 분리하는 가장 안전한 방법은 항상 별도의 클러스터에서 실행하는 것입니다.
- 파게이트 프로필은 VPC 보조 CIDR 블록에서 서브넷을 지정하는 것을 지원합니다. 보조 CIDR 블록을 지정하는 것이 좋습니다. 이는 서브넷에 사용할 수 있는 IP 주소의 수가 제한적이기 때문입니다. 따라서 클러스터에서 생성할 수 있는 포드의 수도 제한적입니다. 포드에 대해 다른 서브넷을 사용하면 사용 가능한 IP 주소의 수를 늘릴 수 있습니다. 자세한 내용은 VPC에 IPv4 CIDR 블록 추가를 참조하세요.
- Fargate 노드에 배포된 포드에는 Amazon EC2 인스턴스 메타데이터 서비스(IMDS)를 사용할 수 없습니다. Fargate에 배포된 포드 중 IAM 자격 증명이 필요한 경우 IRSA 사용하여 포드에 할당합니다. 만약 포드가 IMDS를 통해 제공되는 다른 정보에 액세스할 필요가 있다면, 이 정보를 포드 사양에 하드코딩해야 합니다. 여기에는 포드가 배포된 AWS 지역 또는 가용성 구역이 포함됩니다.
- Fargate 포드를 AWS 아웃포스트, AWS Wavegelength 또는 AWS Local Zone에 배포할 수 없습니다.
- Amazon EKS는 파게이트 포드를 안전하게 보호하기 위해 주기적으로 패치를 적용해야 합니다. 영향을 줄이는 방식으로 업데이트를 시도하지만, 성공적으로 퇴출되지 않으면 포드를 삭제해야 하는 경우가 있습니다. 중단을 최소화하기 위해 취할 수 있는 몇 가지 조치가 있습니다. 자세한 내용은 AWS 파게이트 OS 패치 이벤트에 대한 작업 설정을 참조하세요.
- Amazon EKS용 Amazon VPC CNI 플러그인은 Fargate 노드에 설치되어 있습니다. Fargate 노드가 있는 Amazon EKS 클러스터에는 대체 CNI 플러그인을 사용할 수 없습니다.
- Fargate에서 실행되는 Pod는 수동 드라이버 설치 단계 없이 Amazon EFS 파일 시스템을 자동으로 마운트합니다. Fargate 노드에서는 EFS 동적 영구 볼륨 프로비저닝을 사용할 수 없지만 EFS 정적 프로비저닝을 사용할 수 있습니다.
- Amazon EKS는 Fargate Spot을 지원하지 않습니다.
- Amazon EBS 볼륨을 Fargate 포드에 마운트할 수 없습니다.
- Fargate 노드에서 Amazon EBS CSI 컨트롤러를 실행할 수 있지만 Amazon EBS CSI 노드 DaemonSet은 Amazon EC2 인스턴스에서만 실행할 수 있습니다.
- 쿠버네티스 Job이 완료 또는 실패로 표시된 후에도 작업이 생성하는 포드는 일반적으로 계속 존재합니다. 이 동작을 사용하면 로그와 결과를 볼 수 있지만, 파게이트에서는 작업을 나중에 정리하지 않으면 비용이 발생합니다.
- 작업이 완료되거나 실패한 후 관련 포드를 자동으로 삭제하려면 Time-to-Live(TTL) 컨트롤러를 사용하여 기간을 지정할 수 있습니다. 다음 예제는 작업 매니페스트에서 .spec.ttlSecondsAfterFinished를 지정하는 방법을 보여줍니다.
apiVersion: batch/v1
kind: Job
metadata:
  name: busybox
spec:
  template:
    spec:
      containers:
      - name: busybox
        image: busybox
        command: ["/bin/sh", "-c", "sleep 10"]
      restartPolicy: Never
  ttlSecondsAfterFinished: 60 # <-- TTL controller
→ Fargate does not currently support Kubernetes topologySpreadConstraints.
▶ Define which Pods use AWS Fargate when launched - Docs
들어가며
- 클러스터의 Fargate에서 파드를 배포하기 전에, Fargate 프로필을 하나 이상 정의해야 합니다.
- 관리자는 Fargate 프로필을 사용하여 Fargate에서 실행되는 포드를 선언할 수 있습니다. 프로필의 셀렉터를 통해 이 작업을 수행할 수 있습니다. 각 셀렉터에는 최대 5개의 셀렉터를 추가할 수 있습니다. 각 셀렉터에는 네임스페이스가 포함되어야 합니다. 셀렉터에는 레이블도 포함될 수 있습니다. 레이블 필드는 여러 개의 선택적 키-값 쌍으로 구성됩니다. 셀렉터와 일치하는 포드는 Fargate에서 예약됩니다.
- 포드는 네임스페이스와 셀렉터에 지정된 레이블을 사용하여 일치합니다. 네임스페이스 셀렉터가 레이블 없이 정의된 경우 Amazon EKS는 해당 네임스페이스에서 실행되는 모든 포드를 프로필을 사용하여 Fargate로 예약하려고 시도합니다. 예약할 포드가 Fargate 프로필의 셀렉터 중 하나와 일치하는 경우 해당 포드는 Fargate에서 예약됩니다.
- Pod가 여러 Fargate 프로필과 일치하는 경우, Pod 사양에 다음 Kubernetes 레이블을 추가하여 Pod가 사용하는 프로필을 지정할 수 있습니다: eks.amazonaws.com/fargate-profile : my-fargate-profile. Fargate에 예약하려면 해당 프로필의 셀렉터와 일치해야 합니다. Kubernetes 친화성/반 affinity 규칙은 적용되지 않으며 Amazon EKS Fargate Pod에는 필요하지 않습니다.
- Fargate 프로필을 생성할 때는 Pod 실행 역할을 지정해야 합니다. 이 실행 역할은 해당 프로필을 사용하여 Fargate 인프라에서 실행되는 Amazon EKS 구성 요소에 대한 것입니다. 이 역할은 승인을 위해 클러스터의 Kubernetes 역할 기반 액세스 제어(RBAC)에 추가됩니다. 이렇게 하면 Fargate 인프라에서 실행되는 kubelet이 Amazon EKS 클러스터에 등록되어 클러스터에 노드로 표시될 수 있습니다. 또한 Pod 실행 역할은 Fargate 인프라에 대한 IAM 권한을 제공하여 Amazon ECR 이미지 저장소에 대한 읽기 액세스를 허용합니다. 자세한 내용은 Amazon EKS Pod 실행 IAM 역할을 참조하세요 - Docs
- 파게이트 프로필은 변경할 수 없습니다. 그러나 기존 프로필을 대체할 새 업데이트된 프로필을 만든 다음 원본을 삭제할 수 있습니다.
- Fargate 프로필을 사용하여 실행 중인 모든 포드는 프로필이 삭제되면 중지되고 대기 상태로 전환됩니다.
- 클러스터에 있는 Fargate 프로필이 DELETTING 상태인 경우, 해당 클러스터에 다른 프로필을 만들기 전에 Fargate 프로필이 삭제될 때까지 기다려야 합니다.
- Amazon EKS와 Fargate는 Fargate 프로필에 정의된 각 서브넷에 포드를 배포합니다. 그러나 불균형한 스프레드가 발생할 수 있습니다. 균등한 스프레드가 있어야 하는 경우 두 개의 Fargate 프로필을 사용하세요. 두 개의 복제본을 배포하고 다운타임을 원하지 않는 시나리오에서는 균등한 스프레드가 중요합니다. 각 프로필에는 하나의 서브넷만 있는 것이 좋습니다.
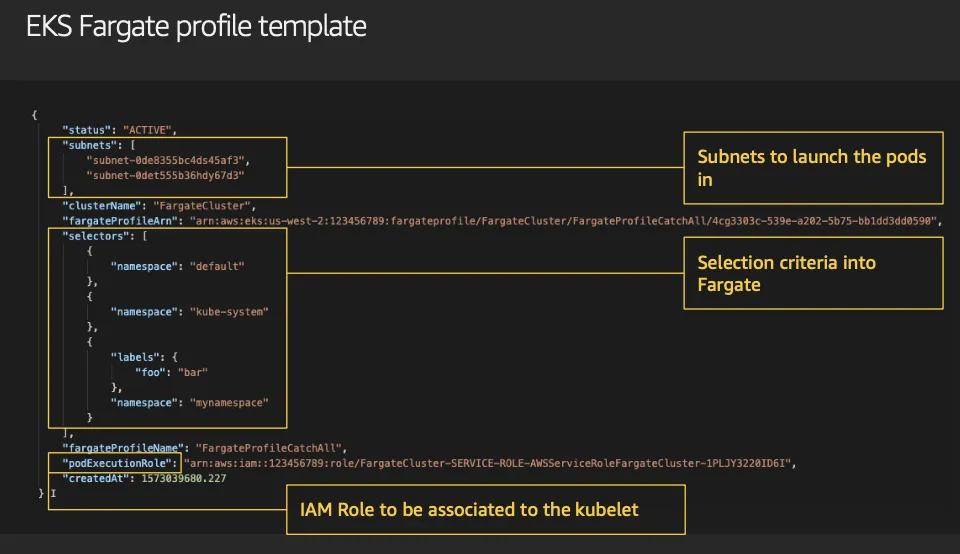
1. Fargate profile components
- Pod execution role 실행 역할
- 클러스터가 AWS Fargate에서 Pods를 생성할 때 Fargate 인프라에서 실행 중인 kubelet은 사용자를 대신하여 AWS API에 호출해야 합니다. 예를 들어, ECR에서 컨테이너 이미지를 가져오기 위해 호출해야 합니다. Amazon EKS Pod 실행 역할은 이 작업을 수행할 수 있는 IAM 권한을 제공합니다.
- Fargate 프로필을 생성할 때는 포드에서 사용할 포드 실행 역할을 지정해야 합니다. 이 역할은 승인을 위해 클러스터의 Kubernetes 역할 기반 액세스 제어(RBAC)에 추가됩니다. 이는 Fargate 인프라에서 실행 중인 큐브렛이 Amazon EKS 클러스터에 등록되어 클러스터에 노드로 표시될 수 있도록 하기 위함입니다. 자세한 내용은 Amazon EKS 포드 실행 IAM 역할을 참조하세요.
- Subnets
- 파드를 배포할때 서브넷의 ID는 이 프로필을 사용합니다. 현재 Fargate에서 실행 중인 파드에는 공용 IP 주소가 할당되지 않습니다.
- 따라서 이 매개변수에는 인터넷 게이트웨이로 직접 가는 경로가 없는 private 서브넷만 허용됩니다.
- Selectors
- 포드가 이 Fargate 프로필을 사용하기 위해 일치시킬 셀렉터입니다. Fargate 프로필에는 최대 5개의 셀렉터를 지정할 수 있습니다. 셀렉터에는 다음과 같은 구성 요소가 있습니다:
- 네임스페이스 : 셀렉터의 네임스페이스를 지정해야 합니다. 셀렉터는 이 네임스페이스에 생성된 포드와 일치하는 것만 확인할 수 있습니다. 그러나 여러 네임스페이스를 타겟팅하기 위해 여러 셀렉터를 생성할 수 있습니다.
- 라벨 : 선택기에 일치하도록 Kubernetes 라벨을 선택적으로 지정할 수 있습니다. 선택기는 선택기에 지정된 모든 라벨이 있는 포드와 일치하는 경우에만 해당합니다.
- 포드가 이 Fargate 프로필을 사용하기 위해 일치시킬 셀렉터입니다. Fargate 프로필에는 최대 5개의 셀렉터를 지정할 수 있습니다. 셀렉터에는 다음과 같은 구성 요소가 있습니다:
2. Fargate profile wildcards
- Kubernetes에서 허용하는 문자 외에도 네임스페이스, 레이블 키, 레이블 값에 대한 선택 기준에서 *****와 **?**을 사용할 수 있습니다:
- ***** 는 없음, 하나 또는 여러 문자를 나타냅니다. 예를 들어, prod*는 prod와 prod-metric을 나타낼 수 있습니다.
- ? 는 단일 문자를 나타냅니다(예: value?는 valuea를 나타낼 수 있습니다). 그러나 value와 value-a를 나타낼 수는 없습니다. 왜냐하면 ?는 정확히 하나의 문자만 나타낼 수 있기 때문입니다.
- 이러한 와일드카드 문자는 모든 위치와 조합으로 사용할 수 있습니다(예: prod*, dev, 프론트엔드*?). 다른 와일드카드와 정규 표현식과 같은 패턴 매칭 형태는 지원되지 않습니다.
- Pod 사양에 네임스페이스와 레이블에 일치하는 프로필이 여러 개 있는 경우, Fargate는 프로필 이름에 따른 영숫자 정렬을 기반으로 프로필을 선택합니다. 예를 들어, 프로필 A(베타 workload)와 프로필 B(프로덕트 workload) 모두 출시될 포드에 맞는 선택기를 가지고 있는 경우, Fargate는 프로필 A(beta workload)를 포드에 선택합니다. 포드에는 프로필 A가 있는 레이블이 있습니다(예: eks.amazonaws.com/fargate-profile=beta-workload) ).
- 기존 Fargate 포드를 와일드카드를 사용하는 새 프로필로 마이그레이션하려면 두 가지 방법이 있습니다:
- 일치하는 선택기를 사용하여 새 프로필을 만든 다음 이전 프로필을 삭제합니다. 이전 프로필로 레이블이 지정된 포드는 새 일치 프로필로 일정이 변경됩니다.
- 워크로드를 마이그레이션하고 싶지만 각 Fargate 포드에 어떤 Fargate 레이블이 있는지 확실하지 않다면 다음 방법을 사용할 수 있습니다. 동일한 클러스터의 프로필 중에서 먼저 알파벳 순으로 정렬되는 이름의 새 프로필을 만듭니다. 그런 다음 새 프로필로 마이그레이션해야 하는 Fargate 포드를 재활용합니다.
▶ Understand Fargate Pod configuration details - Docs
Pod CPU and memory
- Kubernetes를 사용하면 포드의 각 컨테이너에 할당된 요청, 최소 vCPU 양, 메모리 리소스를 정의할 수 있습니다.
- Kubernetes는 각 포드에 대해 최소한 요청된 리소스가 컴퓨팅 리소스에서 사용 가능한지 확인하기 위해 포드를 스케줄링합니다.
- 자세한 내용은 Kubernetes 문서의 컨테이너에 대한 컴퓨팅 리소스 관리를 참조하십시오.
- Amazon EKS Fargate는 노드당 하나의 포드만 실행하기 때문에 리소스가 적은 경우 포드를 퇴출하는 시나리오는 발생하지 않습니다.
- Fargate runs only one Pod per node, the scenario of evicting Pods in case of fewer resources doesn’t occur
- 모든 Amazon EKS Fargate 포드는 우선순위가 보장된 상태로 실행되므로 요청된 CPU와 메모리는 모든 컨테이너에 대한 한도와 같아야 합니다.
- Fargate Pods run with guaranteed priority, so the requested CPU and memory must be equal to the limit for all of the containers.
- 자세한 내용은 Kubernetes 문서의 포드 서비스 품질 구성을 참조하십시오.
- Fargate에서 포드가 예약되면, 포드 사양 내의 vCPU 및 메모리 예약이 포드를 위해 얼마나 많은 CPU와 메모리를 프로비저닝할지를 결정합니다.
- Init 컨테이너 중 최대 요청은 Init 요청 vCPU 및 메모리 요구 사항을 결정하는 데 사용됩니다.
- The maximum request out of any Init containers is used to determine the Init request vCPU and memory requirements.
- 모든 장기 컨테이너에 대한 요청이 추가되어 장기 요청 vCPU 및 메모리 요구 사항을 결정합니다.
- Requests for all long-running containers are added up to determine the long-running request vCPU and memory requirements.
- 이전 두 값 중 더 큰 값은 포드에 사용할 vCPU 및 메모리 요청에 선택됩니다.
- The larger of the previous two values is chosen for the vCPU and memory request to use for your Pod.
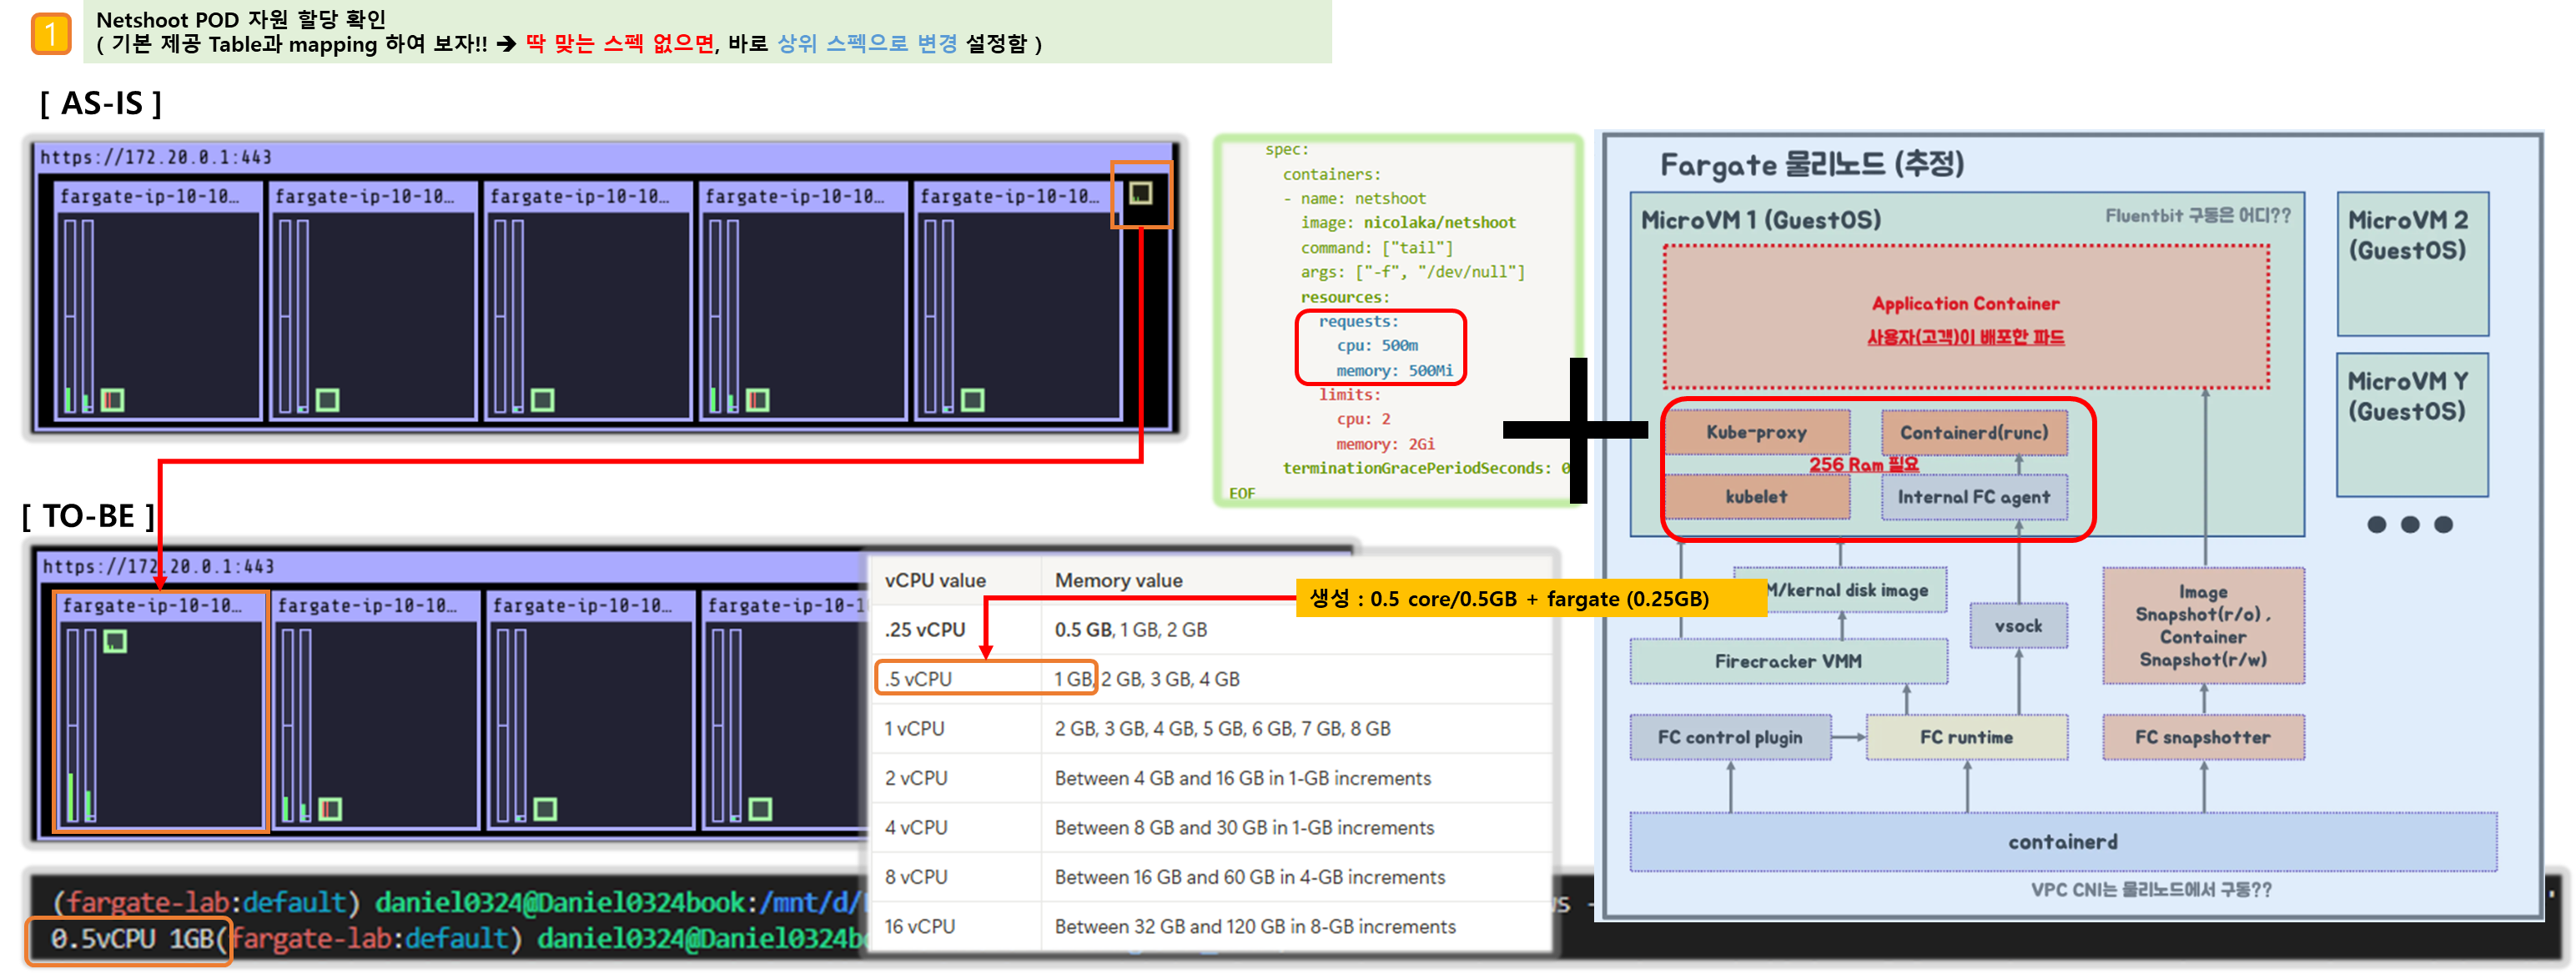
- Fargate는 필요한 Kubernetes 구성 요소(kubelet, kube-proxy, and **containerd)**에 대해 각 Pod의 메모리 예약에 256MB를 추가합니다.
- Fargate adds 256 MB to each Pod’s memory reservation for the required Kubernetes components (kubelet, kube-proxy, and containerd).
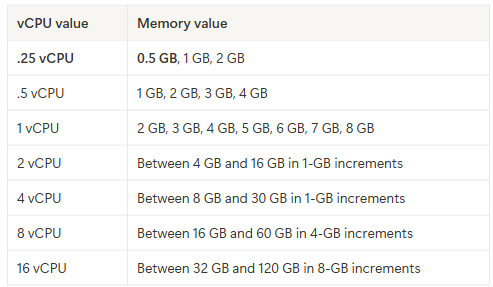
- Fargate는 포드가 항상 실행에 필요한 리소스를 확보할 수 있도록 vCPU와 메모리 요청의 합과 가장 일치하는 다음과 같은 컴퓨팅 구성으로 반올림합니다.
- vCPU와 메모리 조합을 지정하지 않으면 사용 가능한 가장 작은 조합(.25 vCPU와 0.5 GB 메모리)이 사용됩니다.
- 다음 표는 Fargate에서 실행 중인 포드에 사용할 수 있는 vCPU 및 메모리 조합을 보여줍니다.
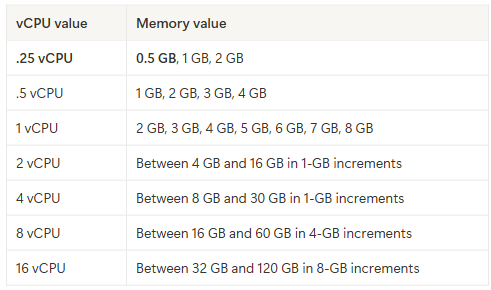
- Kubernetes 구성 요소를 위해 예약된 추가 메모리는 요청된 것보다 더 많은 vCPU를 가진 Fargate 작업을 유발할 수 있습니다. 예를 들어, 1 vCPU와 8GB 메모리 요청은 메모리 요청에 256MB가 추가되며, 1 vCPU와 9GB 메모리를 가진 작업이 없기(반올림) 때문에 2 vCPU와 9GB 메모리로 Fargate 작업을 프로비저닝합니다.
- Fargate에서 실행되는 Pod의 크기와 Kubernetes가 보고한 Kubectl get 노드 간의 노드 크기 사이에는 상관관계가 없습니다. 보고된 노드 크기는 종종 Pod의 용량보다 큽니다. 다음 명령어를 사용하여 Pod 용량을 확인할 수 있습니다. 기본값을 Pod의 네임스페이스와 Pod 이름으로 대체합니다.
#
kubectl describe pod --namespace default pod-name
annotations:
CapacityProvisioned: 0.25vCPU 0.5GB- 용량 프로비저닝 주석은 강제된 포드 용량을 나타내며 Fargate에서 실행되는 포드의 비용을 결정합니다. 컴퓨팅 구성에 대한 가격 정보는 AWS Fargate 가격을 참조하세요.
▶ Set actions for AWS Fargate OS patching events - Docs
- Amazon EKS는 AWS Fargate 노드의 보안을 유지하기 위해 주기적으로 OS를 패치합니다. 패치 프로세스의 일환으로 노드를 재활용하여 OS 패치를 설치합니다. 업데이트는 서비스에 미치는 영향을 최소화하는 방식으로 시도됩니다. 그러나 포드가 성공적으로 퇴출되지 않으면 삭제해야 하는 경우가 있습니다. 다음은 잠재적인 중단을 최소화하기 위해 취할 수 있는 조치입니다:
- 적절한 Pod 중단 예산(PDB)을 설정하여 동시에 감소하는 Pod의 수를 제어합니다.
- 포드가 삭제되기 전에 실패한 퇴거를 처리할 수 있는 Amazon EventBridge 규칙을 만듭니다.
- 알림에 게시된 퇴거일 이전에 영향을 받은 포드를 수동으로 재시작합니다.
- AWS 사용자 알림에서 알림 구성을 만듭니다.
- Amazon EKS는 Kubernetes 커뮤니티와 긴밀히 협력하여 버그 수정 및 보안 패치를 가능한 한 빨리 제공합니다. 모든 Fargate 포드는 클러스터의 Kubernetes 버전에 대해 Amazon EKS에서 제공하는 최신 Kubernetes 패치 버전에서 시작됩니다. 이전 패치 버전의 포드가 있는 경우 Amazon EKS에서 이를 재활용하여 최신 버전으로 업데이트할 수 있습니다. 이렇게 하면 포드에 최신 보안 업데이트가 설치되어 있습니다. 따라서 중요한 공통 취약점 및 노출(CVE) 문제가 있는 경우 보안 위험을 줄이기 위해 최신 정보를 유지할 수 있습니다.
- AWS Fargate OS가 업데이트되면 Amazon EKS에서 영향을 받은 리소스와 향후 포드 퇴거 날짜가 포함된 알림을 보내드립니다. 제공된 퇴거 날짜가 불편하다면 알림에 게시된 퇴거 날짜 이전에 영향을 받은 포드를 수동으로 재시작할 수 있는 옵션이 있습니다. 알림을 받기 전에 생성된 포드는 퇴거 대상입니다. 포드를 수동으로 재시작하는 방법에 대한 자세한 지침은 Kubernetes 문서를 참조하세요.
- 포드가 재활용될 때 한 번에 감소하는 포드의 수를 제한하려면 포드 중단 예산(PDB)을 설정할 수 있습니다. PDB를 사용하여 각 애플리케이션의 요구 사항에 따라 최소 가용성을 정의하면서 업데이트를 수행할 수 있습니다. PDB의 최소 가용성은 100% 미만이어야 합니다. 자세한 내용은 Kubernetes 문서에서 애플리케이션의 중단 예산 지정을 참조하십시오.
- Amazon EKS는 애플리케이션에 설정한 PDB를 존중하면서 Eviction API를 사용하여 Pod를 안전하게 배출합니다. 가용성 영역에서는 영향을 최소화하기 위해 Pod를 퇴거시킵니다. 퇴거에 성공하면 새로운 Pod에 최신 패치가 적용되므로 추가 조치가 필요하지 않습니다.
- 포드 퇴거가 실패하면 Amazon EKS는 퇴거에 실패한 포드에 대한 세부 정보가 담긴 이벤트를 계정으로 보냅니다. 예정된 종료 시간 전에 메시지에 따라 조치를 취할 수 있습니다. 특정 시간은 패치의 긴급성에 따라 달라집니다. 시간이 되면 Amazon EKS는 포드를 다시 퇴거시키려고 시도합니다. 하지만 퇴거에 실패하면 이번에는 새로운 이벤트가 전송되지 않습니다. 퇴거에 다시 실패하면 기존 포드가 주기적으로 삭제되어 새 포드에 최신 패치를 적용할 수 있습니다.
- 다음은 포드 퇴거가 실패했을 때 수신되는 샘플 이벤트입니다. 여기에는 클러스터, 포드 이름, 포드 네임스페이스, 파게이트 프로필 및 예정된 종료 시간에 대한 세부 정보가 포함되어 있습니다.
{
    "version": "0",
    "id": "12345678-90ab-cdef-0123-4567890abcde",
    "detail-type": "EKS Fargate Pod Scheduled Termination",
    "source": "aws.eks",
    "account": "111122223333",
    "time": "2021-06-27T12:52:44Z",
    "region": "region-code",
    "resources": [
        "default/my-database-deployment"
    ],
    "detail": {
        "clusterName": "my-cluster",
        "fargateProfileName": "my-fargate-profile",
        "podName": "my-pod-name",
        "podNamespace": "default",
        "evictErrorMessage": "Cannot evict pod as it would violate the pod's disruption budget",
        "scheduledTerminationTime": "2021-06-30T12:52:44.832Z[UTC]"
    }
}- 또한 포드에 여러 개의 PDB가 연결되어 있으면 퇴거 실패 이벤트가 발생할 수 있습니다. 이 이벤트는 다음과 같은 오류 메시지를 반환합니다.
"evictErrorMessage": "This pod has multiple PodDisruptionBudget, which the eviction subresource does not support",
- 이 이벤트를 기반으로 원하는 작업을 생성할 수 있습니다. 예를 들어, 포드 중단 예산(PDB)을 조정하여 포드가 퇴출되는 방식을 제어할 수 있습니다. 보다 구체적으로, 사용 가능한 포드의 목표 비율을 지정하는 PDB로 시작한다고 가정해 보겠습니다. 업그레이드 중에 포드를 강제 종료하기 전에 PDB를 다른 비율의 포드로 조정할 수 있습니다. 이 이벤트를 받으려면 클러스터가 속한 AWS 계정 및 AWS 지역에서 Amazon EventBridge 규칙을 만들어야 합니다. 규칙은 다음 사용자 지정 패턴을 사용해야 합니다. 자세한 내용은 Amazon EventBridge 사용자 가이드의 이벤트에 반응하는 Amazon EventBridge 규칙 만들기를 참조하세요 - Docs
{
  "source": ["aws.eks"],
  "detail-type": ["EKS Fargate Pod Scheduled Termination"]
}
- 이벤트에 적합한 타겟을 설정하여 이벤트를 캡처할 수 있습니다. 사용 가능한 타겟의 전체 목록은 Amazon EventBridge 사용자 가이드에서 Amazon EventBridge 타겟을 참조하세요. 또한 AWS 사용자 알림에서 알림 구성을 만들 수도 있습니다. 알림을 생성할 때 AWS 관리 콘솔을 사용할 때 이벤트 규칙에서 AWS 서비스 이름은 Elastic Kubernetes Service(EKS)를, 이벤트 유형은 EKS Fargate Pod 예약 종료를 선택합니다. 자세한 내용은 AWS 사용자 알림 사용자 가이드에서 AWS 사용자 알림 시작하기를 참조하세요.
- FAQ를 참조하세요: AWS에서 Fargate Pod 퇴거 알림 re:Post:EKS Pod 퇴거와 관련된 자주 묻는 질문을 확인하세요 - Docs
▶ Collect AWS Fargate app and usage metrics - Docs
- 애플리케이션 메트릭 - Docs
- Amazon EKS 및 AWS Fargate에서 실행되는 애플리케이션의 경우 AWS Distro for OpenTelemetry(ADOT)를 사용할 수 있습니다. ADOT를 사용하면 시스템 메트릭을 수집하여 CloudWatch 컨테이너 인사이트 대시보드로 보낼 수 있습니다. Fargate에서 실행되는 애플리케이션의 ADOT를 시작하려면 ADOT 문서에서 AWS Distro for OpenTelemetry를 사용하는 방법을 참조하세요.
- Usage metrics
- CloudWatch 사용 지표를 사용하여 계정의 리소스 사용량을 파악할 수 있습니다. 이 지표를 사용하여 CloudWatch 그래프와 대시보드에서 현재 서비스 사용량을 시각화할 수 있습니다.
- AWS Fargate 사용량 지표는 AWS 서비스 할당량에 해당합니다. 사용량이 서비스 할당량에 가까워지면 알림을 보내는 알람을 구성할 수 있습니다. Fargate 서비스 할당량에 대한 자세한 내용은 Amazon EKS 및 Fargate 서비스 할당량 보기 및 관리를 참조하십시오.
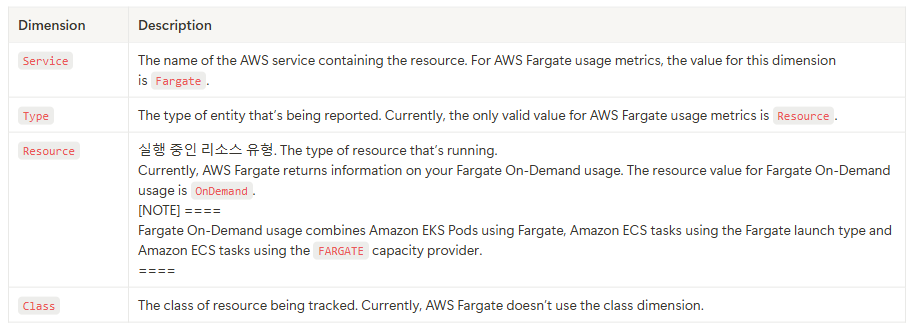
- AWS Fargate는 AWS/Usage 네임스페이스에 다음 메트릭을 게시합니다.

- 다음 치수는 AWS Fargate에서 게시하는 사용 지표를 개선하는 데 사용
- Creating a CloudWatch alarm to monitor Fargate resource usage metrics
- AWS Fargate는 Fargate 온디맨드 리소스 사용량에 대한 AWS 서비스 할당량에 해당하는 CloudWatch 사용량 지표를 제공합니다. 서비스 할당량 콘솔에서 사용자의 사용량을 그래프로 시각화할 수 있습니다. 또한 사용량이 서비스 할당량에 가까워졌을 때 알림을 주는 알람을 구성할 수도 있습니다. 자세한 내용은 AWS Fargate 앱 및 사용량 지표 수집을 참조하십시오.
- 다음 단계를 통해 Fargate 리소스 사용 지표를 기반으로 CloudWatch 알람을 생성합니다.
- 서비스 할당량 콘솔을 https://console.aws.amazon.com/servicequotas/ 에서 엽니다.
- 왼쪽 탐색 창에서 AWS 서비스를 선택합니다.
- AWS 서비스 목록에서 AWS Fargate를 검색하고 선택합니다.
- 서비스 할당량 목록에서 알람을 생성할 Fargate 사용량 할당량을 선택합니다.
- Amazon CloudWatch 알람 섹션에서 생성을 선택합니다.
- 알람 임계값에 대해 알람 값으로 설정하려는 할당량 값의 비율을 선택합니다.
- 알람 이름에 알람 이름을 입력한 다음 생성을 선택합니다.
▶ Logging - Docs
들어가며
- Fargate의 Amazon EKS는 Fluent Bit 기반의 내장 로그 라우터를 제공합니다. 즉, Fluent Bit 컨테이너를 사이드카로 명시적으로 실행하지 않고 Amazon에서 실행합니다. 로그 라우터를 구성하기만 하면 됩니다.
- Amazon EKS on Fargate offers a built-in log router based on Fluent Bit. This means that you don’t explicitly run a Fluent Bit container as a sidecar, but Amazon runs it for you.
- 구성은 다음 기준을 충족해야 하는 전용 ConfigMap을 통해 이루어집니다.
- 이름 : aws-logging
- aws-observability라는 전용 네임스페이스에서 생성됨
- 5300자를 초과할 수 없습니다.
- ConfigMap을 생성하면 Fargate의 Amazon EKS가 자동으로 이를 감지하고 로그 라우터를 구성합니다. Fargate는 AWS에서 관리하는 Fluent Bit의 업스트림 호환 배포판인 Fluent Bit용 AWS 버전을 사용합니다. 자세한 내용은 GitHub의 Fluent Bit용 AWS를 참조하세요 - Docs
- 로그 라우터를 사용하면 AWS의 다양한 서비스를 로그 분석 및 저장에 사용할 수 있습니다. Fargate에서 Amazon CloudWatch, Amazon OpenSearch 서비스로 로그를 직접 스트리밍할 수 있습니다. 또한 Amazon Data Firehose를 통해 Amazon S3, Amazon Kinesis 데이터 스트림 및 파트너 도구와 같은 대상으로 로그를 스트리밍할 수도 있습니다.
- Fargate 포드를 배포할 기존 Kubernetes 네임스페이스를 지정하는 기존 Fargate 프로필입니다.
▶ Log router configuration : In the following steps, replace every example value with your own values.
- aws-observability라는 이름의 전용 Kubernetes 네임스페이스를 만듭니다.
a. 다음 내용을 컴퓨터의 aws-observability-namespace.yaml 파일에 저장합니다. 이름 값은 aws-observability와 레이블 aws-observability: enabled 필요함.
kind: Namespace
apiVersion: v1
metadata:
  name: aws-observability
  labels:
    aws-observability: enabled
b. Create the namespace.
kubectl apply -f aws-observability-namespace.yaml
2. 컨테이너 로그를 목적지로 배송하려면 Fluent Conf 데이터 값이 포함된 ConfigMap을 만듭니다. Fluent Conf는 빠르고 가벼운 로그 프로세서 구성 언어인 Fluent Bit으로, 컨테이너 로그를 원하는 로그 목적지로 라우팅하는 데 사용됩니다. 자세한 내용은 Fluent Bit 문서의 구성 파일을 참조하세요.
☞ 일반적인 Fluent Conf에 포함된 주요 섹션은 서비스, 입력, 필터, 출력입니다. 그러나 Fargate 로그 라우터는 다음만 허용합니다:
- 필터 및 출력 섹션. The Filter and Output sections.
- 파서 섹션. A Parser section.
다른 섹션을 제공하면 거부됩니다.
- Fargate 로그 라우터는 서비스 및 입력 섹션을 관리합니다. 다음과 같은 입력 섹션이 있으며, 이 섹션은 수정할 수 없으며 ConfigMap에 필요하지 않습니다. 그러나 메모리 버퍼 한계와 로그에 적용되는 태그와 같은 인사이트를 얻을 수 있습니다.
[INPUT]
    Name tail
    Buffer_Max_Size 66KB
    DB /var/log/flb_kube.db
    Mem_Buf_Limit 45MB
    Path /var/log/containers/*.log
    Read_From_Head On
    Refresh_Interval 10
    Rotate_Wait 30
    Skip_Long_Lines On
Tag kube.*- ConfigMap을 만들 때 Fargate가 필드를 검증하는 데 사용하는 다음 규칙을 고려해야 합니다:
- [FILTER] [필터], [OUTPUT] [출력], and [PARSER][파서] 는 각 해당 키 아래에 지정되어야 합니다. 예를 들어, [필터]는 filters.conf 아래에 있어야 합니다. filters.conf 아래에 하나 이상의 [필터]가 있을 수 있습니다. [출력] 및 [파서] 섹션도 해당 키 아래에 있어야 합니다. 여러 [출력] 섹션을 지정하여 로그를 동시에 다른 목적지로 라우팅할 수 있습니다.
- Fargate는 각 섹션에 필요한 키를 검증합니다. 각 [필터]와 [출력]에는 이름과 일치하는 키가 필요합니다. 각 [파서]에는 이름과 형식이 필요합니다. 키는 대소문자를 구분하지 않습니다.
- ${ENV_VAR}와 같은 환경 변수는 ConfigMap에서 허용되지 않습니다.
- 각 필터.conf, output.conf, parsers.conf 내에서 지시문 또는 키-값 쌍에 대한 들여쓰기는 지시문보다 더 많이 들여쓰기되어야 합니다.
- Fargate는 다음과 같은 지원되는 필터에 대해 검증합니다: grep, 파서, record_modifier, rewrite_tag, 스로틀, 네스트, 수정, 그리고 kubernetes.
- Fargate는 다음과 같은 지원 출력에 대해 검증합니다: e, firehose, kinesis_firehose, cloudwatch, cloudwatch_logs, kinesis.
- 로깅을 활성화하려면 ConfigMap에서 지원되는 출력 플러그인을 하나 이상 제공해야 합니다. 로깅을 활성화하려면 필터와 파서가 필요하지 않습니다.
- 원하는 구성을 사용하여 Amazon EC2에서 Fluent Bit을 실행하여 검증에서 발생하는 모든 문제를 해결할 수도 있습니다. 다음 예제 중 하나를 사용하여 ConfigMap을 생성합니다.
☞ Amazon EKS Fargate 로깅은 ConfigMap의 동적 구성을 지원하지 않습니다. ConfigMap에 대한 모든 변경 사항은 새 포드에만 적용됩니다. 기존 포드에는 변경 사항이 적용되지 않습니다.
- 원하는 로그 대상에 대한 예제를 사용하여 ConfigMap을 만듭니다.
※ 3가지 예제 참고 : CloudWatch, Amazon OpenSearch Service, Firehose
- You have two output options when using CloudWatch:
- The following example shows you how to use the cloudwatch_logs plugin to send logs to CloudWatch.
- Save the following contents to a file named aws-logging-cloudwatch-configmap.yaml. Replace *region-code* with the AWS Region that your cluster is in. The parameters under [OUTPUT] are required.
kind: ConfigMap
apiVersion: v1
metadata:
  name: aws-logging
  namespace: aws-observability
data:
  flb_log_cw: "false"  # Set to true to ship Fluent Bit process logs to CloudWatch.
  filters.conf: |
    [FILTER]
        Name parser
        Match *
        Key_name log
        Parser crio
    [FILTER]
        Name kubernetes
        Match kube.*
        Merge_Log On
        Keep_Log Off
        Buffer_Size 0
        Kube_Meta_Cache_TTL 300s
  output.conf: |
    [OUTPUT]
        Name cloudwatch_logs
        Match   kube.*
        region region-code
        log_group_name my-logs
        log_stream_prefix from-fluent-bit-
        log_retention_days 60
        auto_create_group true
  parsers.conf: |
    [PARSER]
        Name crio
        Format Regex
        Regex ^(?<time>[^ ]+) (?<stream>stdout|stderr) (?<logtag>P|F) (?<log>.*)$
        Time_Key    time
Time_Format %Y-%m-%dT%H:%M:%S.%L%z- Apply the manifest to your cluster.
kubectl apply -f aws-logging-cloudwatch-configmap.yaml
3. Set up permissions for the Fargate Pod execution role to send logs to your destination.
a. Download the IAM policy for your destination to your computer : CW, OpenSearch, Fiorehose
# Download the CloudWatch IAM policy to your computer. You can also view the policy on GitHub.
curl -O https://raw.githubusercontent.com/aws-samples/amazon-eks-fluent-logging-examples/mainline/examples/fargate/cloudwatchlogs/permissions.json
b. Create an IAM policy from the policy file that you downloaded.
aws iam create-policy --policy-name eks-fargate-logging-policy --policy-document file://permissions.json
c. Attach the IAM policy to the pod execution role specified for your Fargate profile with the following command. Replace 111122223333 with your account ID. Replace AmazonEKSFargatePodExecutionRole with your Pod execution role (for more information, see Step 2: Create a Fargate Pod execution role).
aws iam attach-role-policy \
  --policy-arn arn:aws:iam::111122223333:policy/eks-fargate-logging-policy \
  --role-name AmazonEKSFargatePodExecutionRole
▶ Log router configuration 기타
1. Kubernetes filter support
- The Fluent Bit Kubernetes filter allows you to add Kubernetes metadata to your log files. For more information about the filter, see Kubernetes in the Fluent Bit documentation. You can apply a filter using the API server endpoint.
filters.conf: |
    [FILTER]
        Name             kubernetes
        Match            kube.*
        Merge_Log           On
        Buffer_Size         0
        Kube_Meta_Cache_TTL 300s
- Kube_URL, Kube_CA_File, Kube_Token_Command, and Kube_Token_File are service owned configuration parameters and must not be specified. Amazon EKS Fargate populates these values.
- Kube_Meta_Cache_TTL is the time Fluent Bit waits until it communicates with the API server for the latest metadata. If Kube_Meta_Cache_TTL isn’t specified, Amazon EKS Fargate appends a default value of 30 minutes to lessen the load on the API server.
2. To ship Fluent Bit process logs to your account
- You can optionally ship Fluent Bit process logs to Amazon CloudWatch using the following ConfigMap. Shipping Fluent Bit process logs to CloudWatch requires additional log ingestion and storage costs. Replace region-code with the AWS Region that your cluster is in.
kind: ConfigMap
apiVersion: v1
metadata:
  name: aws-logging
  namespace: aws-observability
  labels:
data:
  # Configuration files: server, input, filters and output
  # ======================================================
  flb_log_cw: "true"  # Ships Fluent Bit process logs to CloudWatch.

  output.conf: |
    [OUTPUT]
        Name cloudwatch
        Match kube.*
        region region-code
        log_group_name fluent-bit-cloudwatch
        log_stream_prefix from-fluent-bit-
        auto_create_group true
The logs are in CloudWatch in the same AWS Region as the cluster. The log group name is my-cluster-fluent-bit-logs and the Fluent Bit logstream name is fluent-bit-podname-pod-namespace .
To stop shipping Fluent Bit process logs
- Shipping Fluent Bit process logs to CloudWatch requires additional log ingestion and storage costs. To exclude process logs in an existing ConfigMap setup, do the following steps.
- Locate the CloudWatch log group automatically created for your Amazon EKS cluster’s Fluent Bit process logs after enabling Fargate logging. It follows the format *my-cluster*fluent-bit-logs.
- Delete the existing CloudWatch log streams created for each Pod’s process logs in the CloudWatch log group.
- Edit the ConfigMap and set flb_log_cw: "false".
- Restart any existing Pods in the cluster.
▶ Test application - Docs
1. Deploy a sample Pod.
a. Save the following contents to a file named sample-app.yaml on your computer.
cat <<EOF | kubectl apply -f -
apiVersion: apps/v1
kind: Deployment
metadata:
  name: sample-app
  namespace: study-aews
spec:
  replicas: 2
  selector:
    matchLabels:
      app: nginx
  template:
    metadata:
      labels:
        app: nginx
    spec:
      containers:
        - name: nginx
          image: nginx:latest
          ports:
            - name: http
              containerPort: 80
EOF
b. Apply the manifest to the cluster.
kubectl apply -f sample-app.yaml
c. View the NGINX logs using the destination(s) that you configured in the ConfigMap.
2. Size considerations
- 로그 라우터에 최대 50MB의 메모리를 계획하는 것이 좋습니다.
- 애플리케이션이 매우 높은 처리량으로 로그를 생성할 것으로 예상되는 경우 최대 100MB까지 계획하는 것이 좋습니다.
3. Troubleshooting
- 잘못된 ConfigMap과 같은 이유로 로깅 기능이 활성화되었는지 비활성화되었는지, 그리고 왜 비활성화되었는지 확인하려면 Kubectl을 사용하는 Pod 이벤트에서 Pod 포드 이름을 확인하세요. 출력에는 다음 예제 출력과 같이 로깅 활성화 여부를 명확히 하는 Pod 이벤트가 포함될 수 있습니다.
[...]
Annotations:          CapacityProvisioned: 0.25vCPU 0.5GB
                      Logging: LoggingDisabled: LOGGING_CONFIGMAP_NOT_FOUND
                      kubernetes.io/psp: eks.privileged
[...]
Events:
  Type     Reason           Age        From                                                           Message
  ----     ------           ----       ----                                                           -------
Warning LoggingDisabled <unknown> fargate-scheduler Disabled logging because aws-logging configmap was not found. configmap "aws-logging" not found- 포드 이벤트는 설정에 따라 일시적이며 일정 기간이 주어집니다. kubectl 설명 포드 포드 이름을 사용하여 포드의 주석을 볼 수도 있습니다. 포드 주석에는 로깅 기능의 활성화 또는 비활성화 여부와 그 이유에 대한 정보가 있습니다.
▶ 제약사항 및 고려사항 최종 정리*
- 데몬셋은 Fargate에서 지원되지 않습니다. 애플리케이션에 데몬이 필요한 경우 해당 데몬을 포드에서 사이드카 컨테이너로 실행하도록 재구성합니다.
- Fargate에서는 특권 컨테이너(Privileged containers)가 지원되지 않습니다.
- Fargate에서 실행되는 포드는 포드 매니페스트에서 HostPort 또는 HostNetwork를 지정할 수 없습니다.
- 현재 Fargate에서는 GPU를 사용할 수 없습니다.
- Can run workloads that require Arm processors 미지원.
- Can SSH into node 미지원
- Fargate에서 실행되는 포드는 AWS 서비스에 대한 NAT 게이트웨이 액세스 권한이 있는 private 서브넷에서만 지원됨
- 포드에는 Amazon EC2 인스턴스 메타데이터 서비스(IMDS)를 사용할 수 없습니다
- 대체 CNI 플러그인을 사용할 수 없습니다.
- EFS 동적 영구 볼륨 프로비저닝을 사용할 수 없음.
- Fargate Spot을 지원하지 않음
- EBS 볼륨을 Fargate 포드에 마운트할 수 없음
- Fargate does not currently support Kubernetes topologySpreadConstraints.
- Can run containers on Amazon EC2 dedicated hosts 미지원
- Can run AWS Bottlerocket 미지원
- Fargate Pods run with guaranteed priority, so the requested CPU and memory must be equal to the limit for all of the containers.
- Fargate는 필요한 Kubernetes 구성 요소(kubelet, kube-proxy, and containerd에 대해 각 Pod의 메모리 예약에 256MB를 추가합니다.
- 프로비저닝되면 Fargate에서 실행되는 각 Pod는 기본적으로 20 GiB의 임시 저장소를 받게 됩니다. 임시 저장소의 총 양을 최대 175 GiB까지 늘릴 수 있습니다.
- Fargate의 Amazon EKS는 Fluent Bit 기반의 내장 로그 라우터를 제공합니다. 즉, Fluent Bit 컨테이너를 사이드카로 명시적으로 실행하지 않고 Amazon에서 실행합니다
[ 실습 - 예제 ]
▶ Amazon EKS Blueprints for Terraform 소개 : 현재는 더이상 업데이트 되지 않는 것으로 보임 - Link / FAQ - Link
◈ EKS Blueprints for Terraform has been designed to be consumed in the following manners:
- 참고 Reference: Users can refer to the patterns and snippets provided to help guide them to their desired solution. Users will typically view how the pattern or snippet is configured to achieve the desired end result and then replicate that in their environment.
- 복붙 Copy & Paste: Users can copy and paste the patterns and snippets into their own environment, using EKS Blueprints as the starting point for their implementation. Users can then adapt the initial pattern to customize it to their specific needs.
◈ 고려사항
- EKS Blueprints for Terraform are not intended to be consumed as-is directly from this project. → 그대로 사용은 의도된 것이 아님
- In "Terraform speak" - the patterns and snippets provided in this repository are not designed to be consumed as a Terraform module. → 패턴과 스니펫은 Terraform 모듈로 사용하도록 설계되지 않음
- Therefore, the patterns provided only contain variables when certain information is required to deploy the pattern (i.e. - a Route53 hosted zone ID, or ACM certificate ARN) and generally use local variables. If you wish to deploy the patterns into a different region or with other changes, it is recommended that you make those modifications locally before applying the pattern. → 일반적으로 Local 블록을 통해 변경하고, 특정 정보가 필요한 경우(R53 호스트영역 ID 등)만 variables 블록을 사용
- EKS Blueprints for Terraform will not expose variables and outputs in the same manner that Terraform modules follow in order to avoid confusion around the consumption model. → 복잡성(혼란?)을 줄이기 위해 variables 과 outputs 을 최대한 노출하지 않음
- However, we do have a number of Terraform modules that were created to support EKS Blueprints in addition to the community hosted modules. Please see the respective projects for more details on the modules constructed to support EKS Blueprints for Terraform; those projects are listed below. → EKS Blueprints 지원을 위해 제작한 모듈은 아래와 같음
- terraform-aws-eks-blueprint-addon (단수)
- Terraform module which can provision an addon using the Terraform helm_release resource in addition to an IAM role for service account (IRSA).
- 서비스 계정(IRSA)에 대한 IAM 역할 외에도 Terraform 리소스를 사용하여 애드온을 프로비저닝할 수 있는 Terraform 모듈입니다.
- terraform-aws-eks-blueprint-addons (복수)
- Terraform module which can provision multiple addons; both EKS addons using the aws_eks_addon resource as well as Helm chart based addons using the terraform-aws-eks-blueprint-addon module.
- 여러 애드온을 프로비저닝할 수 있는 Terraform 모듈입니다 - ‘aws_eks_addon 기반 애드온’ + ‘terraform-aws-eks-blueprint-addon 모듈 사용 헬름 차트 기반 애드온’
- terraform-aws-eks-blueprints-teams
- Terraform module that creates Kubernetes multi-tenancy resources and configurations, allowing both administrators and application developers to access only the resources which they are responsible for.
- 관리자와 애플리케이션 개발자 모두 자신이 담당하는 리소스에만 액세스할 수 있도록 Kubernetes 멀티테넌시 리소스 및 구성을 생성하는 Terraform 모듈.
◈ 기타 프로젝트
- GitOps
- terraform-aws-eks-ack-addons - Terraform module to deploy ACK controllers onto EKS clusters
- crossplane-on-eks - Crossplane Blueprints is an open source repo to bootstrap Amazon EKS clusters and provision AWS resources using a library of Crossplane Compositions (XRs) with Composite Resource Definitions (XRDs).
- Data on EKS
- data-on-eks - A collection of blueprints intended for data workloads on Amazon EKS.
- terraform-aws-eks-data-addons - Terraform module to deploy multiple addons that are specific to data workloads on EKS clusters.
- Observability Accelerator
- terraform-aws-observability-accelerator - A set of opinionated modules to help you set up observability for your AWS environments with AWS-managed observability services such as Amazon Managed Service for Prometheus, Amazon Managed Grafana, AWS Distro for OpenTelemetry (ADOT) and Amazon CloudWatch
- Karpenter Blueprints
- karpenter-blueprints - includes a list of common workload scenarios, some of them go in depth with the explanation of why configuring Karpenter and Kubernetes objects in such a way is important.
◈ 주의사항 Terraform Caveats
- EKS Blueprints for Terraform does not intend to teach users the recommended practices for Terraform nor does it offer guidance on how users should structure their Terraform projects. → 권장 사례나 테라폼 구성 지침을 제공하지 않습니다.
- The patterns provided are intended to show users how they can achieve a defined architecture or configuration in a way that they can quickly and easily get up and running to start interacting with that pattern. Therefore, there are a few caveats users should be aware of when using EKS Blueprints for Terraform: → 최대한 빠르고 쉽게 목표 패턴 실행에 목적
- We recognize that most users will already have an existing VPC in a separate Terraform workspace. However, the patterns provided come complete with a VPC to ensure a stable, deployable example that has been tested and validated.
- → 사용자가 기존 VPC가 있지만, 제공되는 패턴에서 안정적인 배포 보장을 위해 신규 VPC를 배포
- Hashicorp does not recommend providing computed values in provider blocks , which means that the cluster configuration should be defined in a workspace separate from the resources deployed onto the cluster (i.e. - addons). → 분리 권고 지만…
- However, to simplify the pattern experience, we have defined everything in one workspace and provided instructions to provision the patterns using a targeted apply approach. Users are encouraged to investigate a Terraform project structure that suites their needs; EKS Blueprints for Terraform does not have an opinion in this matter and will defer to Hashicorp's guidance. → 단순화 하여 모든 것을 하나의 작업 공간에서 정의하고 배포함.
- Patterns are not intended to be consumed in-place in the same manner that one would consume a module. Therefore, we do not provide variables and outputs to expose various levels of configuration for the examples. Users can modify the pattern locally after cloning to suite their requirements. → Local 블록 수정
Please see the FAQ section on authenticating Kubernetes based providers (kubernetes, helm, kubectl) to Amazon EKS clusters regarding the use of static tokens versus dynamic tokens using the awscli
[도전과제] EKS Blueprints for Terraform 에 다양한 패턴 실습과 내용 정리 해보기 - Link
▶ 테라폼으로 실습 환경 배포 : EKS, fargate profile
Step1. 코드 가져오기
#
git clone https://github.com/aws-ia/terraform-aws-eks-blueprints
tree terraform-aws-eks-blueprints/patterns
cd terraform-aws-eks-blueprints/patterns/fargate-serverless
☞ main.tf 수정 : 리전 등 일부 실습 편리를 위해 수정, Sample App 배포 부분 삭제
1) local 변수 : region = "ap-northeast-2" , vpc_cidr = "10.10.0.0/16" ,
2) fargate_profiles = { study_wildcard = { selectors = [ { namespace = "study-*" } ] }
provider "aws" {
  region = local.region
}

provider "kubernetes" {
  host                   = module.eks.cluster_endpoint
  cluster_ca_certificate = base64decode(module.eks.cluster_certificate_authority_data)

  exec {
    api_version = "client.authentication.k8s.io/v1beta1"
    command     = "aws"
    # This requires the awscli to be installed locally where Terraform is executed
    args = ["eks", "get-token", "--cluster-name", module.eks.cluster_name]
  }
}

provider "helm" {
  kubernetes {
    host                   = module.eks.cluster_endpoint
    cluster_ca_certificate = base64decode(module.eks.cluster_certificate_authority_data)

    exec {
      api_version = "client.authentication.k8s.io/v1beta1"
      command     = "aws"
      # This requires the awscli to be installed locally where Terraform is executed
      args = ["eks", "get-token", "--cluster-name", module.eks.cluster_name]
    }
  }
}

data "aws_availability_zones" "available" {
  # Do not include local zones
  filter {
    name   = "opt-in-status"
    values = ["opt-in-not-required"]
  }
}

locals {
  name     = basename(path.cwd)
  region   = "ap-northeast-2"

  vpc_cidr = "10.10.0.0/16"
  azs      = slice(data.aws_availability_zones.available.names, 0, 3)

  tags = {
    Blueprint  = local.name
    GithubRepo = "github.com/aws-ia/terraform-aws-eks-blueprints"
  }
}

################################################################################
# Cluster
################################################################################

module "eks" {
  source  = "terraform-aws-modules/eks/aws"
  version = "~> 20.11"

  cluster_name                   = local.name
  cluster_version                = "1.30"
  cluster_endpoint_public_access = true

  # Give the Terraform identity admin access to the cluster
  # which will allow resources to be deployed into the cluster
  enable_cluster_creator_admin_permissions = true

  vpc_id     = module.vpc.vpc_id
  subnet_ids = module.vpc.private_subnets

  # Fargate profiles use the cluster primary security group so these are not utilized
  create_cluster_security_group = false
  create_node_security_group    = false

  fargate_profiles = {
    study_wildcard = {
      selectors = [
        { namespace = "study-*" }
      ]
    }
    kube_system = {
      name = "kube-system"
      selectors = [
        { namespace = "kube-system" }
      ]
    }
  }

  fargate_profile_defaults = {
    iam_role_additional_policies = {
      additional = module.eks_blueprints_addons.fargate_fluentbit.iam_policy[0].arn
    }
  }

  tags = local.tags
}

################################################################################
# EKS Blueprints Addons
################################################################################

module "eks_blueprints_addons" {
  source  = "aws-ia/eks-blueprints-addons/aws"
  version = "~> 1.16"

  cluster_name      = module.eks.cluster_name
  cluster_endpoint  = module.eks.cluster_endpoint
  cluster_version   = module.eks.cluster_version
  oidc_provider_arn = module.eks.oidc_provider_arn

  # We want to wait for the Fargate profiles to be deployed first
  create_delay_dependencies = [for prof in module.eks.fargate_profiles : prof.fargate_profile_arn]

  # EKS Add-ons
  eks_addons = {
    coredns = {
      configuration_values = jsonencode({
        computeType = "Fargate"
        # Ensure that the we fully utilize the minimum amount of resources that are supplied by
        # Fargate https://docs.aws.amazon.com/eks/latest/userguide/fargate-pod-configuration.html
        # Fargate adds 256 MB to each pod's memory reservation for the required Kubernetes
        # components (kubelet, kube-proxy, and containerd). Fargate rounds up to the following
        # compute configuration that most closely matches the sum of vCPU and memory requests in
        # order to ensure pods always have the resources that they need to run.
        resources = {
          limits = {
            cpu = "0.25"
            # We are targeting the smallest Task size of 512Mb, so we subtract 256Mb from the
            # request/limit to ensure we can fit within that task
            memory = "256M"
          }
          requests = {
            cpu = "0.25"
            # We are targeting the smallest Task size of 512Mb, so we subtract 256Mb from the
            # request/limit to ensure we can fit within that task
            memory = "256M"
          }
        }
      })
    }
    vpc-cni    = {}
    kube-proxy = {}
  }

  # Enable Fargate logging this may generate a large ammount of logs, disable it if not explicitly required
  enable_fargate_fluentbit = true
  fargate_fluentbit = {
    flb_log_cw = true
  }

  enable_aws_load_balancer_controller = true
  aws_load_balancer_controller = {
    set = [
      {
        name  = "vpcId"
        value = module.vpc.vpc_id
      },
      {
        name  = "podDisruptionBudget.maxUnavailable"
        value = 1
      },
    ]
  }

  tags = local.tags
}

################################################################################
# Supporting Resources
################################################################################

module "vpc" {
  source  = "terraform-aws-modules/vpc/aws"
  version = "~> 5.0"

  name = local.name
  cidr = local.vpc_cidr

  azs             = local.azs
  private_subnets = [for k, v in local.azs : cidrsubnet(local.vpc_cidr, 4, k)]
  public_subnets  = [for k, v in local.azs : cidrsubnet(local.vpc_cidr, 8, k + 48)]

  enable_nat_gateway = true
  single_nat_gateway = true

  public_subnet_tags = {
    "kubernetes.io/role/elb" = 1
  }

  private_subnet_tags = {
    "kubernetes.io/role/internal-elb" = 1
  }

  tags = local.tags
}
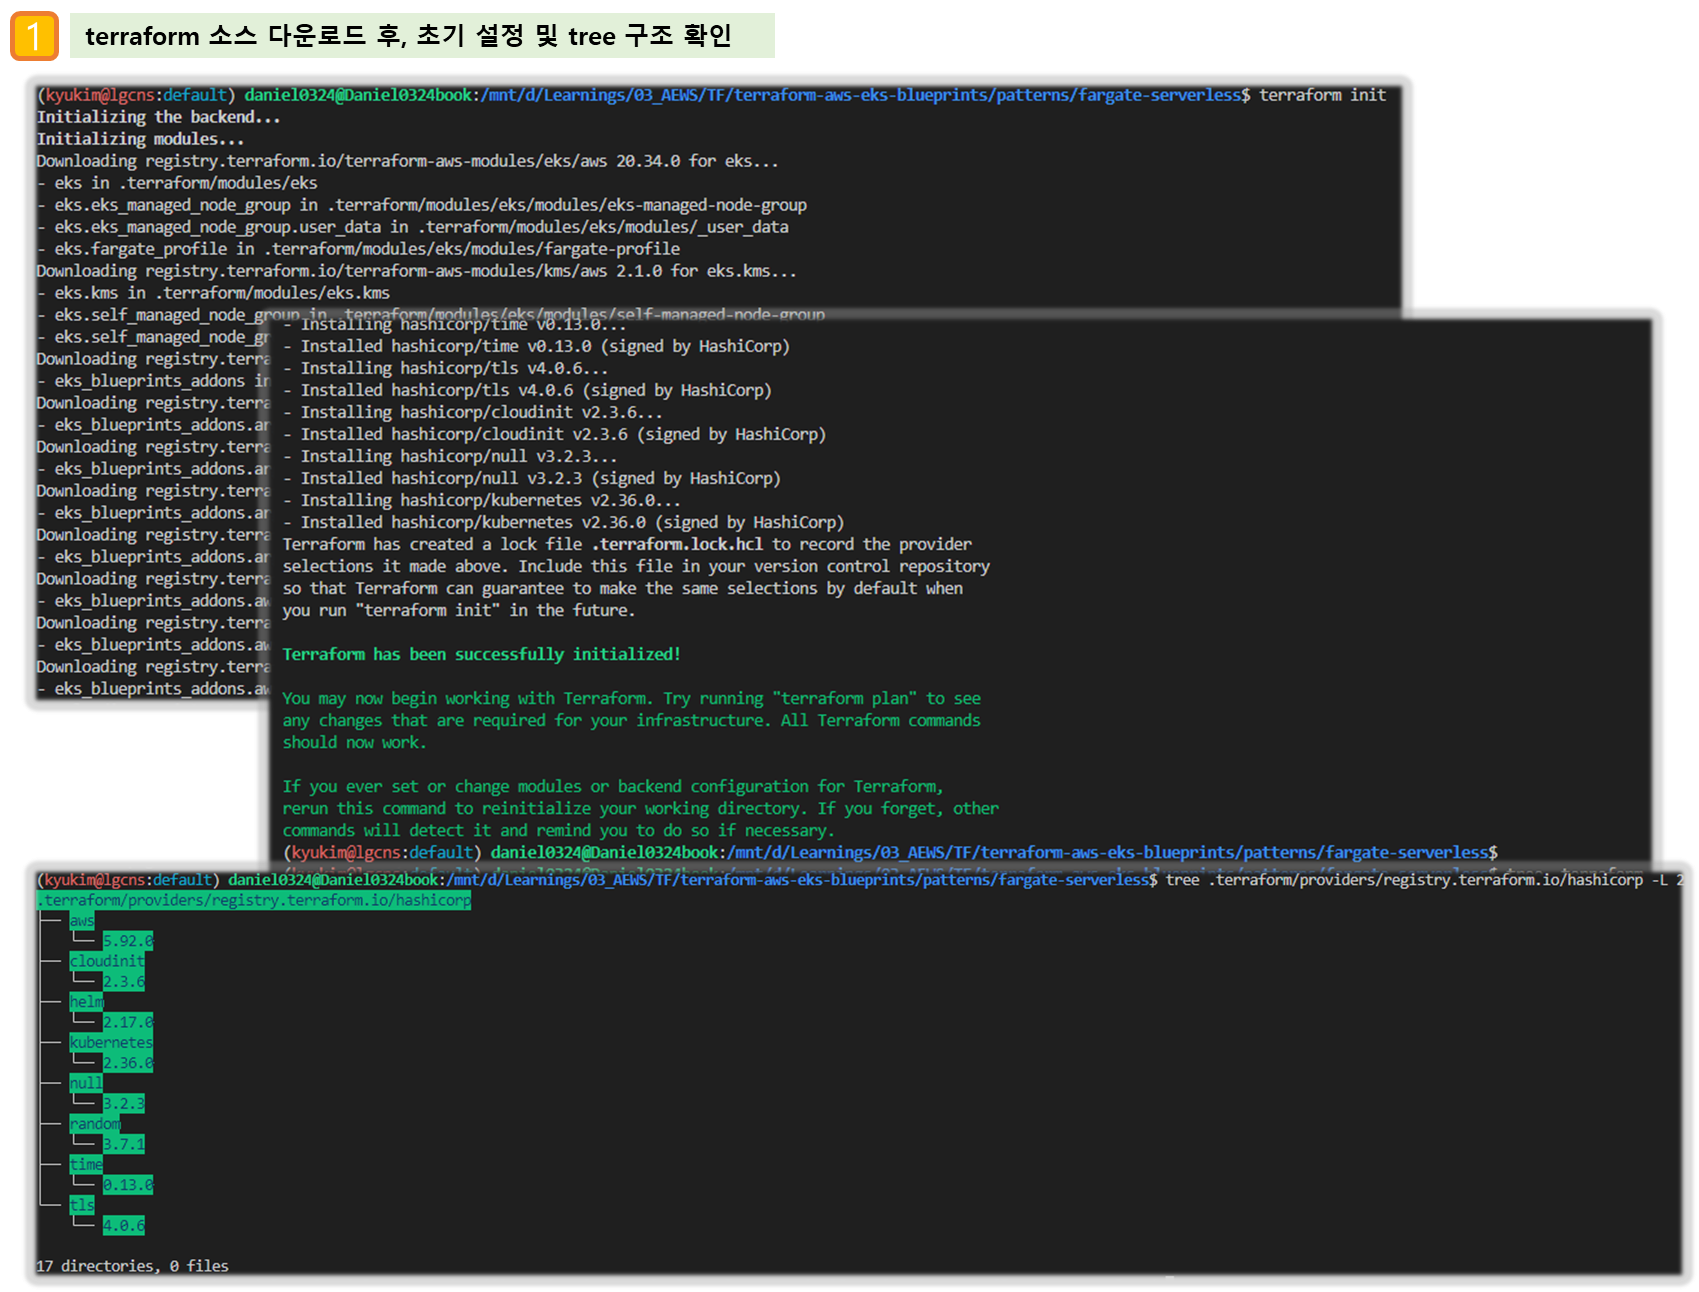
Step2. 테라폼 초기화
# init 초기화
terraform init
tree .terraform
cat .terraform/modules/modules.json | jq
tree .terraform/providers/registry.terraform.io/hashicorp -L 2

# plan
terraform plan
Step3. [옵션] VPC 배포 : 3분 소요 ⇒ skip 해도 됨
# VPC 정보 확인
aws ec2 describe-vpcs --filter 'Name=isDefault,Values=false' --output yaml

# vpc 배포 '9:6 ~ ' : 3분 소요
terraform apply -target="module.vpc" -auto-approve

# 배포 확인
terraform state list
data.aws_availability_zones.available
module.vpc.aws_default_network_acl.this[0]
module.vpc.aws_default_route_table.default[0]
module.vpc.aws_default_security_group.this[0]
module.vpc.aws_eip.nat[0]
module.vpc.aws_internet_gateway.this[0]
module.vpc.aws_nat_gateway.this[0]
module.vpc.aws_route.private_nat_gateway[0]
module.vpc.aws_route.public_internet_gateway[0]
module.vpc.aws_route_table.private[0]
module.vpc.aws_route_table.public[0]
module.vpc.aws_route_table_association.private[0]
module.vpc.aws_route_table_association.private[1]
module.vpc.aws_route_table_association.private[2]
module.vpc.aws_route_table_association.public[0]
module.vpc.aws_route_table_association.public[1]
module.vpc.aws_route_table_association.public[2]
module.vpc.aws_subnet.private[0]
module.vpc.aws_subnet.private[1]
module.vpc.aws_subnet.private[2]
module.vpc.aws_subnet.public[0]
module.vpc.aws_subnet.public[1]
module.vpc.aws_subnet.public[2]
module.vpc.aws_vpc.this[0]

terraform show
...

# VPC 정보 확인
aws ec2 describe-vpcs --filter 'Name=isDefault,Values=false' --output yaml

# 상세 정보 확인
echo "data.aws_availability_zones.available" | terraform console
{
  "all_availability_zones" = tobool(null)
  "exclude_names" = toset(null) /* of string */
  "exclude_zone_ids" = toset(null) /* of string */
  "filter" = toset(null) /* of object */
  "group_names" = toset([
    "ap-northeast-2",
  ])
  "id" = "ap-northeast-2"
  "names" = tolist([
    "ap-northeast-2a",
    "ap-northeast-2b",
    "ap-northeast-2c",
    "ap-northeast-2d",
  ])
  "state" = tostring(null)
  "timeouts" = null /* object */
  "zone_ids" = tolist([
    "apne2-az1",
    "apne2-az2",
    "apne2-az3",
    "apne2-az4",
  ])
}

terraform state show 'module.vpc.aws_vpc.this[0]'
VPCID=<각자 자신의 VPC ID>
aws ec2 describe-subnets --filters "Name=vpc-id,Values=$VPCID" | jq
aws ec2 describe-subnets --filters "Name=vpc-id,Values=$VPCID" --output text

# public 서브넷과 private 서브넷 CIDR 확인
## private_subnets = [for k, v in local.azs : cidrsubnet(local.vpc_cidr, 4, k)]
## public_subnets  = [for k, v in local.azs : cidrsubnet(local.vpc_cidr, 8, k + 48)]
terraform state show 'module.vpc.aws_subnet.public[0]'
terraform state show 'module.vpc.aws_subnet.private[0]'
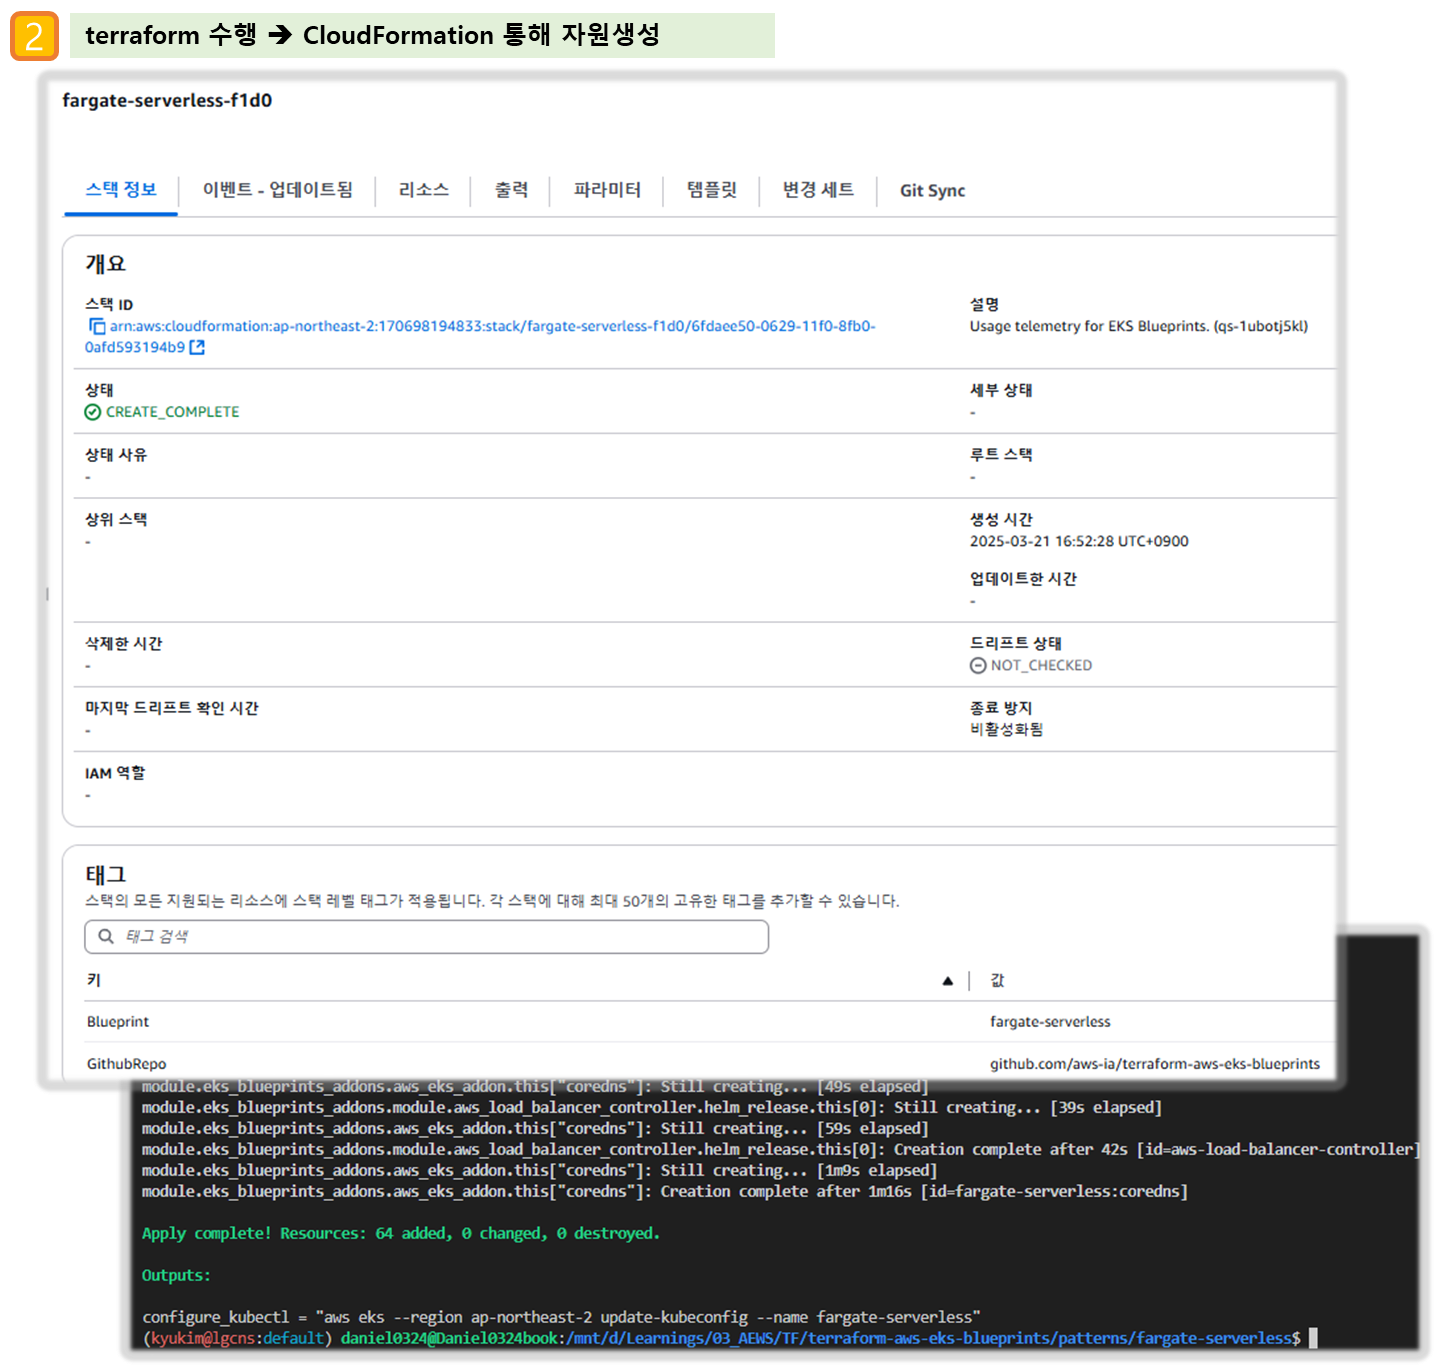
Step4. EKS 배포 : 13분 소요
# 배포 : EKS, Add-ons, fargate profile - 13분 소요
## terraform apply -target="module.eks" -auto-approve
## terraform apply -target="module.eks_blueprints_addons" -auto-approve
terraform apply -auto-approve
# 배포 완료 후 확인
terraform state list
module.eks.data.aws_caller_identity.current
...
terraform output
...
# EKS 자격증명
$(terraform output -raw configure_kubectl) # aws eks --region ap-northeast-2 update-kubeconfig --name fargate-serverless
cat ~/.kube/config
# kubectl context 변경
kubectl ctx
kubectl config rename-context "arn:aws:eks:ap-northeast-2:$(aws sts get-caller-identity --query 'Account' --output text):cluster/fargate-serverless" "fargate-lab"
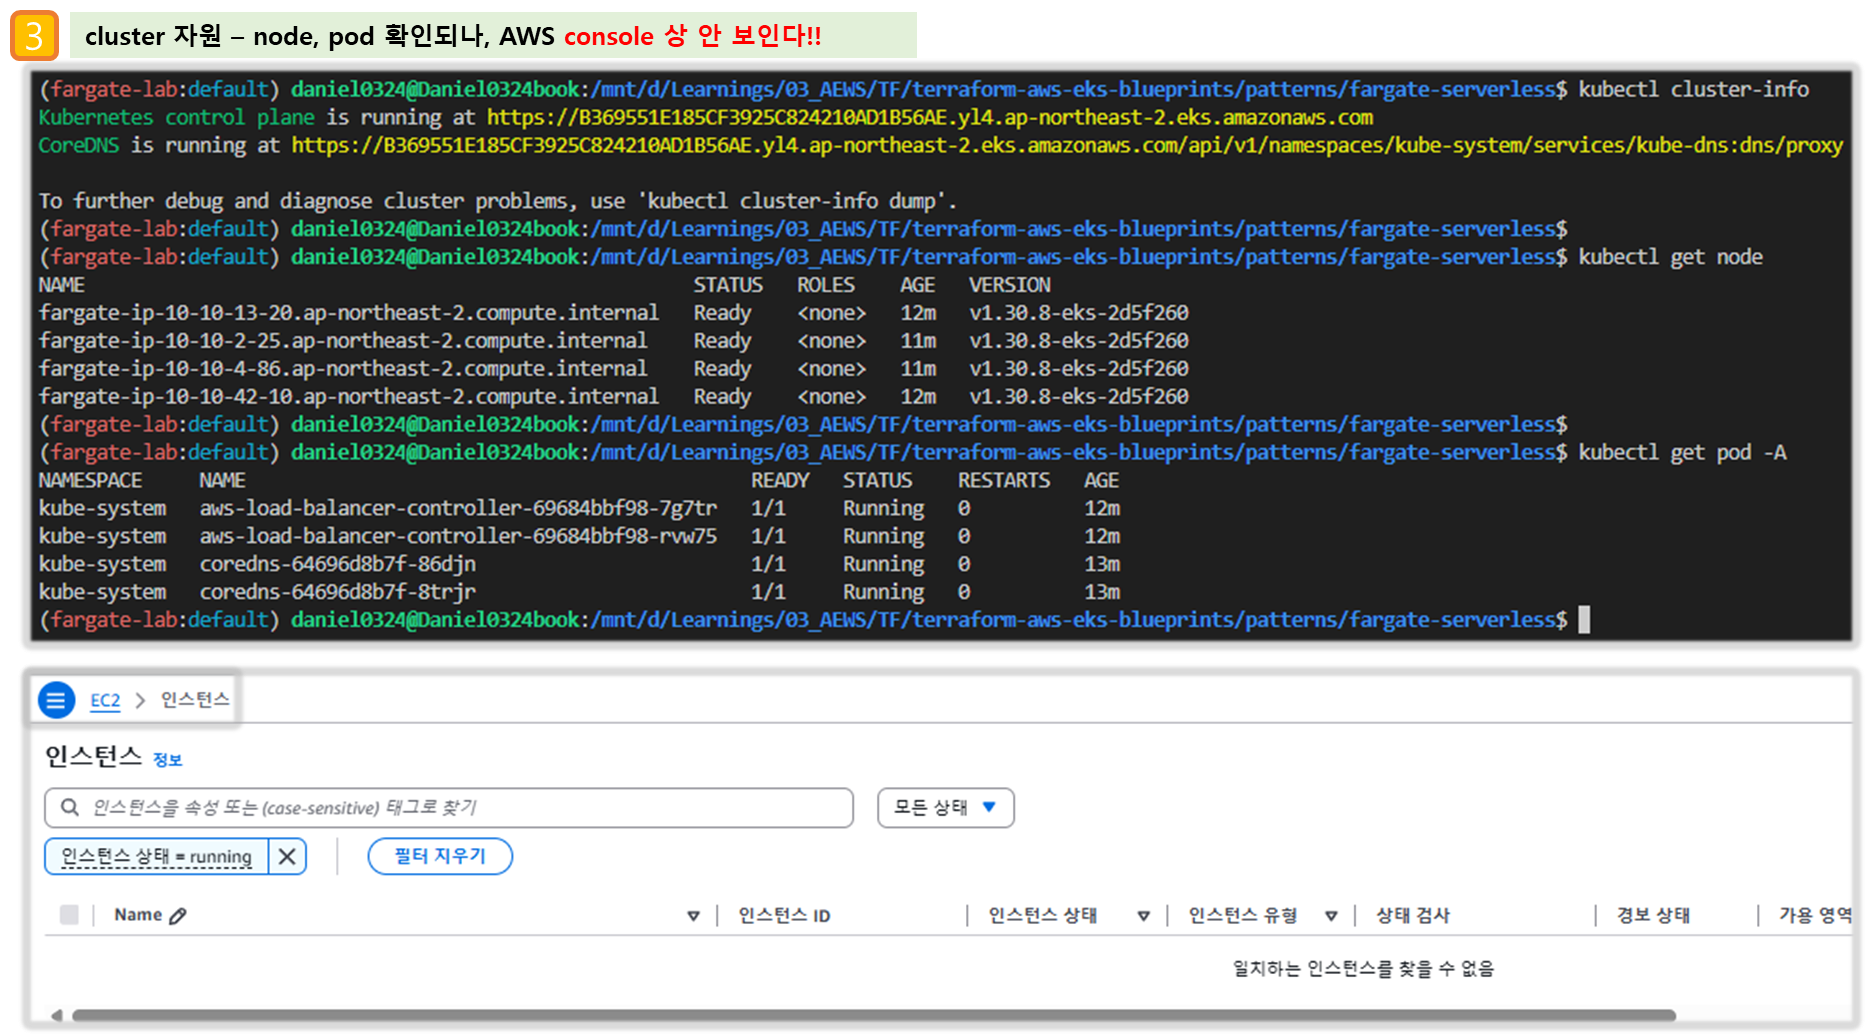
# k8s 노드, 파드 정보 확인
kubectl ns default
kubectl cluster-info
kubectl get node
kubectl get pod -A
# 상세 정보 확인
terraform show
...
terraform state list
terraform state show 'module.eks.aws_eks_cluster.this[0]'
terraform state show 'module.eks.data.tls_certificate.this[0]'
terraform state show 'module.eks.aws_cloudwatch_log_group.this[0]'
terraform state show 'module.eks.aws_eks_access_entry.this["cluster_creator"]'
terraform state show 'module.eks.aws_iam_openid_connect_provider.oidc_provider[0]'
terraform state show 'module.eks.data.aws_partition.current'
terraform state show 'module.eks.aws_iam_policy.cluster_encryption[0]'
terraform state show 'module.eks.aws_iam_role.this[0]'
terraform state show 'module.eks.time_sleep.this[0]'
terraform state show 'module.eks.module.kms.aws_kms_key.this[0]'
terraform state show 'module.eks.module.fargate_profile["kube_system"].aws_eks_fargate_profile.this[0]'
...
Step5. 기본 정보 확인
1) 생성 리소스 정보확인
# k8s api service 확인 : ENDPOINTS 의 IP는 EKS Owned-ENI 2개
kubectl get svc,ep
NAME TYPE CLUSTER-IP EXTERNAL-IP PORT(S) AGE
service/kubernetes ClusterIP 172.20.0.1 <none> 443/TCP 42m
NAME ENDPOINTS AGE
endpoints/kubernetes 10.10.21.253:443,10.10.32.164:443 42m
# node 확인 : 노드(Micro VM) 4대
kubectl get csr
kubectl get node -owide
NAME STATUS ROLES AGE VERSION INTERNAL-IP EXTERNAL-IP OS-IMAGE KERNEL-VERSION CONTAINER-RUNTIME
fargate-ip-10-10-15-159.ap-northeast-2.compute.internal Ready <none> 7m50s v1.30.8-eks-2d5f260 10.10.15.159 <none> Amazon Linux 2 5.10.234-225.895.amzn2.x86_64 containerd://1.7.25
fargate-ip-10-10-30-57.ap-northeast-2.compute.internal Ready <none> 7m46s v1.30.8-eks-2d5f260 10.10.30.57 <none> Amazon Linux 2 5.10.234-225.895.amzn2.x86_64 containerd://1.7.25
fargate-ip-10-10-41-163.ap-northeast-2.compute.internal Ready <none> 7m46s v1.30.8-eks-2d5f260 10.10.41.163 <none> Amazon Linux 2 5.10.234-225.895.amzn2.x86_64 containerd://1.7.25
fargate-ip-10-10-43-78.ap-northeast-2.compute.internal Ready <none> 7m41s v1.30.8-eks-2d5f260 10.10.43.78 <none> Amazon Linux 2 5.10.234-225.895.amzn2.x86_64 containerd://1.7.25
kubectl describe node | grep eks.amazonaws.com/compute-type
Labels: eks.amazonaws.com/compute-type=fargate
Taints: eks.amazonaws.com/compute-type=fargate:NoSchedule
...
# 파드 확인 : 파드의 IP와 노드의 IP가 같다!
kubectl get pdb -n kube-system
kubectl get pod -A -owide
NAMESPACE NAME READY STATUS RESTARTS AGE IP NODE NOMINATED NODE READINESS GATES
kube-system aws-load-balancer-controller-8577658566-5qkr6 1/1 Running 0 30m 10.10.15.159 fargate-ip-10-10-15-159.ap-northeast-2.compute.internal <none> <none>
kube-system aws-load-balancer-controller-8577658566-hl72j 1/1 Running 0 30m 10.10.41.163 fargate-ip-10-10-41-163.ap-northeast-2.compute.internal <none> <none>
kube-system coredns-64696d8b7f-2cvlv 1/1 Running 0 30m 10.10.43.78 fargate-ip-10-10-43-78.ap-northeast-2.compute.internal <none> <none>
kube-system coredns-64696d8b7f-s45g7 1/1 Running 0 30m 10.10.30.57 fargate-ip-10-10-30-57.ap-northeast-2.compute.internal <none> <none>
# aws-load-balancer-webhook-service , eks-extension-metrics-api?
kubectl get svc,ep -n kube-system
NAME TYPE CLUSTER-IP EXTERNAL-IP PORT(S) AGE
service/aws-load-balancer-webhook-service ClusterIP 172.20.72.191 <none> 443/TCP 34m
service/eks-extension-metrics-api ClusterIP 172.20.173.28 <none> 443/TCP 42m
# eks-extension-metrics-api?
kubectl get apiservices.apiregistration.k8s.io | grep eks
v1.metrics.eks.amazonaws.com kube-system/eks-extension-metrics-api True 53m
kubectl get --raw "/apis/metrics.eks.amazonaws.com" | jq
kubectl get --raw "/apis/metrics.eks.amazonaws.com/v1" | jq
# configmap 확인
kubectl get cm -n kube-system
...
# aws-auth 보다 우선해서 IAM access entry 가 있음을 참고.
# 기본 관리노드 보다 system:node-proxier 그룹이 추가되어 있음.
# fargate profile 이 2개인데, 그 profile 갯수만큼 있음.
kubectl get cm -n kube-system aws-auth -o yaml
...
mapRoles: |
- groups:
- system:bootstrappers
- system:nodes
- system:node-proxier
rolearn: arn:aws:iam::911283464785:role/kube-system-2025031115064156060000000f
username: system:node:{{SessionName}}
...
#
kubectl rbac-tool lookup system:node-proxier
SUBJECT | SUBJECT TYPE | SCOPE | NAMESPACE | ROLE | BINDING
----------------------+--------------+-------------+-----------+---------------------+-------------------------
system:node-proxier | Group | ClusterRole | | system:node-proxier | eks:kube-proxy-fargate
kubectl rolesum -k Group system:node-proxier
...
Policies:
• [CRB] */eks:kube-proxy-fargate ⟶ [CR] */system:node-proxier
Resource Name Exclude Verbs G L W C U P D DC
endpoints [*] [-] [-] ✖ ✔ ✔ ✖ ✖ ✖ ✖ ✖
endpointslices.discovery.k8s.io [*] [-] [-] ✖ ✔ ✔ ✖ ✖ ✖ ✖ ✖
events.[,events.k8s.io] [*] [-] [-] ✖ ✖ ✖ ✔ ✔ ✔ ✖ ✖
nodes [*] [-] [-] ✔ ✔ ✔ ✖ ✖ ✖ ✖ ✖
services [*] [-] [-] ✖ ✔ ✔ ✖ ✖ ✖ ✖ ✖
#
kubectl get cm -n kube-system amazon-vpc-cni -o yaml
apiVersion: v1
data:
branch-eni-cooldown: "60"
minimum-ip-target: "3"
warm-ip-target: "1"
warm-prefix-target: "0"
...
# coredns 설정 내용
kubectl get cm -n kube-system coredns -o yaml
# 인증서 작성되어 있음 : client-ca-file , requestheader-client-ca-file
kubectl get cm -n kube-system extension-apiserver-authentication -o yaml
#
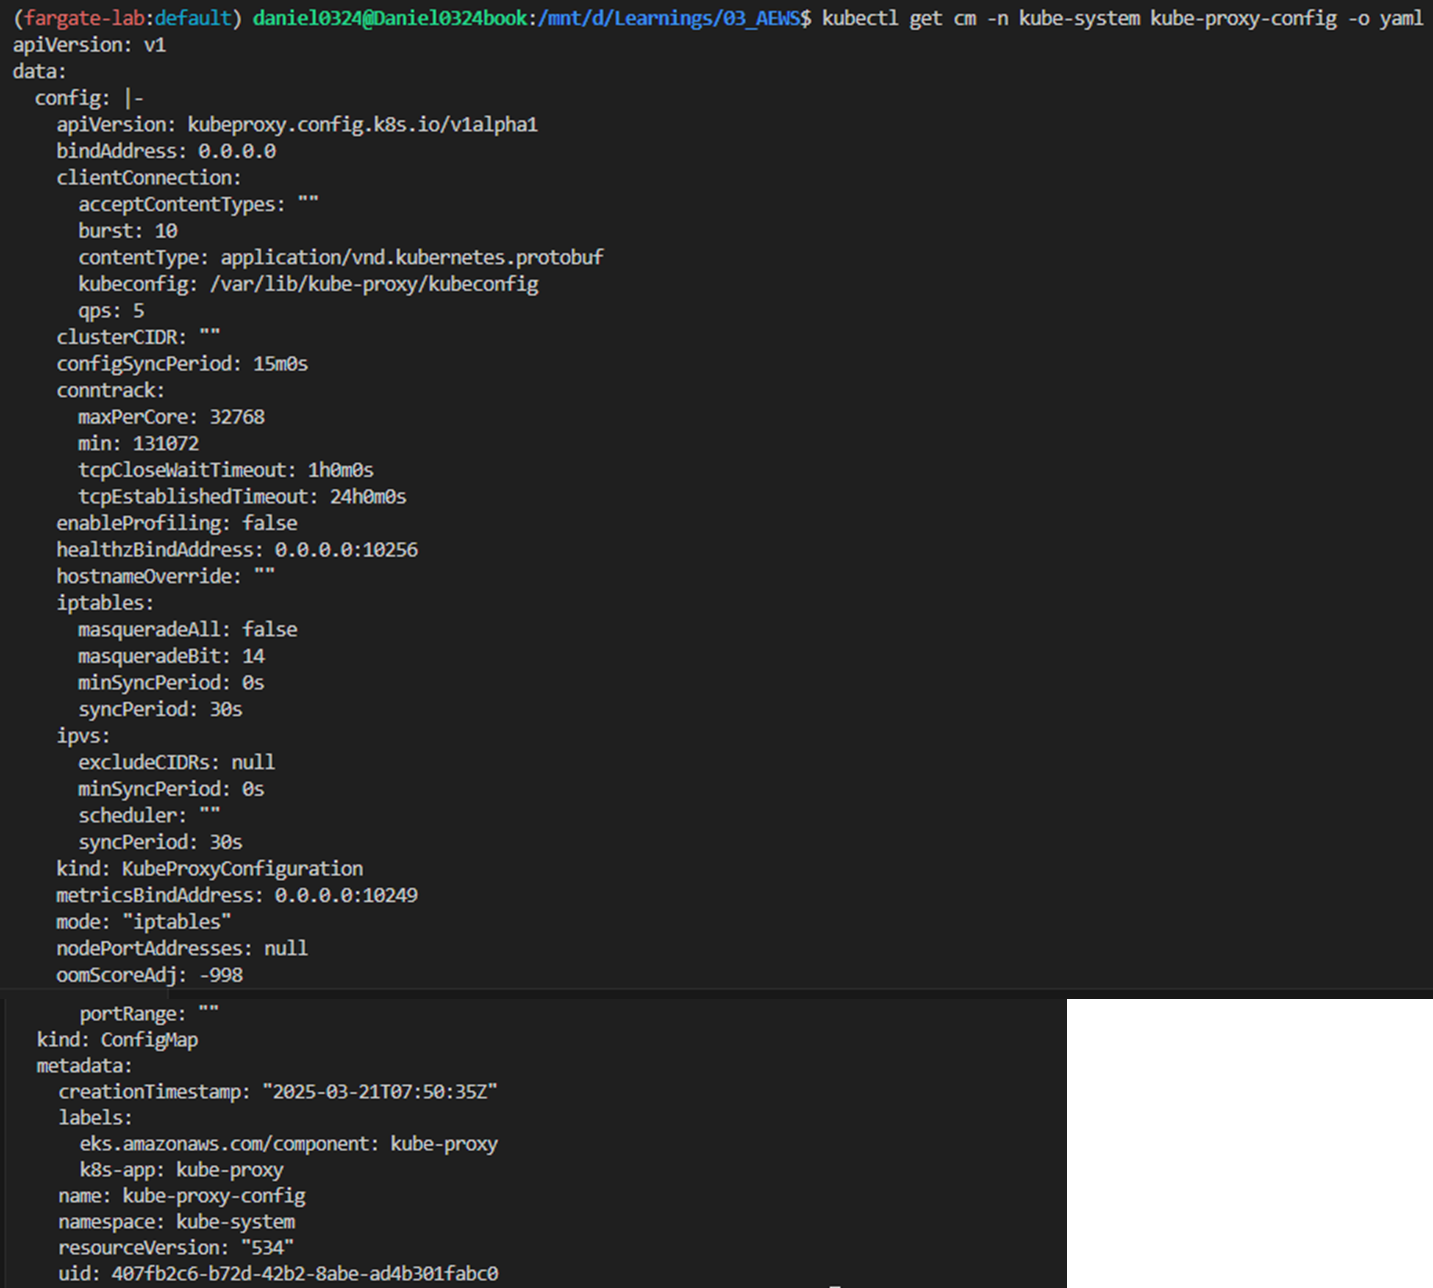
kubectl get cm -n kube-system kube-proxy -o yaml
kubectl get cm -n kube-system kube-proxy-config -o yaml
apiVersion: v1
data:
config: |-
apiVersion: kubeproxy.config.k8s.io/v1alpha1
bindAddress: 0.0.0.0
clientConnection:
acceptContentTypes: ""
burst: 10
contentType: application/vnd.kubernetes.protobuf
kubeconfig: /var/lib/kube-proxy/kubeconfig
qps: 5
clusterCIDR: ""
configSyncPeriod: 15m0s
conntrack:
maxPerCore: 32768
min: 131072
tcpCloseWaitTimeout: 1h0m0s
tcpEstablishedTimeout: 24h0m0s
enableProfiling: false
healthzBindAddress: 0.0.0.0:10256
hostnameOverride: ""
iptables:
masqueradeAll: false
masqueradeBit: 14
minSyncPeriod: 0s
syncPeriod: 30s
ipvs:
excludeCIDRs: null
minSyncPeriod: 0s
scheduler: ""
syncPeriod: 30s
kind: KubeProxyConfiguration
metricsBindAddress: 0.0.0.0:10249
mode: "iptables"
nodePortAddresses: null
oomScoreAdj: -998
portRange: ""
2) coredns 파드 상세 정보 확인 : schedulerName: fargate-scheduler
# coredns 파드 상세 정보 확인
kubectl get pod -n kube-system -l k8s-app=kube-dns -o yaml
...
  spec:
    affinity:
      nodeAffinity:
        requiredDuringSchedulingIgnoredDuringExecution:
          nodeSelectorTerms:
          - matchExpressions:
            - key: kubernetes.io/os
              operator: In
              values:
              - linux
            - key: kubernetes.io/arch
              operator: In
              values:
              - amd64
              - arm64
      podAntiAffinity:
        preferredDuringSchedulingIgnoredDuringExecution:
        - podAffinityTerm:
            labelSelector:
              matchExpressions:
              - key: k8s-app
                operator: In
                values:
                - kube-dns
            topologyKey: kubernetes.io/hostname
          weight: 100
      ...
      resources:
        limits:
          cpu: 250m
          memory: 256M
        requests:
          cpu: 250m
          memory: 256M
      ...
      securityContext:
        allowPrivilegeEscalation: false
        capabilities:
          add:
          - NET_BIND_SERVICE
          drop:
          - ALL
        readOnlyRootFilesystem: true
    ...
    dnsPolicy: Default
    enableServiceLinks: true
    nodeName: fargate-ip-10-10-34-186.ap-northeast-2.compute.internal
    preemptionPolicy: PreemptLowerPriority
    priority: 2000001000
    priorityClassName: system-node-critical
    restartPolicy: Always
    schedulerName: fargate-scheduler
    securityContext: {}
    serviceAccount: coredns
    serviceAccountName: coredns
    terminationGracePeriodSeconds: 30
    tolerations:
    - effect: NoSchedule
      key: node-role.kubernetes.io/control-plane
    - key: CriticalAddonsOnly
      operator: Exists
    - effect: NoExecute
      key: node.kubernetes.io/not-ready
      operator: Exists
      tolerationSeconds: 300
    - effect: NoExecute
      key: node.kubernetes.io/unreachable
      operator: Exists
      tolerationSeconds: 300
    topologySpreadConstraints:
    - labelSelector:
        matchLabels:
          k8s-app: kube-dns
      maxSkew: 1
      topologyKey: topology.kubernetes.io/zone
      whenUnsatisfiable: ScheduleAnyway
    ...
    qosClass: Guaranteed
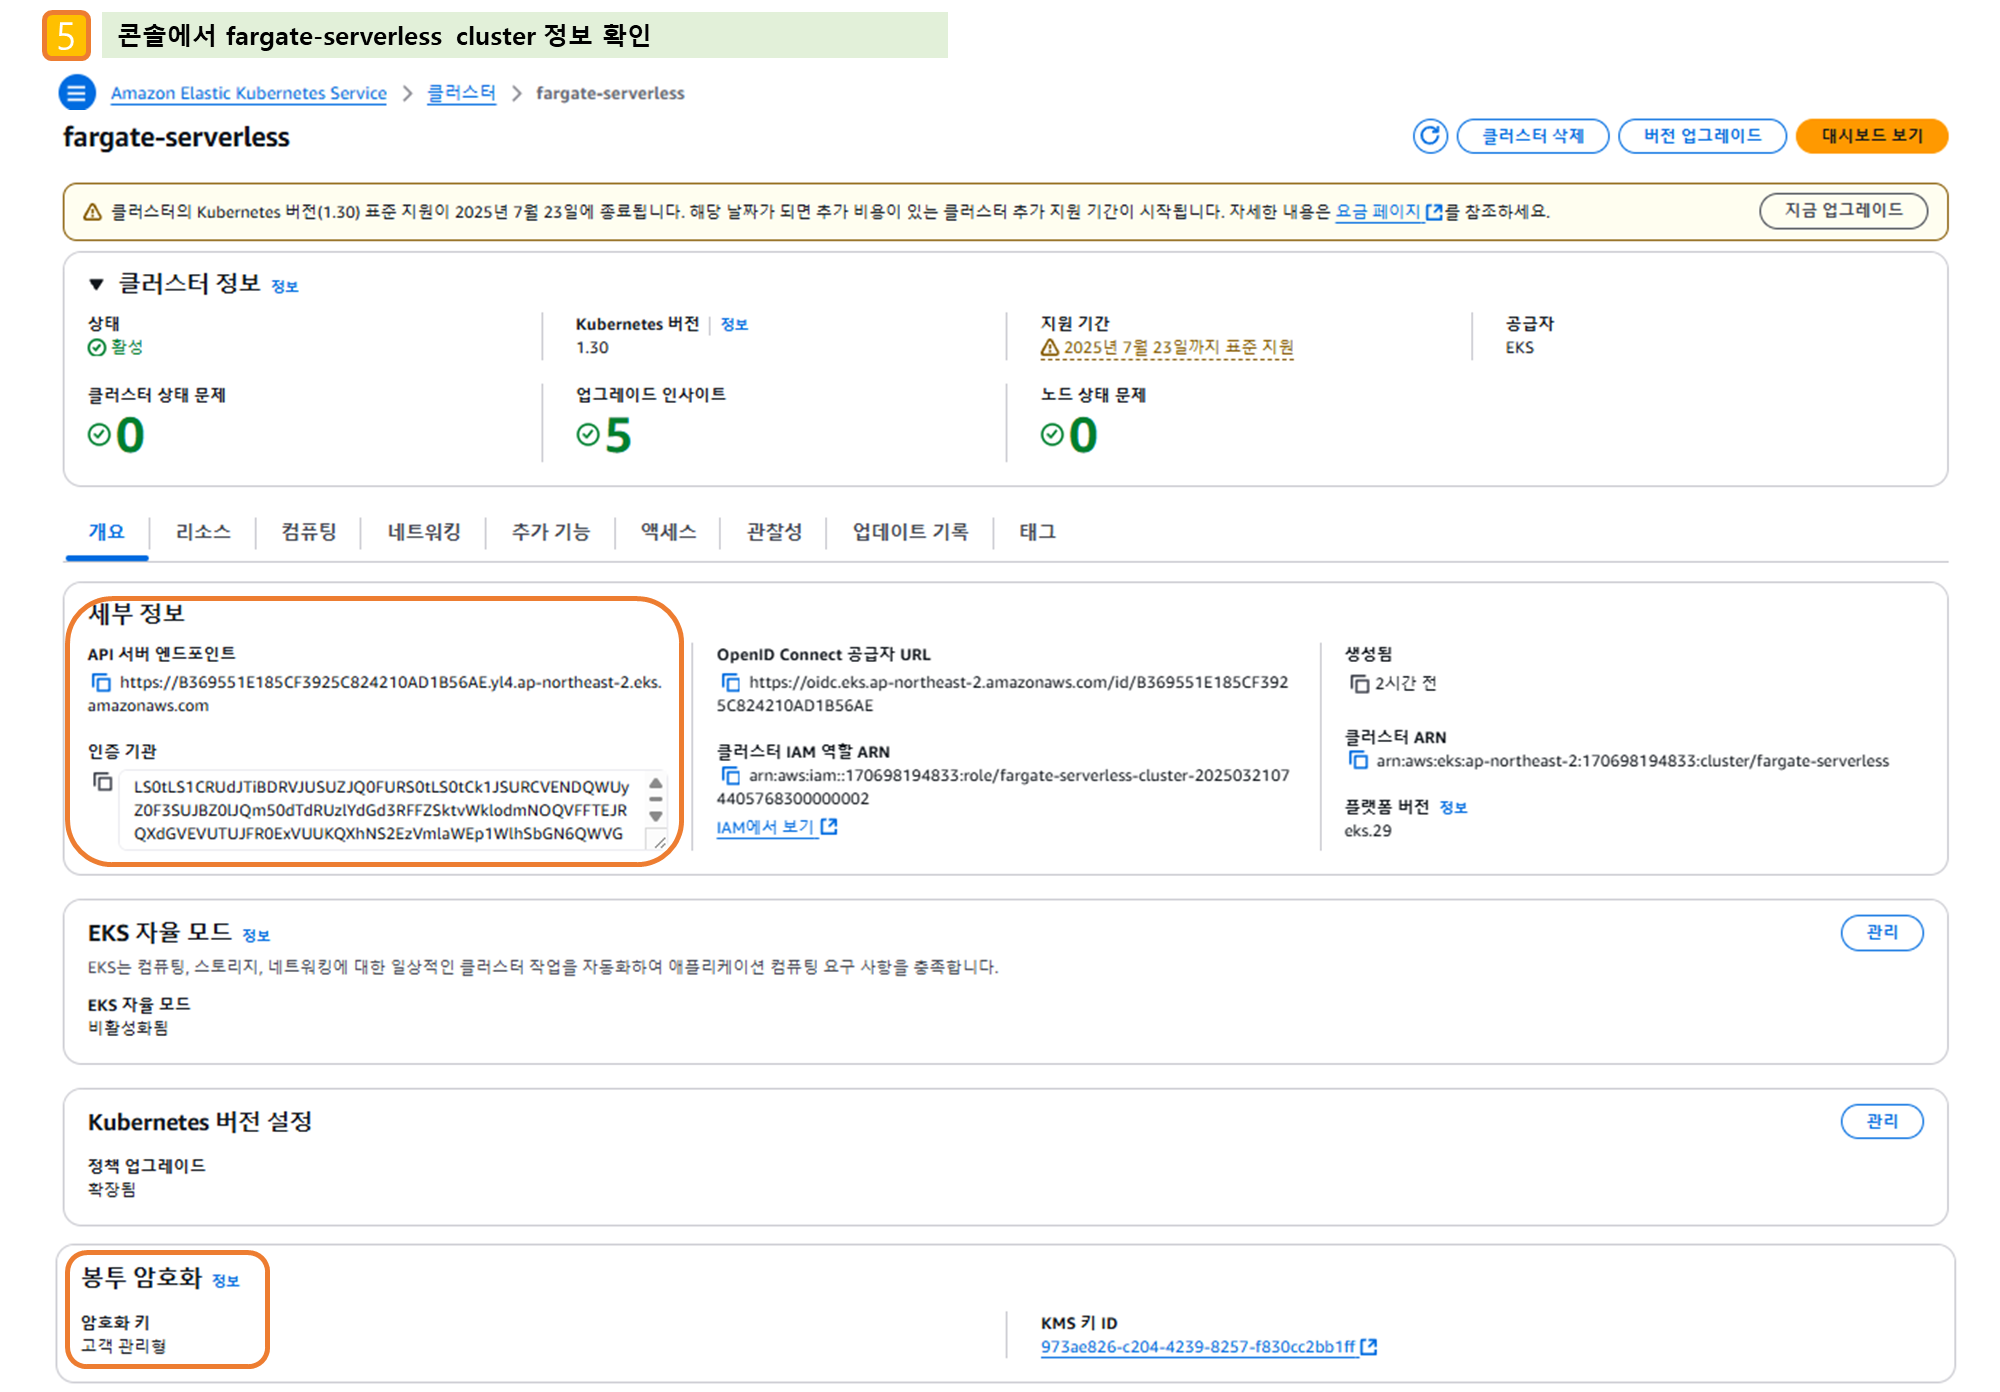
3) AWS 관리 콘솔 확인
- EKS - Compute(Nodes, Fargate profile - Pod execution role 확인), Add-ons, Access(IAM access entry), Control plane logs
- EC2 : EC2 없다!, EBS, ENI(eks owned, fargate owned 확인)
- VPC : NATGW, Routing Table, Public Subnet(/24), Private Subnet(/20)
[ 실행 결과 - 한 눈에 보기 ]

☞ SchedulerName : fargate-scheduler

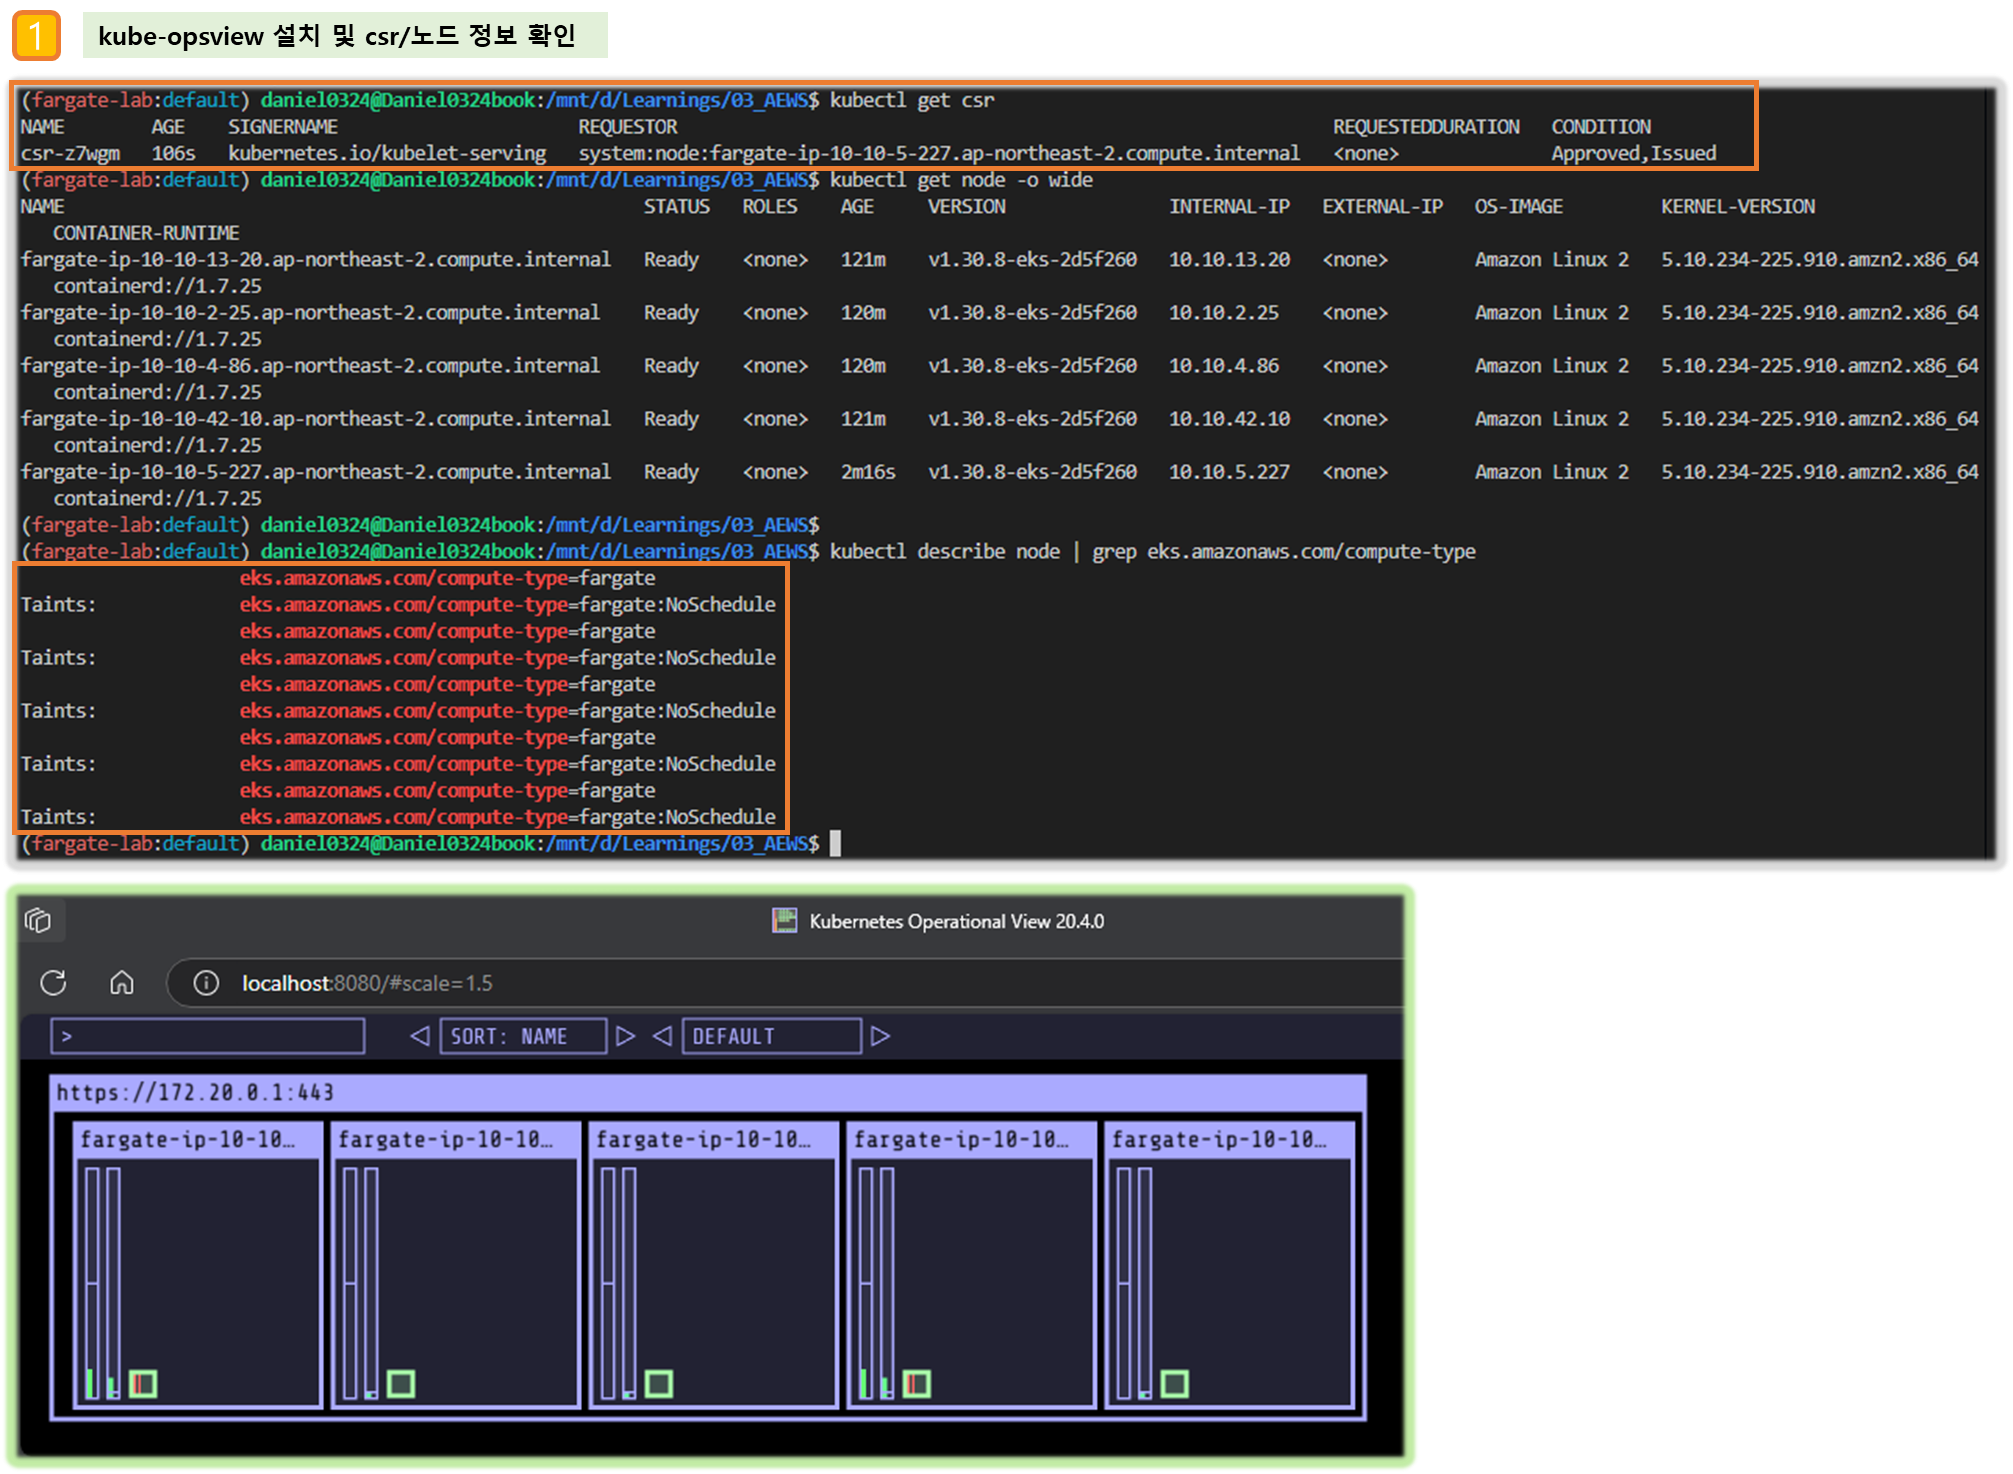
▶ fargate 에 kube-ops-view
# helm 배포
helm repo add geek-cookbook https://geek-cookbook.github.io/charts/
helm install kube-ops-view geek-cookbook/kube-ops-view --version 1.2.2 --set env.TZ="Asia/Seoul" --namespace kube-system

# 포트 포워딩
kubectl port-forward deployment/kube-ops-view -n kube-system 8080:8080 &

# 접속 주소 확인 : 각각 1배, 1.5배, 3배 크기
echo -e "KUBE-OPS-VIEW URL = http://localhost:8080"
echo -e "KUBE-OPS-VIEW URL = http://localhost:8080/#scale=1.5"
echo -e "KUBE-OPS-VIEW URL = http://localhost:8080/#scale=3"

open "http://127.0.0.1:8080/#scale=1.5" # macOS
- kube-ops-view 파드 정보 확인
# node 확인 : 노드(Micro VM)
kubectl get csr
kubectl get node -owide
kubectl describe node | grep eks.amazonaws.com/compute-type

# kube-ops-view 디플로이먼트/파드 상세 정보 확인
kubectl get pod -n kube-system
kubectl get pod -n kube-system -o jsonpath='{.items[0].metadata.annotations.CapacityProvisioned}'
kubectl get pod -n kube-system -l app.kubernetes.io/instance=kube-ops-view -o jsonpath='{.items[0].metadata.annotations.CapacityProvisioned}'
0.25vCPU 0.5GB

# 디플로이먼트 상세 정보
kubectl get deploy -n kube-system kube-ops-view -o yaml
...
  template:
    ...
    spec:
      automountServiceAccountToken: true
      containers:
      - env:
        - name: TZ
          value: Asia/Seoul
        image: hjacobs/kube-ops-view:20.4.0
        imagePullPolicy: IfNotPresent
        livenessProbe:
          failureThreshold: 3
          periodSeconds: 10
          successThreshold: 1
          tcpSocket:
            port: 8080
          timeoutSeconds: 1
        name: kube-ops-view
        ports:
        - containerPort: 8080
          name: http
          protocol: TCP
        readinessProbe:
          failureThreshold: 3
          periodSeconds: 10
          successThreshold: 1
          tcpSocket:
            port: 8080
          timeoutSeconds: 1
        resources: {}
        securityContext:
          readOnlyRootFilesystem: true
          runAsNonRoot: true
          runAsUser: 1000
        startupProbe:
          failureThreshold: 30
          periodSeconds: 5
          successThreshold: 1
          tcpSocket:
            port: 8080
          timeoutSeconds: 1
        terminationMessagePath: /dev/termination-log
        terminationMessagePolicy: File
      dnsPolicy: ClusterFirst
      enableServiceLinks: true
      restartPolicy: Always
      schedulerName: default-scheduler
      securityContext: {}
      serviceAccount: kube-ops-view
      serviceAccountName: kube-ops-view
      terminationGracePeriodSeconds: 30
...

# 파드 상세 정보 : admission control 이 동작했음을 알 수 있음
kubectl get pod -n kube-system -l app.kubernetes.io/instance=kube-ops-view -o yaml
...
  metadata:
    annotations:
      CapacityProvisioned: 0.25vCPU 0.5GB
      Logging: LoggingEnabled
    ...
      resources: {}
    ...
    dnsPolicy: ClusterFirst
    enableServiceLinks: true
    nodeName: fargate-ip-10-10-13-36.ap-northeast-2.compute.internal
    preemptionPolicy: PreemptLowerPriority
    priority: 2000001000
    priorityClassName: system-node-critical
    restartPolicy: Always
    schedulerName: fargate-scheduler
    securityContext: {}
    serviceAccount: kube-ops-view
    serviceAccountName: kube-ops-view
    terminationGracePeriodSeconds: 30
    tolerations:
    - effect: NoExecute
      key: node.kubernetes.io/not-ready
      operator: Exists
      tolerationSeconds: 300
    - effect: NoExecute
      key: node.kubernetes.io/unreachable
      operator: Exists
      tolerationSeconds: 300
    ...
    qosClass: BestEffort

#
kubectl describe pod -n kube-system -l app.kubernetes.io/instance=kube-ops-view | grep Events: -A10
Events:
  Type    Reason          Age   From               Message
  ----    ------          ----  ----               -------
  Normal  LoggingEnabled  22m   fargate-scheduler  Successfully enabled logging for pod
  Normal  Scheduled       21m   fargate-scheduler  Successfully assigned kube-system/kube-ops-view-796947d6dc-vrnjc to fargate-ip-10-10-13-36.ap-northeast-2.compute.internal
...
[ 실행 결과 - 한 눈에 보기 ]

▶ fargate 에 netshoot 디플로이먼트(파드)
# 네임스페이스 생성
kubectl create ns study-aews

# 테스트용 파드 netshoot 디플로이먼트 생성 : 0.5vCPU 1GB 할당되어, 아래 Limit 값은 의미가 없음. 배포 시 대략 시간 측정해보자!
cat <<EOF | kubectl apply -f -
apiVersion: apps/v1
kind: Deployment
metadata:
  name: netshoot
  namespace: study-aews
spec:
  replicas: 1
  selector:
    matchLabels:
      app: netshoot
  template:
    metadata:
      labels:
        app: netshoot
    spec:
      containers:
      - name: netshoot
        image: nicolaka/netshoot
        command: ["tail"]
        args: ["-f", "/dev/null"]
        resources:
          requests:
            cpu: 500m
            memory: 500Mi
          limits:
            cpu: 2
            memory: 2Gi
      terminationGracePeriodSeconds: 0
EOF
kubectl get events -w --sort-by '.lastTimestamp'

# 확인 : 메모리 할당 측정은 어떻게 되었는지?
kubectl get pod -n study-aews -o wide
kubectl get pod -n study-aews -o jsonpath='{.items[0].metadata.annotations.CapacityProvisioned}'
0.5vCPU 1GB

# 디플로이먼트 상세 정보
kubectl get deploy -n study-aews netshoot -o yaml
...
  template:
    ...
    spec:
      ...
      schedulerName: default-scheduler
      securityContext: {}
      terminationGracePeriodSeconds: 0
...

# 파드 상세 정보 : admission control 이 동작했음을 알 수 있음
kubectl get pod -n study-aews -l app=netshoot -o yaml
...
  metadata:
    annotations:
      CapacityProvisioned: 0.5vCPU 1GB
      Logging: LoggingEnabled
    ...
    preemptionPolicy: PreemptLowerPriority
    priority: 2000001000
    priorityClassName: system-node-critical
    restartPolicy: Always
    schedulerName: fargate-scheduler
    ...
    qosClass: Burstable

#
kubectl describe pod -n study-aews -l app=netshoot | grep Events: -A10

#
kubectl get mutatingwebhookconfigurations.admissionregistration.k8s.io
kubectl describe mutatingwebhookconfigurations 0500-amazon-eks-fargate-mutation.amazonaws.com
kubectl get validatingwebhookconfigurations.admissionregistration.k8s.io

# 파드 내부에 zsh 접속 후 확인
kubectl exec -it deploy/netshoot -n study-aews -- zsh
-----------------------------------------------------
ip -c a
cat /etc/resolv.conf
curl ipinfo.io/ip # 출력되는 IP는 어떤것? , 어떤 경로를 통해서 인터넷이 되는 걸까?
ping -c 1 <다른 파드 IP ex. coredns pod ip>
lsblk
df -hT /
cat /etc/fstab
exit
-----------------------------------------------------
[ 실행 결과 - 한 눈에 보기 ]
▶ 파드 권한과 호스트 네임스페이스 공유로 호스트 탈취 시도 - Blog
kubectl apply -f - <<EOF
apiVersion: v1
kind: Pod
metadata:
  name: root-shell
  namespace: study-aews
spec:
  containers:
  - command:
    - /bin/cat
    image: alpine:3
    name: root-shell
    securityContext:
      privileged: true
    tty: true
    stdin: true
    volumeMounts:
    - mountPath: /host
      name: hostroot
  hostNetwork: true
  hostPID: true
  hostIPC: true
  tolerations:
  - effect: NoSchedule
    operator: Exists
  - effect: NoExecute
    operator: Exists
  volumes:
  - hostPath:
      path: /
    name: hostroot
EOF

#
kubectl get pod -n study-aews root-shell
kubectl describe pod -n study-aews root-shell | grep Events: -A 10
Events:
  Type     Reason            Age   From               Message
  ----     ------            ----  ----               -------
  Warning  FailedScheduling  48s   fargate-scheduler  Pod not supported on Fargate: fields not supported: HostNetwork, HostPID, HostIPC, volumes not supported: hostroot is of an unsupported volume Type, invalid SecurityContext fields: Privileged

# 출력 메시지
# Pod not supported on Fargate: fields not supported:
# HostNetwork, HostPID, HostIPC, volumes not supported:
# hostroot is of an unsupported volume Type, invalid SecurityContext fields: Privileged

# 삭제
kubectl delete pod -n study-aews root-shell


# (참고) fargate가 아닌 권한이 충분한 곳에서 실행 시 : 아래 처럼 호스트 네임스페이스로 진입 가능!
kubectl -n kube-system exec -it root-shell -- chroot /host /bin/bash
root@myk8s-control-plane:/# id
uid=0(root) gid=0(root) groups=0(root),1(daemon),2(bin),3(sys),4(adm),6(disk),10(uucp),11,20(dialout),26(tape),27(sudo)
[ 실행 결과 - 한 눈에 보기 ]
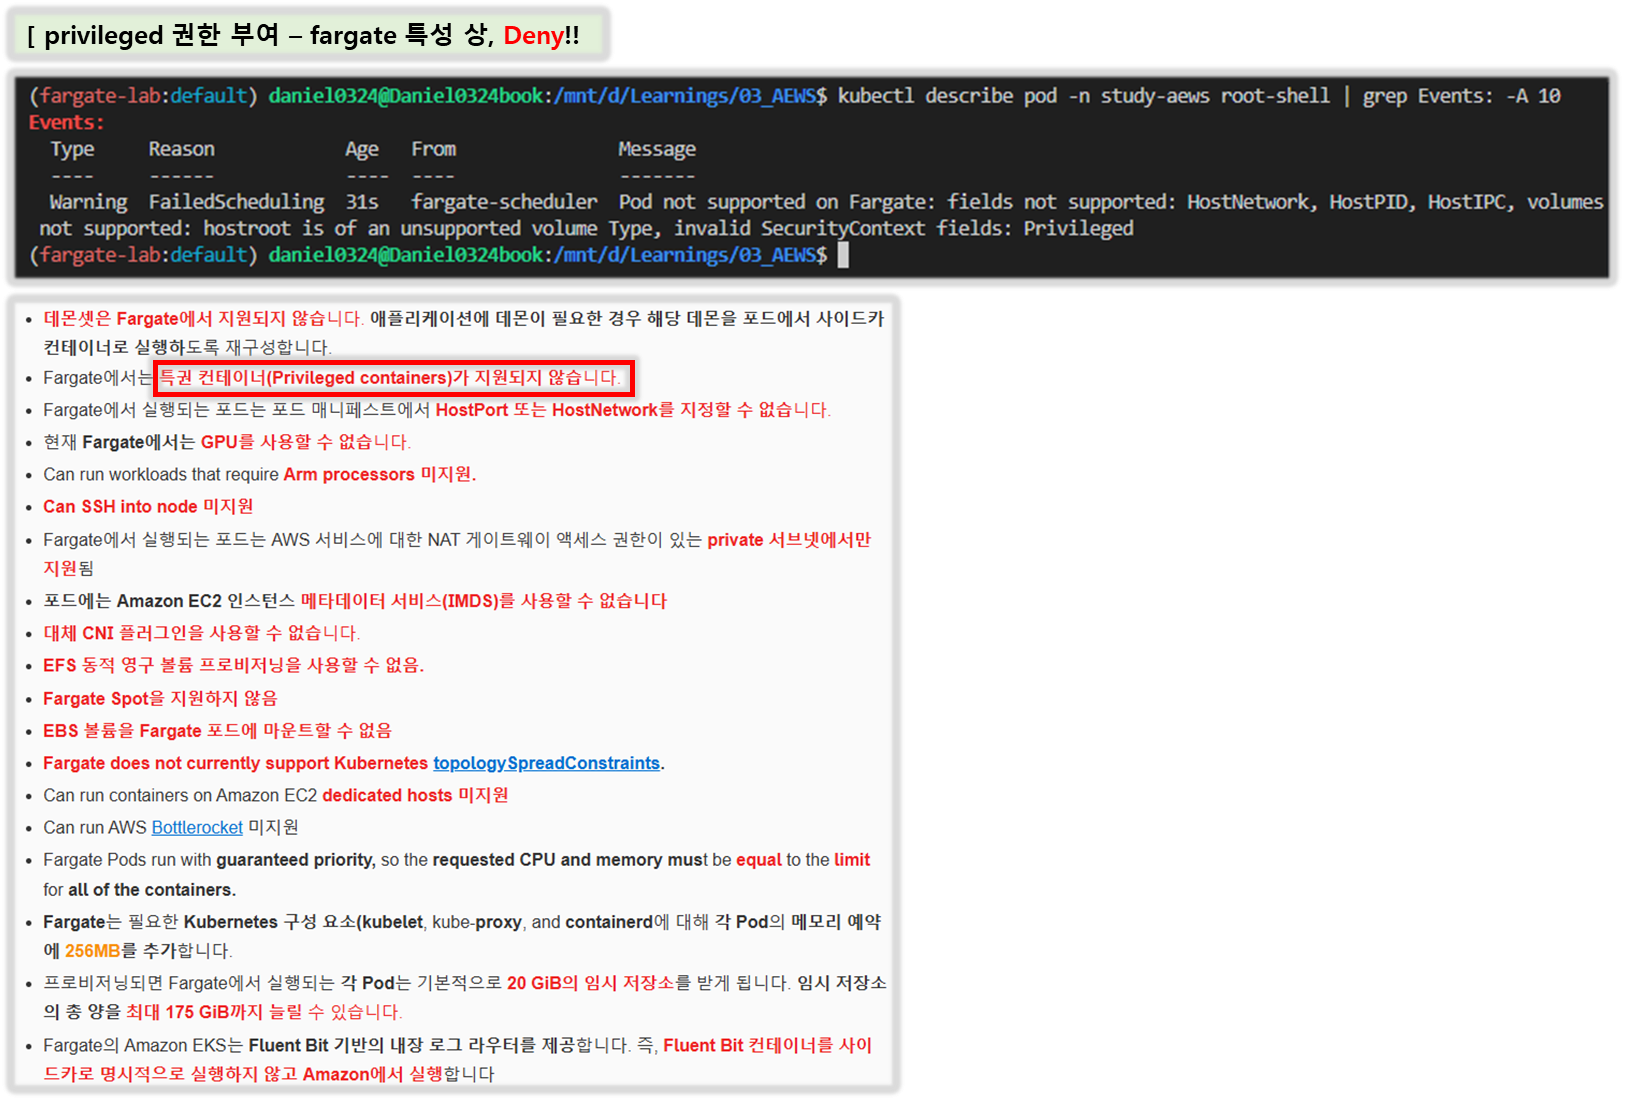
▶ AWS ALB(Ingress)

# 게임 디플로이먼트와 Service, Ingress 배포
cat <<EOF | kubectl apply -f -
apiVersion: apps/v1
kind: Deployment
metadata:
  namespace: study-aews
  name: deployment-2048
spec:
  selector:
    matchLabels:
      app.kubernetes.io/name: app-2048
  replicas: 2
  template:
    metadata:
      labels:
        app.kubernetes.io/name: app-2048
    spec:
      containers:
      - image: public.ecr.aws/l6m2t8p7/docker-2048:latest
        imagePullPolicy: Always
        name: app-2048
        ports:
        - containerPort: 80
---
apiVersion: v1
kind: Service
metadata:
  namespace: study-aews
  name: service-2048
spec:
  ports:
    - port: 80
      targetPort: 80
      protocol: TCP
  type: ClusterIP
  selector:
    app.kubernetes.io/name: app-2048
---
apiVersion: networking.k8s.io/v1
kind: Ingress
metadata:
  namespace: study-aews
  name: ingress-2048
  annotations:
    alb.ingress.kubernetes.io/scheme: internet-facing
    alb.ingress.kubernetes.io/target-type: ip
spec:
  ingressClassName: alb
  rules:
    - http:
        paths:
        - path: /
          pathType: Prefix
          backend:
            service:
              name: service-2048
              port:
                number: 80
EOF


# 모니터링
watch -d kubectl get pod,ingress,svc,ep,endpointslices -n study-aews

# 생성 확인
kubectl get-all -n study-aews
kubectl get ingress,svc,ep,pod -n study-aews
kubectl get targetgroupbindings -n study-aews

# Ingress 확인
kubectl describe ingress -n study-aews ingress-2048
kubectl get ingress -n study-aews ingress-2048 -o jsonpath="{.status.loadBalancer.ingress[*].hostname}{'\n'}"

# 게임 접속 : ALB 주소로 웹 접속
kubectl get ingress -n study-aews ingress-2048 -o jsonpath='{.status.loadBalancer.ingress[0].hostname}' | awk '{ print "Game URL = http://"$1 }'

# 파드 IP 확인
kubectl get pod -n study-aews -owide

# 파드 증가
kubectl scale deployment -n study-aews  deployment-2048 --replicas 4

# 게임 실습 리소스  삭제
kubectl delete ingress ingress-2048 -n study-aews
kubectl delete svc service-2048 -n study-aews && kubectl delete deploy deployment-2048 -n study-aews
[ 실행 결과 - 한 눈에 보기 ]
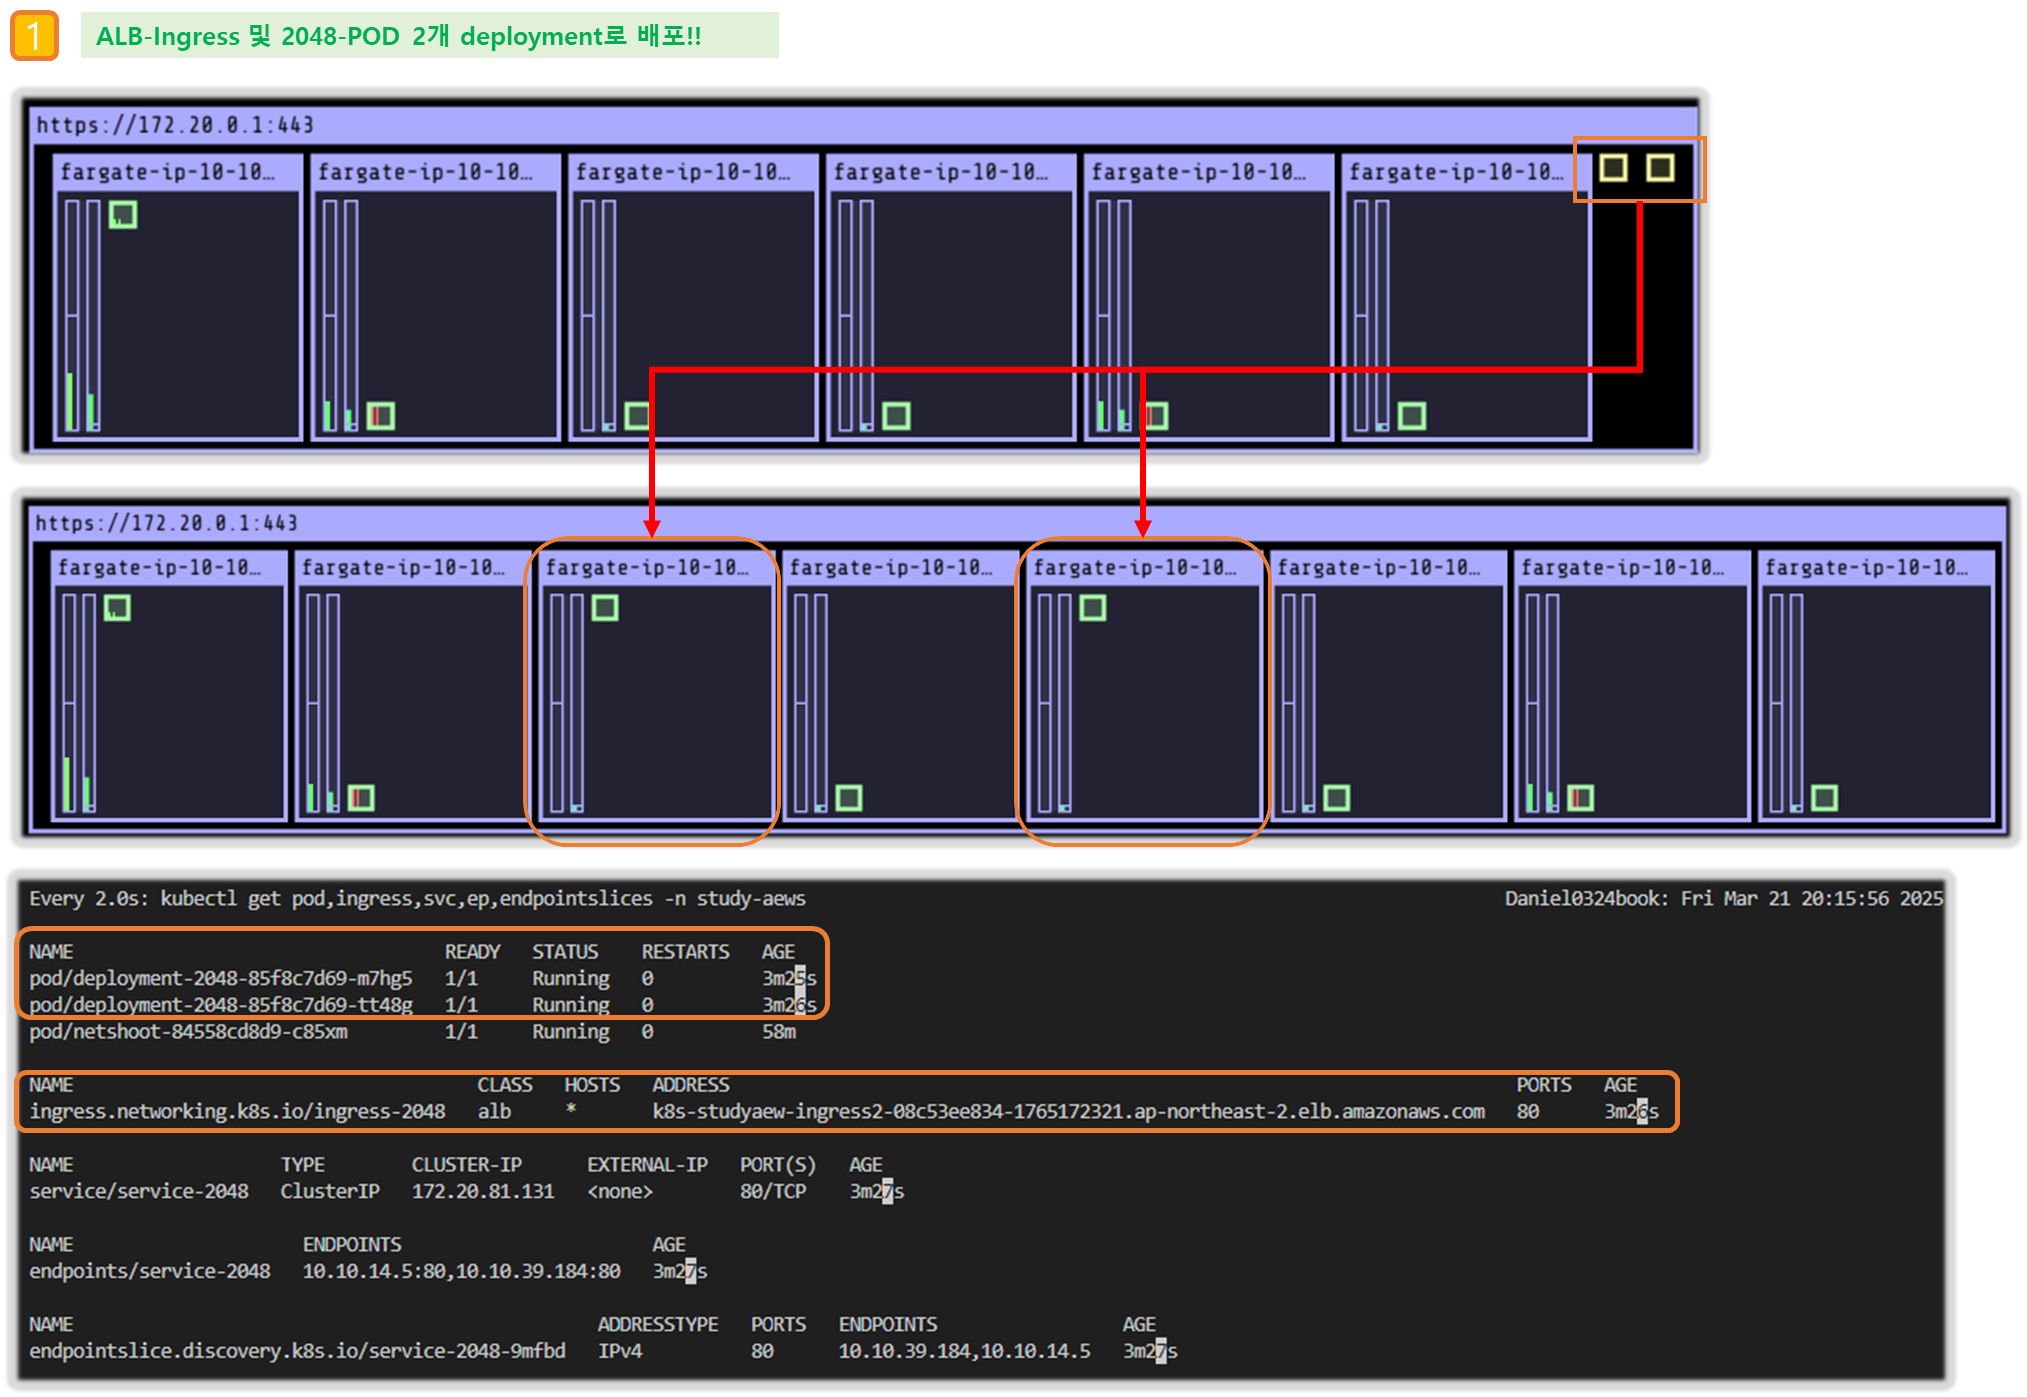
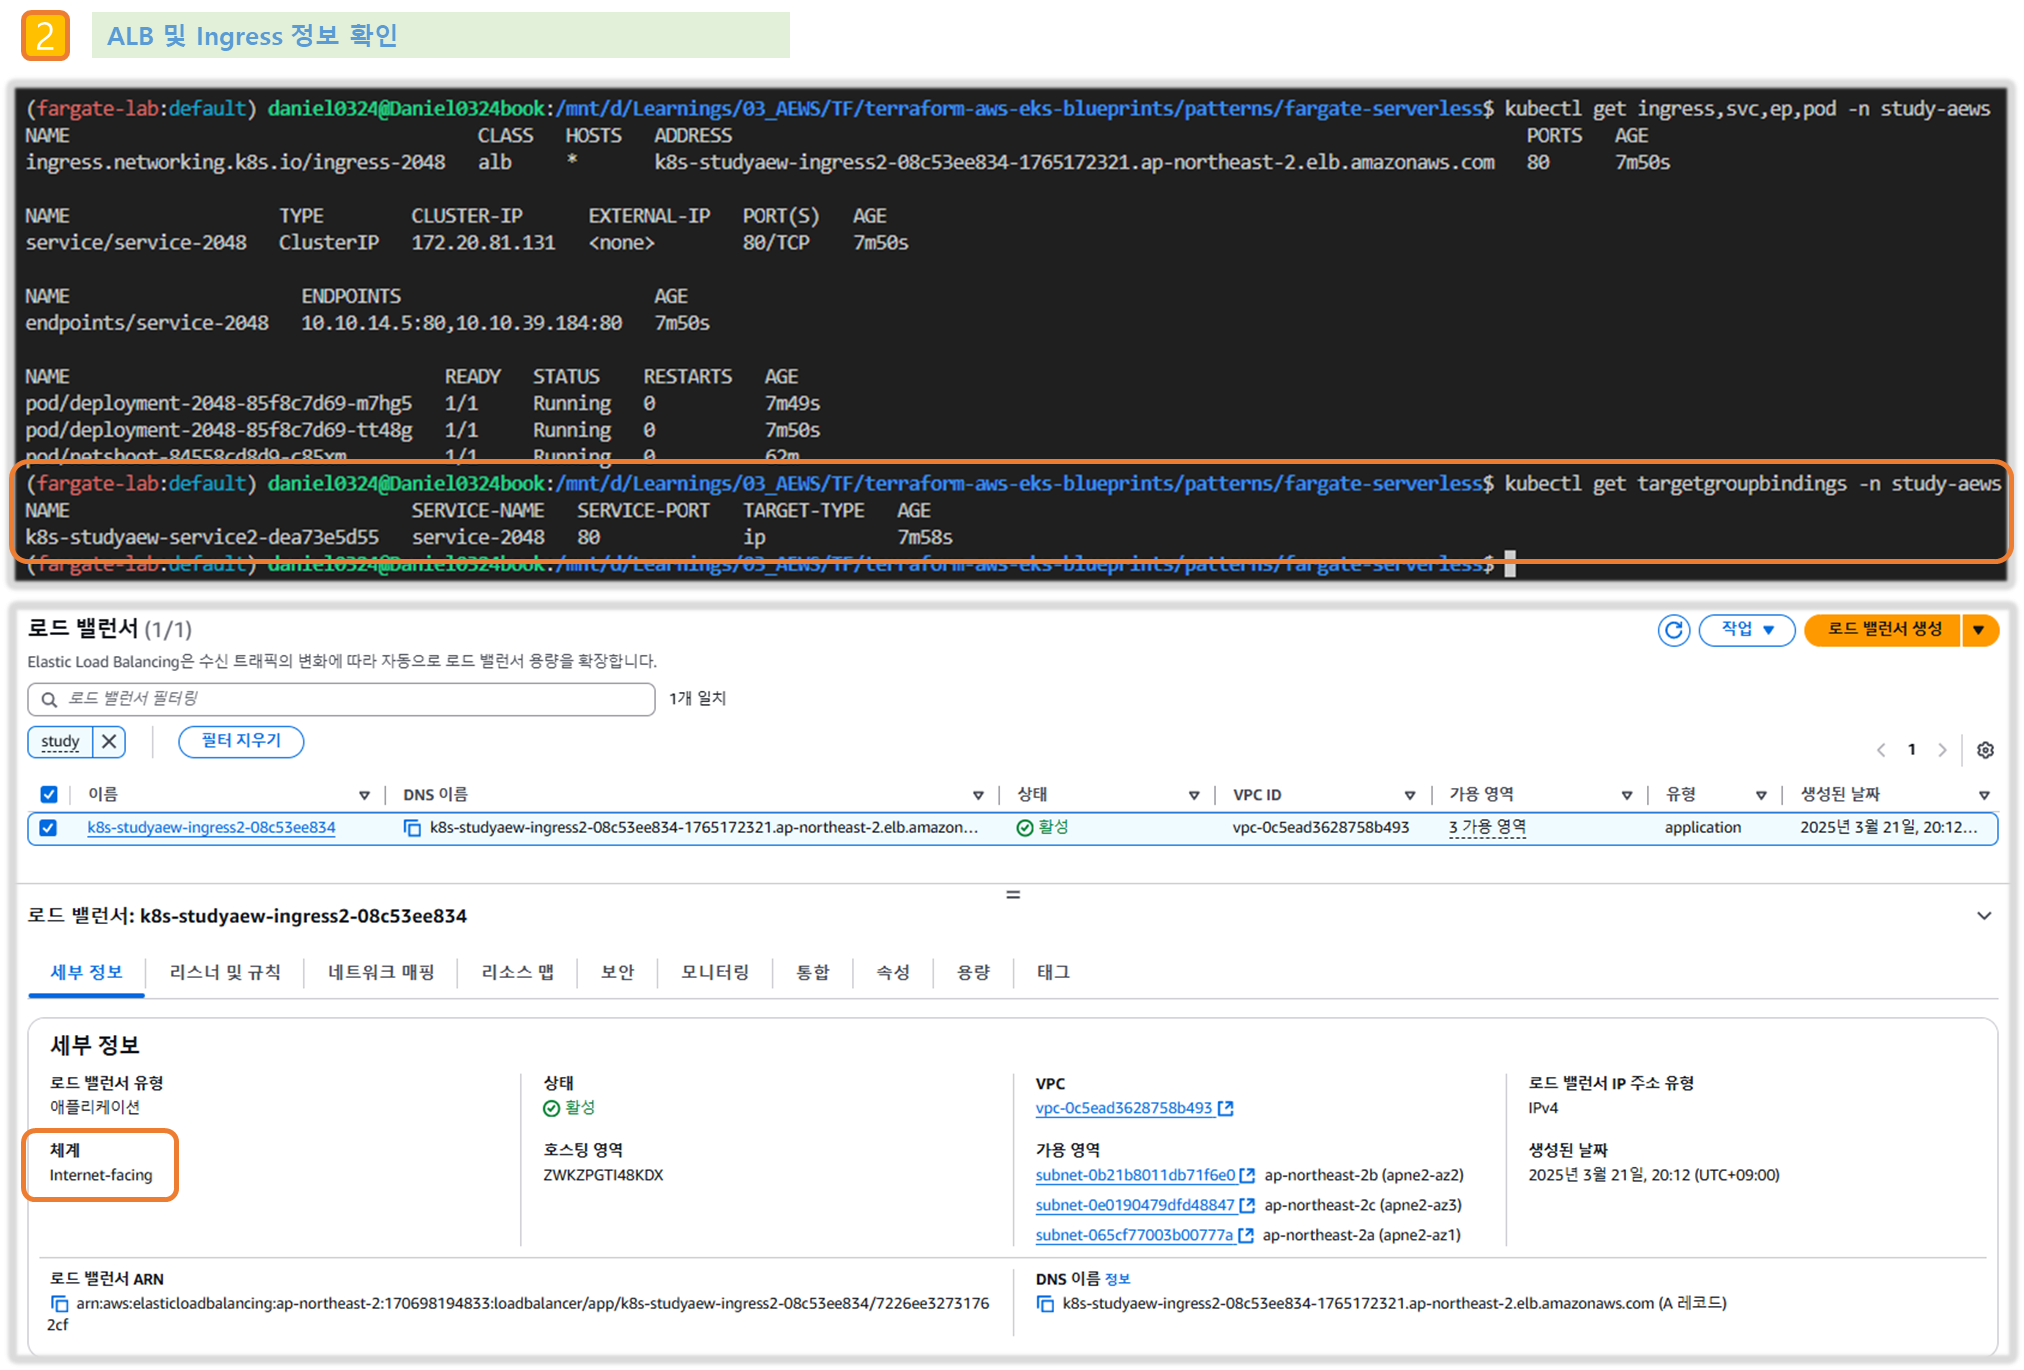
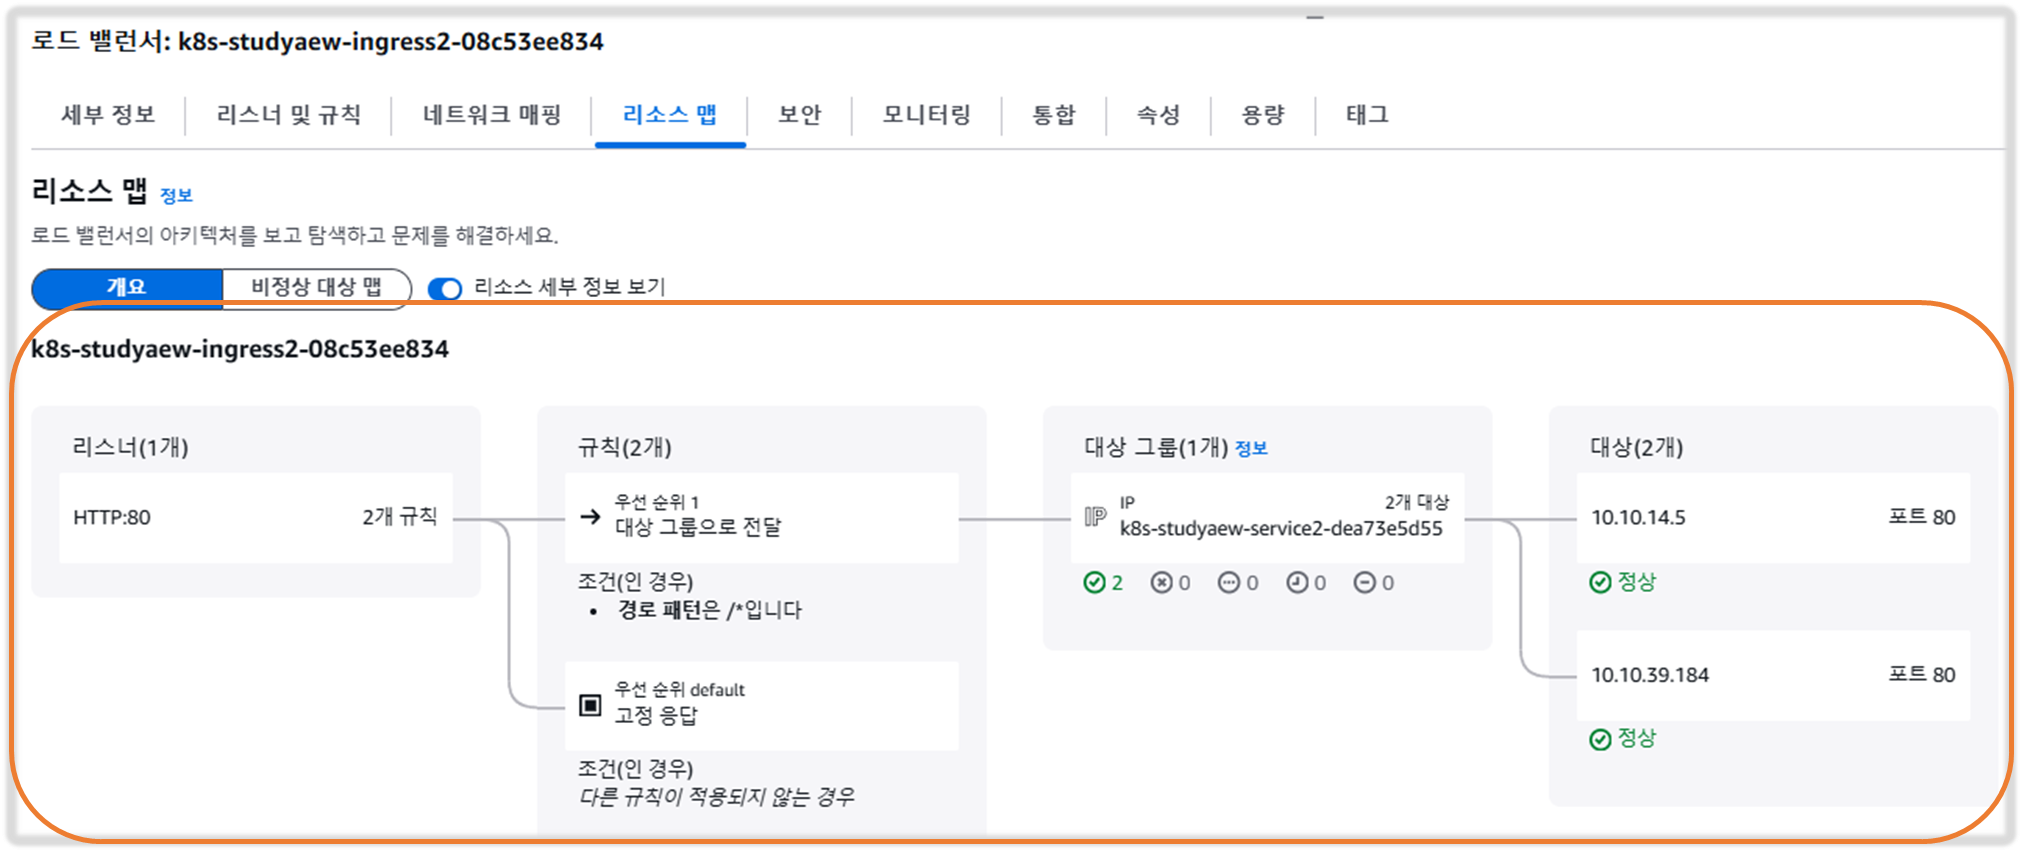
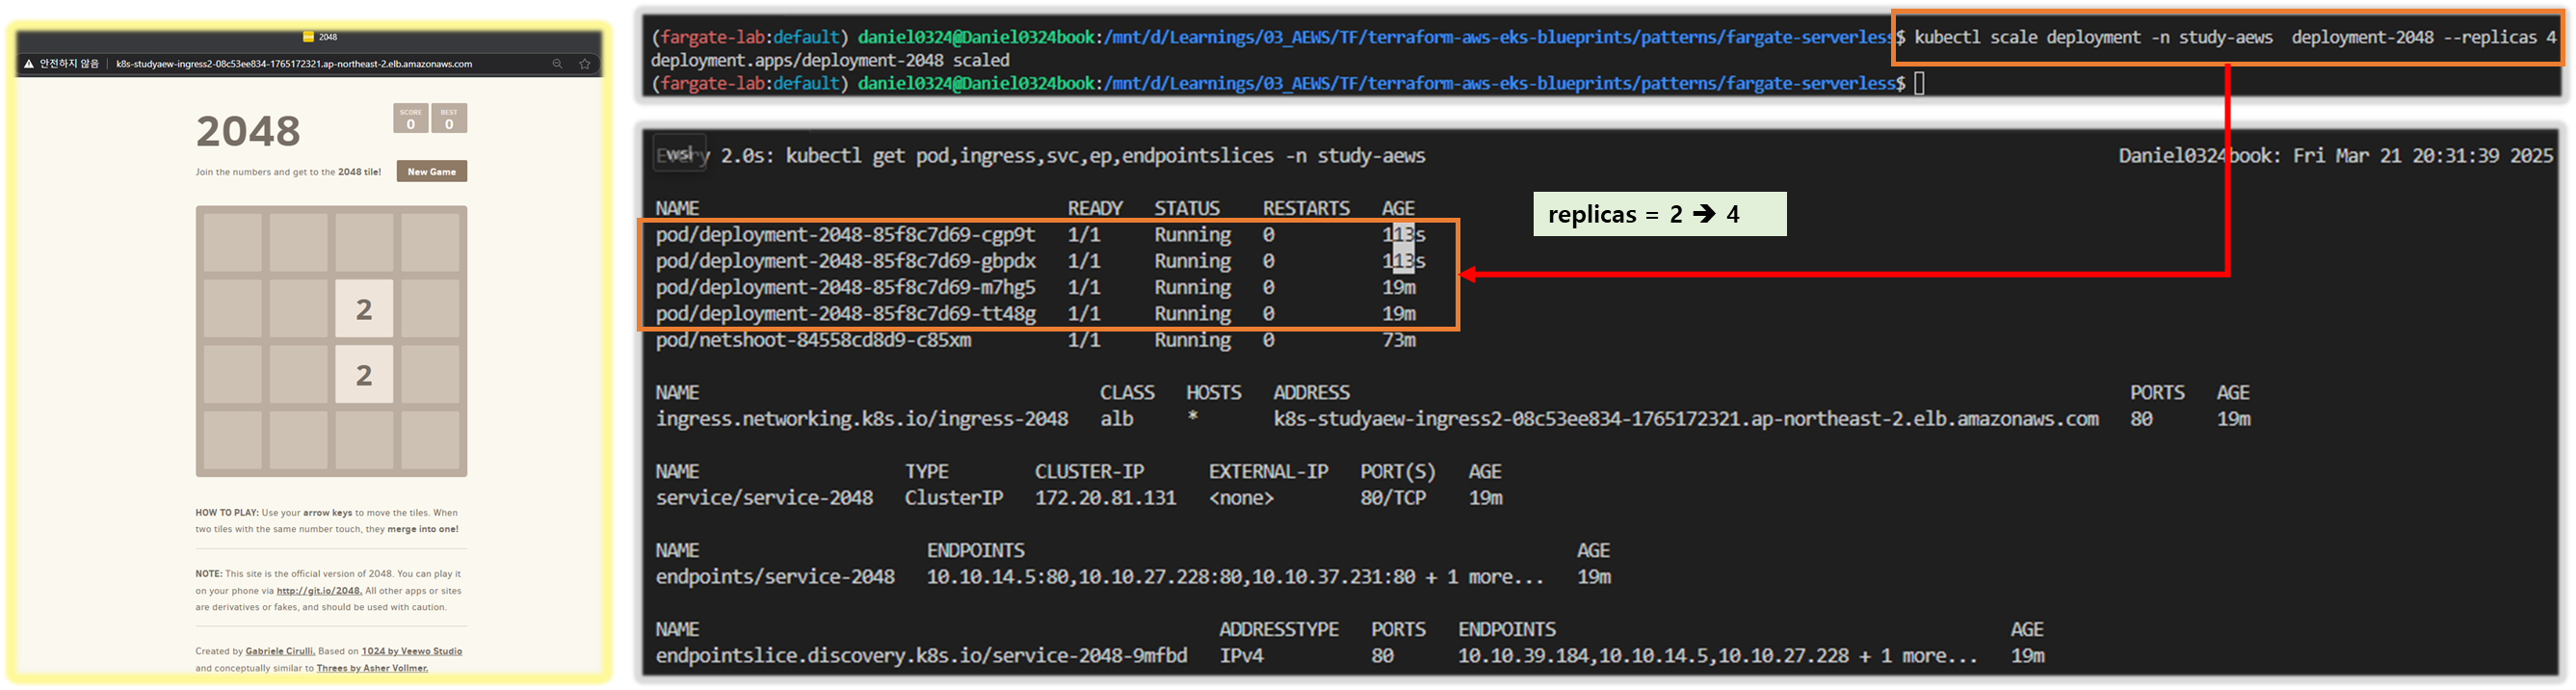
▶ Fargate job
#
cat <<EOF | kubectl apply -f -
apiVersion: batch/v1
kind: Job
metadata:
  name: busybox1
  namespace: study-aews
spec:
  template:
    spec:
      containers:
      - name: busybox
        image: busybox
        command: ["/bin/sh", "-c", "sleep 10"]
      restartPolicy: Never
  ttlSecondsAfterFinished: 60 # <-- TTL controller
---
apiVersion: batch/v1
kind: Job
metadata:
  name: busybox2
  namespace: study-aews
spec:
  template:
    spec:
      containers:
      - name: busybox
        image: busybox
        command: ["/bin/sh", "-c", "sleep 10"]
      restartPolicy: Never
EOF

#
kubectl get job,pod -n study-aews
kubectl get job -n study-aews -w
kubectl get pod -n study-aews -w
kubectl get job,pod -n study-aews

# 삭제
kubectl delete job -n study-aews --all
[ 실행 결과 - 한 눈에 보기 ]
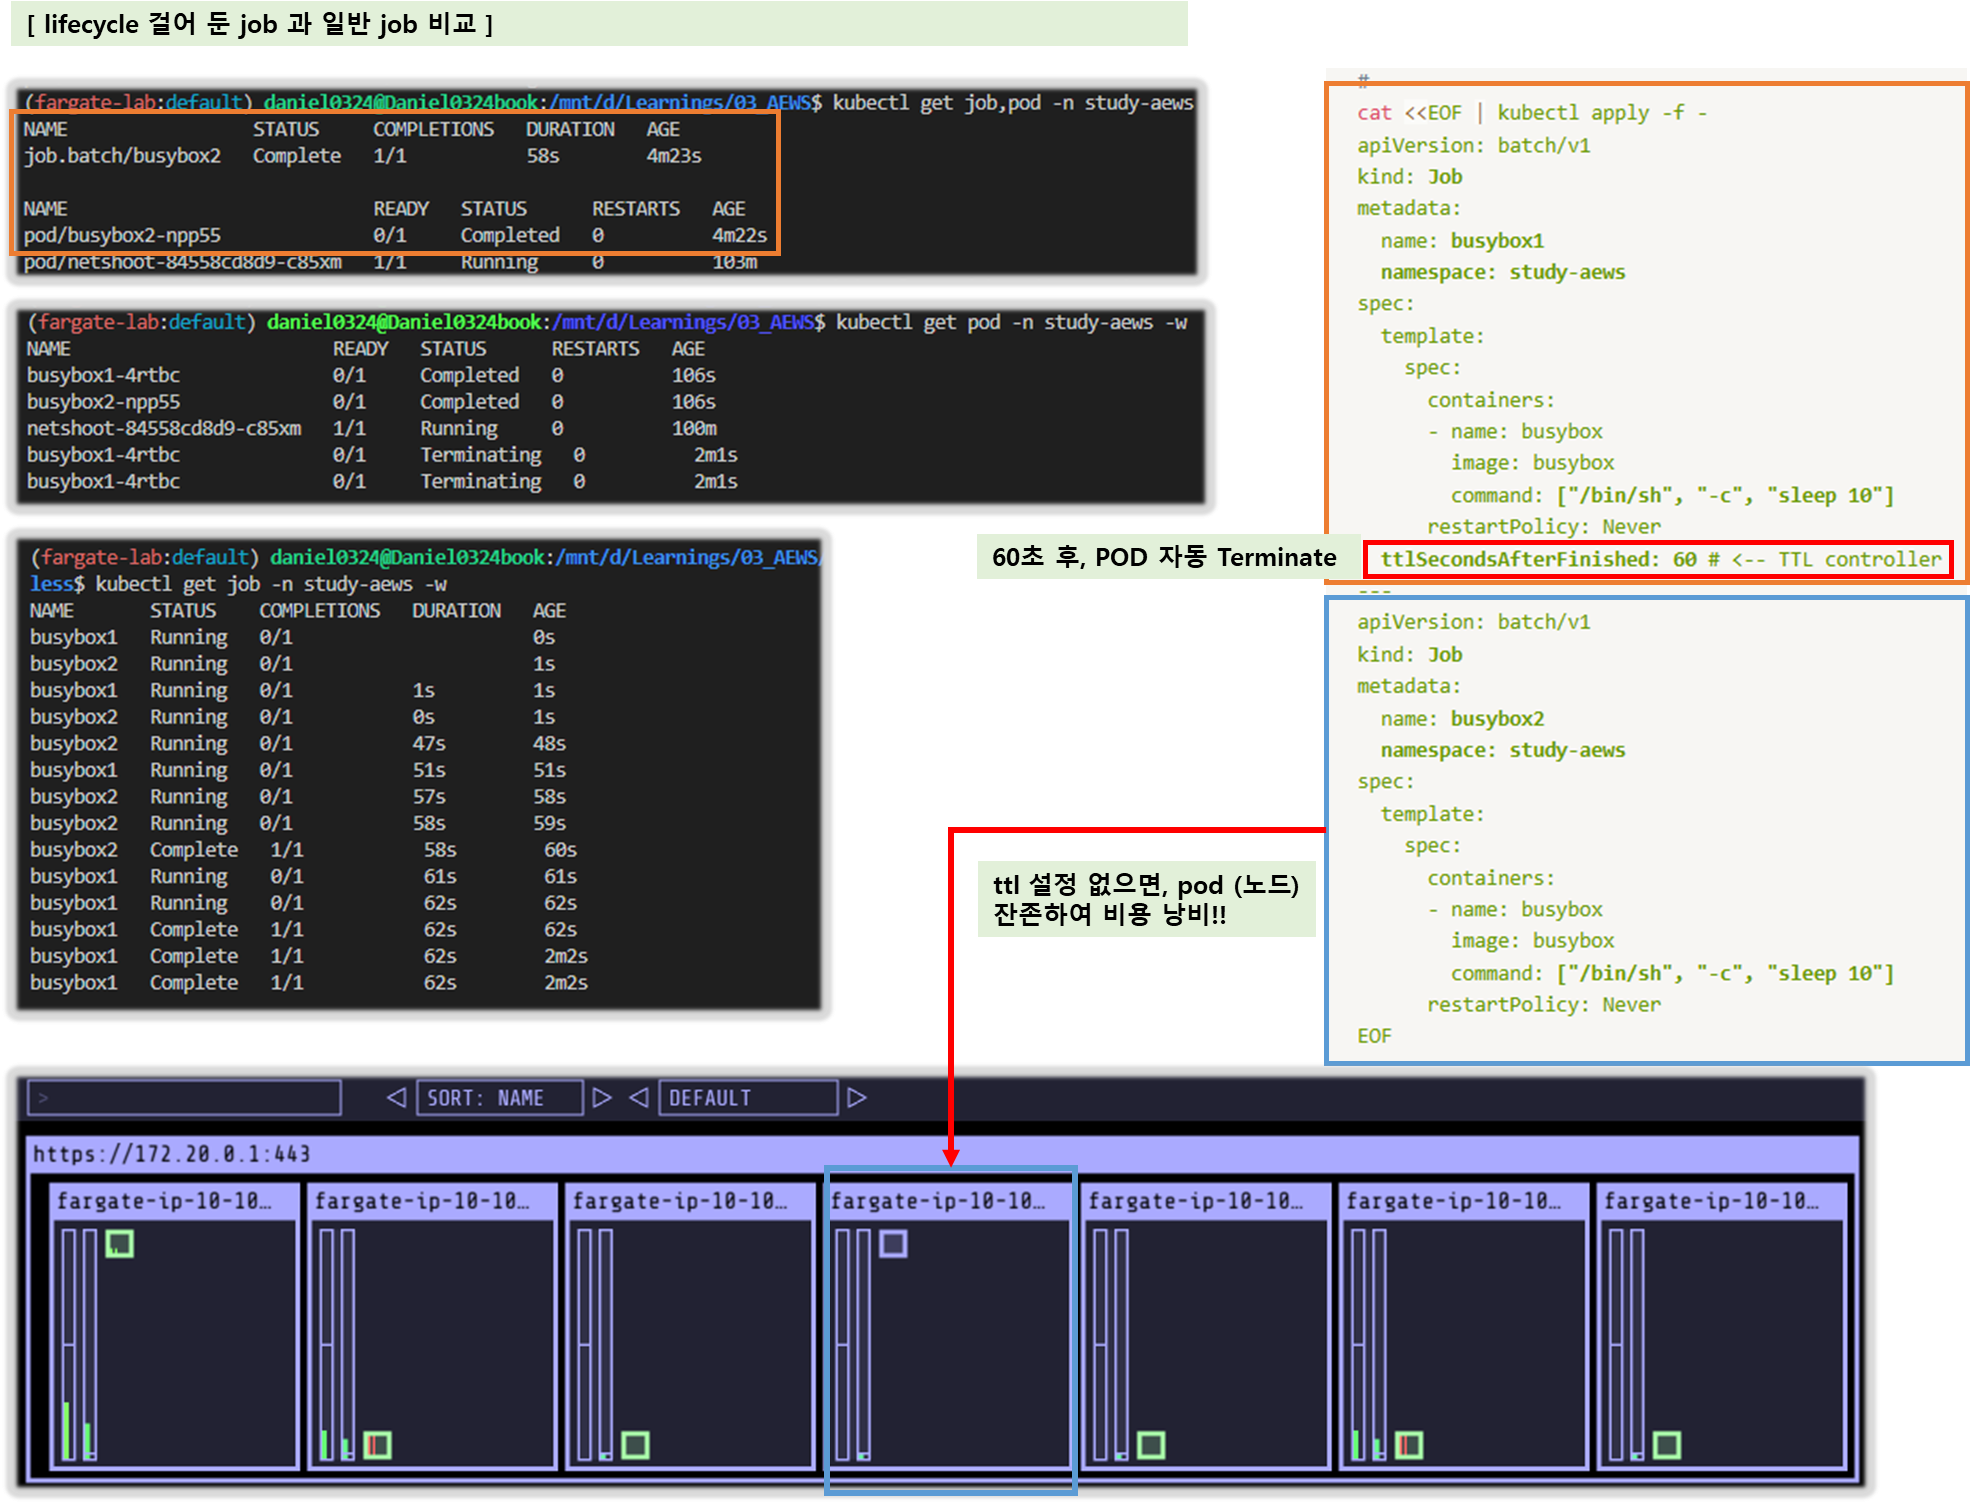
▶ fargate logging
들어가며 → 내장 로그 라우터는 어디에서 구동될까요???
a. Fargate의 Amazon EKS는 Fluent Bit 기반의 내장 로그 라우터를 제공합니다. 즉, Fluent Bit 컨테이너를 사이드카로 명시적으로 실행하지 않고 Amazon에서 실행합니다. 로그 라우터를 구성하기만 하면 됩니다.
- Amazon EKS on Fargate offers a built-in log router based on Fluent Bit. This means that you don’t explicitly run a Fluent Bit container as a sidecar, but Amazon runs it for you.
b. 구성은 다음 기준을 충족해야 하는 전용 ConfigMap을 통해 이루어집니다.
- 이름 : aws-logging
- aws-observability라는 전용 네임스페이스에서 생성됨
- 5300자를 초과할 수 없습니다.
c. ConfigMap을 생성하면 Fargate의 Amazon EKS가 자동으로 이를 감지하고 로그 라우터를 구성합니다. Fargate는 AWS에서 관리하는 Fluent Bit의 업스트림 호환 배포판인 Fluent Bit용 AWS 버전을 사용합니다. 자세한 내용은 GitHub의 Fluent Bit용 AWS를 참조하세요 - Docs
d. 로그 라우터를 사용하면 AWS의 다양한 서비스를 로그 분석 및 저장에 사용할 수 있습니다. Fargate에서 Amazon CloudWatch, Amazon OpenSearch 서비스로 로그를 직접 스트리밍할 수 있습니다. 또한 Amazon Data Firehose를 통해 Amazon S3, Amazon Kinesis 데이터 스트림 및 파트너 도구와 같은 대상으로 로그를 스트리밍할 수도 있습니다.
e. Fargate 포드를 배포할 기존 Kubernetes 네임스페이스를 지정하는 기존 Fargate 프로필입니다.
- 로그 발생 nginx 배포
cat <<EOF | kubectl apply -f -
apiVersion: apps/v1
kind: Deployment
metadata:
  name: sample-app
  namespace: study-aews
spec:
  replicas: 2
  selector:
    matchLabels:
      app: nginx
  template:
    metadata:
      labels:
        app: nginx
    spec:
      containers:
      - image: nginx:latest
        name: nginx
        ports:
        - containerPort: 80
          name: http
        resources:
          requests:
            cpu: 500m
            memory: 500Mi
          limits:
            cpu: 2
            memory: 2Gi
---
apiVersion: v1
kind: Service
metadata:
  name: sample-app
  namespace: study-aews
spec:
  selector:
    app: nginx
  ports:
  - port: 80
    targetPort: 80
    protocol: TCP
  type: ClusterIP
EOF

# 확인
kubectl get pod -n study-aews -l app=nginx
kubectl describe pod -n study-aews -l app=nginx

# 반복 접속
kubectl exec -it deploy/netshoot -n study-aews -- curl sample-app | grep title
while true; do kubectl exec -it deploy/netshoot -n study-aews -- curl sample-app | grep title; sleep 1; echo ; date; done;

# 로그 확인
kubectl stern -n study-aews -l app=nginx
- 로그 설정 정보 확인
# main.tf
...
  # Enable Fargate logging this may generate a large ammount of logs, disable it if not explicitly required
  enable_fargate_fluentbit = true
  fargate_fluentbit = {
    flb_log_cw = true
  }
...

# aws-observability라는 이름의 전용 네임스페이스 확인
kubectl get ns --show-labels

# Fluent Conf 데이터 값이 포함된 ConfigMap : 컨테이너 로그를 목적지로 배송 설정
## Amazon EKS Fargate 로깅은 ConfigMap의 동적 구성을 지원하지 않습니다.
## ConfigMap에 대한 모든 변경 사항은 새 포드에만 적용됩니다. 기존 포드에는 변경 사항이 적용되지 않습니다.
kubectl get cm -n aws-observability
kubectl get cm -n aws-observability aws-logging -o yaml
data:
  filters.conf: |
    [FILTER]
      Name parser
      Match *
      Key_name log
      Parser crio
    [FILTER]
      Name kubernetes
      Match kube.*
      Merge_Log On
      Keep_Log Off
      Buffer_Size 0
      Kube_Meta_Cache_TTL 300s
  flb_log_cw: "true"  # Ships Fluent Bit process logs to CloudWatch.
  output.conf: |+
    [OUTPUT]
          Name cloudwatch
          Match kube.*
          region ap-northeast-2
          log_group_name /fargate-serverless/fargate-fluentbit-logs2025031600585521800000000c
          log_stream_prefix fargate-logs-
          auto_create_group true
    [OUTPUT]
          Name cloudwatch_logs
          Match *
          region ap-northeast-2
          log_group_name /fargate-serverless/fargate-fluentbit-logs2025031600585521800000000c
          log_stream_prefix fargate-logs-fluent-bit-
          auto_create_group true

  parsers.conf: |
    [PARSER]
      Name crio
      Format Regex
      Regex ^(?<time>[^ ]+) (?<stream>stdout|stderr) (?<logtag>P|F) (?<log>.*)$
      Time_Key    time
      Time_Format %Y-%m-%dT%H:%M:%S.%L%z
      Time_Keep On
- 수집된 파드 로그 확인 : CW Log streams 에서 nginx 로 검색 필터링(fluent-bot 포함 체크) → First event time 중 가장 최근것 클릭
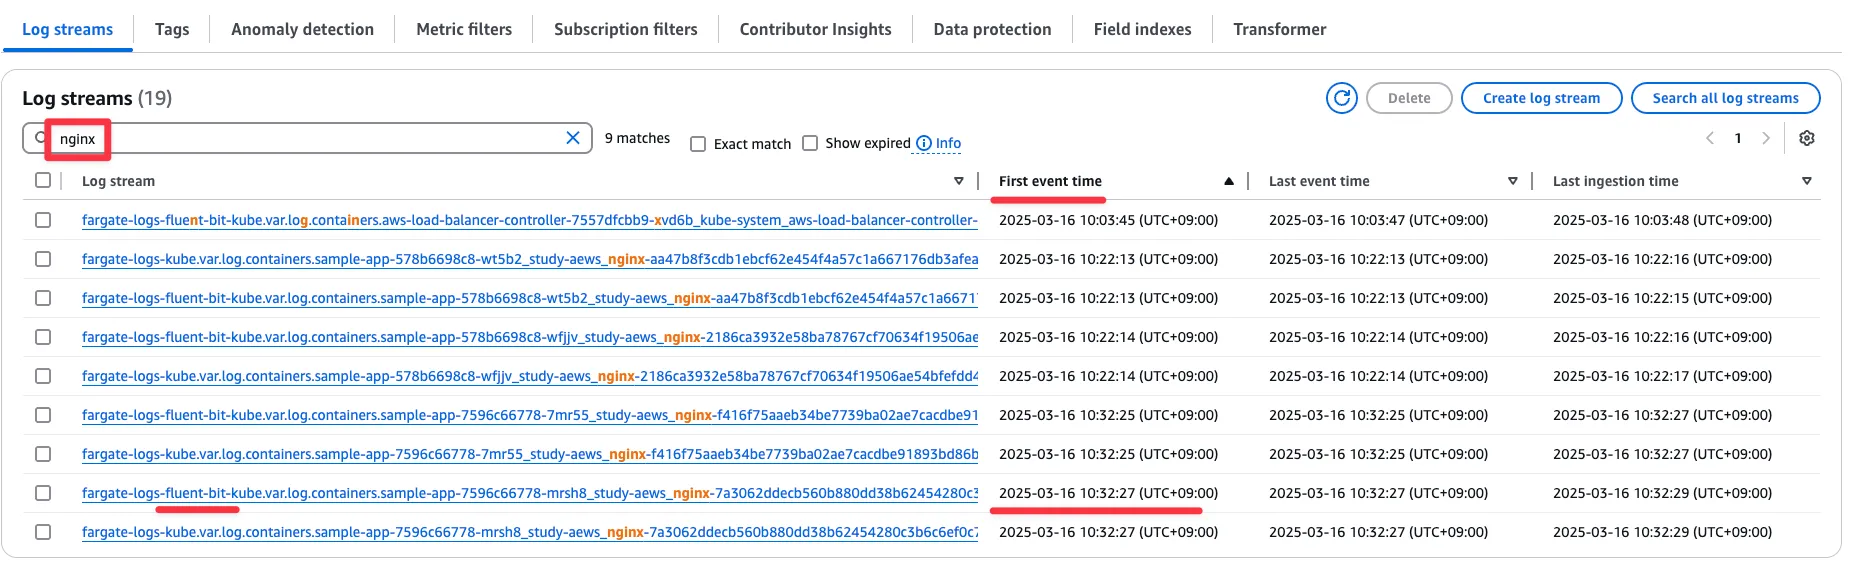
- 아래 처럼 해당 로그 스트림 화면에서 상세 로그 정보 확인 : curl 접속 로그 확인
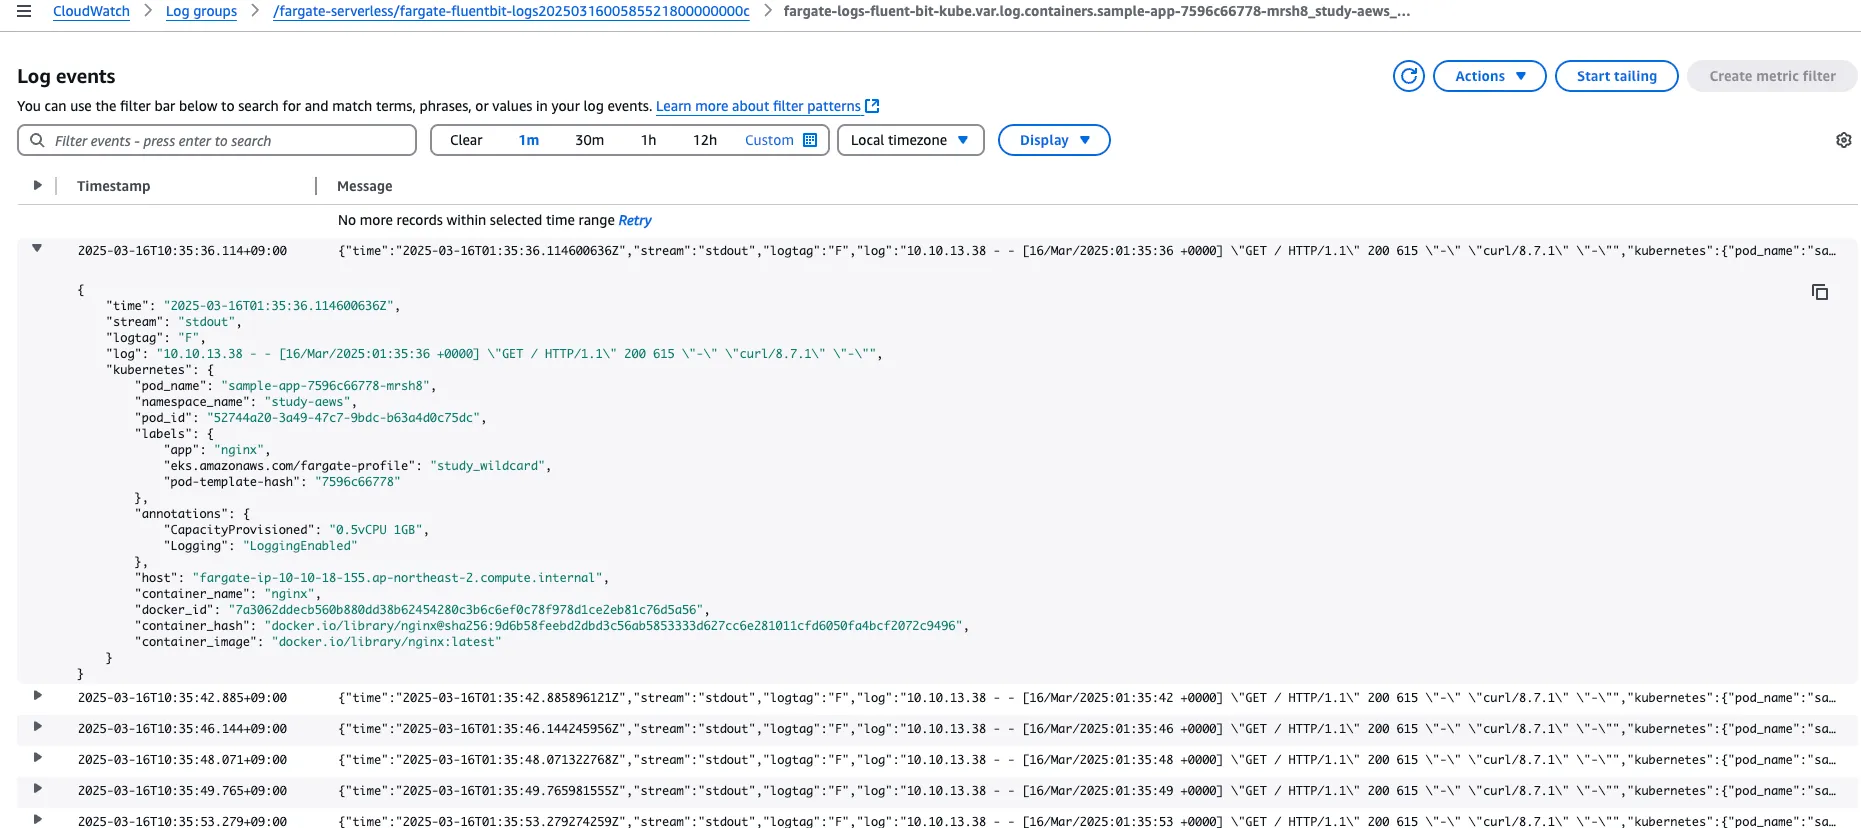
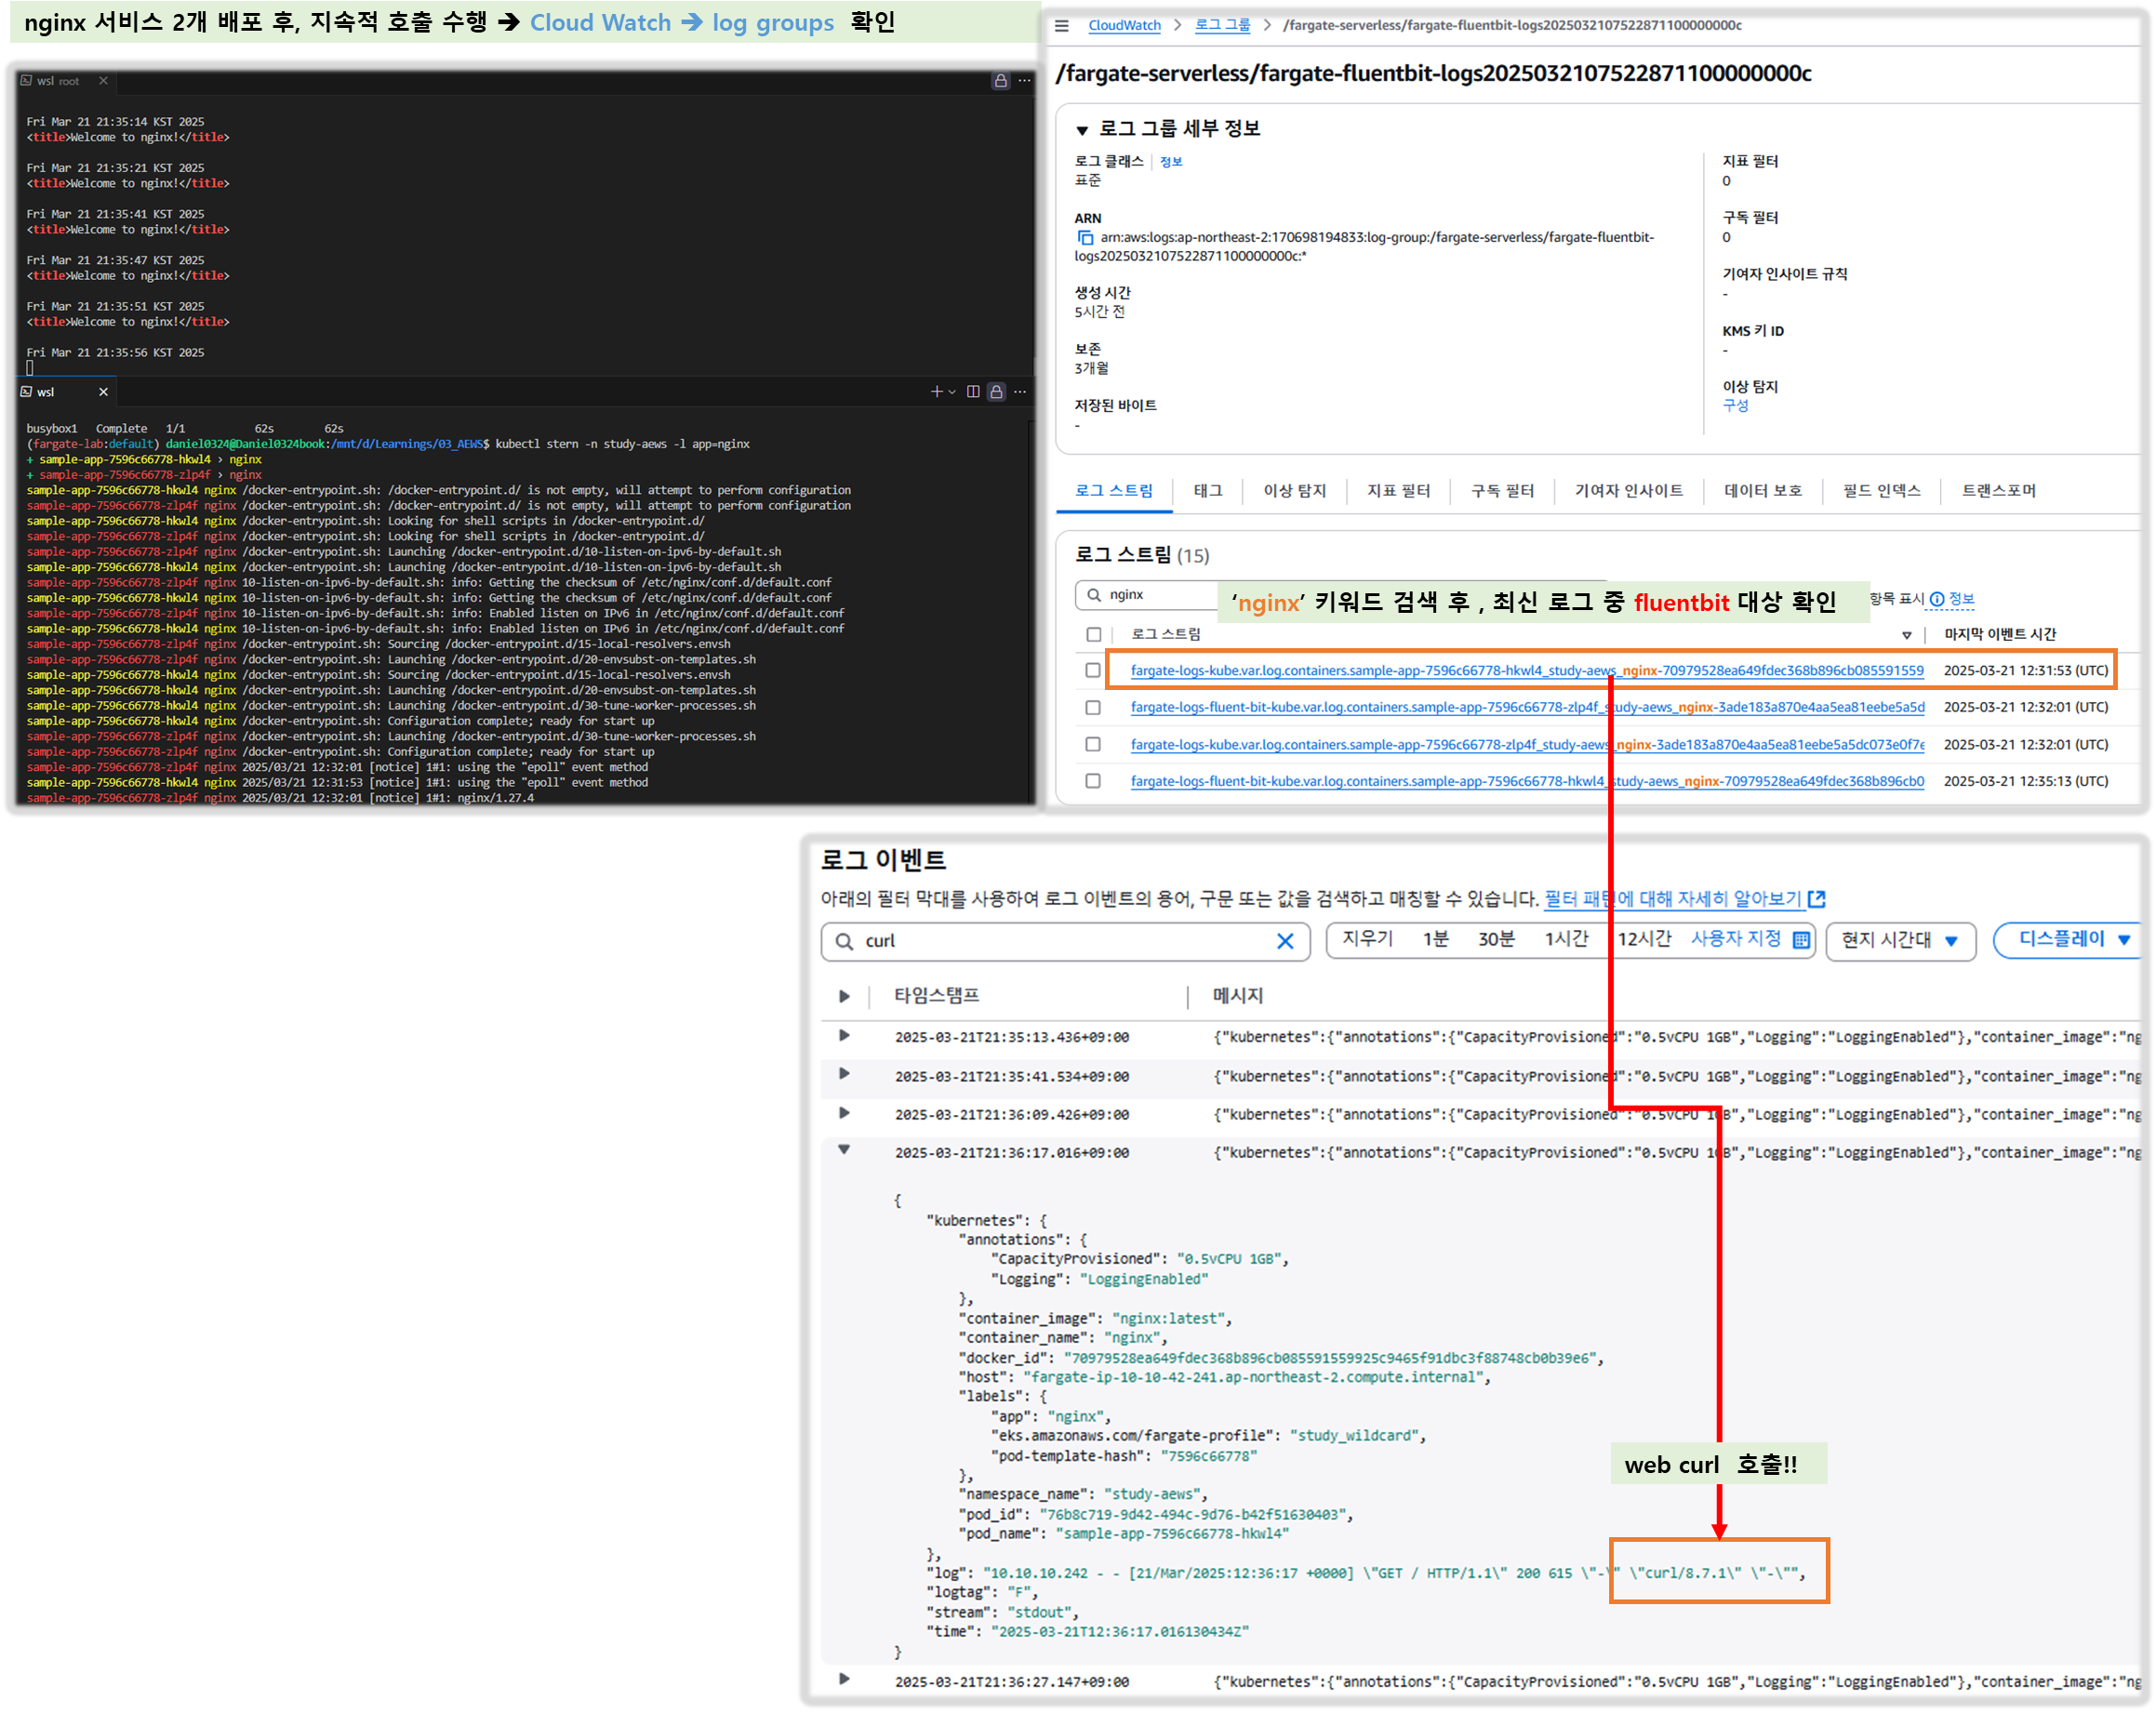
- 삭제 : kubectl delete deploy,svc -n study-aews sample-app
▶ 자원 정리 : 순서대로 삭제 할 것!!! FAQ (삭제 잘 안 되거나 오래 걸릴 때) 10분 소요 - Link
1) 실습 배포 리소스들 먼저 삭제
# 게임 실습 리소스  삭제
kubectl delete ingress ingress-2048 -n study-aews
kubectl delete svc service-2048 -n study-aews && kubectl delete deploy deployment-2048 -n study-aews

# netshoot 삭제
kubectl delete deploy netshoot -n study-aews

# kube-ops-view 삭제
helm uninstall kube-ops-view -n kube-system
2) 테라폼 삭제
# 테라폼 삭제 : vpc 삭제가 잘 안될 경우 aws 콘솔에서 vpc 수동 삭제 -> vnic 등 남아 있을 경우 해당 vnic 강제 삭제
terraform destroy -auto-approve

# VPC 삭제 확인
aws ec2 describe-vpcs --filter 'Name=isDefault,Values=false' --output yaml

# kubeconfig 삭제
rm -rf ~/.kube/config
2. EKS Auto Mode
[ About 'Auto mode' ]
☞ EKS Auto Mode는 AWS가 Kubernetes 클러스터의 인프라스트럭처를 자동으로 설정하고 관리해주는 기능입니다. 이를 통해 컴퓨트 오토스케일링, 파드 및 서비스 네트워킹, 애플리케이션 로드 밸런싱, 클러스터 DNS, 블록 스토리지, GPU 지원 등 다양한 Kubernetes 기능을 핵심 구성요소로서 제공하며, AWS의 전문성을 활용하여 일상적인 운영을 간소화할 수 있습니다.
[ 아키텍쳐 구성도 - 추정 내용 포함 ]
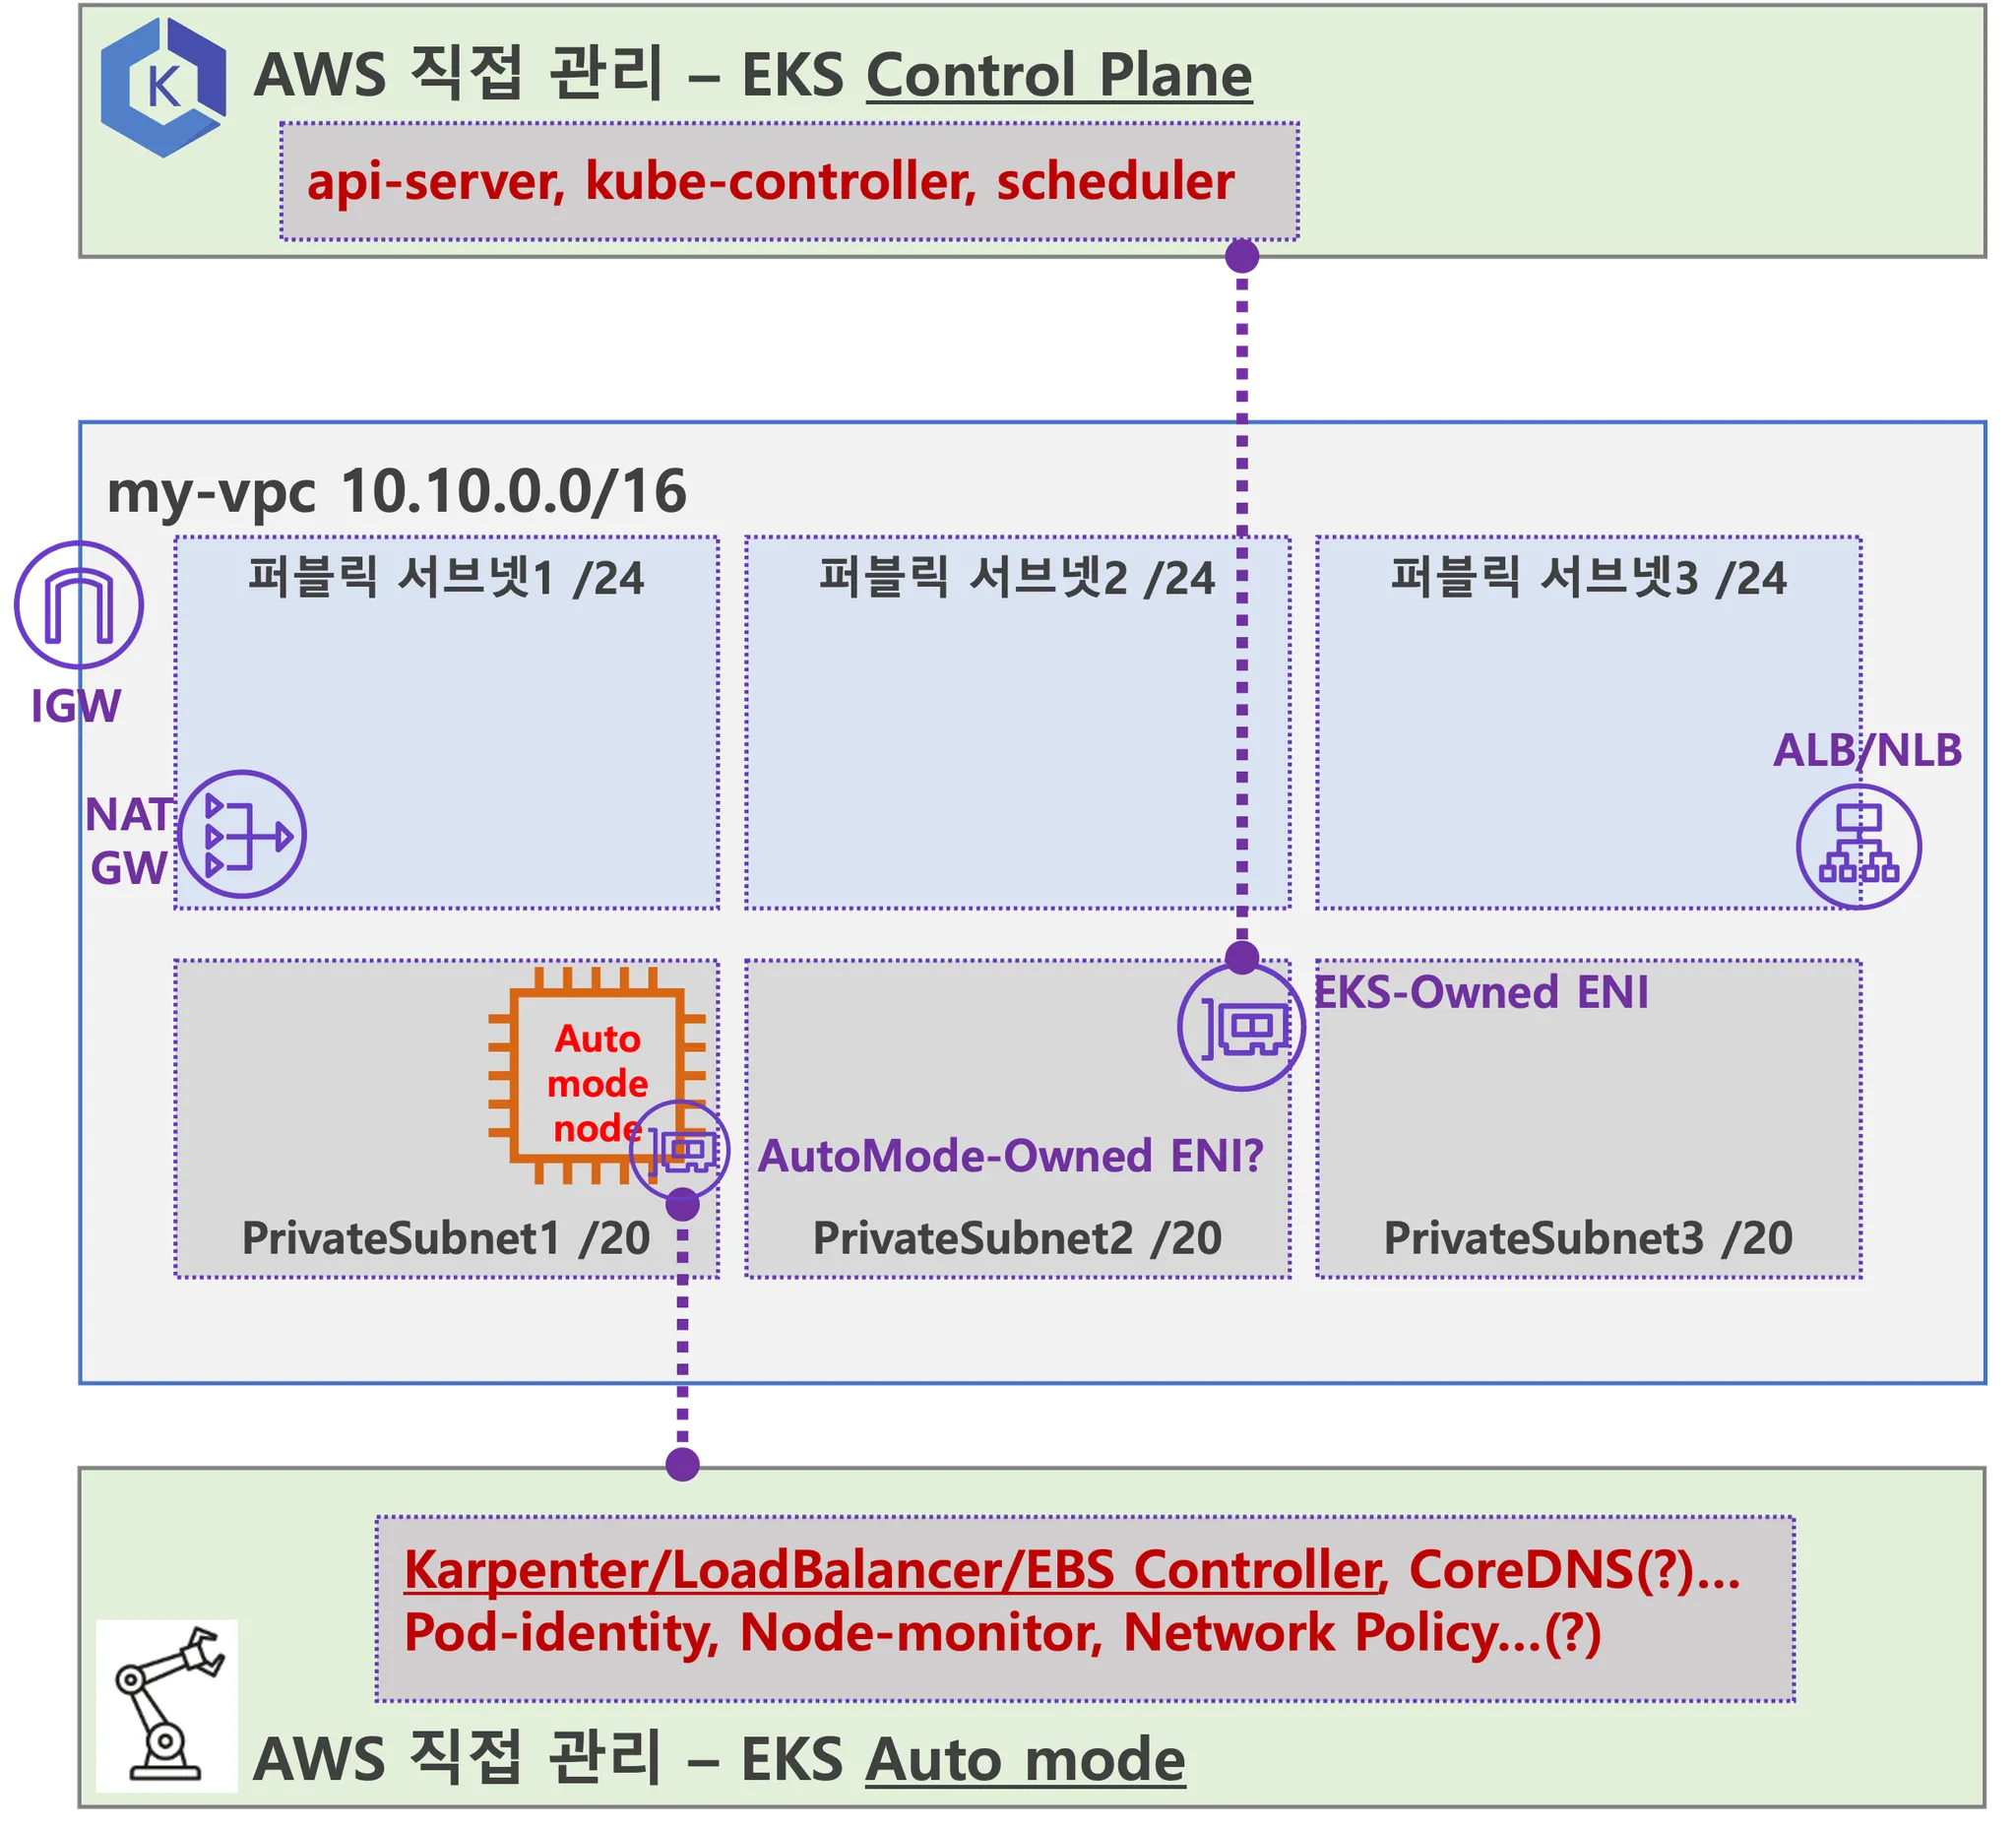
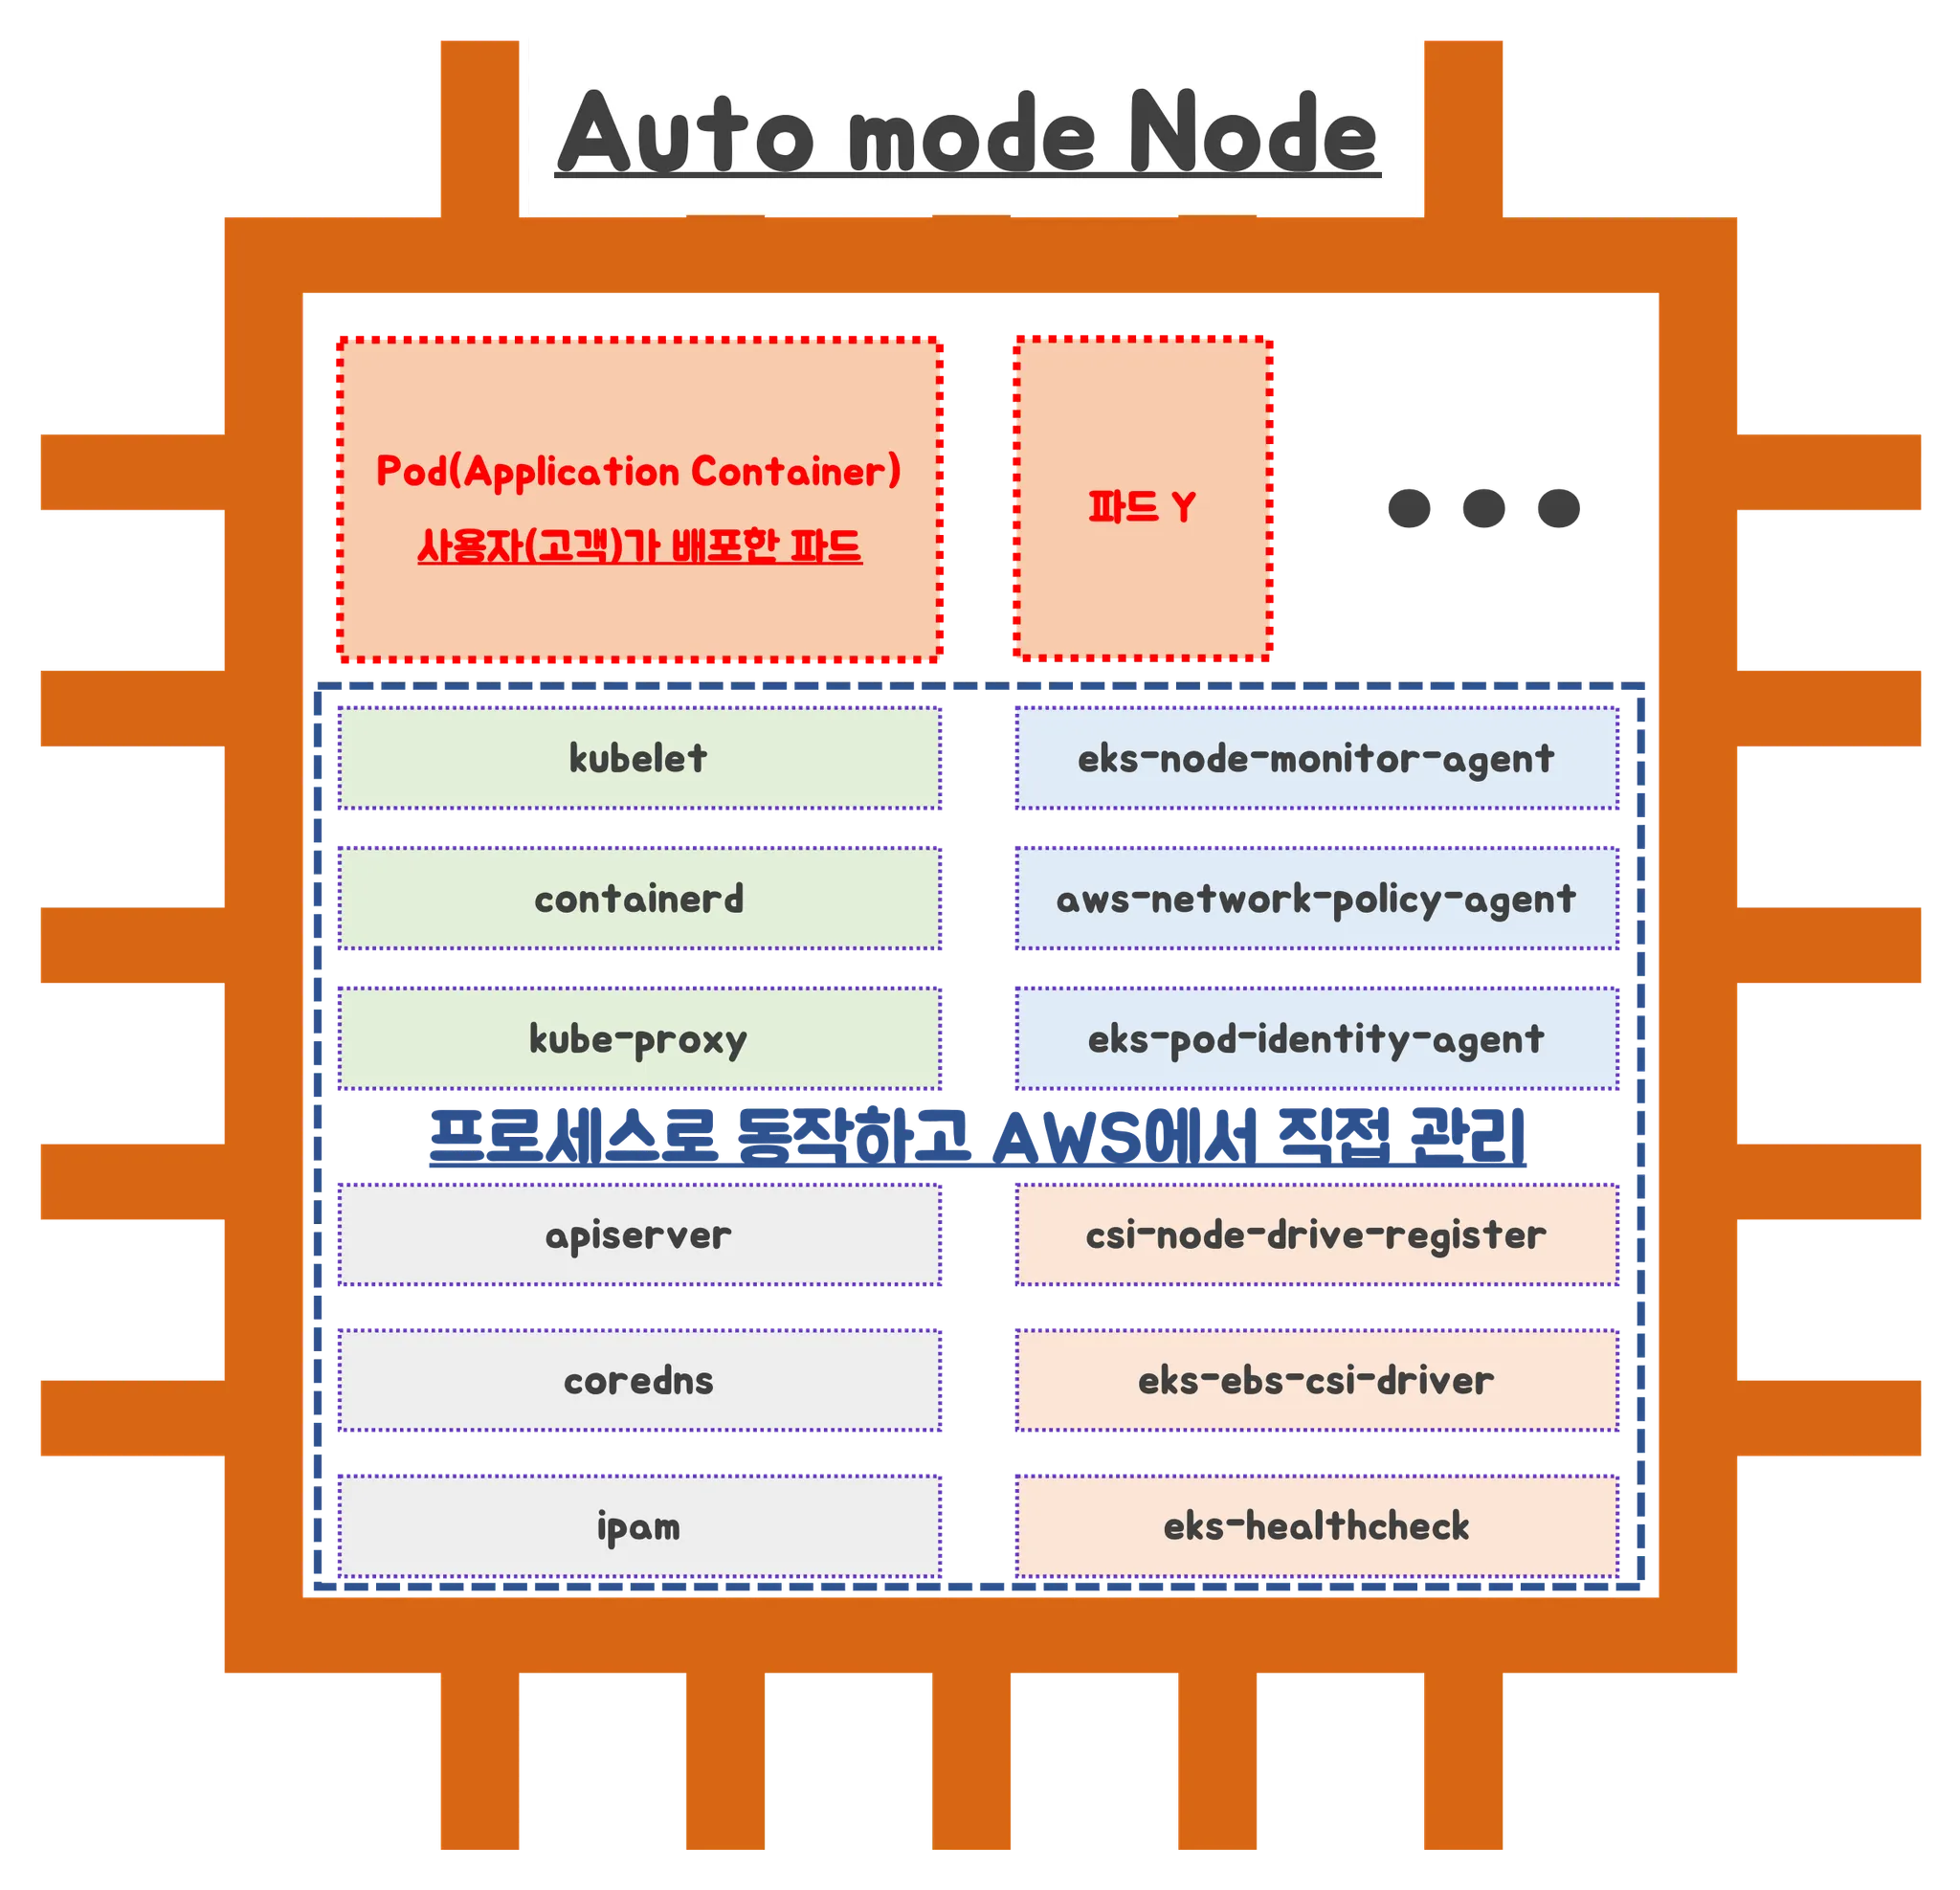
[ 주요 특징 ]
- 클러스터 관리 간소화: EKS Auto Mode는 프로덕션 준비가 완료된 클러스터를 최소한의 운영 오버헤드로 제공하여, 깊은 EKS 전문 지식 없이도 동적 워크로드를 자신 있게 실행할 수 있도록 도와줍니다. (AWS Documentation)
- 애플리케이션 가용성 향상: 워크로드의 수요에 따라 노드를 동적으로 추가하거나 제거하여 수동 용량 계획의 필요성을 줄이고, 애플리케이션의 가용성을 보장합니다. (AWS Documentation)
- 비용 효율성: 컴퓨트 비용을 최적화하도록 설계되어, NodePool 및 워크로드 요구 사항에 정의된 유연성을 준수하면서도 비용을 절감할 수 있습니다. (AWS Documentation)
- 관리형 구성요소: 파드 IP 주소 할당, 파드 네트워크 정책, 로컬 DNS 서비스, GPU 플러그인, 상태 검사기, EBS CSI 스토리지 등 Kubernetes 및 AWS 클라우드 기능을 핵심 구성요소로 포함하여, 추가 기능으로 관리해야 할 필요성을 줄입니다. (AWS Documentation)
- 커스터마이징 가능한 NodePools 및 NodeClasses: 스토리지, 컴퓨트 또는 네트워킹 구성을 변경해야 하는 워크로드의 경우, 사용자 지정 NodePools 및 NodeClasses를 생성하여 특정 요구 사항을 충족시킬 수 있습니다. (AWS Documentation)
[ More ... ]
▶ AWS re:Invent 2024 - The future of Kubernetes on AWS (KUB201) - Youtube , PDF
- EKS 지난 7년 발전 과정
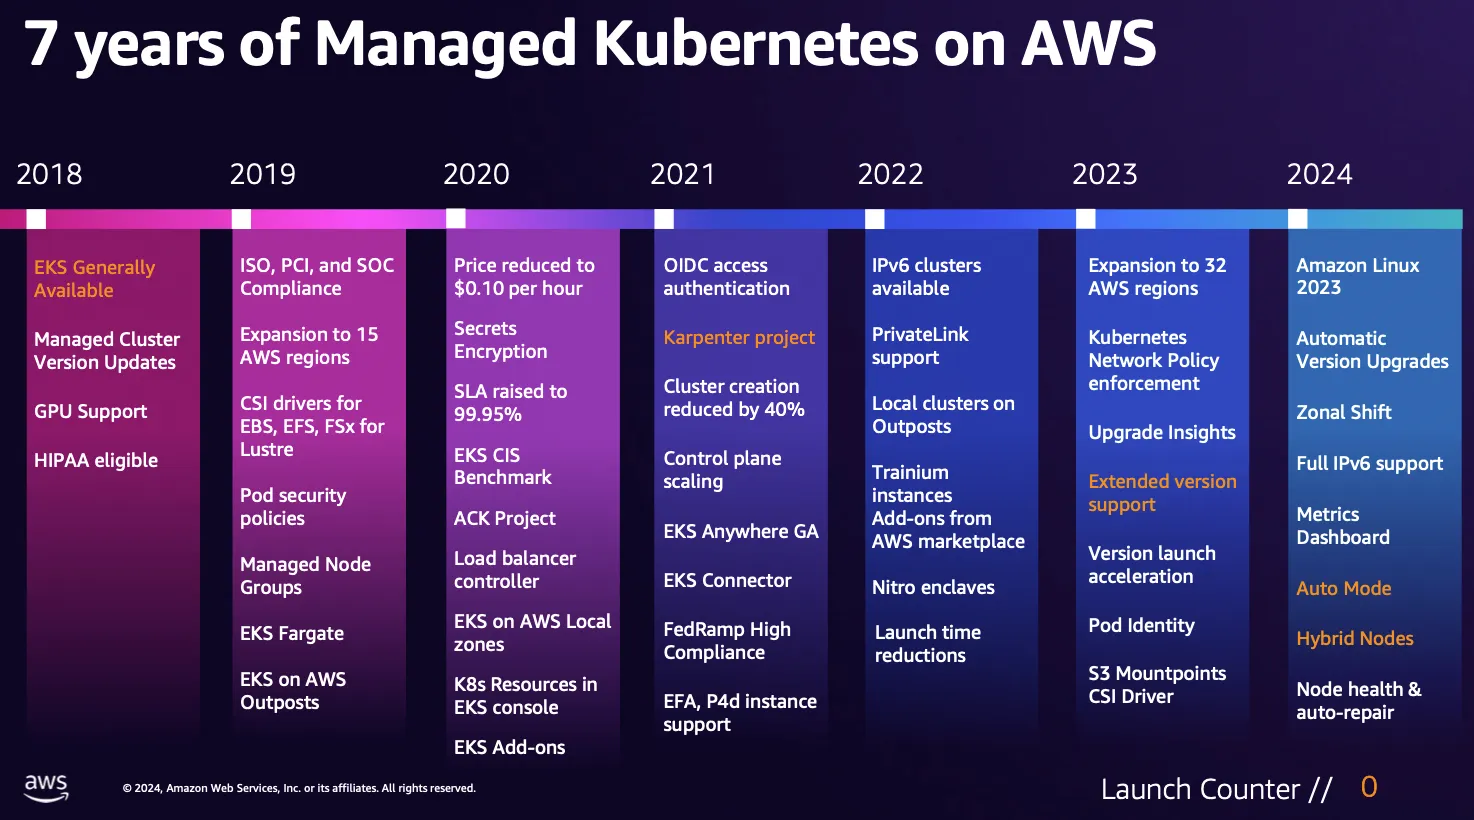
- ECR Enhanced Image Scanning : DB와 OS 취약점 탐색 기능 추가
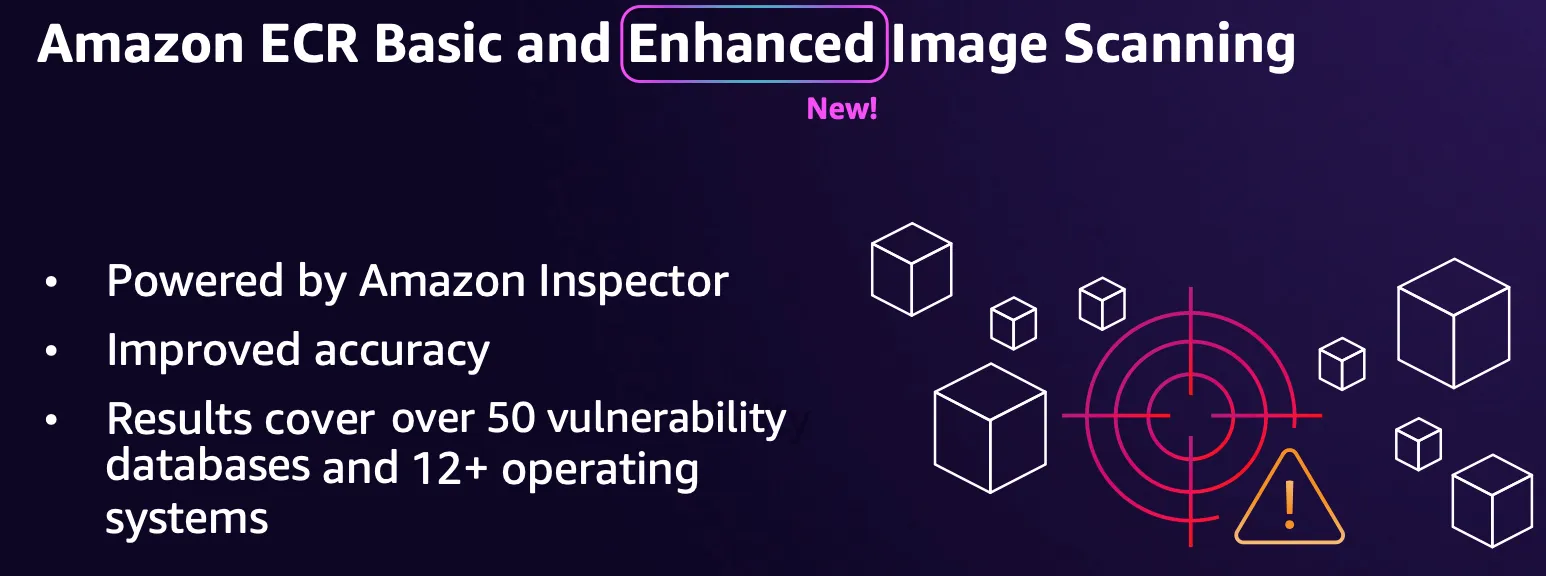
- 다른 컨테이너 이미지 저장소(Upstream registry)에 동기화(sync)를 통하여 신규 이미지를 즉시에 제공 가능
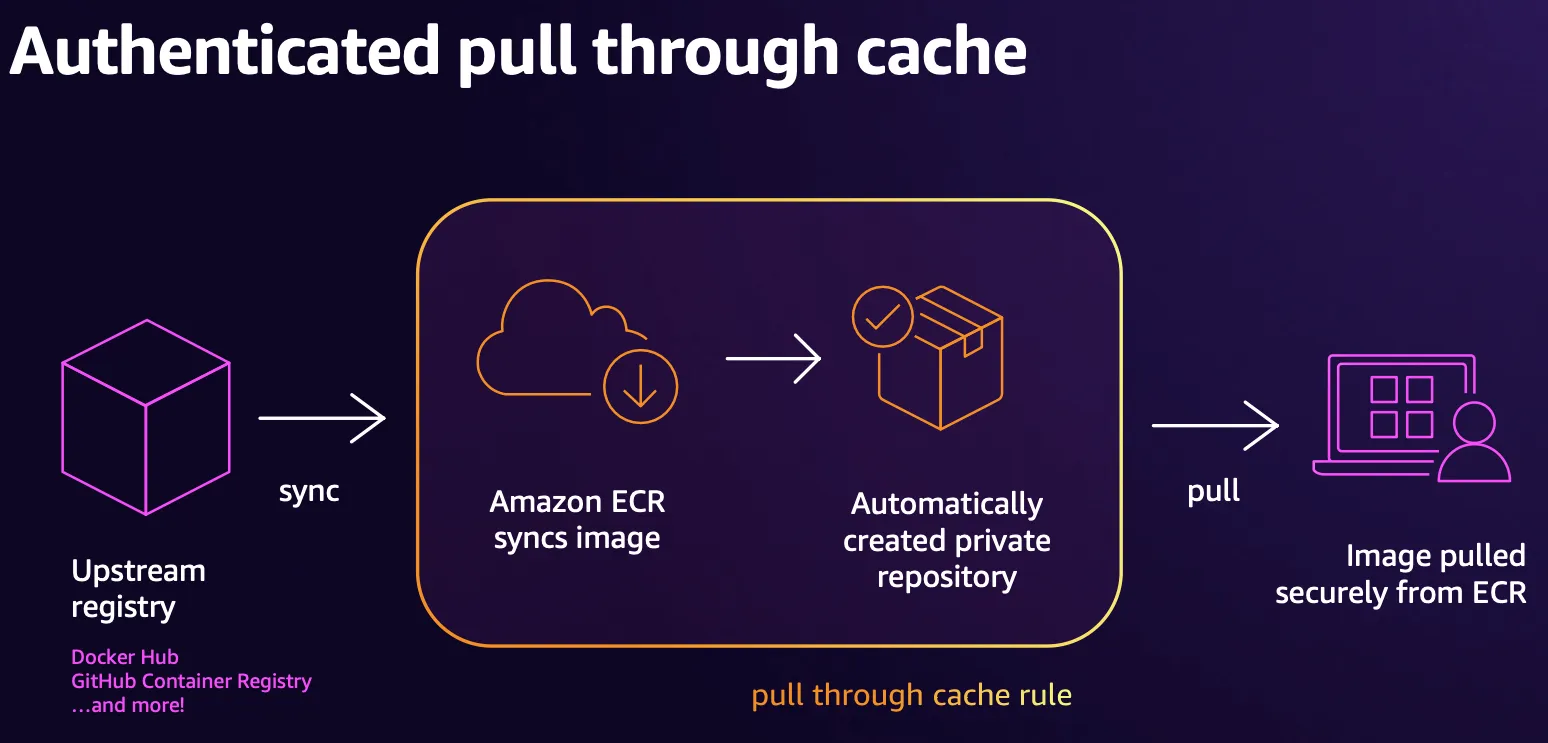
- k8s 버전 출시 후 보통 .1 패치 시점(40일 정도)에 EKS 버전 출시됨. 23년의 경우 k8s 버전을 따라가기 위해서 어쩔수없이? 1년에 4개 버전 출시됨.
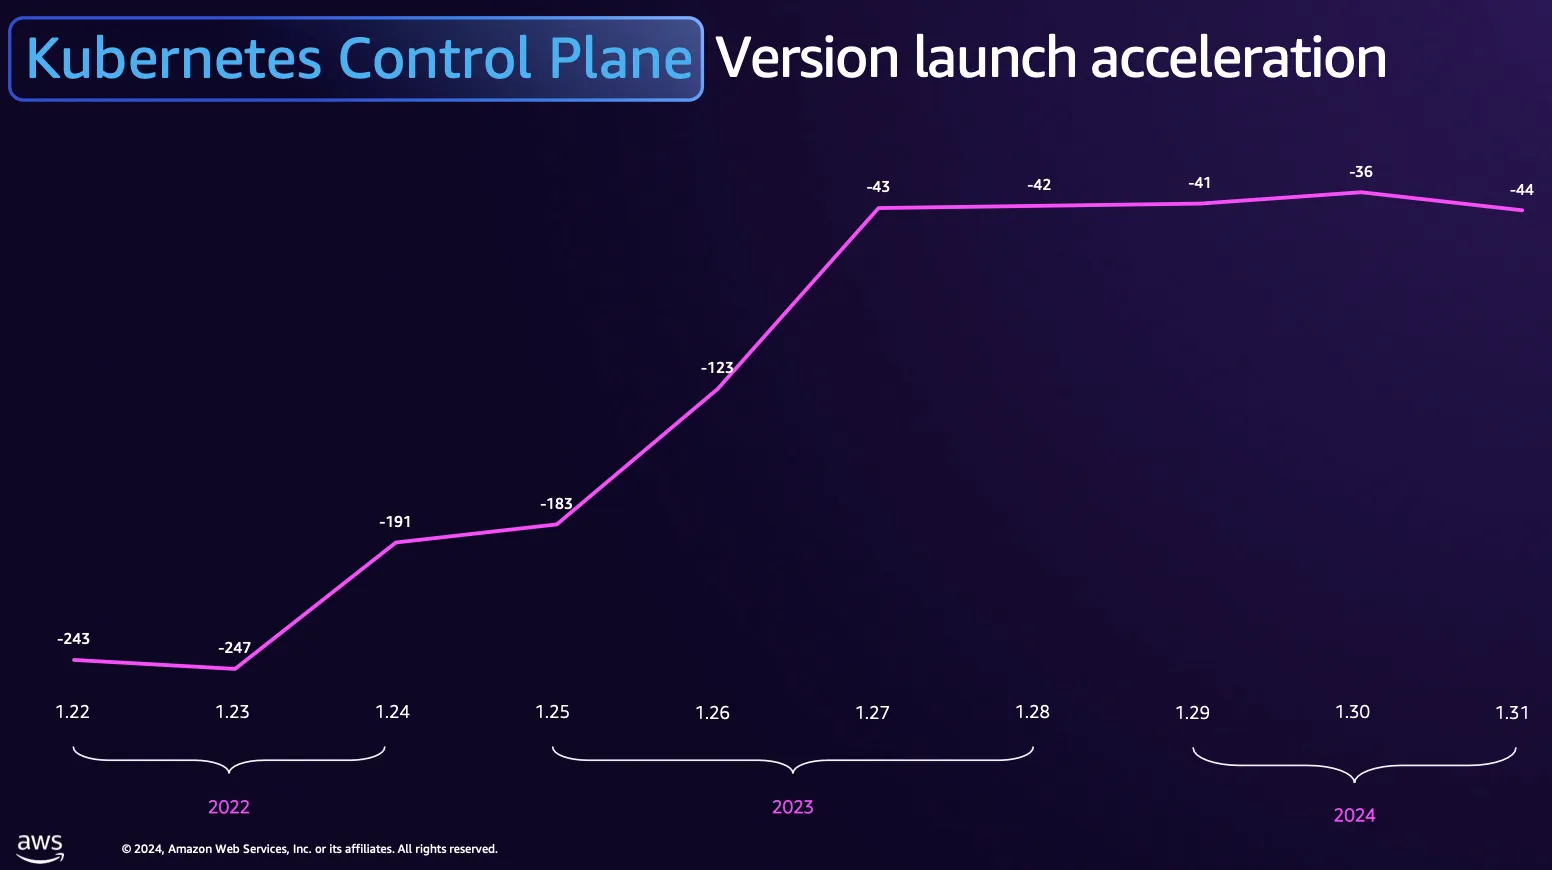
- Extended Support for Amazon EKS 연장 지원 제공
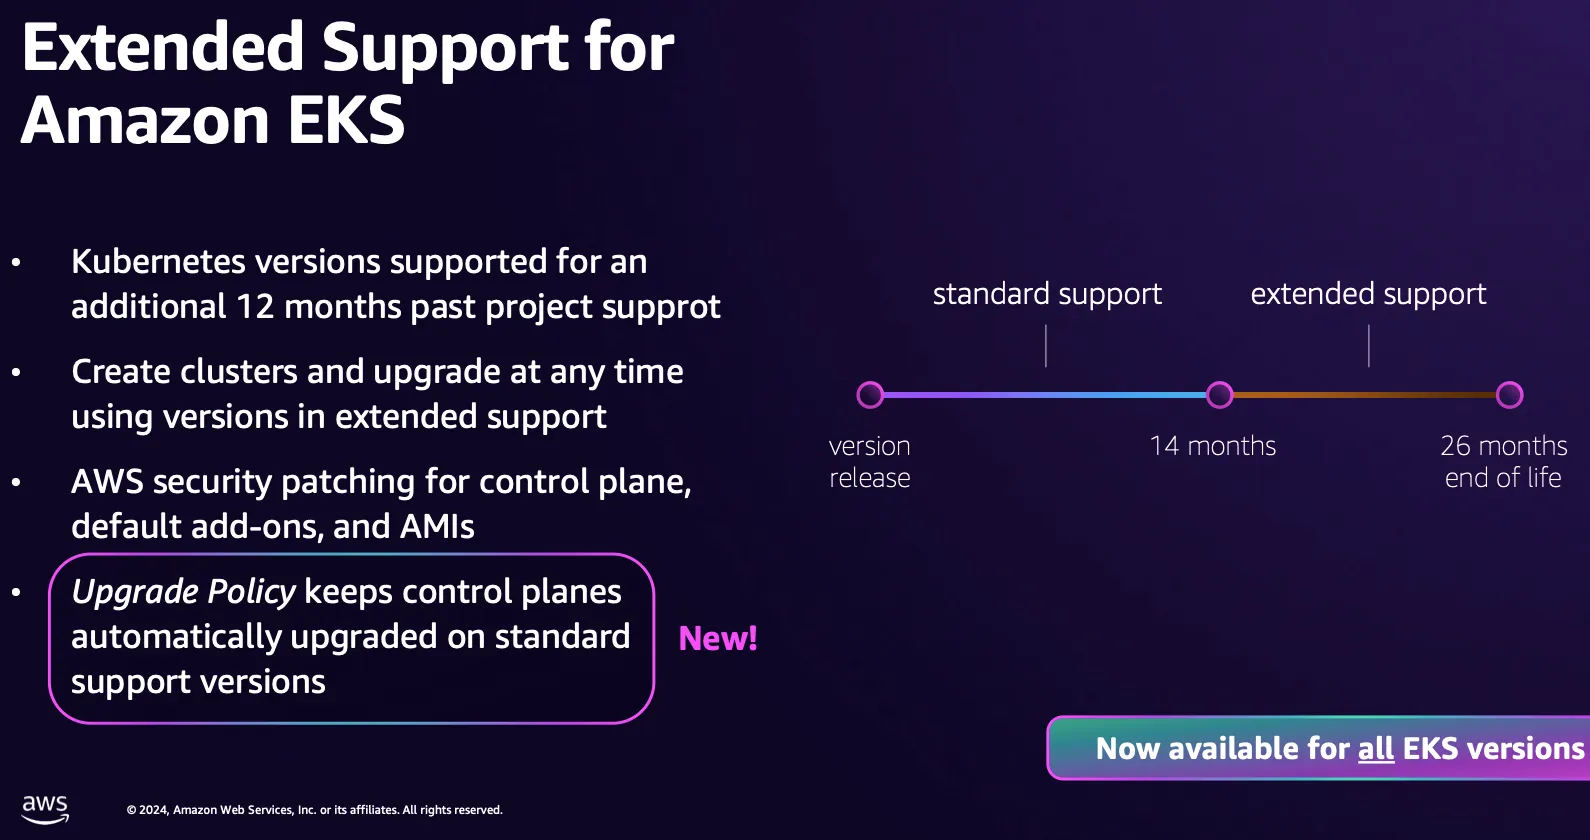
- Upgrade insights 에서 문제가 있는 api 요청 확인 가능
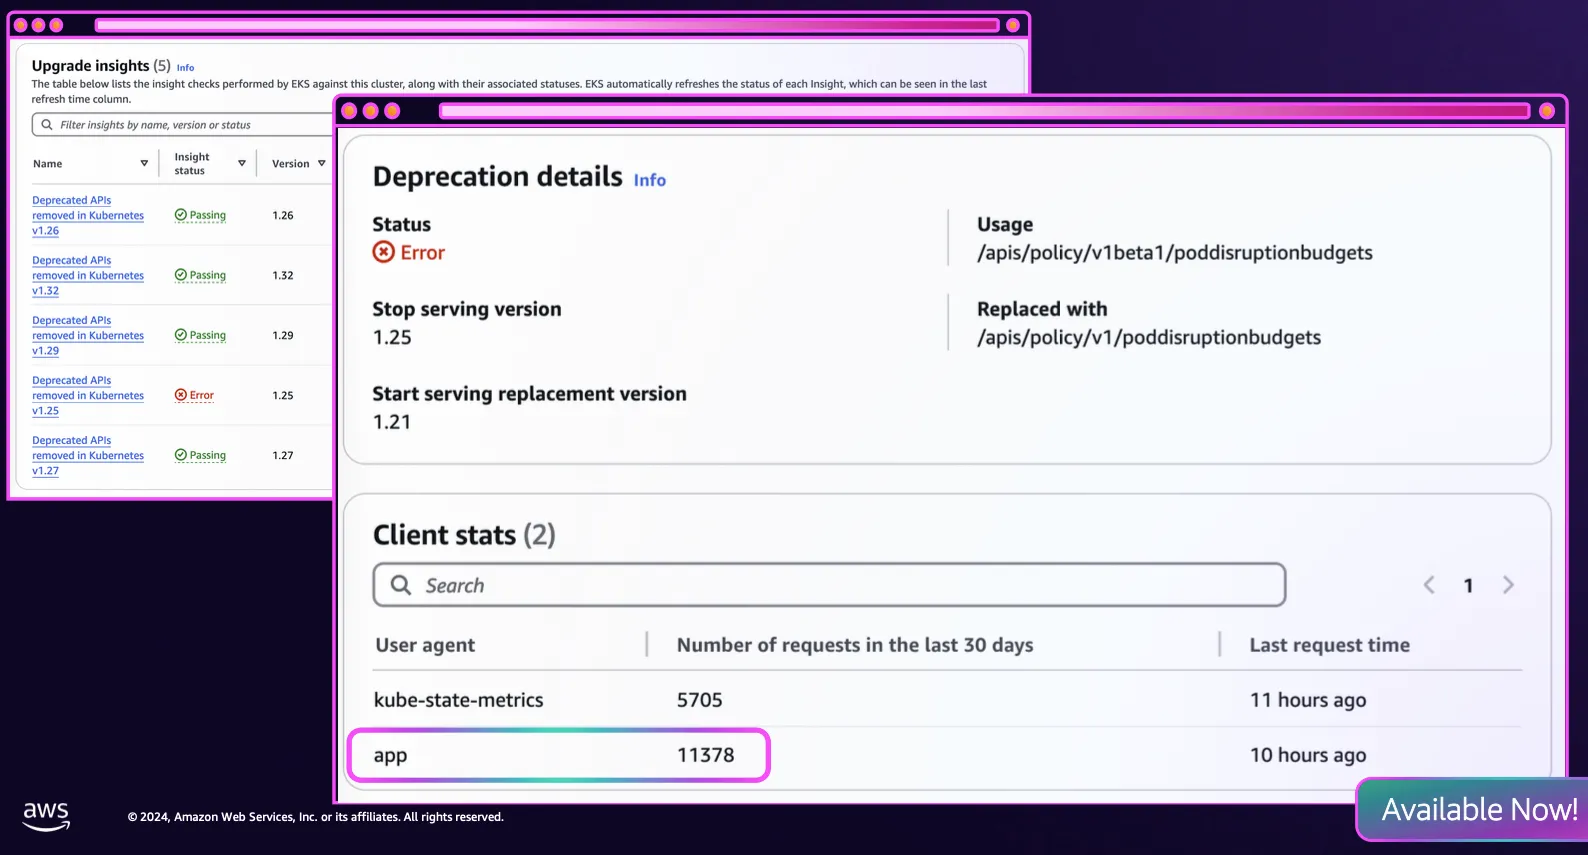
- 2개의 메트릭 추가(controller-manager, scheduler)
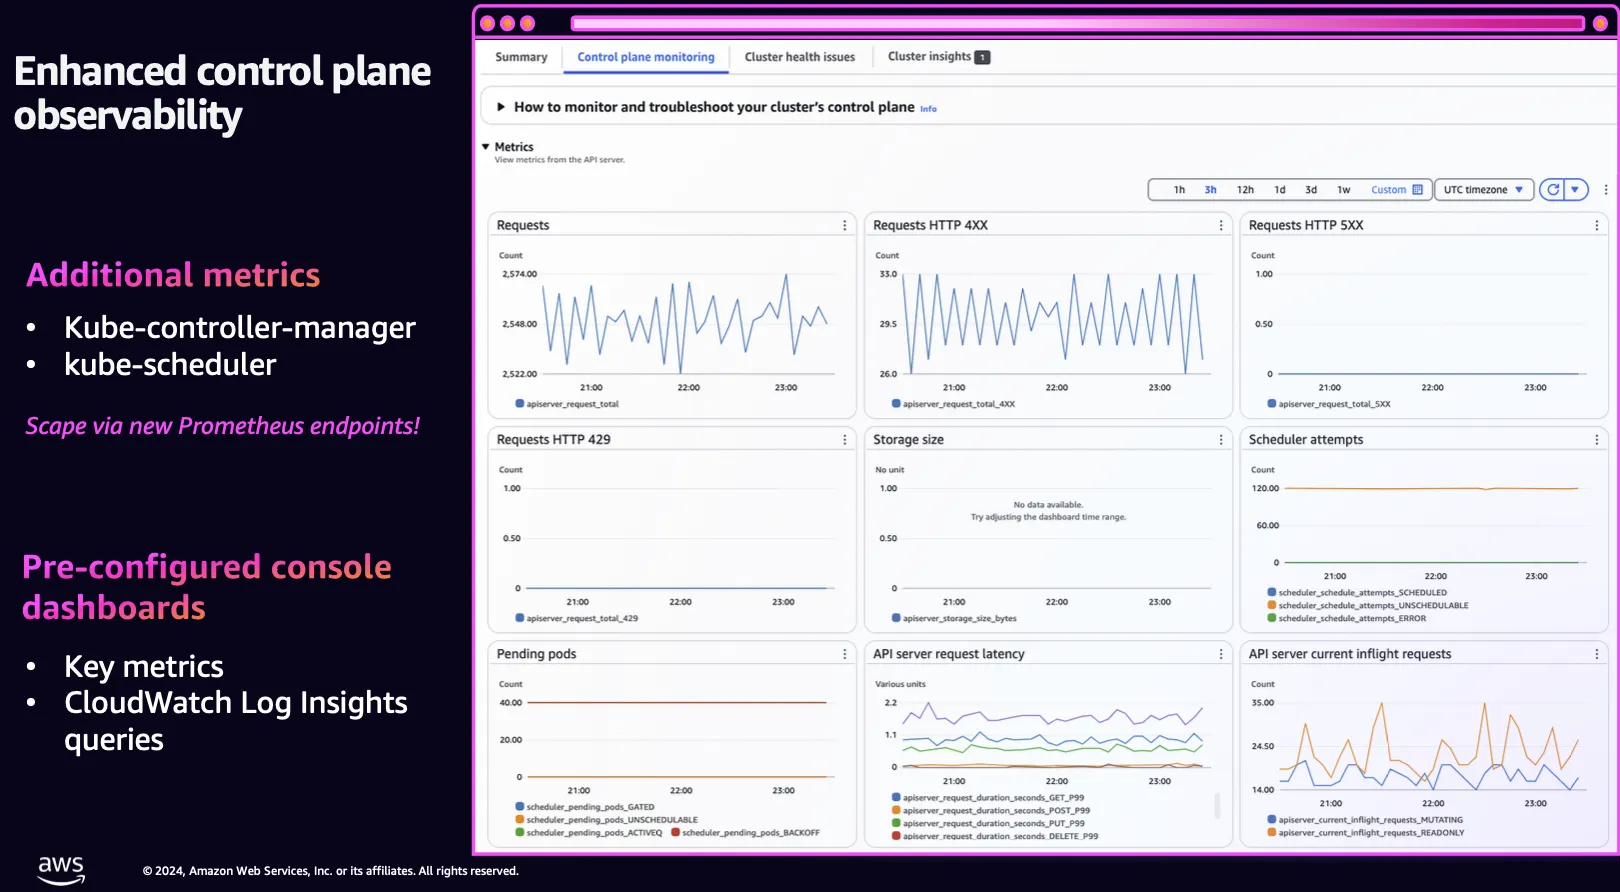
- CloudWatch Network Flow Monitor
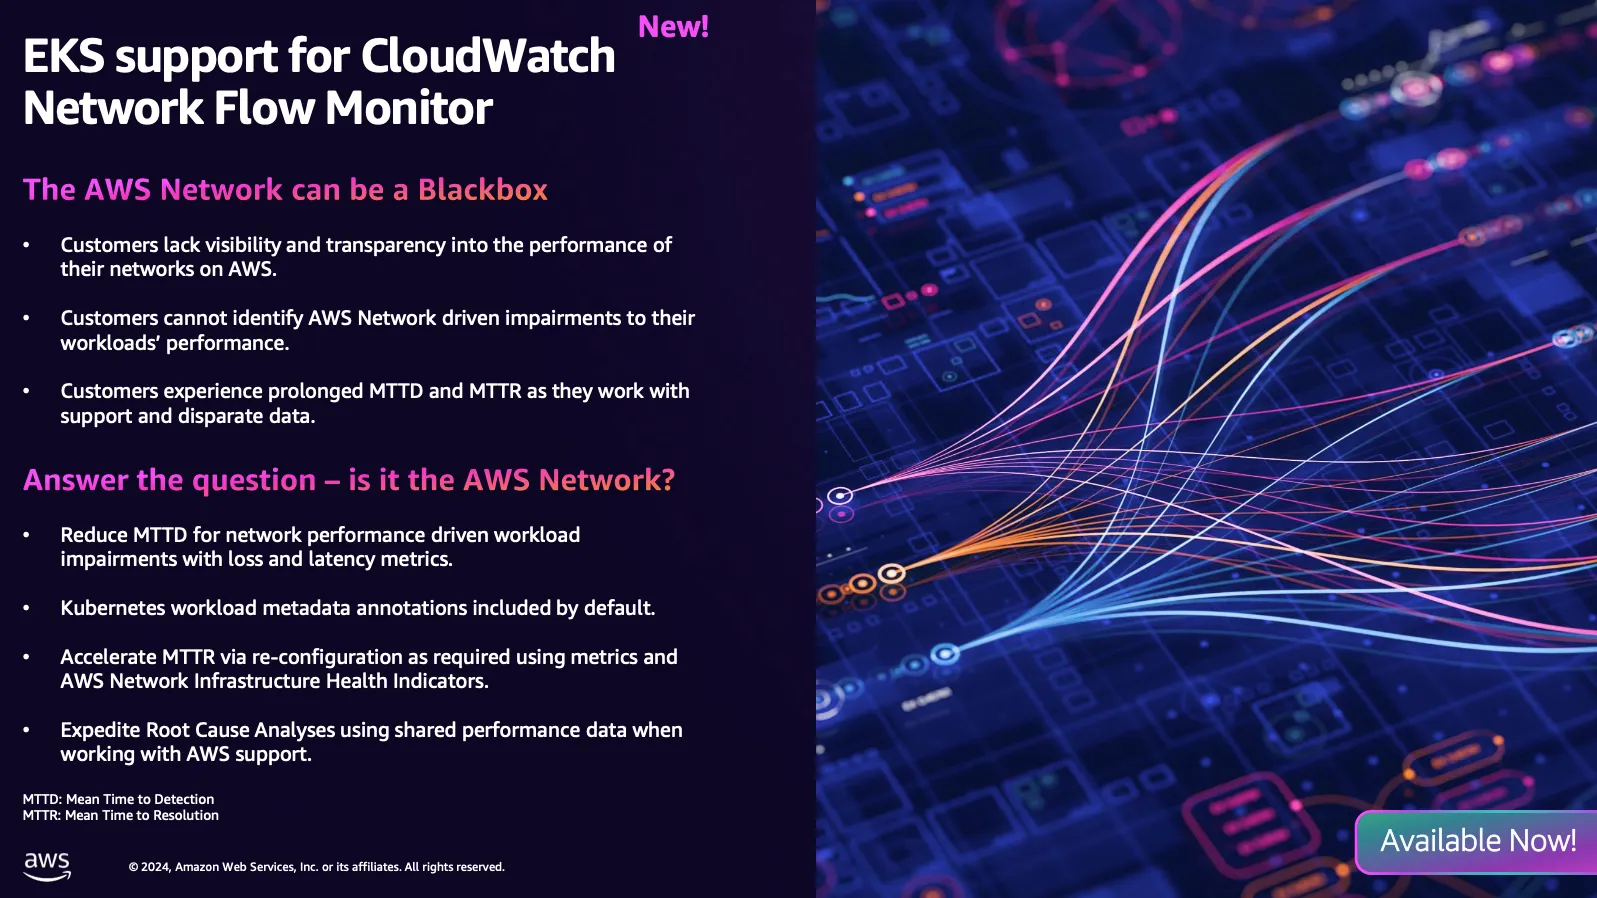
- 파드, 네임스페이스, 클러스터 별 EC2 비용 확인 가능!
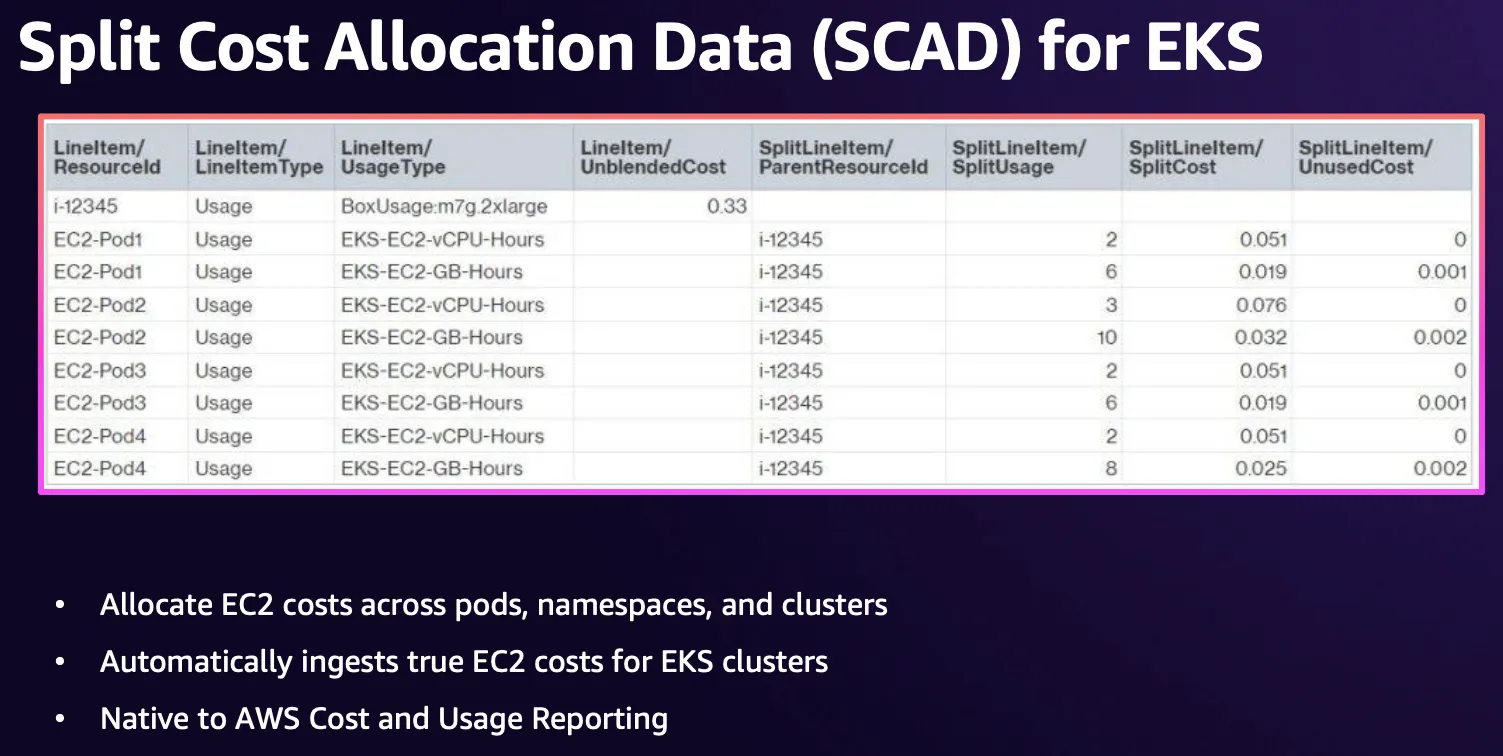
- add-ons 추가 : CW Container Insights, CSI Snapshot Controller, Pod Identity Agent, Node Monitoring Agent
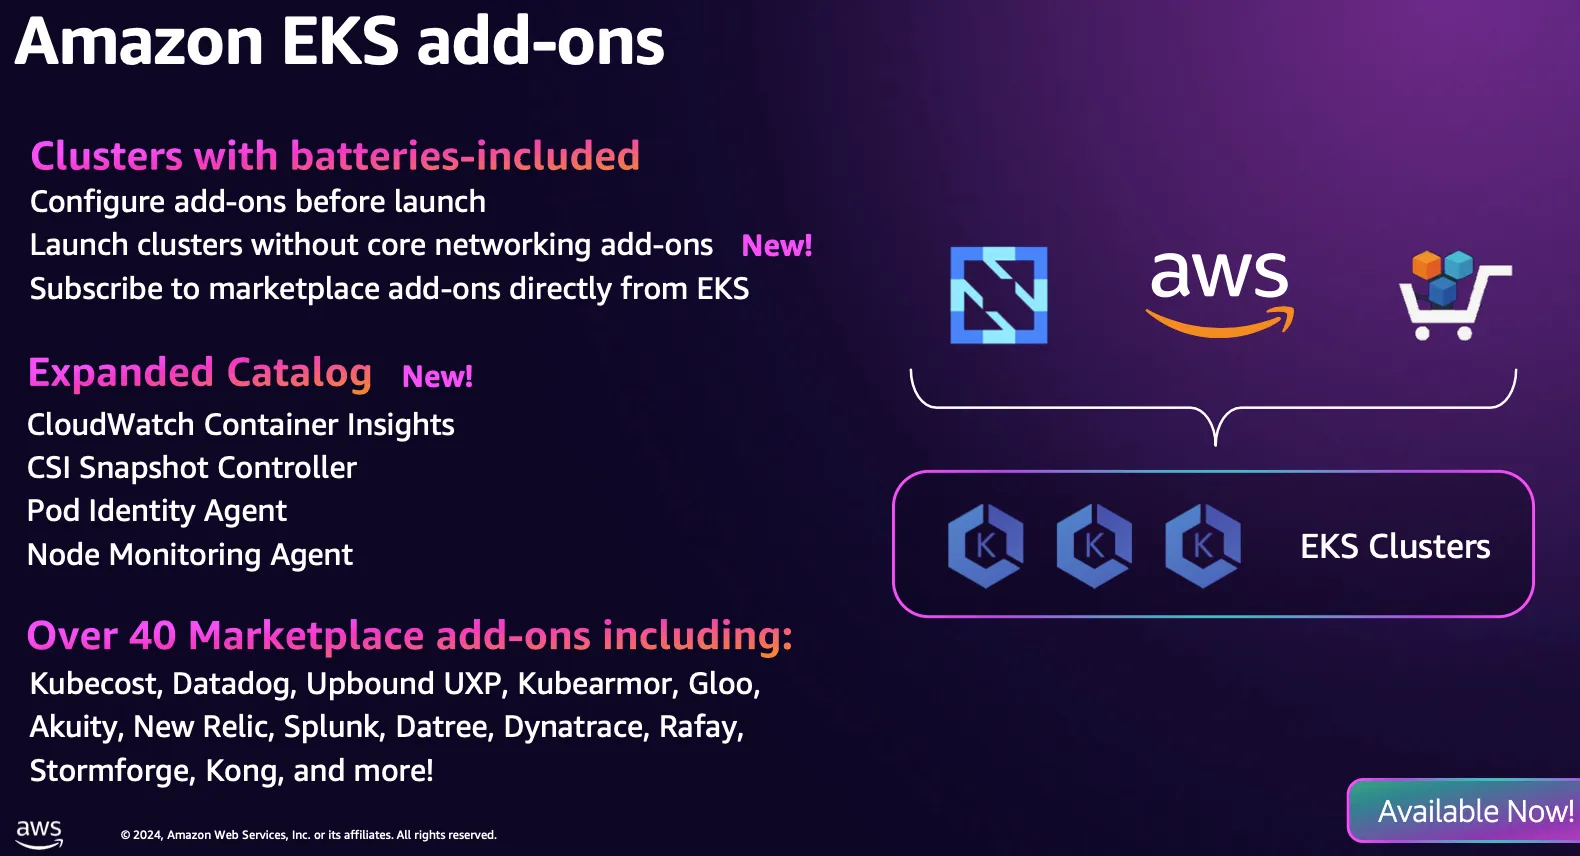
- Add-ons 에 Pod Identity 연동 지원 확대 중
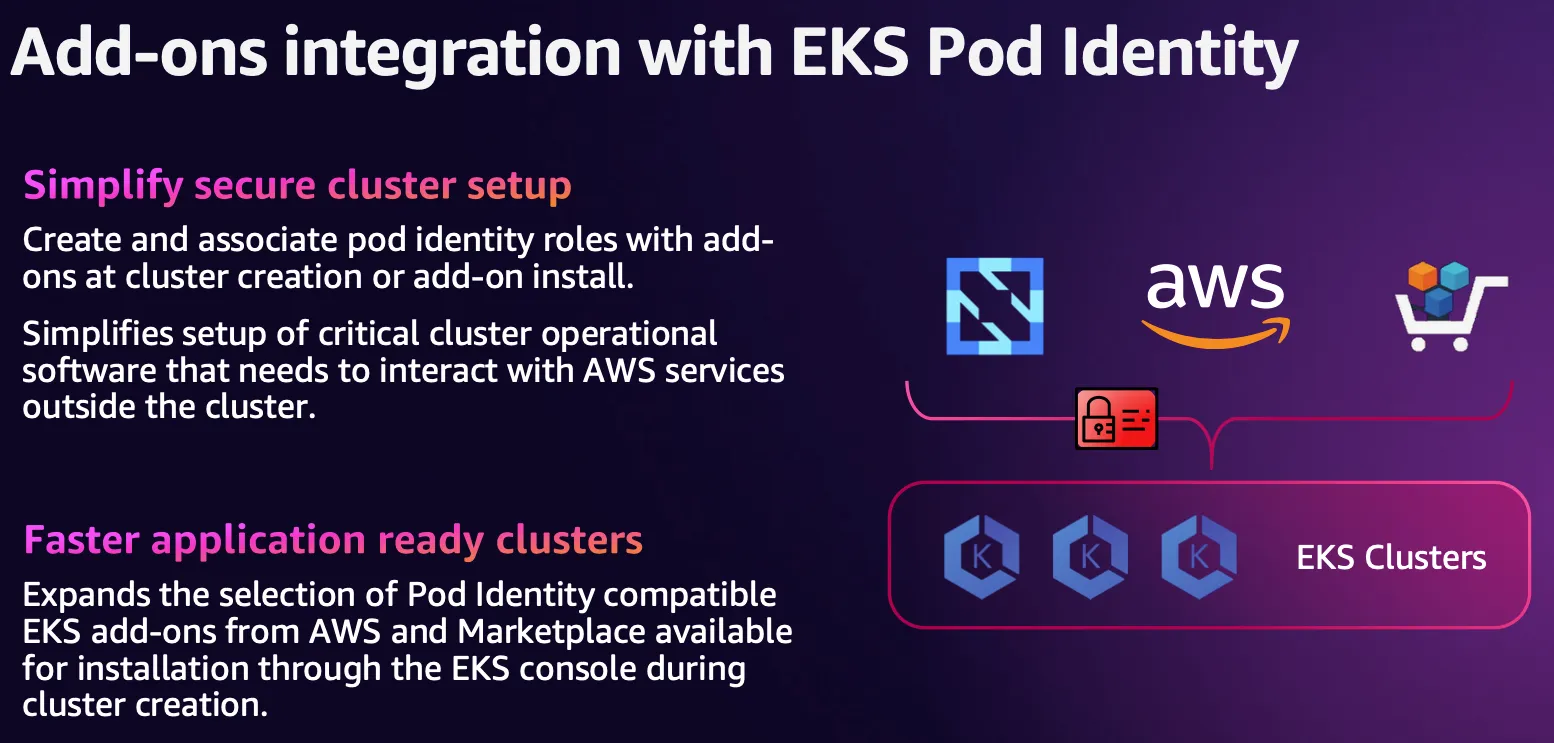
- EKS Object 암호화에 KMS v2 기본 적용
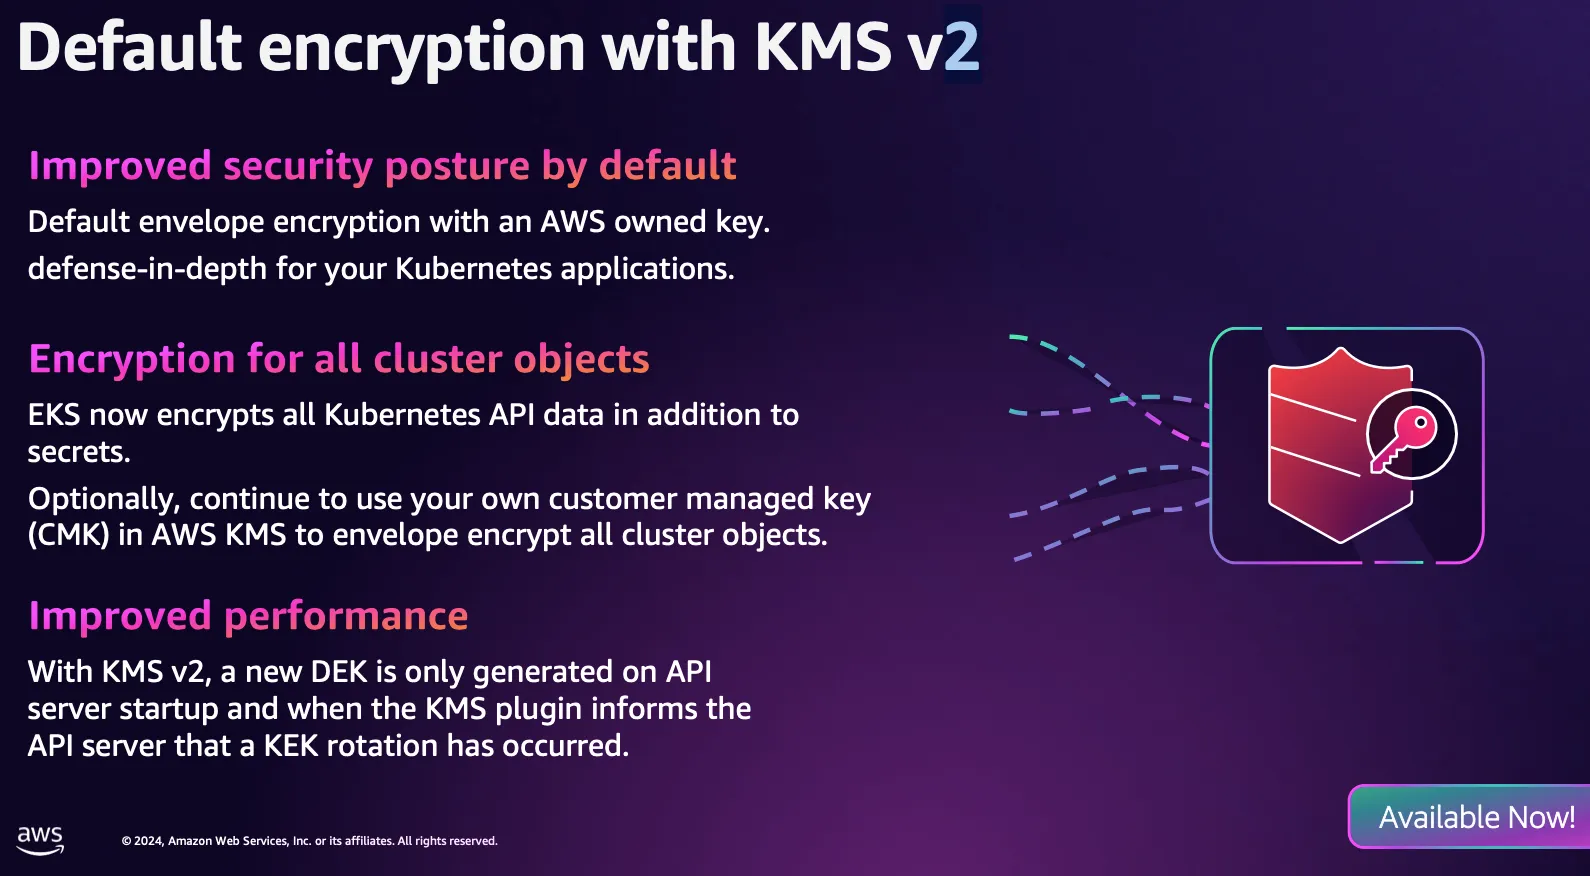
- ACK
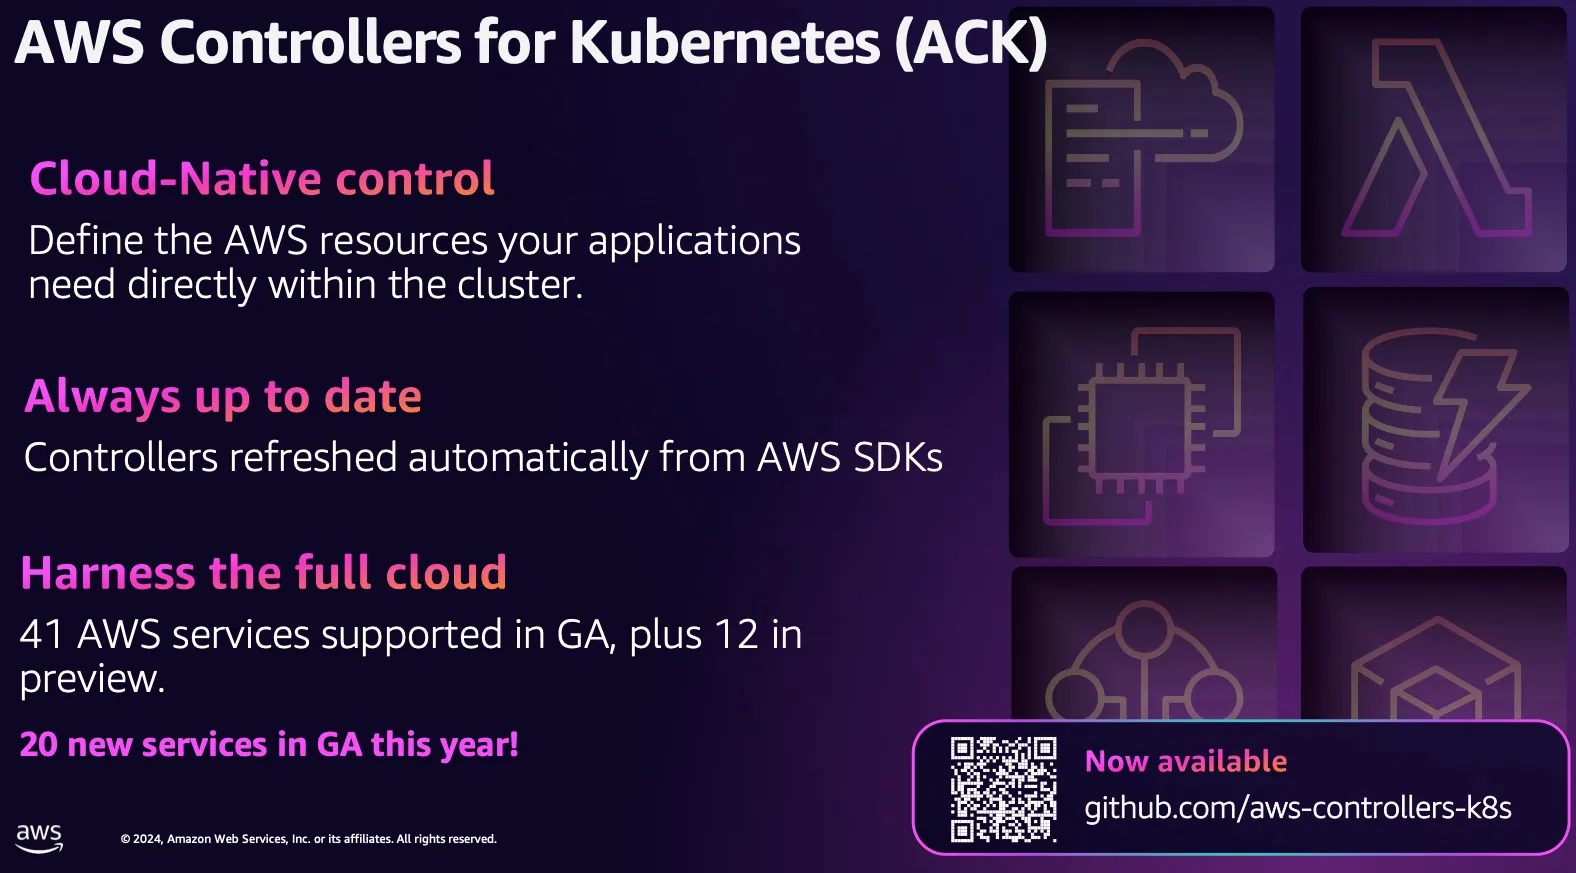
- KRO : ACK의 좀 더 발전된 오케스트레이터로 보임.
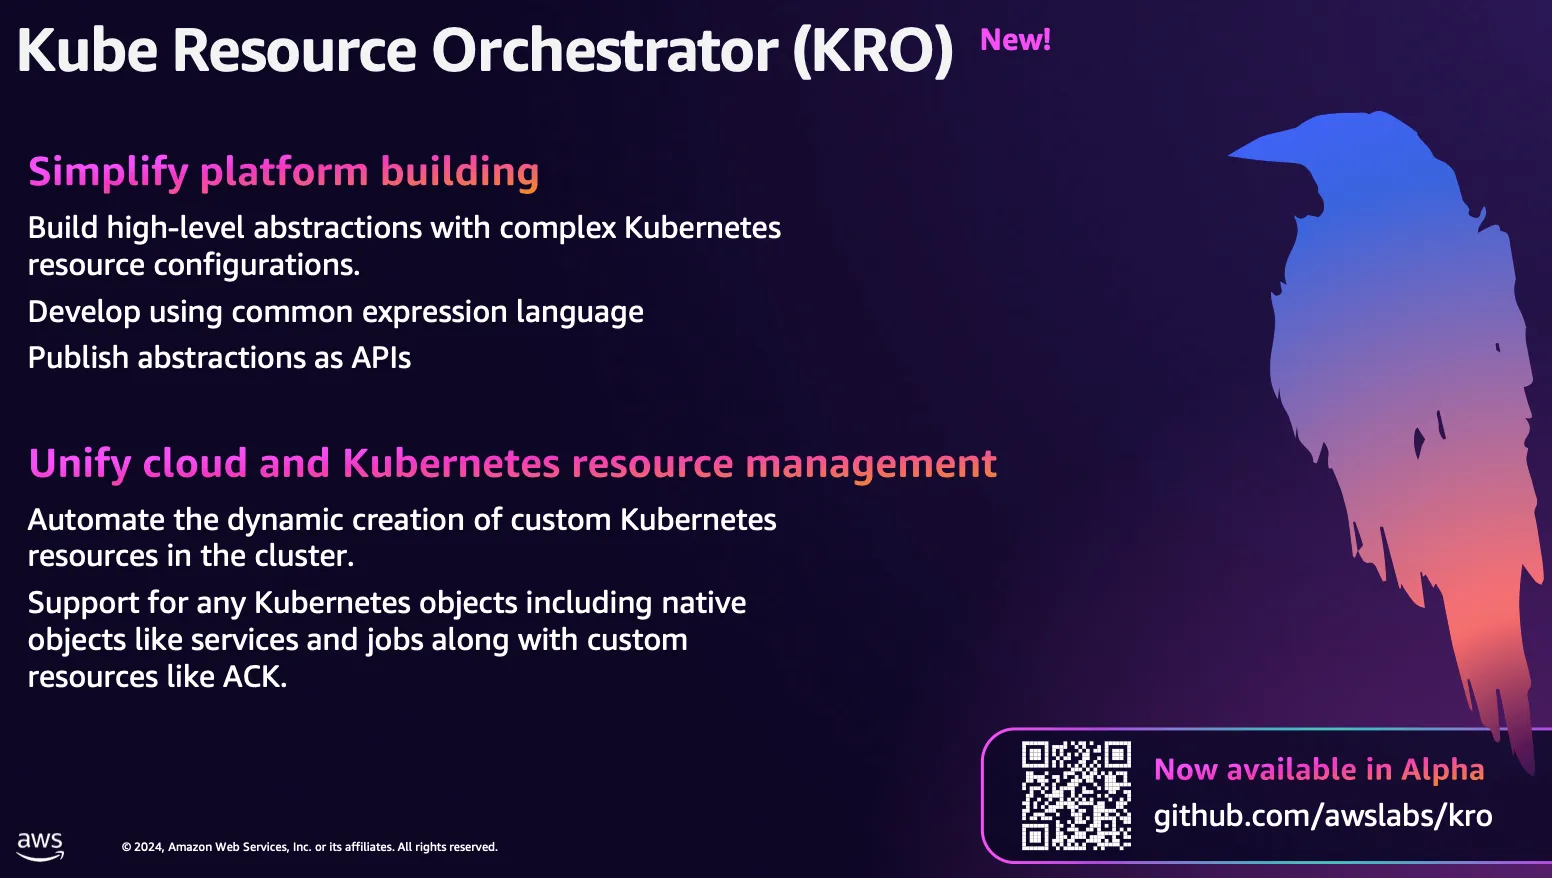
- EKS Hybrid Nodes
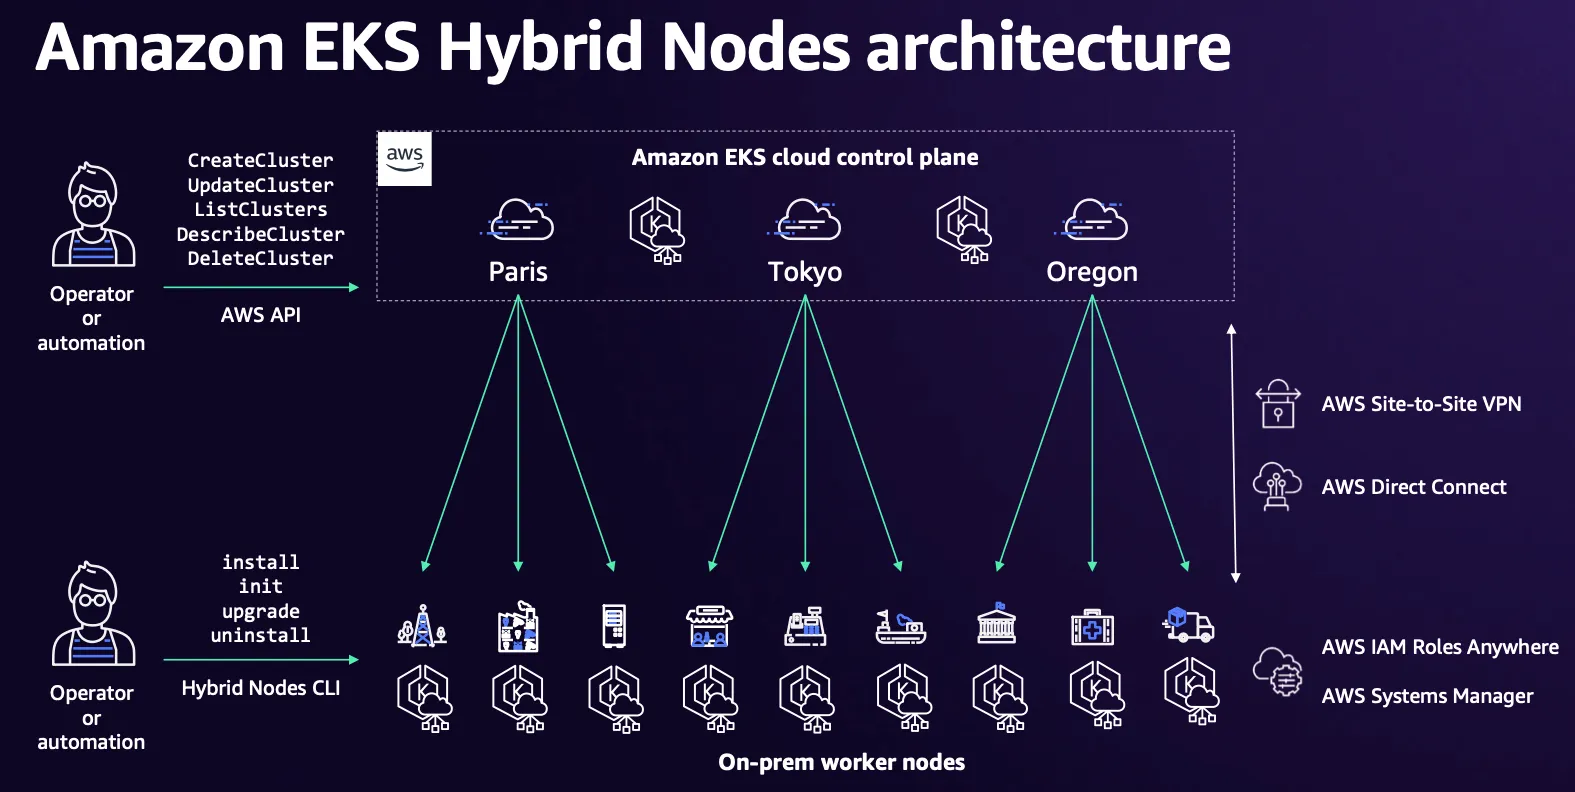
- Auto mode
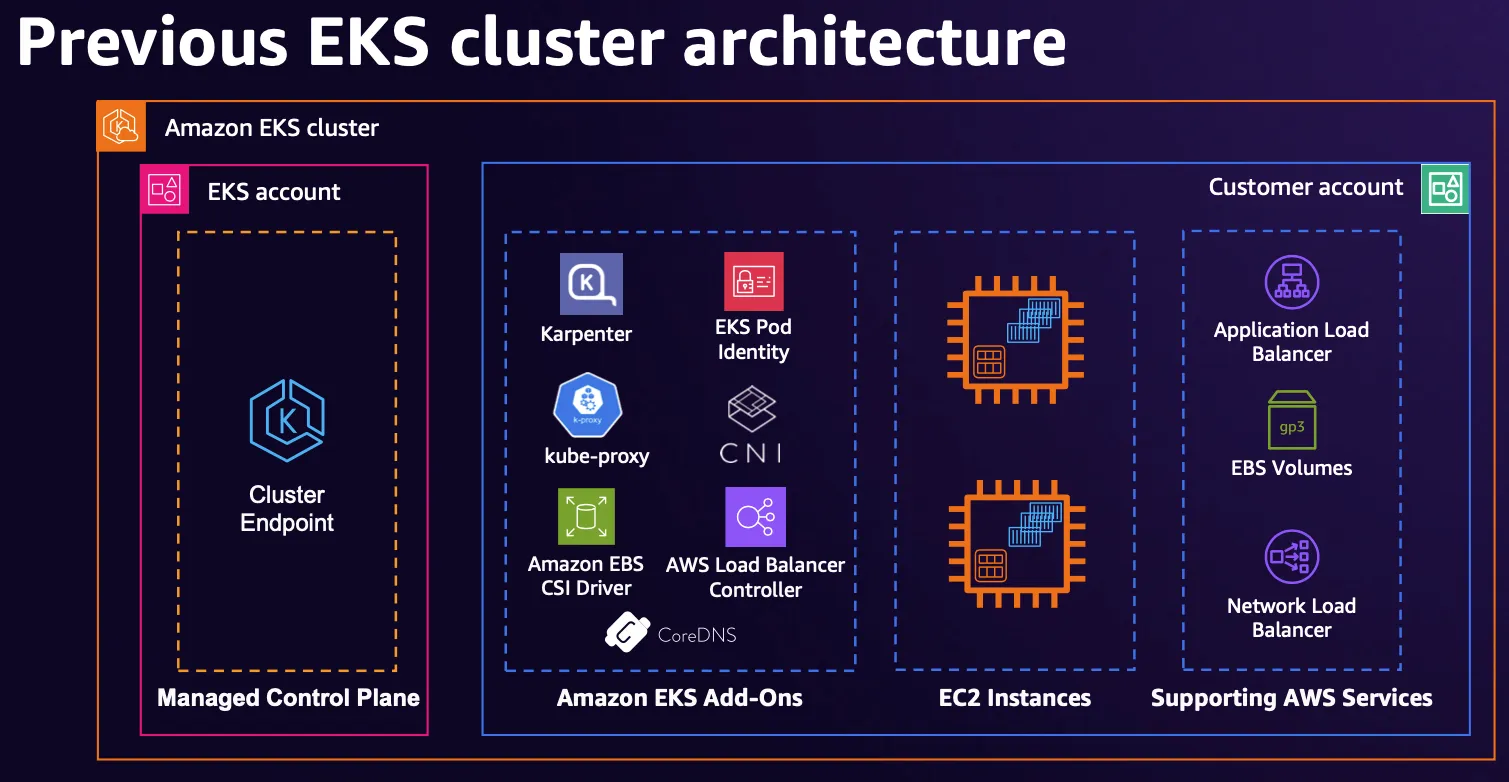
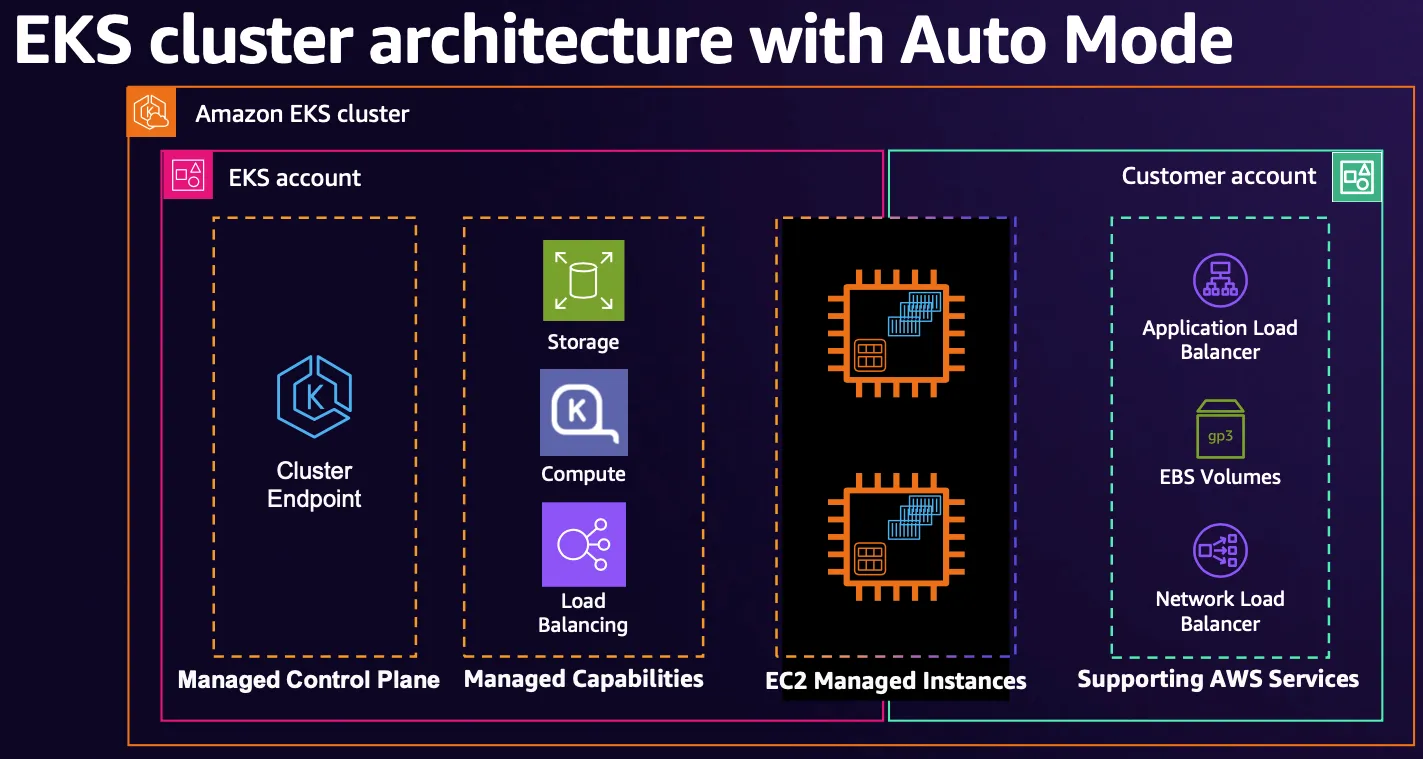
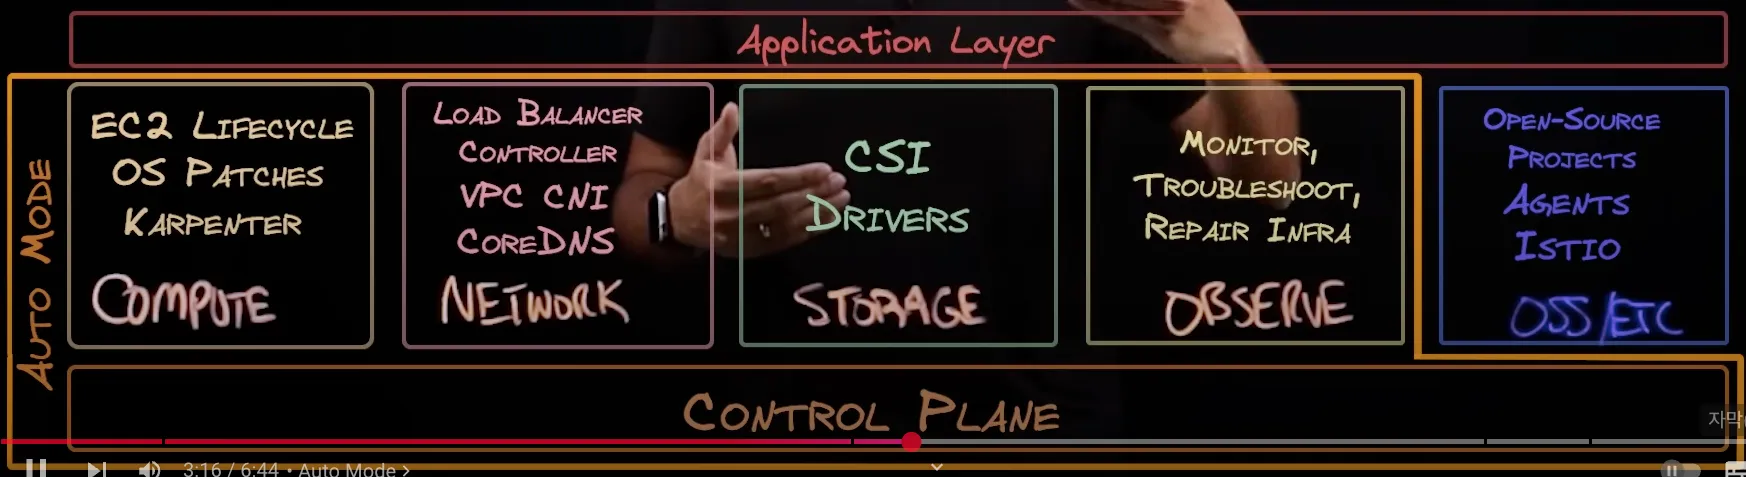
- Node Health and Auto-Repair
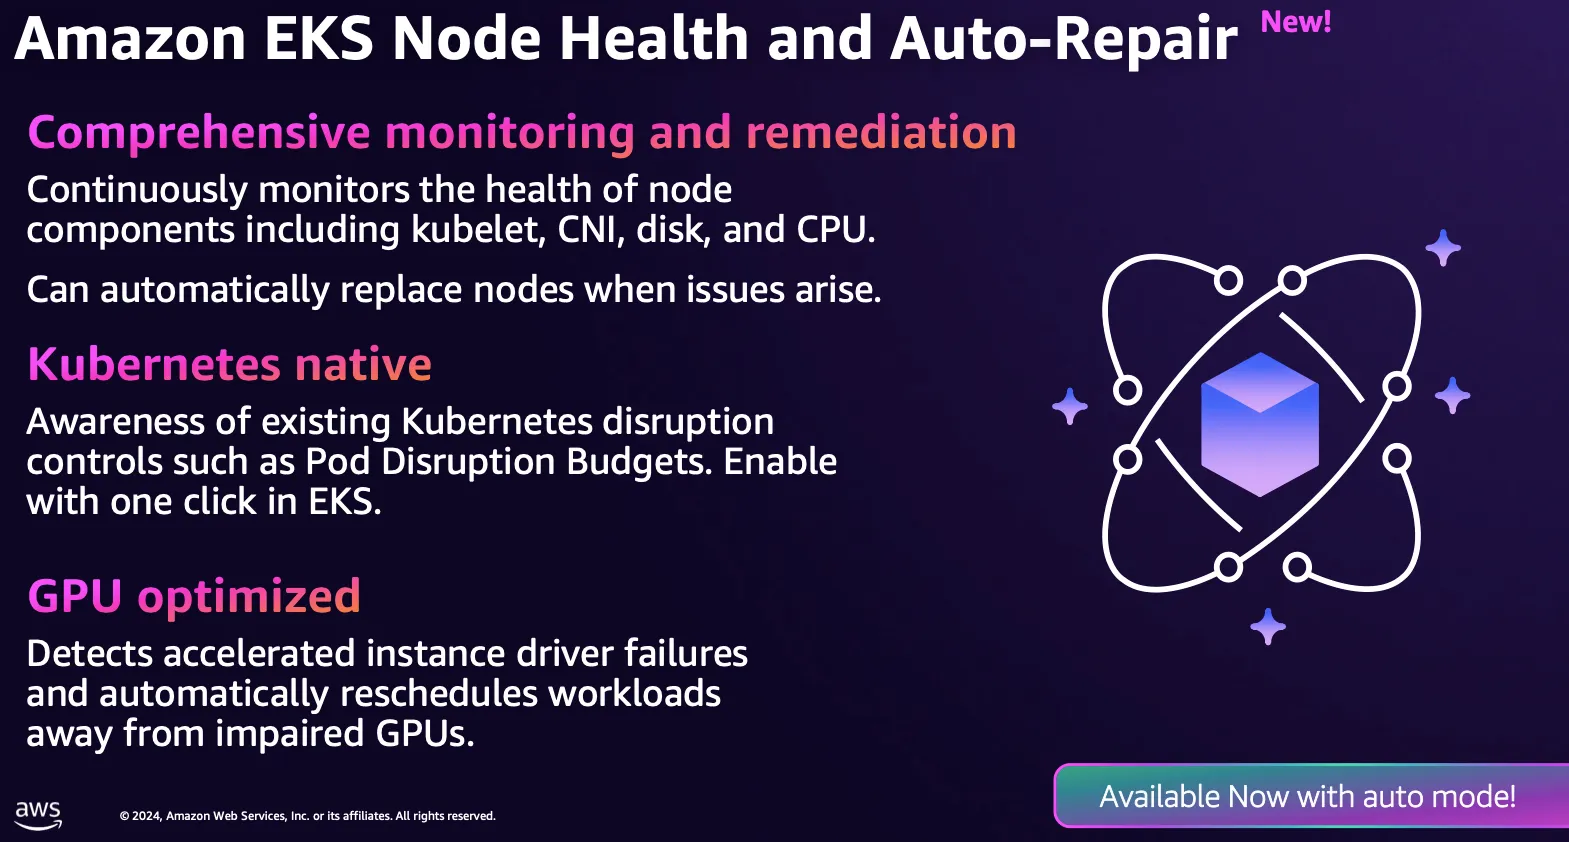
[ 추가 참고 자료 ]
▶ AWS re:Invent 2024 - Automate your entire Kubernetes cluster with Amazon EKS Auto Mode (KUB204-NEW) - Youtube
▶ AWS re:Invent 2024 - Simplify Kubernetes workloads with Karpenter & Amazon EKS Auto Mode (KUB312) - Youtube , PDF
▶ [AWS Docs] Auto Mode* - Docs
▶ [Containers from the Couch] Hands on with Amazon EKS Auto Mode - Youtube
▶ 제약사항 및 고려사항 최종 정리*
- 6가지 구성요소가 파드로 구성되는게 아니고, 해당 노드에 systemd 데몬(agent)로 실행됨. - 아래 프로세스 확인
- kube-proxy, kubelet, eks-pod-identity-agent, eks-node-monitor-agent, eks-healthcheck, eks-ebs-csi-driver,
- csi-node-driver-registrar, coredns, containerd, aws-network-policy-agent, apiserver, ipam
- 노드에 대해 불변으로 취급되는 AMI를 사용합니다. 이러한 AMI는 잠금 소프트웨어를 강제하고 SELinux 필수 액세스 제어를 활성화하며 읽기 전용 루트 파일 시스템을 제공합니다. 또한 EKS Auto Mode에서 실행하는 노드의 최대 수명은 21일. SELinux 강제 모드와 읽기 전용 루트 파일 시스템을 사용하여 AMI의 파일에 대한 액세스를 차단합니다.
- SSH 또는 SSM 액세스를 허용하지 않음으로써 노드에 대한 직접 액세스를 방지합니다.
- 자동 업그레이드: EKS 자동 모드는 최신 패치를 통해 Kubernetes 클러스터, 노드 및 관련 구성 요소를 최신 상태로 유지하면서 구성된 Pod Disruption Budgets(PDB) 및 NodePool Disruption Budgets(NDB)를 준수합니다. 최대 21일의 수명까지 PDB 또는 기타 구성을 차단하여 업데이트를 방해하는 경우 개입이 필요할 수 있습니다.
- 관리되는 구성 요소: EKS Auto 모드에는 추가 기능으로 관리해야 하는 핵심 구성 요소로 Kubernetes와 AWS 클라우드 기능이 포함되어 있습니다. 여기에는 Pod IP 주소 할당, Pod 네트워크 정책, 로컬 DNS 서비스, GPU 플러그인, 헬스 체커 및 EBS CSI 스토리지에 대한 내장 지원이 포함됩니다.
- Create node class : ephemeralStorage(80GiB), 노드 당 최대 파드 110개 제한.
- Create node pool : 기본 노드풀은 활성화/비활성화 가능, budgets 로 disruption 중지 가능.
- Create ingress class : IngressClassParams 리소스 및 API 일부 변경, 미지원 기능 확인
- Create StorageClss : provisioner: ebs.csi.eks.amazonaws.com , EBS 성능 프로메테우스 메트릭 접근 불가.
- Update Kubernetes version : 업그레이드 시 자체 관리 Add-on 등은 고객 담당.
- Review build-in node pools : 공통(온디멘드) - system(amd, arm64), general-purpose(amd64).
- Run critical add-ons : system 노드풀로 **전용인스턴스(dedicated instances)**에 파드 배포 - Docs , 전용인스턴스
- Control deployment : mixed mode 시 Auto-mode node 사용/미사용 방법 잘 확인 할 것
- Managed Instances : AWS 소유 관리 인스턴스(OS, CRI, Kubelet 등 관리/책임) - Docs
- EKS Auto Mode에서 생성된 EC2 인스턴스는 다른 EC2 인스턴스와 다르며 관리되는 인스턴스입니다. 이러한 관리되는 인스턴스는 EKS가 소유하고 있으며 더 제한적입니다. EKS Auto Mode에서 관리하는 인스턴스에는 직접 액세스하거나 소프트웨어를 설치할 수 없습니다.
- EKS 자동 모드는 다음 인스턴스 유형을 지원합니다 : vCPU 1개 이상, 불가(nano, micro, small)
- EKS 자동 모드는 지원되는 인스턴스 유형에 대해 NVMe 로컬 스토리지를 자동으로 포맷하고 구성합니다. 여러 개의 NVMe 드라이브를 가진 노드의 경우, EKS는 RAID 0 어레이를 설정합니다. 이 자동화를 통해 EKS 클러스터에서 로컬 NVMe 스토리지를 수동으로 포맷하고 RAID를 구성할 필요가 없습니다.
- EKS 자동 모드 노드에 Neuron Device Plugin을 설치할 필요가 없습니다.
- Identity and access : Cluster IAM role, Node IAM role, Service-linked role - Docs
- Networking : VPC CNI 관련 미지원 기능 확인 - Docs
- Troubleshoot* : NodeDiagnostic, get-console-output, 디버깅 컨테이너 - Docs
- Kubernetes NodeDiagnostic리소스를 사용하여 노드 모니터링 에이전트를 사용하여 노드 로그를 검색합니다. 자세한 단계는 kubectl 및 S3를 사용하여 관리 노드에 대한 노드 로그 검색을 참조하십시오.
- AWS EC2 CLI 명령 get-console-output을 사용하여 노드에서 콘솔 출력을 가져옵니다. 자세한 단계는 AWS EC2 CLI를 사용하여 EC2 관리 인스턴스에서 콘솔 출력 가져오기를 참조하십시오.
- Kubernetes 디버깅 컨테이너를 사용하여 노드 로그를 검색합니다. 자세한 단계는 디버그 컨테이너와 kubectl CLI를 사용하여 노드 로그 가져오기를 참조하십시오.
▶ 환경 구성 : 배포 ( This repository provides a production-ready template for deploying various workloads on EKS Auto Mode - Github)
Step1. 테라폼 배포 - 참고 : Blog
1) variables.tf 수정 : ap-northeast-2 , 10.20.0.0/16
# Get the code : 배포 코드에 addon 내용이 읍다!
git clone https://github.com/aws-samples/sample-aws-eks-auto-mode.git
cd sample-aws-eks-auto-mode/terraform

# eks.tf : "system" 은 '전용인스턴스'로 추가하지 않는다
...
  cluster_compute_config = {
    enabled    = true
    node_pools = ["general-purpose"]
  }
...

# Initialize and apply Terraform
terraform init
terraform plan
terraform apply -auto-approve
...
null_resource.create_nodepools_dir: Creating...
null_resource.create_nodepools_dir: Provisioning with 'local-exec'...
null_resource.create_nodepools_dir (local-exec): Executing: ["/bin/sh" "-c" "mkdir -p ./../nodepools"]
...


# Configure kubectl
cat setup.tf
ls -l ../nodepools
$(terraform output -raw configure_kubectl)

# kubectl context 변경
kubectl ctx
kubectl config rename-context "arn:aws:eks:ap-northeast-2:$(aws sts get-caller-identity --query 'Account' --output text):cluster/automode-cluster" "automode-lab"
kubectl ns default

# 아래 IP의 ENI 찾아보자
kubectl get svc,ep
NAME                 TYPE        CLUSTER-IP   EXTERNAL-IP   PORT(S)   AGE
service/kubernetes   ClusterIP   172.20.0.1   <none>        443/TCP   27m

NAME                   ENDPOINTS                           AGE
endpoints/kubernetes   10.20.22.204:443,10.20.40.216:443   27m

#
terraform state list
terraform show
terraform state show 'module.eks.aws_eks_cluster.this[0]'
...
    compute_config {
        enabled       = true
        node_pools    = [
            "general-purpose",
        ]
        node_role_arn = "arn:aws:iam::911283464785:role/automode-cluster-eks-auto-20250316042752605600000003"
    }
...
Step2. 관리 콘솔 확인
- VPC - ENI 확인 : EKS Owned-ENI

- EKS : Cluster IAM Role, Node IAM Role, Auto Mode
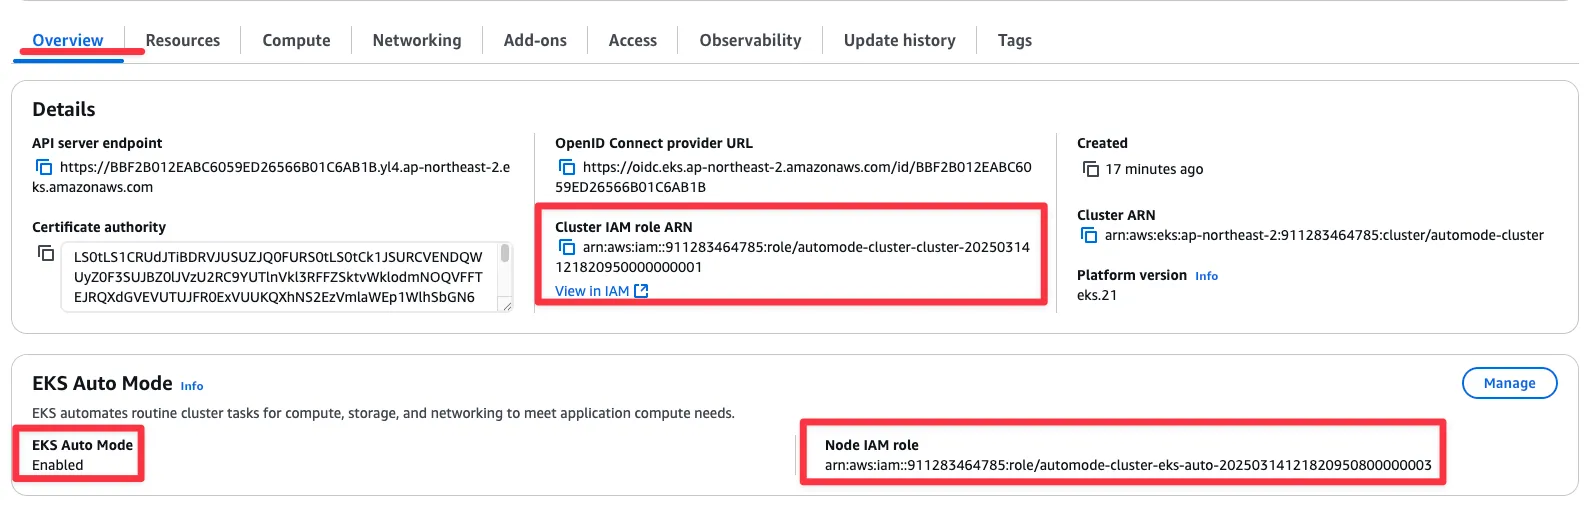
- Compute : Built-in node pools

- Add-ons 없음!

- Access : IAM access entries
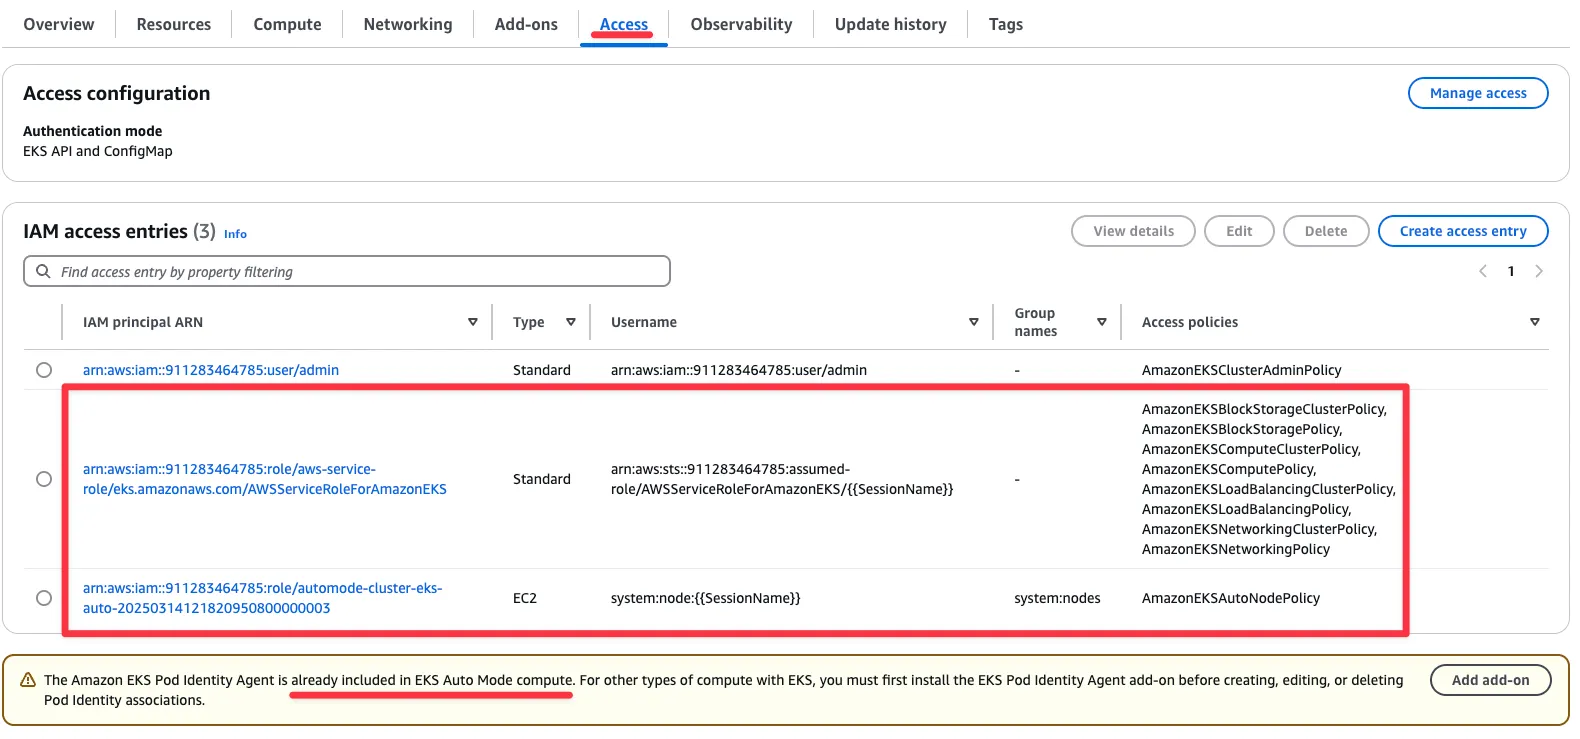
Step3. kubectl 로 자원 상태 확인하기
#
kubectl get crd
NAME                                         CREATED AT
cninodes.eks.amazonaws.com                   2025-03-14T12:27:23Z
cninodes.vpcresources.k8s.aws                2025-03-14T12:23:31Z
ingressclassparams.eks.amazonaws.com         2025-03-14T12:27:23Z
nodeclaims.karpenter.sh                      2025-03-14T12:27:23Z
nodeclasses.eks.amazonaws.com                2025-03-14T12:27:23Z
nodediagnostics.eks.amazonaws.com            2025-03-14T12:27:23Z
nodepools.karpenter.sh                       2025-03-14T12:27:23Z
policyendpoints.networking.k8s.aws           2025-03-14T12:23:31Z
securitygrouppolicies.vpcresources.k8s.aws   2025-03-14T12:23:31Z
targetgroupbindings.eks.amazonaws.com        2025-03-14T12:27:23Z

kubectl api-resources | grep -i node
nodes                               no           v1                                false        Node
cninodes                            cni,cnis     eks.amazonaws.com/v1alpha1        false        CNINode
nodeclasses                                      eks.amazonaws.com/v1              false        NodeClass
nodediagnostics                                  eks.amazonaws.com/v1alpha1        false        NodeDiagnostic
nodeclaims                                       karpenter.sh/v1                   false        NodeClaim
nodepools                                        karpenter.sh/v1                   false        NodePool
runtimeclasses                                   node.k8s.io/v1                    false        RuntimeClass
csinodes                                         storage.k8s.io/v1                 false        CSINode
cninodes                            cnd          vpcresources.k8s.aws/v1alpha1     false        CNINode

# 노드에 Access가 불가능하니, 분석 지원(CRD)제공
kubectl explain nodediagnostics
GROUP:      eks.amazonaws.com
KIND:       NodeDiagnostic
VERSION:    v1alpha1

DESCRIPTION:
    The name of the NodeDiagnostic resource is meant to match the name of the
    node which should perform the diagnostic tasks

#
kubectl get nodeclasses.eks.amazonaws.com
NAME      ROLE                                                   READY   AGE
default   automode-cluster-eks-auto-20250314121820950800000003   True    29m

kubectl get nodeclasses.eks.amazonaws.com -o yaml
...
  spec:
    ephemeralStorage:
      iops: 3000
      size: 80Gi
      throughput: 125
    networkPolicy: DefaultAllow
    networkPolicyEventLogs: Disabled
    role: automode-cluster-eks-auto-20250314121820950800000003
    securityGroupSelectorTerms:
    - id: sg-05d210218e5817fa1
    snatPolicy: Random # ???
    subnetSelectorTerms:
    - id: subnet-0539269140458ced5
    - id: subnet-055dc112cdd434066
    - id: subnet-0865f60e4a6d8ad5c
  status:
    ...
    instanceProfile: eks-ap-northeast-2-automode-cluster-4905473370491687283
    securityGroups:
    - id: sg-05d210218e5817fa1
      name: eks-cluster-sg-automode-cluster-2065126657
    subnets:
    - id: subnet-0539269140458ced5
      zone: ap-northeast-2a
      zoneID: apne2-az1
    - id: subnet-055dc112cdd434066
      zone: ap-northeast-2b
      zoneID: apne2-az2
    - id: subnet-0865f60e4a6d8ad5c
      zone: ap-northeast-2c
      zoneID: apne2-az3

#
kubectl get nodepools
NAME              NODECLASS   NODES   READY   AGE
general-purpose   default     0       True    33m

kubectl get nodepools -o yaml
...
  spec:
    disruption:
      budgets:
      - nodes: 10%
      consolidateAfter: 30s
      consolidationPolicy: WhenEmptyOrUnderutilized
    template:
      metadata: {}
      spec:
        expireAfter: 336h # 14일
        nodeClassRef:
          group: eks.amazonaws.com
          kind: NodeClass
          name: default
        requirements:
        - key: karpenter.sh/capacity-type
          operator: In
          values:
          - on-demand
        - key: eks.amazonaws.com/instance-category
          operator: In
          values:
          - c
          - m
          - r
        - key: eks.amazonaws.com/instance-generation
          operator: Gt
          values:
          - "4"
        - key: kubernetes.io/arch
          operator: In
          values:
          - amd64
        - key: kubernetes.io/os
          operator: In
          values:
          - linux
        terminationGracePeriod: 24h0m0s
...

#
kubectl get mutatingwebhookconfiguration
kubectl get validatingwebhookconfiguration
[ 실행 결과 - 한 눈에 보기 ]
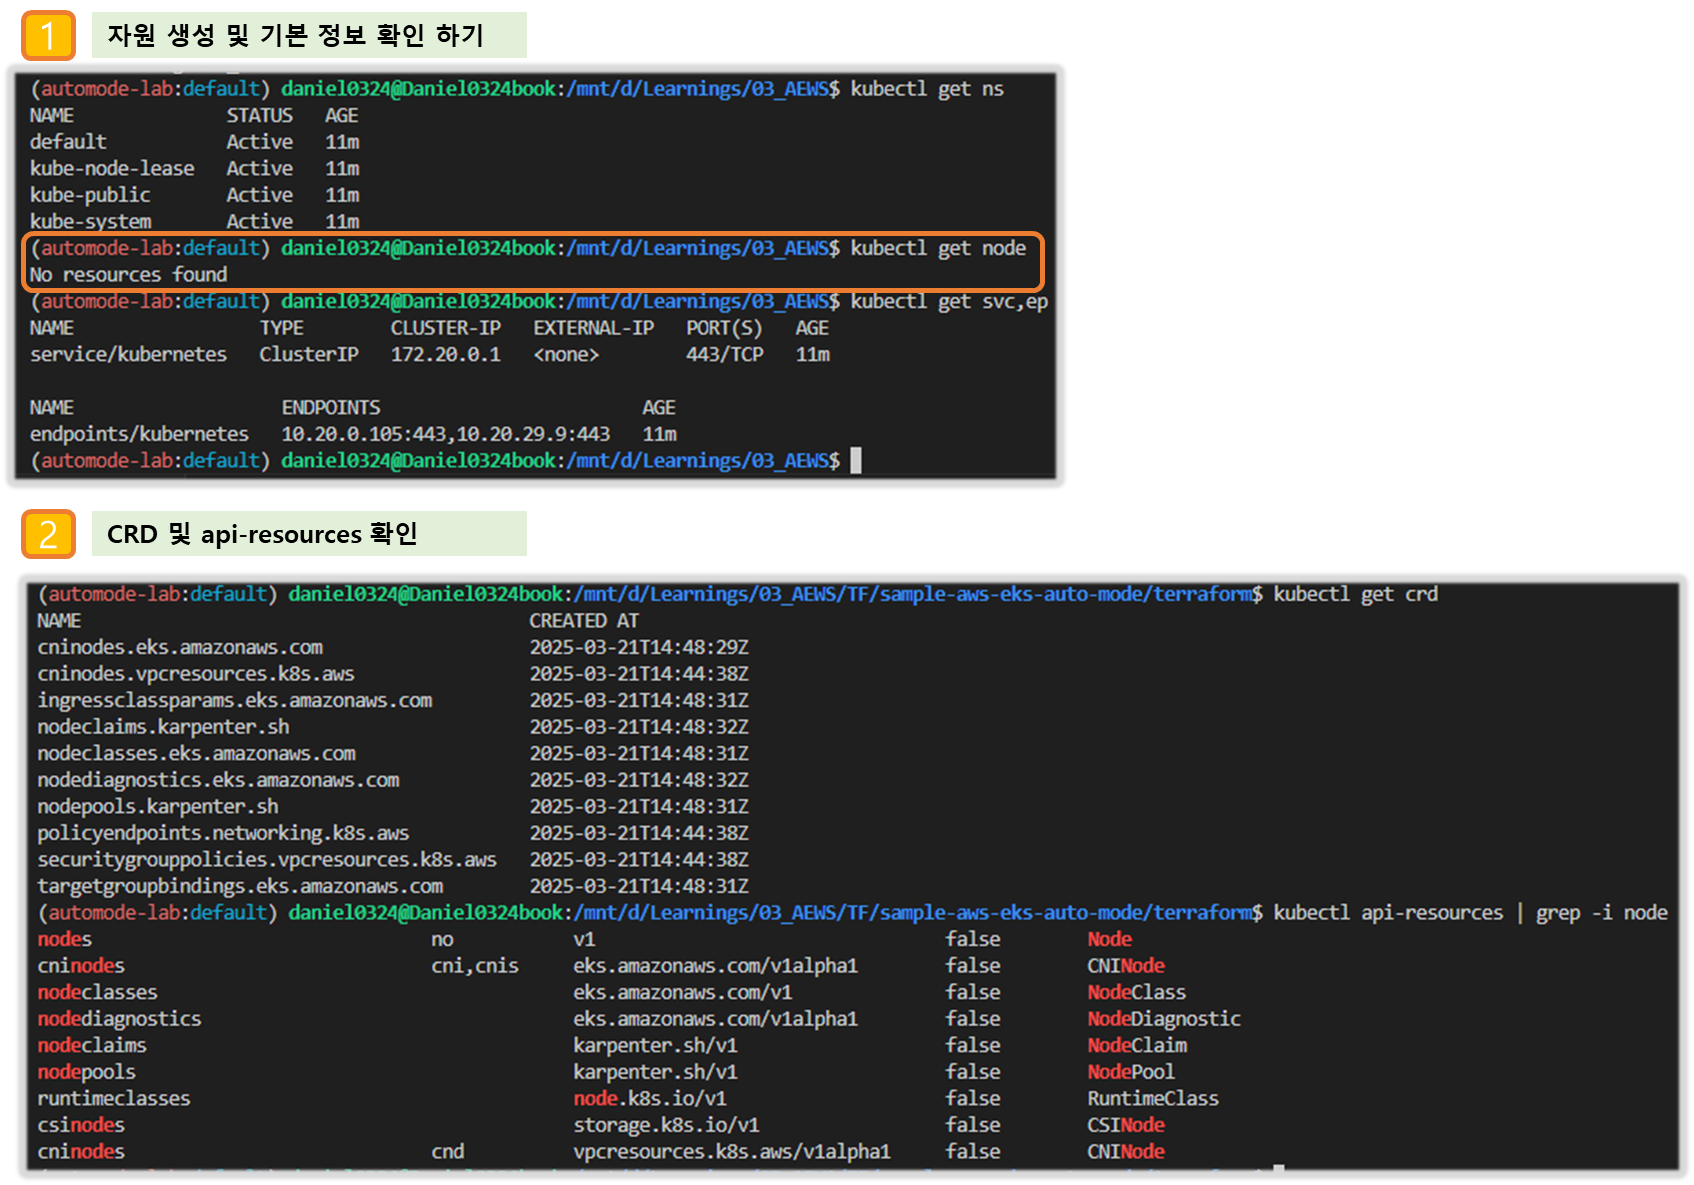
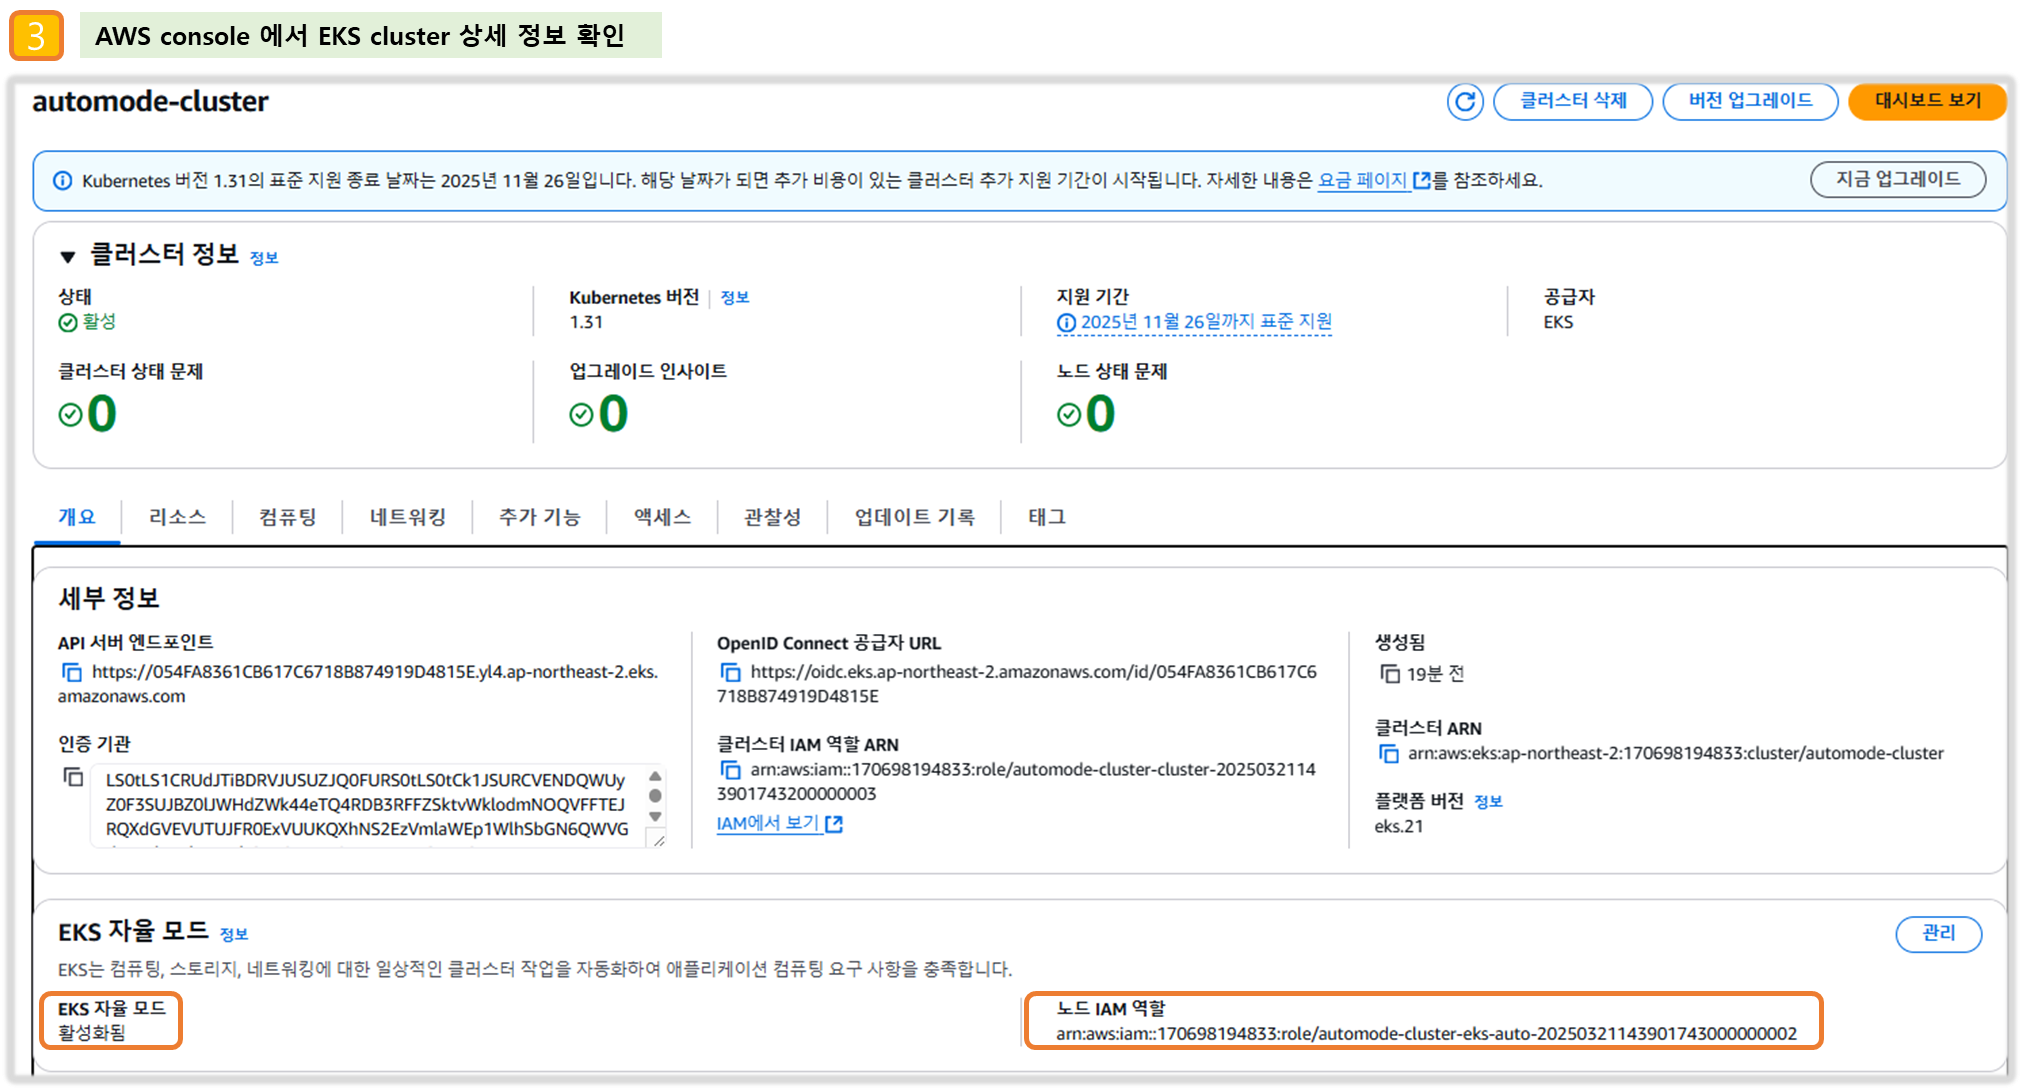
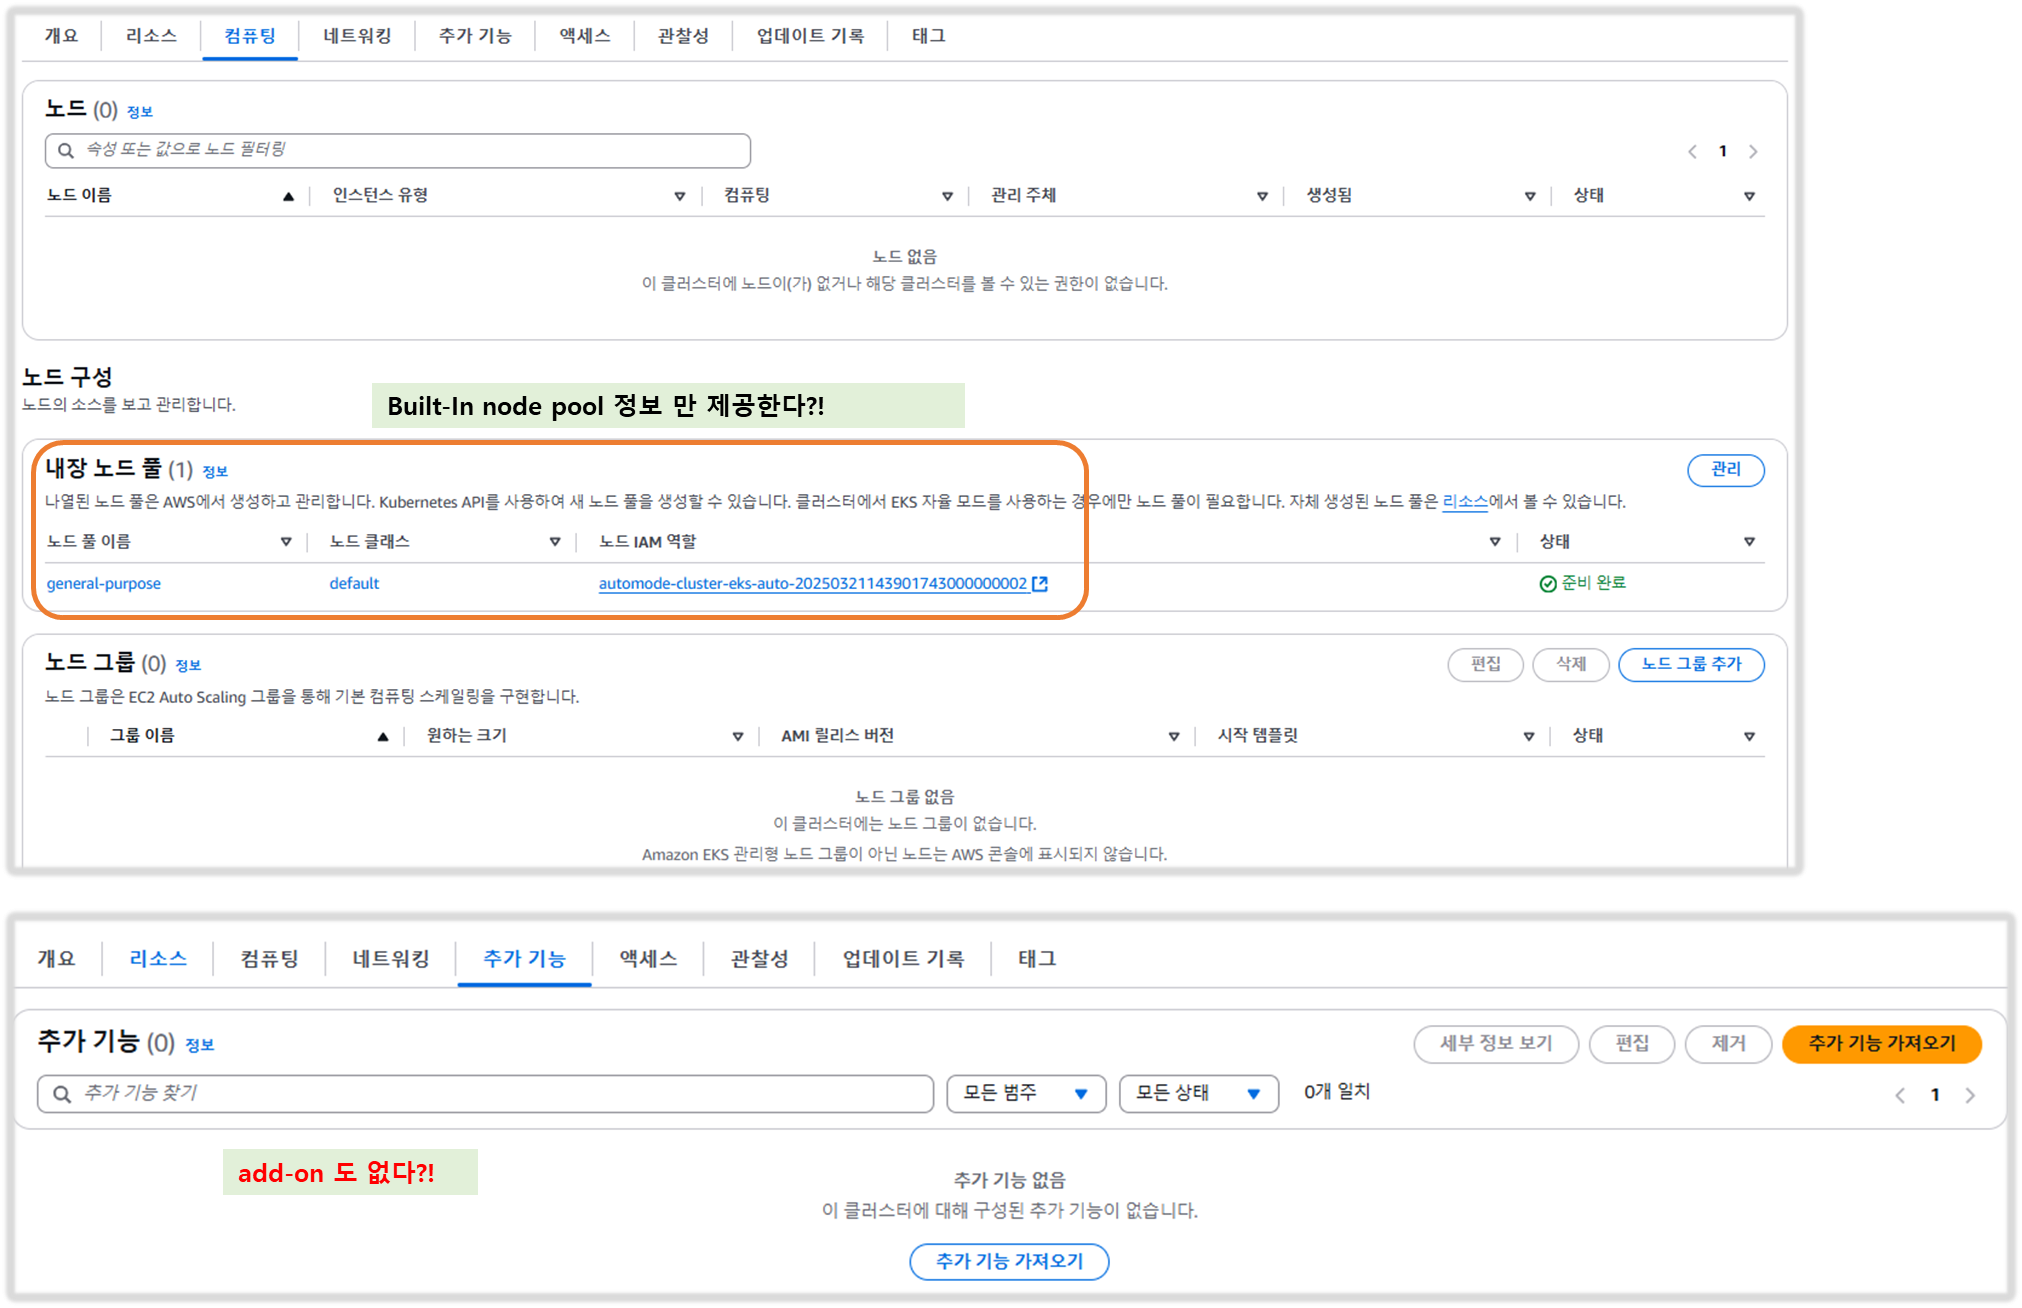
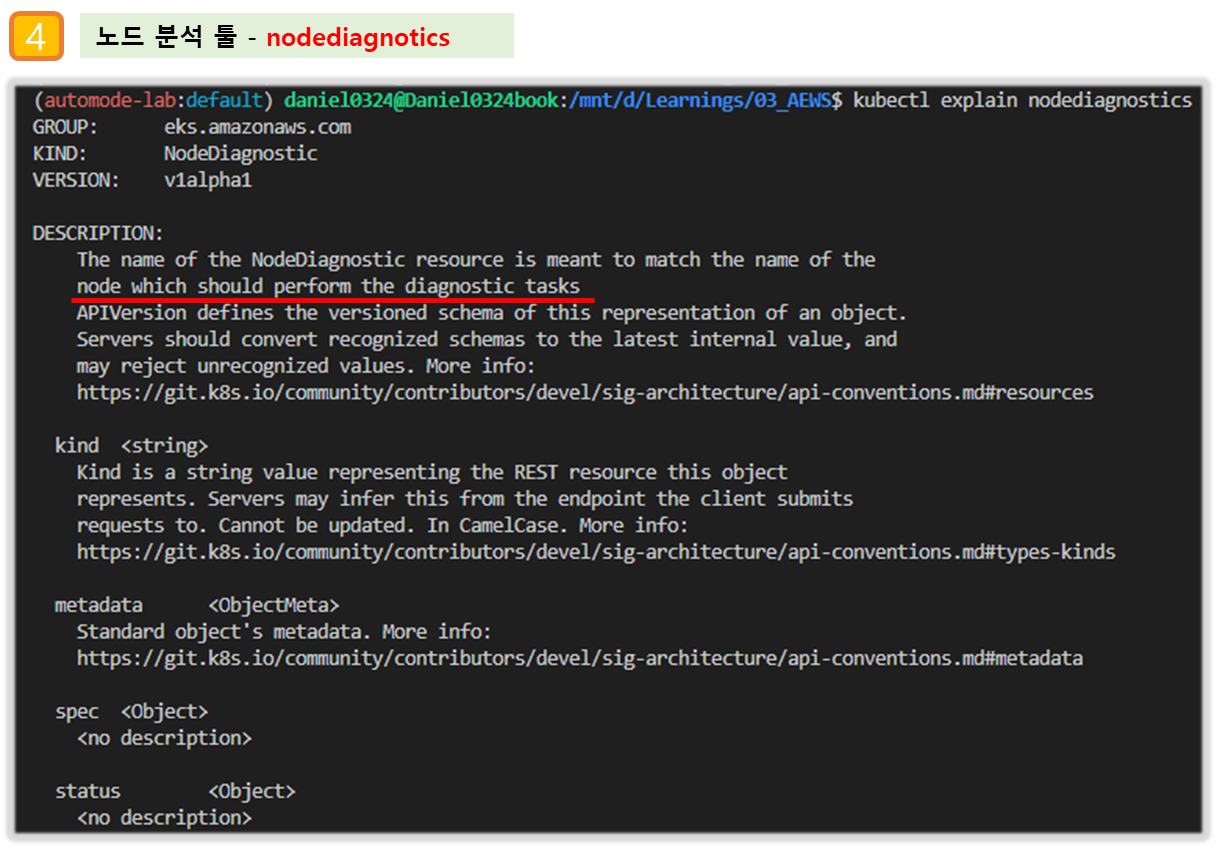
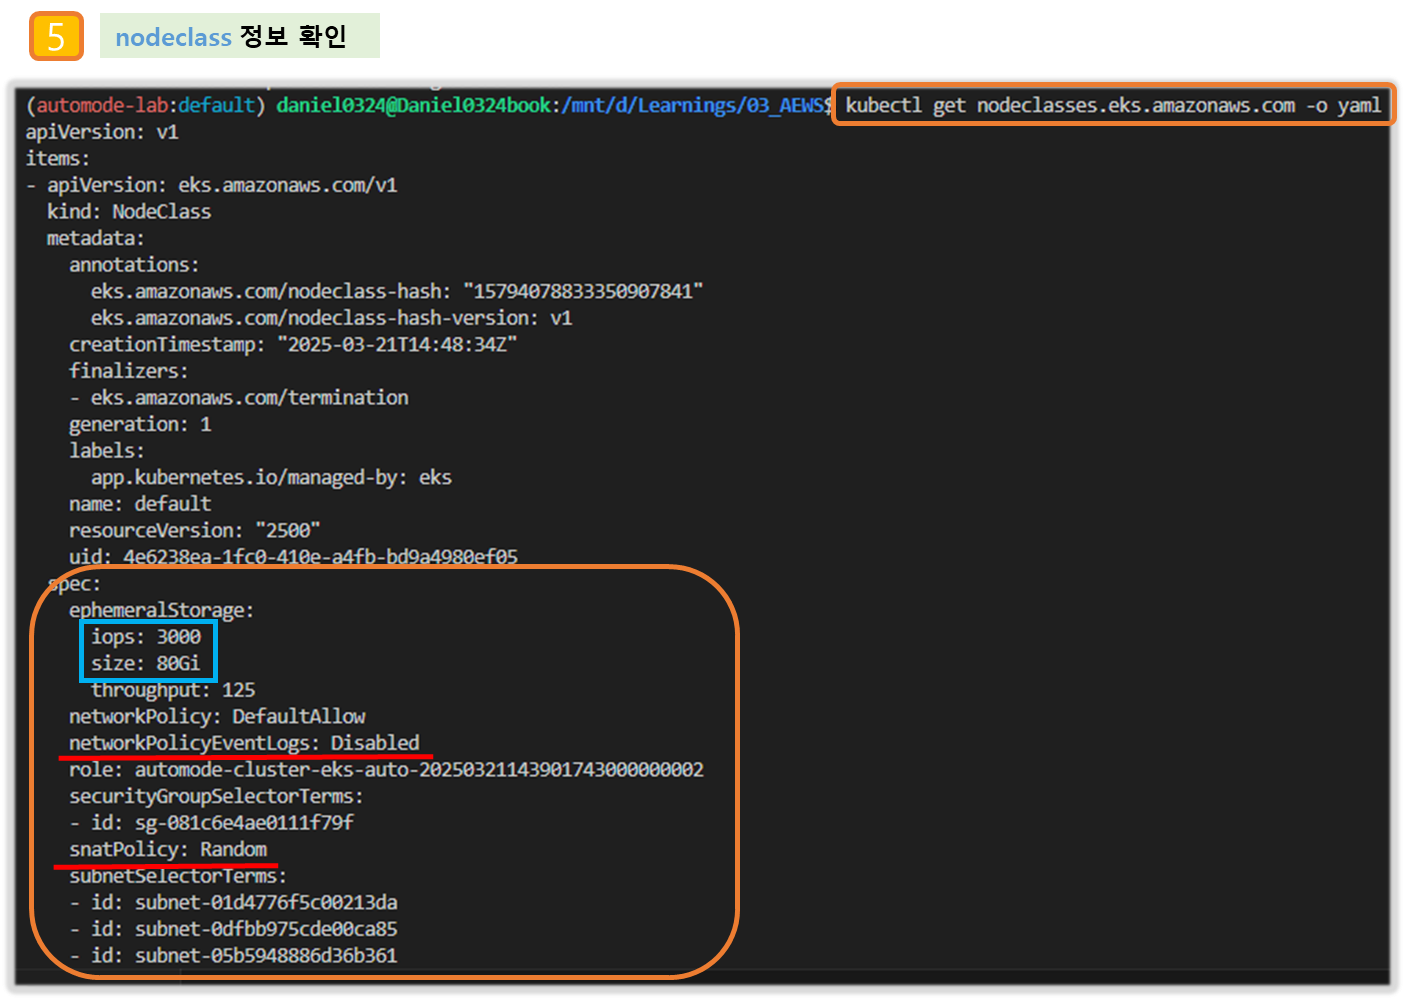
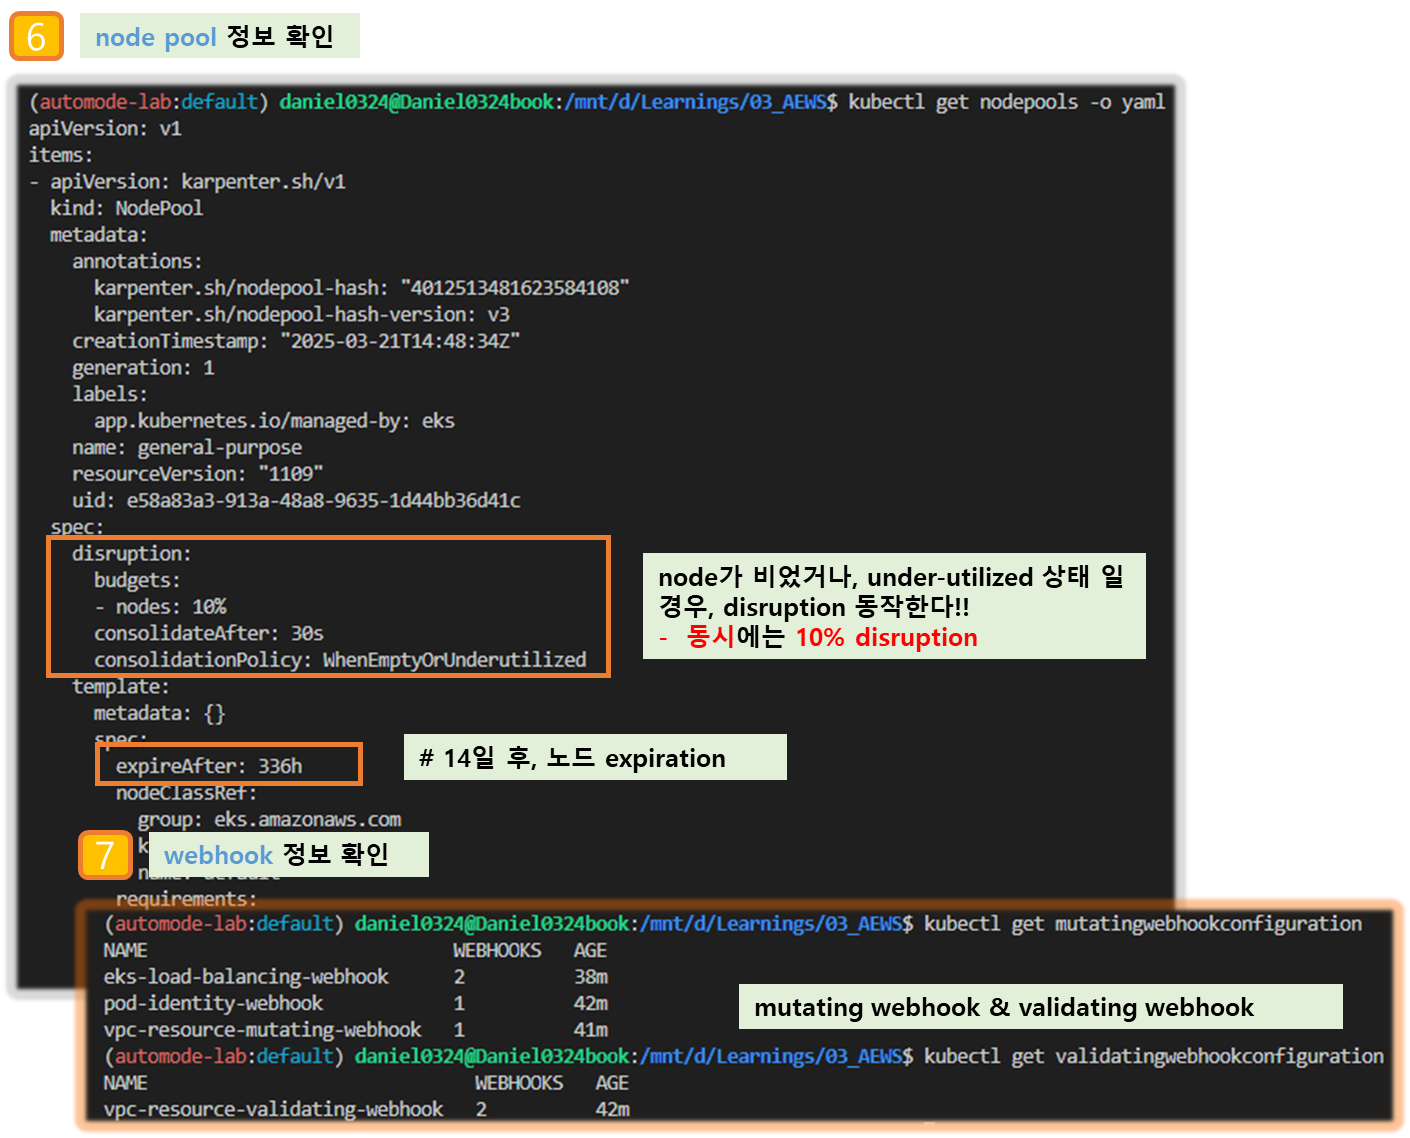
▶ kube-ops-view 설치 - [ 참조 : eks-node-viewer 설치 - https://daniel00324.tistory.com/28 ]
[ WSL2 - eks-node-viewer 설치 및 path 잡기 ]
# Windows 에 WSL2 (Ubuntu) 설치
sudo apt install golang-go
go install github.com/awslabs/eks-node-viewer/cmd/eks-node-viewer@latest  # 설치 시 2~3분 정도 소요
##echo 'export PATH="$PATH:/root/go/bin"' >> /etc/profile
## 자신의 홈 디렉토리 내 path 설정해야 함!!
echo 'export PATH=$PATH:/home/daniel0324/go/bin' >> ~/.profile
source ~/.profile
[ kube-ops-view 설치 ]
# 모니터링
eks-node-viewer --node-sort=eks-node-viewer/node-cpu-usage=dsc --extra-labels eks-node-viewer/node-age
watch -d kubectl get node,pod -A

# helm 배포
helm repo add geek-cookbook https://geek-cookbook.github.io/charts/
helm install kube-ops-view geek-cookbook/kube-ops-view --version 1.2.2 --set env.TZ="Asia/Seoul" --namespace kube-system
kubectl get events -w --sort-by '.lastTimestamp' # 출력 이벤트 로그 분석해보자

# 확인
kubectl get nodeclaims
NAME                      TYPE         CAPACITY    ZONE              NODE                  READY   AGE
general-purpose-528mt     c5a.large    on-demand   ap-northeast-2c   i-09cf206aee76f0bee   True    54s

# OS, KERNEL, CRI 확인
kubectl get node -owide
NAME                  STATUS   ROLES    AGE     VERSION               INTERNAL-IP    EXTERNAL-IP   OS-IMAGE                                          KERNEL-VERSION   CONTAINER-RUNTIME
i-09cf206aee76f0bee   Ready    <none>   2m14s   v1.31.4-eks-0f56d01   10.20.44.40    <none>        Bottlerocket (EKS Auto) 2025.3.9 (aws-k8s-1.31)   6.1.129          containerd://1.7.25+bottlerocket

# CNI 노드 확인
kubectl get cninodes.eks.amazonaws.com
NAME                  AGE
i-09cf206aee76f0bee   3m24s


#[신규 터미널] 포트 포워딩
kubectl port-forward deployment/kube-ops-view -n kube-system 8080:8080 &

# 접속 주소 확인 : 각각 1배, 1.5배, 3배 크기
echo -e "KUBE-OPS-VIEW URL = http://localhost:8080"
echo -e "KUBE-OPS-VIEW URL = http://localhost:8080/#scale=1.5"
echo -e "KUBE-OPS-VIEW URL = http://localhost:8080/#scale=3"

open "http://127.0.0.1:8080/#scale=1.5" # macOS- AWS 관리콘솔 : EC2 확인
[ 실행 결과 - 한 눈에 보기 ]
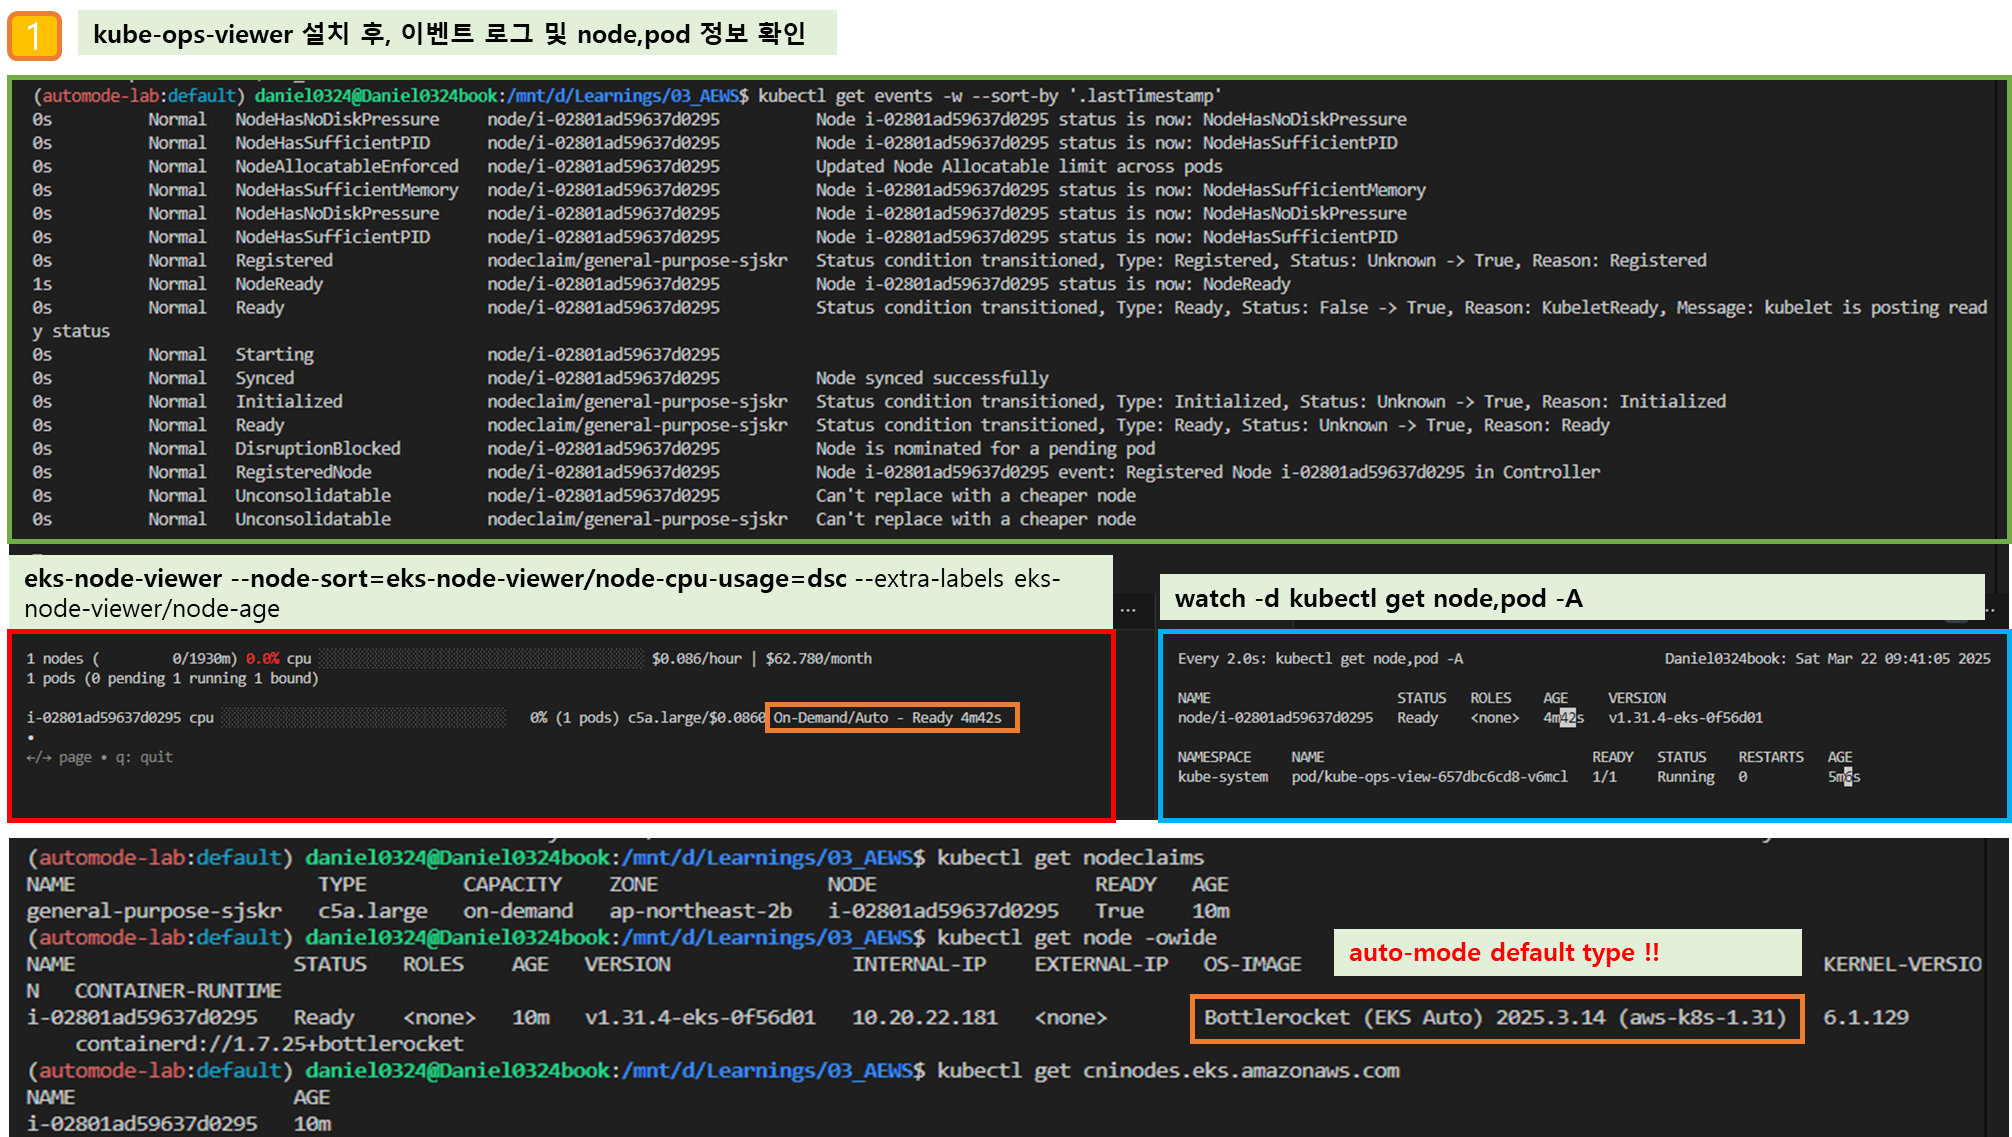
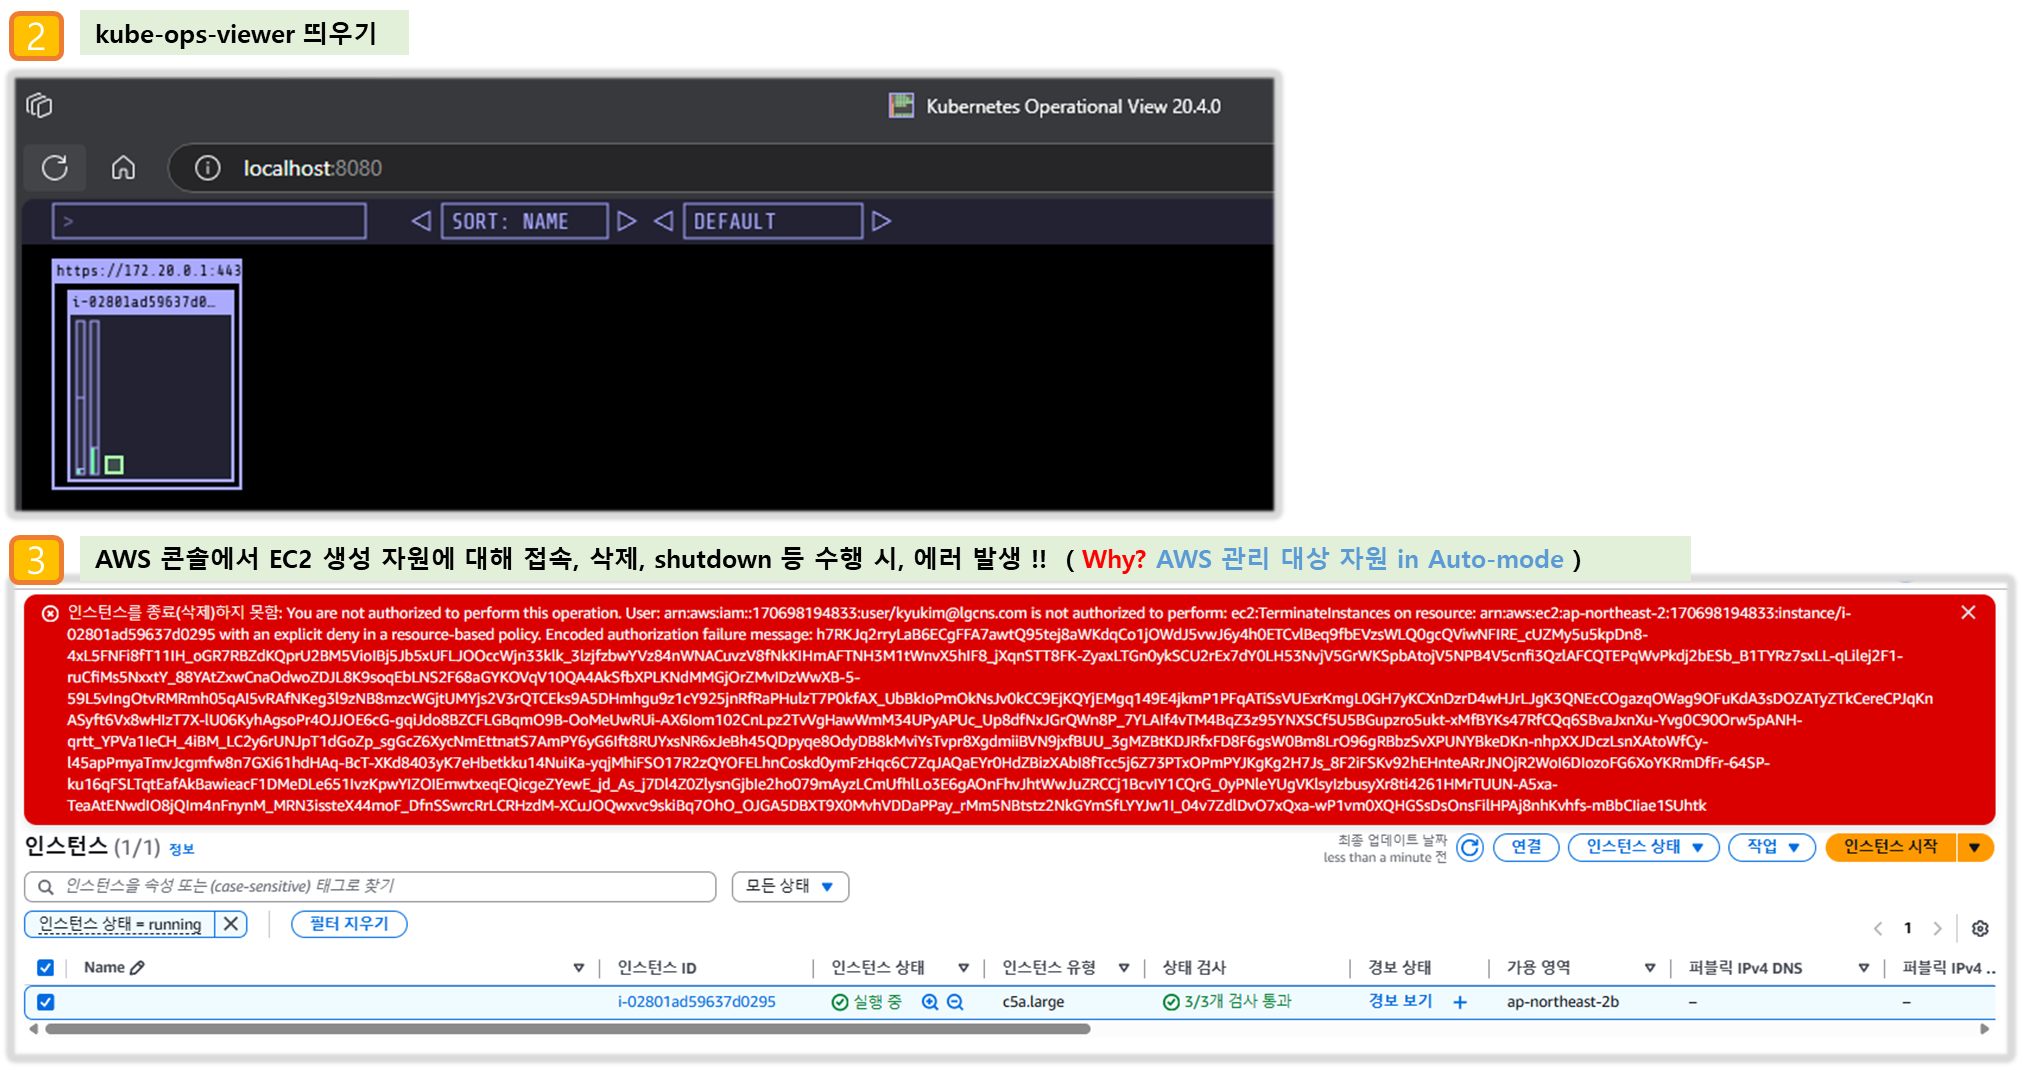
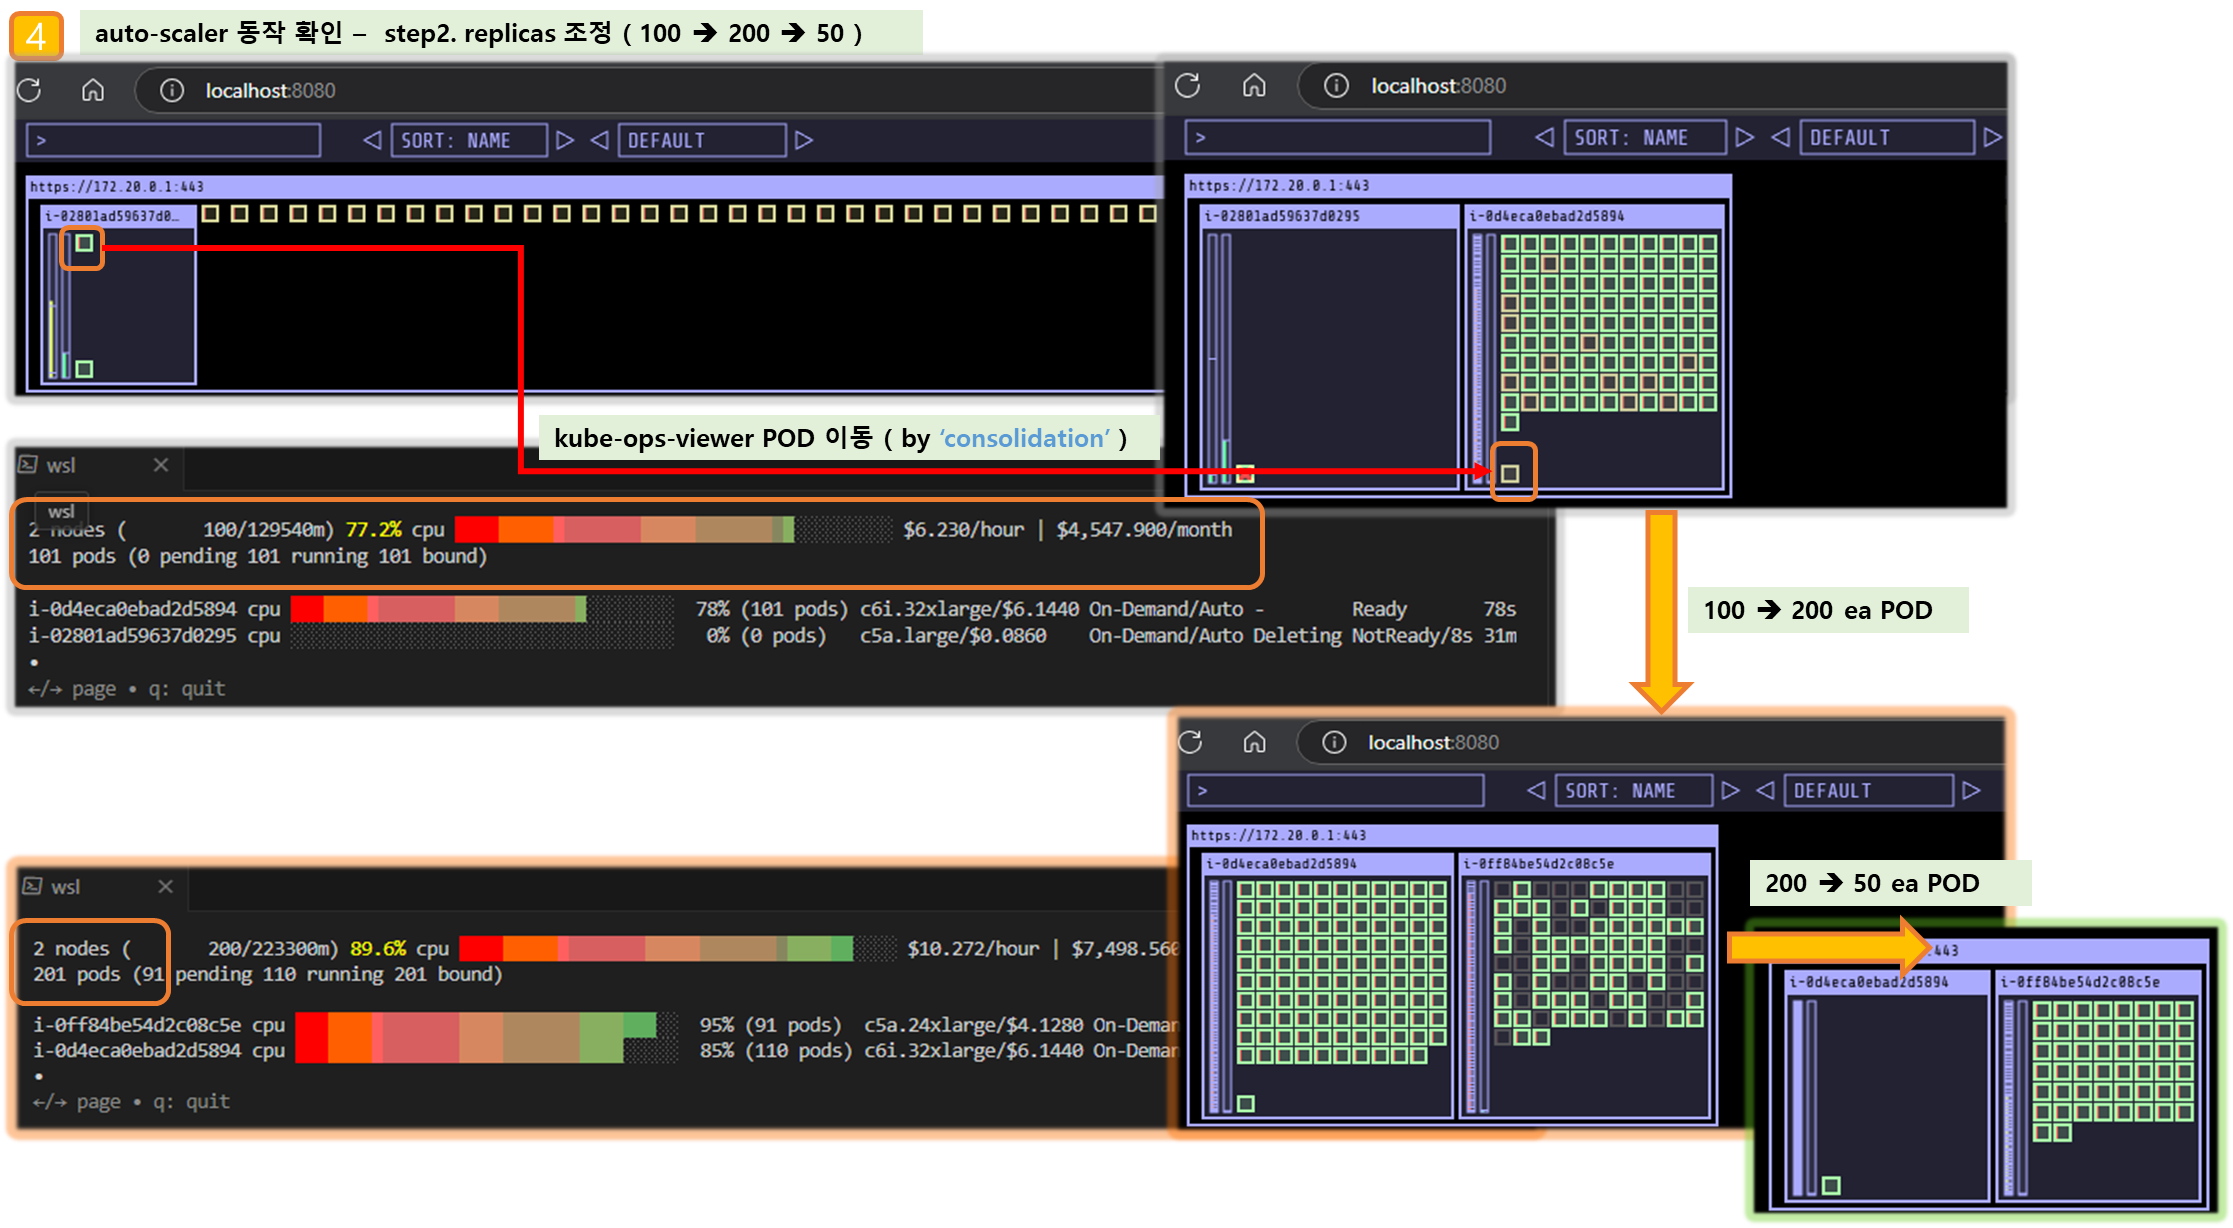
▶ [컴퓨팅] karpenter 동작 확인
Step1. 실습을 위한 deployment 배포
# Step 1: Review existing compute resources (optional)
kubectl get nodepools
general-purpose

# Step 2: Deploy a sample application to the cluster
# eks.amazonaws.com/compute-type: auto selector requires the workload be deployed on an Amazon EKS Auto Mode node.
cat <<EOF | kubectl apply -f -
apiVersion: apps/v1
kind: Deployment
metadata:
  name: inflate
spec:
  replicas: 1
  selector:
    matchLabels:
      app: inflate
  template:
    metadata:
      labels:
        app: inflate
    spec:
      terminationGracePeriodSeconds: 0
      nodeSelector:
        eks.amazonaws.com/compute-type: auto
      securityContext:
        runAsUser: 1000
        runAsGroup: 3000
        fsGroup: 2000
      containers:
        - name: inflate
          image: public.ecr.aws/eks-distro/kubernetes/pause:3.7
          resources:
            requests:
              cpu: 1
          securityContext:
            allowPrivilegeEscalation: false
EOF


# Step 3: Watch Kubernetes Events
kubectl get events -w --sort-by '.lastTimestamp'
kubectl get nodes
Step2. 스케일링 설정 후 확인 : kube-ops-view 파드 evict 되면, port-forward 명령 다시 입력 할것! → pod 안전성 설정이 없을 경우에 대한 간접 경험
# 모니터링
eks-node-viewer --node-sort=eks-node-viewer/node-cpu-usage=dsc --extra-labels eks-node-viewer/node-age
watch -d kubectl get node,pod -A

#
kubectl scale deployment inflate --replicas 100 && kubectl get events -w --sort-by '.lastTimestamp'

#
kubectl scale deployment inflate --replicas 200 && kubectl get events -w --sort-by '.lastTimestamp'

#
kubectl scale deployment inflate --replicas 50 && kubectl get events -w --sort-by '.lastTimestamp'

# 실습 확인 후 삭제
kubectl delete deployment inflate && kubectl get events -w --sort-by '.lastTimestamp'
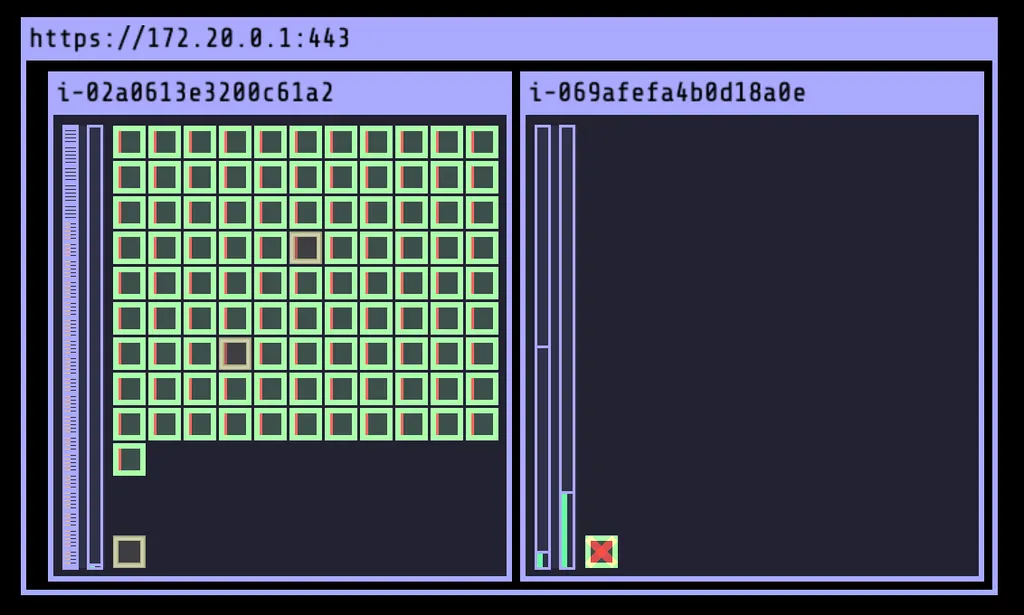
▶ [네트워킹] Graviton Workloads (2048 game) 배포 with ingress(ALB) : custom nodeclass/pool 사용
Step1. custom nodeclass/pool, ment 배포
# custom node pool 생성 : 고객 NodePool : Karpenter 와 키가 다르니 주의!
## 기존(karpenter.k8s.aws/instance-family) → 변경(eks.amazonaws.com/instance-family) - Link
ls ../nodepools
cat ../nodepools/graviton-nodepool.yaml
kubectl apply -f ../nodepools/graviton-nodepool.yaml
---
apiVersion: eks.amazonaws.com/v1
kind: NodeClass
metadata:
  name: graviton-nodeclass
spec:
  role: automode-cluster-eks-auto-20250314121820950800000003
  subnetSelectorTerms:
    - tags:
        karpenter.sh/discovery: "automode-demo"
  securityGroupSelectorTerms:
    - tags:
        kubernetes.io/cluster/automode-cluster: owned
  tags:
    karpenter.sh/discovery: "automode-demo"
---
apiVersion: karpenter.sh/v1
kind: NodePool
metadata:
  name: graviton-nodepool
spec:
  template:
    spec:
      nodeClassRef:
        group: eks.amazonaws.com
        kind: NodeClass
        name: graviton-nodeclass
      requirements:
        - key: "eks.amazonaws.com/instance-category"
          operator: In
          values: ["c", "m", "r"]
        - key: "eks.amazonaws.com/instance-cpu"
          operator: In
          values: ["4", "8", "16", "32"]
        - key: "kubernetes.io/arch"
          operator: In
          values: ["arm64"]
      taints:
        - key: "arm64"
          value: "true"
          effect: "NoSchedule"  # Prevents non-ARM64 pods from scheduling
  limits:
    cpu: 1000
  disruption:
    consolidationPolicy: WhenEmpty
    consolidateAfter: 30s

#
kubectl get NodeClass
NAME                 ROLE                                                   READY   AGE
default              automode-cluster-eks-auto-20250314121820950800000003   True    64m
graviton-nodeclass   automode-cluster-eks-auto-20250314121820950800000003   True    3m4s

kubectl get NodePool
NAME                NODECLASS            NODES   READY   AGE
general-purpose     default              0       True    64m
graviton-nodepool   graviton-nodeclass   0       True    3m32s

#
ls ../examples/graviton
cat ../examples/graviton/game-2048.yaml
...
          resources:
            requests:
              cpu: "100m"
              memory: "128Mi"
            limits:
              cpu: "200m"
              memory: "256Mi"
      automountServiceAccountToken: false
      tolerations:
      - key: "arm64"
        value: "true"
        effect: "NoSchedule"
      nodeSelector:
        kubernetes.io/arch: arm64
...

kubectl apply -f ../examples/graviton/game-2048.yaml

# c6g.xlarge : vCPU 4, 8 GiB RAM > 스팟 선택됨!
kubectl get nodeclaims
NAME                      TYPE         CAPACITY   ZONE              NODE                  READY   AGE
graviton-nodepool-ngp42   c6g.xlarge   spot       ap-northeast-2b   i-0b7ca5072ebf3c969   True    9m48s

kubectl get nodeclaims -o yaml
...
  spec:
    expireAfter: 336h
    ...
kubectl get cninodes.eks.amazonaws.com
kubectl get cninodes.eks.amazonaws.com -o yaml
eks-node-viewer --resources cpu,memory
kubectl get node -owide
kubectl describe node
...
Taints:             arm64=true:NoSchedule
...
Conditions:
  Type                    Status  LastHeartbeatTime                 LastTransitionTime                Reason                       Message
  ----                    ------  -----------------                 ------------------                ------                       -------
  MemoryPressure          False   Fri, 14 Mar 2025 22:53:54 +0900   Fri, 14 Mar 2025 22:37:35 +0900   KubeletHasSufficientMemory   kubelet has sufficient memory available
  DiskPressure            False   Fri, 14 Mar 2025 22:53:54 +0900   Fri, 14 Mar 2025 22:37:35 +0900   KubeletHasNoDiskPressure     kubelet has no disk pressure
  PIDPressure             False   Fri, 14 Mar 2025 22:53:54 +0900   Fri, 14 Mar 2025 22:37:35 +0900   KubeletHasSufficientPID      kubelet has sufficient PID available
  Ready                   True    Fri, 14 Mar 2025 22:53:54 +0900   Fri, 14 Mar 2025 22:37:35 +0900   KubeletReady                 kubelet is posting ready status
  KernelReady             True    Fri, 14 Mar 2025 22:57:39 +0900   Fri, 14 Mar 2025 22:37:39 +0900   KernelIsReady                Monitoring for the Kernel system is active
  ContainerRuntimeReady   True    Fri, 14 Mar 2025 22:57:39 +0900   Fri, 14 Mar 2025 22:37:39 +0900   ContainerRuntimeIsReady      Monitoring for the ContainerRuntime system is active
  StorageReady            True    Fri, 14 Mar 2025 22:57:39 +0900   Fri, 14 Mar 2025 22:37:39 +0900   DiskIsReady                  Monitoring for the Disk system is active
  NetworkingReady         True    Fri, 14 Mar 2025 22:57:39 +0900   Fri, 14 Mar 2025 22:37:39 +0900   NetworkingIsReady            Monitoring for the Networking system is active
...
System Info:
  Machine ID:                 ec272ed9293b6501bd9f665eed7e1627
  System UUID:                ec272ed9-293b-6501-bd9f-665eed7e1627
  Boot ID:                    97c24ba6-d319-4686-abf8-bb62c4f22888
  Kernel Version:             6.1.129
  OS Image:                   Bottlerocket (EKS Auto) 2025.3.9 (aws-k8s-1.31)
  Operating System:           linux
  Architecture:               arm64
  Container Runtime Version:  containerd://1.7.25+bottlerocket
  Kubelet Version:            v1.31.4-eks-0f56d01
  Kube-Proxy Version:         v1.31.4-eks-0f56d01

#
kubectl get deploy,pod -n game-2048 -owide
Step2. 관리 콘솔 확인
- EKS - Compute : 내장 node pool 이 아닌 별도 node pool 생성 확인.

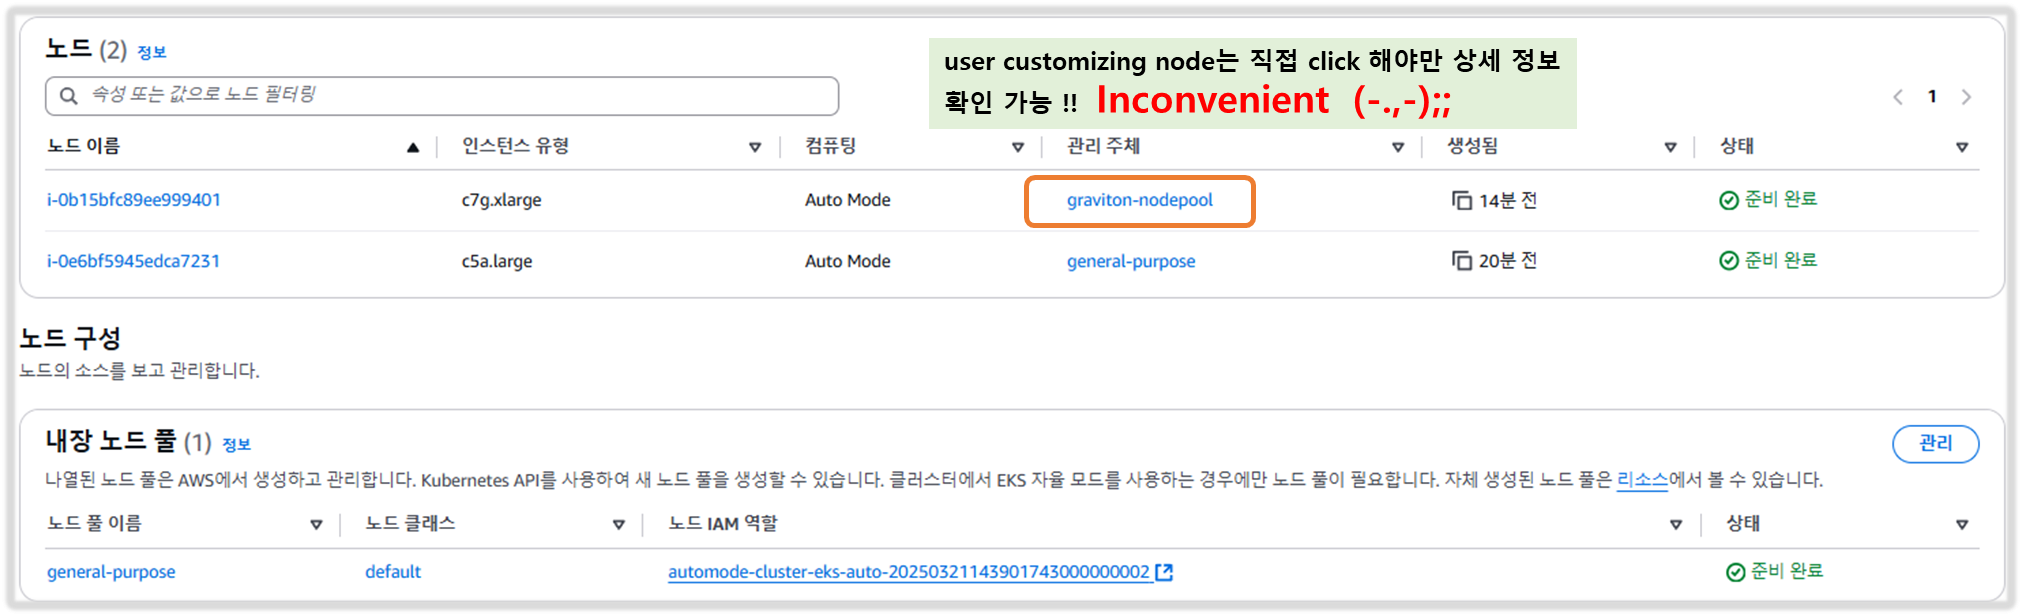
- EC2 - 1대 생성 확인!, 참고로 접근 안됨. ⇒ Reboot 해보자 ⇒ Terminated 해보자!
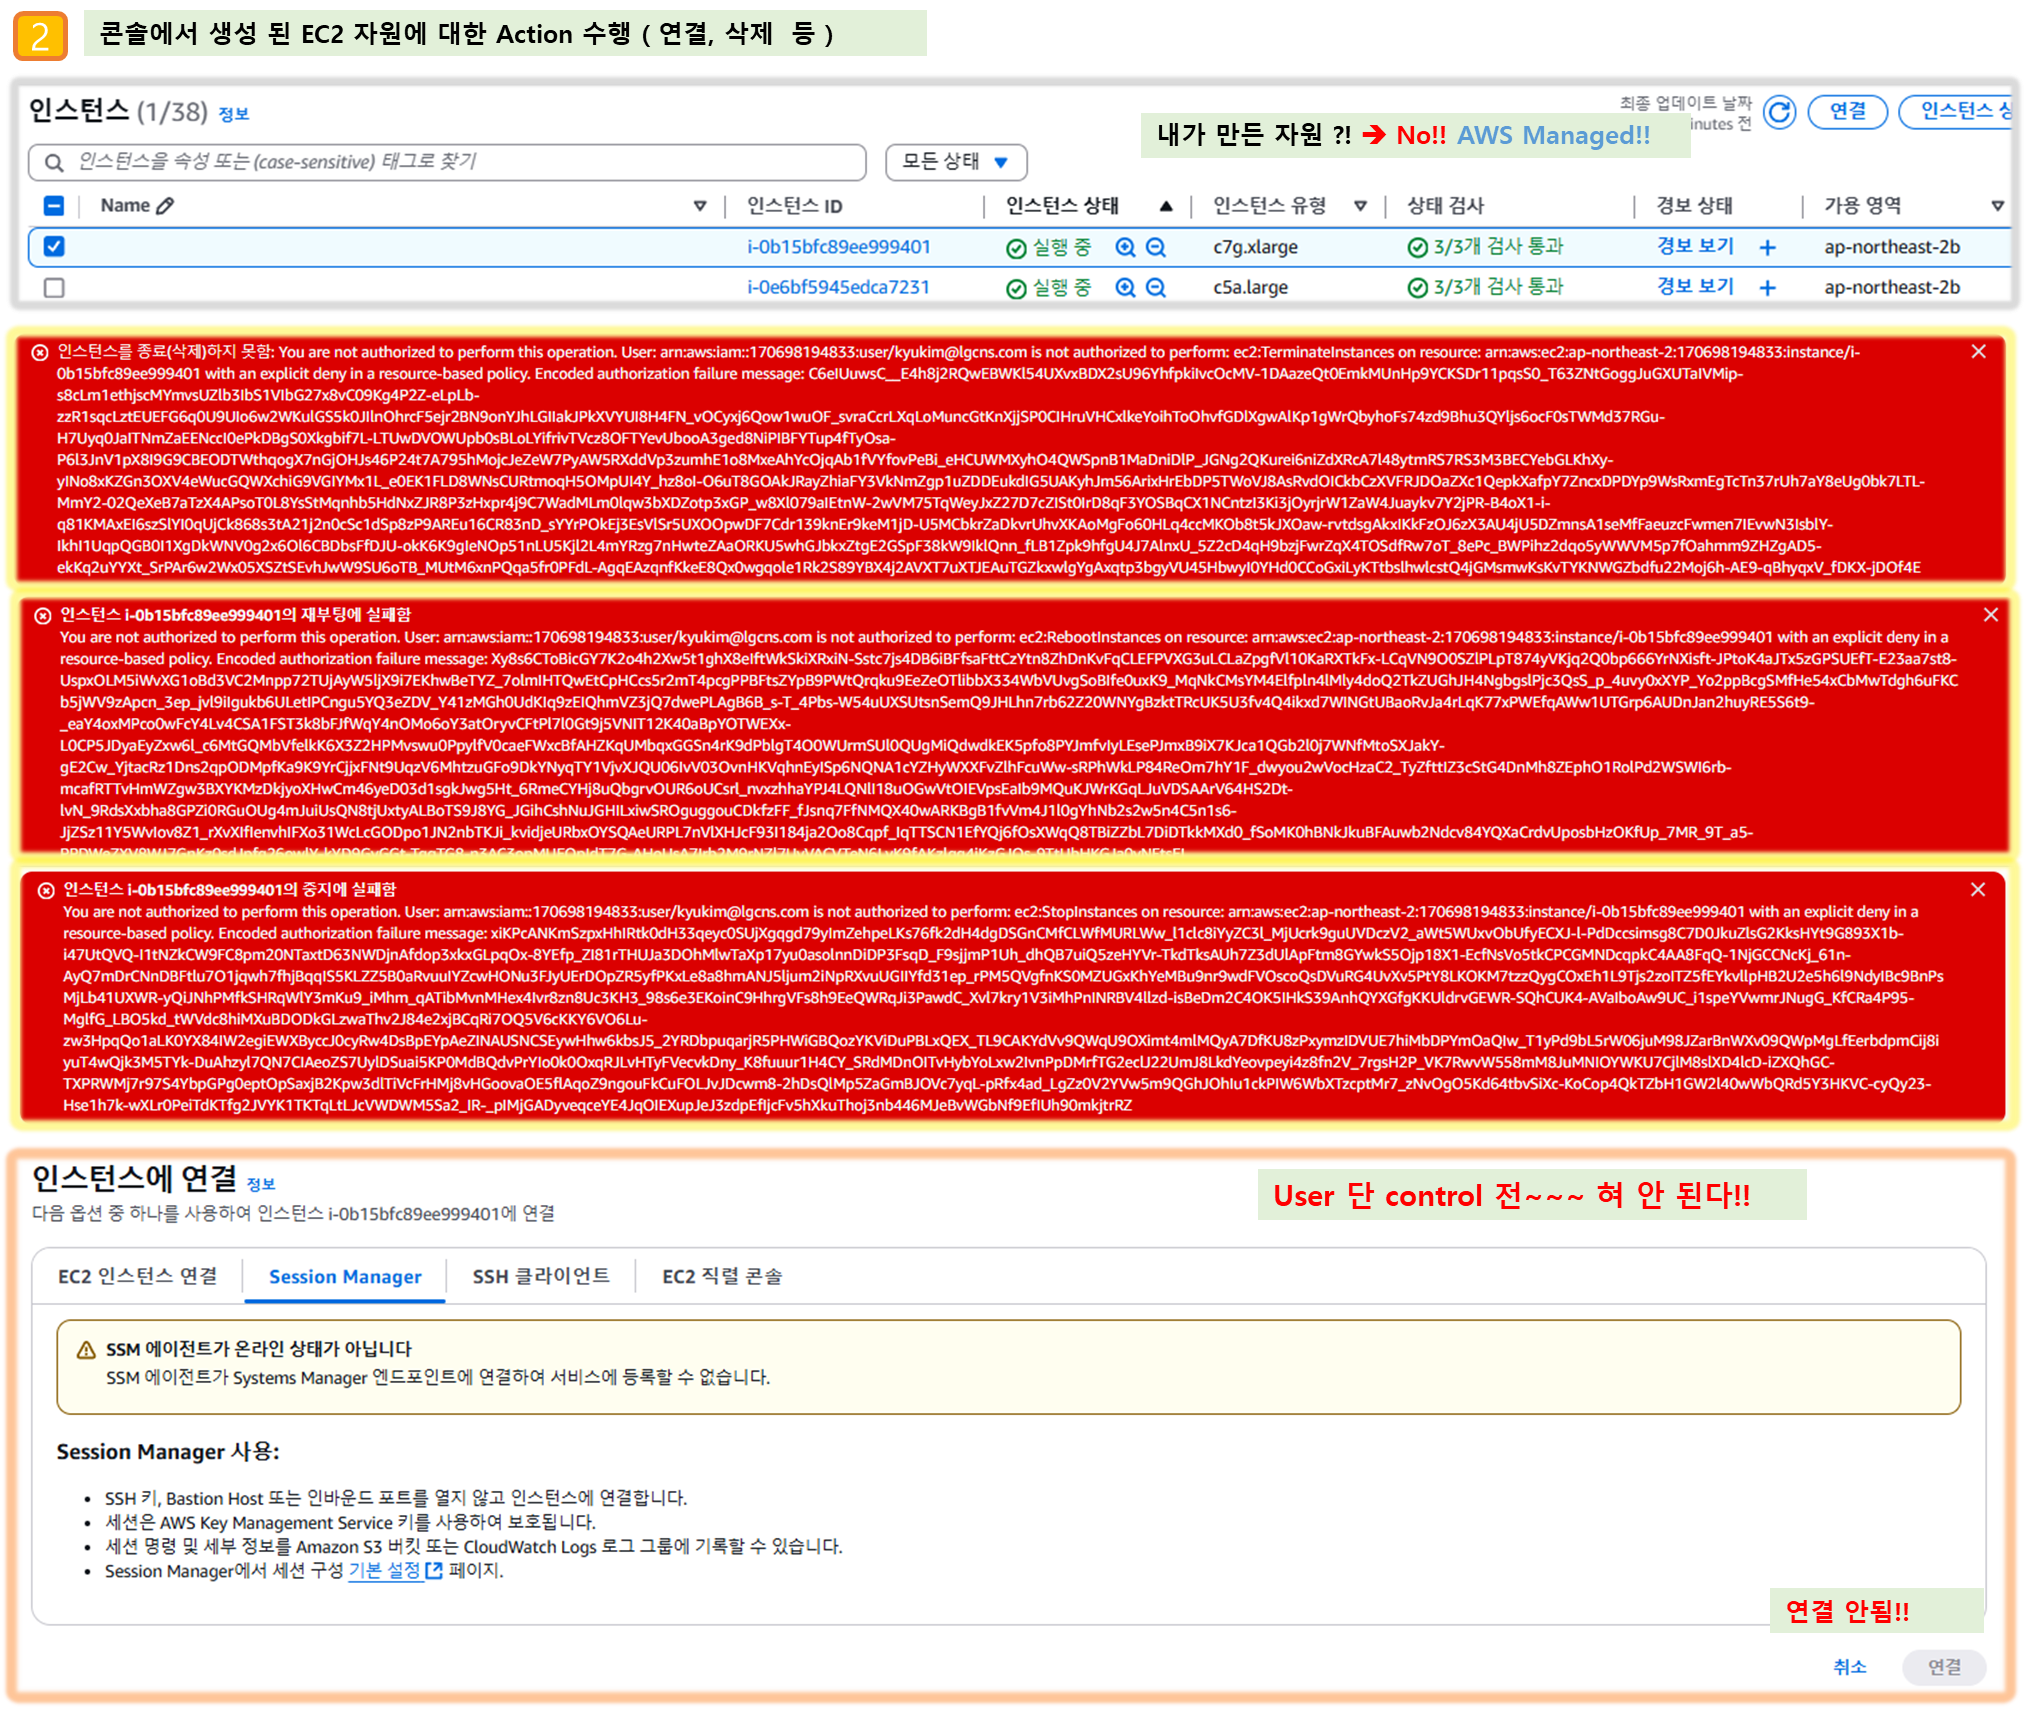
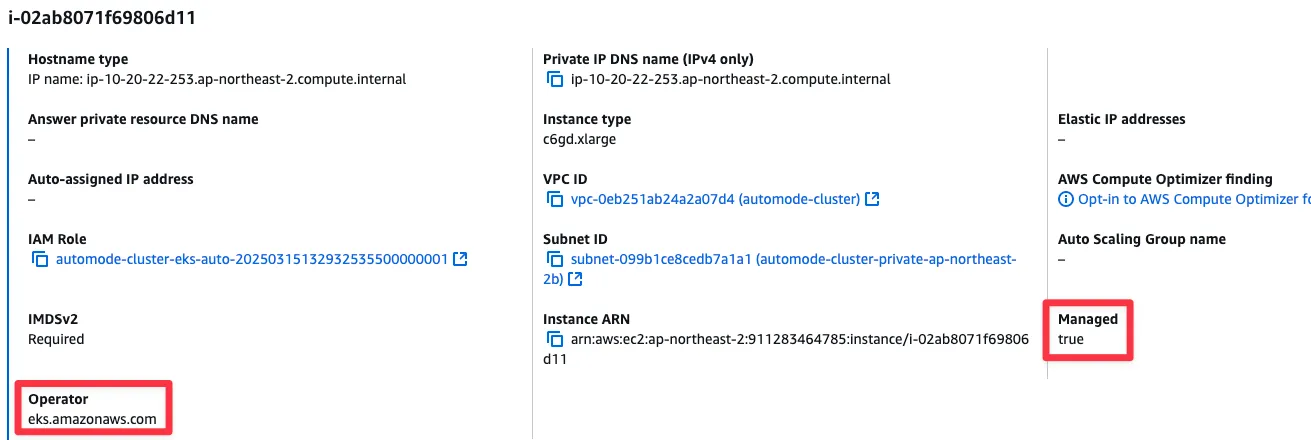
- 참고로, 생성되는 EC2의 OS는 Bottlerocket 이며, 루트 볼륨은 읽기 전용임.
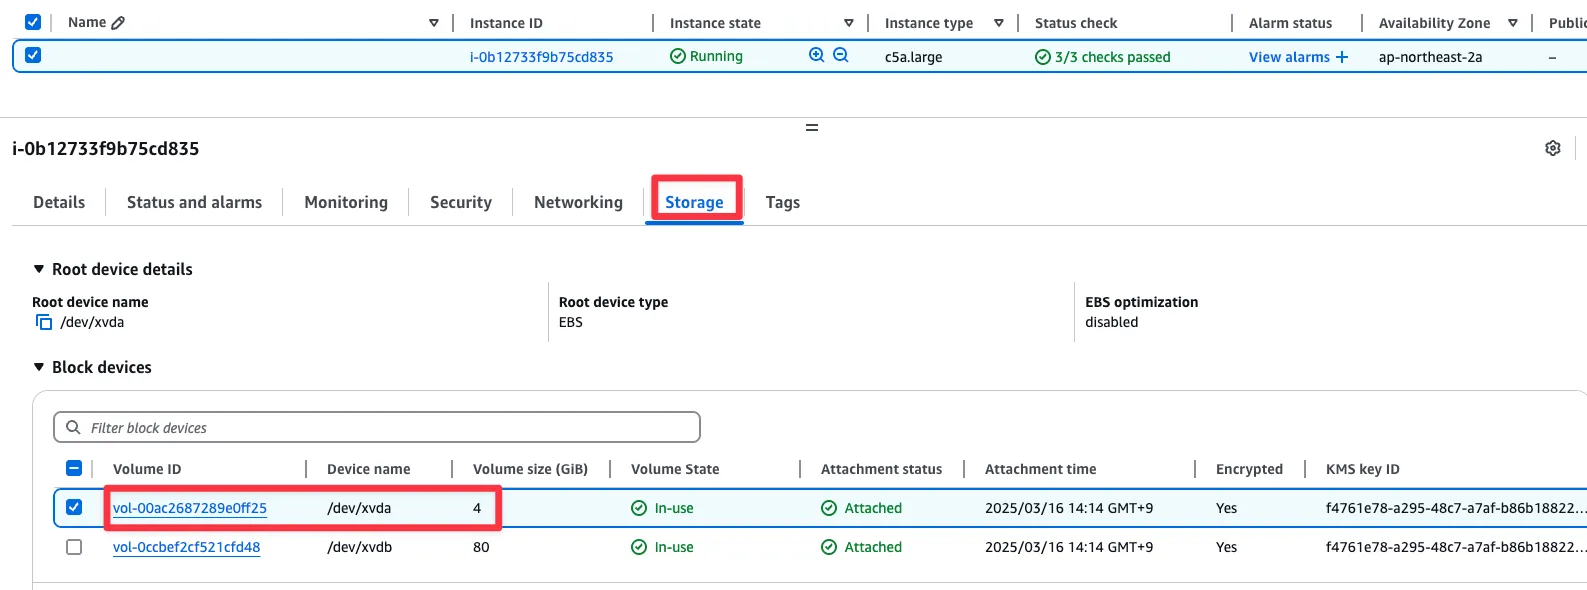
- 해당 EC2에서 Monitoring → Instance audit 확인 ⇒ 맨 하단에 RunInstances(CloudTrail) 클릭 , 재부팅/삭제 실패도 클릭
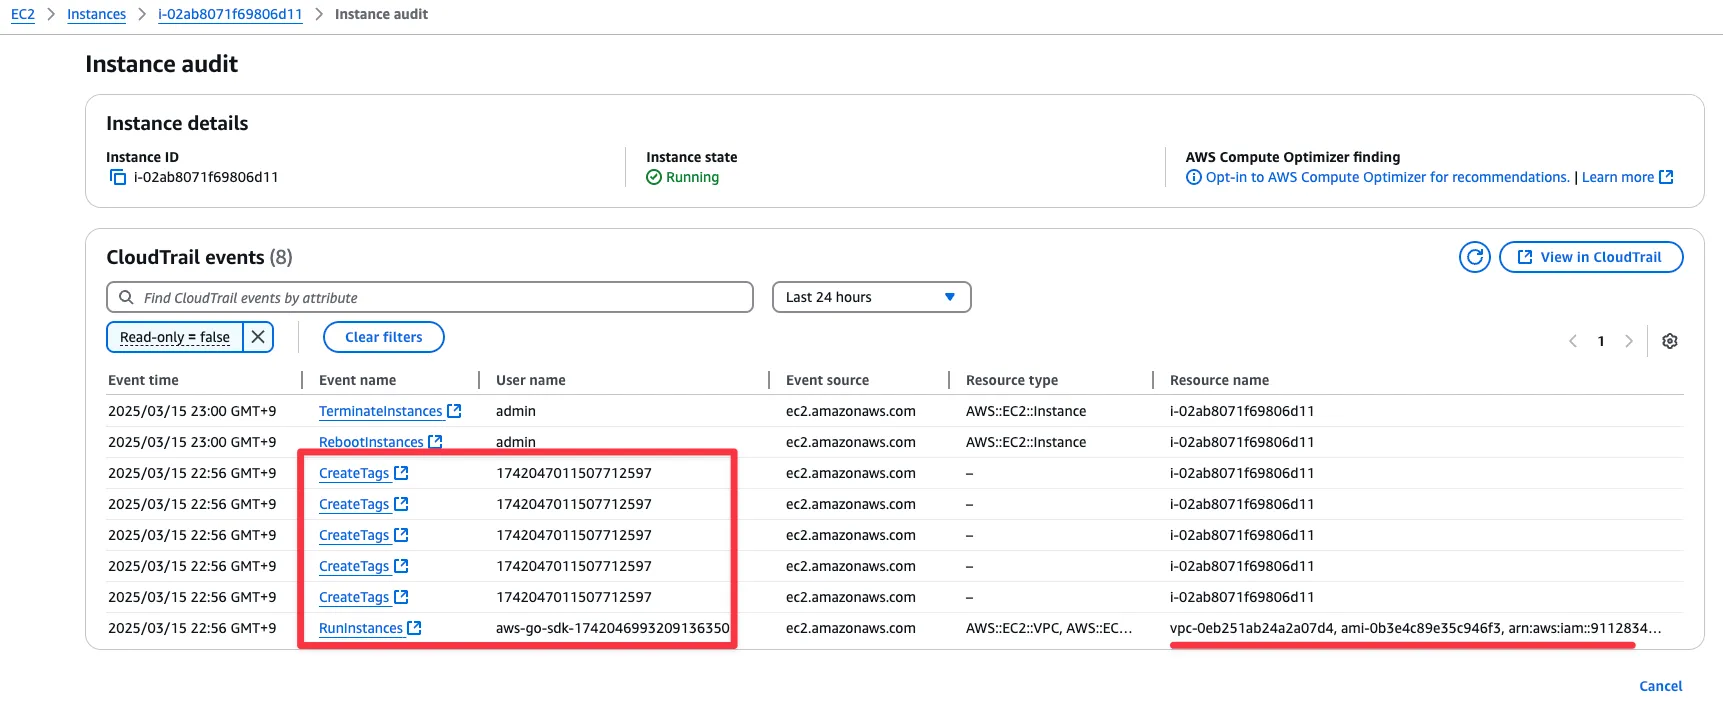

- CloudTrail 확인 : 실행 주체 확인
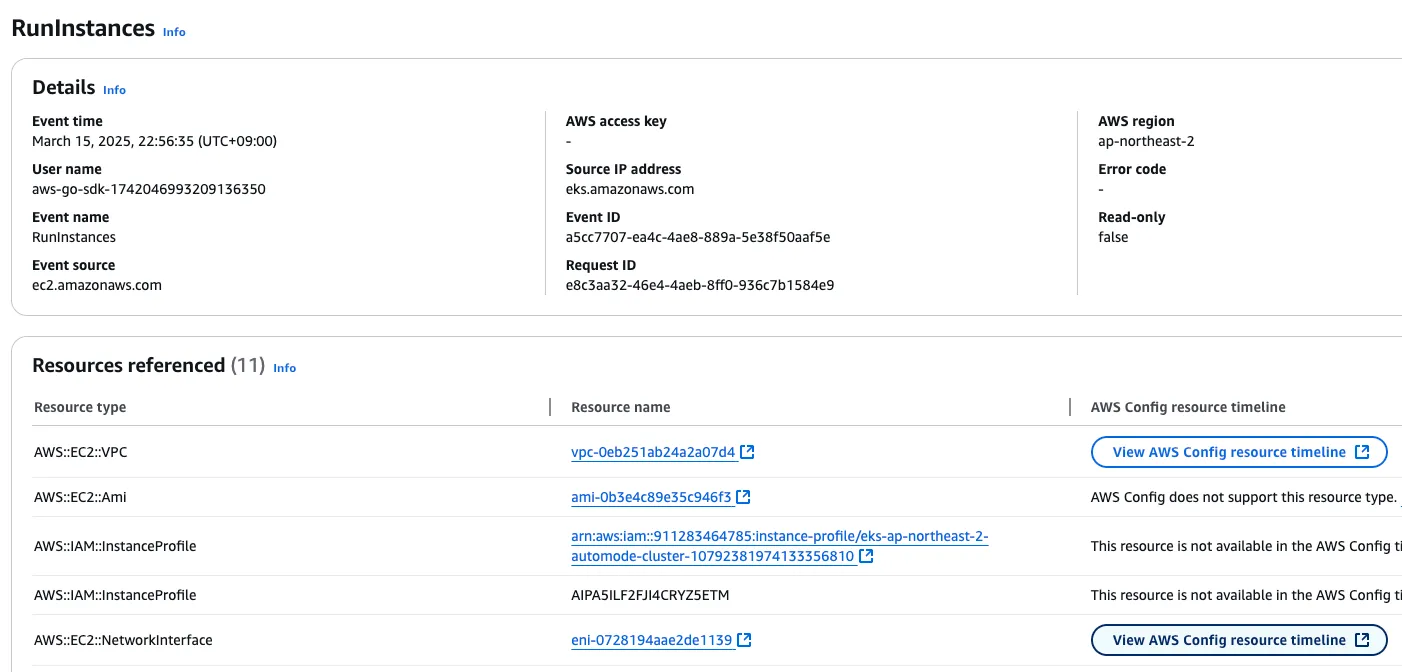
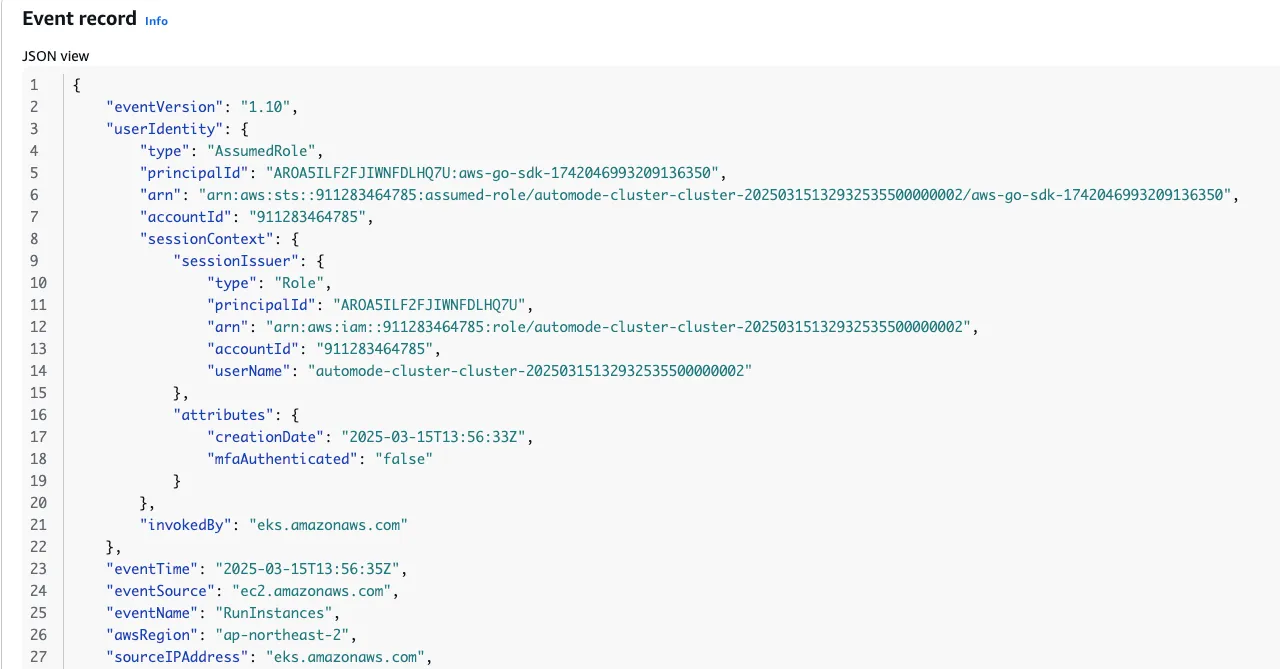
- EC2 - 보안 그룹 확인
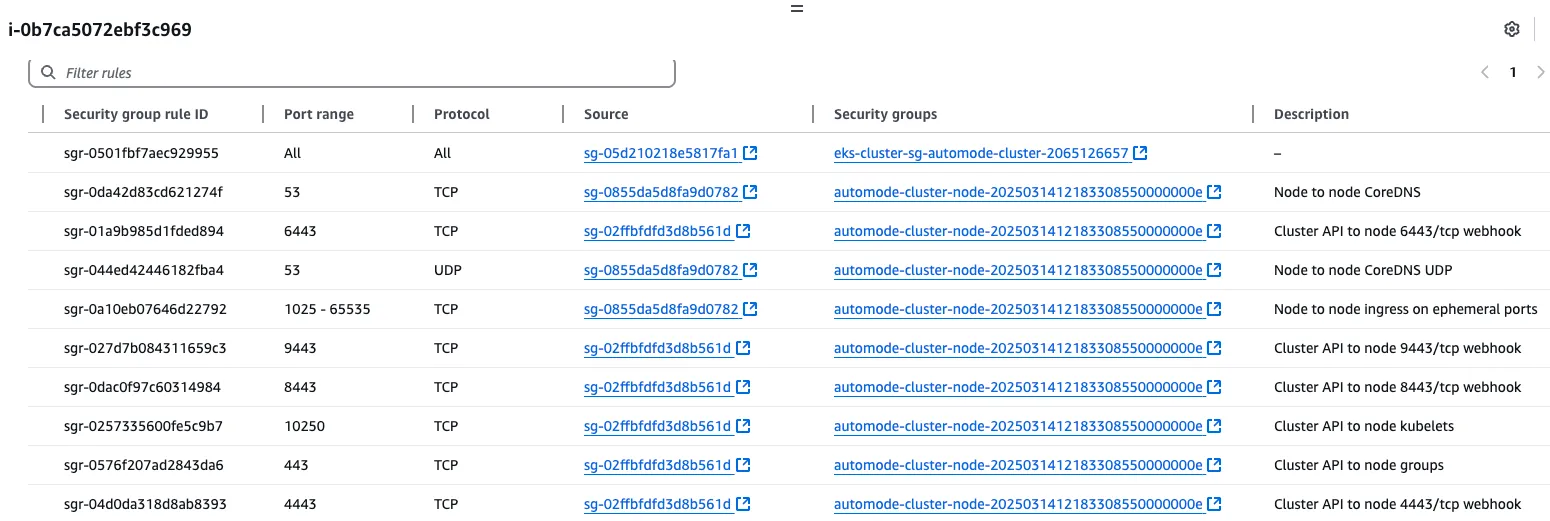
- EC2 - ENI 추가됨

[ 실행 결과 - 한 눈에 보기 ]
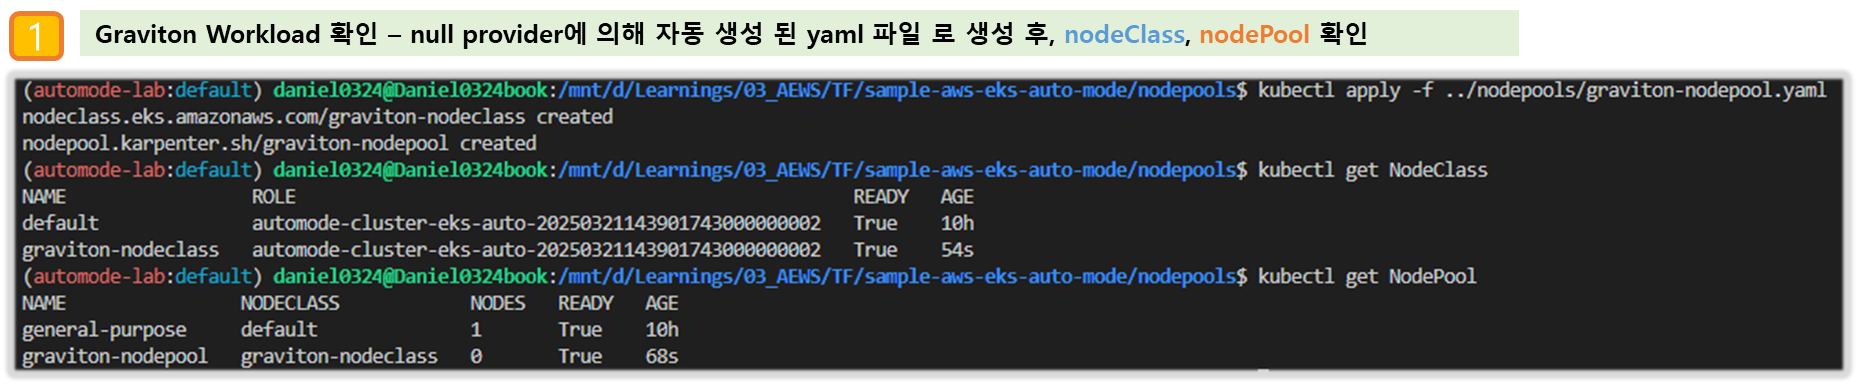
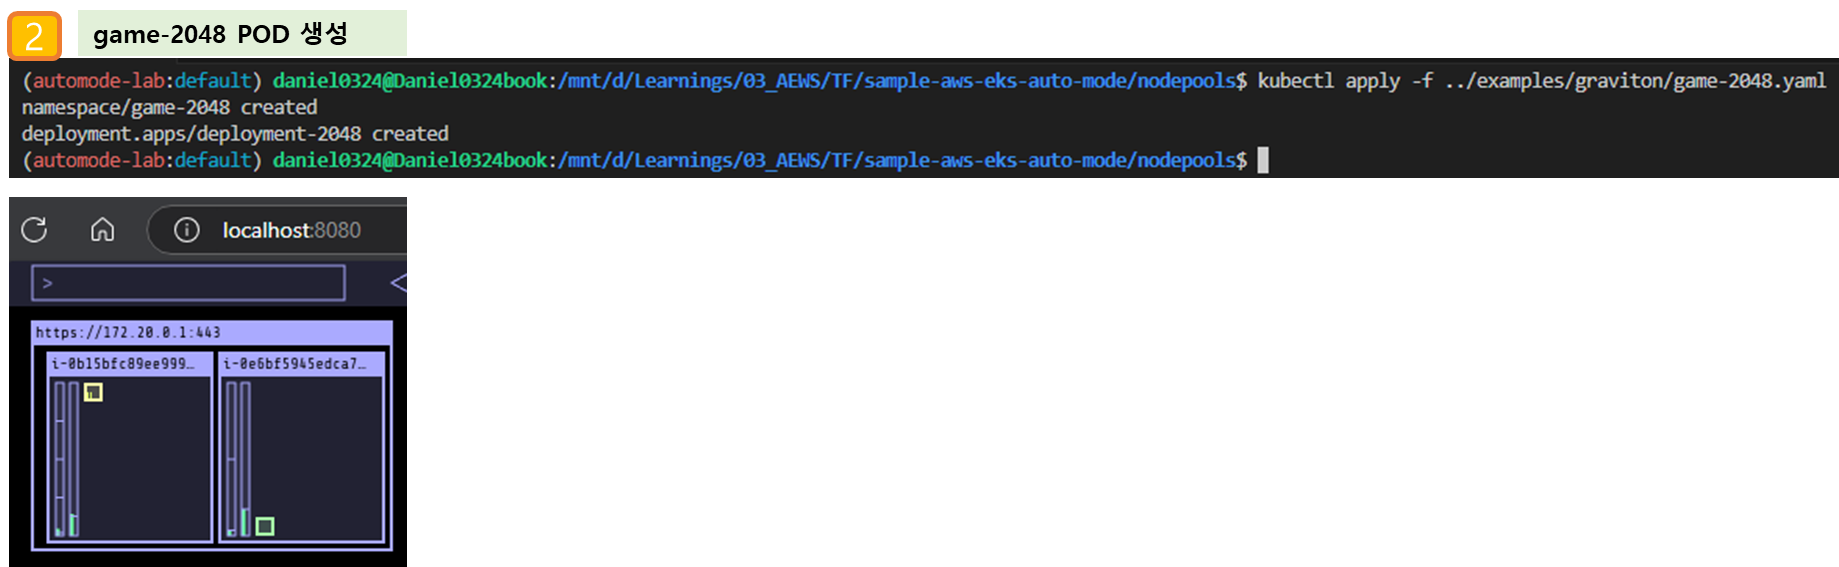
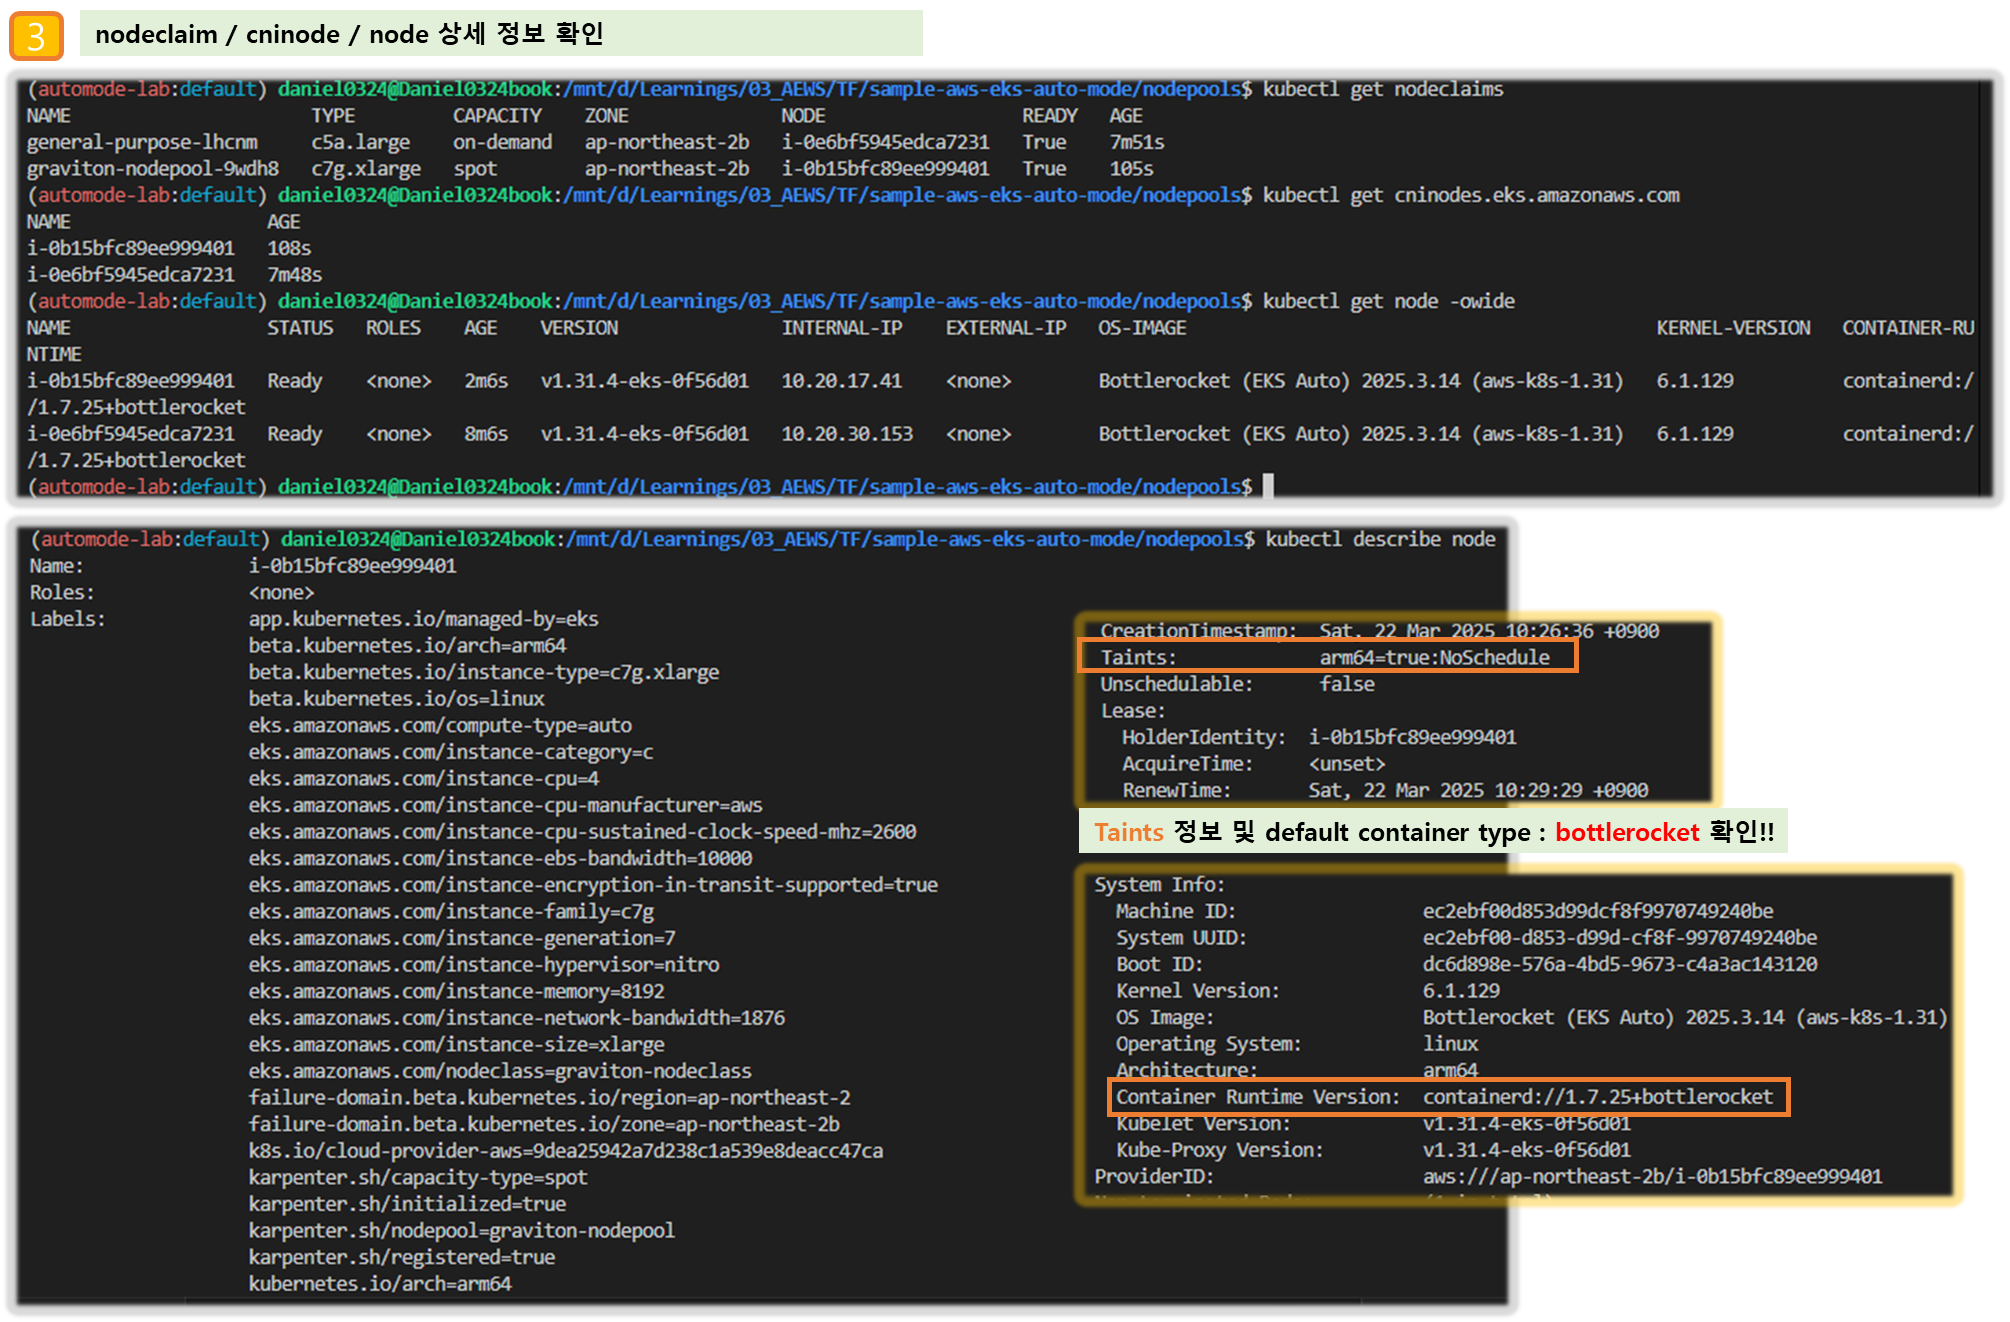

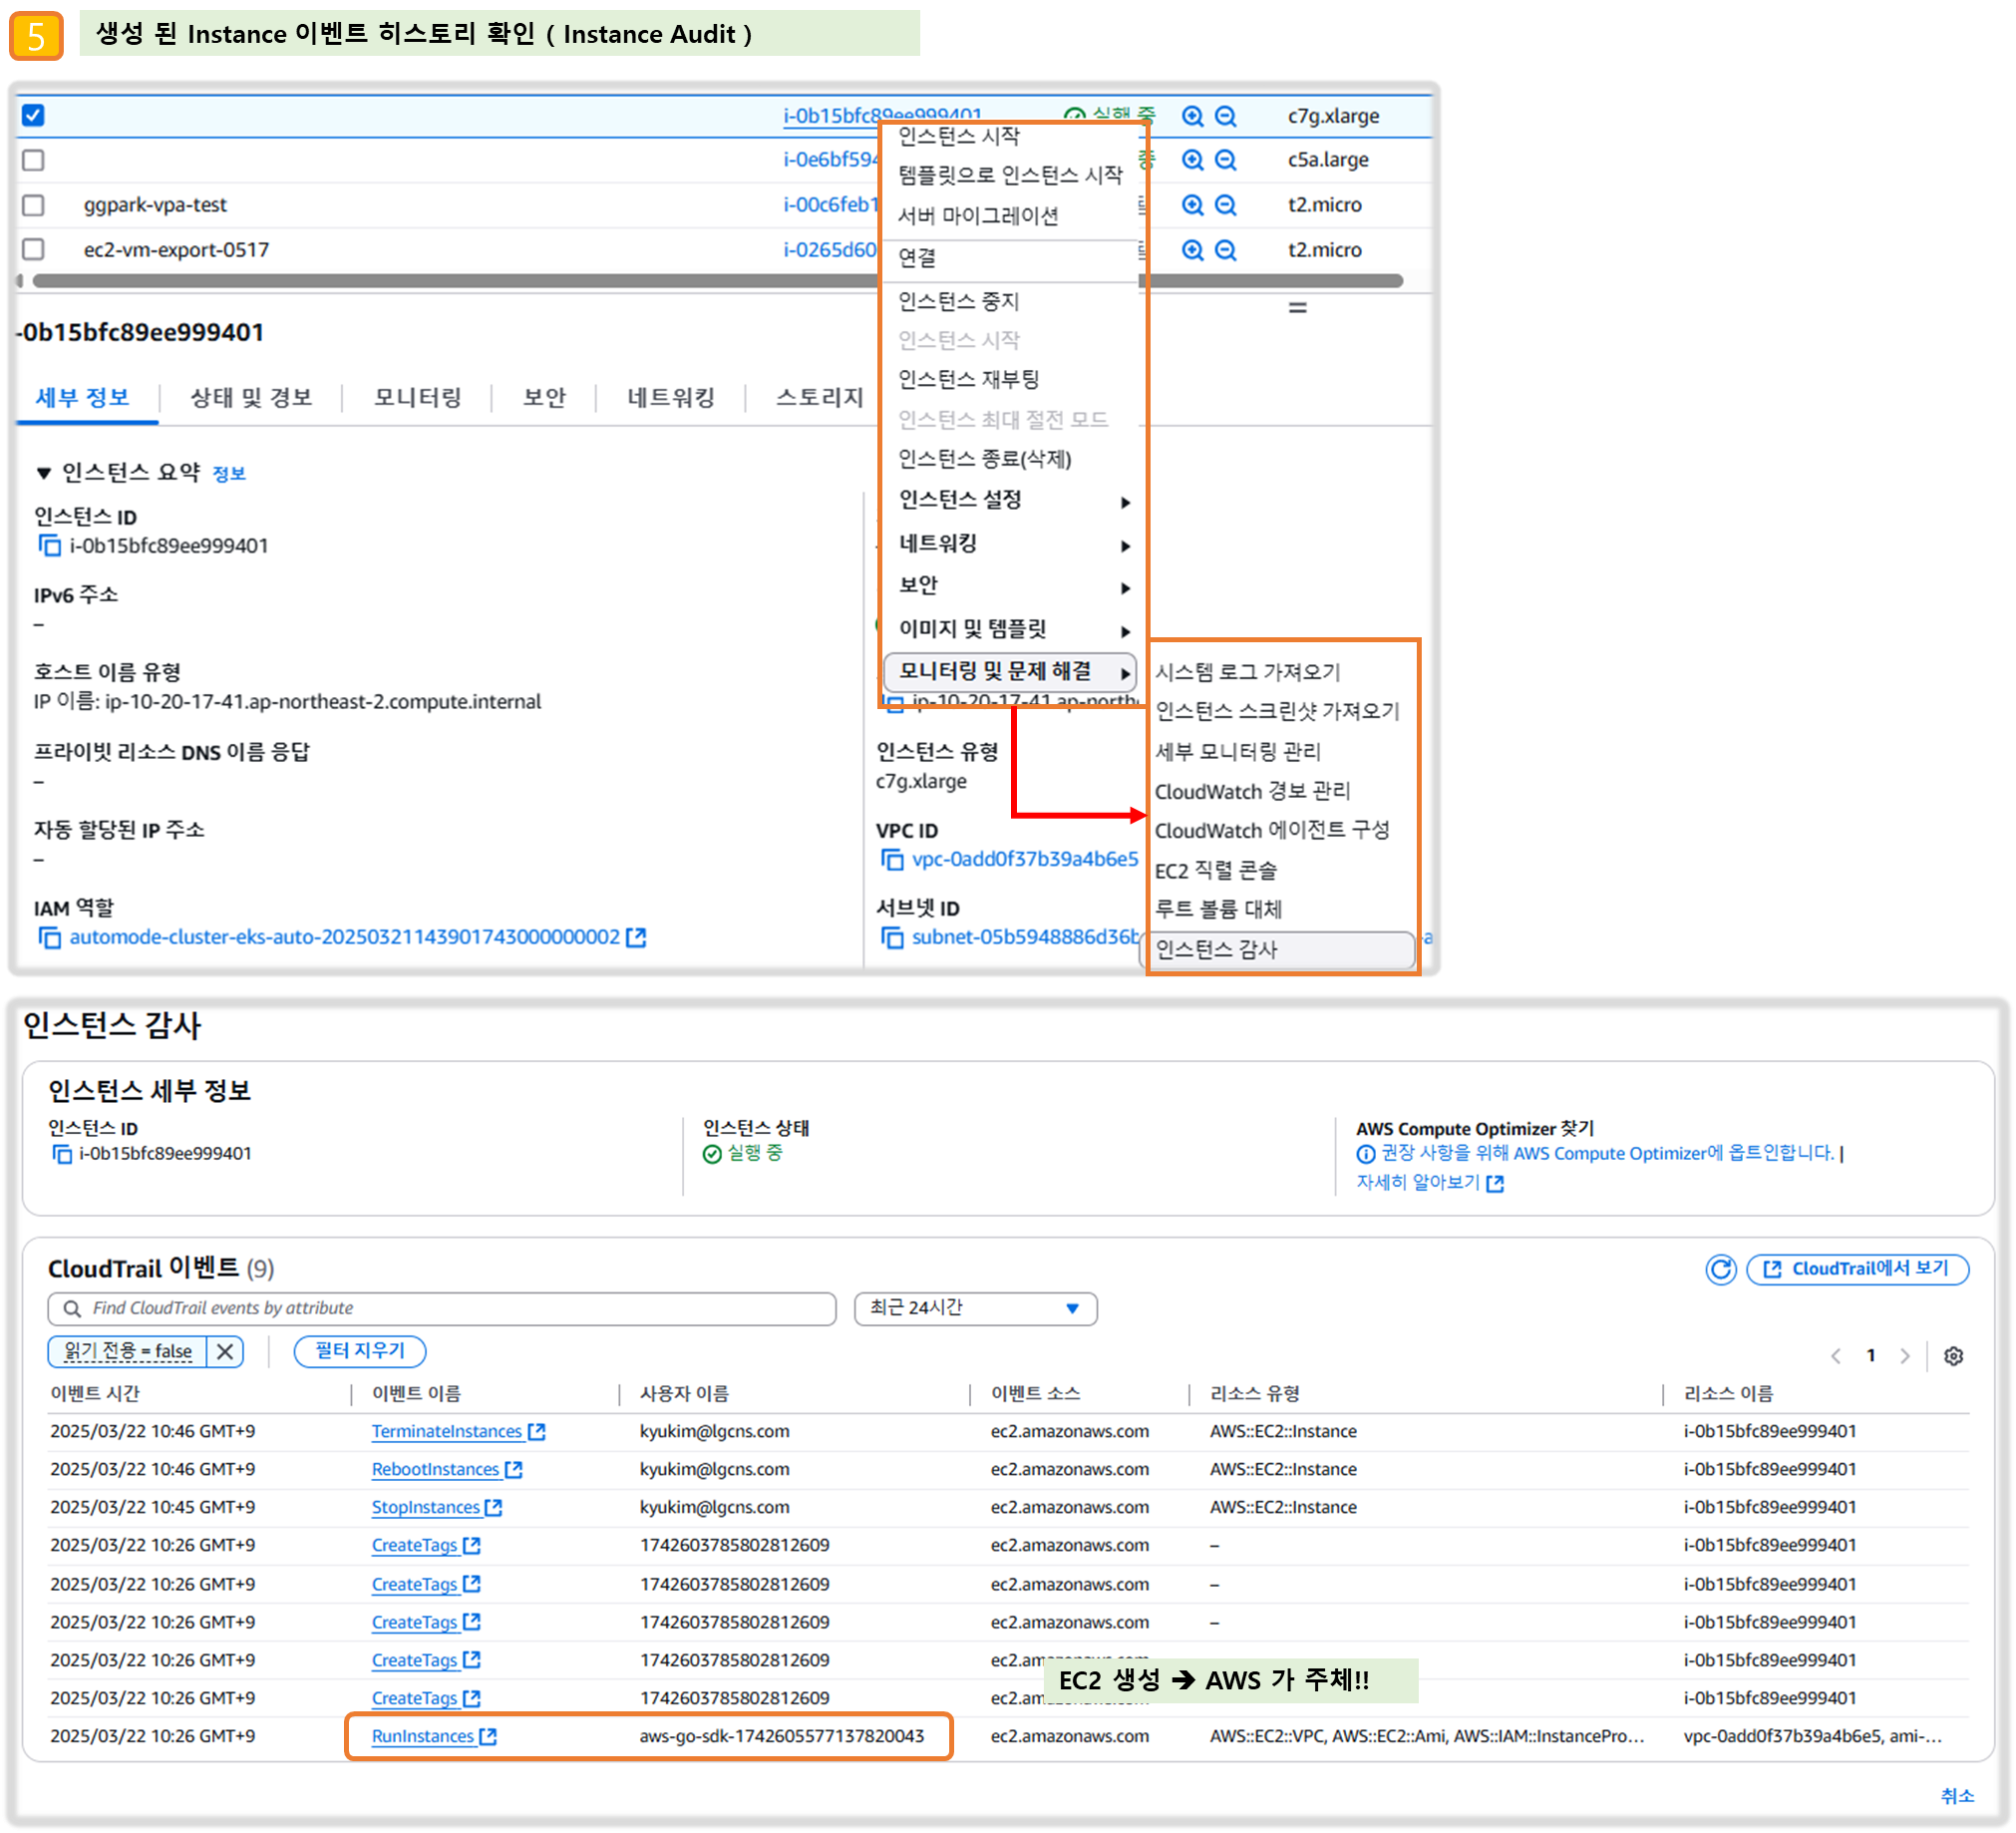
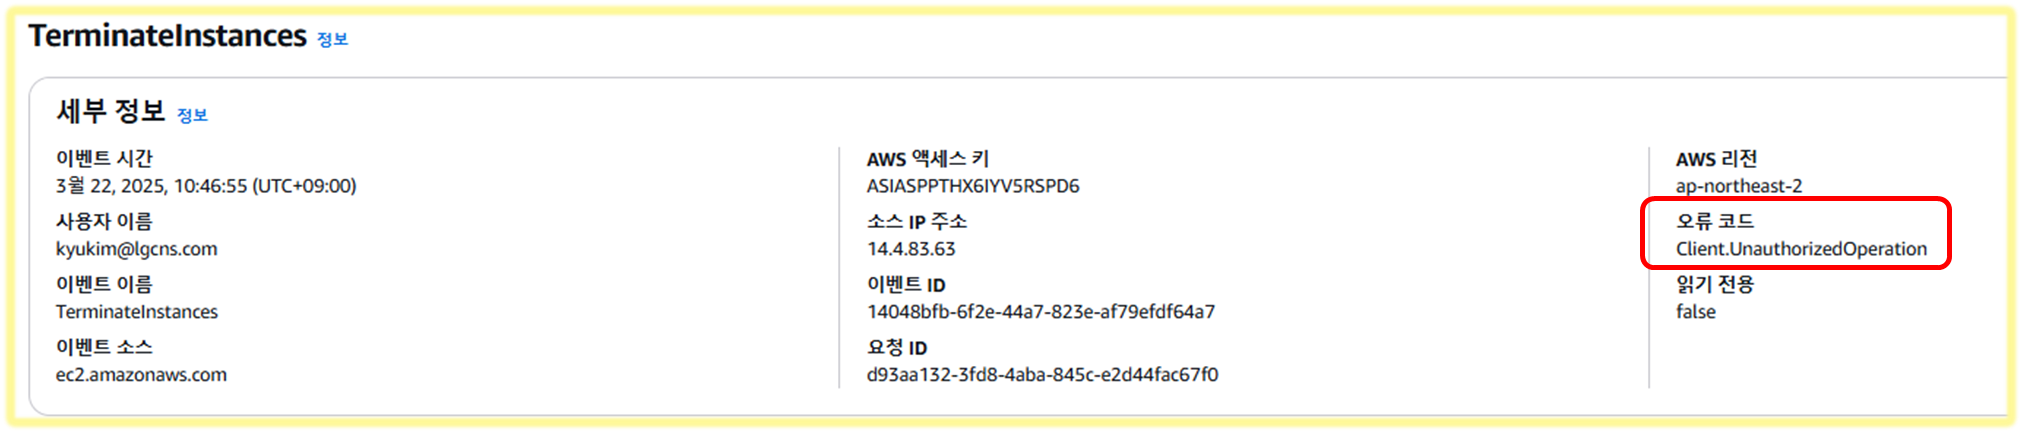
▶ ALB(Ingress) 설정
#
cat ../examples/graviton/2048-ingress.yaml
...
apiVersion: eks.amazonaws.com/v1
kind: IngressClassParams
metadata:
  namespace: game-2048
  name: params
spec:
  scheme: internet-facing

---
apiVersion: networking.k8s.io/v1
kind: IngressClass
metadata:
  namespace: game-2048
  labels:
    app.kubernetes.io/name: LoadBalancerController
  name: alb
spec:
  controller: eks.amazonaws.com/alb
  parameters:
    apiGroup: eks.amazonaws.com
    kind: IngressClassParams
    name: params

---
apiVersion: networking.k8s.io/v1
kind: Ingress
metadata:
  namespace: game-2048
  name: ingress-2048
spec:
  ingressClassName: alb
  rules:
    - http:
        paths:
          - path: /
            pathType: Prefix
            backend:
              service:
                name: service-2048
                port:
                  number: 80

kubectl apply -f ../examples/graviton/2048-ingress.yaml

#
kubectl get ingressclass,ingressclassparams,ingress,svc,ep -n game-2048
NAME                                 CONTROLLER              PARAMETERS                                    AGE
ingressclass.networking.k8s.io/alb   eks.amazonaws.com/alb   IngressClassParams.eks.amazonaws.com/params   105s

NAME                                          GROUP-NAME   SCHEME            IP-ADDRESS-TYPE   AGE
ingressclassparams.eks.amazonaws.com/params                internet-facing                     105s

NAME                                     CLASS   HOSTS   ADDRESS                                                                       PORTS   AGE
ingress.networking.k8s.io/ingress-2048   alb     *       k8s-game2048-ingress2-db993ba6ac-782663732.ap-northeast-2.elb.amazonaws.com   80      105s

NAME                   TYPE       CLUSTER-IP      EXTERNAL-IP   PORT(S)        AGE
service/service-2048   NodePort   172.20.194.11   <none>        80:30280/TCP   105s

NAME                     ENDPOINTS        AGE
endpoints/service-2048 10.20.30.64:80 105s- Configure Security Groups : Configure security group rules to allow communication between the ALB and EKS cluster
- 보안 그룹 소스에 ALB SG ID가 이미 들어가 있는 상태라서 아래 규칙 추가 없이 접속이 되어야 하지만, 혹시 잘 안될 경우 아래 추가 할 것
# Get security group IDs
ALB_SG=$(aws elbv2 describe-load-balancers \
  --query 'LoadBalancers[?contains(DNSName, `game2048`)].SecurityGroups[0]' \
  --output text)

EKS_SG=$(aws eks describe-cluster \
  --name automode-cluster \
  --query 'cluster.resourcesVpcConfig.clusterSecurityGroupId' \
  --output text)

echo $ALB_SG $EKS_SG # 해당 보안그룹을 관리콘솔에서 정책 설정 먼저 확인해보자

# Allow ALB to communicate with EKS cluster : 실습 환경 삭제 때, 미리 $EKS_SG에 추가된 규칙만 제거해둘것.
aws ec2 authorize-security-group-ingress \
  --group-id $EKS_SG \
  --source-group $ALB_SG \
  --protocol tcp \
  --port 80

# 아래 웹 주소로 http 접속!
kubectl get ingress ingress-2048 \
  -o jsonpath='{.status.loadBalancer.ingress[0].hostname}' \
  -n game-2048
k8s-game2048-ingress2-db993ba6ac-782663732.ap-northeast-2.elb.amazonaws.com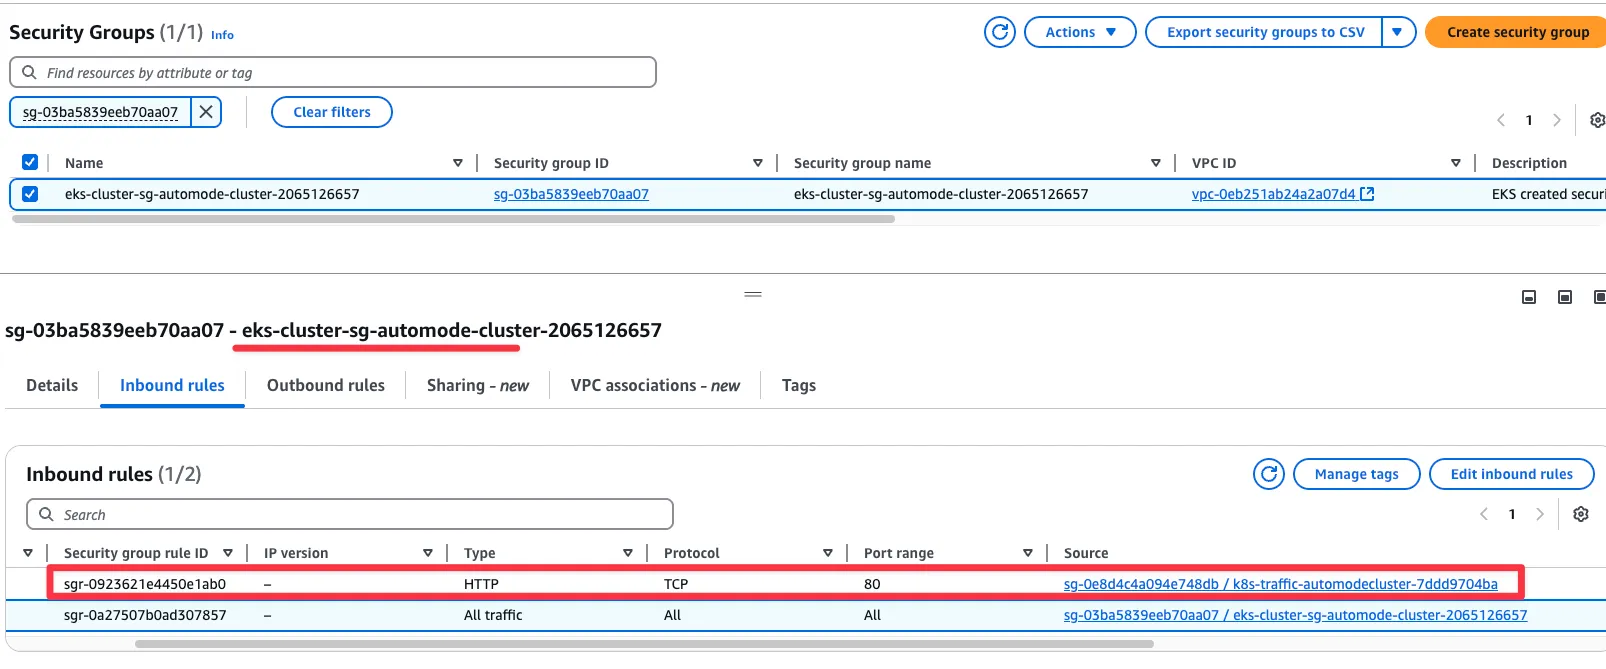
[ 실행 결과 - 한 눈에 보기 ]

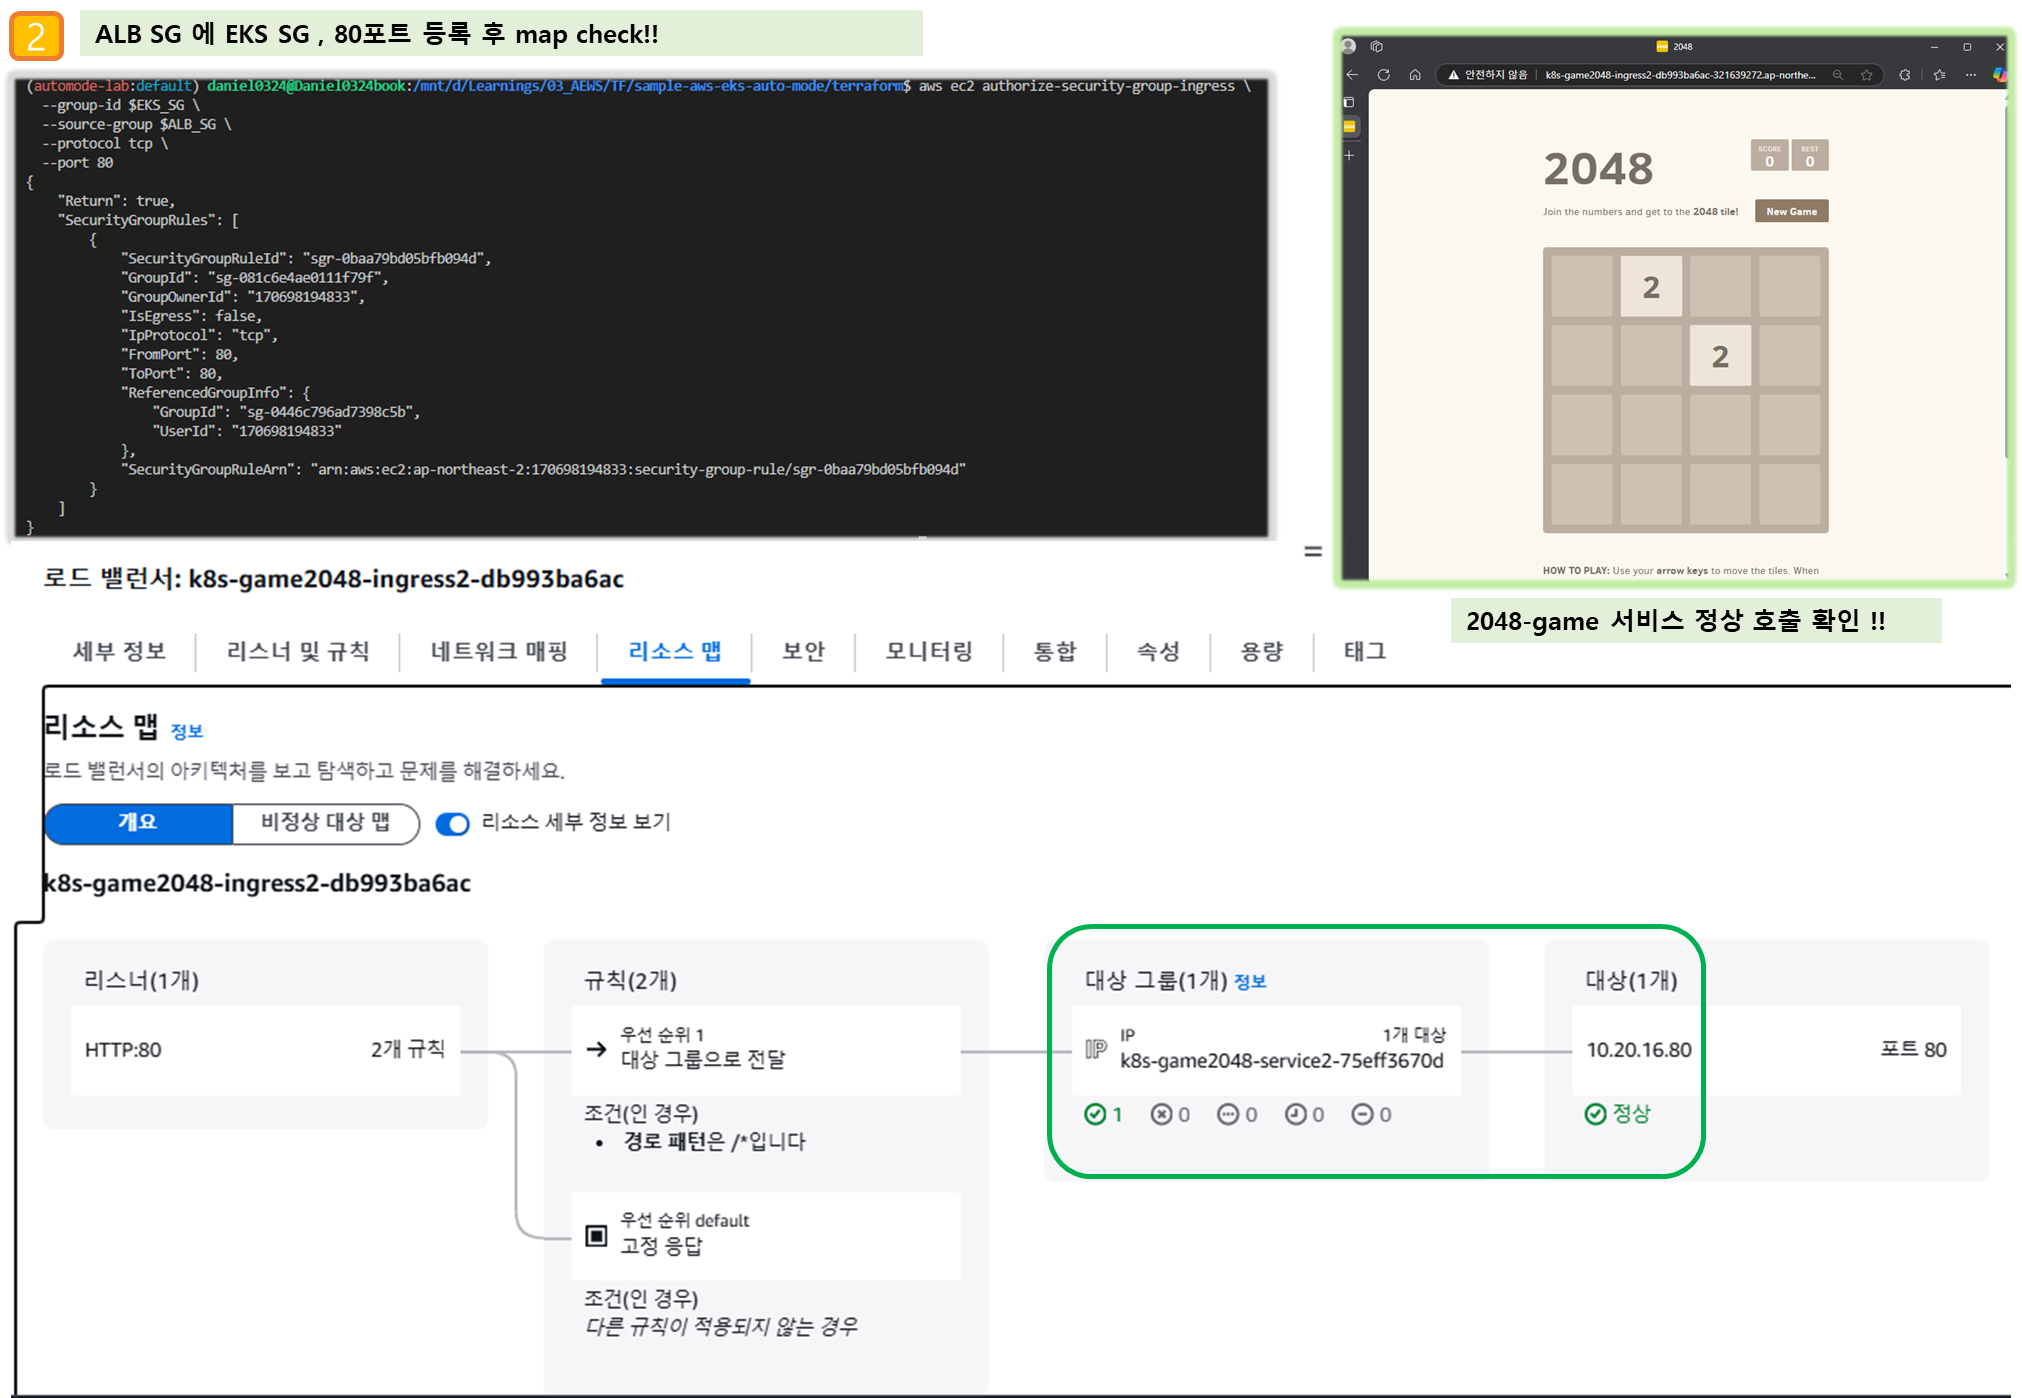
▶ 자원 삭제 ( 먼저, $EKS_SG에 추가 된 $ALB_SG 규칙 삭제 !! )
# Remove application components
kubectl delete ingress -n game-2048 ingress-2048 # 먼저 $EKS_SG에 추가된 규칙만 제거할것!!!
kubectl delete svc -n game-2048 service-2048
kubectl delete deploy -n game-2048 deployment-2048

# 생성된 노드가 삭제 후에 노드 풀 제거 할 것 : Remove Graviton node pool
kubectl delete -f ../nodepools/graviton-nodepool.yaml
▶ [스토리지] stateful workload with PV(EBS) 배포 : EBS Controller 동작 확인
- EKS Auto Mode does not create a StorageClass for you.
- You must create a StorageClass referencing ebs.csi.eks.amazonaws.com to use the storage capability of EKS Auto Mode.
- 배포
# Create the storage class
cat <<EOF | kubectl apply -f -
apiVersion: storage.k8s.io/v1
kind: StorageClass
metadata:
  name: auto-ebs-sc
  annotations:
    storageclass.kubernetes.io/is-default-class: "true"
provisioner: ebs.csi.eks.amazonaws.com  # Uses EKS Auto Mode
volumeBindingMode: WaitForFirstConsumer  # Delays volume creation until a pod needs it
parameters:
  type: gp3
  encrypted: "true"
EOF

# Create the persistent volume claim
cat <<EOF | kubectl apply -f -
apiVersion: v1
kind: PersistentVolumeClaim
metadata:
  name: auto-ebs-claim
spec:
  accessModes:
    - ReadWriteOnce
  storageClassName: auto-ebs-sc
  resources:
    requests:
      storage: 8Gi
EOF

# Deploy the Application : The Deployment runs a container that writes timestamps to the persistent volume.
## Simple bash container that writes timestamps to a file
## Mounts the PVC at /data
## Requests 1 CPU core
## Uses node selector for EKS managed nodes
cat <<EOF | kubectl apply -f -
apiVersion: apps/v1
kind: Deployment
metadata:
  name: inflate-stateful
spec:
  replicas: 1
  selector:
    matchLabels:
      app: inflate-stateful
  template:
    metadata:
      labels:
        app: inflate-stateful
    spec:
      terminationGracePeriodSeconds: 0
      nodeSelector:
        eks.amazonaws.com/compute-type: auto
      containers:
        - name: bash
          image: public.ecr.aws/docker/library/bash:4.4
          command: ["/usr/local/bin/bash"]
          args: ["-c", "while true; do echo \$(date -u) >> /data/out.txt; sleep 60; done"]
          resources:
            requests:
              cpu: "1"
          volumeMounts:
            - name: persistent-storage
              mountPath: /data
      volumes:
        - name: persistent-storage
          persistentVolumeClaim:
            claimName: auto-ebs-claim
EOF
kubectl get events -w --sort-by '.lastTimestamp'
- 관리 콘솔 확인 : EBS
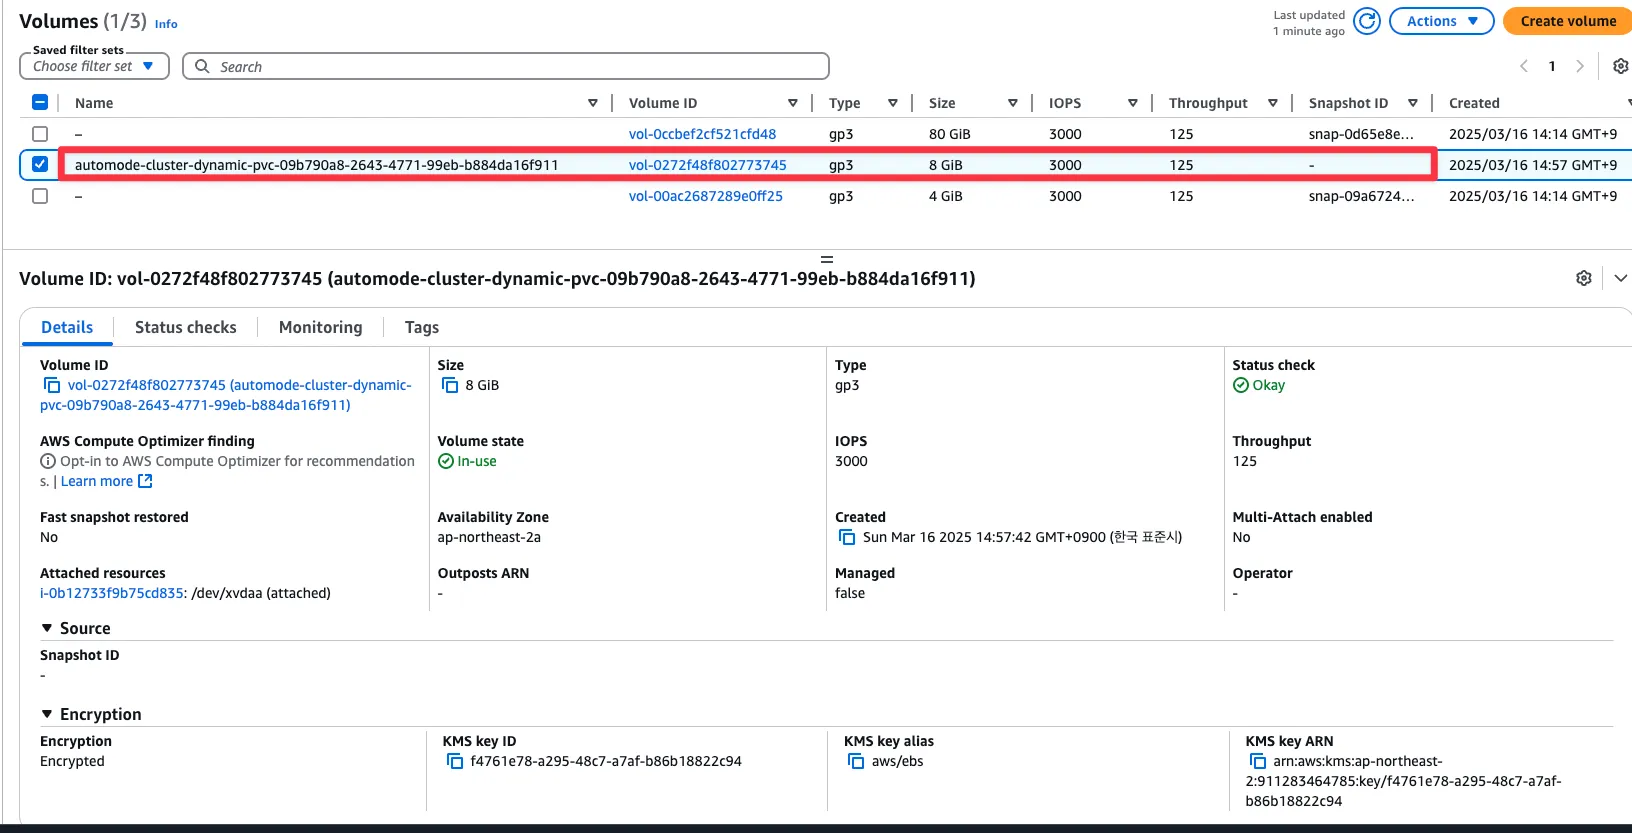
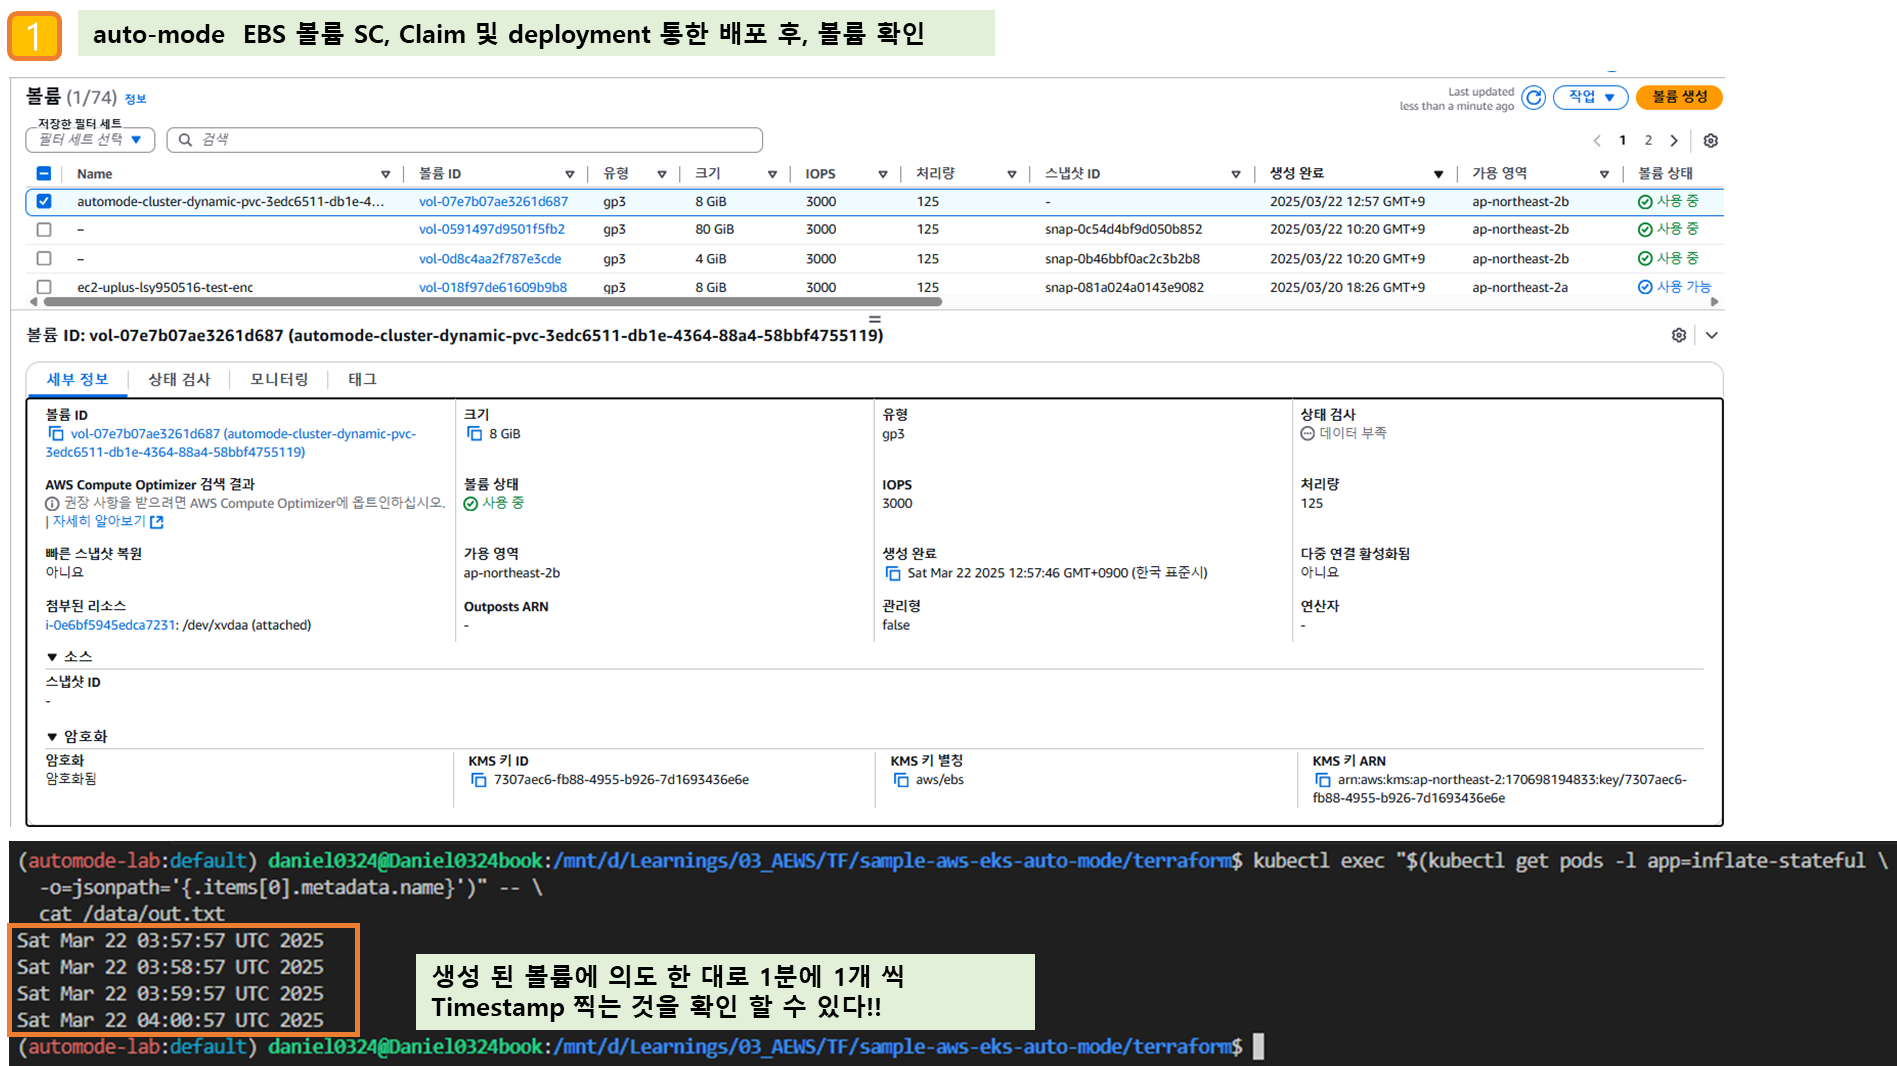
- 동작 확인 후 삭제
# Verify the Setup
kubectl get pods -l app=inflate-stateful
kubectl get pvc auto-ebs-claim

# Check the EBS volume : 관리콘솔에서 EBS 확인
## Get the PV name
PV_NAME=$(kubectl get pvc auto-ebs-claim -o jsonpath='{.spec.volumeName}')
## Describe the EBS volume
aws ec2 describe-volumes \
  --filters Name=tag:CSIVolumeName,Values=${PV_NAME}

# Verify data is being written:
kubectl exec "$(kubectl get pods -l app=inflate-stateful \
  -o=jsonpath='{.items[0].metadata.name}')" -- \
  cat /data/out.txt

kubectl exec "$(kubectl get pods -l app=inflate-stateful \
  -o=jsonpath='{.items[0].metadata.name}')" -- \
  tail -f /data/out.txt

# Cleanup - Delete all resources in one command
kubectl delete deployment/inflate-stateful pvc/auto-ebs-claim storageclass/auto-ebs-sc
[도전과제] EKS Auto mode 에서 CSI Shapshot Controller 설치 후 PV/PVC(EBS) 백업(스냅샷) 해보기 - Docs
▶ [운영] 노드 콘솔 출력 정보 확인 : get-console-output - Docs
- Get console output from an EC2 managed instance by using the AWS EC2 CLI
- 이 절차는 부팅 시간 또는 커널 수준 문제를 해결하는 데 도움이 됩니다.
- 먼저 워크로드와 관련된 인스턴스의 EC2 인스턴스 ID를 확인해야 합니다. 둘째, AWS CLI를 사용하여 콘솔 출력을 가져옵니다.
# 노드 인스턴스 ID 확인
kubectl get node
NODEID=<각자 자신의 노드ID>
NODEID=i-0b12733f9b75cd835

# Use the EC2 instance ID to retrieve the console output.
aws ec2 get-console-output --instance-id $NODEID --latest --output text
...
● kubelet.service - Kubelet
     Loaded: loaded (/x86_64-bottlerocket-linux-gnu/sys-root/usr/lib/systemd/system/kubelet.service; enabled; preset: enabled)
    Drop-In: /x86_64-bottlerocket-linux-gnu/sys-root/usr/lib/systemd/system/service.d
             └─00-aws-config.conf
             /x86_64-bottlerocket-linux-gnu/sys-root/usr/lib/systemd/system/kubelet.service.d
             └─dockershim-symlink.conf
             /etc/systemd/system/kubelet.service.d
             └─exec-start.conf
             /x86_64-bottlerocket-linux-gnu/sys-root/usr/lib/systemd/system/kubelet.service.d
             └─make-kubelet-dirs.conf, prestart-load-pause-ctr.conf
     Active: active (running) since Sun 2025-03-16 05:15:10 UTC; 1h 40min ago
       Docs: https://github.com/kubernetes/kubernetes
    Process: 1172 ExecStartPre=/sbin/iptables -P FORWARD ACCEPT (code=exited, status=0/SUCCESS)
    Process: 1175 ExecStartPre=/bin/ln -sf ./containerd/containerd.sock /run/dockershim.sock (code=exited, status=0/SUCCESS)
    Process: 1176 ExecStartPre=/usr/bin/mkdir -p /var/lib/kubelet/providers/secrets-store /var/lib/kubelet/node-feature-discovery/features.d (code=exited, status=0/SUCCESS)
    Process: 1177 ExecStartPre=/usr/bin/ctr --namespace=k8s.io image import --all-platforms /usr/libexec/kubernetes/kubernetes-pause.tar (code=exited, status=0/SUCCESS)
    Process: 1225 ExecStartPre=/usr/bin/ctr --namespace=k8s.io image label localhost/kubernetes/pause:0.1.0 io.cri-containerd.pinned=pinned (code=exited, status=0/SUCCESS)
   Main PID: 1231 (kubelet)
      Tasks: 12 (limit: 4562)
     Memory: 132.3M
        CPU: 37.650s
     CGroup: /runtime.slice/kubelet.service
             └─1231 /usr/bin/kubelet --cloud-provider external --kubeconfig /etc/kubernetes/kubelet/kubeconfig --config /etc/kubernetes/kubelet/config --container-runtime-endpoint=unix:///run/containerd/containerd.sock --containerd=/run/containerd/containerd.sock --root-dir /var/lib/kubelet --cert-dir /var/lib/kubelet/pki --image-credential-provider-bin-dir /usr/libexec/kubernetes/kubelet/plugins --image-credential-provider-config /etc/kubernetes/kubelet/credential-provider-config.yaml --hostname-override i-0b12733f9b75cd835 --node-ip 10.20.1.198 --node-labels eks.amazonaws.com/nodeclass=default,karpenter.sh/capacity-type=on-demand,karpenter.sh/nodepool=general-purpose --register-with-taints karpenter.sh/unregistered=:NoExecute --pod-infra-container-image localhost/kubernetes/pause:0.1.0 --runtime-cgroups=/runtime.slice/containerd.service

NMA::LOG|2025-03-16T06:55:15Z|kubelet
Mar 16 06:52:36 ip-10-20-1-198.ap-northeast-2.compute.internal kubelet[1231]: I0316 06:52:36.033902    1231 pod_container_deletor.go:53] "DeleteContainer returned error" containerID={"Type":"containerd","ID":"ddf5236f5991145e28e18d8cfb2902f48ab802d2ab8c685d3d3fa14f9e6cb99f"} err="failed to get container status \"ddf5236f5991145e28e18d8cfb2902f48ab802d2ab8c685d3d3fa14f9e6cb99f\": rpc error: code = NotFound desc = an error occurred when try to find container \"ddf5236f5991145e28e18d8cfb2902f48ab802d2ab8c685d3d3fa14f9e6cb99f\": not found"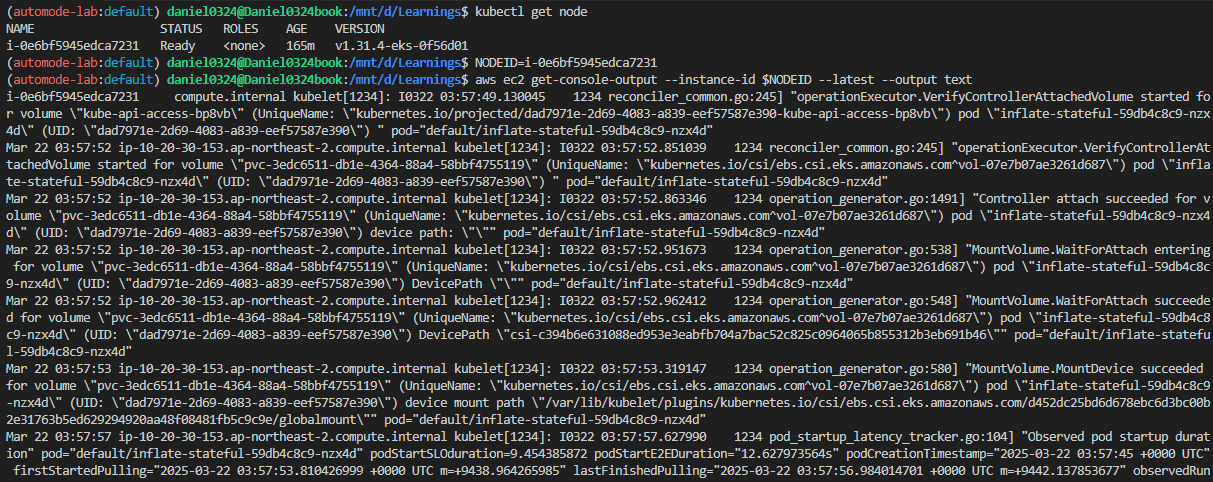
▶ [운영] 노드 특정 프로세스 로그 실시간 확인 : debug container - Docs
- Get node logs by using *debug containers and the kubectl CLI*
- EKS Auto Mode 노드에서 로그를 검색하는 권장 방법은 NodeDiagnostic 리소스를 사용하는 것입니다. 이러한 단계는 kubectl 및 S3를 사용하여 관리 노드에 대한 노드 로그 검색을 참조하십시오.
- 그러나 kubectl debug node 명령을 사용하여 인스턴스에서 로그를 실시간으로 스트리밍할 수 있습니다. 이 명령어는 디버그하려는 노드에서 새로운 Pod를 실행하여 대화형으로 사용할 수 있습니다.
# 노드 인스턴스 ID 확인
kubectl get node
NODEID=<각자 자신의 노드ID>
NODEID=i-0b12733f9b75cd835

# 디버그 컨테이너를 실행합니다. 다음 명령어는 노드의 인스턴스 ID에 i-01234567890123456을 사용하며,
# 대화형 사용을 위해 tty와 stdin을 할당하고 kubeconfig 파일의 sysadmin 프로필을 사용합니다.
## Create an interactive debugging session on a node and immediately attach to it.
## The container will run in the host namespaces and the host's filesystem will be mounted at /host
## --profile='legacy': Options are "legacy", "general", "baseline", "netadmin", "restricted" or "sysadmin"
kubectl debug -h
kubectl debug node/$NODEID -it --profile=sysadmin --image=public.ecr.aws/amazonlinux/amazonlinux:2023
-------------------------------------------------
bash-5.2# whoami

# 셸에서 이제 nsenter 명령을 제공하는 util-linux-core를 설치할 수 있습니다.
# nsenter를 사용하여 호스트에서 PID 1의 마운트 네임스페이스(init)를 입력하고 journalctl 명령을 실행하여 큐블릿에서 로그를 스트리밍합니다:
yum install -y util-linux-core htop
nsenter -t 1 -m journalctl -f -u kubelet
htop # 해당 노드(인스턴스) CPU,Memory 크기 확인

# 정보 확인
nsenter -t 1 -m ip addr
nsenter -t 1 -m ps -ef
nsenter -t 1 -m ls -l /proc
nsenter -t 1 -m df -hT

nsenter -t 1 -m ctr
nsenter -t 1 -m ctr ns ls
nsenter -t 1 -m ctr -n k8s.io containers ls
CONTAINER                                                           IMAGE                                          RUNTIME
09e8f837f54d66305f3994afeee44d800971d7a921c06720382948dbdd9c6fab    localhost/kubernetes/pause:0.1.0               io.containerd.runc.v2
2e1af1a9ff996505c0de0ee6b55bd8b3fefdaf6579fd6af46e978ad6e2096bae    public.ecr.aws/amazonlinux/amazonlinux:2023    io.containerd.runc.v2
ebd4b8805ed0338a0bc6a54625c51f3a4c202641f0d492409d974871db49c476    localhost/kubernetes/pause:0.1.0               io.containerd.runc.v2
f4924417248c24b7eaac2498a11c912b575fc03cef1b8e55cae66772bdb36af5    docker.io/hjacobs/kube-ops-view:20.4.0         io.containerd.runc.v2

...

# (참고) 보안을 위해 Amazon Linux 컨테이너 이미지는 기본적으로 많은 바이너리를 설치하지 않습니다.
# yum whatproved 명령을 사용하여 특정 바이너리를 제공하기 위해 설치해야 하는 패키지를 식별할 수 있습니다.
yum whatprovides ps
-------------------------------------------------
※ 디버그 파드 삭제
$ kubectl delete pod <node-debugger-#>
[ 실행 결과 - 한 눈에 보기 ]
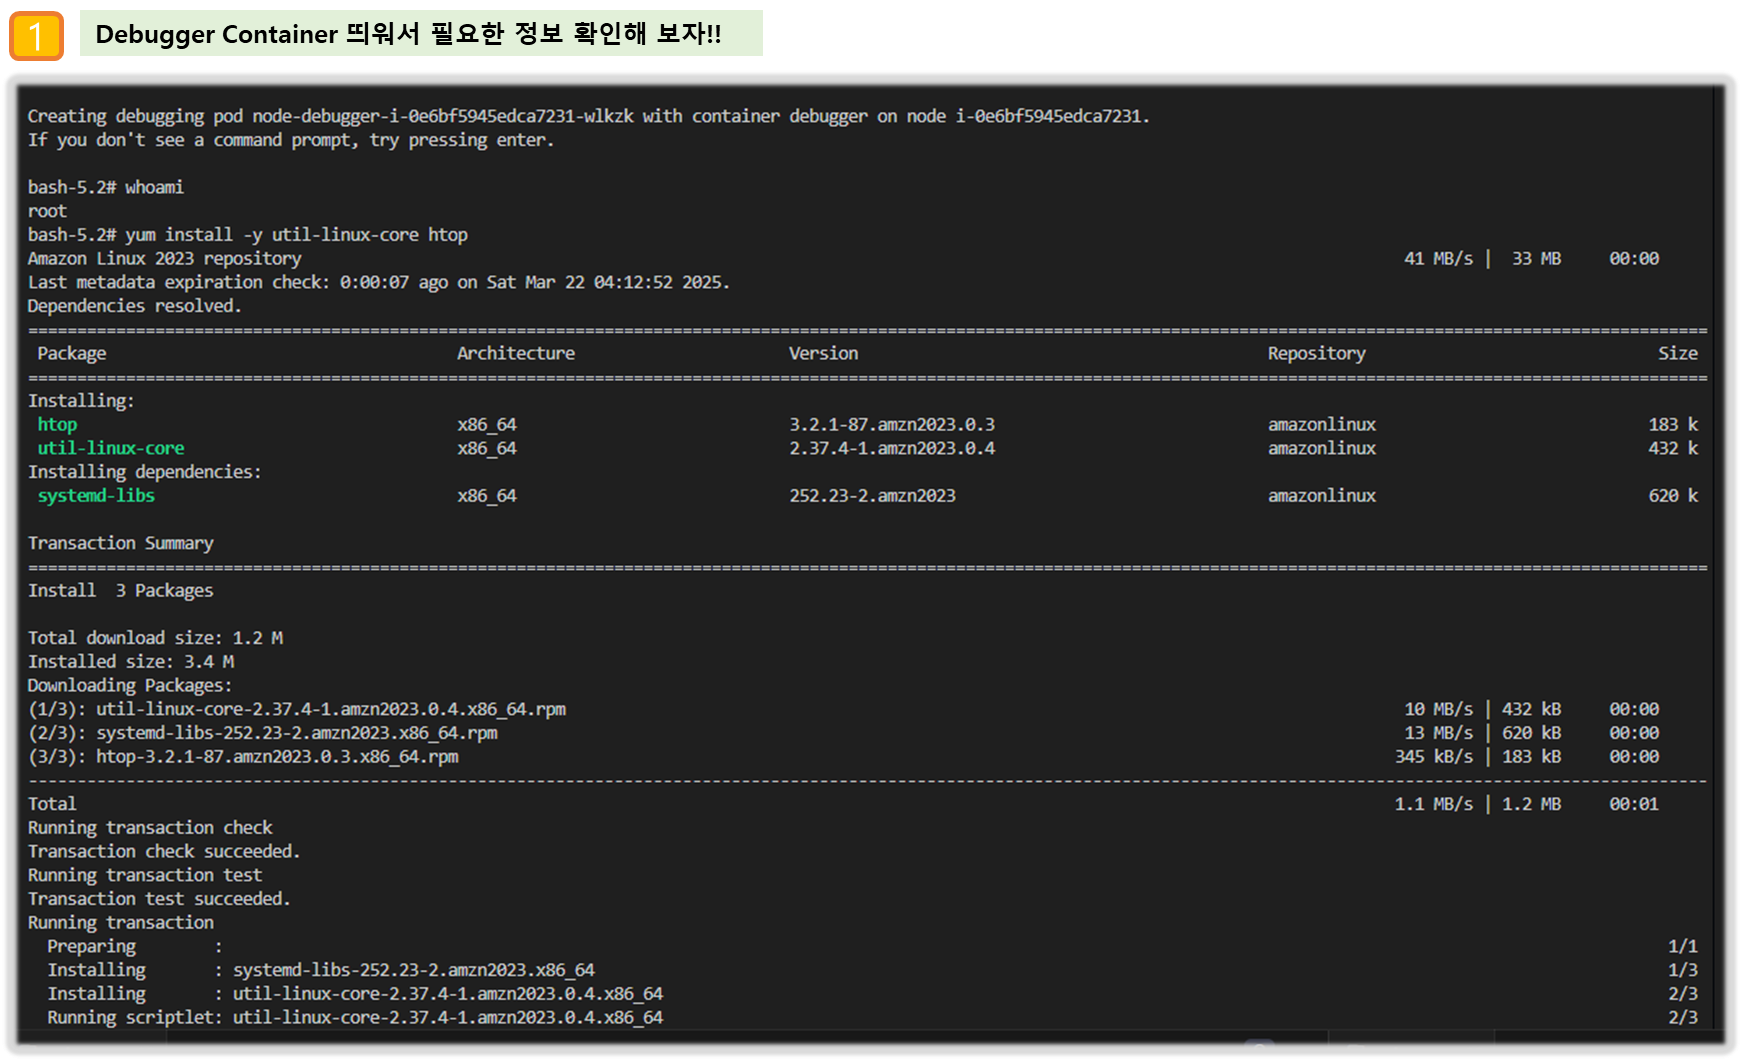
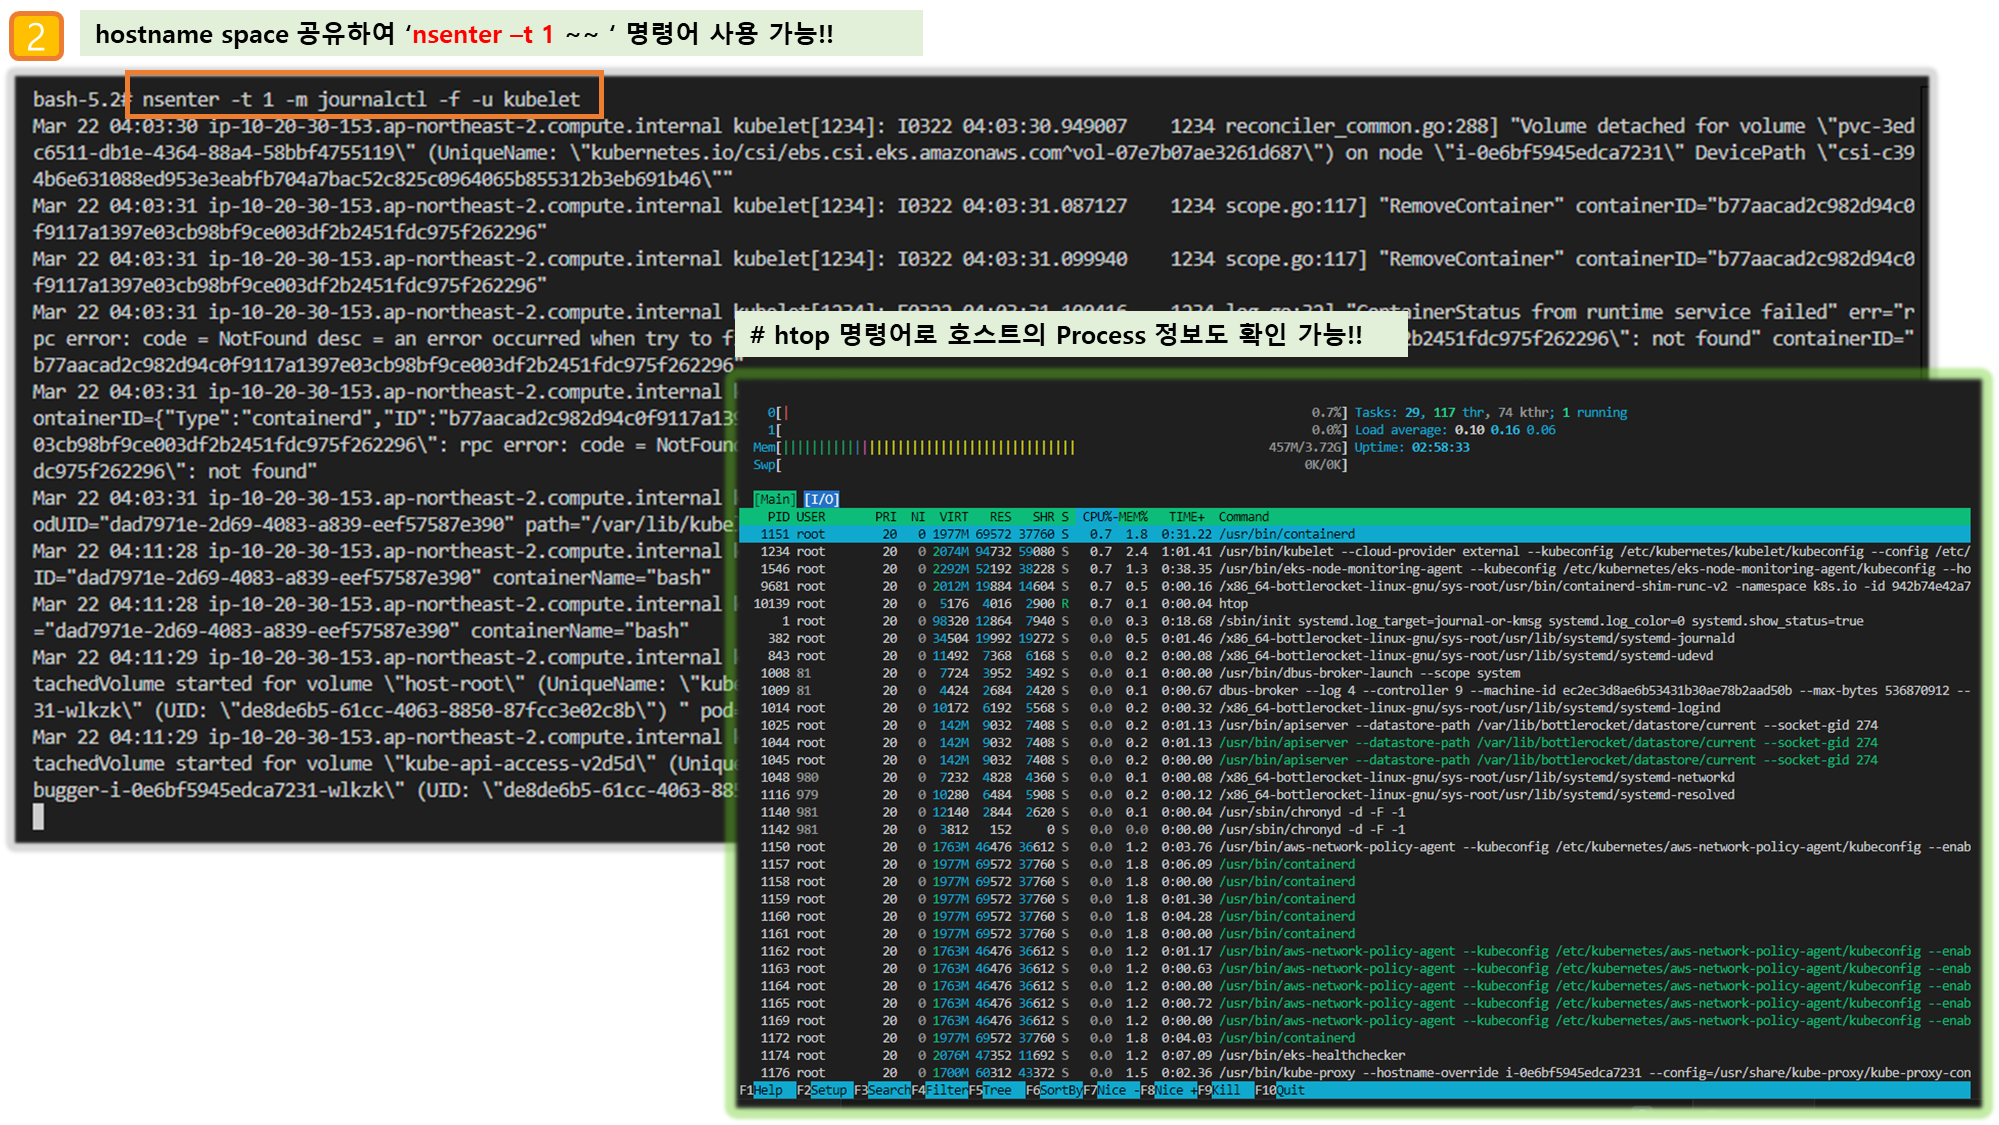
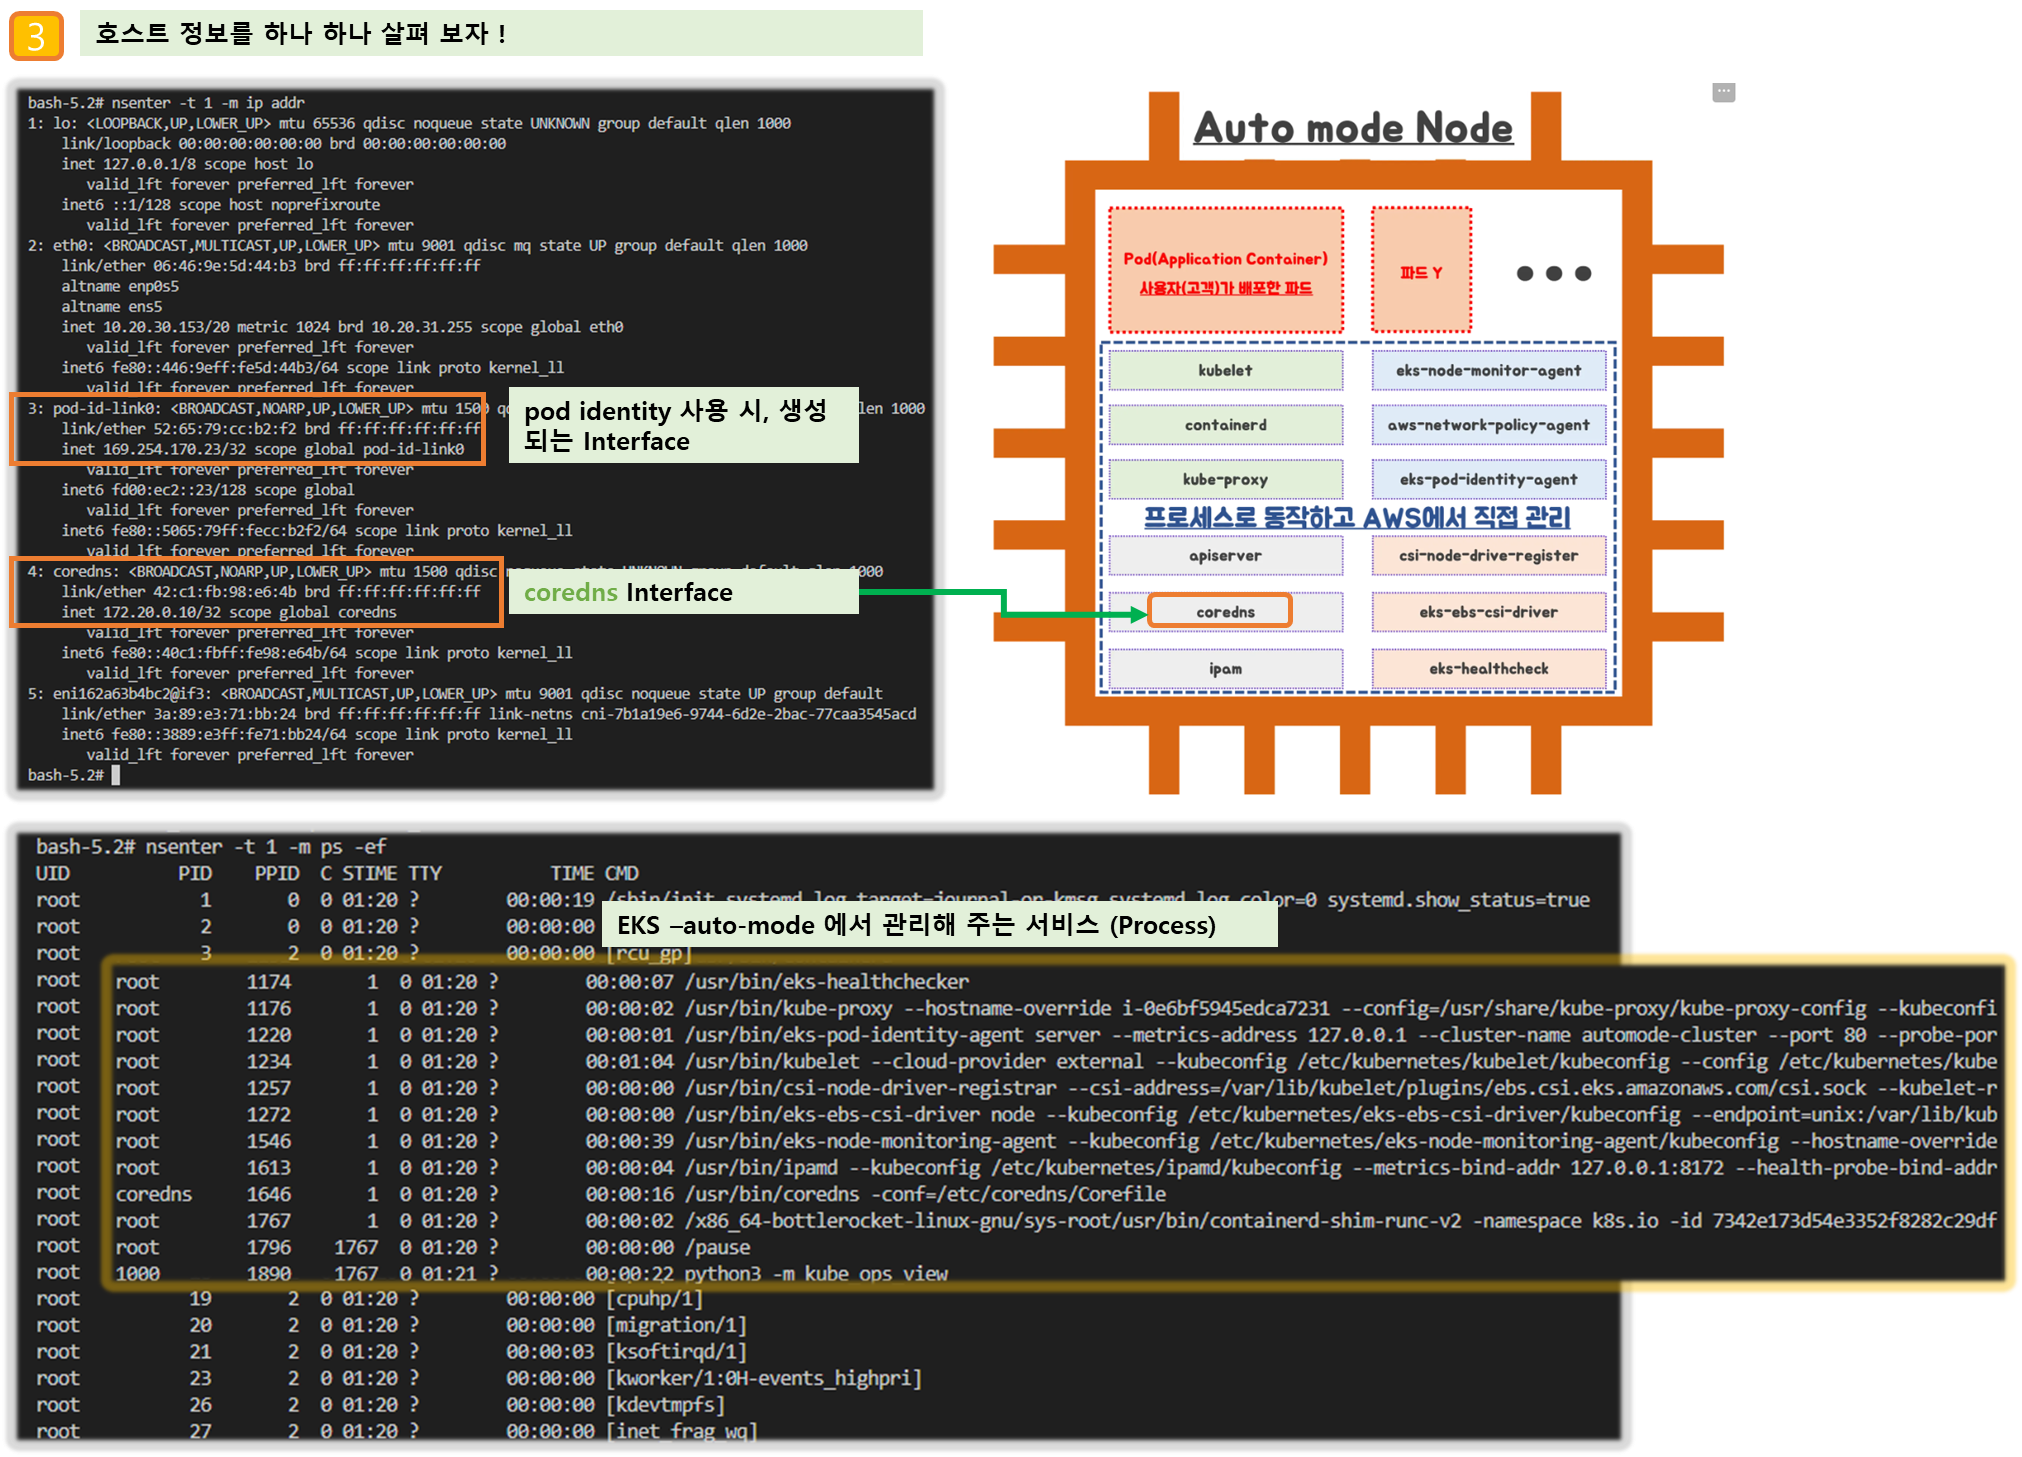
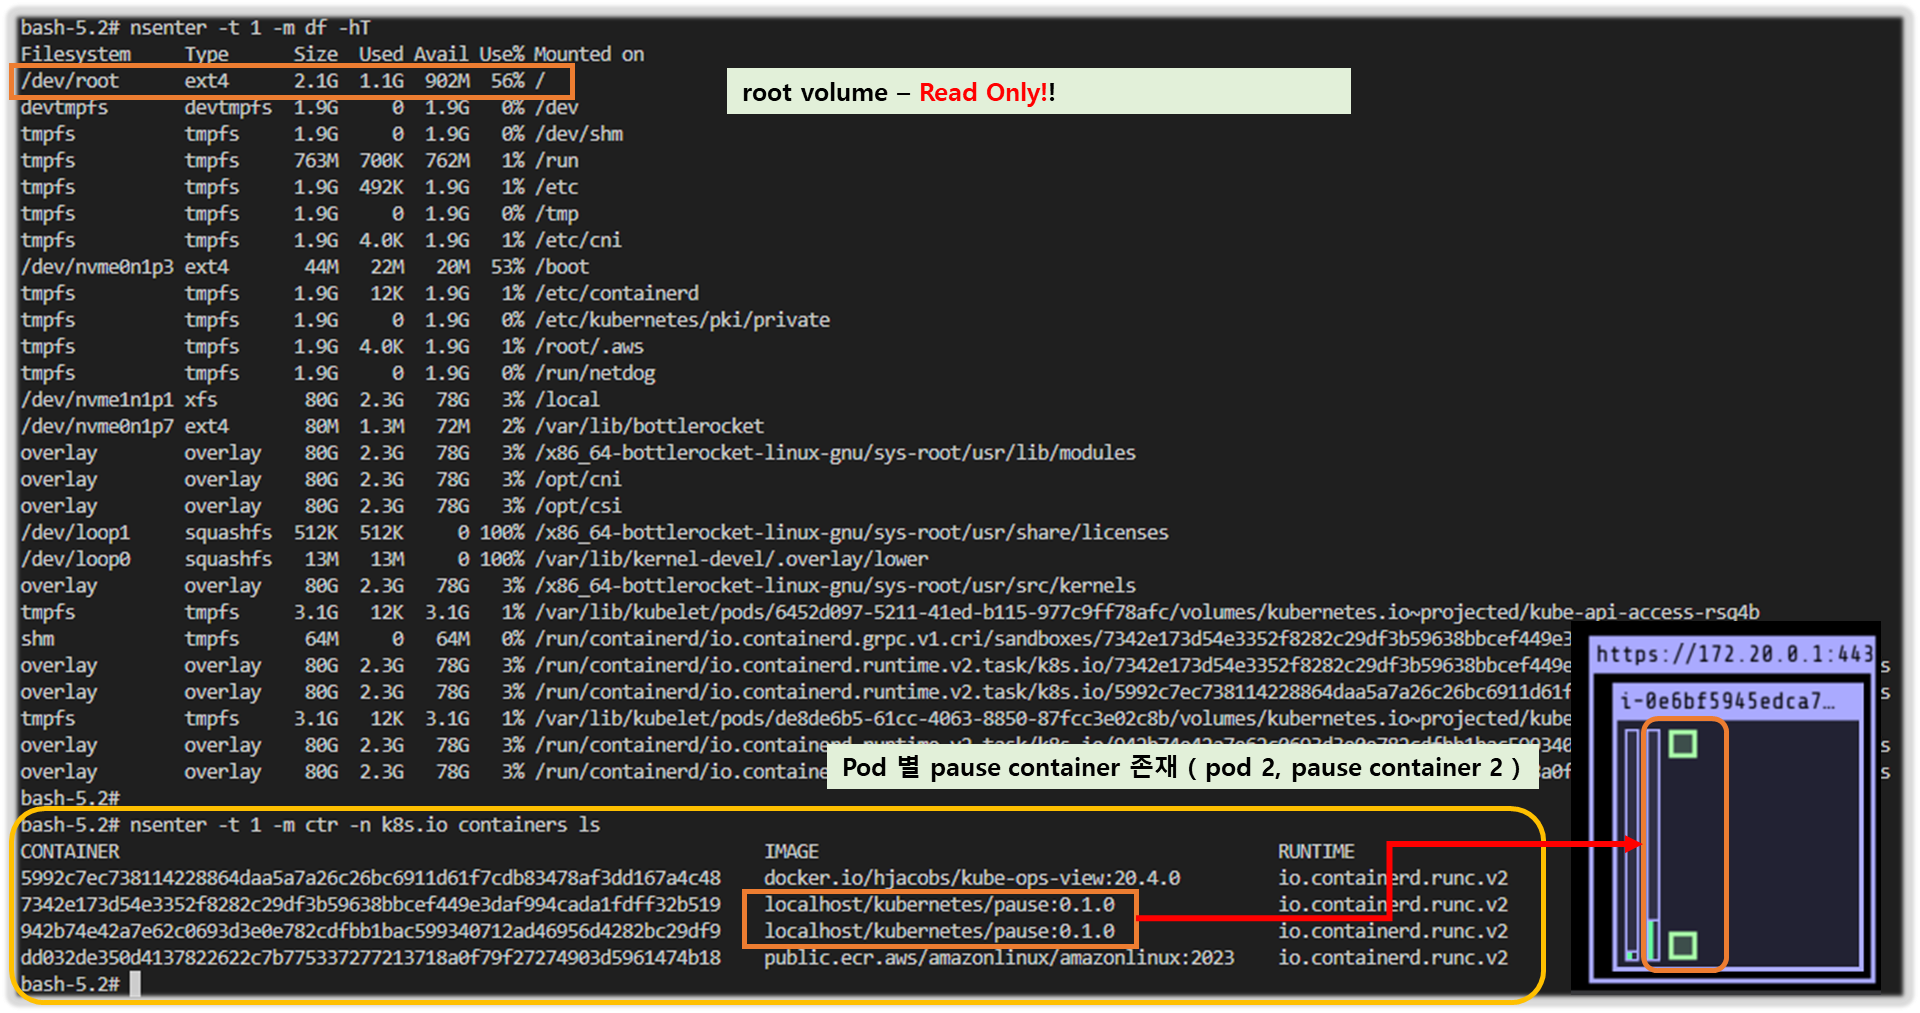

▶ [보안] 호스트 네임스페이스를 공유하는 파드 탈옥(?) 를 통해 호스트 정보 획득 시도 - Blog
- 호스트 네임스페이스를 공유하는 파드 실행
kubectl apply -f - <<EOF
apiVersion: v1
kind: Pod
metadata:
  name: root-shell
  namespace: kube-system
spec:
  containers:
  - command:
    - /bin/cat
    image: alpine:3
    name: root-shell
    securityContext:
      privileged: true
    tty: true
    stdin: true
    volumeMounts:
    - mountPath: /host
      name: hostroot
  hostNetwork: true
  hostPID: true
  hostIPC: true
  tolerations:
  - effect: NoSchedule
    operator: Exists
  - effect: NoExecute
    operator: Exists
  volumes:
  - hostPath:
      path: /
    name: hostroot
EOF

# 파드 확인 : 파드와 노드의 IP가 같다 (hostNetwork: true)
kubectl get pod -n kube-system root-shell
kubectl get node,pod -A -owide
NAME                       STATUS   ROLES    AGE   VERSION               INTERNAL-IP   EXTERNAL-IP   OS-IMAGE                                          KERNEL-VERSION   CONTAINER-RUNTIME
node/i-0b12733f9b75cd835   Ready    <none>   62m   v1.31.4-eks-0f56d01   10.20.1.198   <none>        Bottlerocket (EKS Auto) 2025.3.9 (aws-k8s-1.31)   6.1.129          containerd://1.7.25+bottlerocket

NAMESPACE     NAME                                 READY   STATUS    RESTARTS   AGE     IP            NODE                  NOMINATED NODE   READINESS GATES
kube-system   pod/kube-ops-view-657dbc6cd8-2lx4d   1/1     Running   0          62m     10.20.12.0    i-0b12733f9b75cd835   <none>           <none>
kube-system   pod/root-shell                       1/1     Running   0          5m29s   10.20.1.198   i-0b12733f9b75cd835   <none>           <none>

# 호스트패스 : 파드에 /host 경로에 rw로 마운트 확인
kubectl describe pod -n kube-system root-shell
...
    Mounts:
      /host from hostroot (rw)
    ...
Volumes:
  hostroot:
    Type:          HostPath (bare host directory volume)
    Path:          /
    HostPathType:
...

# 탈취 시도!
kubectl -n kube-system exec -it root-shell -- chroot /host /bin/sh- 파드 내 shell 진입 후 확인
#
kubectl -n kube-system exec -it root-shell -- sh
------------------------------------------------
whoami
pwd

# 네트워크 정보 확인 : 호스트와 같다 (hostNetwork: true)
ip link
ip addr # eth0, pod-id-link0, coredns

netstat -tnlp
netstat -unlp

# 프로세스 정보 확인 : 호스트와 같다 (hostPID: true)
top -d 1

ps aux
ps -ef

pstree
pstree -p

apk add htop
htop

# 마운트 정보 : 데이터 EBS (80GiB)
df -hT | grep -v host
Filesystem           Type            Size      Used Available Use% Mounted on
overlay              overlay        79.9G      1.9G     78.0G   2% /
...

df -hT | grep host
/dev/root            ext4            2.1G      1.1G    901.5M  55% /host
...

cat /etc/hostname
ip-10-20-1-198.ap-northeast-2.compute.internal

## (호스트패스 : 파드에 /host 경로에 rw로 마운트 확인)
ls -l /host
cat /host/usr/share/kube-proxy/kube-proxy-config
cat /host/etc/coredns/Corefile
cat /host/etc/kubernetes/ipamd/kubeconfig
cat /host/etc/kubernetes/eks-node-monitoring-agent/kubeconfig

# 루트볼륨에 파일 생성 시도 : rw로 마운트
echo "hello" > /host/home/1.txt
sh: can't create /host/home/1.txt: Read-only file system

# 탈취 시도!
which apiclient
which sh
/bin/sh

chroot /host /bin/sh
chroot: can't execute '/bin/sh': No such file or directory

# 정보 확인
nsenter -t 1 -m journalctl -f -u kubelet
nsenter -t 1 -m ip addr
nsenter -t 1 -m ps -ef
nsenter -t 1 -m ls -l /proc
nsenter -t 1 -m df -hT

nsenter -t 1 -m ctr
nsenter -t 1 -m ctr ns ls
nsenter -t 1 -m ctr -n k8s.io containers ls
CONTAINER                                                           IMAGE                                          RUNTIME
09e8f837f54d66305f3994afeee44d800971d7a921c06720382948dbdd9c6fab    localhost/kubernetes/pause:0.1.0               io.containerd.runc.v2
2e1af1a9ff996505c0de0ee6b55bd8b3fefdaf6579fd6af46e978ad6e2096bae    public.ecr.aws/amazonlinux/amazonlinux:2023    io.containerd.runc.v2
ebd4b8805ed0338a0bc6a54625c51f3a4c202641f0d492409d974871db49c476    localhost/kubernetes/pause:0.1.0               io.containerd.runc.v2
f4924417248c24b7eaac2498a11c912b575fc03cef1b8e55cae66772bdb36af5    docker.io/hjacobs/kube-ops-view:20.4.0         io.containerd.runc.v2

------------------------------------------------- 프로세스 확인 : 컨테이너로 기동되지 않음을 확인
- kube-proxy, kubelet, eks-pod-identity-agent, eks-node-monitor-agent, eks-healthcheck, eks-ebs-csi-driver,
- csi-node-driver-registrar, coredns, containerd, aws-network-policy-agent, apiserver, ipam
...
 1024 root      0:00 /usr/bin/apiserver --datastore-path /var/lib/bottlerocket/datastore/current --socket-gid 274
 1147 root      0:01 /usr/bin/aws-network-policy-agent --kubeconfig /etc/kubernetes/aws-network-policy-agent/kubeconfig -
 1148 root      0:15 /usr/bin/containerd
 1169 root      0:02 /usr/bin/eks-healthchecker
 1171 root      0:00 /usr/bin/kube-proxy --hostname-override i-0b12733f9b75cd835 --config=/usr/share/kube-proxy/kube-prox
 1216 root      0:00 /usr/bin/eks-pod-identity-agent server --metrics-address 127.0.0.1 --cluster-name automode-cluster -
 1231 root      0:27 /usr/bin/kubelet --cloud-provider external --kubeconfig /etc/kubernetes/kubelet/kubeconfig --config
 1255 root      0:00 /usr/bin/csi-node-driver-registrar --csi-address=/var/lib/kubelet/plugins/ebs.csi.eks.amazonaws.com/
 1270 root      0:00 /usr/bin/eks-ebs-csi-driver node --kubeconfig /etc/kubernetes/eks-ebs-csi-driver/kubeconfig --endpoi
 1543 root      0:13 /usr/bin/eks-node-monitoring-agent --kubeconfig /etc/kubernetes/eks-node-monitoring-agent/kubeconfig
 1611 root      0:01 /usr/bin/ipamd --kubeconfig /etc/kubernetes/ipamd/kubeconfig --metrics-bind-addr 127.0.0.1:8172 --he
 1644 983       0:06 /usr/bin/coredns -conf=/etc/coredns/Corefile
...
▶ 삭제 : kubectl delete pod -n kube-system root-shell
[ 실행 결과 - 한 눈에 보기 ]
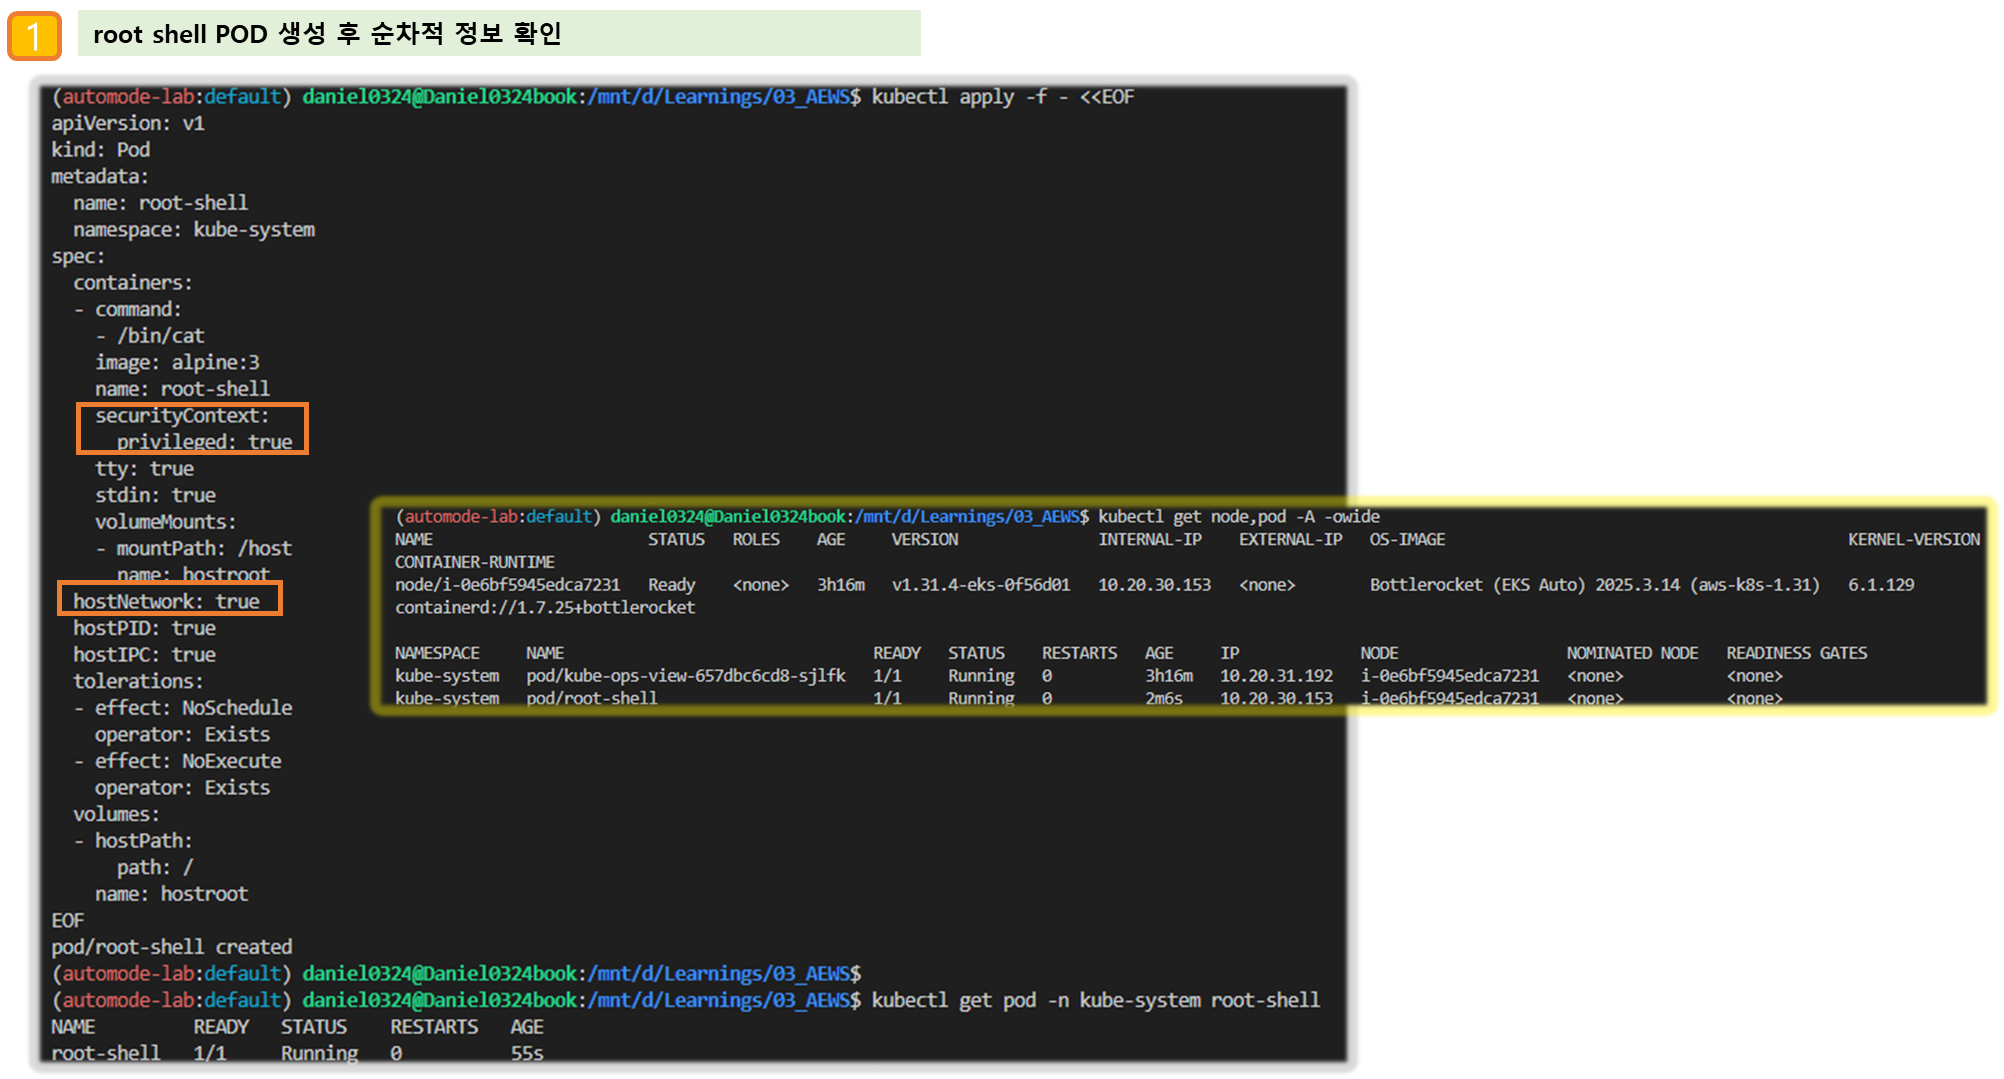
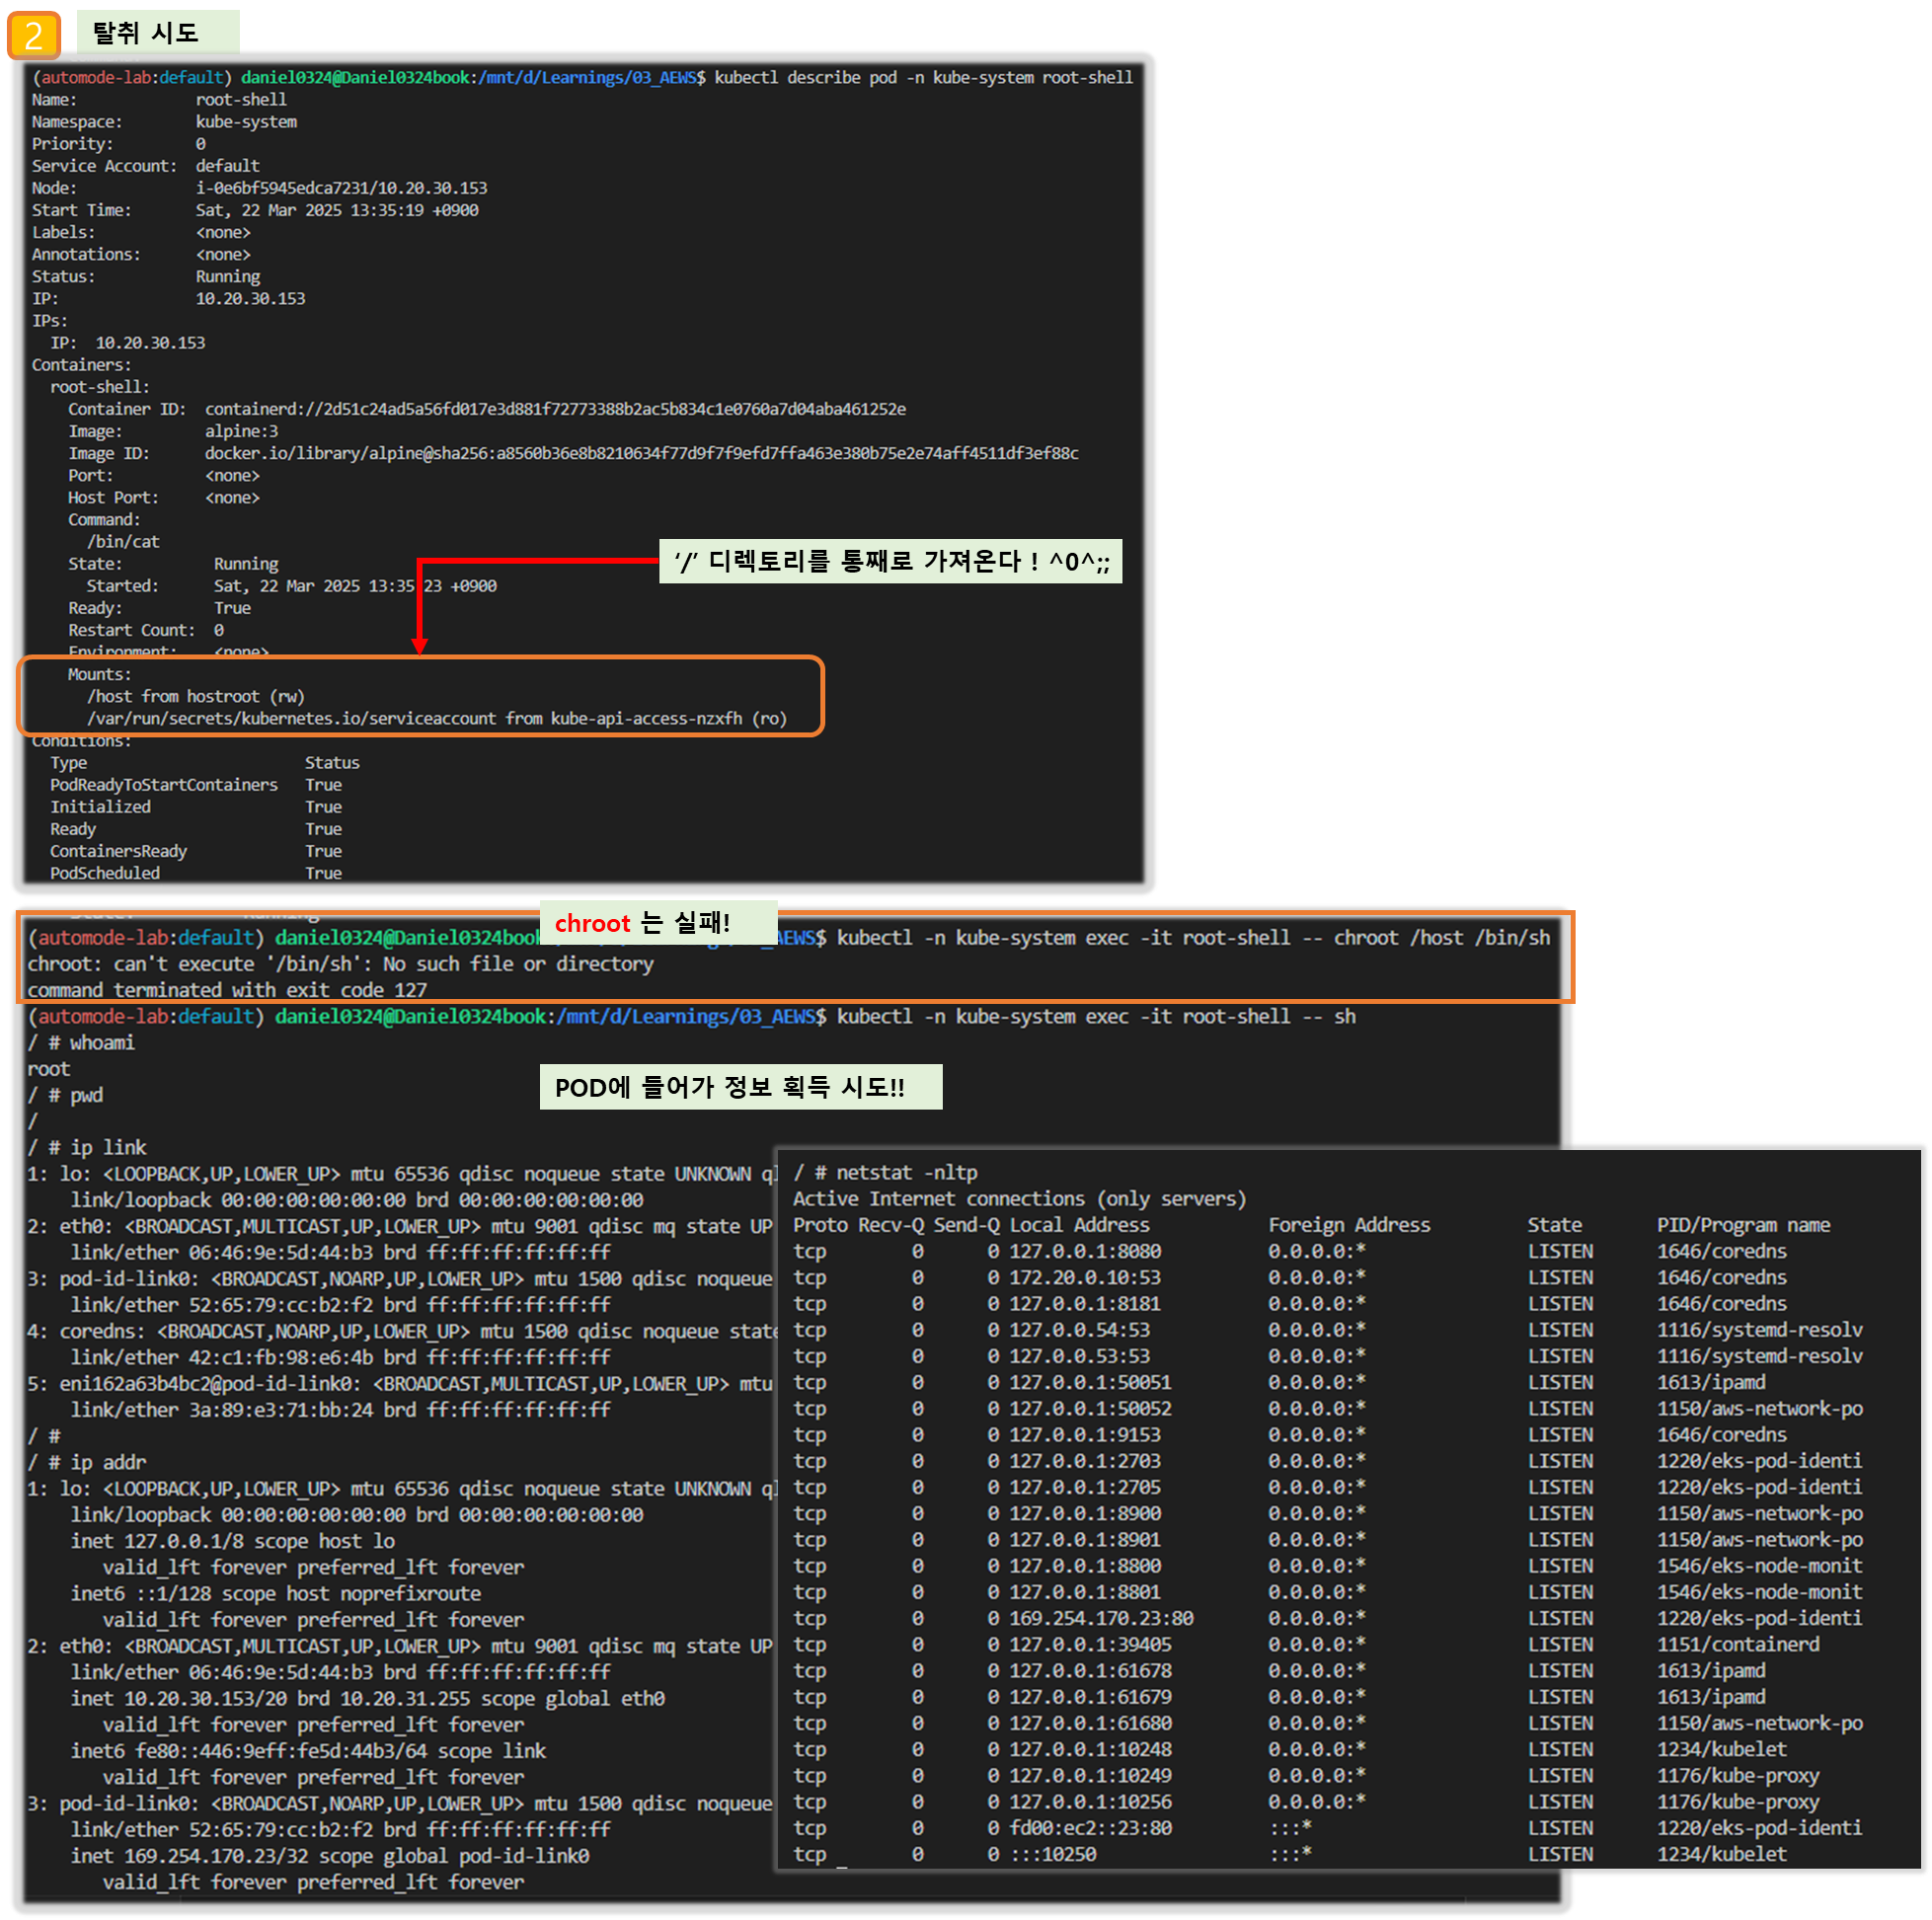
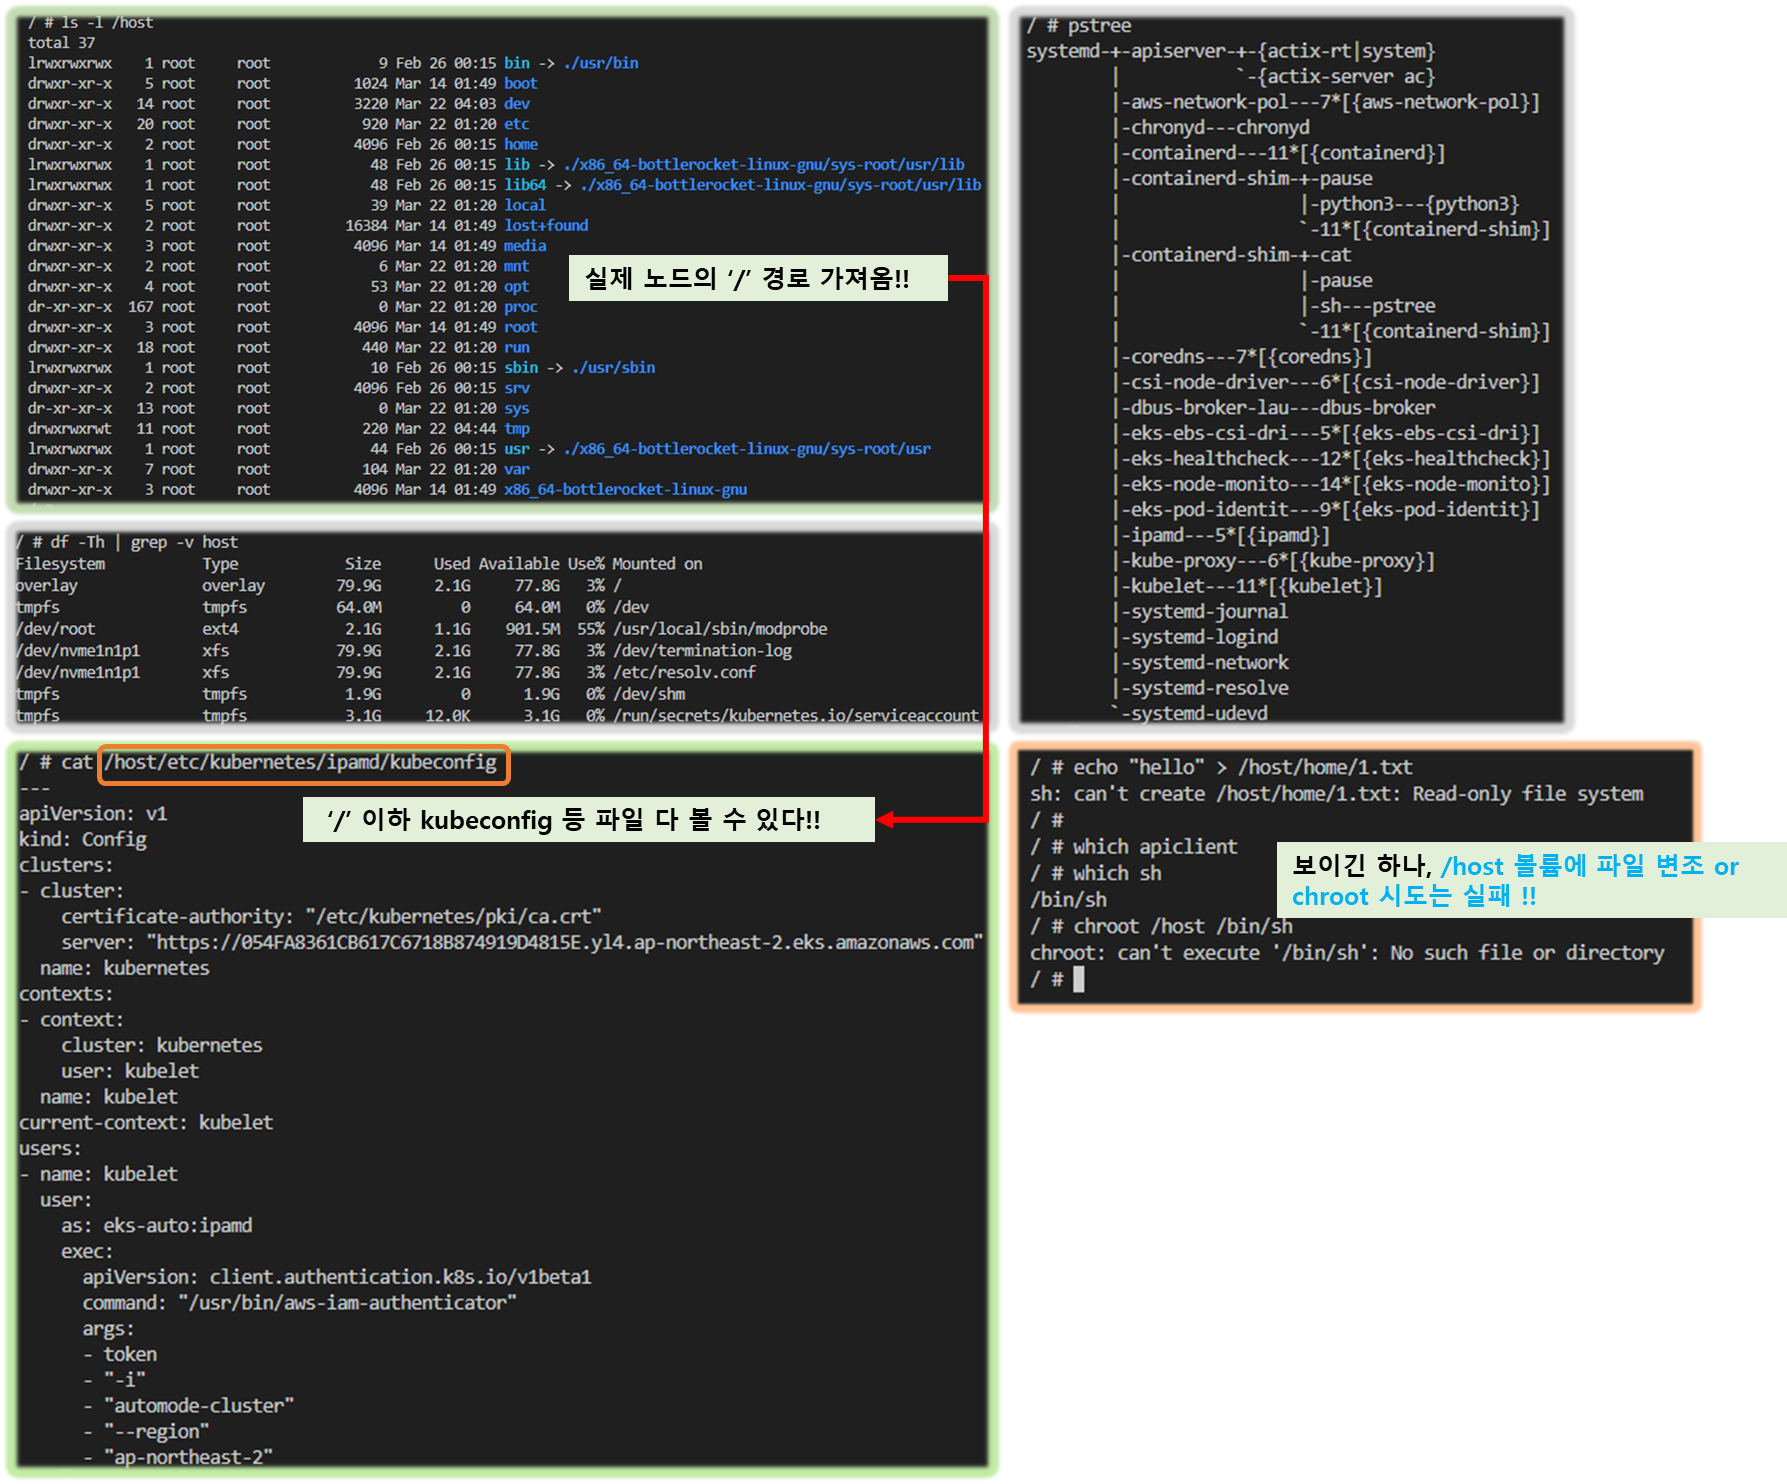
[추가 시도 1] 노드(Bottlerocket)에 apiclient 파드를 배포하여 enter-admin-container 진입
# kube-system 네임스페이스에 파드 배포
cat <<EOF | kubectl apply -f -
apiVersion: v1
kind: Pod
metadata:
  name: apiclient
  namespace: kube-system
spec:
  containers:
  - command:
    - sleep
    - infinity
    image: fedora
    imagePullPolicy: Always
    name: regain-access
    securityContext:
      seLinuxOptions:
        level: s0
        role: system_r
        type: control_t
        user: system_u
    volumeMounts:
    - mountPath: /usr/bin/apiclient
      name: apiclient
      readOnly: true
    - mountPath: /run/api.sock
      name: apiserver-socket
  restartPolicy: Always
  terminationGracePeriodSeconds: 0
  volumes:
  - hostPath:
      path: /usr/bin/apiclient
      type: File
    name: apiclient
  - hostPath:
      path: /run/api.sock
      type: Socket
    name: apiserver-socket
EOF

# 파드 배포 확인
kubectl get pod -n kube-system apiclient

# 관리 컨테이너 활성화 및 진입 시도!
kubectl exec -i -t -n kube-system apiclient -- apiclient exec -t control enter-admin-container
ctr: failed to dial "/run/host-containerd/containerd.sock": context deadline exceeded: connection error: desc = "transport: error while dialing: dial unix:///run/host-containerd/containerd.sock: timeout"
command terminated with exit code 1

# 파드 삭제
kubectl delete pod -n kube-system apiclient
[추가 시도 2] aws ssm start-session --target <ID> 실패!
▶ [네트워킹] Service(LoadBalancer) AWS NLB 사용해보기 - sample-app , Workshop
# 배포 시간 3분 정도 소요 : CrashLoopBackOff 는 다른 파드를 정상 상태되면서 자연 해소
kubectl apply -f https://github.com/aws-containers/retail-store-sample-app/releases/latest/download/kubernetes.yaml
kubectl get events -w --sort-by '.lastTimestamp'
watch -d kubectl get node,pod -owide

#
kubectl get svc ui -o yaml | kubectl neat
apiVersion: v1
kind: Service
metadata:
  labels:
    app.kubernetes.io/component: service
    app.kubernetes.io/instance: ui
    app.kubernetes.io/managed-by: Helm
    app.kubernetes.io/name: ui
    app.kubernetes.io/owner: retail-store-sample
    helm.sh/chart: ui-1.0.1
  name: ui
  namespace: default
spec:
  clusterIP: 172.20.181.70
  clusterIPs:
  - 172.20.181.70
  ipFamilies:
  - IPv4
  ipFamilyPolicy: SingleStack
  loadBalancerClass: eks.amazonaws.com/nlb
  ports:
  - name: http
    nodePort: 32223
    port: 80
    targetPort: http
  selector:
    app.kubernetes.io/component: service
    app.kubernetes.io/instance: ui
    app.kubernetes.io/name: ui
    app.kubernetes.io/owner: retail-store-sample
  type: LoadBalancer

#
kubectl get targetgroupbindings.eks.amazonaws.com
NAME                        SERVICE-NAME   SERVICE-PORT   TARGET-TYPE   AGE
k8s-default-ui-c1e031d638   ui             80             ip            4m52s

kubectl get targetgroupbindings.eks.amazonaws.com -o yaml
...

# 아래 EXTERNAL-IP로 웹 접속
kubectl get svc,ep ui
NAME         TYPE           CLUSTER-IP      EXTERNAL-IP                                                                   PORT(S)        AGE
service/ui   LoadBalancer   172.20.181.70   k8s-default-ui-8d775f47e5-701aea9835f8c751.elb.ap-northeast-2.amazonaws.com   80:32223/TCP   5m11s

NAME           ENDPOINTS          AGE
endpoints/ui 10.20.12.10:8080 5m11s- 접속 안됨 → Auto mode yaml 규칙 확인
# 접속 안됨 => 아래 annotate 설정 후 신규 NLB 생성 되어 정상되면 접속 가능!
kubectl annotate svc ui service.beta.kubernetes.io/aws-load-balancer-scheme=internet-facing

# NLB 신규 확인
kubectl get svc,ep ui
NAME         TYPE           CLUSTER-IP      EXTERNAL-IP                                                                   PORT(S)        AGE
service/ui   LoadBalancer   172.20.181.70   k8s-default-ui-d63e862f19-b318413dc179fd4e.elb.ap-northeast-2.amazonaws.com   80:32223/TCP   9m9s

NAME           ENDPOINTS          AGE
endpoints/ui   10.20.12.10:8080   9m9s

#
kubectl get svc ui -o yaml | kubectl neat
kubectl get targetgroupbindings.eks.amazonaws.com
kubectl get targetgroupbindings.eks.amazonaws.com -o yaml
☞ 자원 삭제
# kubectl delete -f https://github.com/aws-containers/retail-store-sample-app/releases/latest/download/kubernetes.yaml
▶ 실습 환경 삭제
1. `helm uninstall -n kube-system kube-ops-view` ## → 노드(인스턴스)까지 삭제 확인 후 아래 테라폼 삭제 할 것
2`terraform destroy --auto-approve`
3. `rm -rf ~/.kube/config`
[ 마무리 ]
Fargate와 Auto-mode 는 AWS가 관리해주는 영역이 많아진 만큼 편리함과 기존의 유저 관리하에 있던 자원의 접근,통제가 불가하다라는 불편함이 공존하는 선택지 인 것 같다. 구축 시에도, Auto-mode에서는 provider 등 변경된 항목과 제약 사항들이 많아 customizing에 대한 고려가 상당히 많이 필요하고, 보안 측면에서도 AWS 영역에 Black-box 처럼 유저단의 데이터가 관리되기 때문에 추후 AWS 측의 친절한(?) 가이드가 필요하지 않을까 생각이 든다.
[ 참고 링크 모음 - 추후 도전해 볼 과제들 ]
[도전과제] 스케줄러가 노드 선택하는 플러그인들 관련 실습 진행
- [K8S Docs] Assign Pods to Nodes using Node Affinity - Task
- [K8S Docs] Pod Topology Spread Constraints - Docs , Blog
- [K8S Docs] Taints and Tolerations - Docs
[도전과제] KVM이 지원되는 Linux 환경에서 Firecrack 설치 후 MicroVM을 배포 확인 해보자 - Github ,Install
[도전과제] EKS Blueprints for Terraform 에 다양한 패턴 실습과 내용 정리 해보기 - Link
[도전과제] nodepools 에 disruption.budgets 에 평일 오전 9시~17시에는 disruption 동작하지 않게 설정 및 검증 해보기
[도전과제] EKS Auto mode 에서 externaldns 설치 후, Ingress에 도메인으로 https 접속 설정 해보자
[도전과제] EKS Auto mode 에서 CSI Shapshot Controller 설치 후 PV/PVC(EBS) 백업(스냅샷) 해보기 - Docs
[도전과제] DeepSeek을 EKS Auto Mode에서 셀프 호스팅 - Link
[도전과제] EKS Auto Mode에서 EKS 클러스터 버전 업그레이드(v1.32) 시, add-on 업글 작업 불필요 경험과 노드 AMI 순차 업그레이드 확인 by Terraform
[도전과제] EKS Auto Mode에서 NVIDIA GPU를 사용, Driver 자동 설정 확인 - Link , Github
[도전과제] EKS Auto Mode에서 ‘인스턴스 스토어’가 포함된 EC2(노드) 배포 후 해당 Disk가 자동으로 RAID 0 설정되는지 확인
[도전과제] EKS Auto Mode에서 Pod Security Standards 또는 Pod Security Admission을 사용 - Link
[도전과제] EKS Auto Mode에서 우선 순위가 낮은 Pod를 배치하여 포드가 없어도 항상 일정 수의 노드가 시작 - Link
[도전과제] Terraform에서 Auto Mode EKS 클러스터를 만들고 Pod Identity에서 AWS 권한을 부여한 파드(애플리케이션)을 배포 - Link
[도전과제] 노드에 강제 장애 주입(Disk Full, Memory Leak 등) 시 자동으로 노드 장애 복구 되는지 확인
[도전과제] Auto Mode 와 관리형노드그룹(MNG) 공존 시, LB/Storage 컨트롤러를 각기 설치가 필요한지? API가 구별되는 이유가 이것때문인지? 확인
[도전과제] EKS HyBrid Nodes 환경 구성을 직접 만들어보고, 테스트를 해보자
[Q. 알아보자] nodeclasses 에 snatPolicy: Random 동작은 어떻게 하는 걸까?
[Q. 알아보자] EKS Auto mode 환경에서 보안 인증 심사를 수행하게 되면, 어떤 항목들에 대한 심사 추가가 필요 할까요?
- ex) AWS측에서 노드(서버)를 직접 통제 관리를 하게 되니, 고객의 데이터에 접속 할 수 있을 듯 한데, 어떻게 보호하고 보장하는지?..
[ 참고 자료 ]
▶ Hybrid node 실습 Workshotp : https://www.eksworkshop.com/docs/networking/eks-hybrid-nodes/
▶ k8s scheduler Deep Dive 정리 : Blog
▶ Argo CD 악분님 Blog
'AEWS' 카테고리의 다른 글
| AEWS 9주차 - EKS Upgrade [AWS Workshop] (0) | 2025.04.01 |
|---|---|
| AEWS 8주차 - K8S CI/CD (0) | 2025.03.25 |
| AEWS - 6주차 EKS Security (1) | 2025.03.11 |
| AEWS 5주차 - EKS Autoscaling (0) | 2025.03.08 |
| AEWS 4주차 - EKS Observability (0) | 2025.02.24 |


