
| 일 | 월 | 화 | 수 | 목 | 금 | 토 |
|---|---|---|---|---|---|---|
| 1 | 2 | 3 | ||||
| 4 | 5 | 6 | 7 | 8 | 9 | 10 |
| 11 | 12 | 13 | 14 | 15 | 16 | 17 |
| 18 | 19 | 20 | 21 | 22 | 23 | 24 |
| 25 | 26 | 27 | 28 | 29 | 30 | 31 |
- Kubernetes
- Observability
- 타빌리
- K8S
- envoy
- aws eks
- grafana
- Streamlit 활용한 챗봇만들기
- GPT 멀티챗
- Jenkins
- kiali
- service mesh
- 랭그래프 목차만들기
- 스트림릿 활용한 GPT
- Ambient
- docker
- GPT 역할 부여하기
- 멀티에이전트 RAG
- CICD
- vagrant
- loadbalancer
- CNI
- PuMuPDF
- Ingress
- WSL
- argocd
- prometheus
- vpc cni
- Kind
- Istio
- Today
- Total
WellSpring
AEWS 1주차 - Amazon EKS 설치 및 기본 사용 본문
※ 본 게재 글은 gasida님의 'AEWS' 강의내용과 실습예제 및 EKS 관련 AWS 공식사이트, Blog 등을 참고하여 작성하였습니다.
[ EKS 기초정리 ]
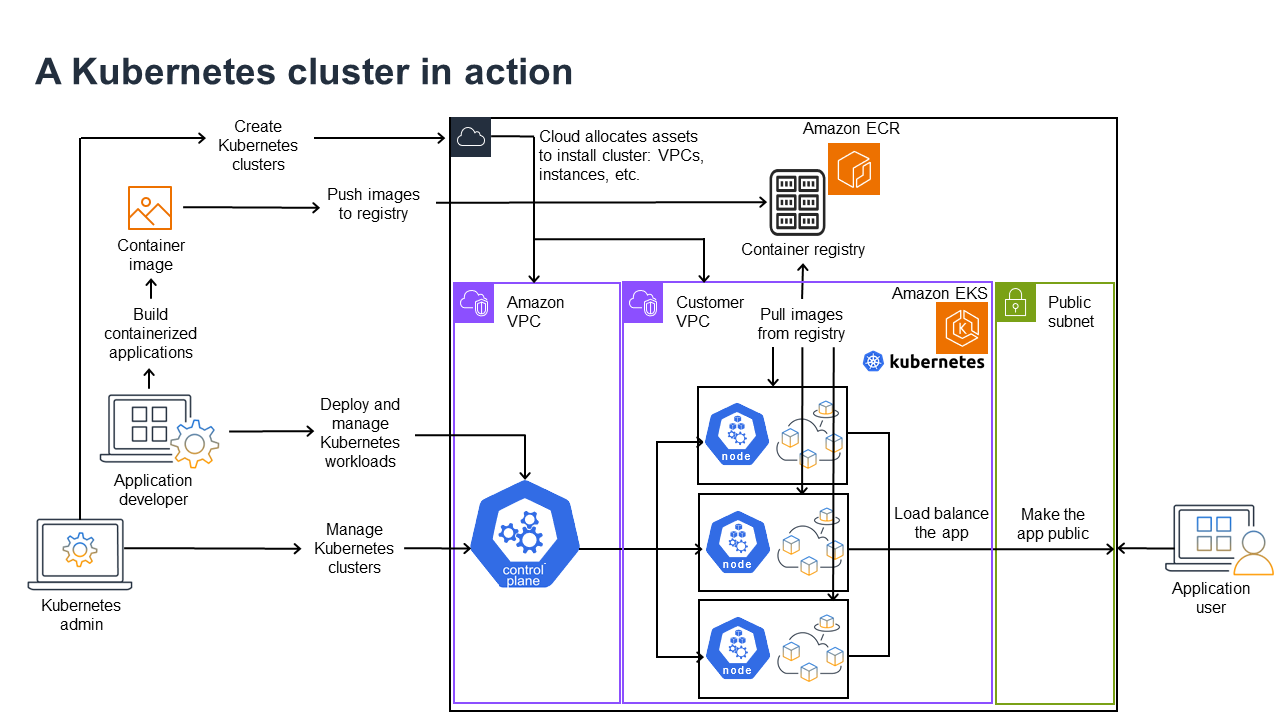
. AWS EKS 란 ?
☞ Amazon Web Services(AWS) 및 자체 데이터 센터에서 Kubernetes 클러스터의 가용성과 확장성을 운영하고
유지할 필요가 없는 관리형 Kubernetes 서비스
1) Why Kubernetes?
- 복잡한 인프라 관리를 자동화 해주어 개발자가 본연의 업무에 집중할 수 있도록 도와준다.
- 여러 시스템에 애플리케이션 배포(포드에 배포된 컨테이너 사용)
- 컨테이너 상태 모니터링 및 장애가 발생한 컨테이너 다시 시작
- 부하에 따라 컨테이너 확장 및 축소
- 새 버전으로 컨테이너 업데이트
- 컨테이너 간 리소스 할당
- 시스템 간 트래픽 균형 조정
2) Kubernetes 의 속성
- Containerized : 다양한 micro-service에 맞춤형 인프라를 제공해 줄 수 있다.
- Scalable : HPA(Horizontal Pod AutoScaling) 기능을 통해 원하는 스펙으로 손 쉽게 전환가능
- Available : 한 locale, node에 국한되지 않고 Cluster 로 묶인 자원 내에서 unhealthy resource (node/container/pod etc) 발생 시, 다른 노드로 전환하여 서비스 제공 가능
- Declarative : 필요한 Final status를 정의한 YAML 파일을 근간으로, 사용자가 원하는 서비스에 맞도록 자원 형상을 유지할 수 있다.
- Extensible : API 및 구성파일을 수정할 수 있어, Kubernetes와 연계하여 서비스를 제공하는 3rd-party 에서도 각 솔루션 특성에 맞춘 controller 를 제작하여 확장성 있는 관리체계를 유지할 수 있다.
- Portable : 표준화 된 관리체계를 기반으로 모든 어플리케이션을 동일한 방식으로 관리가 가능하며, 오픈소스 이기 때문에 특수 Kubernetes 배포판과 이를 관리하는 데 필요한 도구를 함께 개발이 가능하다.
3) Kubernetes 관리
- EKS는 다양한 기능을 제공하는 만큼, 복잡한 구성을 가지고 있기 때문에 관리자에 전문지식과 높은 수준의 역량을 요구한다. 이에 따라 대부분의 회사에서는 자체 테스트 환경에서 검토 한 내용을, CSP에서 제공하는 인프라 환경에 배포하여 보다 안정적인 서비스를 제공하는 것을 지향한다.
- 하드웨어 측면 : 초기 도입비용 절감 가능
- 컨트롤 플레인 관리 : CSP에서 컨트롤플레인의 보안 및 가용성을 관리하여, 사용자는 Application workload에 집중 가능
- 검증 된 업그레이드 : Amazon EKS 또는 Amazon EKS Anywhere를 사용하여 Kubernetes 배포의 테스트된 버전을 제공
- 추가 기능 : CSP에서 제공하는 Amazon EKS Anywhere 같은 서비스를 사용하여, 개발/배포 시 겪을 수 있는 문제들을 사전 회피할 수 있다.
1. 발음정리 - Link
2. Kubernetes Components
: K8S 클러스터는 Controle Plane(마스터)와 Node(노드)로 구성 - 링크
☞ Kuberbetes는 자원의 형상을 관리하는 Control Plane 과 서비스를 구현하는 Node components 로 구성된다.
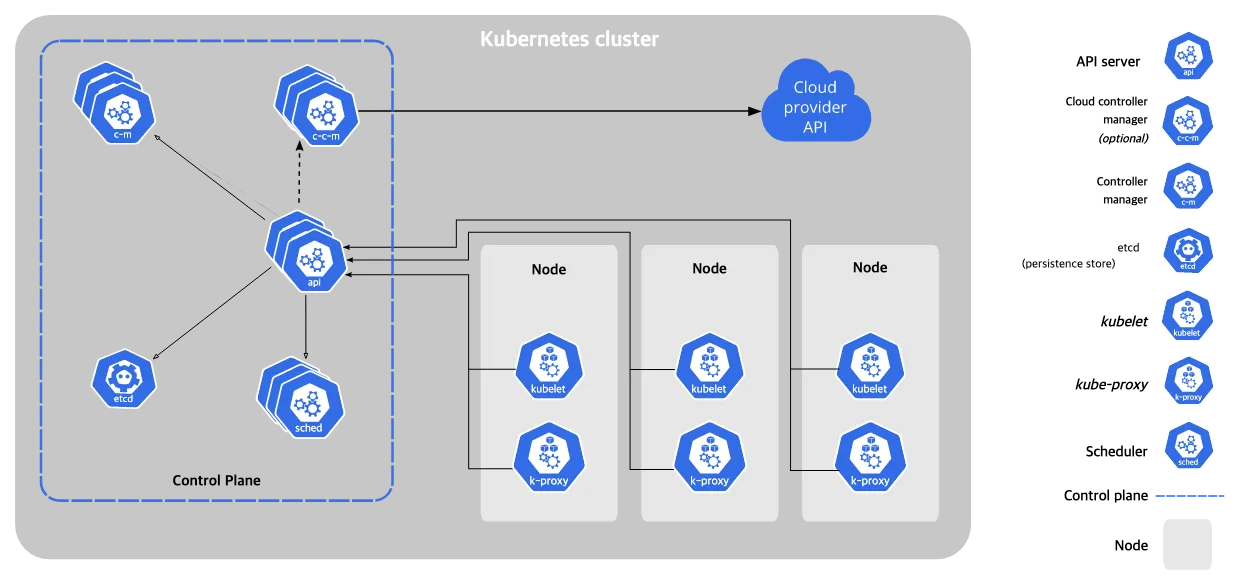
☞ 하기 도식을 통해 User 단 명령어가 Kubernetes Node 에 전달되어 요청 결과물(자원)을 생성하는 과정을 살펴 볼 수 있다.
1. Control Plane(마스터 노드) 핵심 컴포넌트 : 마스터는 단일 서버 혹은 고가용성을 위한 클러스터 마스터로 구축
- kube-apiserver : 마스터로 전달되는 모든 요청을 받아 드리는 API 서버 - (심화) 링크1 링크2 링크3
- etcd : 클러스터내 모든 메타 정보를 저장하는 서비스 - 기본 동작 원리의 이해 : 링크1 & 링크2
- kube-scheduler : 사용자의 요청에 따라 적절하게 컨테이너를 워커 노드에 배치하는 스케줄러
- kube-controller-manager : 현재 상태와 바라는 상태를 지속적으로 확인하며 특정 이벤트에 따라 특정 동작을 수행하는 컨트롤러 - 링크
- cloud-controller-manager : 클라우드 플랫폼(AWS, GCP, Azure 등)에 특화된 리소스를 제어하는 클라우드 컨트롤러 - 링크
2. 워커 노드 - 링크
- kubelet : 마스터의 명령에 따라 컨테이너의 라이프 사이클을 관리하는 노드 관리자
- kube-proxy : 컨테이너의 네트워킹을 책임지는 프록시, 네트워크 규칙을 유지 관리
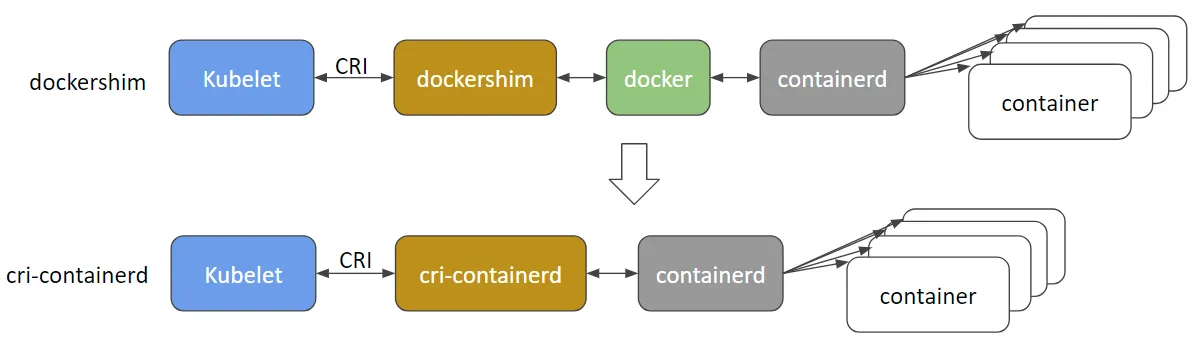
- Container Runtime : 실제 컨테이너를 실행하는 컨테이너 실행 환경, (
Docker& containerD & CRI-O)

3. Addons
1) CNI : Container Network Interface 는 k8s 네트워크 환경을 구성해준다 - 링크, 다양한 플러그인이 존재 - 링크
2) DNS : 쿠버네티스 서비스를 위해 DNS 레코드를 제공해주며, Service Discovery 기능을 제공을 한다. 대표적으로 CoreDNS 가 있다 - 링크
3. Kubernetes 핵심개념
3-1. 애완동물과 가축
쿠버네티스는 서버를 애완동물(Pet)보다는 가축(cattle)에 가깝다고 비유합니다.
애완동물은 세심한 관리가 필요하고 가축은 떼로 방목하여 키웁니다. 애완동물은 개체마다 정해진 이름이 있고, 배고프지 말라고 끼니를 챙겨주며, 아프지 말라고 예방 접종을 합니다.
반면, 가축은 개별적으로 정해진 이름 없이 무리로 관리합니다. 때로 무리에서 낙오된 개체는 죽기도 합니다. 애완동물과는 다르게 가축 한두 마리 죽는 것에 크게 슬퍼하지 않습니다. 워낙 개체수가 많으니까요.
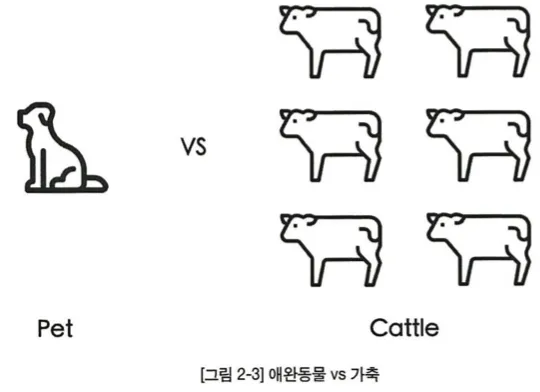
쿠버네티스도 서버를 바라보는 관점이 이와 유사합니다.
첫째, 서버마다 특별한 이름을 부여하지 않습니다.
예를 들어, 특정 서버의 역할을 빌드 서버, 웹 서버, 모니터링 서버 등으로 구분하지 않습니다. 모든 서버들은 워커 서버로 동작합니다.
둘째, 가축과 마찬가지로 한두 개의 서버(워커 노드)가 망가져도 문제없습니다.
손쉽게 다른 서버에게 그 역할을 맡길 수 있으니까요. 쿠버네티스 안에서는 모든 서버들이 마스터와 워커로만 구분됩니다. 마스터에서는 쿠버네티스를 운용하기 위한 필수적인 핵심 컴포넌트가 존재하고, 나머지 워커 노드들은 단순히 컨테이너를 실행하는 환경으로 사용합니다. 워커마다 특별한 역할을 맡지 않기 때문에 마스터가 죽지 않은 이상 특정 워커가 수행했던 역할을 나머지 워커들에 맡겨도 문제없습니다. 이것은 컨테이너라는 고립화된 가상실행 환경을 통해 이식성을 높였기에 가능한 일입니다. 이러한 특징으로, 많은 수의 서버를 관리하기에 수월합니다.
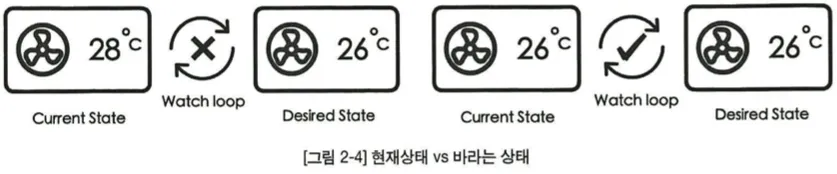
3-2. 바라는 상태(Desired State)
☞ control plane 내 controler를 통해 유저가 바라는 EKS 내 어플리케이션을 제공하기 위한 자원의 상태를 업데이트, 유지한다.
에어콘을 사용할 때, 현재 상태가 존재하고(=현재 온도), 사용자가 바라는 상태(=희망 온도)가 있습니다.
에어컨 시스템이 사용자의 희망온도에 따라 현재 상태를 변경시키기 위해 에어컨 시스템을 작동시키듯, 쿠버네티스는 사용자의 요청에 따라 현재 상태가 바라는 상태와 동일해지도록 사전이 미리 정의된 특정 작업을 수행합니다.
쿠버네티스에서 바라는 상태란 사용자가 생각하는 최종 애플리케이션 배포 상태를 말합니다.
사용자는 자신이 원하는 애플리케이션 배포 상태를 쿠버네티스에 알려주면 쿠버네티스가 자동으로 현재 상태를 바라는 상태로 변경합니다.
바라는 상태가 가지는 것의 장점으로는 쿠버네티스가 장애가 발생하여 애플리케이션이 죽더라도, 바라는 상태를 알기 때문에 손쉽게 원래의 바라는 상태로 배포 상태를 되살릴 수가 있습니다(=자가 치유)
3-3. 네임스페이스
☞ Kubernetes에서 namespace 란?
1) 단일 클러스터 내에서의 리소스 그룹 격리 메커니즘을 제공 : 자원의 논리적 구분
2) 리소스의 이름은 네임스페이스 내에서 유일해야 하며, 네임스페이스 간에서 유일할 필요는 없다.
3) 네임스페이스에 따른 자원 관리 범위 : 네임스페이스 기반 오브젝트 (예: 디플로이먼트, 서비스 등) 에만 적용 가능하며 클러스터 범위의 오브젝트 (예: 스토리지클래스, 노드, 퍼시스턴트볼륨 등) 에는 적용 불가능하다.
[ More ... ]
쿠버네티스의 모든 리소스를 크게 두 가지로 구분하자면 네임스페이스 레벨 리소스와 클러스터 레벨 리소스로 구분이 됩니다.
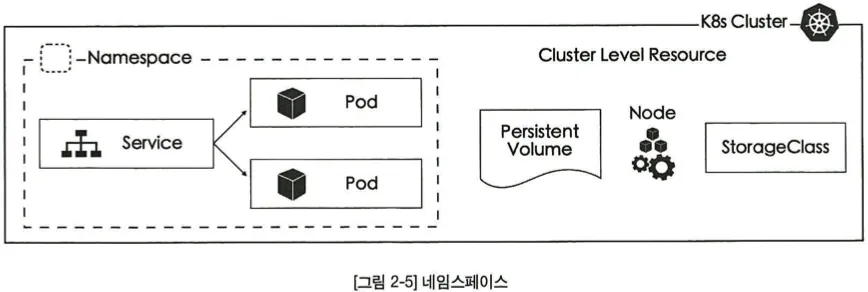
네임스페이스 리소스는 특정 네임스페이스 안에 속하여 존재합니다. Pod, Deployment, Service 와 같이 대부분의 쿠버네티스 리소스가 네임스페이스 안에 포함됩니다.
반면, Node, PersistentVolume, StorageClass 와 같이 네임스페이스 영역에 상관없이 클러스터 레벨에서 존재하는 리소스도 있습니다.
3-4. 쿠버네티스 리소스(Resource), 오브젝트
☞ Kubernetes에서는 모든 것 ( Pod, Replicaset, SA, Node etc ) 이 Resource 로 표현되며, 각 리소스는 고유의 역할이 있다.
[ K8S 에서 사용할 수 있는 오브젝트 확인 ]
# K8s 사용할 수 있는 오브젝트 확인
root@manager:~# kubectl api-resources
NAME                              SHORTNAMES   APIVERSION                             NAMESPACED   KIND
bindings                                       v1                                     true         Binding
componentstatuses                 cs           v1                                     false        ComponentStatus
configmaps                        cm           v1                                     true         ConfigMap
endpoints                         ep           v1                                     true         Endpoints
events                            ev           v1                                     true         Event
limitranges                       limits       v1                                     true         LimitRange
namespaces                        ns           v1                                     false        Namespace
nodes                             no           v1                                     false        Node
persistentvolumeclaims            pvc          v1                                     true         PersistentVolumeClaim
persistentvolumes                 pv           v1                                     false        PersistentVolume
pods                              po           v1                                     true         Pod
...

# 특정 오브젝트 설명
root@manager:~# kubectl explain pod
KIND:     Pod
VERSION:  v1

DESCRIPTION:
     Pod is a collection of containers that can run on a host. This resource is
     created by clients and scheduled onto hosts.

FIELDS:
   apiVersion	<string>
     APIVersion defines the versioned schema of this representation of an
     object. Servers should convert recognized schemas to the latest internal
     value, and may reject unrecognized values. More info:
     https://git.k8s.io/community/contributors/devel/sig-architecture/api-conventions.md#resources
...

# 특정 오브젝트의 하위 필드의 정보 확인
root@k8s-m:~# kubectl explain pod.spec | more
KIND:     Pod
VERSION:  v1

RESOURCE: spec <Object>

DESCRIPTION:
     Specification of the desired behavior of the pod. More info:
     https://git.k8s.io/community/contributors/devel/sig-architecture/api-conventions.md#spec-and-status
...

# 특정 오브젝트의 모든 하위 필드 정보 확인
root@k8s-m:~# kubectl explain pod --recursive | more
KIND:     Pod
VERSION:  v1

DESCRIPTION:
     Pod is a collection of containers that can run on a host. This resource is
     created by clients and scheduled onto hosts.
...
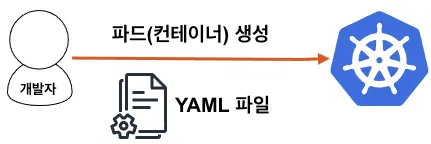
3-5. 선언형 커멘드 (Declarative Command)
☞ Kubernetes에서는 선언형 커멘드를 지향한다.
Why? 사용자가 원하는 최종 상태를 오류 없이 유지 할 수 있는 효과적인 방법!!
( How? No!! / What? Yes!! )
선언형 커맨드란 사용자가 직접 시스템의 상태를 바꾸지 않고 사용자가 바라는 상태를 선언적으로 기술하여 명령을 내리는 방법을 말합니다.
선언형 커맨드와 반대되는 개념이 명령형(Imperative) 커맨드입니다. 명령형 커맨드는 일반적으로 자주 사용하는 명령 형식입니다.
명령형 커맨드의 예로 SQL 쿼리를 들 수 있습니다. SQL 쿼리는 어떻게 테이블의 데이터를 질의할 것인가에 대한 명령입니다. 대부분 명령이 이런 명령형 커맨드에 기반합니다.
반면, 선언형 커맨드의 대표적인 예로 HTML 문서를 들 수 있습니다. HTML 문서는 어떻게 명령을 수행해야 할지에 대한 정보는 없습니다. 대신 무엇을 해야 하는지 선언되어 있습니다.
[ AML 형식의 리소스(Pod) 예시 ]
apiVersion: v1
kind: Pod
metadata:
  name: mypod
spec:
  containers:
  - name: nginx
    image: nginx:latest
이러한 YAML 형식의 리소스를 'YAML 정의서(YAML description)' 라고 부릅니다.
사용자는 쿠버네티스에 어떤 명령을 전달하거나 옵션값을 수정할 때 YAML 정의서의 YAML property를 추가하거나 수정합니다.
사용자는 각 리소스마다의 모든 설정값을 외울 필요가 없습니다. 최소한의 필수값을 채워서 리소스를 생성하면, 나머지는 쿠버네티스가 기본값으로 리소스를 생성합니다.
▶ YAML (YAML Ain't Markup Language) - 링크
- Yaml 또는 Yml 이란?
사람이 쉽게 읽을 수 있는 형태로 표현된 데이터 직렬화 양식입니다.
좀 더 쉽게 말하자면 사람이 읽고 쓰기 쉽도록 만들어진 하나의 약속이라고 볼 수 있습니다.
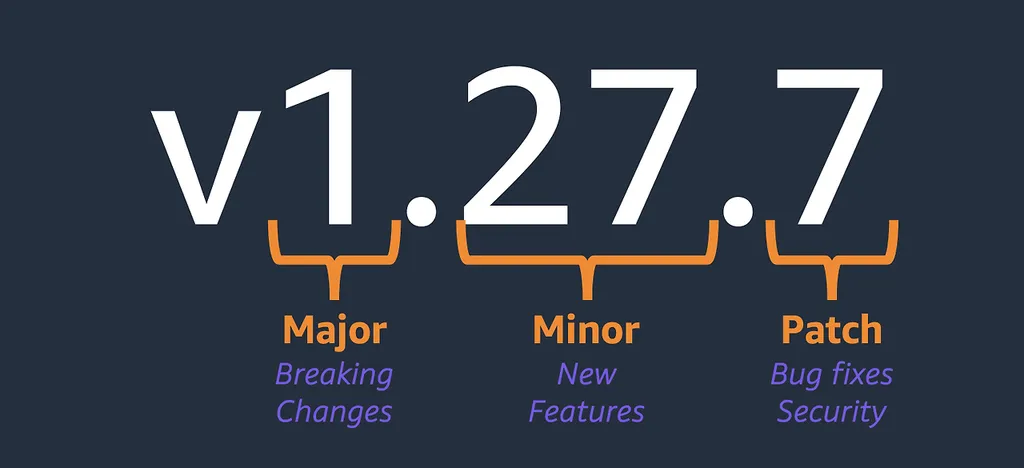
3-6. EKS Version 관리
☞ 보통 4개의 마이너 버전 지원(현재 1.32~1.29), 평균 3개월마다 새 버전 제공, 처음 14개월 지원, 추가(1.28~1.24) 12개월 연장 지원(비용 추가) - 링크
[ 버전 읽는 법 ]
- v1.25.Y → Major.Minor.Patch ⇒ Major(Breaking Changes) . Minor(New Features) . Patch(Bug fixes Security)
0. 실습환경 구성
▶ 기본 인프라 배포 - 링크 ← AWS CloudFormation 페이지로 연결되며, 파라미터 입력 후 스택 실행
▷ 파라미터 : 아래 빨간색 부분은 설정해주는어야 할 것, 그외 부분은 기본값 사용을 권장
- <<<<< EKSCTL MY EC2 >>>>>
- ClusterBaseName: EKS 클러스터의 기본 이름 (생성되는 리소스들의 주석에 접두어로 활용), EKS 클러스터 이름에 '_(밑줄)' 사용 불가!
- KeyName: EC2 접속에 사용하는 SSH 키페어 지정
- SgIngressSshCidr: eksctl 작업을 수행할 EC2 인스턴스를 접속할 수 있는 IP 주소 입력 (집 공인IP/32 입력)
- MyInstanceType: eksctl 작업을 수행할 EC2 인스턴스의 타입 (기본 t3.medium)
- <<<<< Region AZ >>>>> : 리전과 가용영역을 지정
- <<<<< VPC Subnet >>>>> : VPC, 서브넷 정보 지정
# yaml 파일 다운로드
curl -O https://s3.ap-northeast-2.amazonaws.com/cloudformation.cloudneta.net/K8S/myeks-1week.yaml

# 배포
# aws cloudformation deploy --template-file ~/Downloads/myeks-1week.yaml --stack-name mykops --parameter-overrides KeyName=<My SSH Keyname> SgIngressSshCidr=<My Home Public IP Address>/32 --region <리전>
예시) aws cloudformation deploy --template-file ~/Downloads/myeks-1week.yaml \
     --stack-name myeks --parameter-overrides KeyName=kp-gasida SgIngressSshCidr=$(curl -s ipinfo.io/ip)/32 --region ap-northeast-2

# CloudFormation 스택 배포 완료 후 EC2 IP 출력
aws cloudformation describe-stacks --stack-name myeks --query 'Stacks[*].Outputs[*].OutputValue' --output text
예시) 3.35.137.31

# ec2 에 SSH 접속 : root / qwe123
예시) ssh root@3.35.137.31
ssh root@$(aws cloudformation describe-stacks --stack-name myeks --query 'Stacks[*].Outputs[0].OutputValue' --output text)
root@@X.Y.Z.A's password: qwe123
[ 실행 결과 - 한 눈에 보기 ] * aws cli 환경설치 - 참조 링크


▶ 참고 : my-eks.yaml : VPC, Subnet4개, EC2 1대 + 보안그룹(자신의 집 IP만 허용)
AWSTemplateFormatVersion: '2010-09-09'

Metadata:
  AWS::CloudFormation::Interface:
    ParameterGroups:
      - Label:
          default: "<<<<< EKSCTL MY EC2 >>>>>"
        Parameters:
          - ClusterBaseName
          - KeyName
          - SgIngressSshCidr
          - MyInstanceType
          - LatestAmiId
      - Label:
          default: "<<<<< Region AZ >>>>>"
        Parameters:
          - TargetRegion
          - AvailabilityZone1
          - AvailabilityZone2
      - Label:
          default: "<<<<< VPC Subnet >>>>>"
        Parameters:
          - VpcBlock
          - PublicSubnet1Block
          - PublicSubnet2Block
          - PrivateSubnet1Block
          - PrivateSubnet2Block

Parameters:
  ClusterBaseName:
    Type: String
    Default: myeks
    AllowedPattern: "[a-zA-Z][-a-zA-Z0-9]*"
    Description: must be a valid Allowed Pattern '[a-zA-Z][-a-zA-Z0-9]*'
    ConstraintDescription: ClusterBaseName - must be a valid Allowed Pattern

  KeyName:
    Description: Name of an existing EC2 KeyPair to enable SSH access to the instances. Linked to AWS Parameter
    Type: AWS::EC2::KeyPair::KeyName
    ConstraintDescription: must be the name of an existing EC2 KeyPair.

  SgIngressSshCidr:
    Description: The IP address range that can be used to communicate to the EC2 instances
    Type: String
    MinLength: '9'
    MaxLength: '18'
    Default: 0.0.0.0/0
    AllowedPattern: (\d{1,3})\.(\d{1,3})\.(\d{1,3})\.(\d{1,3})/(\d{1,2})
    ConstraintDescription: must be a valid IP CIDR range of the form x.x.x.x/x.

  MyInstanceType:
    Description: Enter t2.micro, t2.small, t2.medium, t3.micro, t3.small, t3.medium. Default is t2.micro.
    Type: String
    Default: t3.medium
    AllowedValues:
      - t2.micro
      - t2.small
      - t2.medium
      - t3.micro
      - t3.small
      - t3.medium

  LatestAmiId:
    Description: (DO NOT CHANGE)
    Type: 'AWS::SSM::Parameter::Value<AWS::EC2::Image::Id>'
    Default: '/aws/service/ami-amazon-linux-latest/amzn2-ami-hvm-x86_64-gp2'
    AllowedValues:
      - /aws/service/ami-amazon-linux-latest/amzn2-ami-hvm-x86_64-gp2

  TargetRegion:
    Type: String
    Default: ap-northeast-2

  AvailabilityZone1:
    Type: String
    Default: ap-northeast-2a

  AvailabilityZone2:
    Type: String
    Default: ap-northeast-2c

  VpcBlock:
    Type: String
    Default: 192.168.0.0/16

  PublicSubnet1Block:
    Type: String
    Default: 192.168.1.0/24

  PublicSubnet2Block:
    Type: String
    Default: 192.168.2.0/24

  PrivateSubnet1Block:
    Type: String
    Default: 192.168.3.0/24

  PrivateSubnet2Block:
    Type: String
    Default: 192.168.4.0/24

Resources:
# VPC
  EksVPC:
    Type: AWS::EC2::VPC
    Properties:
      CidrBlock: !Ref VpcBlock
      EnableDnsSupport: true
      EnableDnsHostnames: true
      Tags:
        - Key: Name
          Value: !Sub ${ClusterBaseName}-VPC

# PublicSubnets
  PublicSubnet1:
    Type: AWS::EC2::Subnet
    Properties:
      AvailabilityZone: !Ref AvailabilityZone1
      CidrBlock: !Ref PublicSubnet1Block
      VpcId: !Ref EksVPC
      MapPublicIpOnLaunch: true
      Tags:
        - Key: Name
          Value: !Sub ${ClusterBaseName}-PublicSubnet1
        - Key: kubernetes.io/role/elb
          Value: 1

  PublicSubnet2:
    Type: AWS::EC2::Subnet
    Properties:
      AvailabilityZone: !Ref AvailabilityZone2
      CidrBlock: !Ref PublicSubnet2Block
      VpcId: !Ref EksVPC
      MapPublicIpOnLaunch: true
      Tags:
        - Key: Name
          Value: !Sub ${ClusterBaseName}-PublicSubnet2
        - Key: kubernetes.io/role/elb
          Value: 1

  InternetGateway:
    Type: AWS::EC2::InternetGateway

  VPCGatewayAttachment:
    Type: AWS::EC2::VPCGatewayAttachment
    Properties:
      InternetGatewayId: !Ref InternetGateway
      VpcId: !Ref EksVPC

  PublicSubnetRouteTable:
    Type: AWS::EC2::RouteTable
    Properties:
      VpcId: !Ref EksVPC
      Tags:
        - Key: Name
          Value: !Sub ${ClusterBaseName}-PublicSubnetRouteTable

  PublicSubnetRoute:
    Type: AWS::EC2::Route
    Properties:
      RouteTableId: !Ref PublicSubnetRouteTable
      DestinationCidrBlock: 0.0.0.0/0
      GatewayId: !Ref InternetGateway

  PublicSubnet1RouteTableAssociation:
    Type: AWS::EC2::SubnetRouteTableAssociation
    Properties:
      SubnetId: !Ref PublicSubnet1
      RouteTableId: !Ref PublicSubnetRouteTable

  PublicSubnet2RouteTableAssociation:
    Type: AWS::EC2::SubnetRouteTableAssociation
    Properties:
      SubnetId: !Ref PublicSubnet2
      RouteTableId: !Ref PublicSubnetRouteTable

# PrivateSubnets
  PrivateSubnet1:
    Type: AWS::EC2::Subnet
    Properties:
      AvailabilityZone: !Ref AvailabilityZone1
      CidrBlock: !Ref PrivateSubnet1Block
      VpcId: !Ref EksVPC
      Tags:
        - Key: Name
          Value: !Sub ${ClusterBaseName}-PrivateSubnet1
        - Key: kubernetes.io/role/internal-elb
          Value: 1

  PrivateSubnet2:
    Type: AWS::EC2::Subnet
    Properties:
      AvailabilityZone: !Ref AvailabilityZone2
      CidrBlock: !Ref PrivateSubnet2Block
      VpcId: !Ref EksVPC
      Tags:
        - Key: Name
          Value: !Sub ${ClusterBaseName}-PrivateSubnet2
        - Key: kubernetes.io/role/internal-elb
          Value: 1

  PrivateSubnetRouteTable:
    Type: AWS::EC2::RouteTable
    Properties:
      VpcId: !Ref EksVPC
      Tags:
        - Key: Name
          Value: !Sub ${ClusterBaseName}-PrivateSubnetRouteTable

  PrivateSubnet1RouteTableAssociation:
    Type: AWS::EC2::SubnetRouteTableAssociation
    Properties:
      SubnetId: !Ref PrivateSubnet1
      RouteTableId: !Ref PrivateSubnetRouteTable

  PrivateSubnet2RouteTableAssociation:
    Type: AWS::EC2::SubnetRouteTableAssociation
    Properties:
      SubnetId: !Ref PrivateSubnet2
      RouteTableId: !Ref PrivateSubnetRouteTable

# EKSCTL-Host
  EKSEC2SG:
    Type: AWS::EC2::SecurityGroup
    Properties:
      GroupDescription: eksctl-host Security Group
      VpcId: !Ref EksVPC
      Tags:
        - Key: Name
          Value: !Sub ${ClusterBaseName}-HOST-SG
      SecurityGroupIngress:
      - IpProtocol: '-1'
        CidrIp: !Ref SgIngressSshCidr

  EKSEC2:
    Type: AWS::EC2::Instance
    Properties:
      InstanceType: !Ref MyInstanceType
      ImageId: !Ref LatestAmiId
      KeyName: !Ref KeyName
      Tags:
        - Key: Name
          Value: !Sub ${ClusterBaseName}-host
      NetworkInterfaces:
        - DeviceIndex: 0
          SubnetId: !Ref PublicSubnet1
          GroupSet:
          - !Ref EKSEC2SG
          AssociatePublicIpAddress: true
          PrivateIpAddress: 192.168.1.100
      BlockDeviceMappings:
        - DeviceName: /dev/xvda
          Ebs:
            VolumeType: gp3
            VolumeSize: 30
            DeleteOnTermination: true
      UserData:
        Fn::Base64:
          !Sub |
            #!/bin/bash
            hostnamectl --static set-hostname "${ClusterBaseName}-host"

            # Config Root account
            echo 'root:qwe123' | chpasswd
            sed -i "s/^#PermitRootLogin yes/PermitRootLogin yes/g" /etc/ssh/sshd_config
            sed -i "s/^PasswordAuthentication no/PasswordAuthentication yes/g" /etc/ssh/sshd_config
            rm -rf /root/.ssh/authorized_keys
            systemctl restart sshd

            # Config convenience
            echo 'alias vi=vim' >> /etc/profile
            echo "sudo su -" >> /home/ec2-user/.bashrc
            sed -i "s/UTC/Asia\/Seoul/g" /etc/sysconfig/clock
            ln -sf /usr/share/zoneinfo/Asia/Seoul /etc/localtime

            # Install Packages
            yum -y install tree jq git htop

            # Install YAML Highlighter
            wget https://github.com/andreazorzetto/yh/releases/download/v0.4.0/yh-linux-amd64.zip
            unzip yh-linux-amd64.zip
            mv yh /usr/local/bin/

            # Install kubectl & helm
            cd /root
            curl -O https://s3.us-west-2.amazonaws.com/amazon-eks/1.31.2/2024-11-15/bin/linux/amd64/kubectl
            install -o root -g root -m 0755 kubectl /usr/local/bin/kubectl
            curl -s https://raw.githubusercontent.com/helm/helm/master/scripts/get-helm-3 | bash

            # Install eksctl
            curl -sL "https://github.com/eksctl-io/eksctl/releases/latest/download/eksctl_Linux_amd64.tar.gz" | tar xz -C /tmp
            mv /tmp/eksctl /usr/local/bin

            # Install aws cli v2
            curl "https://awscli.amazonaws.com/awscli-exe-linux-x86_64.zip" -o "awscliv2.zip"
            unzip awscliv2.zip >/dev/null 2>&1
            ./aws/install
            complete -C '/usr/local/bin/aws_completer' aws
            echo 'export AWS_PAGER=""' >>/etc/profile
            export AWS_DEFAULT_REGION=${AWS::Region}
            echo "export AWS_DEFAULT_REGION=$AWS_DEFAULT_REGION" >> /etc/profile

            # Install krew
            curl -L https://github.com/kubernetes-sigs/krew/releases/download/v0.4.4/krew-linux_amd64.tar.gz -o /root/krew-linux_amd64.tar.gz
            tar zxvf krew-linux_amd64.tar.gz
            ./krew-linux_amd64 install krew
            export PATH="$PATH:/root/.krew/bin"
            echo 'export PATH="$PATH:/root/.krew/bin"' >> /etc/profile

            # Install kube-ps1
            echo 'source <(kubectl completion bash)' >> /etc/profile
            echo 'alias k=kubectl' >> /etc/profile
            echo 'complete -F __start_kubectl k' >> /etc/profile

            git clone https://github.com/jonmosco/kube-ps1.git /root/kube-ps1
            cat <<"EOT" >> /root/.bash_profile
            source /root/kube-ps1/kube-ps1.sh
            KUBE_PS1_SYMBOL_ENABLE=false
            function get_cluster_short() {
              echo "$1" | cut -d . -f1
            }
            KUBE_PS1_CLUSTER_FUNCTION=get_cluster_short
            KUBE_PS1_SUFFIX=') '
            PS1='$(kube_ps1)'$PS1
            EOT

            # CLUSTER_NAME
            export CLUSTER_NAME=${ClusterBaseName}
            echo "export CLUSTER_NAME=$CLUSTER_NAME" >> /etc/profile

            # Create SSH Keypair
            ssh-keygen -t rsa -N "" -f /root/.ssh/id_rsa

            # Install krew plugin
            kubectl krew install ctx ns get-all neat # ktop df-pv mtail tree

            # Install Docker
            amazon-linux-extras install docker -y
            systemctl start docker && systemctl enable docker

            # Install Kubecolor
            wget https://github.com/kubecolor/kubecolor/releases/download/v0.5.0/kubecolor_0.5.0_linux_amd64.tar.gz
            tar -zxvf kubecolor_0.5.0_linux_amd64.tar.gz
            mv kubecolor /usr/local/bin/

Outputs:
  eksctlhost:
    Value: !GetAtt EKSEC2.PublicIp
▶ 기본정보 확인 ( aws configure 로 자격증명 환경 설정 필요!! )
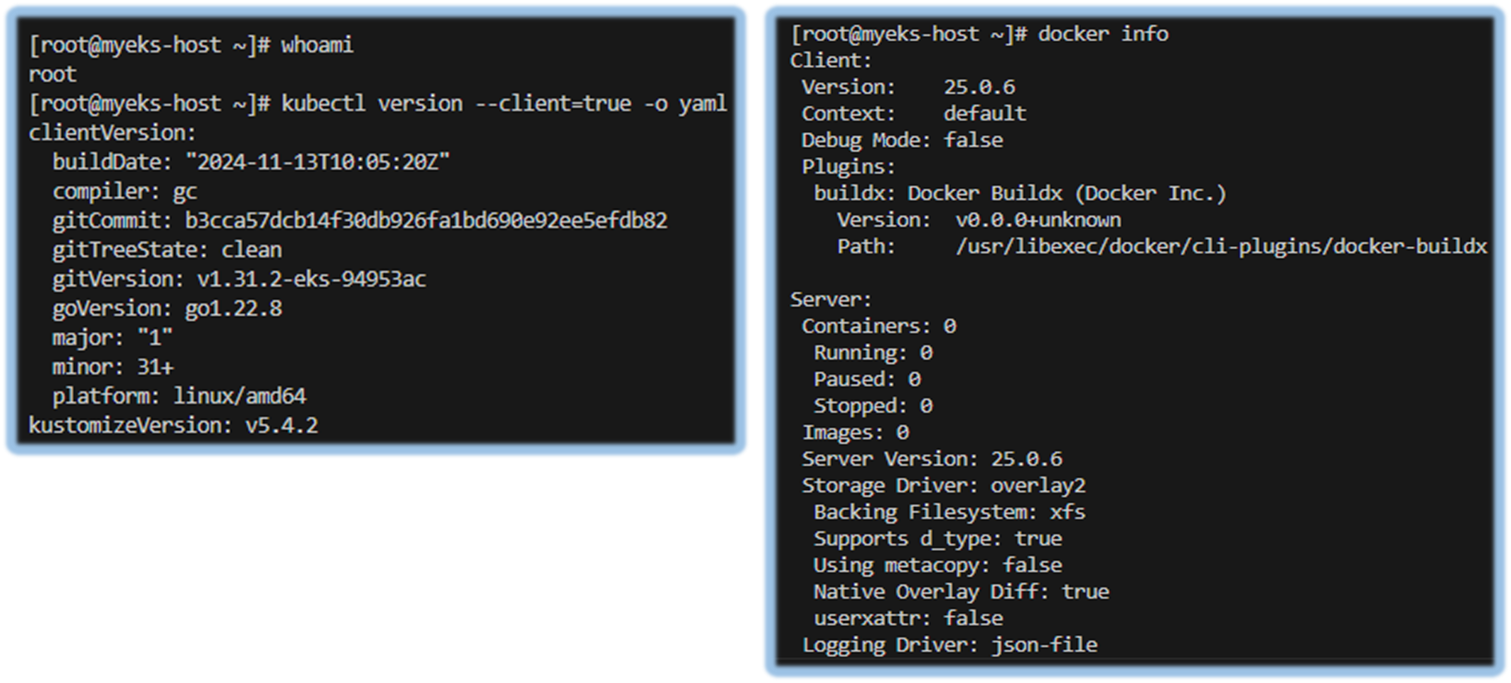
1) 기본 kubectl 명령어 확인
# (옵션) cloud-init 실행 과정 로그 확인
tail -f /var/log/cloud-init-output.log

# 사용자 확인
whoami

# 기본 툴 및 SSH 키 설치 등 확인
kubectl version --client=true -o yaml
eksctl version
aws --version
ls /root/.ssh/id_rsa*

# 도커 엔진 설치 확인
docker info
[ 실행 결과 ]
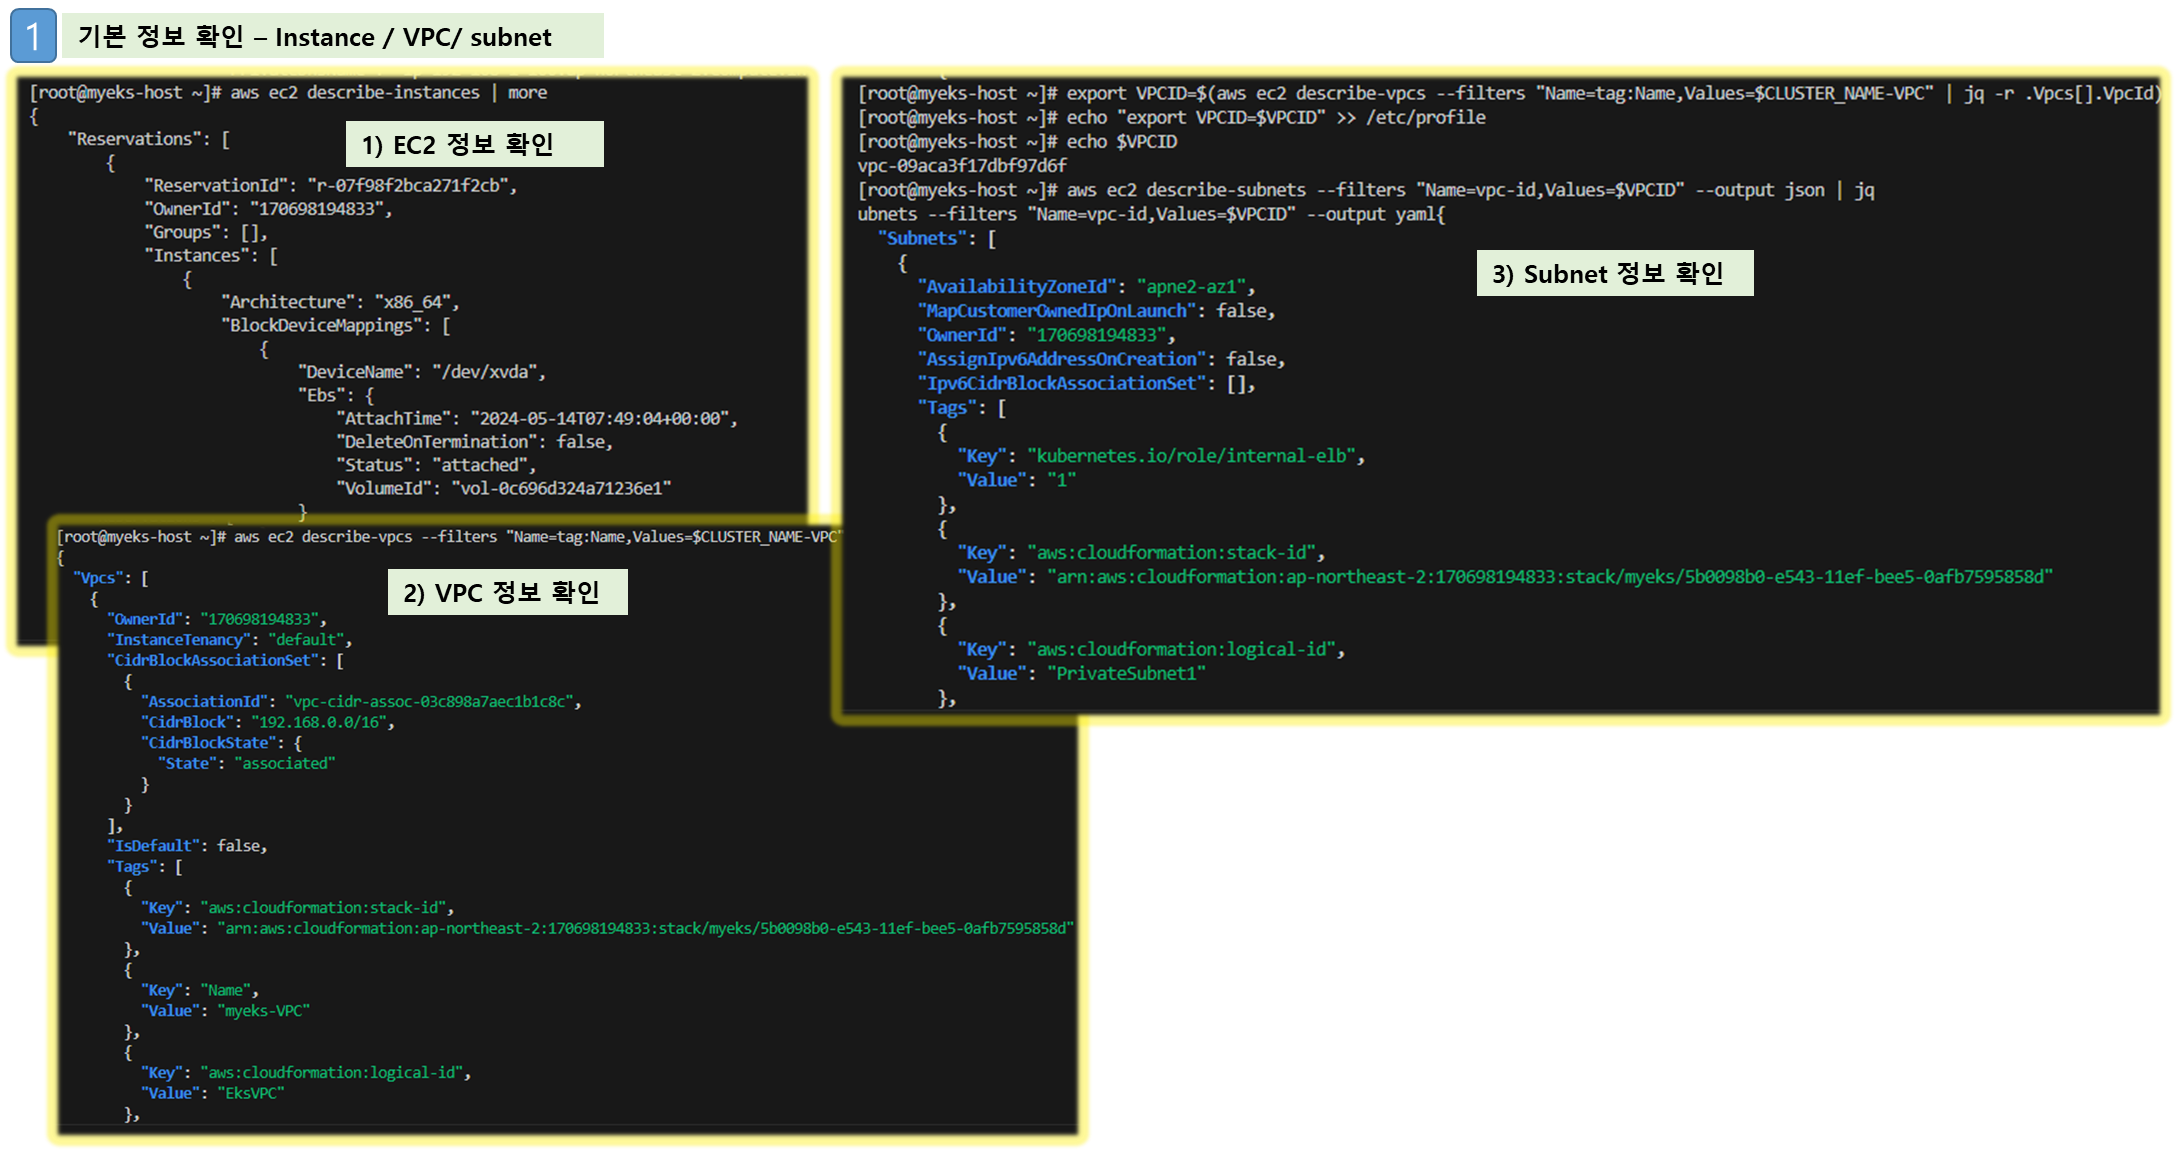
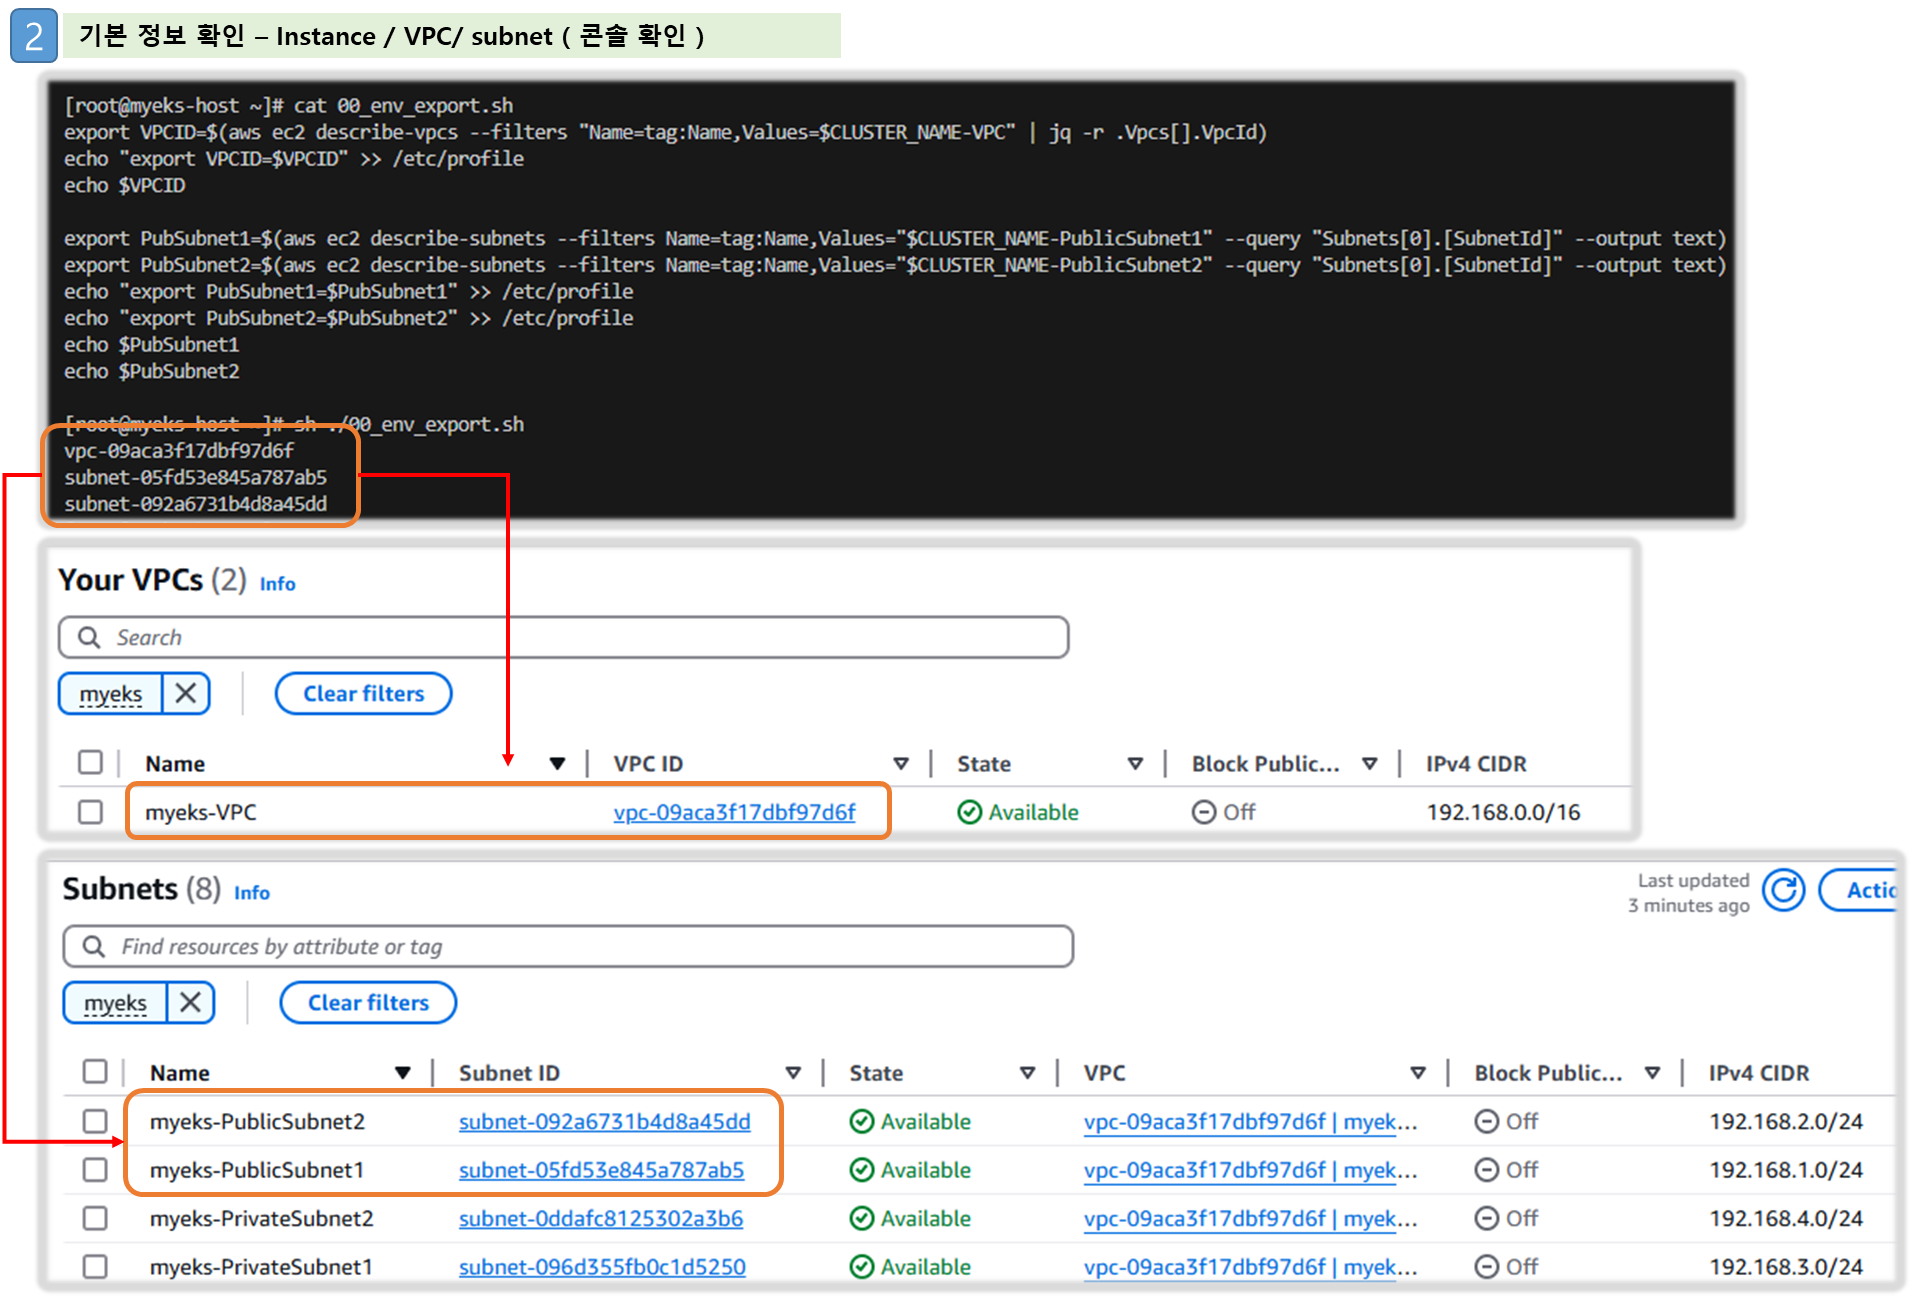
2) aws 자원 확인 ( IAM User 자격 증명 설정 및 VPC 확인 및 변수 지정 필요 )
# 자격 구성 설정 없이 확인
aws ec2 describe-instances

# IAM User 자격 구성 : 실습 편리를 위해 administrator 권한을 가진 IAM User 의 자격 증명 입력
aws configure
AWS Access Key ID [None]: AKIA5...
AWS Secret Access Key [None]: CVNa2...
Default region name [None]: ap-northeast-2
Default output format [None]: json

# 자격 구성 적용 확인 : 노드 IP 확인
aws ec2 describe-instances

# EKS 배포할 VPC 정보 확인
aws ec2 describe-vpcs --filters "Name=tag:Name,Values=$CLUSTER_NAME-VPC" | jq
aws ec2 describe-vpcs --filters "Name=tag:Name,Values=$CLUSTER_NAME-VPC" | jq Vpcs[]
aws ec2 describe-vpcs --filters "Name=tag:Name,Values=$CLUSTER_NAME-VPC" | jq Vpcs[].VpcId
aws ec2 describe-vpcs --filters "Name=tag:Name,Values=$CLUSTER_NAME-VPC" | jq -r .Vpcs[].VpcId
export VPCID=$(aws ec2 describe-vpcs --filters "Name=tag:Name,Values=$CLUSTER_NAME-VPC" | jq -r .Vpcs[].VpcId)
echo "export VPCID=$VPCID" >> /etc/profile
echo $VPCID

# EKS 배포할 VPC에 속한 Subnet 정보 확인
aws ec2 describe-subnets --filters "Name=vpc-id,Values=$VPCID" --output json | jq
aws ec2 describe-subnets --filters "Name=vpc-id,Values=$VPCID" --output yaml

## 퍼블릭 서브넷 ID 확인
aws ec2 describe-subnets --filters Name=tag:Name,Values="$CLUSTER_NAME-PublicSubnet1" | jq
aws ec2 describe-subnets --filters Name=tag:Name,Values="$CLUSTER_NAME-PublicSubnet1" --query "Subnets[0].[SubnetId]" --output text
export PubSubnet1=$(aws ec2 describe-subnets --filters Name=tag:Name,Values="$CLUSTER_NAME-PublicSubnet1" --query "Subnets[0].[SubnetId]" --output text)
export PubSubnet2=$(aws ec2 describe-subnets --filters Name=tag:Name,Values="$CLUSTER_NAME-PublicSubnet2" --query "Subnets[0].[SubnetId]" --output text)
echo "export PubSubnet1=$PubSubnet1" >> /etc/profile
echo "export PubSubnet2=$PubSubnet2" >> /etc/profile
echo $PubSubnet1
echo $PubSubnet2
[ 실행 결과 ]
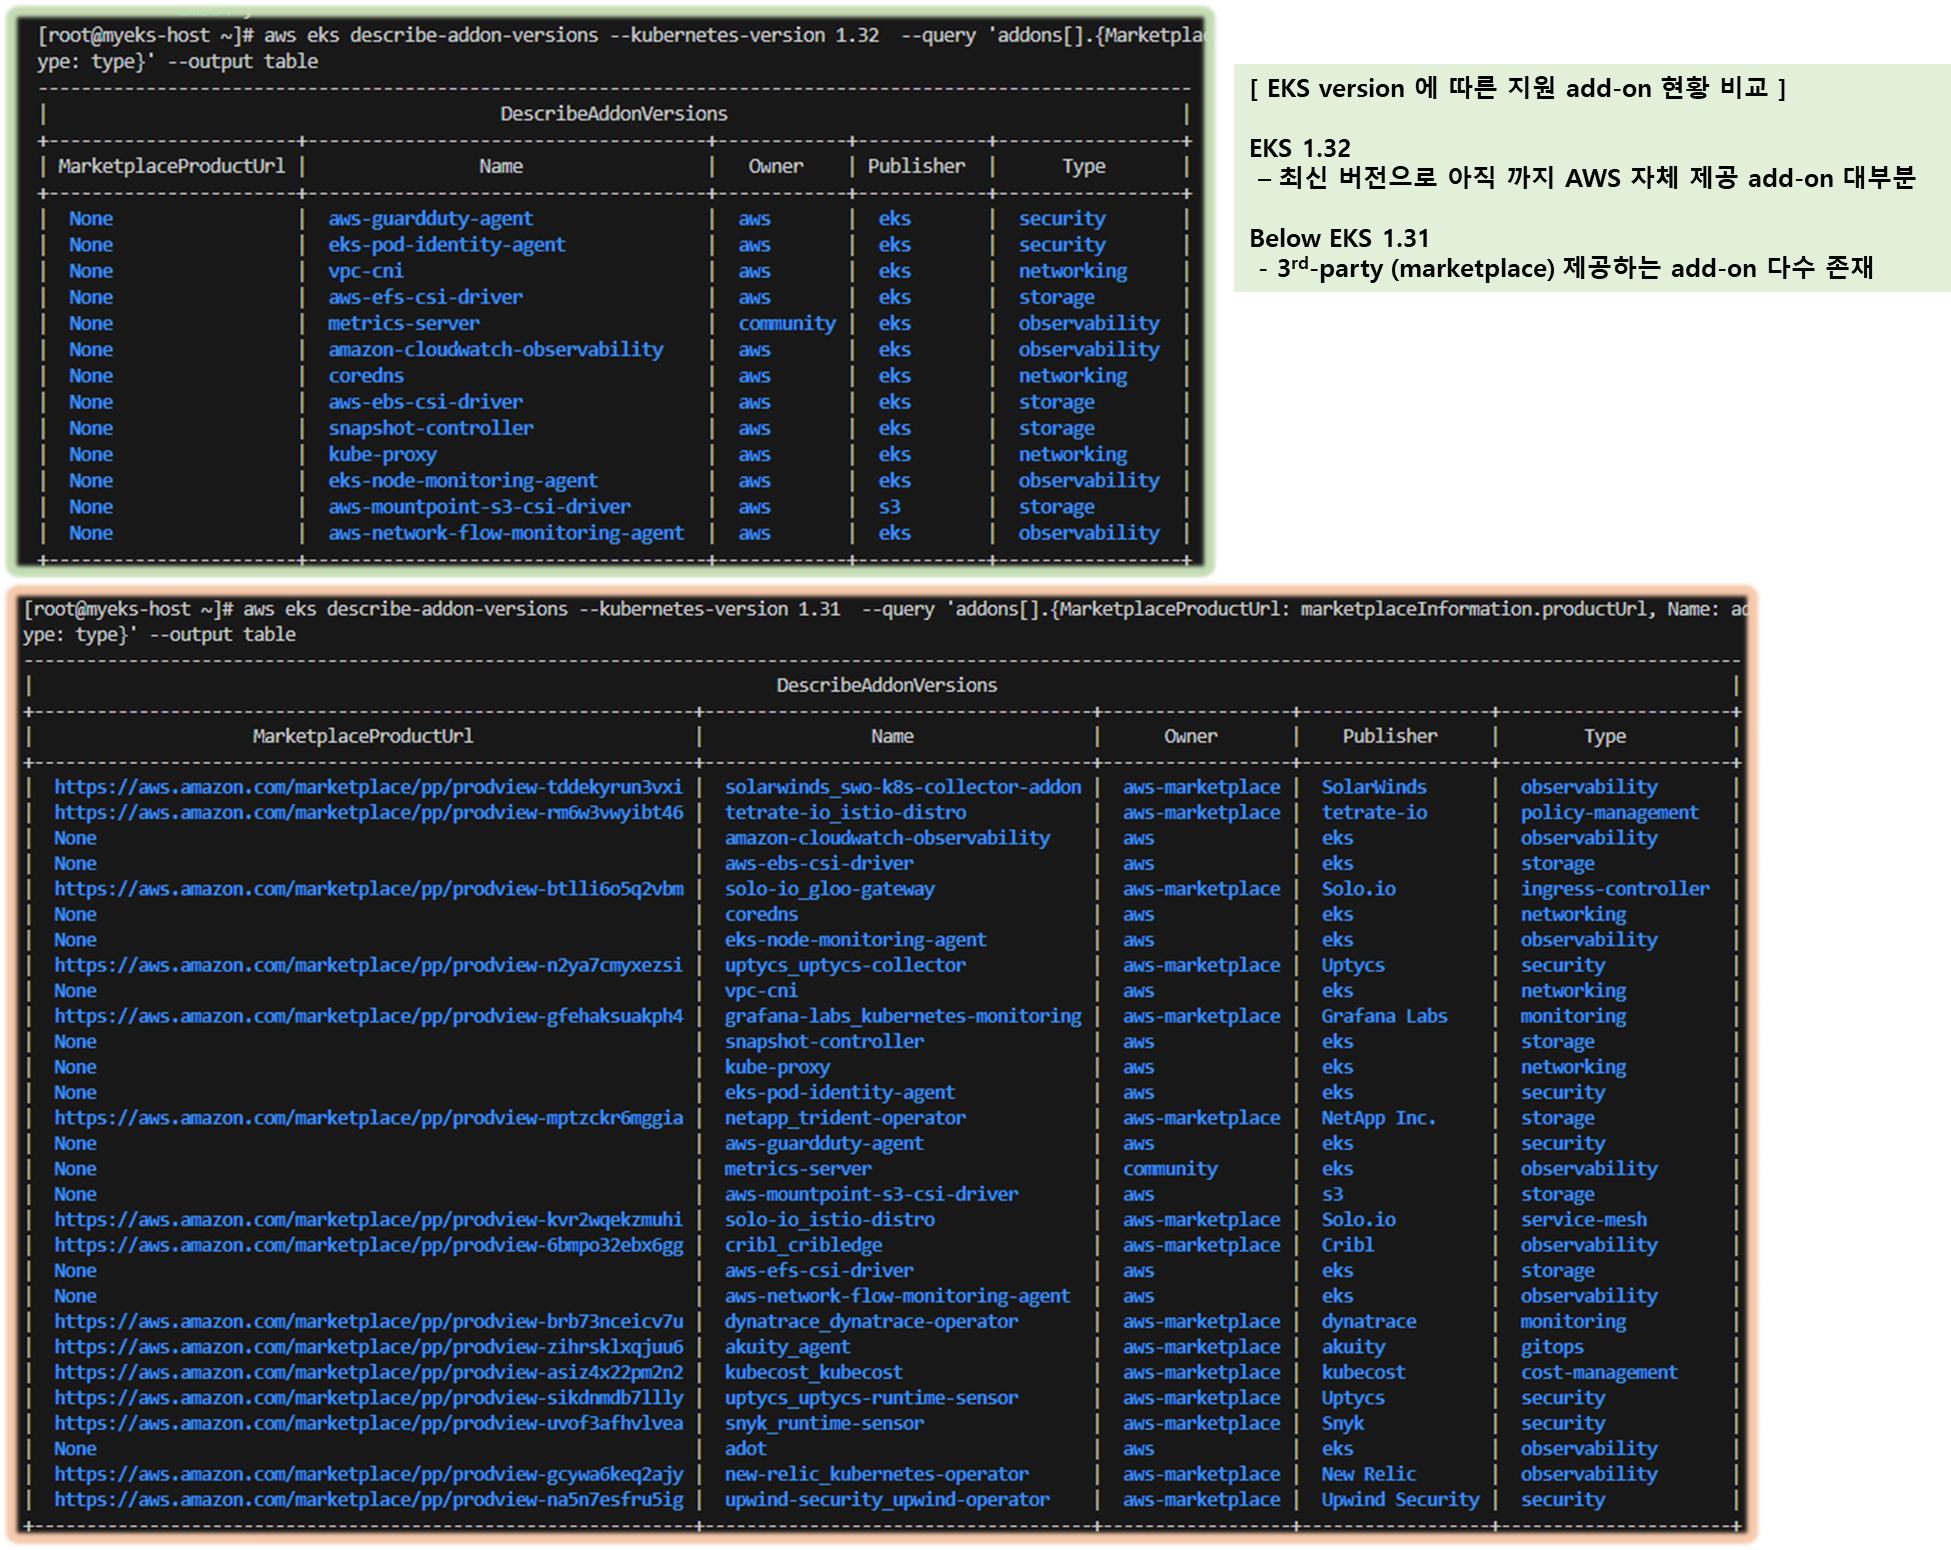
3) EKS Add-on 정보 확인
# EKS Addon 정보 확인
aws eks describe-addon-versions --kubernetes-version 1.32 --query 'addons[].{MarketplaceProductUrl: marketplaceInformation.productUrl, Name: addonName, Owner: owner Publisher: publisher, Type: type}' --output table
aws eks describe-addon-versions --kubernetes-version 1.31 --query 'addons[].{MarketplaceProductUrl: marketplaceInformation.productUrl, Name: addonName, Owner: owner Publisher: publisher, Type: type}' --output table
aws eks describe-addon-versions --kubernetes-version 1.30 --query 'addons[].{MarketplaceProductUrl: marketplaceInformation.productUrl, Name: addonName, Owner: owner Publisher: publisher, Type: type}' --output table
aws eks describe-addon-versions --kubernetes-version 1.29 --query 'addons[].{MarketplaceProductUrl: marketplaceInformation.productUrl, Name: addonName, Owner: owner Publisher: publisher, Type: type}' --output table
## wc -l 로 갯수 비교
aws eks describe-addon-versions --kubernetes-version 1.32 --query 'addons[].{MarketplaceProductUrl: marketplaceInformation.productUrl, Name: addonName, Owner: owner Publisher: publisher, Type: type}' --output text | wc -l
aws eks describe-addon-versions --kubernetes-version 1.31 --query 'addons[].{MarketplaceProductUrl: marketplaceInformation.productUrl, Name: addonName, Owner: owner Publisher: publisher, Type: type}' --output text | wc -l
aws eks describe-addon-versions --kubernetes-version 1.30 --query 'addons[].{MarketplaceProductUrl: marketplaceInformation.productUrl, Name: addonName, Owner: owner Publisher: publisher, Type: type}' --output text | wc -l
aws eks describe-addon-versions --kubernetes-version 1.29 --query 'addons[].{MarketplaceProductUrl: marketplaceInformation.productUrl, Name: addonName, Owner: owner Publisher: publisher, Type: type}' --output text | wc -l
aws eks describe-addon-versions --kubernetes-version 1.28 --query 'addons[].{MarketplaceProductUrl: marketplaceInformation.productUrl, Name: addonName, Owner: owner Publisher: publisher, Type: type}' --output text | wc -l
aws eks describe-addon-versions --kubernetes-version 1.27 --query 'addons[].{MarketplaceProductUrl: marketplaceInformation.productUrl, Name: addonName, Owner: owner Publisher: publisher, Type: type}' --output text | wc -l
# EKS Add-on 별 전체 버전 정보 확인
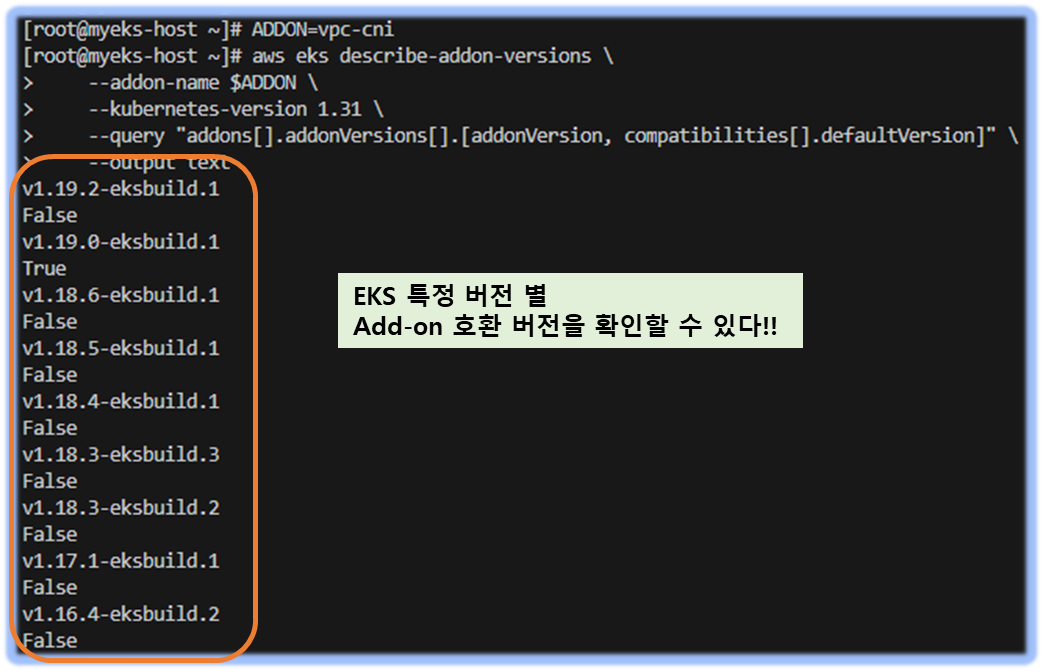
ADDON=<add-on 이름>
ADDON=vpc-cni
# 아래는 vpc-cni 전체 버전 정보와 기본 설치 버전(True) 정보 확인
aws eks describe-addon-versions \
--addon-name $ADDON \
--kubernetes-version 1.31 \
--query "addons[].addonVersions[].[addonVersion, compatibilities[].defaultVersion]" \
--output text
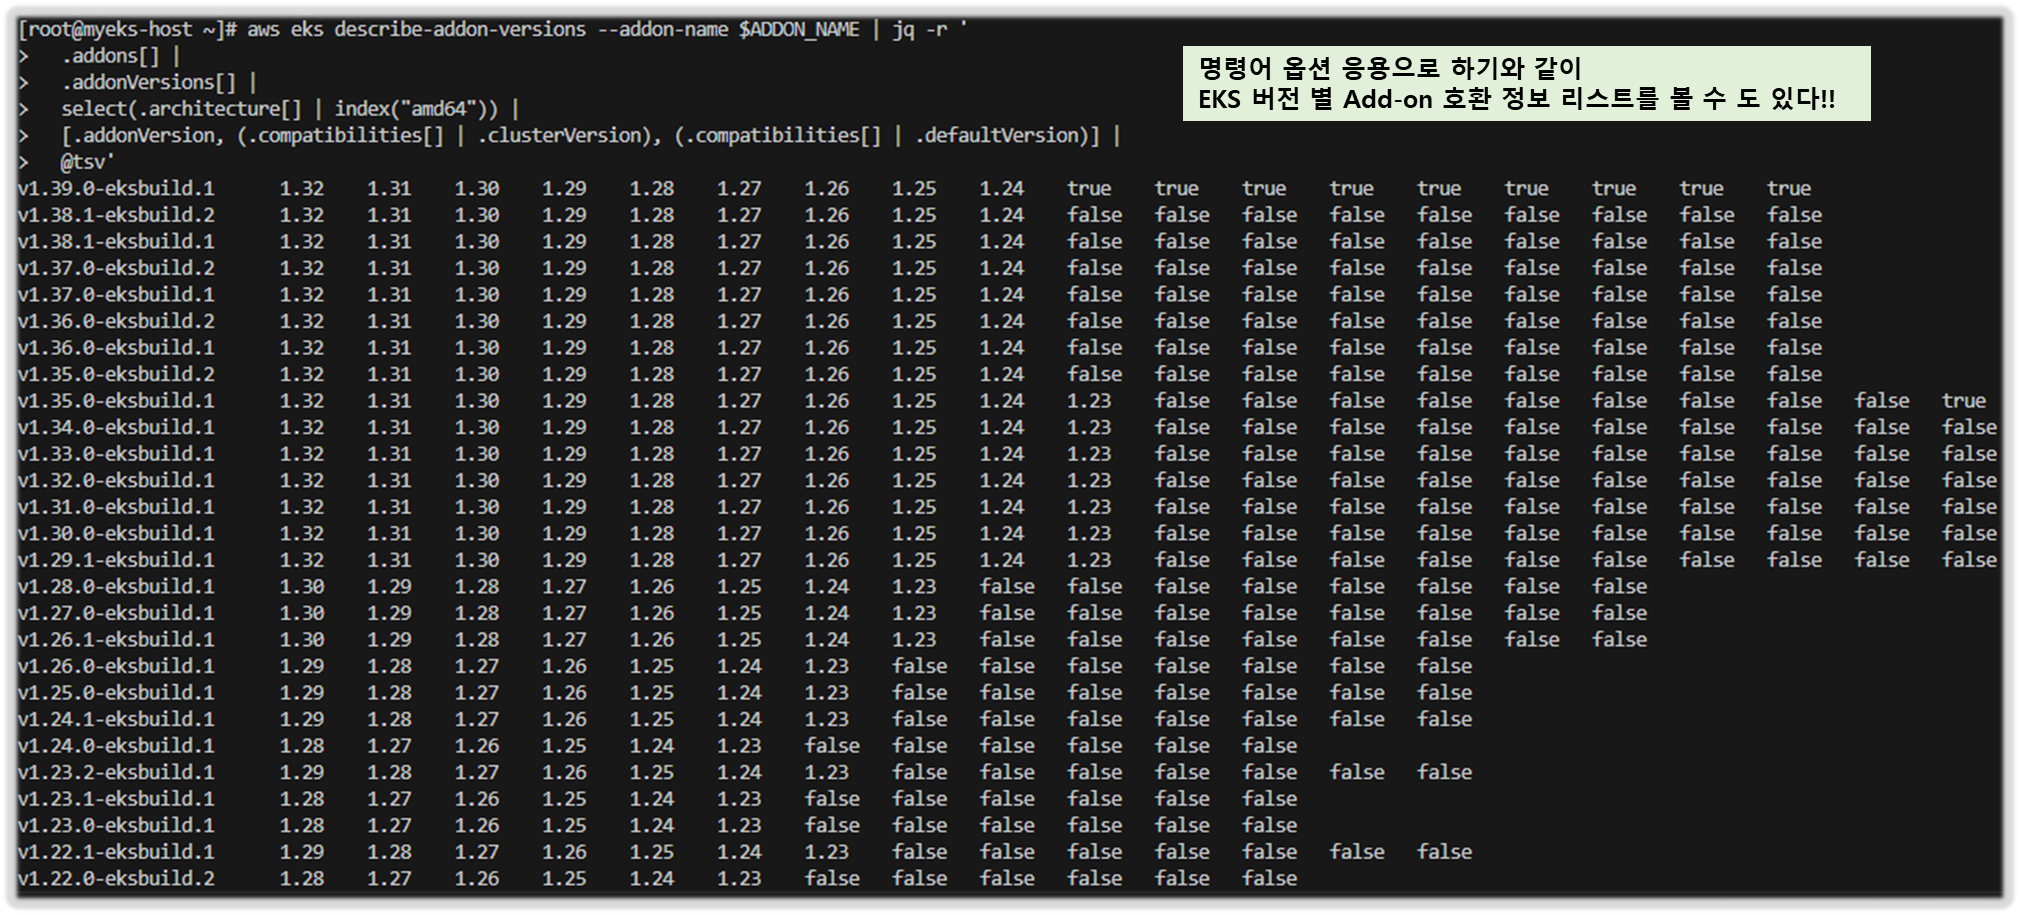
# EKS 애드온의 버전별로 호환되는 EKS 버전을 확인하는 스크립트 https://malwareanalysis.tistory.com/760
ADDON_NAME=aws-ebs-csi-driver
aws eks describe-addon-versions --addon-name $ADDON_NAME | jq -r '
.addons[] |
.addonVersions[] |
select(.architecture[] | index("amd64")) |
[.addonVersion, (.compatibilities[] | .clusterVersion), (.compatibilities[] | .defaultVersion)] |
@tsv'
[ 실행 결과 ]
☞ 운영 안정성을 위해 latest 보다는 1~2 버전 이전의 검증된 버전을 사용하는 것을 권장!!
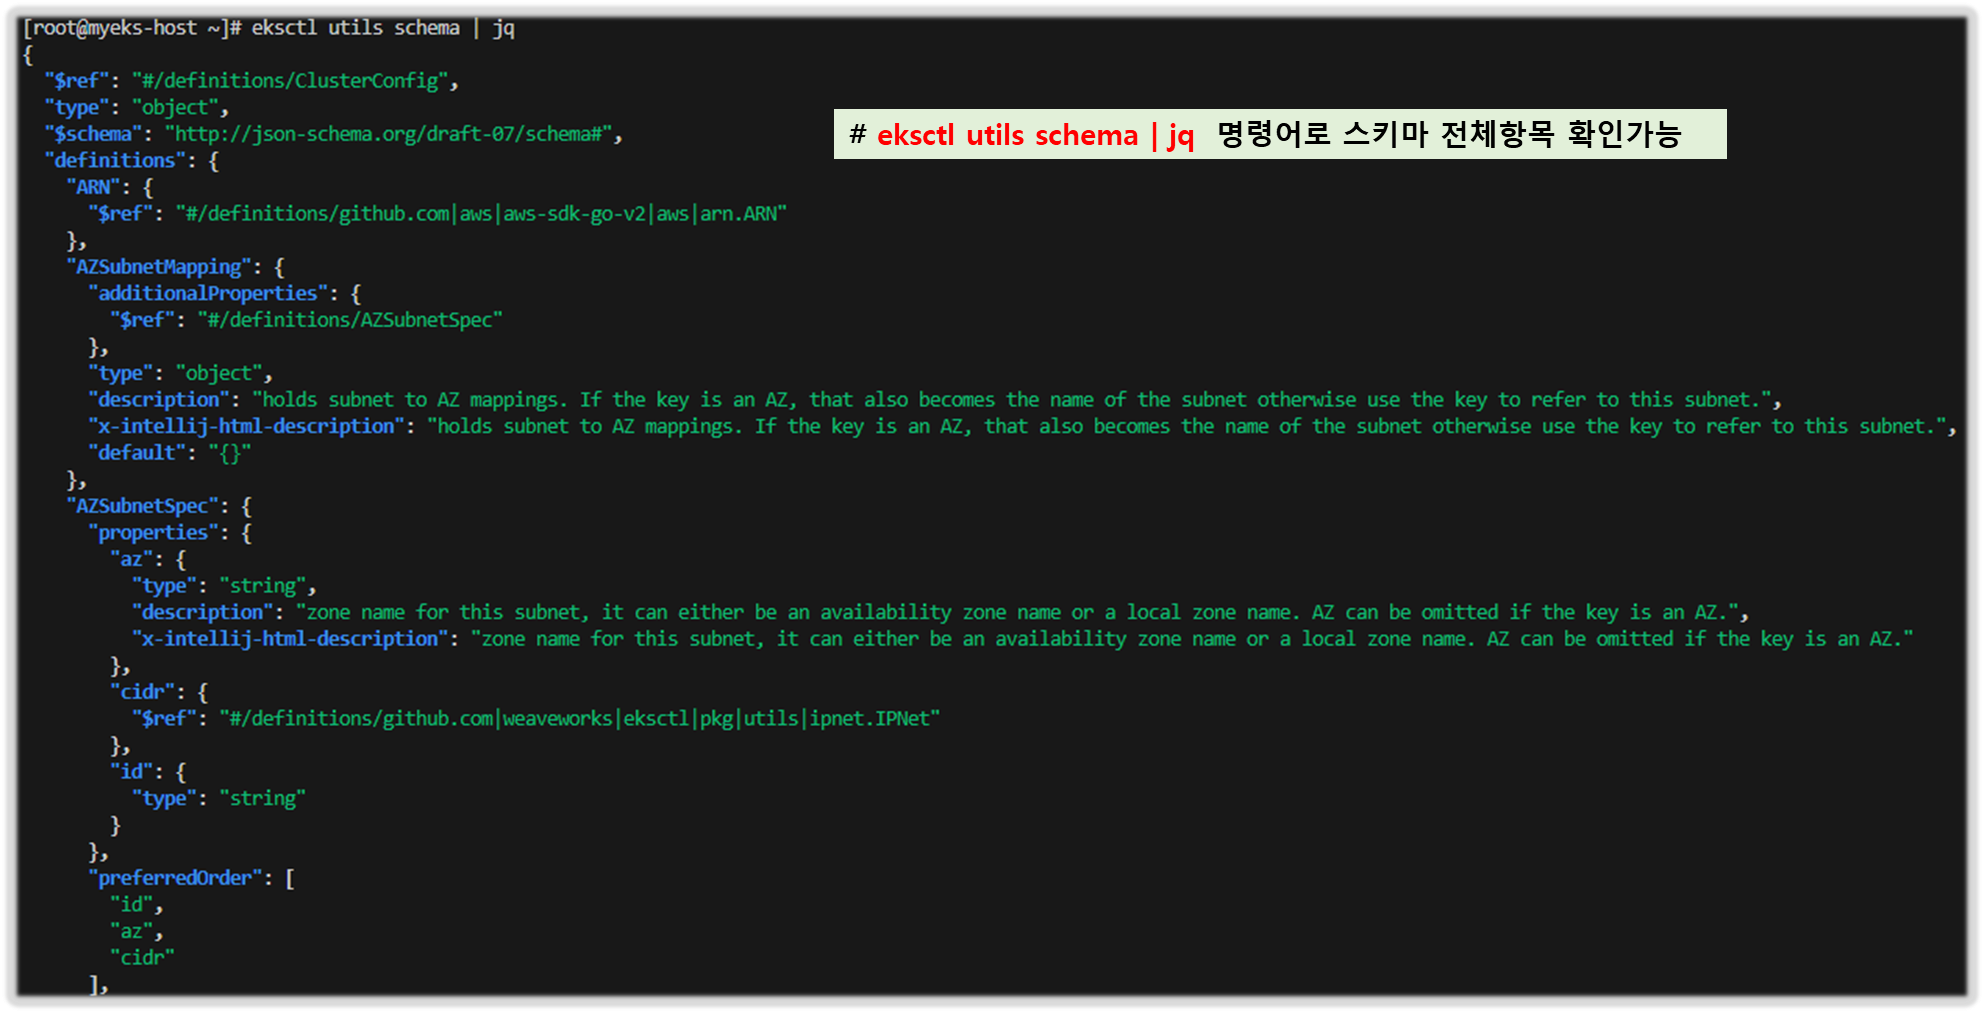
4) eksctl 사용 연습 : --dry-run 실제 배포는 하지 않음 - Link , Schema*(항목 살펴보기) , Example
# eksctl help
eksctl
eksctl create
eksctl create cluster --help
eksctl create nodegroup --help
eksctl utils schema | jq
# 현재 지원 버전 정보 확인
eksctl create cluster -h | grep version
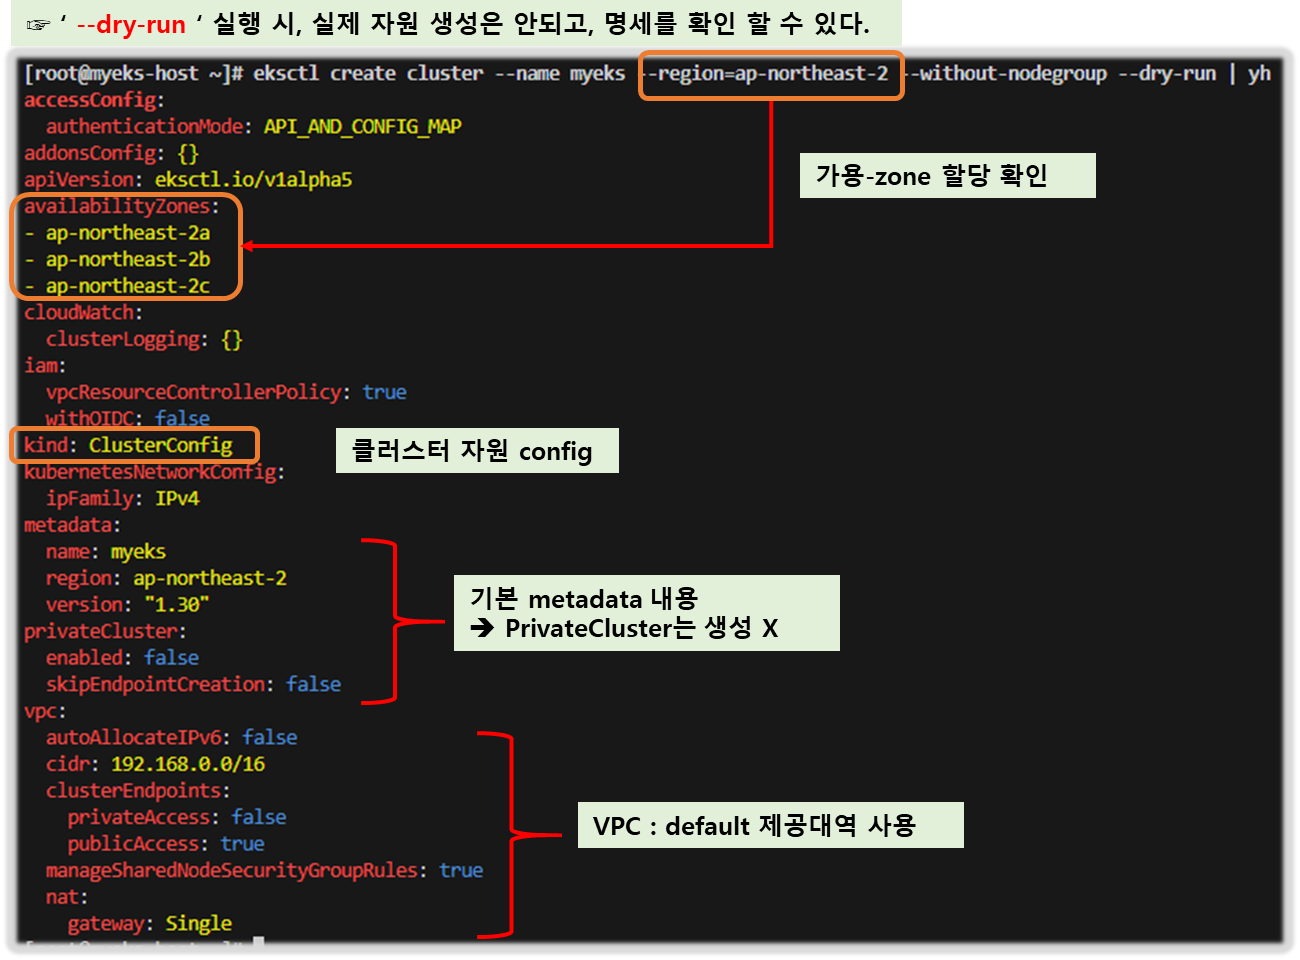
# eks 클러스터 생성 + 노드그룹없이
eksctl create cluster --name myeks --region=ap-northeast-2 --without-nodegroup --dry-run | yh
apiVersion: eksctl.io/v1alpha5
availabilityZones:
- ap-northeast-2c
- ap-northeast-2d
- ap-northeast-2a
...
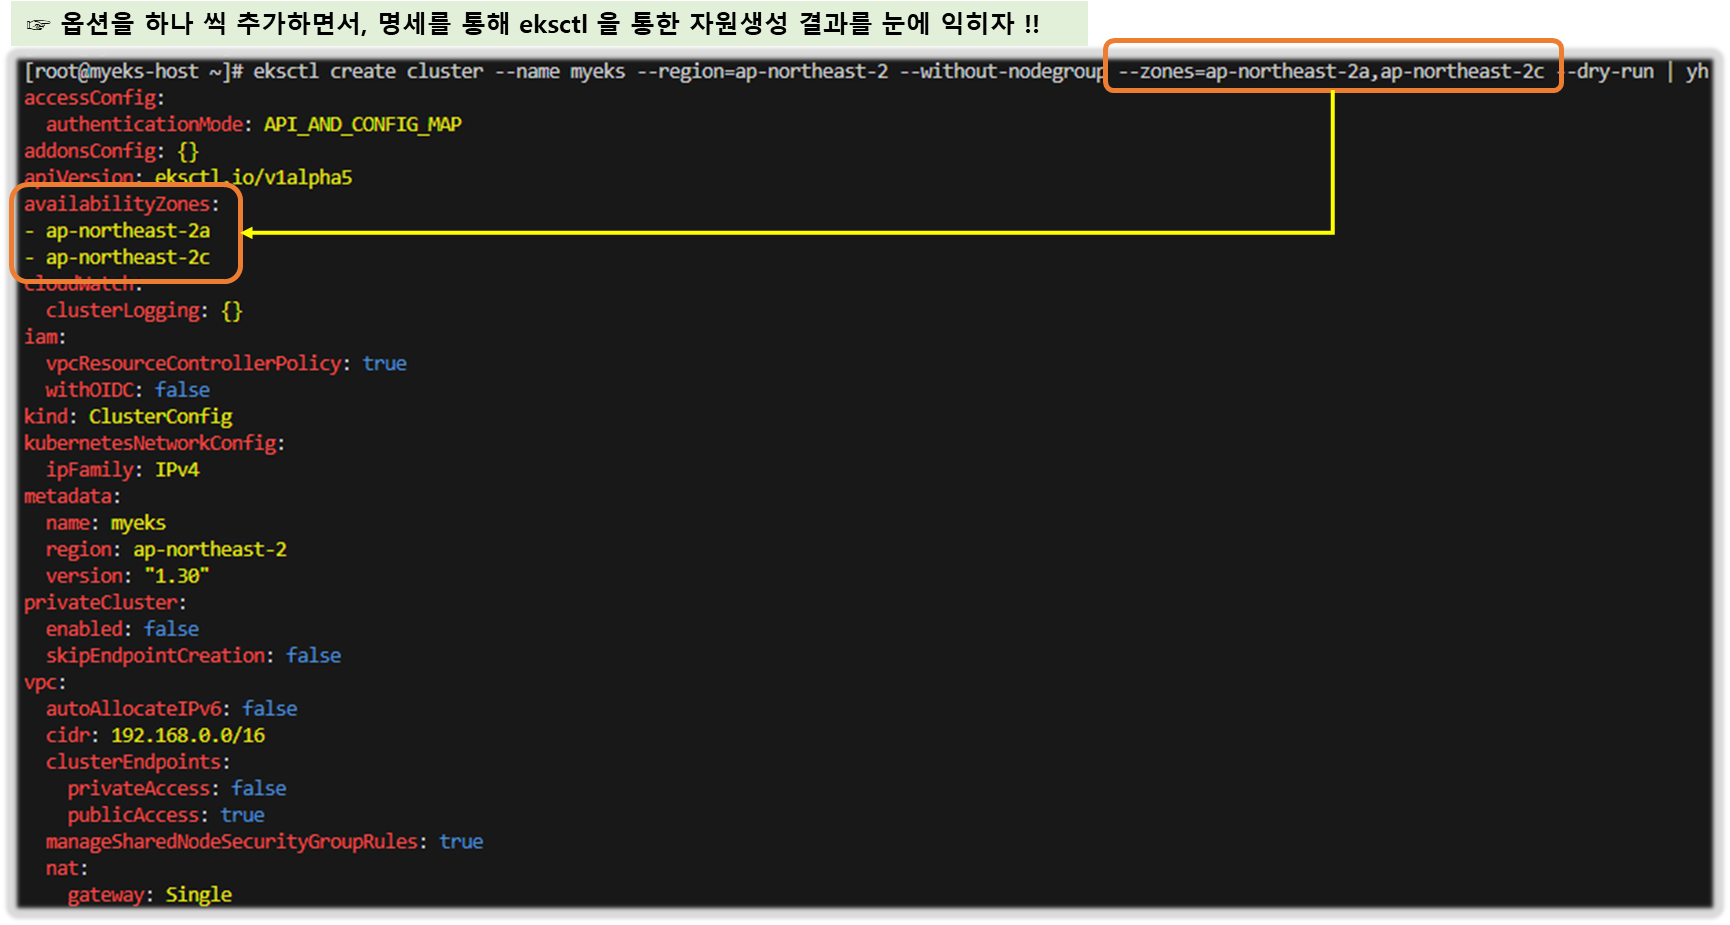
# eks 클러스터 생성 + 노드그룹없이 & 사용 가용영역(2a,2c)
eksctl create cluster --name myeks --region=ap-northeast-2 --without-nodegroup --zones=ap-northeast-2a,ap-northeast-2c --dry-run | yh
apiVersion: eksctl.io/v1alpha5
availabilityZones:
- ap-northeast-2a
- ap-northeast-2c
...
# eks 클러스터 생성 + 관리형노드그룹생성(이름, 인스턴스 타입, EBS볼륨사이즈) & 사용 가용영역(2a,2c) + VPC 대역 지정
eksctl create cluster --name myeks --region=ap-northeast-2 --nodegroup-name=mynodegroup --node-type=t3.medium --node-volume-size=30 \
--zones=ap-northeast-2a,ap-northeast-2c --vpc-cidr=172.20.0.0/16 --dry-run | yh
...
managedNodeGroups:
- amiFamily: AmazonLinux2
desiredCapacity: 2
disableIMDSv1: true
disablePodIMDS: false
iam:
withAddonPolicies:
albIngress: false
appMesh: false
appMeshPreview: false
autoScaler: false
awsLoadBalancerController: false
certManager: false
cloudWatch: false
ebs: false
efs: false
externalDNS: false
fsx: false
imageBuilder: false
xRay: false
instanceSelector: {}
instanceType: t3.medium
labels:
alpha.eksctl.io/cluster-name: myeks
alpha.eksctl.io/nodegroup-name: mynodegroup
maxSize: 2
minSize: 2
name: mynodegroup
privateNetworking: false
releaseVersion: ""
securityGroups:
withLocal: null
withShared: null
ssh:
allow: false
publicKeyPath: ""
tags:
alpha.eksctl.io/nodegroup-name: mynodegroup
alpha.eksctl.io/nodegroup-type: managed
volumeIOPS: 3000
volumeSize: 30
volumeThroughput: 125
volumeType: gp3
metadata:
name: myeks
region: ap-northeast-2
version: "1.30"
privateCluster:
enabled: false
skipEndpointCreation: false
vpc:
autoAllocateIPv6: false
cidr: 172.20.0.0/16
clusterEndpoints:
privateAccess: false
publicAccess: true
manageSharedNodeSecurityGroupRules: true
nat:
gateway: Single
# eks 클러스터 생성 + 관리형노드그룹생성(AMI:Ubuntu 20.04, 이름, 인스턴스 타입, EBS볼륨사이즈, SSH접속허용) & 사용 가용영역(2a,2c) + VPC 대역 지정
eksctl create cluster --name myeks --region=ap-northeast-2 --nodegroup-name=mynodegroup --node-type=t3.medium --node-volume-size=30 \
--zones=ap-northeast-2a,ap-northeast-2c --vpc-cidr=172.20.0.0/16 --ssh-access --node-ami-family Ubuntu2004 --dry-run | yh
...
managedNodeGroups:
- amiFamily: Ubuntu2004
...
ssh:
allow: true
publicKeyPath: ~/.ssh/id_rsa.pub
[ 실행 결과 ]

1. Controlplane 배포 실습
▶ 사전 환경파일 확인 ( /etc/profile - Region/Cluster_name, Public Subnet ) 후, 배포진행
# 변수 확인***
echo $AWS_DEFAULT_REGION
echo $CLUSTER_NAME
echo $VPCID
echo $PubSubnet1,$PubSubnet2
# 옵션 [터미널1] EC2 생성 모니터링
while true; do aws ec2 describe-instances --query "Reservations[*].Instances[*].{PublicIPAdd:PublicIpAddress,PrivateIPAdd:PrivateIpAddress,InstanceName:Tags[?Key=='Name']|[0].Value,Status:State.Name}" --filters Name=instance-state-name,Values=running --output text ; echo "------------------------------" ; sleep 1; done
aws ec2 describe-instances --query "Reservations[*].Instances[*].{PublicIPAdd:PublicIpAddress,PrivateIPAdd:PrivateIpAddress,InstanceName:Tags[?Key=='Name']|[0].Value,Status:State.Name}" --filters Name=instance-state-name,Values=running --output table
# eks 클러스터 & 관리형노드그룹 배포 전 정보 확인
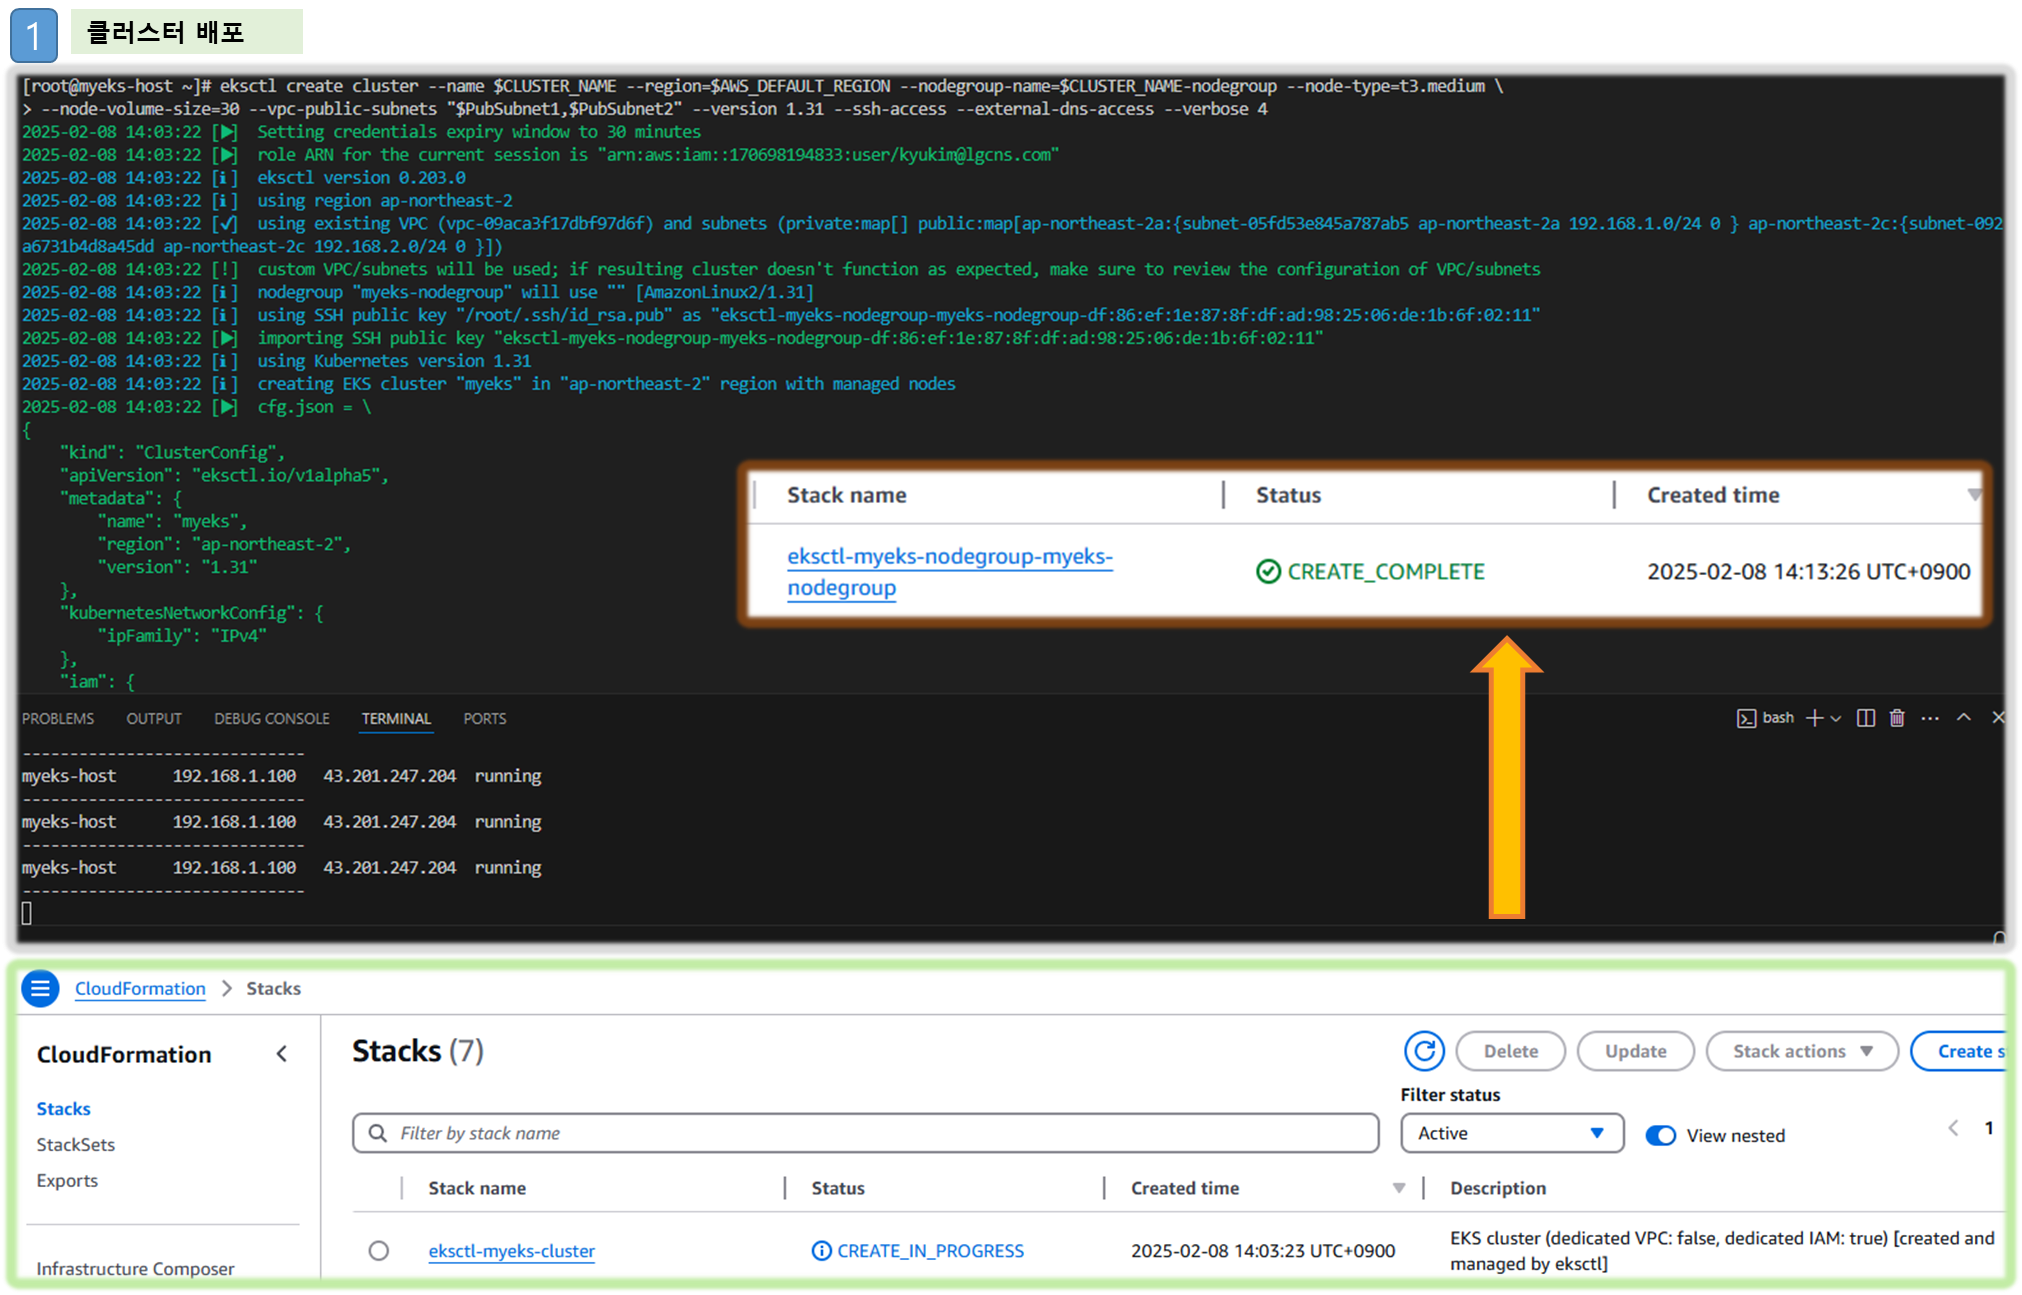
eksctl create cluster --name $CLUSTER_NAME --region=$AWS_DEFAULT_REGION --nodegroup-name=$CLUSTER_NAME-nodegroup --node-type=t3.medium \
--node-volume-size=30 --vpc-public-subnets "$PubSubnet1,$PubSubnet2" --version 1.31 --ssh-access --external-dns-access --dry-run | yh
...
vpc:
autoAllocateIPv6: false
cidr: 192.168.0.0/16
clusterEndpoints:
privateAccess: false
publicAccess: true
id: vpc-0505d154771a3dfdf
manageSharedNodeSecurityGroupRules: true
nat:
gateway: Disable
subnets:
public:
ap-northeast-2a:
az: ap-northeast-2a
cidr: 192.168.1.0/24
id: subnet-0d98bee5a7c0dfcc6
ap-northeast-2c:
az: ap-northeast-2c
cidr: 192.168.2.0/24
id: subnet-09dc49de8d899aeb7
# eks 클러스터 & 관리형노드그룹 배포: 총 15분 소요
eksctl create cluster --name $CLUSTER_NAME --region=$AWS_DEFAULT_REGION --nodegroup-name=$CLUSTER_NAME-nodegroup --node-type=t3.medium \
--node-volume-size=30 --vpc-public-subnets "$PubSubnet1,$PubSubnet2" --version 1.31 --ssh-access --external-dns-access --verbose 4
...
023-04-23 01:32:22 [▶] setting current-context to admin@myeks.ap-northeast-2.eksctl.io
2023-04-23 01:32:22 [✔] saved kubeconfig as "/root/.kube/config"
...
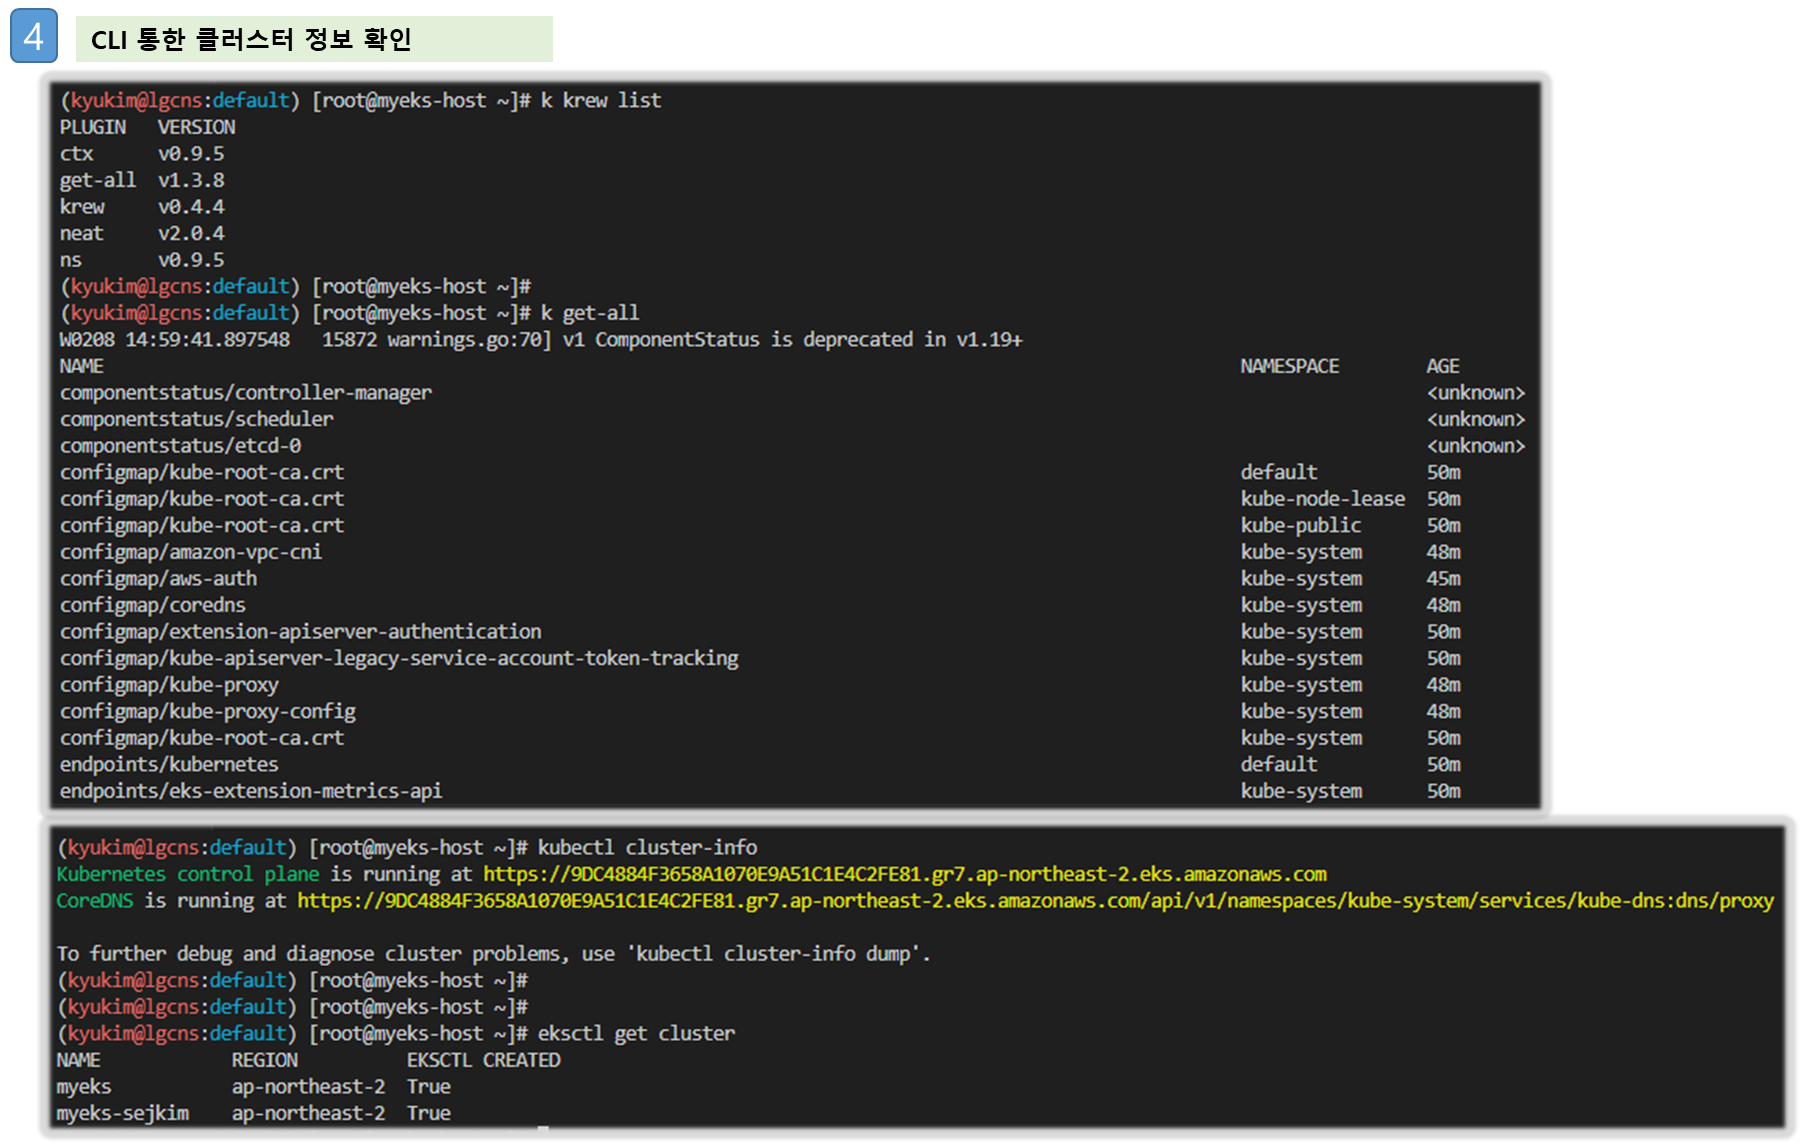
▶ eks 정보 확인
# krew 플러그인 확인
kubectl krew list
kubectl ctx
kubectl ns
kubectl ns default
kubectl get-all # 모든 네임스페이스에서 모든 리소스 확인
# eks 클러스터 정보 확인
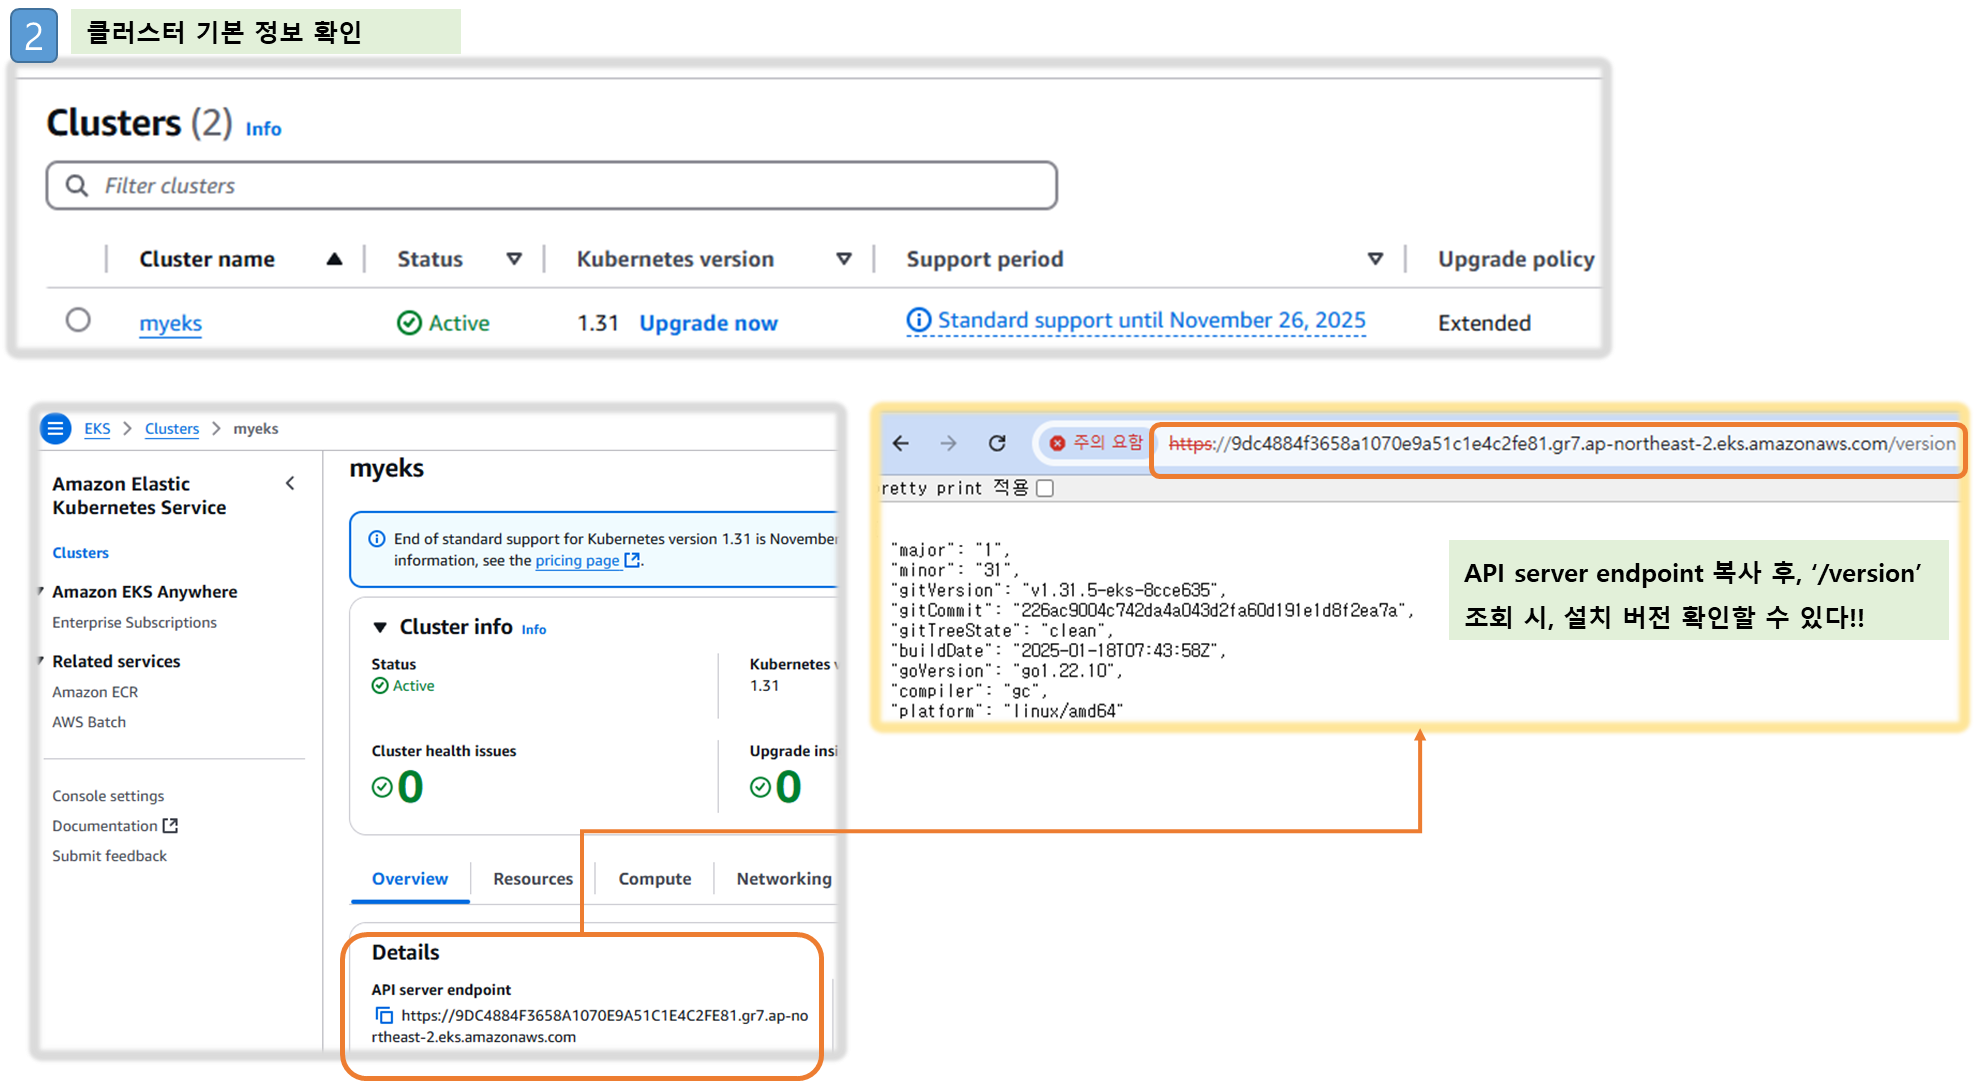
kubectl cluster-info
Kubernetes control plane is running at https://50E14FE698DE0E5CA2055F72AB086163.gr7.ap-northeast-2.eks.amazonaws.com
...
eksctl get cluster
aws eks describe-cluster --name $CLUSTER_NAME | jq
aws eks describe-cluster --name $CLUSTER_NAME | jq -r .cluster.endpoint
https://50E14FE698DE0E5CA2055F72AB086163.gr7.ap-northeast-2.eks.amazonaws.com
## dig 조회 : 해당 IP 소유 리소스는 어떤것일까요? : 자신의 PC에서도 해당 도메인 질의 조회 해보자
APIDNS=$(aws eks describe-cluster --name $CLUSTER_NAME | jq -r .cluster.endpoint | cut -d '/' -f 3)
dig +short $APIDNS
# eks API 접속 시도 : 도메인 or 출력되는 ip 주소로 https://<IP>/version 외부에서도 접속 가능!
curl -k -s $(aws eks describe-cluster --name $CLUSTER_NAME | jq -r .cluster.endpoint)
curl -k -s $(aws eks describe-cluster --name $CLUSTER_NAME | jq -r .cluster.endpoint)/version | jq
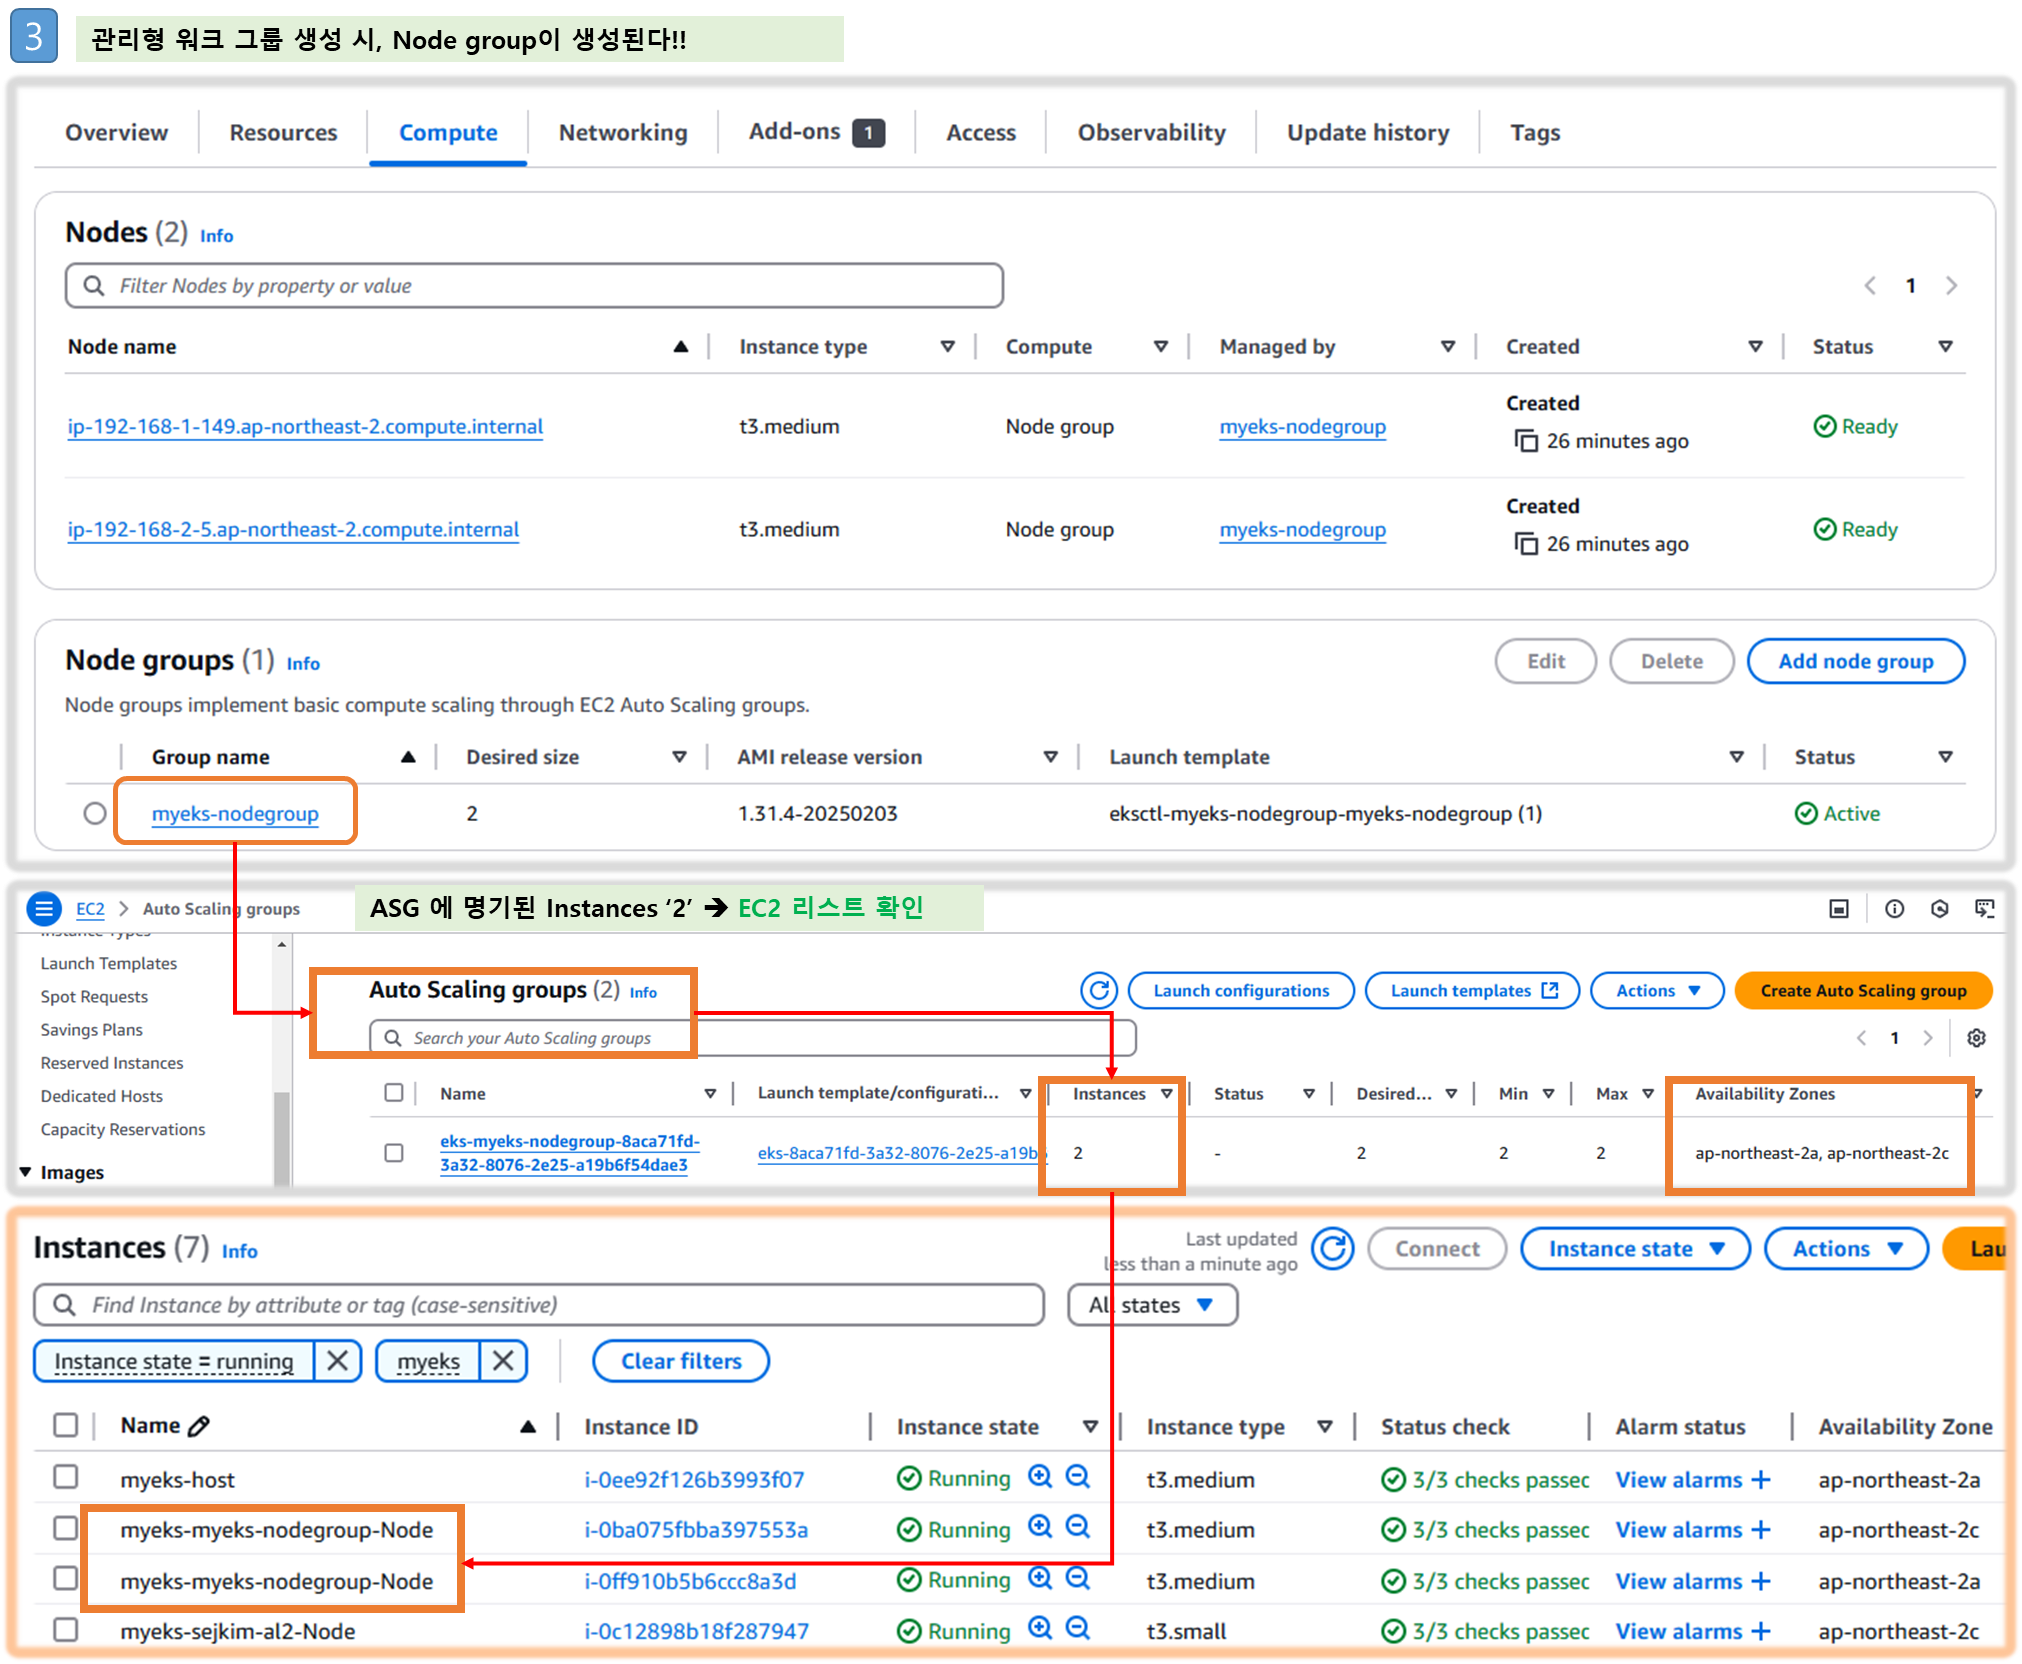
# eks 노드 그룹 정보 확인
eksctl get nodegroup --cluster $CLUSTER_NAME --name $CLUSTER_NAME-nodegroup
aws eks describe-nodegroup --cluster-name $CLUSTER_NAME --nodegroup-name $CLUSTER_NAME-nodegroup | jq
# 노드 정보 확인 : OS와 컨테이너런타임 확인
kubectl get node --label-columns=node.kubernetes.io/instance-type,eks.amazonaws.com/capacityType,topology.kubernetes.io/zone
kubectl get node --label-columns=node.kubernetes.io/instance-type
kubectl get node
kubectl get node -owide
# 노드의 capacityType 확인
kubectl get node --label-columns=eks.amazonaws.com/capacityType
NAME STATUS ROLES AGE VERSION CAPACITYTYPE
ip-192-168-1-76.ap-northeast-2.compute.internal Ready <none> 19m v1.24.11-eks-a59e1f0 ON_DEMAND
ip-192-168-2-21.ap-northeast-2.compute.internal Ready <none> 19m v1.24.11-eks-a59e1f0 ON_DEMAND
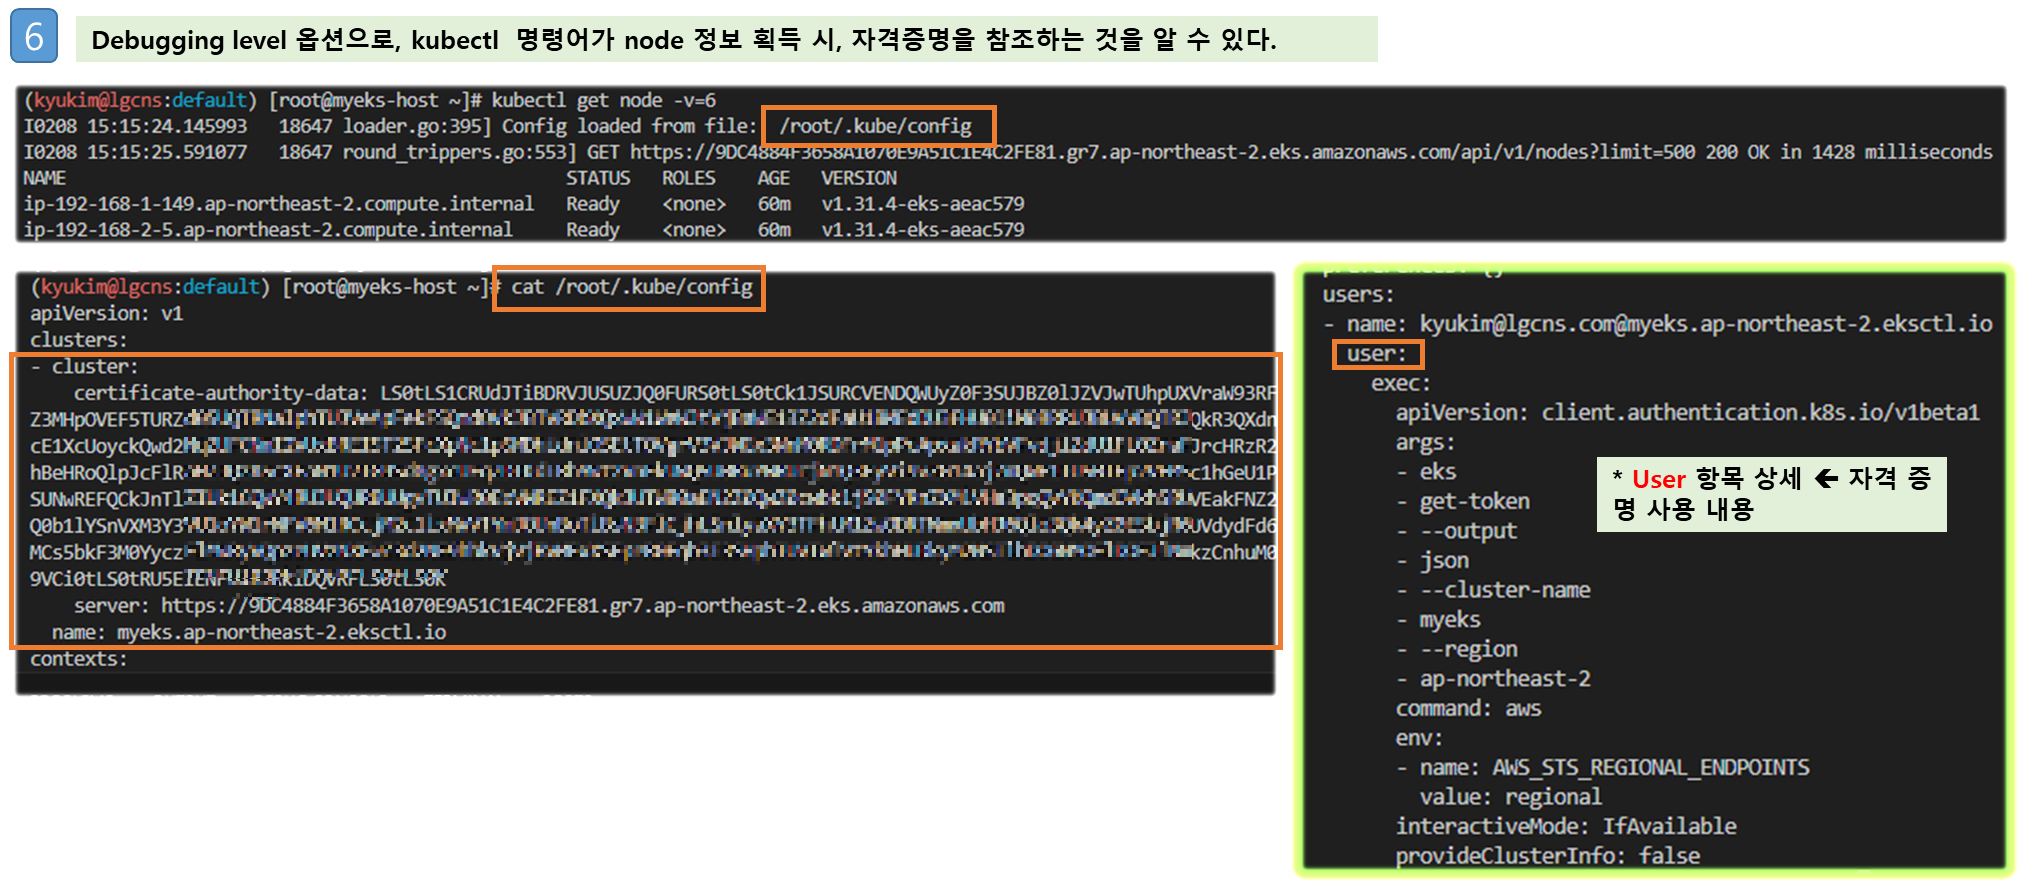
# 인증 정보 확인 : 자세한 정보는 보안에서 다룸
kubectl get node -v=6
I0423 02:00:38.691443 5535 loader.go:374] Config loaded from file: /root/.kube/config
I0423 02:00:39.519097 5535 round_trippers.go:553] GET https://C813D20E6263FBDC356E60D2971FCBA7.gr7.ap-northeast-2.eks.amazonaws.com/api/v1/nodes?limit=500 200 OK in 818 milliseconds
...
cat /root/.kube/config
kubectl config view
kubectl ctx
## Get a token for authentication with an Amazon EKS cluster
aws eks get-token help
aws eks get-token --cluster-name $CLUSTER_NAME --region $AWS_DEFAULT_REGION
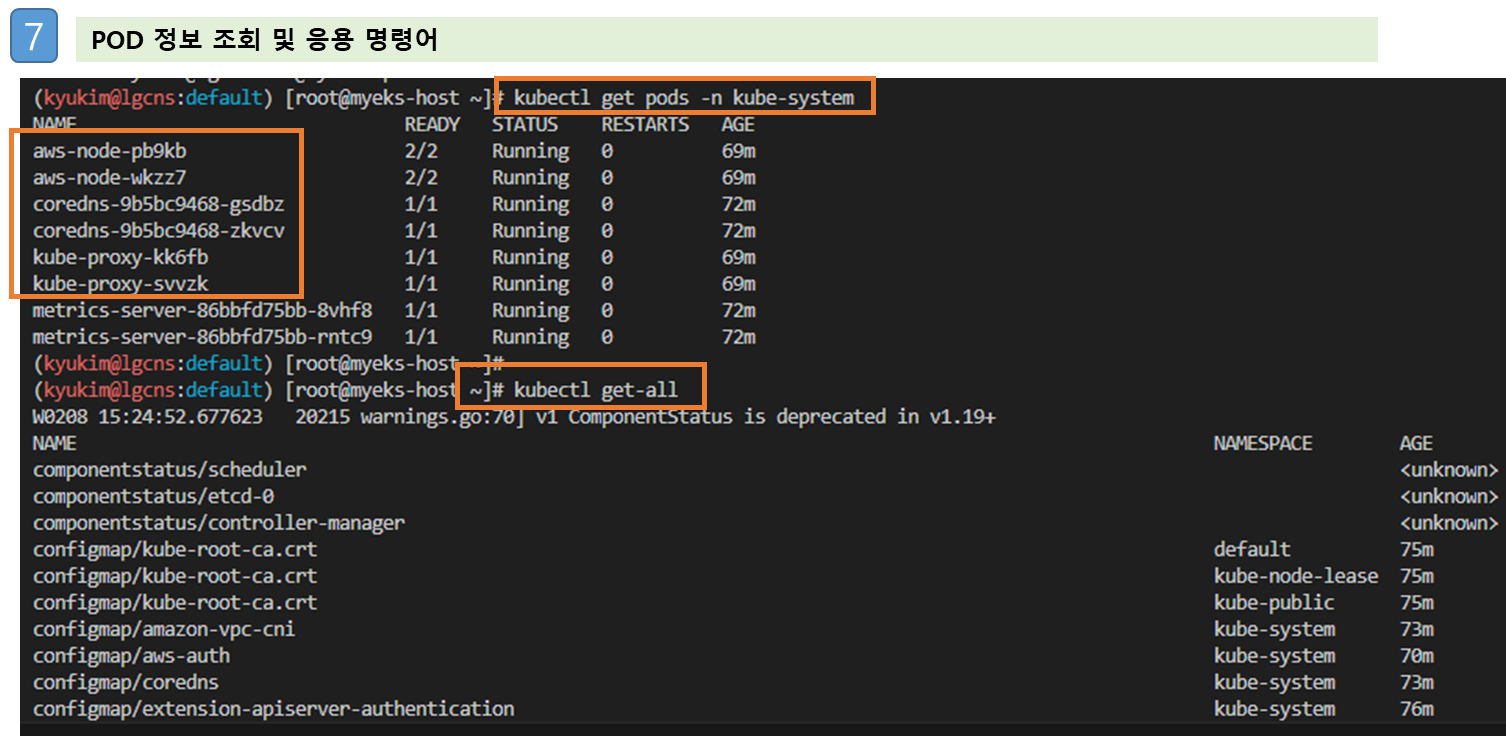
# 파드 정보 확인 : 온프레미스 쿠버네티스의 파드 배치와 다른점은? , 파드의 IP의 특징이 어떤가요? 자세한 네트워크는 2주차에서 다룸
kubectl get pod -n kube-system
kubectl get pod -n kube-system -o wide
kubectl get pod -A
kubectl top node
kubectl top pod -A
# kube-system 네임스페이스에 모든 리소스 확인
kubectl get-all -n kube-system
# 현재 네임스페이스에서 모든 리소스 확인
kubectl get-all
# 모든 파드의 컨테이너 이미지 정보 확인
kubectl get pods --all-namespaces -o jsonpath="{.items[*].spec.containers[*].image}" | tr -s '[[:space:]]' '\n' | sort | uniq -c
2 602401143452.dkr.ecr.ap-northeast-2.amazonaws.com/amazon-k8s-cni:v1.19.0-eksbuild.1
2 602401143452.dkr.ecr.ap-northeast-2.amazonaws.com/amazon/aws-network-policy-agent:v1.1.5-eksbuild.1
2 602401143452.dkr.ecr.ap-northeast-2.amazonaws.com/eks/coredns:v1.11.3-eksbuild.1
2 602401143452.dkr.ecr.ap-northeast-2.amazonaws.com/eks/kube-proxy:v1.31.2-minimal-eksbuild.3
2 602401143452.dkr.ecr.ap-northeast-2.amazonaws.com/eks/metrics-server:v0.7.2-eksbuild.1
# AWS ECR에서 컨테이너 이미지 가져오기 시도
docker pull 602401143452.dkr.ecr.ap-northeast-2.amazonaws.com/eks/coredns:v1.11.3-eksbuild.1
[ 실습 결과 - 한 눈에 보기 ]
- AWS CloudFormation 확인해보기 → AWS EKS 확인해보기 → AWS EC2 확인해보기 → AWS EC2 ASG 확인해보기

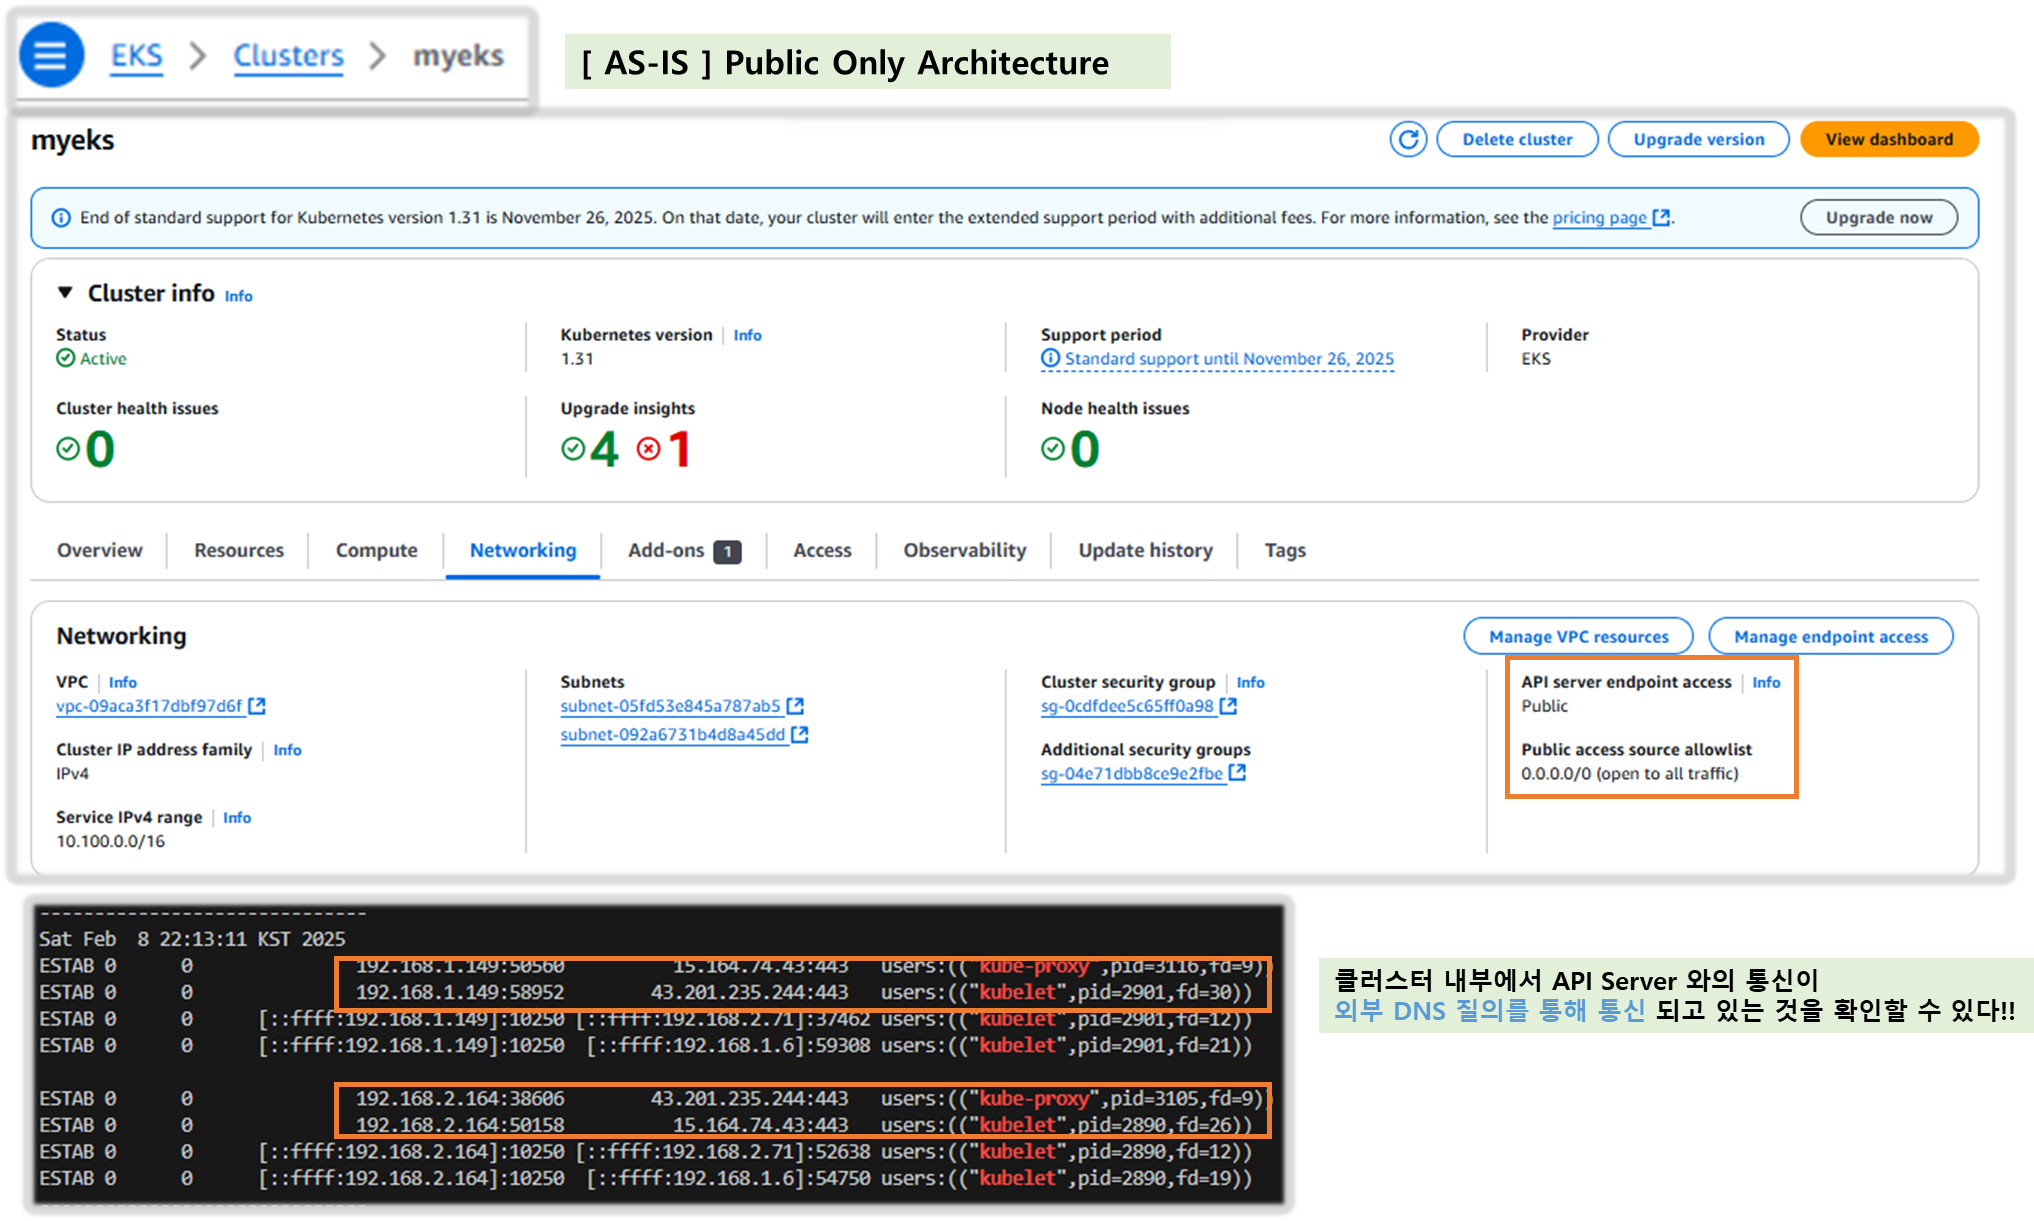
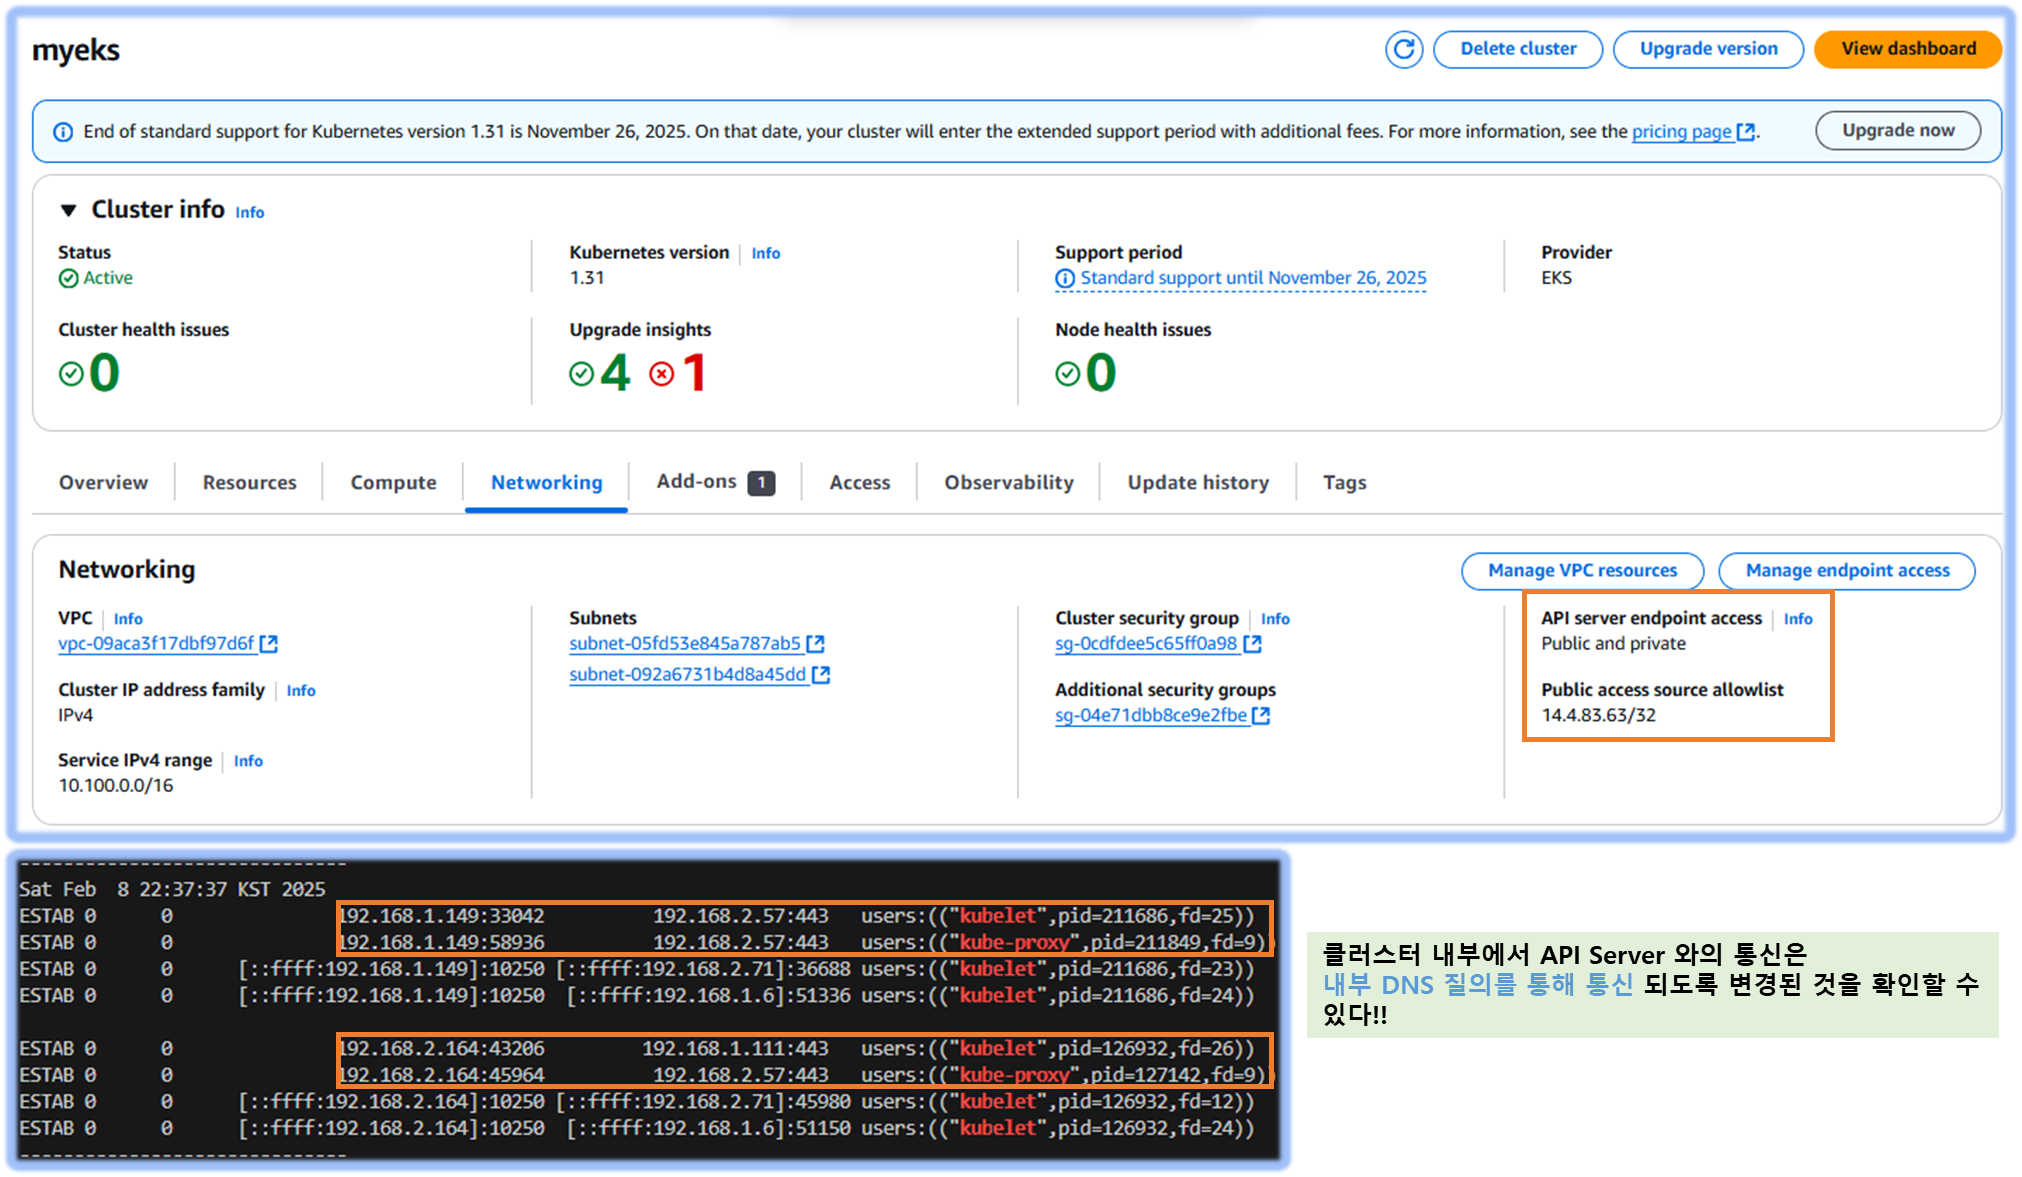
2. EndPoint
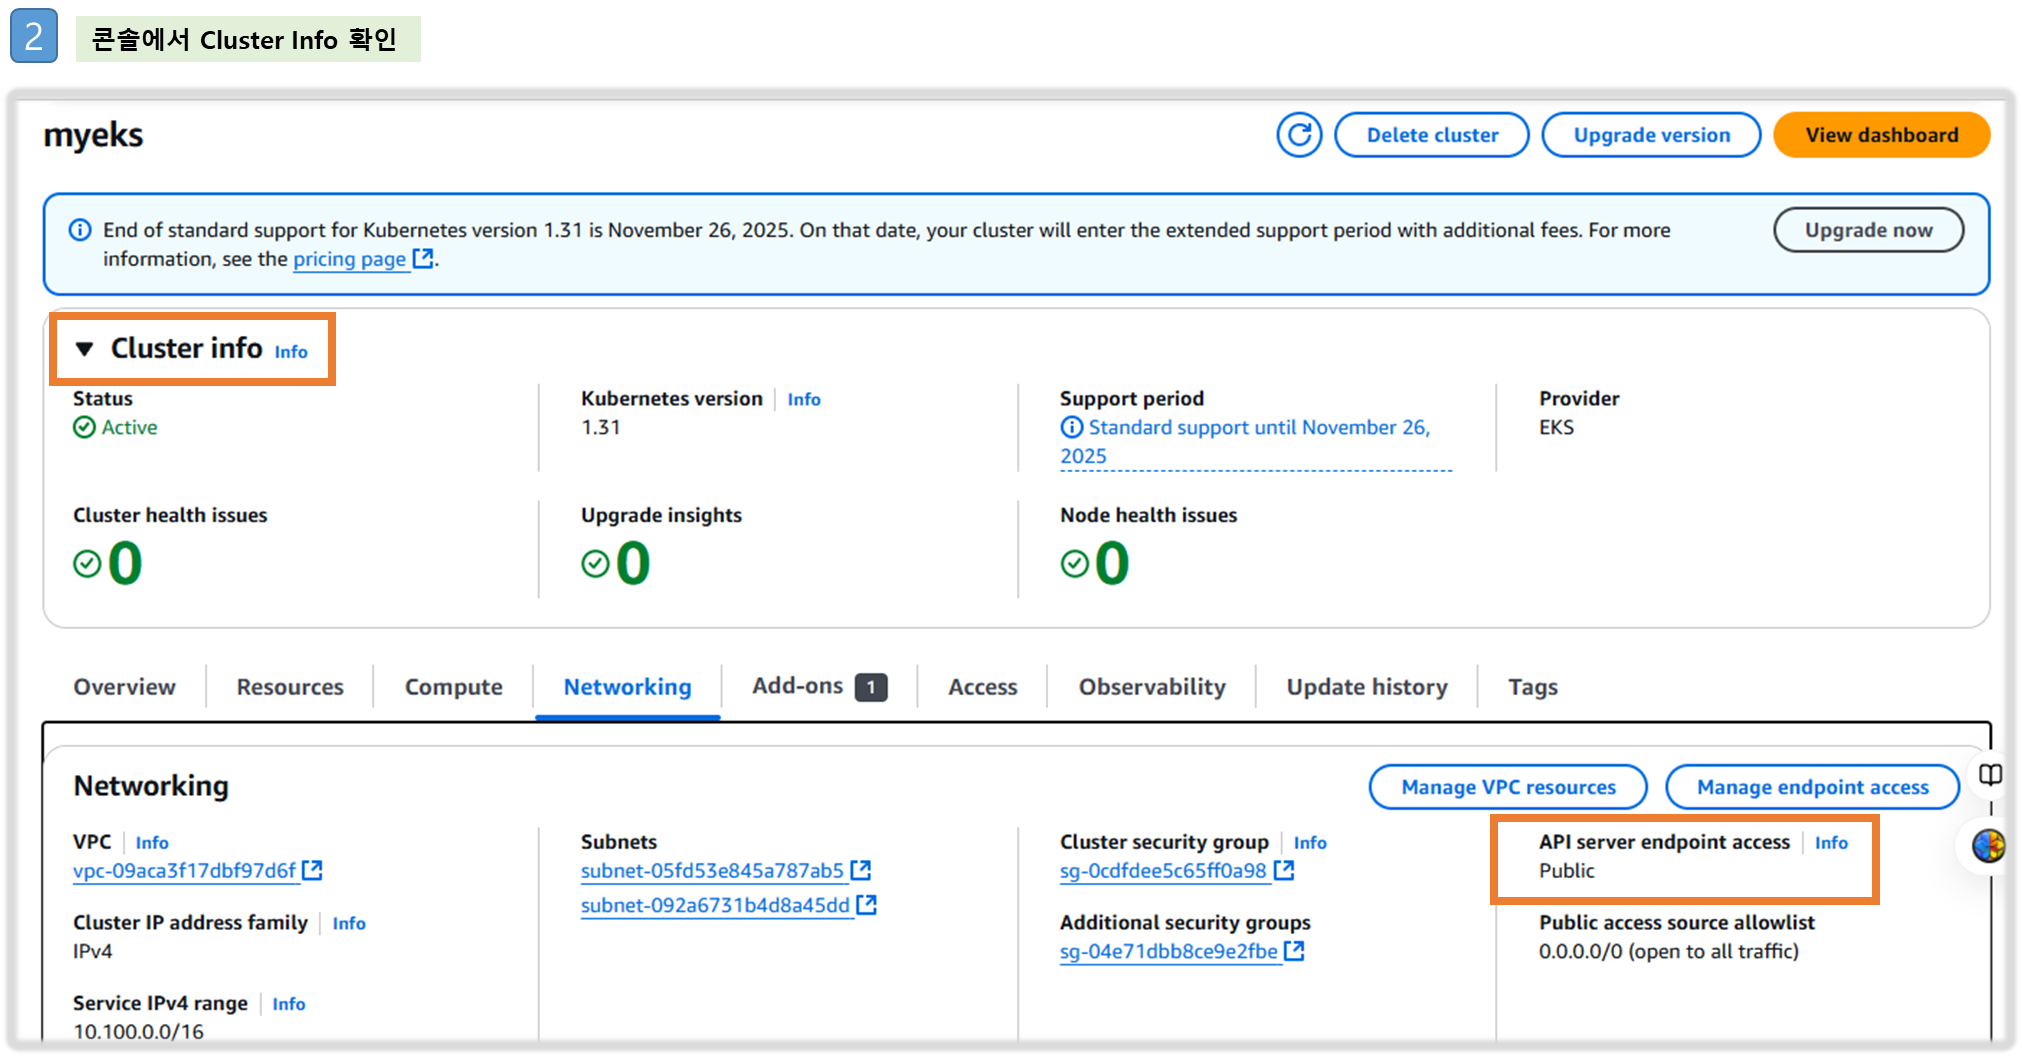
☞ EndPoint 아키텍쳐에는 public, hybrid (public + private), private 3가지가 있다.
실습을 통해 각 아키텍쳐에 대한 이해를 해보자!!
참고 링크 :
Amazon EKS Cluster Endpoint AccessAmazon EKS Cluster Endpoint Access / AWS_Docs
★ Public Only -> Private Only로 갈 수록 보안성은 좋아지나, 사용성은 떨어진다.
보완책으로 hybrid 기법을 사용하여, Cluster 내부 통신에 대해서는 내부 DNS로 질의하도록 설정하여
보안성과 사용성의 균형을 찾을 수 있다!!
1. Public Cluster Endpoint Access 아키텍처

- api-server → kubelet [private 통신]
- kubectl-host → api-server [public 통신]
- kubelet / kube-proxy → api-server [public 통신]
2. Public & Private Cluster Endpoint Access 아키텍처
- kubernetes cluster 내부 통신에 대해서만 클러스터 Domain 질의를 내부 망을 타도록 설정!!
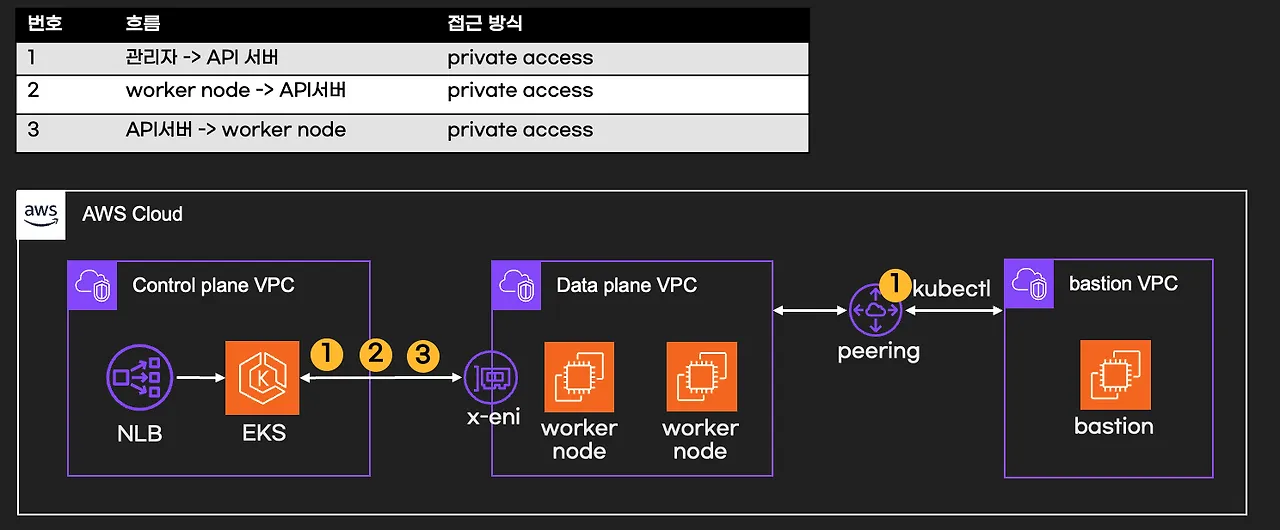
3. Private Cluster Endpoint Access 아키텍처
- api-server → kubelet [private 통신]
- kubectl-host → api-server [private 통신]
- kubelet / kube-proxy → api-server [private 통신]
3. 데이터 플레인 실습
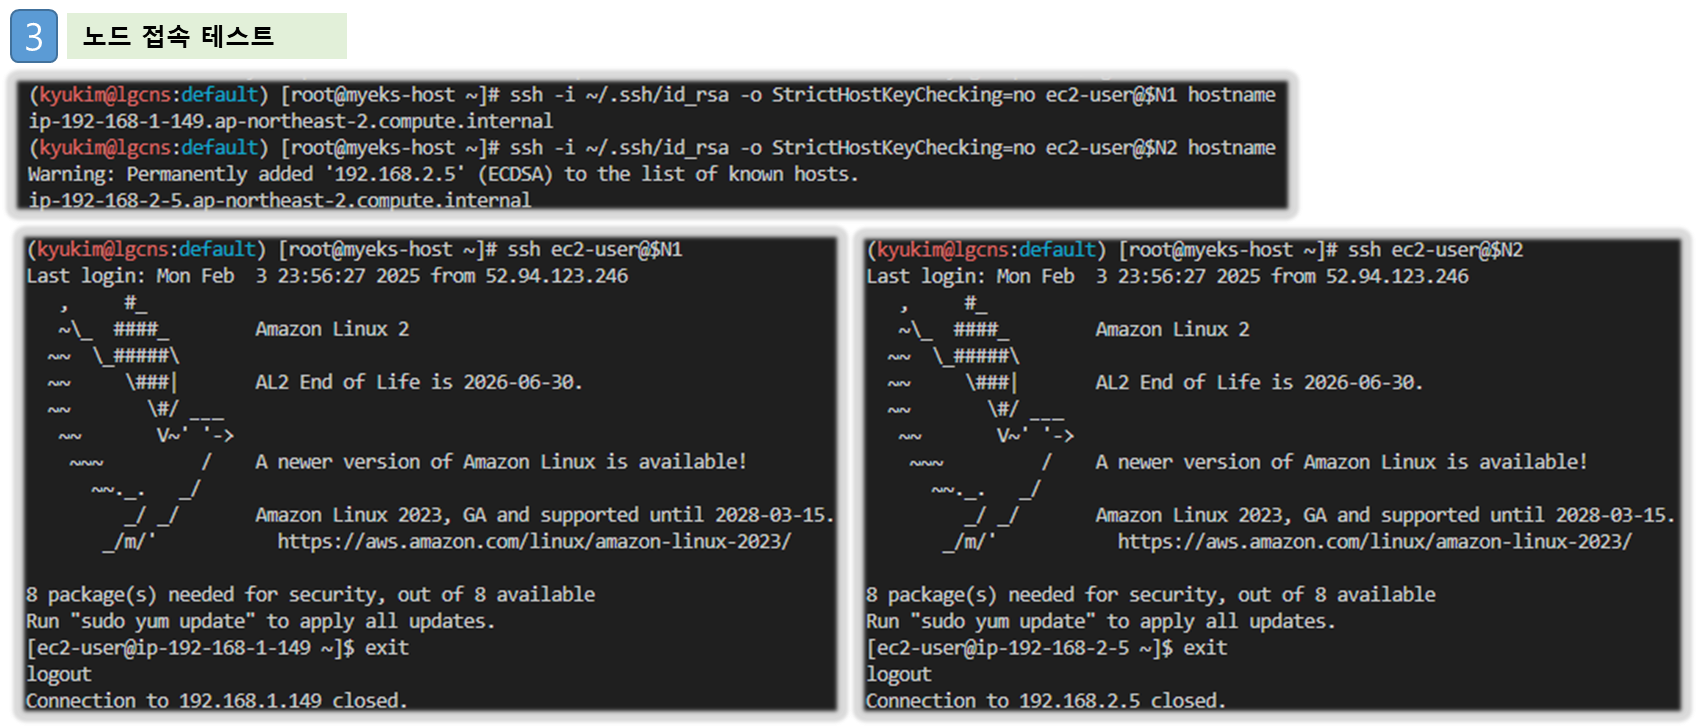
1) 노드 접속 테스트
# 노드 IP 확인 및 PrivateIP 변수 지정
aws ec2 describe-instances --query "Reservations[*].Instances[*].{PublicIPAdd:PublicIpAddress,PrivateIPAdd:PrivateIpAddress,InstanceName:Tags[?Key=='Name']|[0].Value,Status:State.Name}" --filters Name=instance-state-name,Values=running --output table
kubectl get node --label-columns=topology.kubernetes.io/zone
kubectl get node --label-columns=topology.kubernetes.io/zone --selector=topology.kubernetes.io/zone=ap-northeast-2a
kubectl get node --label-columns=topology.kubernetes.io/zone --selector=topology.kubernetes.io/zone=ap-northeast-2c
N1=$(kubectl get node --label-columns=topology.kubernetes.io/zone --selector=topology.kubernetes.io/zone=ap-northeast-2a -o jsonpath={.items[0].status.addresses[0].address})
N2=$(kubectl get node --label-columns=topology.kubernetes.io/zone --selector=topology.kubernetes.io/zone=ap-northeast-2c -o jsonpath={.items[0].status.addresses[0].address})
echo $N1, $N2
echo "export N1=$N1" >> /etc/profile
echo "export N2=$N2" >> /etc/profile

# eksctl-host 에서 노드의IP나 coredns 파드IP로 ping 테스트
ping <IP>
ping -c 1 $N1
ping -c 1 $N2

# 노드 보안그룹 ID 확인
aws ec2 describe-security-groups --filters Name=group-name,Values=*nodegroup* --query "SecurityGroups[*].[GroupId]" --output text
NGSGID=$(aws ec2 describe-security-groups --filters Name=group-name,Values=*nodegroup* --query "SecurityGroups[*].[GroupId]" --output text)
echo $NGSGID
echo "export NGSGID=$NGSGID" >> /etc/profile

# 노드 보안그룹에 eksctl-host 에서 노드(파드)에 접속 가능하게 룰(Rule) 추가 설정
aws ec2 authorize-security-group-ingress --group-id $NGSGID --protocol '-1' --cidr 192.168.1.100/32

# eksctl-host 에서 노드의IP나 coredns 파드IP로 ping 테스트
ping -c 2 $N1
ping -c 2 $N2

# 워커 노드 SSH 접속
ssh -i ~/.ssh/id_rsa -o StrictHostKeyChecking=no ec2-user@$N1 hostname
ssh -i ~/.ssh/id_rsa -o StrictHostKeyChecking=no ec2-user@$N2 hostname
ssh ec2-user@$N1
exit
ssh ec2-user@$N2
exit
[ 실습 결과 - 한 눈에 보기 ]
2) 노드 네트워크 정보 확인
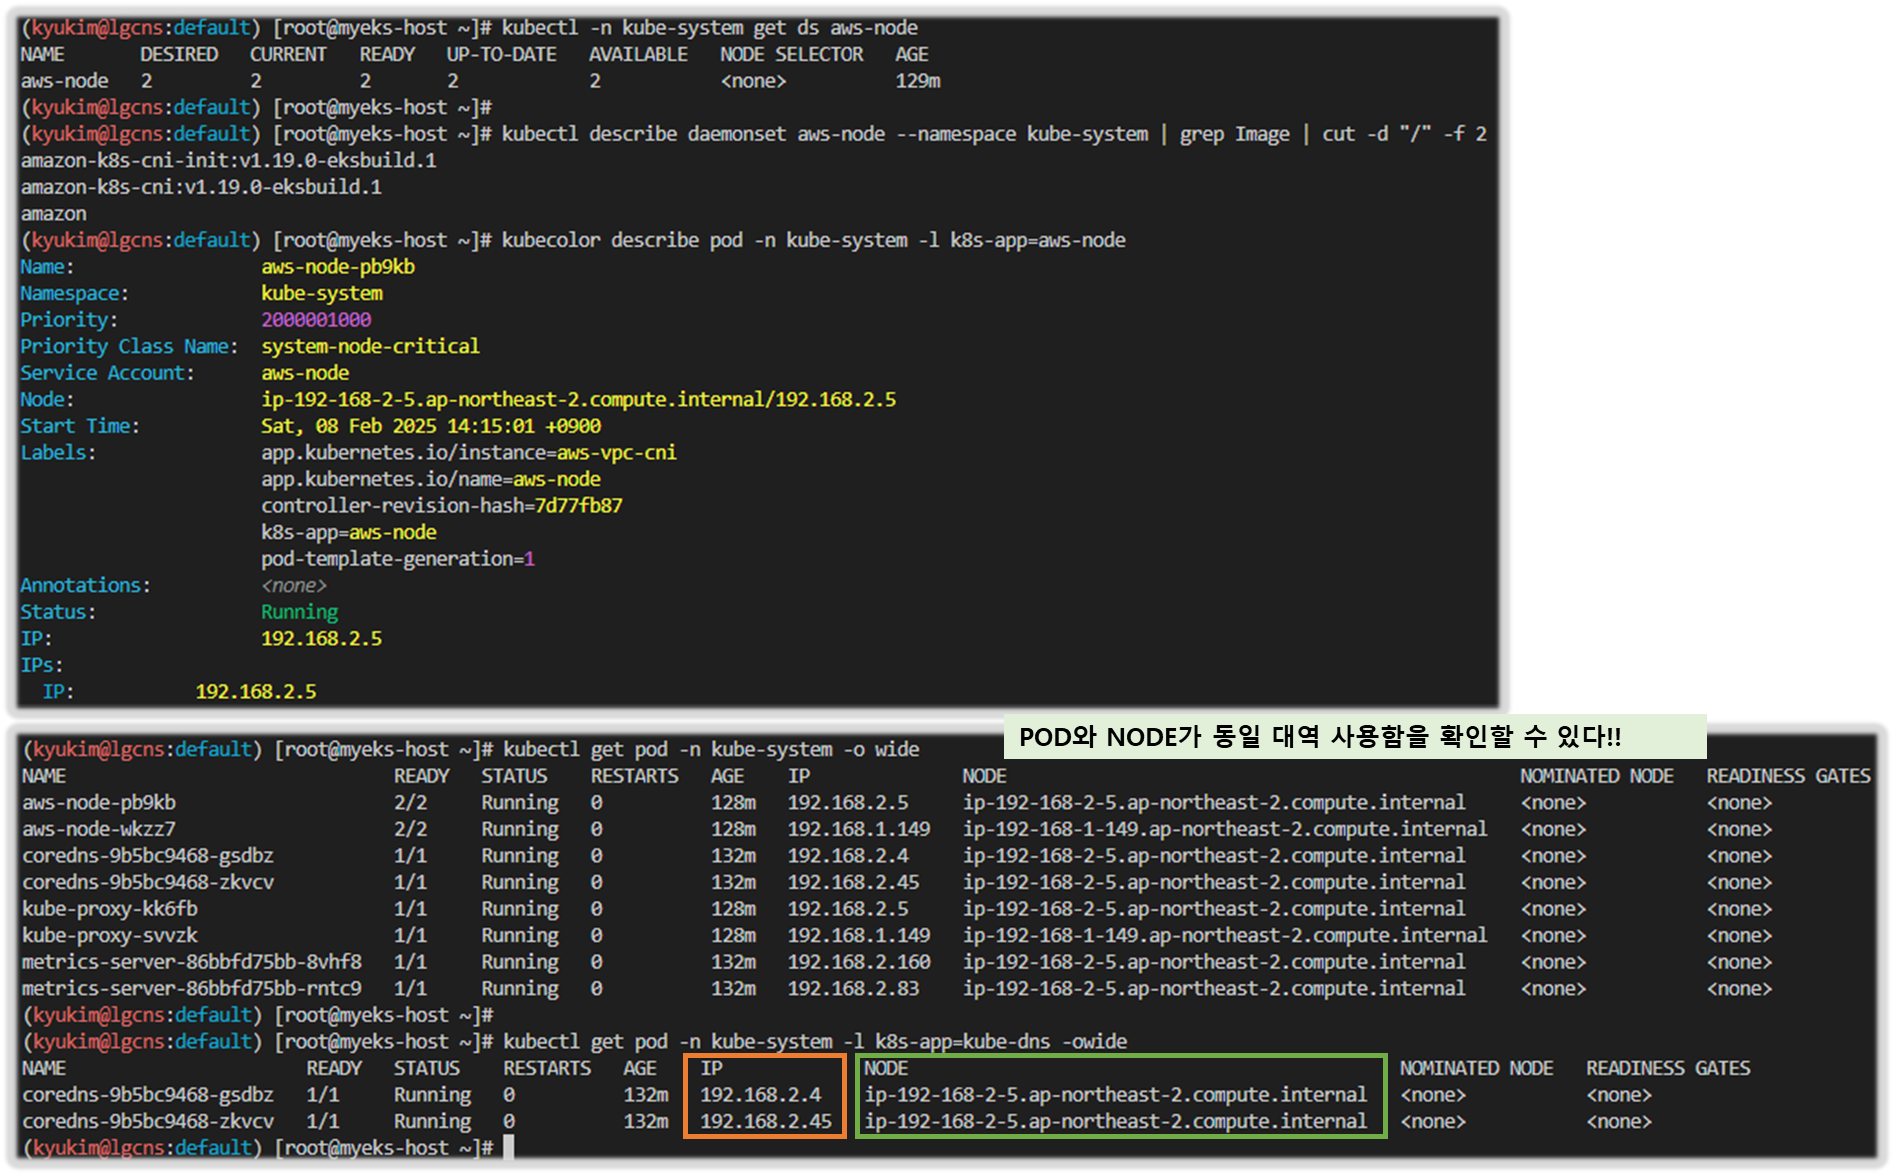
# AWS VPC CNI 사용 확인
kubectl -n kube-system get ds aws-node
kubectl describe daemonset aws-node --namespace kube-system | grep Image | cut -d "/" -f 2
kubecolor describe pod -n kube-system -l k8s-app=aws-node

# 파드 IP 확인
kubectl get pod -n kube-system -o wide
kubectl get pod -n kube-system -l k8s-app=kube-dns -owide

# 노드 정보 확인
for i in $N1 $N2; do echo ">> node $i <<"; ssh ec2-user@$i hostname; echo; done
for i in $N1 $N2; do echo ">> node $i <<"; ssh ec2-user@$i sudo ip -c addr; echo; done
for i in $N1 $N2; do echo ">> node $i <<"; ssh ec2-user@$i sudo ip -c route; echo; done
for i in $N1 $N2; do echo ">> node $i <<"; ssh ec2-user@$i sudo iptables -t nat -S; echo; done
[ 실행 결과 - 한 눈에 보기 ]
3) 노드 Cgroup 정보 확인
- Node cgroup version : v1(tmpfs), v2(cgroup2fs) - Link
for i in $N1 $N2; do echo ">> node $i <<"; ssh ec2-user@$i stat -fc %T /sys/fs/cgroup/; echo; done[ 실행 결과 - 한 눈에 보기 ]

4) Node Process 및 스토리지 정보 확인
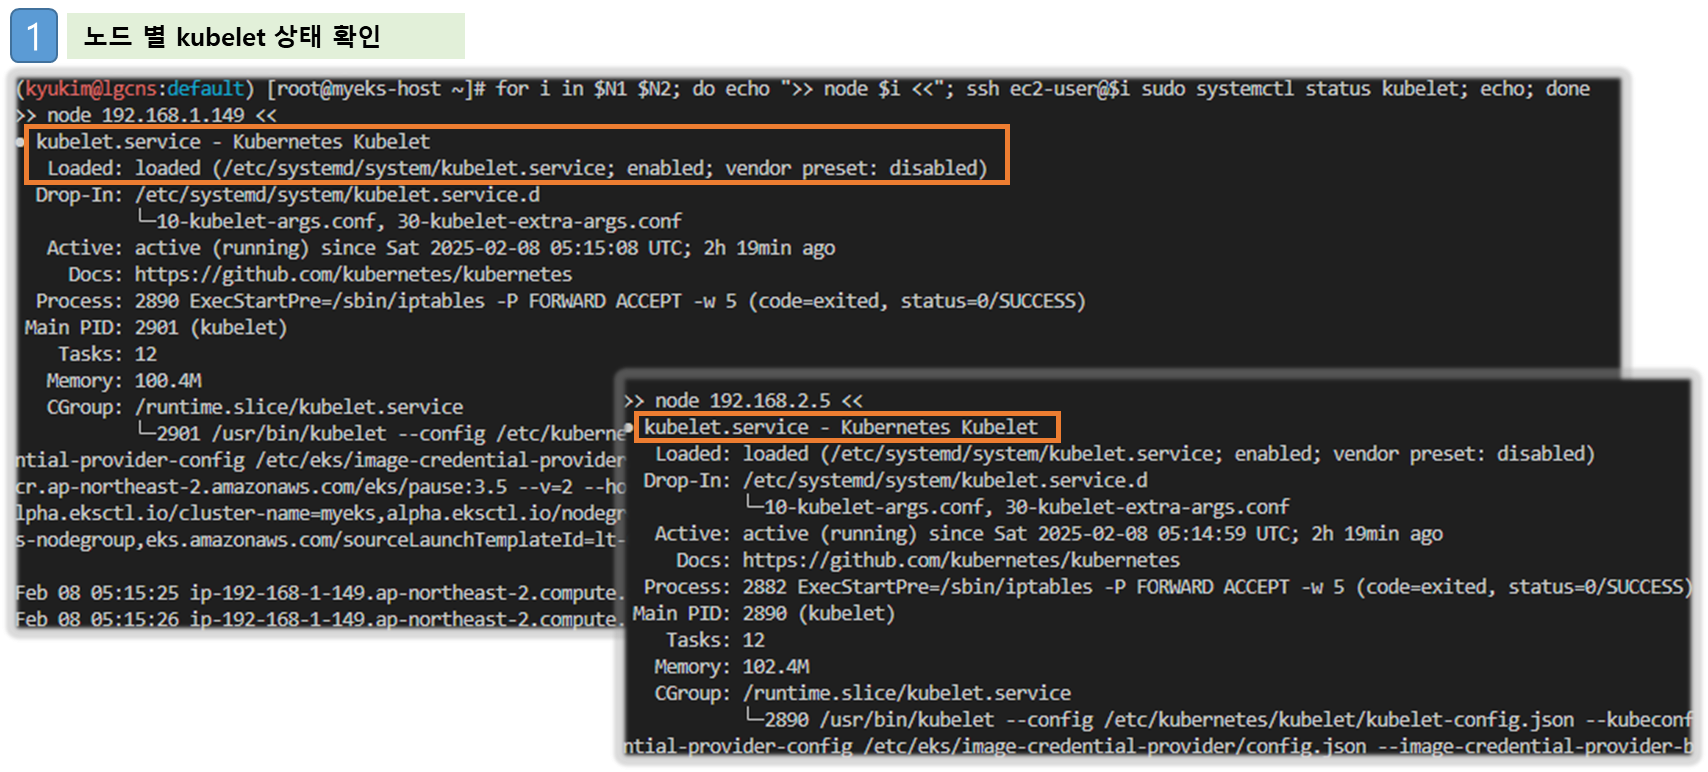
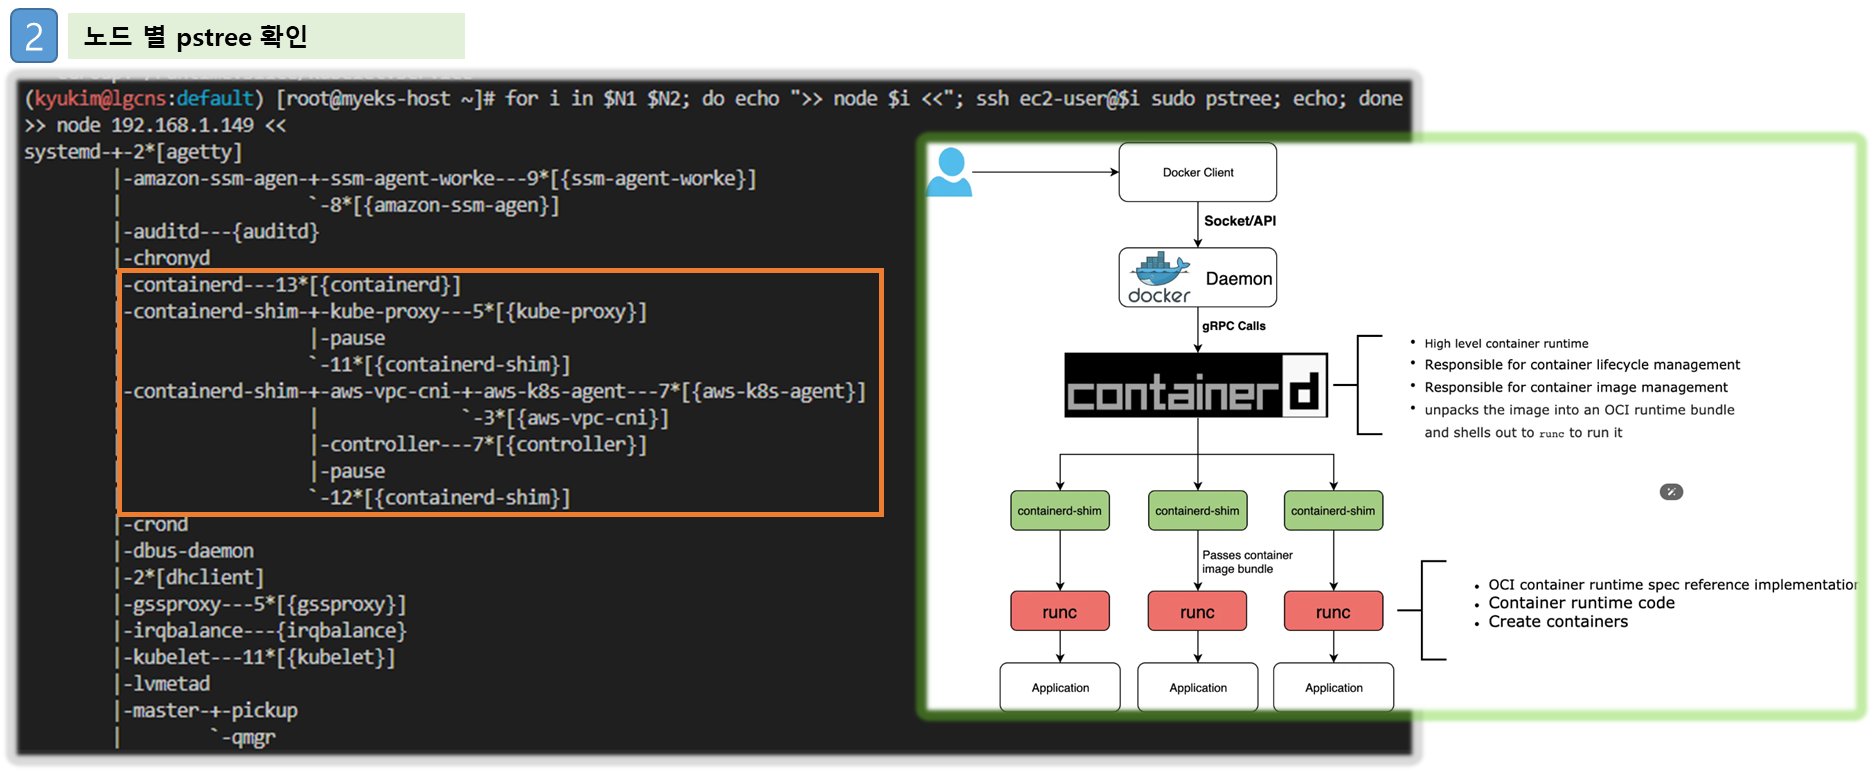
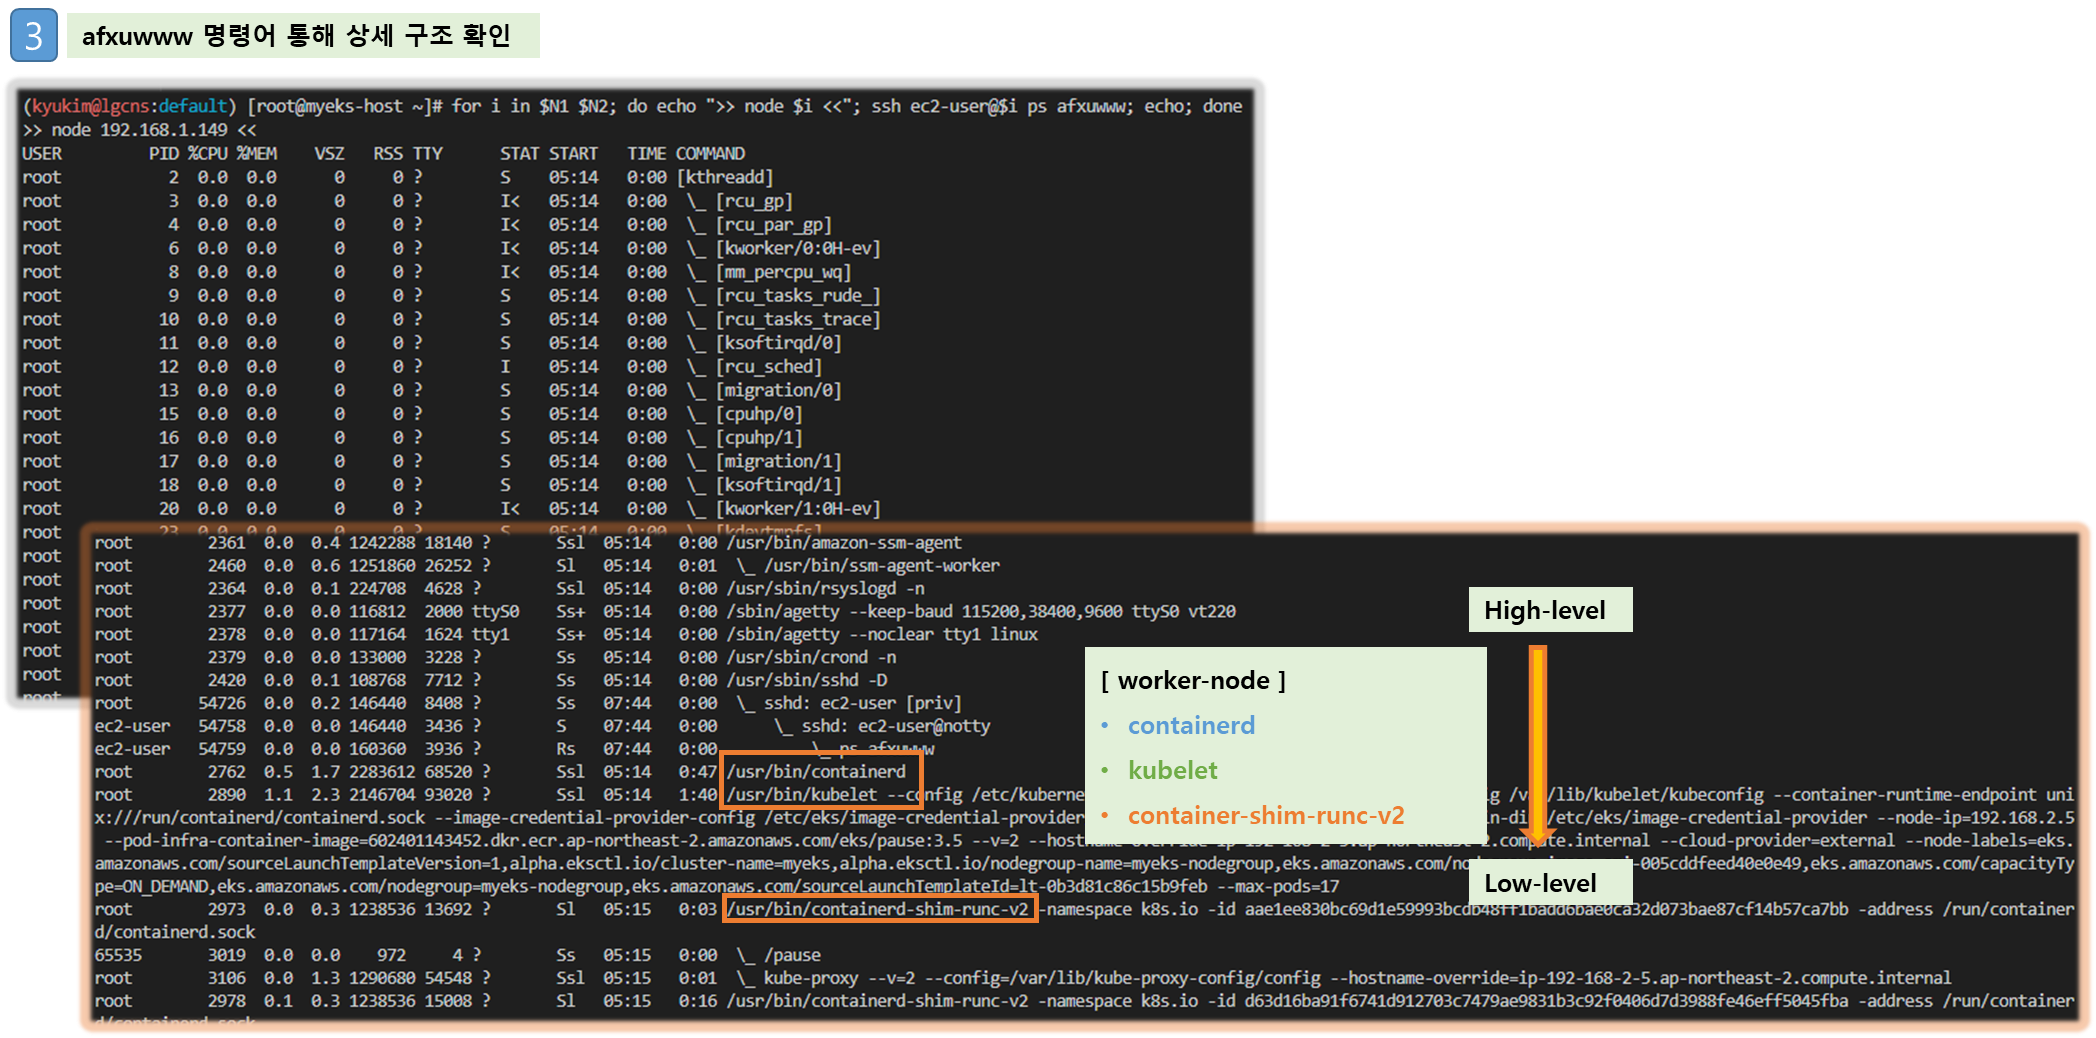
☞ container/ kubelet 통신 관련 프로세스를 단계 별 명령어를 통해 확인할 수 있다.
[ 명령어 및 실행 결과 ]
## kubelet 상태 확인
for i in $N1 $N2; do echo ">> node $i <<"; ssh ec2-user@$i sudo systemctl status kubelet; echo; done
## 노드 별 Process 구조확인
for i in $N1 $N2; do echo ">> node $i <<"; ssh ec2-user@$i sudo pstree; echo; done
for i in $N1 $N2; do echo ">> node $i <<"; ssh ec2-user@$i ps afxuwww; echo; done
for i in $N1 $N2; do echo ">> node $i <<"; ssh ec2-user@$i ps axf |grep /usr/bin/containerd; echo; done
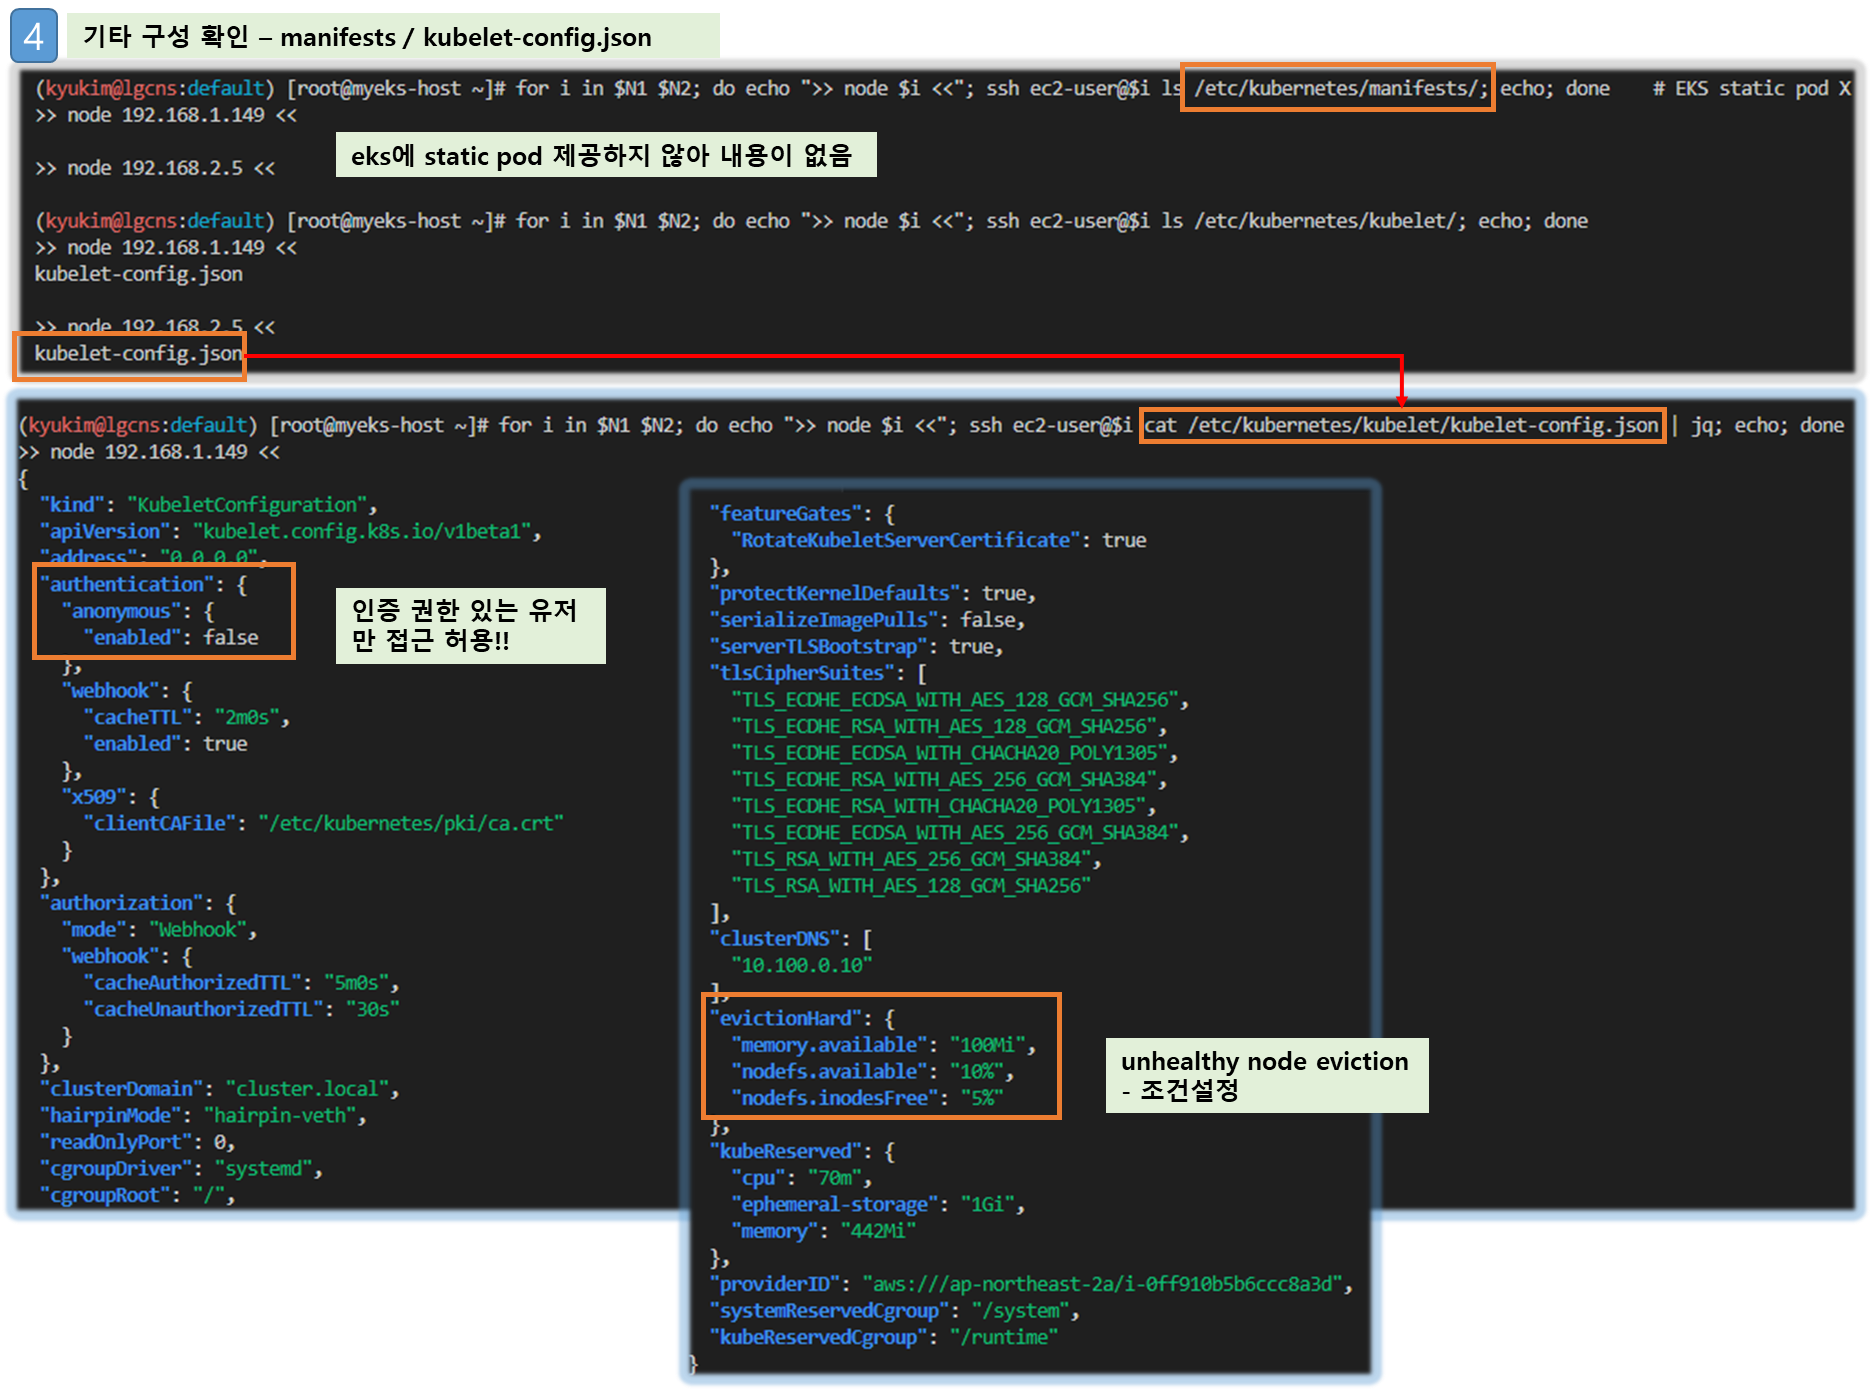
## EKS 내 manifest 및 kubelet-config 구성확인
for i in $N1 $N2; do echo ">> node $i <<"; ssh ec2-user@$i ls /etc/kubernetes/manifests/; echo; done # EKS static pod X
for i in $N1 $N2; do echo ">> node $i <<"; ssh ec2-user@$i ls /etc/kubernetes/kubelet/; echo; done
for i in $N1 $N2; do echo ">> node $i <<"; ssh ec2-user@$i cat /etc/kubernetes/kubelet/kubelet-config.json | jq; echo; done
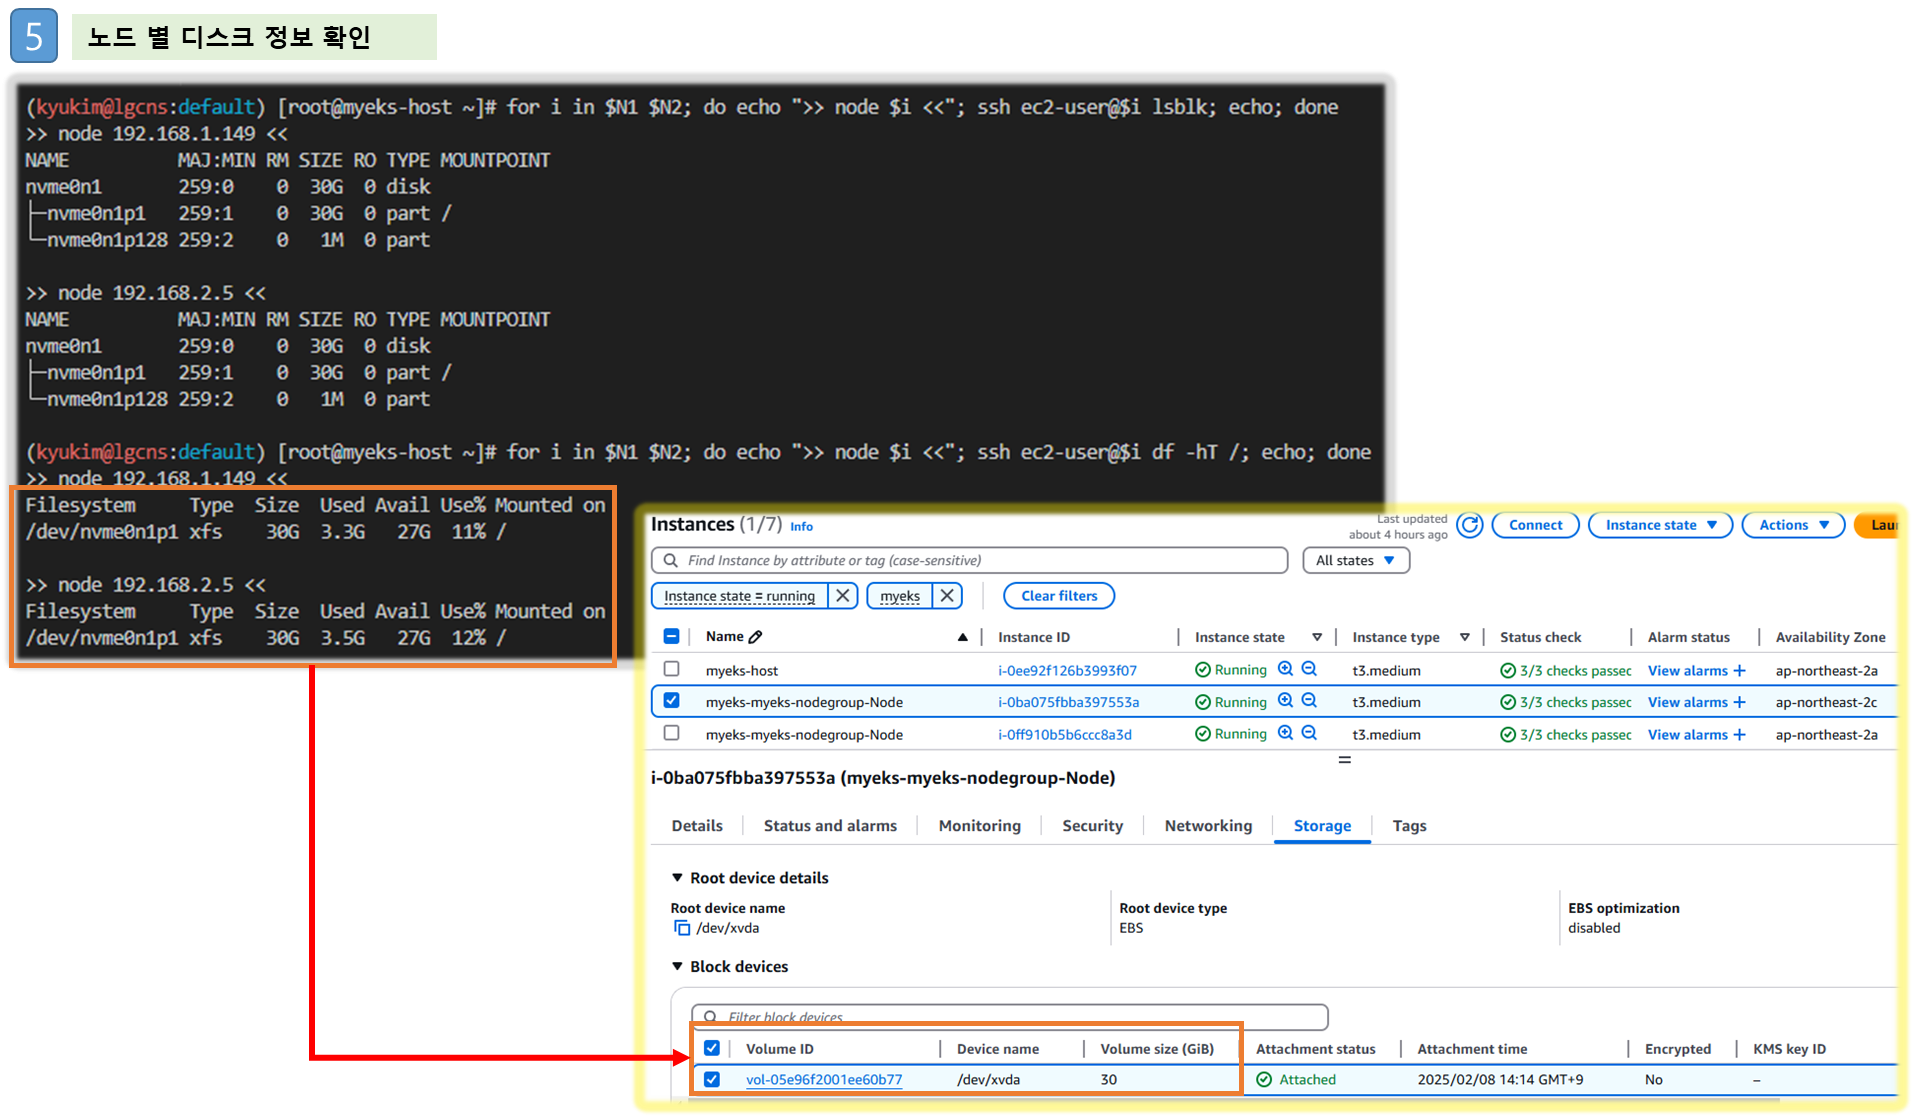
## 스토리지 정보 확인
for i in $N1 $N2; do echo ">> node $i <<"; ssh ec2-user@$i lsblk; echo; done
for i in $N1 $N2; do echo ">> node $i <<"; ssh ec2-user@$i df -hT /; echo; done
[ 실행 결과 - 한 눈에 보기 ]

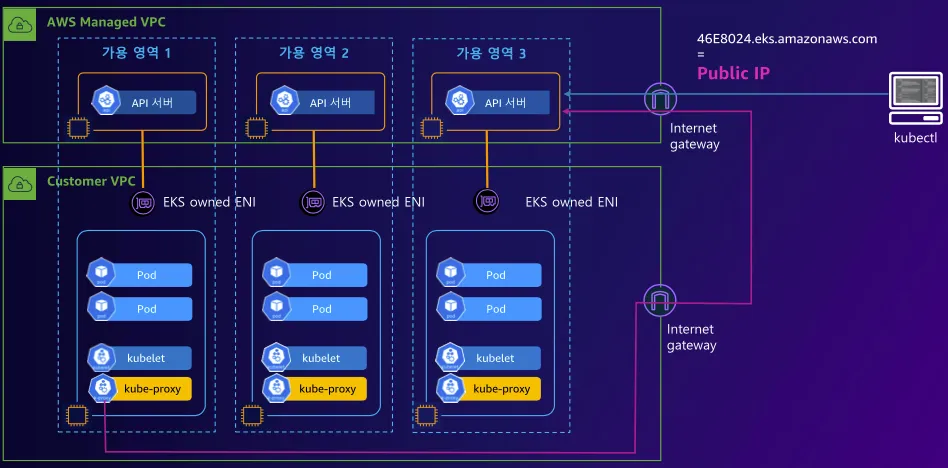
5) EKS owned ENI 확인
☞ EKS = Control Plane + Node(Data) Plane 으로 구성되며, Control plane 내 자원은 CSP Managed 영역으로 User 단에서 접근하거나 관리할 수 없는 자원영역 이다.
[ 퍼블릭 아키텍쳐 ]
☞ Client 단에서 kubectl 접근 시도 시, Control Plane 내 API 서버를 통해 Data Plane 내 EKS owned ENI 를 거쳐 POD를 호출하게 된다.
☞ 내부 kube-proxy와 kubelet 는 Internet gateway를 통해 외부망을 거쳐 control managed 영역의 API 서버와 통신을 하게 된다.
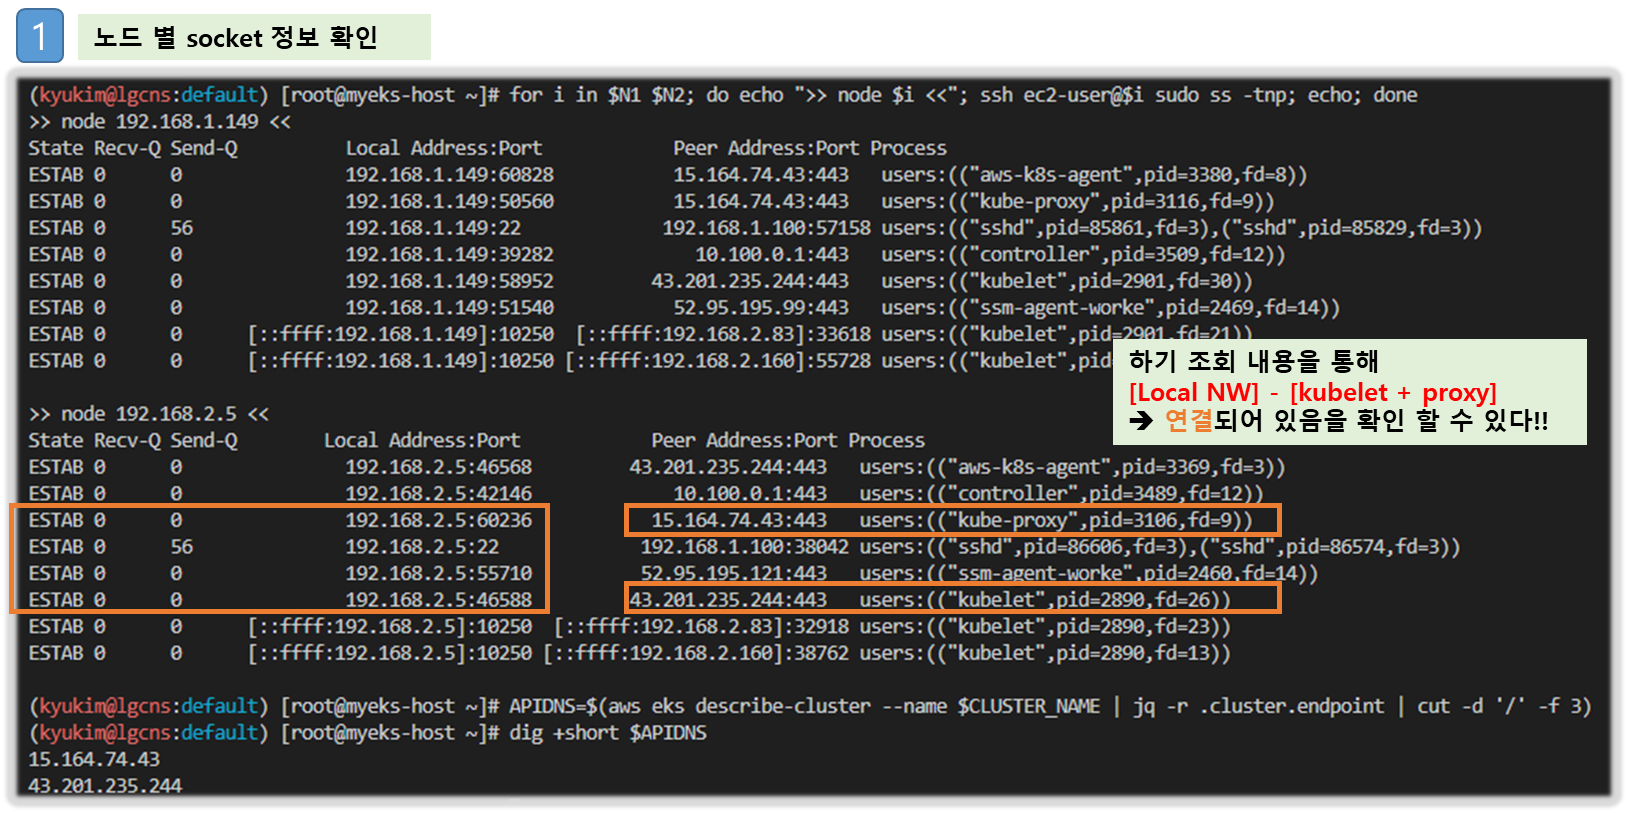
# kubelet, kube-proxy 통신 Peer Address는 어딘인가요?
for i in $N1 $N2; do echo ">> node $i <<"; ssh ec2-user@$i sudo ss -tnp; echo; done
# 참고
APIDNS=$(aws eks describe-cluster --name $CLUSTER_NAME | jq -r .cluster.endpoint | cut -d '/' -f 3)
dig +short $APIDNS
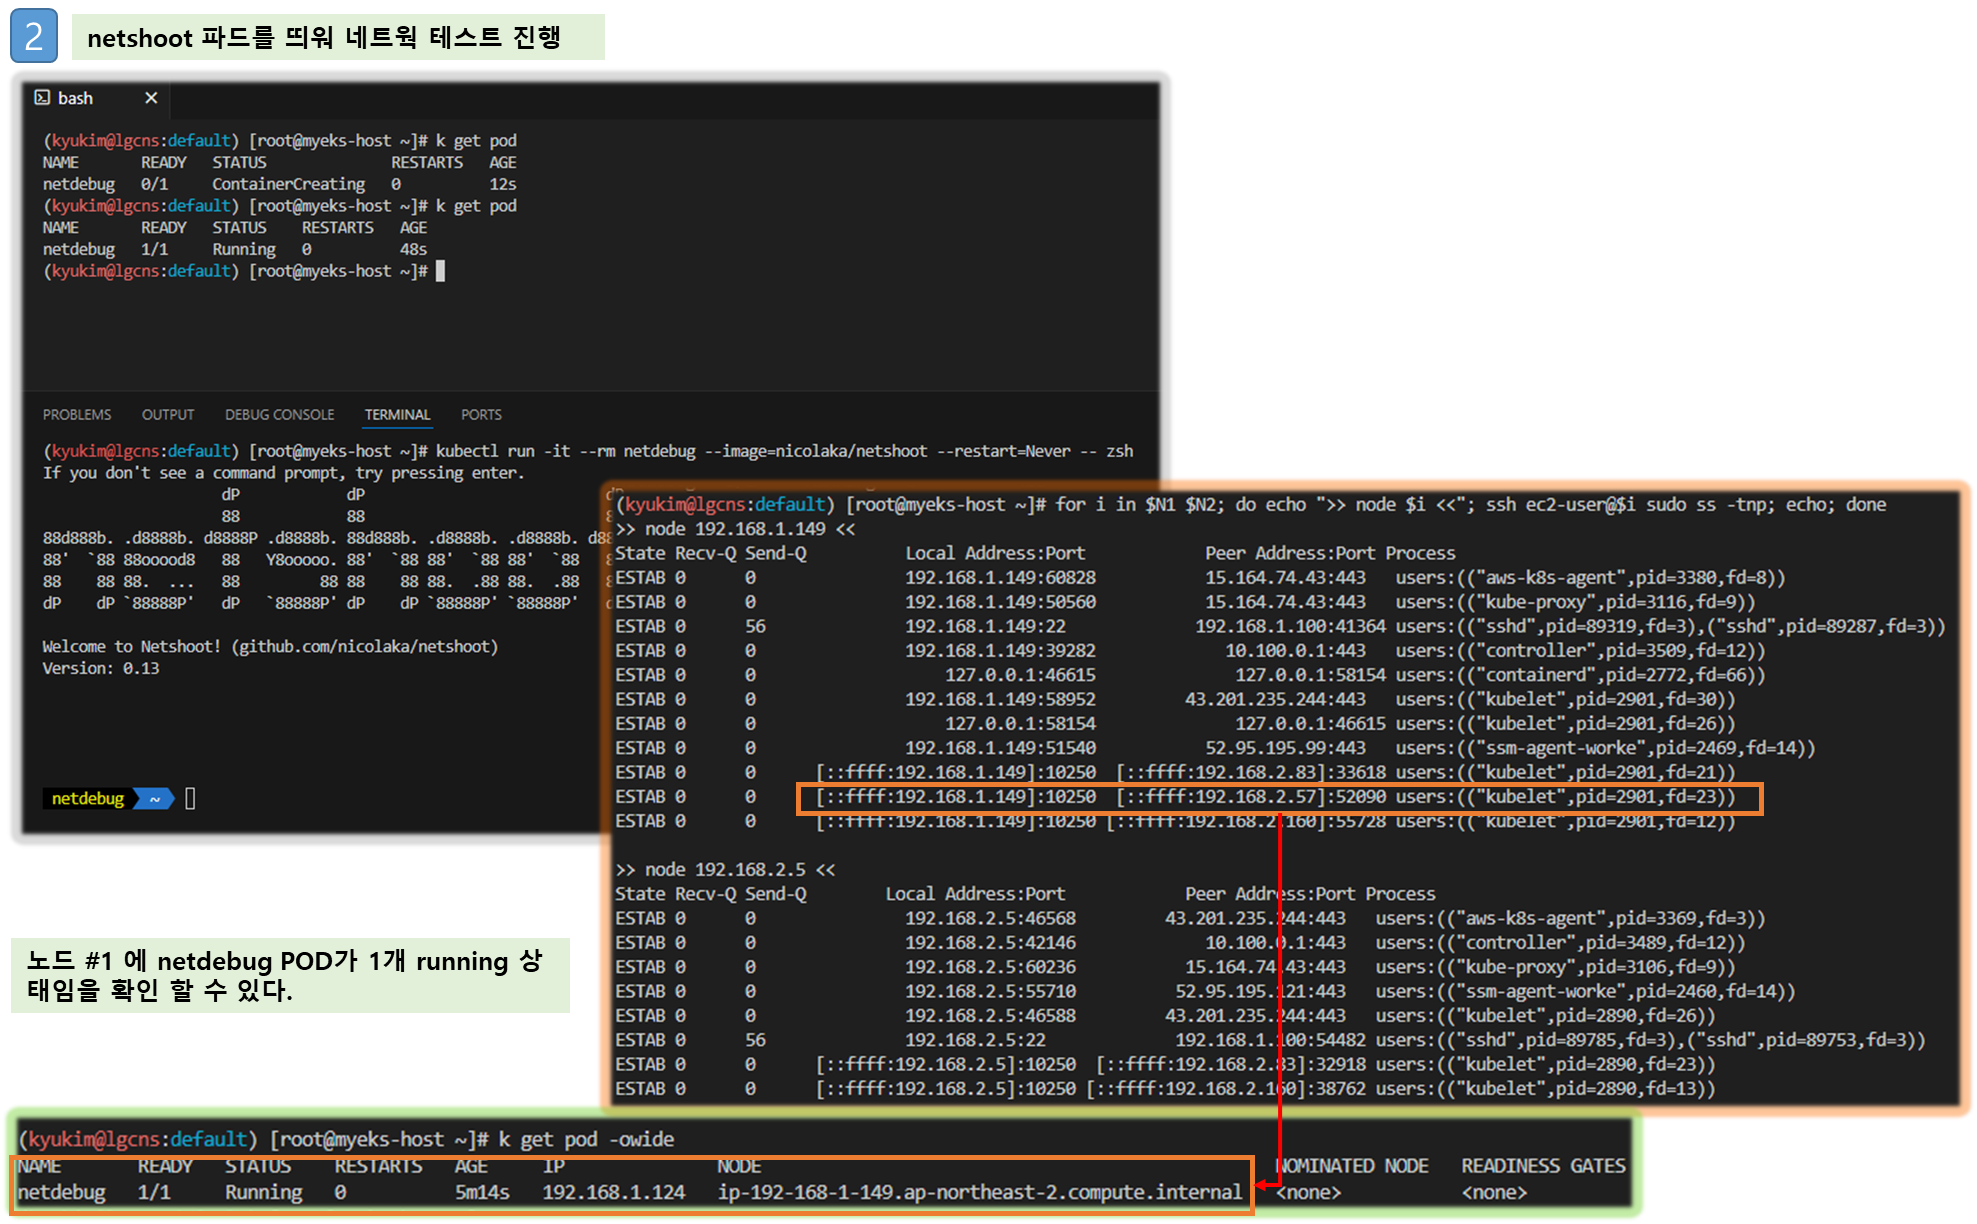
# [터미널] 파드 1곳에 shell 실행해두기
## kubectl 명령으로 특정 파드에 접근 (경로) : 작업PC -> API Server -> kubelet -> pod
kubectl run -it --rm netdebug --image=nicolaka/netshoot --restart=Never -- zsh
$ ip -c a
$ watch uptime
kubectl exec daemonsets/aws-node -it -n kube-system -c aws-eks-nodeagent -- bash
# exec 실행으로 추가된 연결 정보의 Peer Address는 어딘인가요? + AWS 네트워크 인터페이스 ENI에서 해당 IP 정보 확인
for i in $N1 $N2; do echo ">> node $i <<"; ssh ec2-user@$i sudo ss -tnp; echo; done
...
ESTAB 0 0 [::ffff:192.168.1.129]:10250 [::ffff:192.168.1.7]:38238 users:(("kubelet",pid=2933,fd=9))
...
[ 실행 결과 - 한 눈에 보기 ]

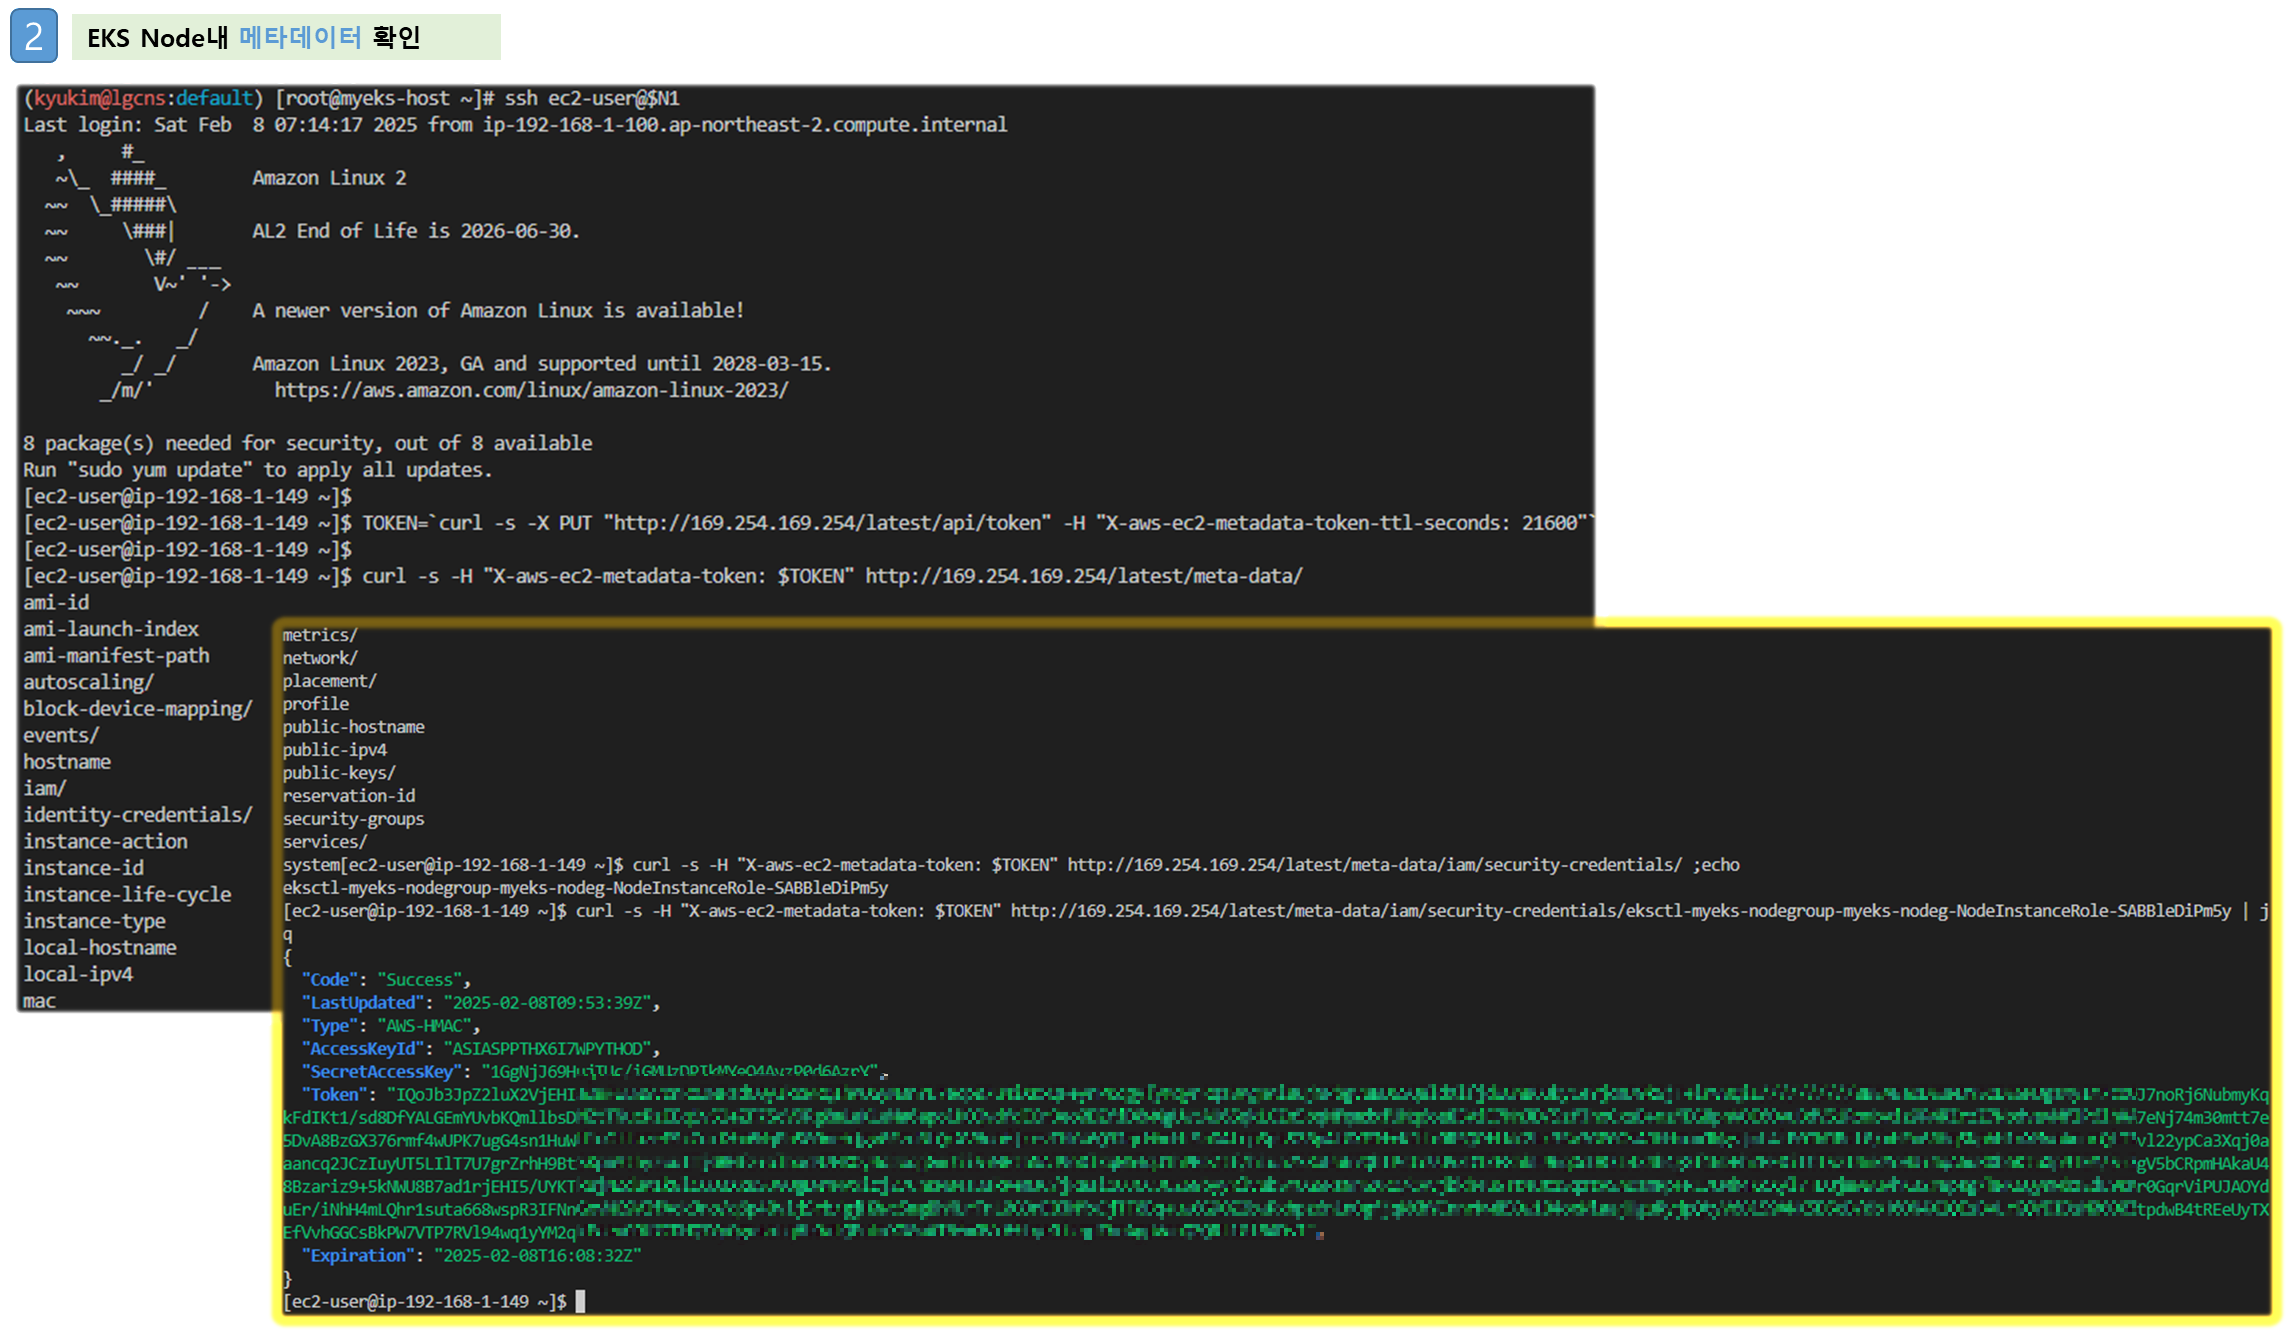
6) EC2 메타데이터 확인(IAM Role)
☞ 상세한 내용은 보안에서 다룸 - 링크
# 노드1 접속
ssh ec2-user@$N1
----------------
# IMDSv2 메타데이터 정보 확인
TOKEN=`curl -s -X PUT "http://169.254.169.254/latest/api/token" -H "X-aws-ec2-metadata-token-ttl-seconds: 21600"`
curl -s -H "X-aws-ec2-metadata-token: $TOKEN" http://169.254.169.254/latest/meta-data/
curl -s -H "X-aws-ec2-metadata-token: $TOKEN" http://169.254.169.254/latest/meta-data/iam/security-credentials/ ;echo
eksctl-myeks-nodegroup-myeks-nodeg-NodeInstanceRole-4nyRq1rhLJLd

curl -s -H "X-aws-ec2-metadata-token: $TOKEN" http://169.254.169.254/latest/meta-data/iam/security-credentials/eksctl-myeks-nodegroup-myeks-nodeg-NodeInstanceRole-4nyRq1rhLJLd | jq
[ 실행 결과 - 한 눈에 보기 ]
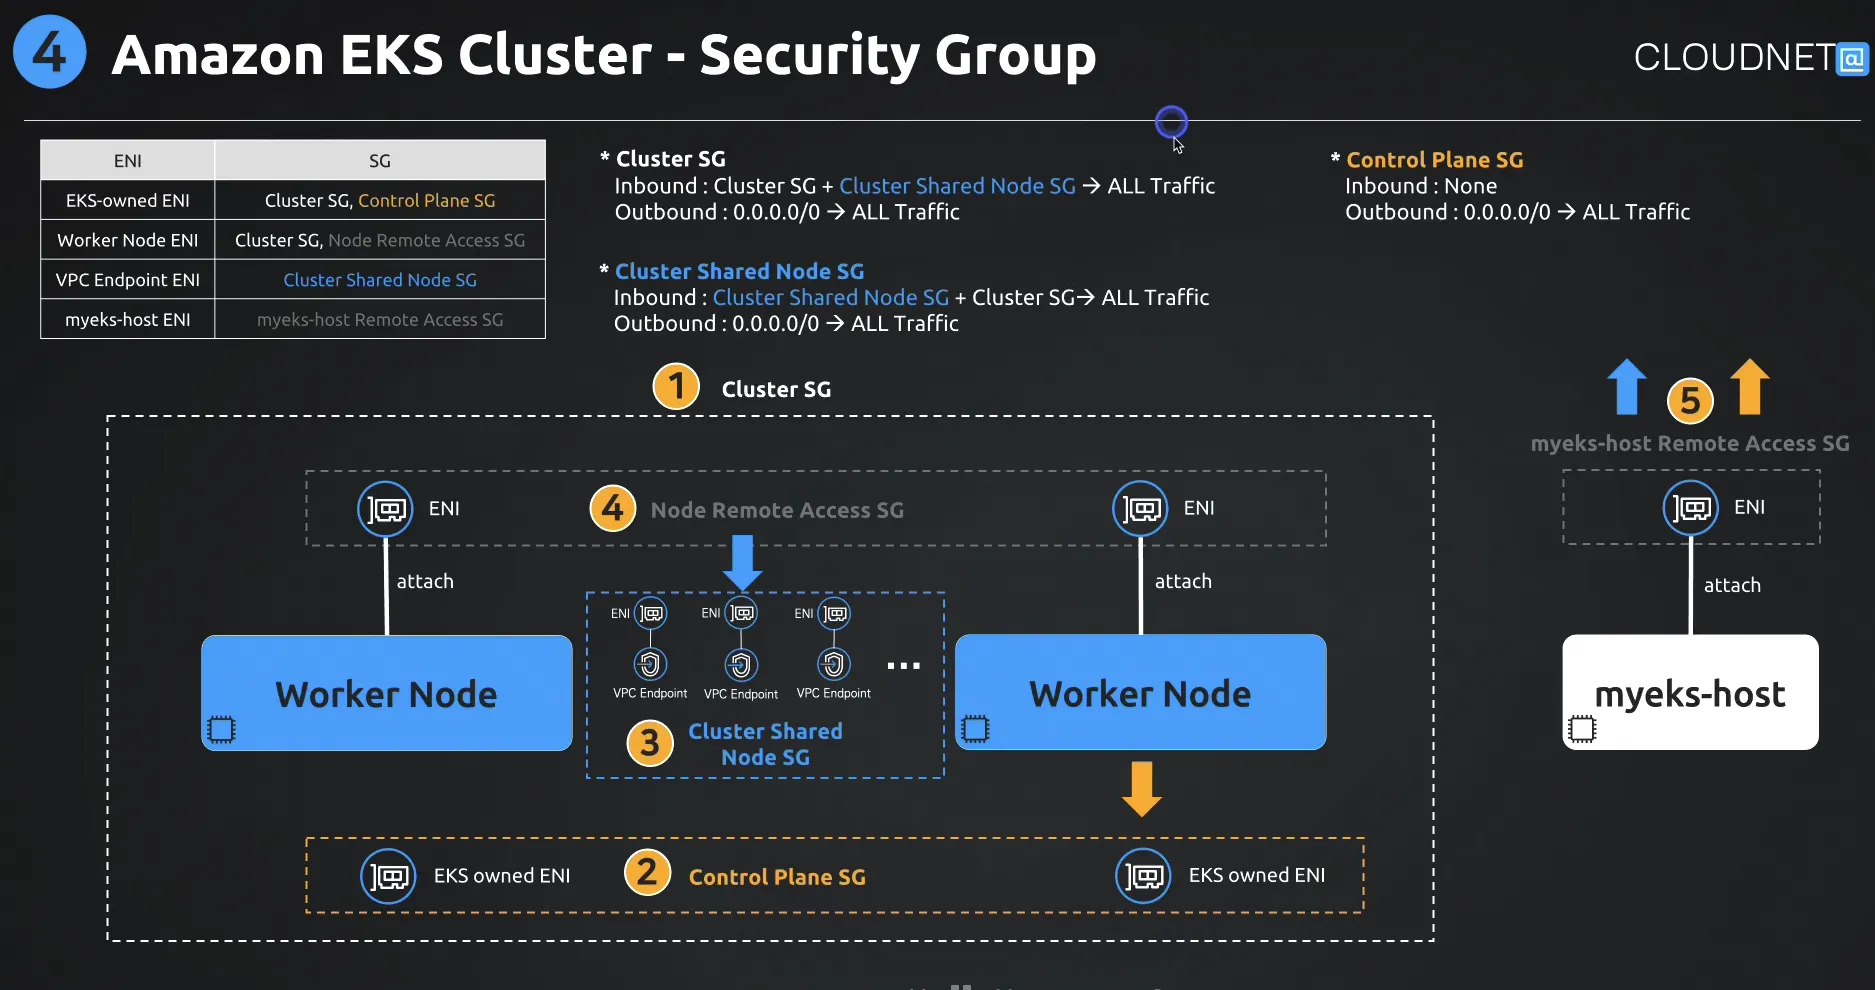
4. EKS 보안그룹
☞ (심화) EKS 보안 그룹 : 각 보안 그룹이 어떻게 적용되는지 생각해보자!
⇒ 크롬에서 규칙 확인이 잘 안될 경우, 사파리에서 실습 권고 합니다.
1) EKS Security Group - Link
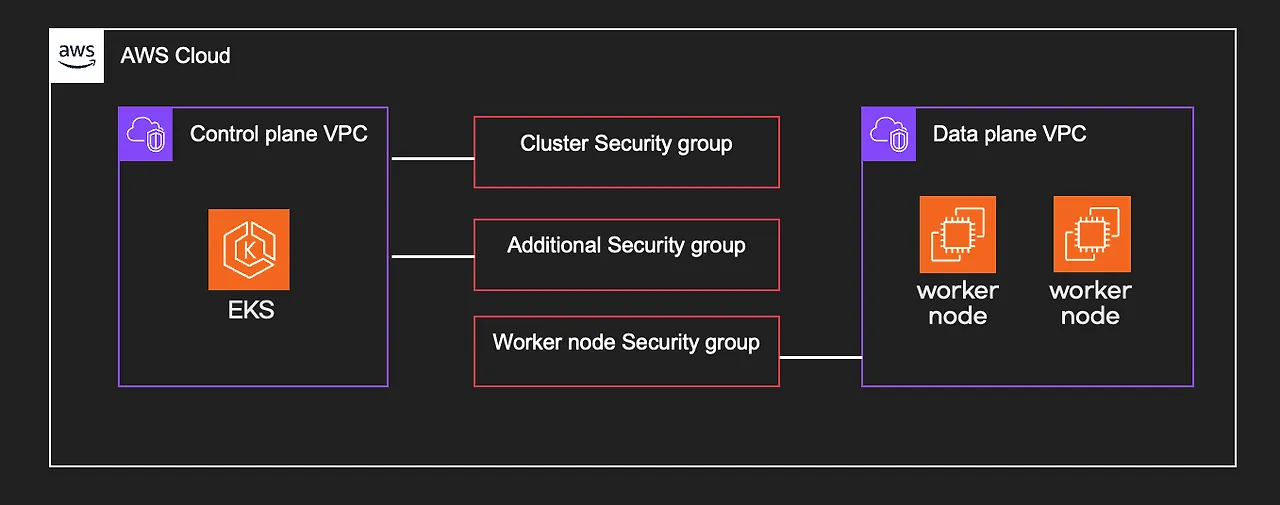
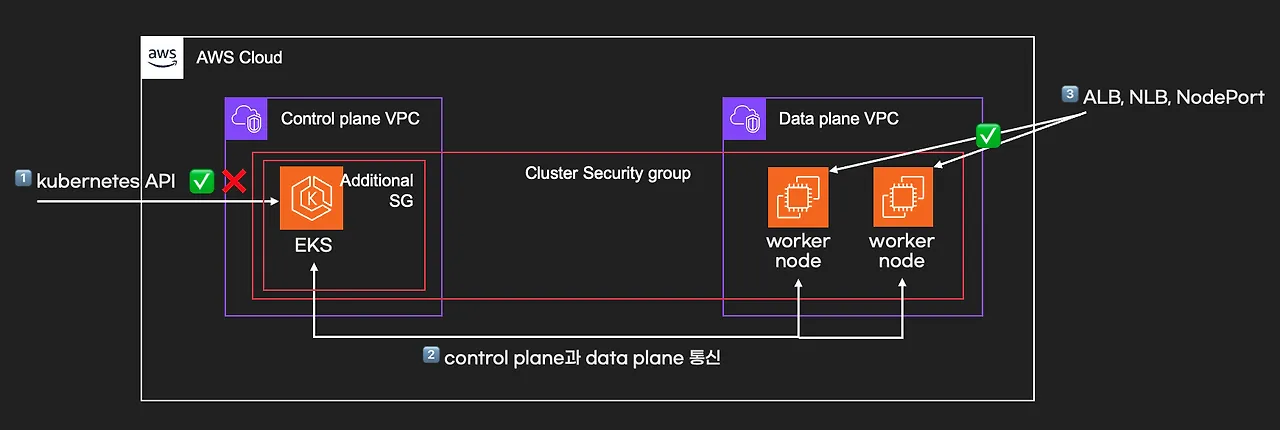
2) EKS Cluster Endpoint public/private - Link
[ 참고 - EKS Cluster _ SG의 구성 및 연계 ]
5. 관리 편의성을 위한 설정
▶ kubectl 자동 완성 기능과 alias 사용하기
# 자동 완성 및 alias 축약 설정
source <(kubectl completion bash)
alias k=kubectl
complete -F __start_kubectl k'
▶ kubectl cli 플러그인 매니저 쿠버네티스 크루(krew) 설치
# 설치
curl -fsSLO https://github.com/kubernetes-sigs/krew/releases/download/v0.4.4/krew-linux_amd64.tar.gz
tar zxvf krew-linux_amd64.tar.gz
./krew-linux_amd64 install krew
tree -L 3 /root/.krew/bin

# krew 확인
kubectl krew
kubectl krew update
kubectl krew search
kubectl krew list
▶ krew 로 kube-ctx, kube-ns 설치 및 사용
- kube-ctx : 쿠버네티스 컨텍스트 사용
# 설치
kubectl krew install ctx

# 컨텍스트 확인
kubectl ctx

# 컨텍스트 사용
kubectl ctx <각자 자신의 컨텍스트 이름>
- kube-ns : 네임스페이스(단일 클러스터 내에서 가상 클러스터) 사용
# 설치
kubectl krew install ns

# 네임스페이스 확인
kubectl ns

# 터미널1
watch kubectl get pod

# kube-system 네임스페이스 선택 사용
kubectl ns kube-system

# default 네임스페이스 선택 사용
kubectl ns -
혹은
kubectl ns default- krew list 확인
kubectl krew list▶ krew 로 기타 플러그인 설치 및 사용 : df-pv get-all ktop neat oomd view-secret [추천]
# 설치
kubectl krew install df-pv get-all ktop neat oomd view-secret # mtail tree

# get-all 사용
kubectl get-all
kubectl get-all -n kube-system

# ktop 사용
kubectl ktop

# oomd 사용
kubectl oomd

# df-pv 사용
kubectl df-pv

# view-secret 사용 : 시크릿 복호화
kubectl view-secret
▶ kube-ps1 설치 및 사용
# 설치 및 설정
git clone https://github.com/jonmosco/kube-ps1.git /root/kube-ps1

cat <<"EOT" >> /root/.bash_profile
source /root/kube-ps1/kube-ps1.sh
KUBE_PS1_SYMBOL_ENABLE=true
function get_cluster_short() {
  echo "$1" | cut -d . -f1
}
KUBE_PS1_CLUSTER_FUNCTION=get_cluster_short
KUBE_PS1_SUFFIX=') '
PS1='$(kube_ps1)'$PS1
EOT

# 적용
exit
exit

# default 네임스페이스 선택
kubectl ns default
6. EKS 기본 사용실습
6-1. 멱등성 실습
# 터미널1 (모니터링)
watch -d 'kubectl get pod'
# 터미널2
# Deployment 배포(Pod 3개)
kubectl create deployment my-webs --image=gcr.io/google-samples/kubernetes-bootcamp:v1 --replicas=3
kubectl get pod -w
# 파드 증가 및 감소
kubectl scale deployment my-webs --replicas=6 && kubectl get pod -w
kubectl scale deployment my-webs --replicas=3
kubectl get pod
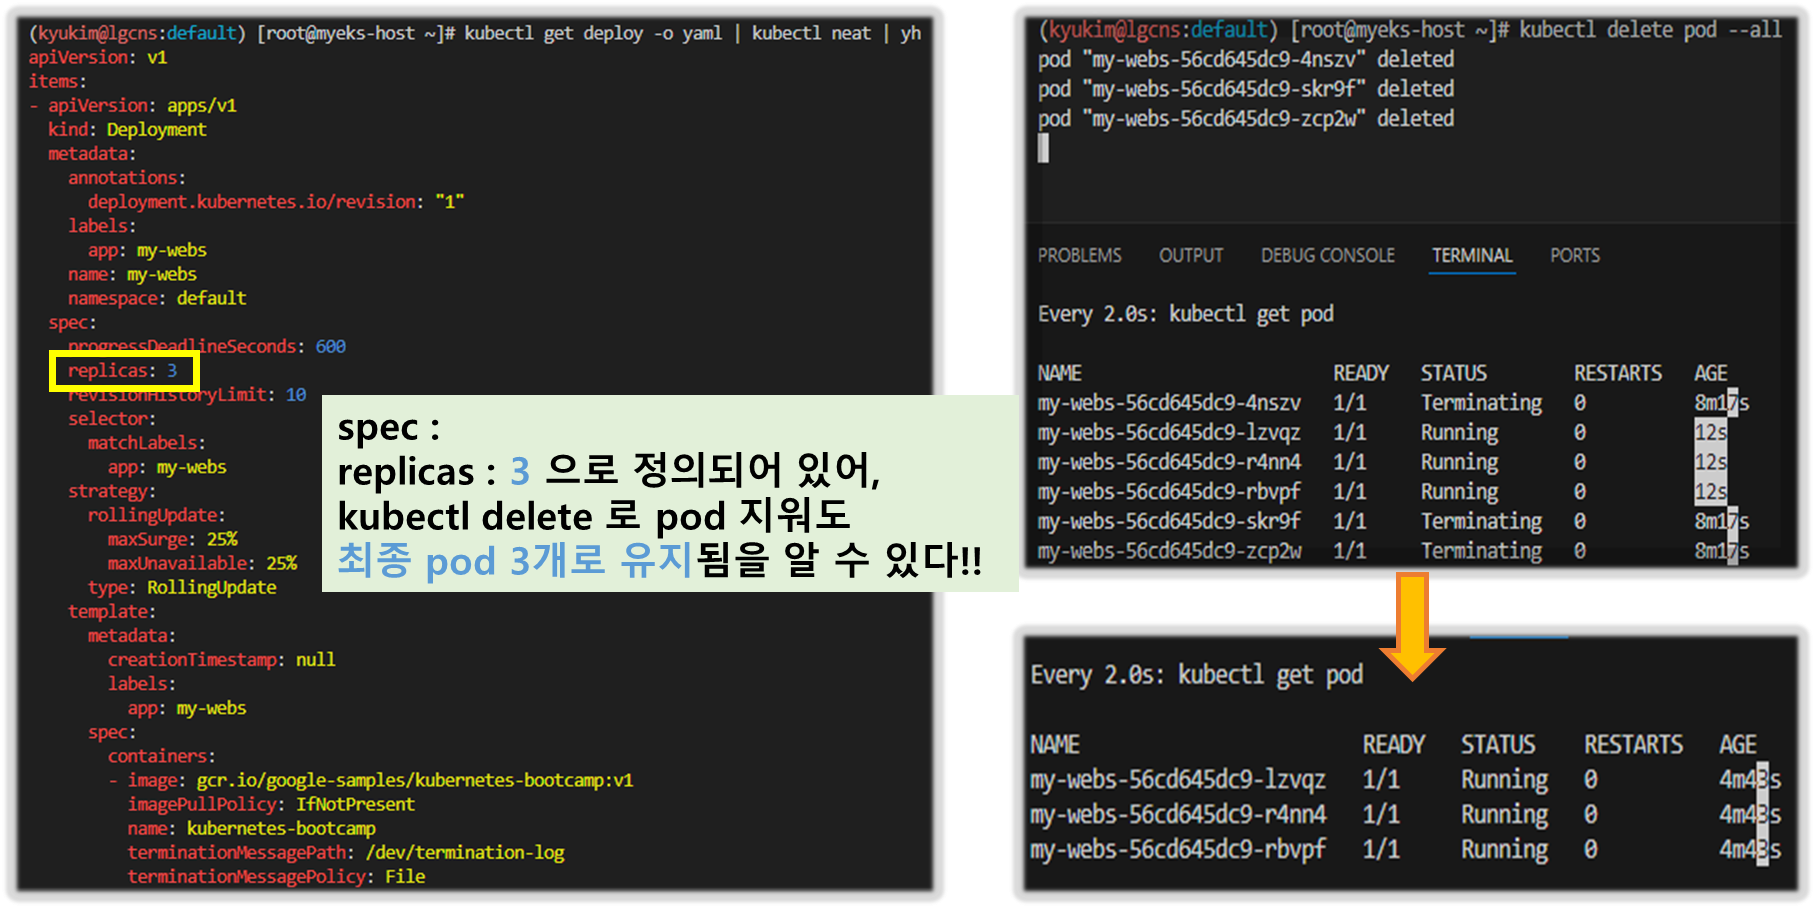
# 강제로 파드 삭제 : 바라는상태 + 선언형에 대한 대략적인 확인! ⇒ 어떤 일이 벌어지는가?
kubectl delete pod --all && kubectl get pod -w
kubectl get pod
kubectl get deploy -o yaml | kubectl neat | yh
# 실습 완료 후 Deployment 삭제
kubectl delete deploy my-webs
[ 실습 결과 ]
Step1. Replicaset 조정으로 pod 변경사항 확인
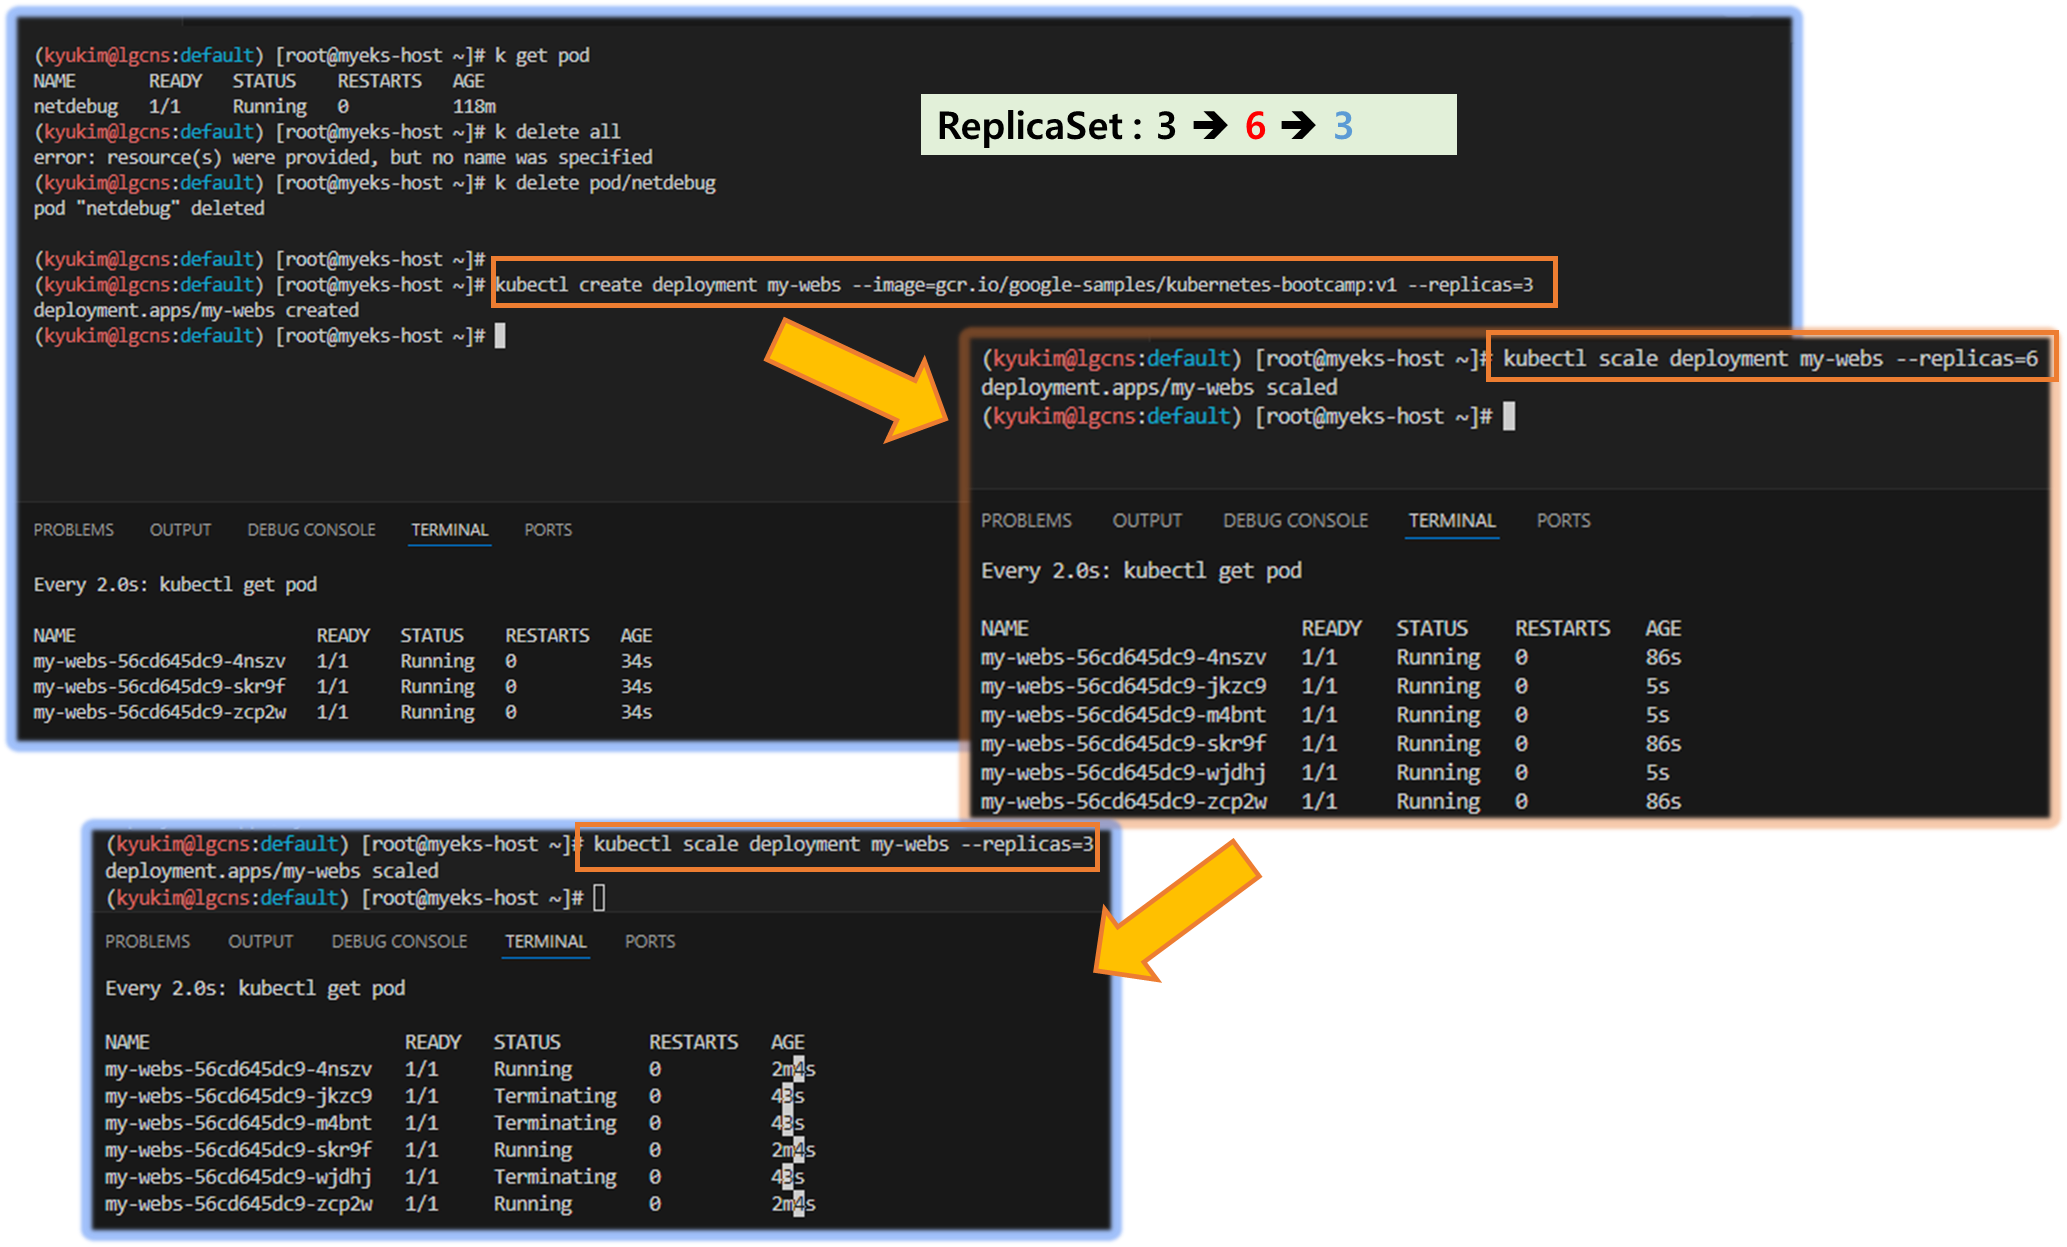
Step2. pod delete를 시도하여 사전 정의된 replicaset 이 유지되는지 확인
6-2. 서비스/디플로이먼트(mario 게임) 배포 테스트 with AWS CLB
# 터미널1 (모니터링)
watch -d 'kubectl get pod,svc'
# 수퍼마리오 디플로이먼트 배포
cat <<EOT > mario.yaml
apiVersion: apps/v1
kind: Deployment
metadata:
name: mario
labels:
app: mario
spec:
replicas: 1
selector:
matchLabels:
app: mario
template:
metadata:
labels:
app: mario
spec:
containers:
- name: mario
image: pengbai/docker-supermario
---
apiVersion: v1
kind: Service
metadata:
name: mario
spec:
selector:
app: mario
ports:
- port: 80
protocol: TCP
targetPort: 8080
type: LoadBalancer
EOT
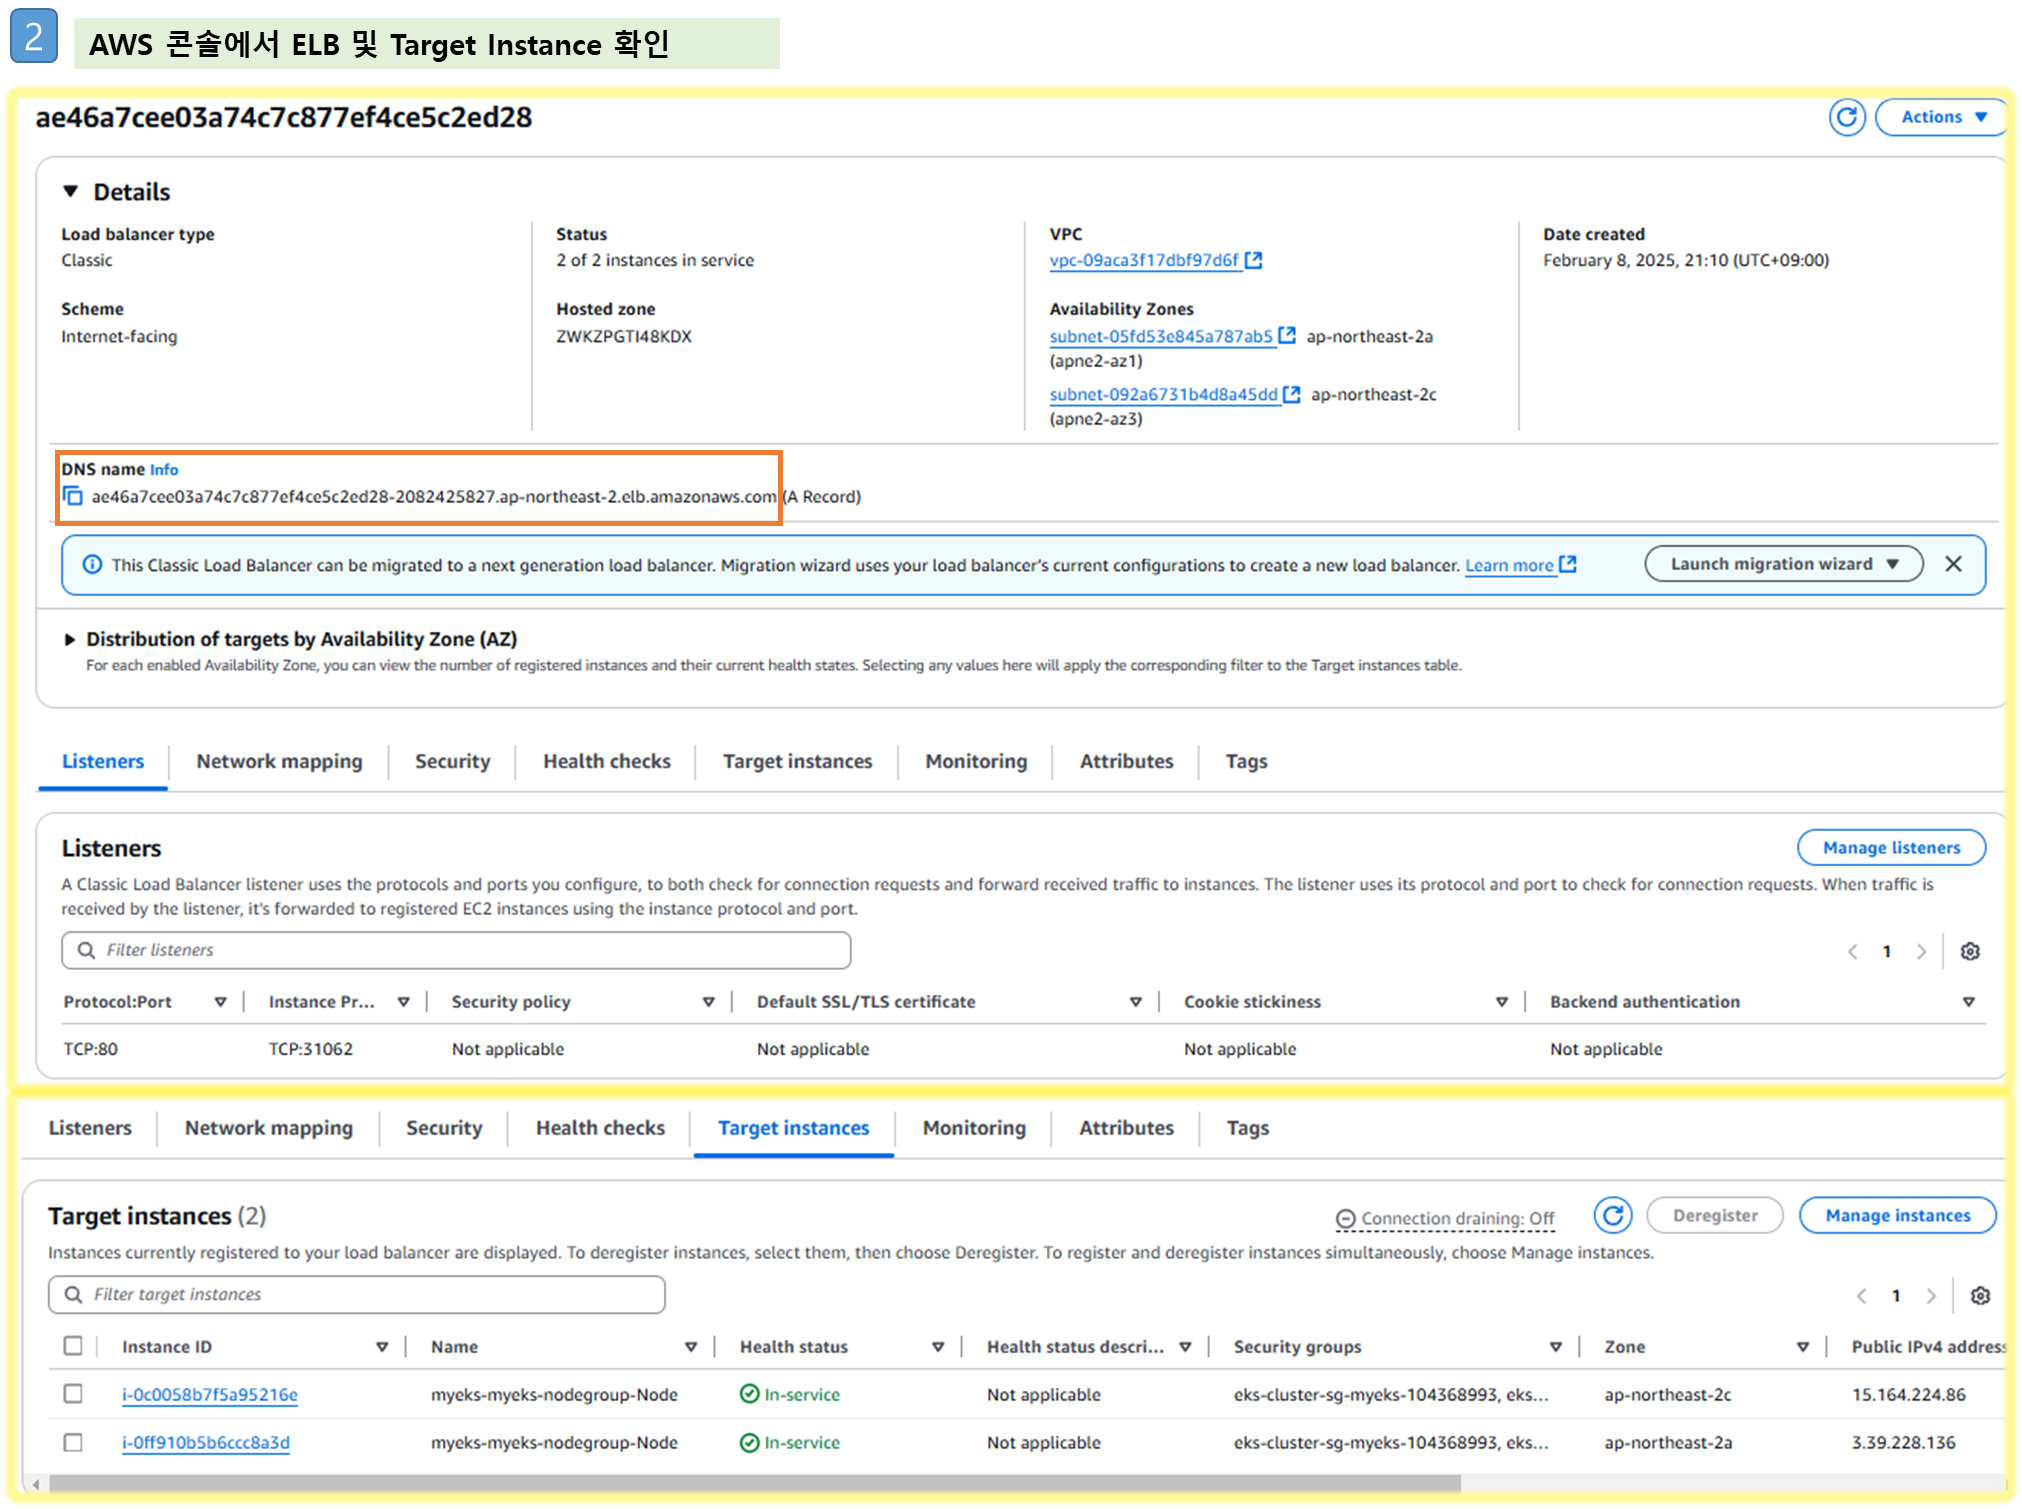
kubectl apply -f mario.yaml
# 배포 확인 : CLB 배포 확인
kubectl get deploy,svc,ep mario
# 마리오 게임 접속 : CLB 주소로 웹 접속
kubectl get svc mario -o jsonpath={.status.loadBalancer.ingress[0].hostname} | awk '{ print "Maria URL = http://"$1 }'
[ 실행 결과 - 한 눈에 보기 ]

[Q] AWS CLB는 어떻게 배포가 되었을 까요?
: Cloud Controller Manager 동작(아래 예시) - Docs → 하지만 부족한점? (동적 파드 IP 등)
- 노드 컨트롤러: 클라우드 공급자가 응답을 멈춘 후 클라우드에서 노드가 삭제되었는지 확인하기 위해 클라우드 공급자를 확인합니다.
- 경로 컨트롤러: 기본 클라우드 인프라에서 경로를 설정하기 위한 것입니다.
- 서비스 컨트롤러: 클라우드 공급자 로드 밸런서를 생성, 업데이트 및 삭제합니다 - Docs
- 서비스 컨트롤러는 서비스 오브젝트 생성, 업데이트 그리고 삭제 이벤트를 수신한 다음 해당 서비스에 대한 엔드포인트를 적절하게 구성한다(엔드포인트슬라이스(EndpointSlice)의 경우, kube-controller-manager가 필요에 따라 이들을 관리한다).
- v1/Service : List , Get, Watch, Patch, Update
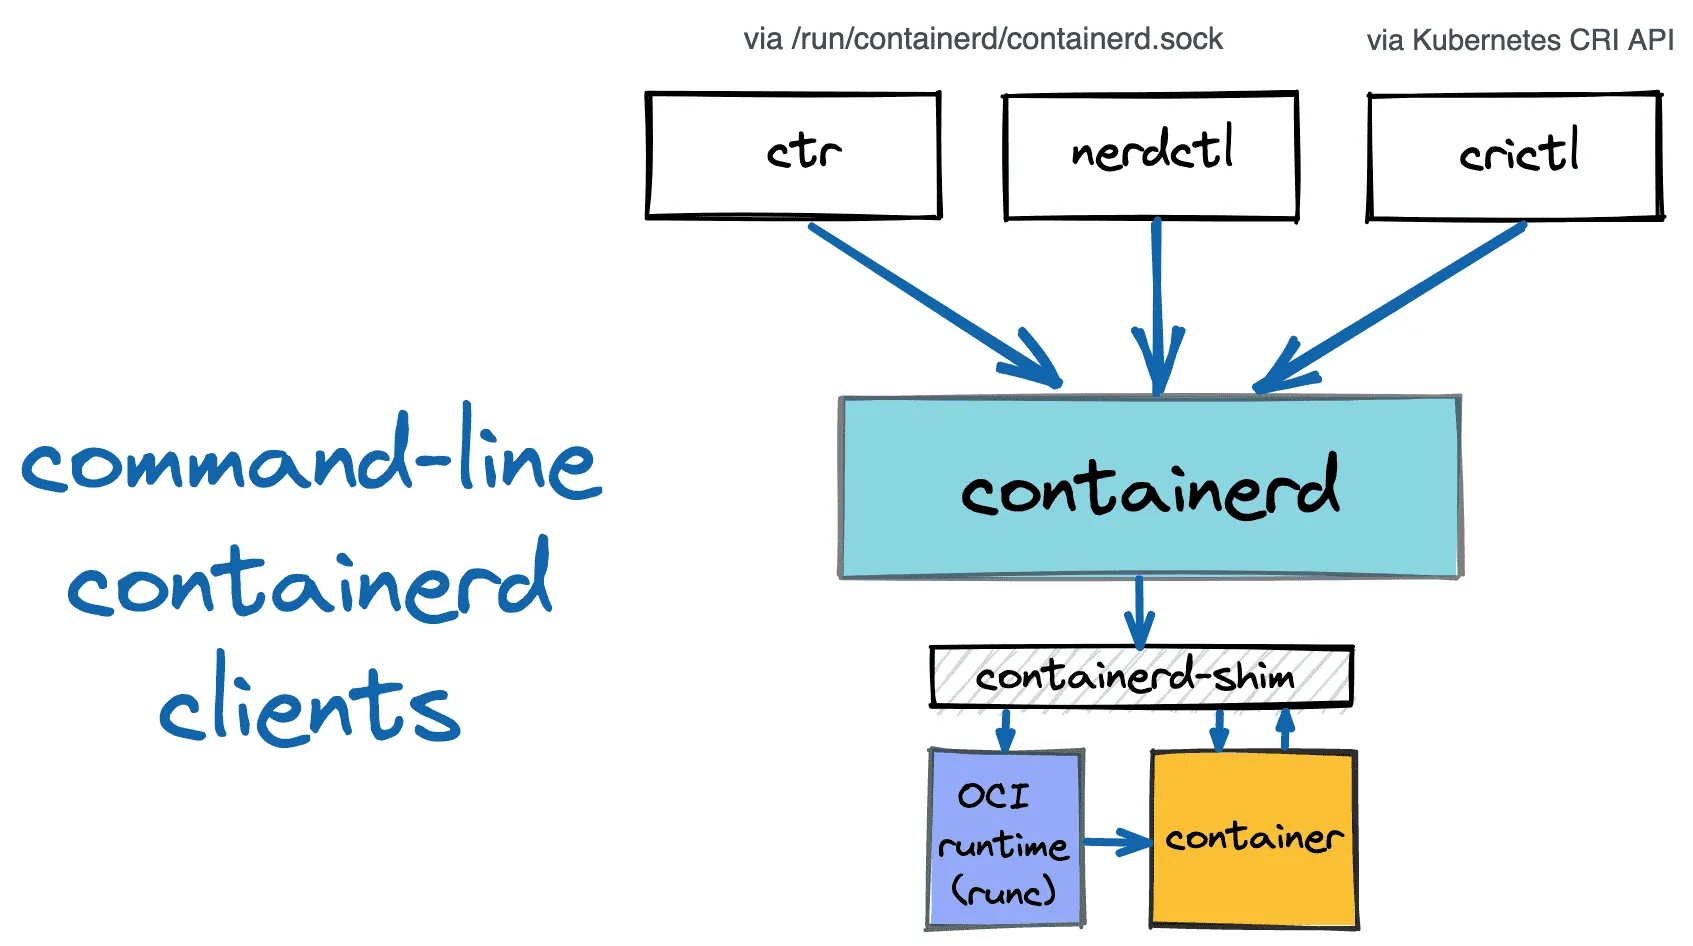
6-3. 노드에 배포된 컨테이너 정보 확인 Containerd clients 3종 : ctr, nerdctl, crictl - 링크

# ctr 버전 확인
ssh ec2-user@$N1 ctr --version

# ctr help
ssh ec2-user@$N1 ctr
NAME:
   ctr -
        __
  _____/ /______
 / ___/ __/ ___/
/ /__/ /_/ /
\___/\__/_/

containerd CLI
...

DESCRIPTION:
ctr is an unsupported debug and administrative client for interacting with the containerd daemon.
Because it is unsupported, the commands, options, and operations are not guaranteed to be backward compatible or stable from release to release of the containerd project.

COMMANDS:
   plugins, plugin            provides information about containerd plugins
   version                    print the client and server versions
   containers, c, container   manage containers
   content                    manage content
   events, event              display containerd events
   images, image, i           manage images
   leases                     manage leases
   namespaces, namespace, ns  manage namespaces
   pprof                      provide golang pprof outputs for containerd
   run                        run a container
   snapshots, snapshot        manage snapshots
   tasks, t, task             manage tasks
   install                    install a new package
   oci                        OCI tools
   shim                       interact with a shim directly
   help, h                    Shows a list of commands or help for one command

# 네임스페이스 확인
ssh ec2-user@$N1 sudo ctr ns list
NAME   LABELS
k8s.io

# 컨테이너 리스트 확인
for i in $N1 $N2; do echo ">> node $i <<"; ssh ec2-user@$i sudo ctr -n k8s.io container list; echo; done
CONTAINER                                                           IMAGE                                                                                          RUNTIME
28b6a15c475e32cd8777c1963ba684745573d0b6053f80d2d37add0ae841eb45    602401143452.dkr.ecr-fips.us-east-1.amazonaws.com/eks/pause:3.5                                io.containerd.runc.v2
4f266ebcee45b133c527df96499e01ec0c020ea72785eb10ef63b20b5826cf7c    602401143452.dkr.ecr-fips.us-east-1.amazonaws.com/eks/pause:3.5                                io.containerd.runc.v2
...

# 컨테이너 이미지 확인
for i in $N1 $N2; do echo ">> node $i <<"; ssh ec2-user@$i sudo ctr -n k8s.io image list --quiet; echo; done
...

# 태스크 리스트 확인
for i in $N1 $N2; do echo ">> node $i <<"; ssh ec2-user@$i sudo ctr -n k8s.io task list; echo; done
...

## 예시) 각 테스크의 PID(3706) 확인
ssh ec2-user@$N1 sudo ps -c 3706
PID CLS PRI TTY      STAT   TIME COMMAND
3099 TS   19 ?       Ssl    0:01 kube-proxy --v=2 --config=/var/lib/kube-proxy-config/config --hostname-override=ip-192-168-1-229.ap-northeast-2.compute.internal
6-4. ECR 퍼블릭 Repository 사용
☞ 퍼블릭 Repo 는 설정 시 us-east-1 를 사용 - 링크
# 퍼블릭 ECR 인증
aws ecr-public get-login-password --region us-east-1 | docker login --username AWS --password-stdin public.ecr.aws
cat /root/.docker/config.json | jq

# 퍼블릭 Repo 기본 정보 확인
aws ecr-public describe-registries --region us-east-1 | jq

# 퍼블릭 Repo 생성
NICKNAME=<각자자신의닉네임>
NICKNAME=gasida
aws ecr-public create-repository --repository-name $NICKNAME/nginx --region us-east-1

# 생성된 퍼블릭 Repo 확인
aws ecr-public describe-repositories --region us-east-1 | jq
REPOURI=$(aws ecr-public describe-repositories --region us-east-1 | jq -r .repositories[].repositoryUri)
echo $REPOURI

# 이미지 태그
docker pull nginx:alpine
docker images
docker tag nginx:alpine $REPOURI:latest
docker images

# 이미지 업로드
docker push $REPOURI:latest

# 파드 실행
kubectl run mynginx --image $REPOURI
kubectl get pod
kubectl delete pod mynginx

# 퍼블릭 이미지 삭제
aws ecr-public batch-delete-image \
      --repository-name $NICKNAME/nginx \
      --image-ids imageTag=latest \
      --region us-east-1

# 퍼블릭 Repo 삭제
aws ecr-public delete-repository --repository-name $NICKNAME/nginx --force --region us-east-1
6-5. [Add-on] 실습
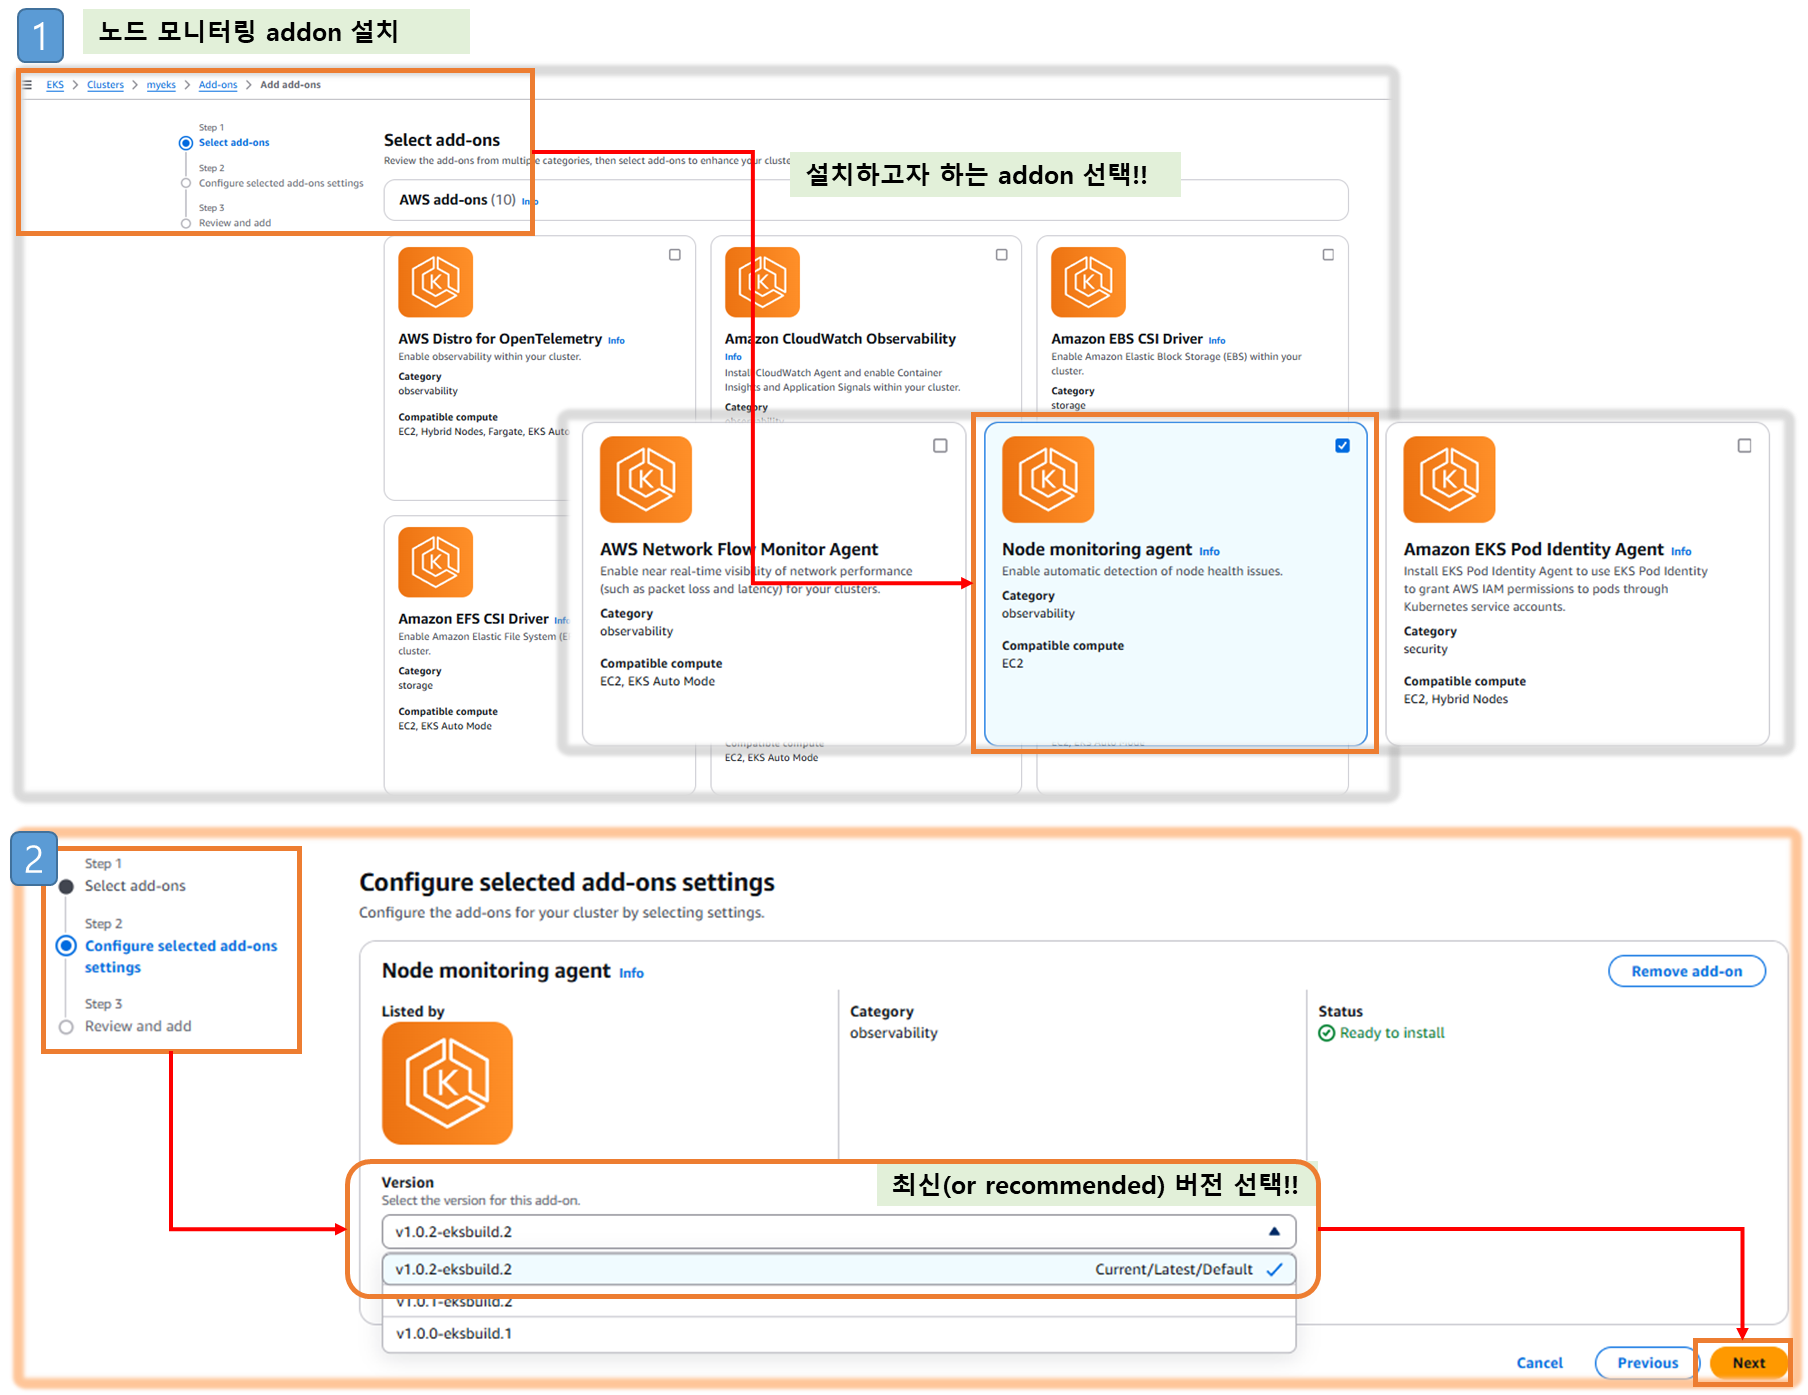
▶ eks-node-monitoring-agent EKS 노드 상태 - Docs
- 웹 관리 콘솔에서 직접 선택 후 설치
# 기본 정보 확인
eksctl utils describe-addon-versions --kubernetes-version 1.31 | grep AddonName
eksctl utils describe-addon-versions --kubernetes-version 1.31 | grep AddonName | grep -i node
eksctl utils describe-addon-versions --kubernetes-version 1.31 --name eks-node-monitoring-agent | grep AddonVersion
"AddonVersion": "v1.0.1-eksbuild.2",
"AddonVersion": "v1.0.0-eksbuild.1",
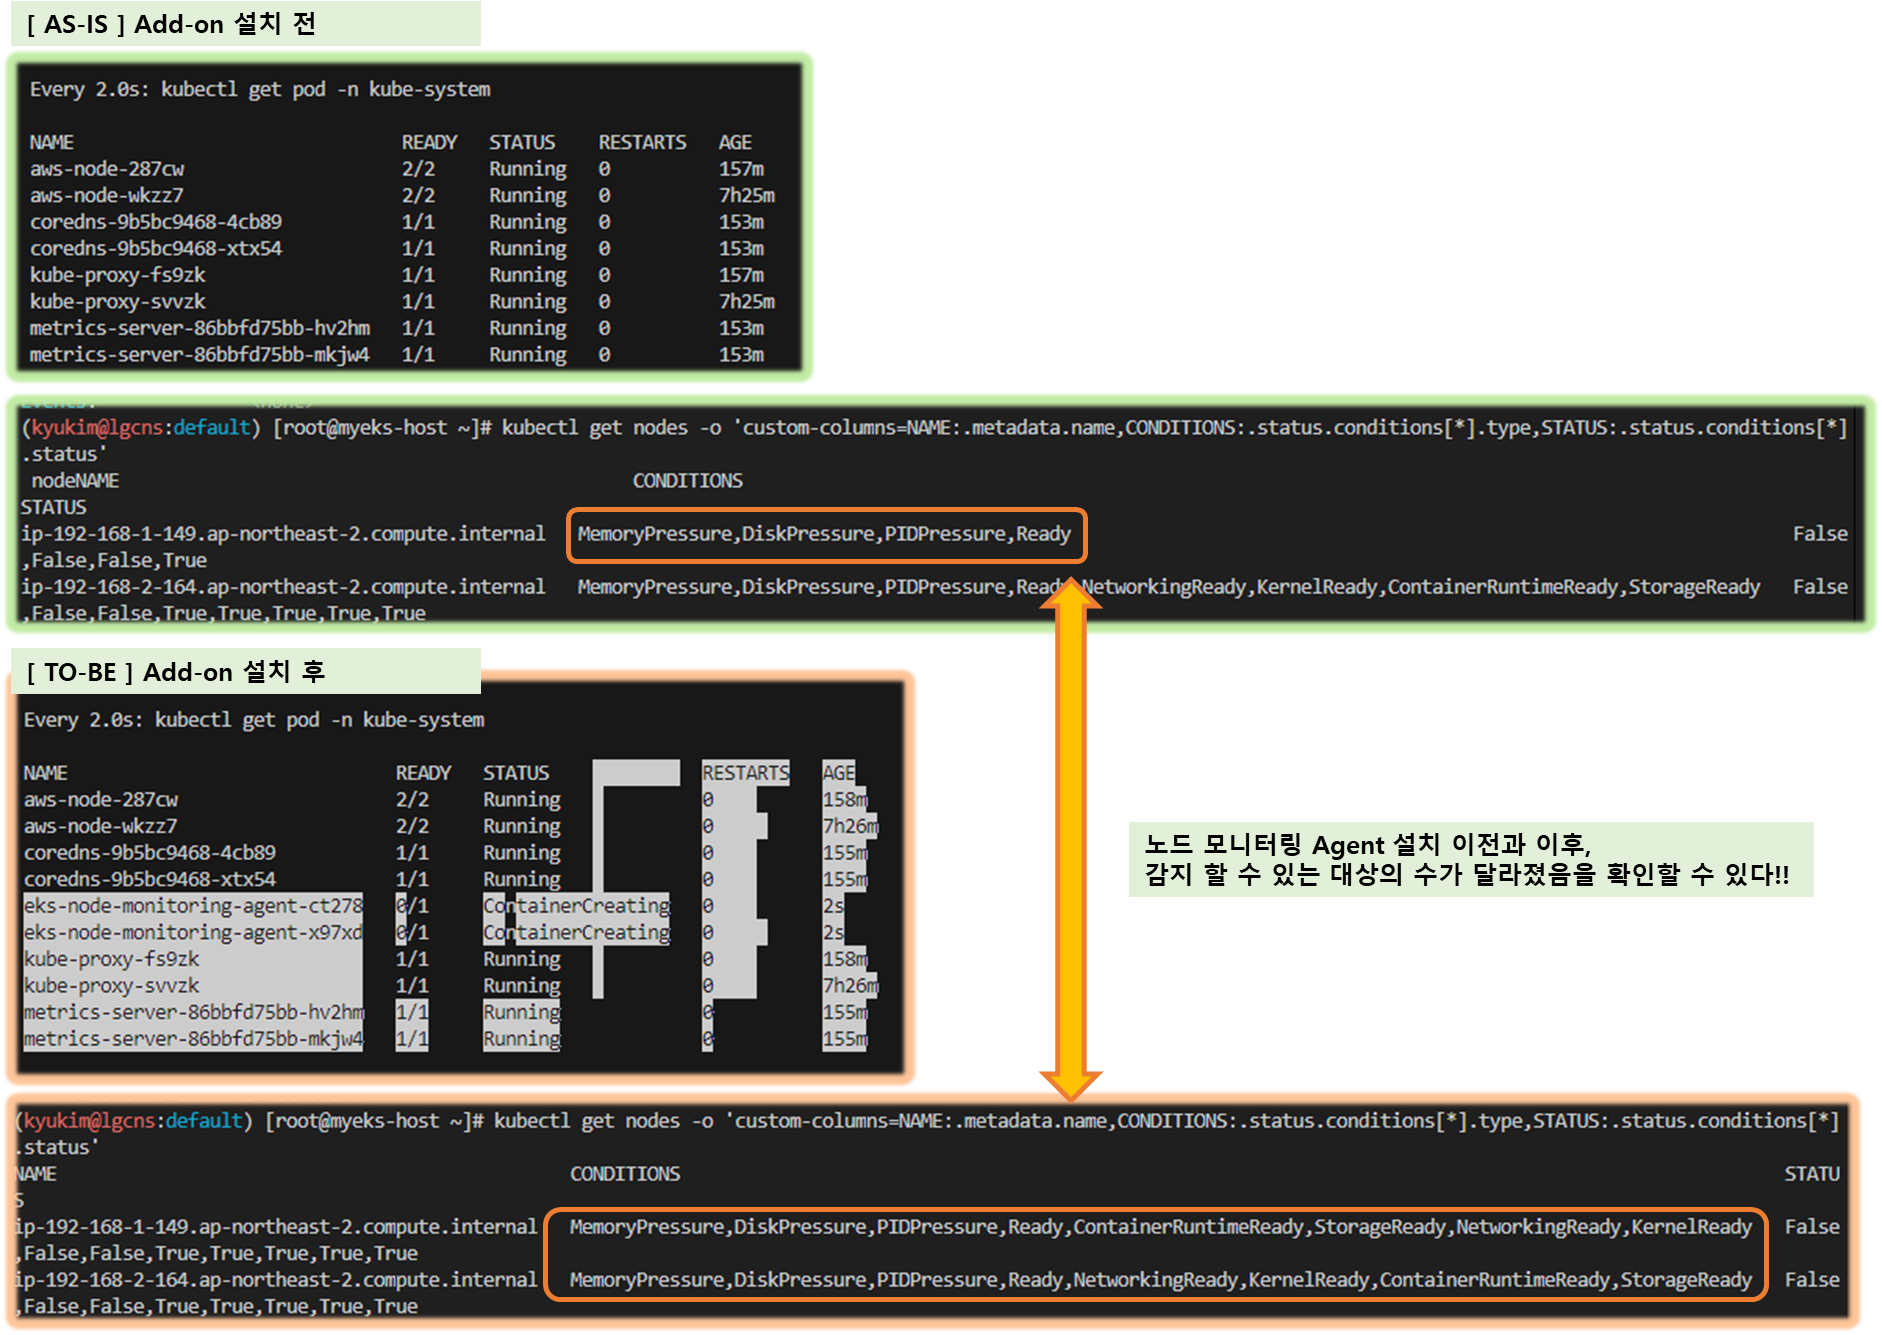
# 설치 확인
watch -d kubectl get pod -n kube-system
kube-system eks-node-monitoring-agent-8lgdx 1/1 Running 0 110s
kube-system eks-node-monitoring-agent-zmpjm 1/1 Running 0 110s
# 노드 상태 정보 관찰 추가 : ContainerRuntimeReady,StorageReady,NetworkingReady,KernelReady
kubectl get nodes -o 'custom-columns=NAME:.metadata.name,CONDITIONS:.status.conditions[*].type,STATUS:.status.conditions[*].status'
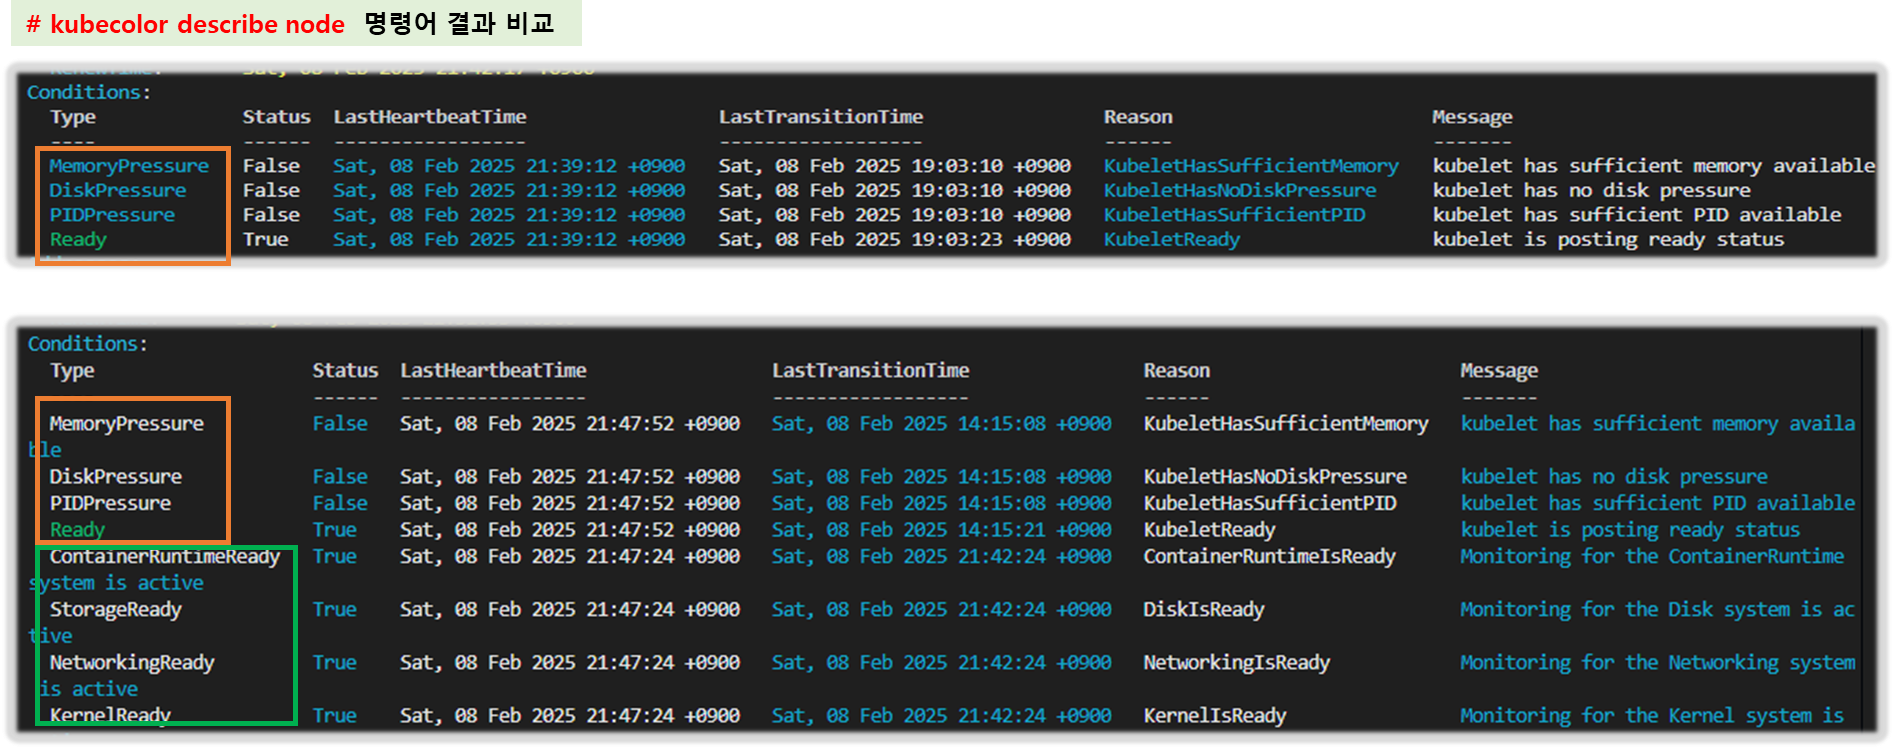
kubecolor describe node
Conditions:
Type Status LastHeartbeatTime LastTransitionTime Reason Message
---- ------ ----------------- ------------------ ------ -------
MemoryPressure False Sun, 02 Feb 2025 00:02:27 +0900 Sat, 01 Feb 2025 21:59:52 +0900 KubeletHasSufficientMemory kubelet has sufficient memory available
DiskPressure False Sun, 02 Feb 2025 00:02:27 +0900 Sat, 01 Feb 2025 21:59:52 +0900 KubeletHasNoDiskPressure kubelet has no disk pressure
PIDPressure False Sun, 02 Feb 2025 00:02:27 +0900 Sat, 01 Feb 2025 21:59:52 +0900 KubeletHasSufficientPID kubelet has sufficient PID available
Ready True Sun, 02 Feb 2025 00:02:27 +0900 Sat, 01 Feb 2025 22:00:07 +0900 KubeletReady kubelet is posting ready status
ContainerRuntimeReady True Sun, 02 Feb 2025 00:02:23 +0900 Sun, 02 Feb 2025 00:02:23 +0900 ContainerRuntimeIsReady Monitoring for the ContainerRuntime system is active
StorageReady True Sun, 02 Feb 2025 00:02:23 +0900 Sun, 02 Feb 2025 00:02:23 +0900 DiskIsReady Monitoring for the Disk system is active
NetworkingReady True Sun, 02 Feb 2025 00:02:23 +0900 Sun, 02 Feb 2025 00:02:23 +0900 NetworkingIsReady Monitoring for the Networking system is active
KernelReady True Sun, 02 Feb 2025 00:02:23 +0900 Sun, 02 Feb 2025 00:02:23 +0900 KernelIsReady Monitoring for the Kernel system is active
# 노드 상태 정보 확인
kubectl get nodes -o 'custom-columns=NAME:.metadata.name,CONDITIONS:.status.conditions[*].type,STATUS:.status.conditions[*].status'
NAME CONDITIONS STATUS
ip-192-168-1-164.ap-northeast-2.compute.internal MemoryPressure,DiskPressure,PIDPressure,Ready,ContainerRuntimeReady,StorageReady,NetworkingReady,KernelReady False,False,False,True,True,True,True,True
ip-192-168-2-20.ap-northeast-2.compute.internal MemoryPressure,DiskPressure,PIDPressure,Ready,ContainerRuntimeReady,StorageReady,NetworkingReady,KernelReady False,False,False,True,True,True,True,True
...>> 아래는 eks-node-monitoring-agent 미설치시 출력 정보
ip-192-168-1-164.ap-northeast-2.compute.internal MemoryPressure,DiskPressure,PIDPressure,Ready False,False,False,True
ip-192-168-2-20.ap-northeast-2.compute.internal MemoryPressure,DiskPressure,PIDPressure,Ready False,False,False,True
# 특정 노드 세부 정보
kubectl describe node <node-name>
kubecolor describe node <node-name>
# 노드 이벤트 정보
kubectl get events --field-selector involvedObject.kind=Node
kubectl get events -w --field-selector involvedObject.kind=Node
# 파드 로그 확인
kubectl krew install stern
kubectl stern -l app.kubernetes.io/instance=eks-node-monitoring-agent -n kube-system # EC2 재부팅 해두고 로그 확인
# 이벤트 확인 https://docs.aws.amazon.com/ko_kr/eks/latest/userguide/node-health.html#node-health-issues
kubectl get events --field-selector=reportingComponent=eks-node-monitoring-agent # EC2 재부팅 해두고 로그 확인
LAST SEEN TYPE REASON OBJECT MESSAGE
60s Warning StorageReady node/ip-192-168-1-164.ap-northeast-2.compute.internal IODelays: Process (kworker/u4:1-xfs-cil/nvme0n1p1) (PID 22) incurred 14.6 seconds of I/O delay
- 웹 관리 콘솔에서 확인 - Link
- Node auto repair : 문제 발생 시 자동으로 노드 교체 기능 - Docs
- By itself, node auto repair can react to the Ready condition of the kubelet and any node objects that are manually deleted. When paired with the node monitoring agent, node auto repair can react to more conditions that wouldn’t be detected otherwise. These additional conditions include KernelReady, NetworkingReady, and StorageReady.
- Node auto repair cannot handle certain problems that are reported such as ~~DiskPressure~~, ~~MemoryPressure~~, and ~~PIDPressure~~.
- Amazon EKS waits 10 minutes before acting on the AcceleratedHardwareReady NodeConditions, and 30 minutes for all other conditions.
- 설정
- AWS CLI, add the --node-repair-config enabled=true
- eksctl ClusterConfig
# An example ClusterConfig that uses a managed node group with auto repair.

apiVersion: eksctl.io/v1alpha5
kind: ClusterConfig

metadata:
  name: cluster-44
  region: us-west-2

managedNodeGroups:
- name: ng-1
  nodeRepairConfig:
    enabled: true
[ 실행 결과 - 한 눈에 보기 ]
6-6. 관리형 노드에 노드 추가 및 삭제 Scale
# 옵션 [터미널1] EC2 생성 모니터링
#aws ec2 describe-instances --query "Reservations[*].Instances[*].{PublicIPAdd:PublicIpAddress,PrivateIPAdd:PrivateIpAddress,InstanceName:Tags[?Key=='Name']|[0].Value,Status:State.Name}" --filters Name=instance-state-name,Values=running --output table
while true; do aws ec2 describe-instances --query "Reservations[*].Instances[*].{PublicIPAdd:PublicIpAddress,PrivateIPAdd:PrivateIpAddress,InstanceName:Tags[?Key=='Name']|[0].Value,Status:State.Name}" --filters Name=instance-state-name,Values=running --output text ; echo "------------------------------" ; sleep 1; done

# eks 노드 그룹 정보 확인
eksctl get nodegroup --cluster $CLUSTER_NAME --name $CLUSTER_NAME-nodegroup

# 노드 2개 → 3개 증가
eksctl scale nodegroup --cluster $CLUSTER_NAME --name $CLUSTER_NAME-nodegroup --nodes 3 --nodes-min 3 --nodes-max 6

# 노드 확인
kubectl get nodes -o wide
kubectl get nodes -l eks.amazonaws.com/nodegroup=$CLUSTER_NAME-nodegroup

# 노드 3개 → 2개 감소 : 적용까지 시간이 소요됨
aws eks update-nodegroup-config --cluster-name $CLUSTER_NAME --nodegroup-name $CLUSTER_NAME-nodegroup --scaling-config minSize=2,maxSize=2,desiredSize=2
6-7. (심화) EKS Cluster Endpoint 를 Public(IP제한)+Private 로 변경 및 확인
☞ 설정 먼저 해두자!(6분 소요) - Docs 참고링크
※ 정확한 실습을 위해서는 kubectl 을 외부망에서 실행 할 수 있는 환경이어야함

- api-server → kubelet [private 통신]
- (외부 인터넷망) kubectl-host → (IP 접속 통제 설정 가능) api-server [public 통신]
- kubelet / kube-proxy → api-server [private 통신]
Step1. 현재 정보 확인
# [모니터링1] 설정 후 변경 확인 >> 추가로 자신의 집 PC에서도 아래 dig 조회 모니터링 걸어보자!
APIDNS=$(aws eks describe-cluster --name $CLUSTER_NAME | jq -r .cluster.endpoint | cut -d '/' -f 3)
dig +short $APIDNS
while true; do dig +short $APIDNS ; echo "------------------------------" ; date; sleep 1; done

# [모니터링2] 노드에서 ControlPlane과 통신 연결 확인 : IPv4 kube-proxy, kubelet 확인
N1=$(kubectl get node --label-columns=topology.kubernetes.io/zone --selector=topology.kubernetes.io/zone=ap-northeast-2a -o jsonpath={.items[0].status.addresses[0].address})
N2=$(kubectl get node --label-columns=topology.kubernetes.io/zone --selector=topology.kubernetes.io/zone=ap-northeast-2c -o jsonpath={.items[0].status.addresses[0].address})
while true; do ssh ec2-user@$N1 sudo ss -tnp | egrep 'kubelet|kube-proxy' ; echo ; ssh ec2-user@$N2 sudo ss -tnp | egrep 'kubelet|kube-proxy' ; echo "------------------------------" ; date; sleep 1; done

# Public(IP제한)+Private 로 변경 : 설정 후 6분 정도 후 반영 >> IP를 자신의 집 공인 IP를 직접 넣어보자!
aws eks update-cluster-config --region $AWS_DEFAULT_REGION --name $CLUSTER_NAME --resources-vpc-config endpointPublicAccess=true,publicAccessCidrs="$(curl -s ipinfo.io/ip)/32",endpointPrivateAccess=true
Step2. kubectl 확인
# kubectl 사용 확인
kubectl get node -v=6
kubectl cluster-info
ss -tnp | grep kubectl  # 신규 터미널에서 확인 해보자 >> EKS 동작 VPC 내부에서는 Cluster Endpoint 도메인 질의 시 Private IP 정보를 리턴해준다

# EKS ControlPlane 보안그룹 ID 확인
aws ec2 describe-security-groups --filters Name=group-name,Values=*ControlPlaneSecurityGroup* --query "SecurityGroups[*].[GroupId]" --output text
CPSGID=$(aws ec2 describe-security-groups --filters Name=group-name,Values=*ControlPlaneSecurityGroup* --query "SecurityGroups[*].[GroupId]" --output text)
echo $CPSGID

# 노드 보안그룹에 eksctl-host 에서 노드(파드)에 접속 가능하게 룰(Rule) 추가 설정
aws ec2 authorize-security-group-ingress --group-id $CPSGID --protocol '-1' --cidr 192.168.1.100/32

# (최소 6분 이후 확인) 아래 dig 조회
dig +short $APIDNS

# kubectl 사용 확인
kubectl get node -v=6
kubectl cluster-info
Step3. 노드에서 확인
# 모니터링 : tcp peer 정보 변화 확인
while true; do ssh ec2-user@$N1 sudo ss -tnp | egrep 'kubelet|kube-proxy' ; echo ; ssh ec2-user@$N2 sudo ss -tnp | egrep 'kubelet|kube-proxy' ; echo "------------------------------" ; date; sleep 1; done

# kube-proxy rollout : ss에 kube-proxy peer IP 변경 확인
kubectl rollout restart ds/kube-proxy -n kube-system

# kubelet 은 노드에서 systemctl restart kubelet으로 적용해보자 : ss에 kubelet peer IP 변경 확인
for i in $N1 $N2; do echo ">> node $i <<"; ssh ec2-user@$i sudo systemctl restart kubelet; echo; done
Step4. 자신의 개인 PC에서 EKS API 정보 확인
# 외부이기 때문에 Cluster Endpoint 도메인 질의 시 Public IP 정보를 리턴해준다
dig +short $APIDNS
[ 실습 결과 - 한 눈에 보기 ]

중요 !! (실습 완료 후) 자원 삭제
## - Amazon EKS 클러스터 ## 삭제(10분 정도 소요):
`eksctl delete cluster --name $CLUSTER_NAME`

## - (클러스터 삭제 완료 확인 후) AWS CloudFormation 스택 삭제 : **
`aws cloudformation delete-stack --stack-name myeks`
[ 마무리 ]
25년 첫 스터디 시작을 AEWS와 함께 시작하게 되었습니다. 막대한 공부량에 두려움 반, 더 성장할 수 있다는 생각에 기대감 반으로 과제를 시작합니다. 첫 타임부터 gasida님의 뜨거운 열정(?!) 이 느껴지는 시간이어서 다음 시간이 더욱 기대가 됩니다. 회사 업무를 하면서 시간을 쪼개 따라가야 하는 부담감이 있지만, 이번 스터디도 끝까지 완주할 생각입니다.
이번 과제를 하면서 클러스터에 대해 좀 더 확실히, 깊게 알아갈 수 있을 것 같은 기대감(?!) 이 듭니다. ^^;
[ 참고 링크 모음 ]
▶ [sam.0] 쿠버네티스 딥다이브 - 추천 링크
- 추천 👍🏻 쿠버네티스 hard?way - Link
- Live Debugging K8s - Link
- 추천 👍🏻 쿠버네티스의 인증 - Link
- kube-apiserver - Link
- kube-controller-manager - Link
- 추천 👍🏻 kube-scheduler - Link
- 추천 👍🏻 kubelet - Link
▶ Amazon EKS 필독영상 : Link
- 요약 문서(PDF) : Link
▶ Hands-On 추천 : "EKS에서 Spot Instance 사용" : Link
▶ K8S 아키텍쳐 추천 : 김태민 기술 블로그 - 링크 아키텍처
▶ Highly Available 구성 - 링크
▶ 추천 Blog
1) 부운영자 Ongja 님 블로그 : Amazon EKS 의 소개
3) EKS 아키텍처 - Docs*
4) EKS 배포 방식 : (1) 웹 관리 콘솔 - 링크, (2) eksctl -링크, (3) IaC - CDK, CloudFormation, Terraform - 링크 등
5) 악분 일상 : eksctl로 EKS생성 - Blog
6) (심화) [CNKCD2024] Kubernetes 접근 제어 proxy 서버 개발기 (최주환) : 링크
7) 악분일상님 : 쿠버네티스 노드 헬스체크 원리(lease API) - Lease(리스) , Blog
▶ 추천 : EKS Expension Hands-on 강의 : 링크
'AEWS' 카테고리의 다른 글
| AEWS - 6주차 EKS Security (1) | 2025.03.11 |
|---|---|
| AEWS 5주차 - EKS Autoscaling (0) | 2025.03.08 |
| AEWS 4주차 - EKS Observability (0) | 2025.02.24 |
| AEWS 3주차 - EKS Storage, Managed Node Groups (1) | 2025.02.17 |
| AEWS 2주차 - EKS Networking (0) | 2025.02.11 |


