
| 일 | 월 | 화 | 수 | 목 | 금 | 토 |
|---|---|---|---|---|---|---|
| 1 | 2 | 3 | ||||
| 4 | 5 | 6 | 7 | 8 | 9 | 10 |
| 11 | 12 | 13 | 14 | 15 | 16 | 17 |
| 18 | 19 | 20 | 21 | 22 | 23 | 24 |
| 25 | 26 | 27 | 28 | 29 | 30 | 31 |
Tags
- 스트림릿 활용한 GPT
- GPT 멀티챗
- 타빌리
- PuMuPDF
- K8S
- Jenkins
- vpc cni
- prometheus
- WSL
- grafana
- envoy
- Ambient
- aws eks
- Ingress
- Kubernetes
- kiali
- Observability
- Streamlit 활용한 챗봇만들기
- CICD
- GPT 역할 부여하기
- 멀티에이전트 RAG
- 랭그래프 목차만들기
- vagrant
- Kind
- Istio
- service mesh
- docker
- CNI
- argocd
- loadbalancer
Archives
- Today
- Total
WellSpring
WSL2 + Vagrant 환경 구성 본문
1. Install Vagrant
1) WSL2 에서 Vagrant 설치
# run inside WSL 2
# check https://www.vagrantup.com/downloads for more info
curl -fsSL https://apt.releases.hashicorp.com/gpg | sudo apt-key add -
sudo apt-add-repository "deb [arch=amd64] https://apt.releases.hashicorp.com $(lsb_release -cs) main"
sudo apt-get update && sudo apt-get install vagrant
2) enable WSL 2 support ( add below 2-lines into ~/.bashrc )
# append those two lines into ~/.bashrc
echo 'export VAGRANT_WSL_ENABLE_WINDOWS_ACCESS="1"' >> ~/.bashrc
echo 'export PATH="$PATH:/mnt/c/Program Files/Oracle/VirtualBox"' >> ~/.bashrc

# now reload the ~/.bashrc file
source ~/.bashrc
2. Install virtualbox_WSL2 plugin
1) Install Vagrant Plug-In
⚠ Since September 2021 vagrant starts to fail with an error like this one:
더보기
Bringing machine 'default' up with 'virtualbox' provider...
==> default: Checking if box 'hashicorp/bionic64' version '1.0.282' is up to date...
==> default: Clearing any previously set forwarded ports...
==> default: Clearing any previously set network interfaces...
==> default: Preparing network interfaces based on configuration...
    default: Adapter 1: nat
==> default: Forwarding ports...
    default: 22 (guest) => 2222 (host) (adapter 1)
==> default: Booting VM...
==> default: Waiting for machine to boot. This may take a few minutes...
    default: SSH address: 127.0.0.1:2222
    default: SSH username: vagrant
    default: SSH auth method: private key
    default: Warning: Connection refused. Retrying...
    default: Warning: Connection refused. Retrying...
    default: Warning: Connection refused. Retrying...
    default: Warning: Connection refused. Retrying...
    default: Warning: Connection refused. Retrying...
    default: Warning: Connection refused. Retrying...
==> default: Waiting for cleanup before exiting...
In order to fix it, an older solution from the community still solves the problem:
# install vagrant on WSL2
sudo apt install vagrant
# Install virtualbox_WSL2 plugin
vagrant plugin install virtualbox_WSL2
더보기

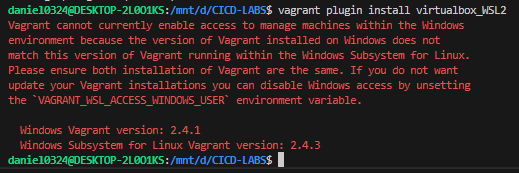
[ Error 화면 : Windows 용 vagrant 가 먼저 설치되어 있어 제거했다 ~ ㅡㅡ;; ]
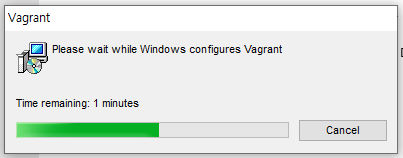
[ 삭제 후 , 재구성 되는 과정 ]

[ 설치 후, 재기동 하면 완료 !! ]
Step1. vagrant 패키지 설치하기
Step2. vagrant plug-In 설치 (on WSL2)
☞ You can check the source code at:
- https://github.com/Karandash8/virtualbox_WSL2
[ 참조 링크 모음 ]
더보기
- VirtualBox download page
https://www.virtualbox.org/wiki/Downloads - Vagrant Quick Start tutorial
https://learn.hashicorp.com/tutorials/vagrant/getting-started-project-setup?in=vagrant/getting-started - Vagrant and Windows Subsystem for Linux
https://www.vagrantup.com/docs/other/wsl - Install WSL 2 on Windows 10
https://www.thomasmaurer.ch/2019/06/install-wsl-2-on-windows-10/ - Connection Refused in Vagrant using WSL 2
https://stackoverflow.com/questions/65001570/connection-refused-in-vagrant-using-wsl-2 - Karandash8/virtualbox_WSL2
https://github.com/Karandash8/virtualbox_WSL2
'Tip & Tips' 카테고리의 다른 글
| Windows - AWS CLI 설치 및 환경 구성 (2) | 2024.10.01 |
|---|---|
| [Tip & Tips] WSL - 삭제하기 (1) | 2024.09.12 |
| [Tip & Tips] Vagrant 사용하기 - 로컬 호스트 파일 복사 (1) | 2024.09.07 |
'Tip & Tips' Related Articles
more


