| 일 | 월 | 화 | 수 | 목 | 금 | 토 |
|---|---|---|---|---|---|---|
| 1 | 2 | 3 | 4 | 5 | 6 | 7 |
| 8 | 9 | 10 | 11 | 12 | 13 | 14 |
| 15 | 16 | 17 | 18 | 19 | 20 | 21 |
| 22 | 23 | 24 | 25 | 26 | 27 | 28 |
- kiali
- 멀티에이전트 RAG
- Ingress
- 타빌리
- Kubernetes
- prometheus
- Ambient
- vpc cni
- Istio
- Jenkins
- CNI
- docker
- WSL
- PuMuPDF
- Observability
- K8S
- aws eks
- envoy
- 랭그래프 목차만들기
- CICD
- Streamlit 활용한 챗봇만들기
- grafana
- service mesh
- loadbalancer
- argocd
- vagrant
- 스트림릿 활용한 GPT
- GPT 멀티챗
- Kind
- GPT 역할 부여하기
- Today
- Total
WellSpring
2주차 - GitHub Actions CI/CD 본문
※ 본 게재 글은 gasida님의 '약식 CI/CD' 강의내용과 실습예제 및 GitHub, Docker 관련 공식문서 및 Blog 등을 참고하여 작성하였습니다.
1. GitHub Action 이란?
☞ Repository에 있는 소스를 기반으로 Build, Test, Deploy를 자동화 할 수 있는 CI/CD(연속 통합 및 지속적인 업데이트) 플랫폼이다. 단순한 DevOps 수준을 넘어 리포지토리에서 다른 이벤트가 발생할 때 워크플로를 실행할 수 있도록 해준다.
☞ CI/CD를 포함하여 원하는 작업을 수행하기 위한 작업을 검색, 생성 및 공유하고 완전히 사용자 정의된 WorkFlow에서 작업을 결합할 수 있도록 도와준다.

[ More ... ]
1. WorkFlow 란?
- 하나 이상의 작업을 실행할 구성 가능한 자동화된 프로세스이다.
- 리포지토리에 체크 인된 YAML 파일에서 정의되며,
- 리포지토리의 이벤트로 트리거될 때 실행되거나 수동으로 또는 정의된 일정에 따라 트리거 된다.
2. Event 란?
- 워크플로 실행을 트리거하는 리포지토리의 특정 활동이다.
3. 작업(Job) 이란?
- 동일한 실행기에서 실행되는 워크플로의 단계 집합
- 각 단계는 실행되는 셸 스크립트 또는 실행되는 ‘작업’ 이다.
- 단계는 순서대로 실행되며 서로 종속되며, 각 단계가 동일한 실행기에서 실행되므로 단계 간에 데이터 공유가 가능하다.
4. Actions
- 자주 반복되는 태스크를 수행하는 GitHub Actions 플랫폼용 사용자 지정 애플리케이션
5. 실행기
- 트리거될 때 워크플로를 실행하는 서버( Ubuntu Linux, Microsoft Windows, macOS 등)
- 각 실행자는 한 번에 하나의 작업을 실행할 수 있다
- 각 워크플로 실행은 새로 프로비저닝된 새 가상 머신에서 실행된다.
▶ (정보 참고) Your first GitHub Actions workflow
- GitHub Actions is a computer that runs code on your behalf based on your repo-level workflow-definition file(s).
- (참고) nektos/act : Run your GitHub Actions locally - https://github.com/nektos/act
- The process for it is as follows:
1. Create a GitHub.com repo for your project. : https://github.com/gasida/roadtok8s-py.git

2. Create a workflow-definition file (or multiple files) in your repo following a specific file path and format (more on this shortly).
3. Commit the workflow file(s) and push your code to GitHub.
4. Run workflows on demand or automatically based on your workflow definition file(s).
- Now let’s build a Hello World workflow to get a sense of how to define and run workflows.
- In chapter 2, we created two GitHub repositories; for this section, I’ll use my road-tok8s-py repo (https://github.com/jmitchel3/roadtok8s-py).
- In the root of your Python project, create the path .github/workflows/.
- This path is required for GitHub Actions to recognize your workflow definition files.
- For more advanced Git users, the workflows will only work on your default branch (e.g., main or master), so be sure to create these folders on your default branch.
mkdir -p .github/workflows/
touch .github/workflows/hello-world.yaml
- 워크 플로 파일 구성 : .github/work-flows/hello-world.yaml
- The name of the workflow
- When the workflow should run
- A single job to run (workflows can have many jobs)
- Which operating system to use (this is done via Docker container images)
- The steps, or code, to run in the job
- YAML 형식 : We need to convert these items into YAML format because that is what GitHub Actions workflows require.
- YAML format is a human-readable data serialization format commonly used for configuration and declarative programming.
- YAML is often great for at-a-glance reviews because it’s very easy to read, as you can see in the following listing.
- Listing 4.1 : YAML basics
name: Hello World
items:
  sub-item:
    name: Hello
    description: world
  sub-list:
    - element a
    - element b
other-list: [1, 2, 3]- Listing 4.2 is a YAML-formatted file that GitHub Actions workflows can understand.
- GitHub Actions is an example of declarative programming because we declare what we want to be done regardless of how exactly it gets done.
- Listing 4.2 : Hello World with Github Actions - Code
name: Hello World    # Github 웹 사이드바 이름
on:
  workflow_dispatch:
  push:

jobs:
  build:             # Jobs 이름
    runs-on: ubuntu-latest
    steps:
      - uses: actions/checkout@v3
      - name: Hello World         # Step 이름
        run: echo "Hello World"
- on: push : 저장소에 코드 푸시할 때 마다 워크플로 실행, scope 범위 설정 가능
- on: workflow_dispatch : 깃헙 웹 페이지에서 수동으로 워크플로 실행 가능

- runs-on: ubuntu-latest : ubuntu 가 가장 유연한 러너 - Docs , Images
- GitHub offers hosted virtual machines to run workflows.
- The virtual machine contains an environment of tools, packages, and settings available for GitHub Actions to use.
- steps : 실행하고자 하는 스텝, 코드 정의
- uses : 사용하려는 액션 이름, 위에서는 내장된 액션으로 코드 체크아웃, 거의 모든 워크플로에 필수적인 단계.
- name : 각 스텝의 이름(옵션)
- run : 명령 실행, (예. echo “my text”, “python3 my_script.py)
▶ After you create this file locally, be sure to commit and push the file to GitHub with the following
git add .github/workflows/hello-world.yaml
git commit -m "Create hello-world.yaml workflow"
git push origin main- 사이드바 이름(Hello World 확인), 커밋 내용
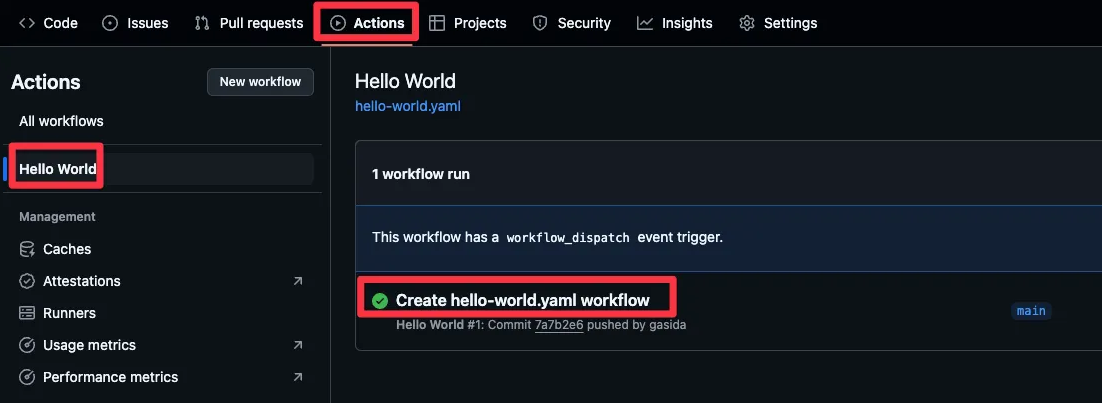
- Job 이름, use 스텝 확인, run 스텝 이름과 실행 확인

⇒ you just used a serverless CI/CD pipeline to run code on your behalf.
- (추가) env 찍어보기
name: Hello World
on:
  workflow_dispatch:
  push:

jobs:
  build:
    runs-on: ubuntu-latest
    steps:
      - uses: actions/checkout@v3
      - name: Print Env
        run: env
SELENIUM_JAR_PATH=/usr/share/java/selenium-server.jar
CONDA=/usr/share/miniconda
GITHUB_WORKSPACE=/home/runner/work/roadtok8s-py/roadtok8s-py
JAVA_HOME_11_X64=/usr/lib/jvm/temurin-11-jdk-amd64
GITHUB_PATH=/home/runner/work/_temp/_runner_file_commands/add_path_6e74f976-4037-4e67-9dd8-a4414fbe4d5c
GITHUB_ACTION=__run
JAVA_HOME=/usr/lib/jvm/temurin-11-jdk-amd64
GITHUB_RUN_NUMBER=6
RUNNER_NAME=GitHub Actions 5
GRADLE_HOME=/usr/share/gradle-8.11.1
GITHUB_REPOSITORY_OWNER_ID=75147009
ACTIONS_RUNNER_ACTION_ARCHIVE_CACHE=/opt/actionarchivecache
XDG_CONFIG_HOME=/home/runner/.config
DOTNET_SKIP_FIRST_TIME_EXPERIENCE=1
ANT_HOME=/usr/share/ant
JAVA_HOME_8_X64=/usr/lib/jvm/temurin-8-jdk-amd64
GITHUB_TRIGGERING_ACTOR=gasida
GITHUB_REF_TYPE=branch
HOMEBREW_CLEANUP_PERIODIC_FULL_DAYS=3650
ANDROID_NDK=/usr/local/lib/android/sdk/ndk/27.2.12479018
BOOTSTRAP_HASKELL_NONINTERACTIVE=1
***
PIPX_BIN_DIR=/opt/pipx_bin
STATS_TRP=true
GITHUB_REPOSITORY_ID=899971986
DEPLOYMENT_BASEPATH=/opt/runner
GITHUB_ACTIONS=true
STATS_VMD=true
ANDROID_NDK_LATEST_HOME=/usr/local/lib/android/sdk/ndk/27.2.12479018
SYSTEMD_EXEC_PID=477
GITHUB_SHA=618580515283a59b43b7e65e45d5377c3c12584b
GITHUB_WORKFLOW_REF=gasida/roadtok8s-py/.github/workflows/hello-world.yaml@refs/heads/main
POWERSHELL_DISTRIBUTION_CHANNEL=GitHub-Actions-ubuntu22
RUNNER_ENVIRONMENT=github-hosted
STATS_EXTP=https://provjobdprod.z13.web.core.windows.net/settings/provjobdsettings-latest/provjobd.data
DOTNET_MULTILEVEL_LOOKUP=0
GITHUB_REF=refs/heads/main
RUNNER_OS=Linux
GITHUB_REF_PROTECTED=false
HOME=/home/runner
GITHUB_API_URL=https://api.github.com
LANG=C.UTF-8
RUNNER_TRACKING_ID=github_582826df-1515-4e1a-b62f-87e0fec00a79
RUNNER_ARCH=X64
GOROOT_1_21_X64=/opt/hostedtoolcache/go/1.21.13/x64
RUNNER_TEMP=/home/runner/work/_temp
GITHUB_STATE=/home/runner/work/_temp/_runner_file_commands/save_state_6e74f976-4037-4e67-9dd8-a4414fbe4d5c
STATS_PIP=false
EDGEWEBDRIVER=/usr/local/share/edge_driver
JAVA_HOME_21_X64=/usr/lib/jvm/temurin-21-jdk-amd64
GITHUB_ENV=/home/runner/work/_temp/_runner_file_commands/set_env_6e74f976-4037-4e67-9dd8-a4414fbe4d5c
GITHUB_EVENT_PATH=/home/runner/work/_temp/_github_workflow/event.json
INVOCATION_ID=1166590ede064b55b04ad54069bed0e2
STATS_D=true
GITHUB_EVENT_NAME=push
GITHUB_RUN_ID=12213846645
JAVA_HOME_17_X64=/usr/lib/jvm/temurin-17-jdk-amd64
ANDROID_NDK_HOME=/usr/local/lib/android/sdk/ndk/27.2.12479018
GITHUB_STEP_SUMMARY=/home/runner/work/_temp/_runner_file_commands/step_summary_6e74f976-4037-4e67-9dd8-a4414fbe4d5c
HOMEBREW_NO_AUTO_UPDATE=1
GITHUB_ACTOR=gasida
NVM_DIR=/home/runner/.nvm
SGX_AESM_ADDR=1
GITHUB_RUN_ATTEMPT=1
STATS_RDCL=true
ANDROID_HOME=/usr/local/lib/android/sdk
GITHUB_GRAPHQL_URL=https://api.github.com/graphql
RUNNER_USER=runner
ACCEPT_EULA=Y
STATS_UE=true
USER=runner
GITHUB_SERVER_URL=https://github.com
STATS_V3PS=true
PIPX_HOME=/opt/pipx
GECKOWEBDRIVER=/usr/local/share/gecko_driver
STATS_EXT=true
CHROMEWEBDRIVER=/usr/local/share/chromedriver-linux64
SHLVL=1
ANDROID_SDK_ROOT=/usr/local/lib/android/sdk
VCPKG_INSTALLATION_ROOT=/usr/local/share/vcpkg
GITHUB_ACTOR_ID=75147009
RUNNER_TOOL_CACHE=/opt/hostedtoolcache
ImageVersion=20241201.1.0
DOTNET_NOLOGO=1
GOROOT_1_23_X64=/opt/hostedtoolcache/go/1.23.3/x64
GITHUB_WORKFLOW_SHA=618580515283a59b43b7e65e45d5377c3c12584b
GITHUB_REF_NAME=main
GITHUB_JOB=build
XDG_RUNTIME_DIR=/run/user/1001
AZURE_EXTENSION_DIR=/opt/az/azcliextensions
PERFLOG_LOCATION_SETTING=RUNNER_PERFLOG
STATS_VMFE=true
GITHUB_REPOSITORY=gasida/roadtok8s-py
CHROME_BIN=/usr/bin/google-chrome
ANDROID_NDK_ROOT=/usr/local/lib/android/sdk/ndk/27.2.12479018
GOROOT_1_22_X64=/opt/hostedtoolcache/go/1.22.9/x64
GITHUB_RETENTION_DAYS=90
JOURNAL_STREAM=8:18476
RUNNER_WORKSPACE=/home/runner/work/roadtok8s-py
LEIN_HOME=/usr/local/lib/lein
LEIN_JAR=/usr/local/lib/lein/self-installs/leiningen-2.11.2-standalone.jar
GITHUB_ACTION_REPOSITORY=
PATH=/snap/bin:/home/runner/.local/bin:/opt/pipx_bin:/home/runner/.cargo/bin:/home/runner/.config/composer/vendor/bin:/usr/local/.ghcup/bin:/home/runner/.dotnet/tools:/usr/local/sbin:/usr/local/bin:/usr/sbin:/usr/bin:/sbin:/bin:/usr/games:/usr/local/games:/snap/bin
RUNNER_PERFLOG=/home/runner/perflog
GITHUB_BASE_REF=
GHCUP_INSTALL_BASE_PREFIX=/usr/local
CI=true
SWIFT_PATH=/usr/share/swift/usr/bin
ImageOS=ubuntu22
STATS_D_D=true
GITHUB_REPOSITORY_OWNER=gasida
GITHUB_HEAD_REF=
GITHUB_ACTION_REF=
STATS_D_TC=true
GITHUB_WORKFLOW=Hello World
DEBIAN_FRONTEND=noninteractive
GITHUB_OUTPUT=/home/runner/work/_temp/_runner_file_commands/set_output_6e74f976-4037-4e67-9dd8-a4414fbe4d5c
AGENT_TOOLSDIRECTORY=/opt/hostedtoolcache
_=/usr/bin/env
2. 실습환경 구성
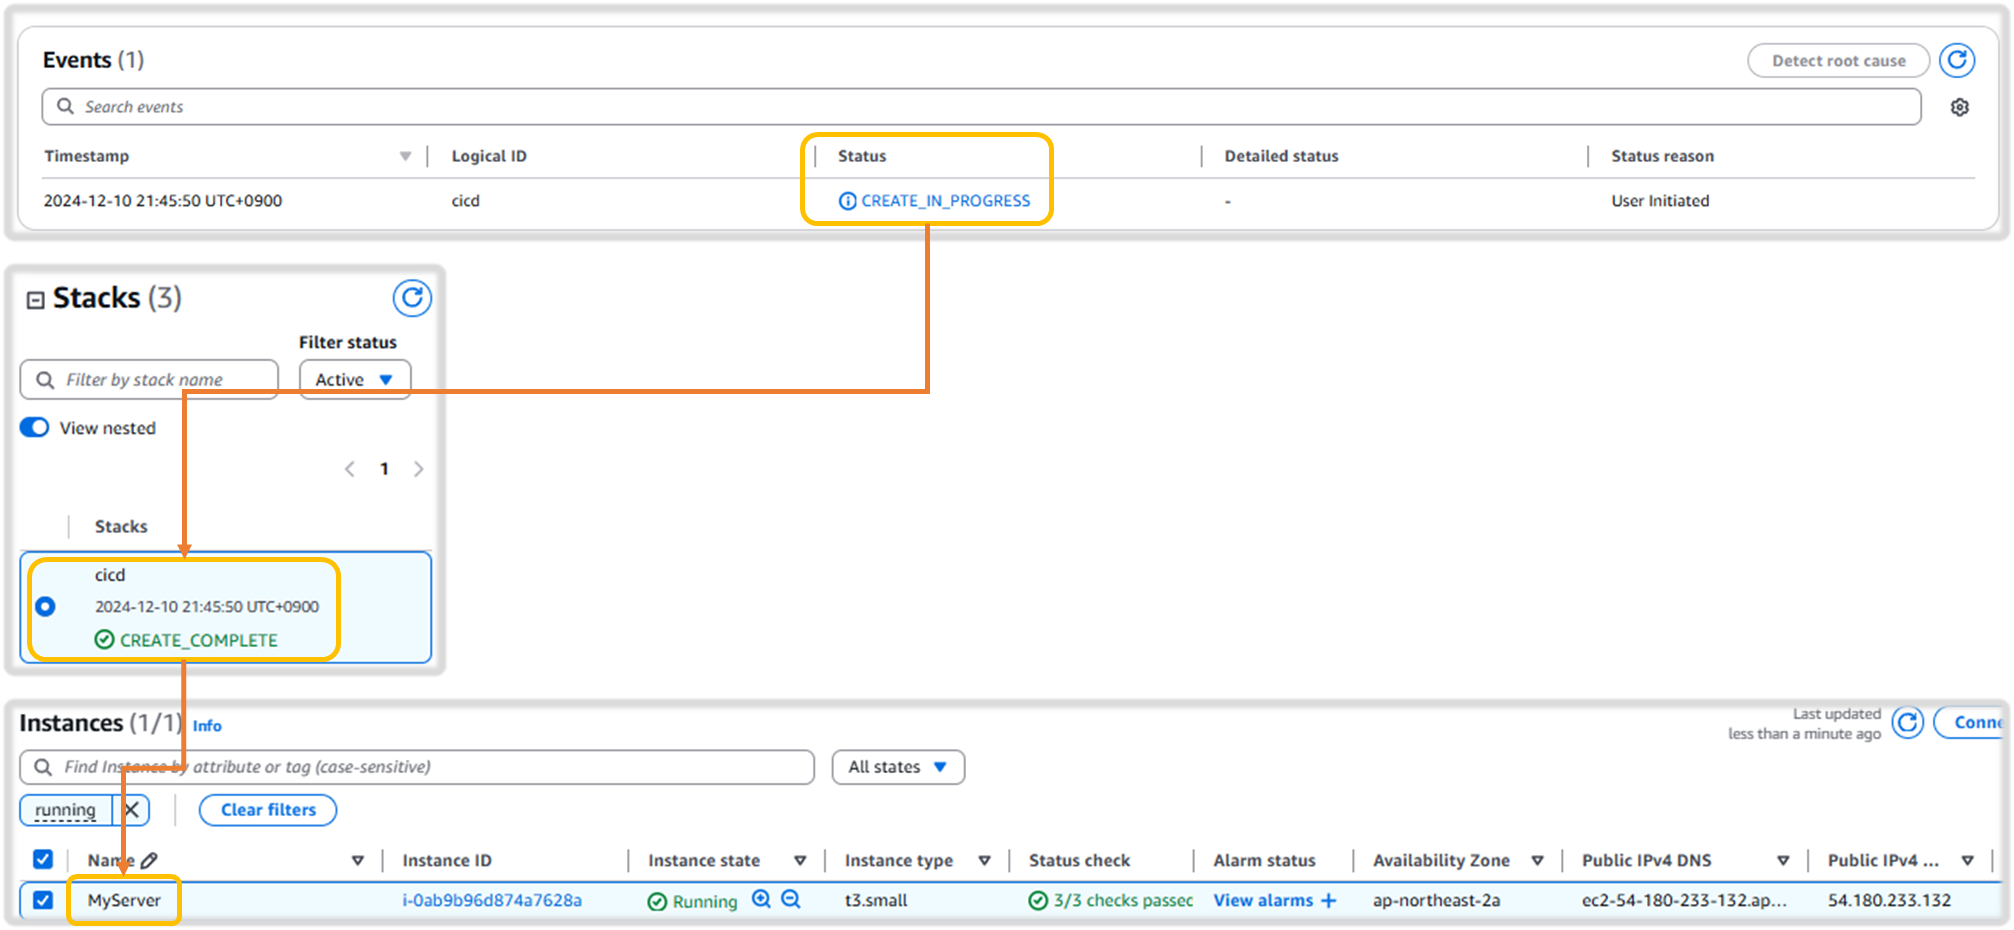
☞ CloudFormation : EC2 1대 - 보안 그룹(tcp 22,80 any IPv4 허용)
[ CloudFormation 사용 한 EC2 생성 ]


3. CICD 단계 별 테스트
3-1. 직접 개발 후 배포 ( without Github Actions )
1) AWS EC2 접속 후 아래 작업 : ssh ubuntu@<EC2 Public IP>
#
python3 -V

#
cat > server.py <<EOF
from http.server import ThreadingHTTPServer, BaseHTTPRequestHandler
from datetime import datetime

class RequestHandler(BaseHTTPRequestHandler):
    def do_GET(self):
        self.send_response(200)
        self.send_header('Content-type', 'text/plain')
        self.end_headers()
        now = datetime.now()
        response_string = now.strftime("The time is %-I:%M:%S %p, CloudNeta Study.\n")
        self.wfile.write(bytes(response_string, "utf-8"))

def startServer():
    try:
        server = ThreadingHTTPServer(('', 80), RequestHandler)
        print("Listening on " + ":".join(map(str, server.server_address)))
        server.serve_forever()
    except KeyboardInterrupt:
        server.shutdown()

if __name__== "__main__":
    startServer()
EOF

#
sudo python3 server.py
## 아래 확인 후
CTRL+C 로 실행 취소

# (신규터미널) 서버1 SSH 접속
curl localhost
sudo ss -tnlp
State        Recv-Q       Send-Q             Local Address:Port              Peer Address:Port       Process
LISTEN       0            5                        0.0.0.0:80                     0.0.0.0:*           users:(("python3",pid=3065,fd=3))
[ 실행 결과 - 한 눈에 보기 ]

2) Git 작업
Step1. 토큰 발급해두기 : scopes(repo, workflow)
: Git 접속 > Account Setting > developer Setting > Token 생성 + scope 지정

Step2. Private Repo 신규 생성
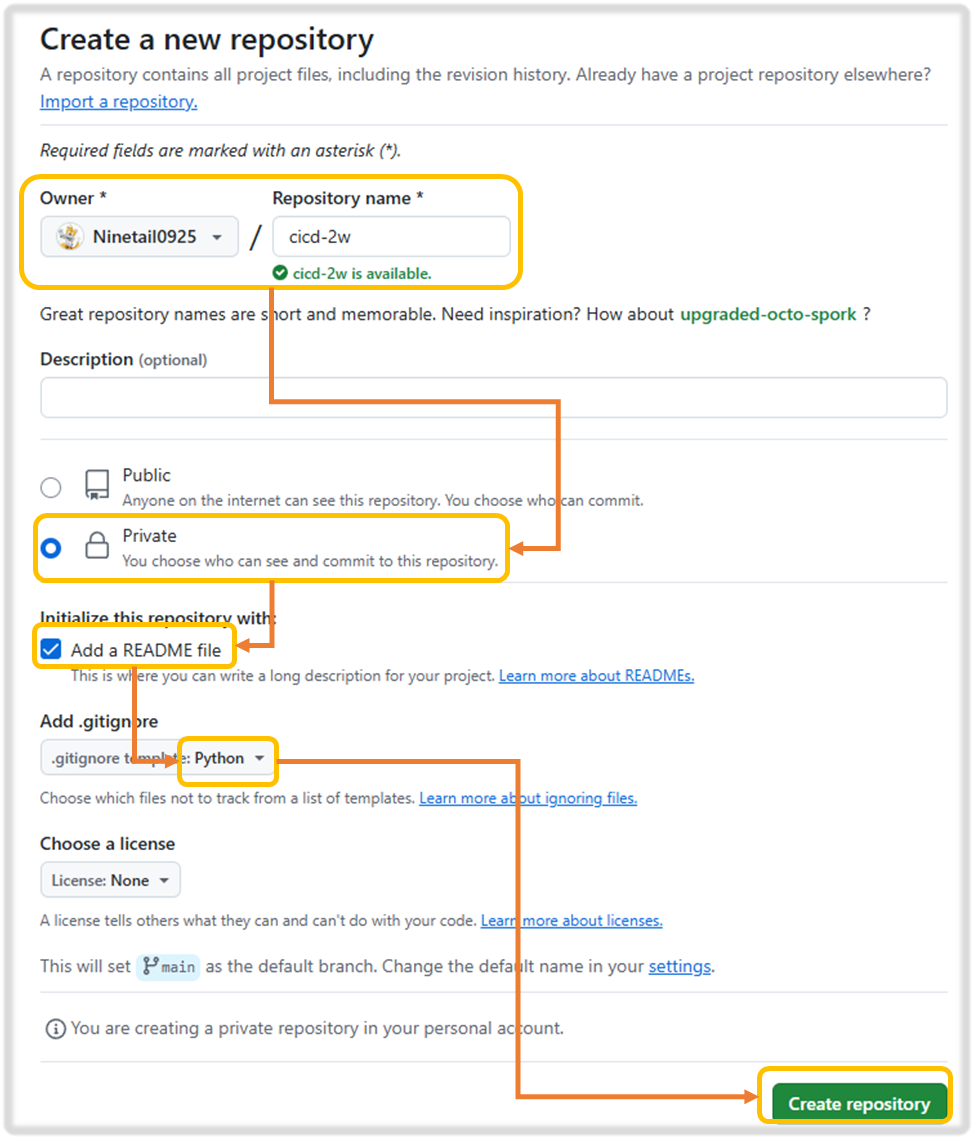
Step3. 우분투 서버에서 Git 작업 진행 ( * 자신의 git 주소로 수행 )
#
GITUSER=<>
GITUSER=gasida

git clone https://github.com/$GITUSER/cicd-2w.git
tree cicd-2w/
cp server.py cicd-2w/
cd cicd-2w/

#
git status
git add .
git commit -m "first commit"
git push origin main
Username for 'https://github.com': <>
Password for 'https://gasida@github.com': <>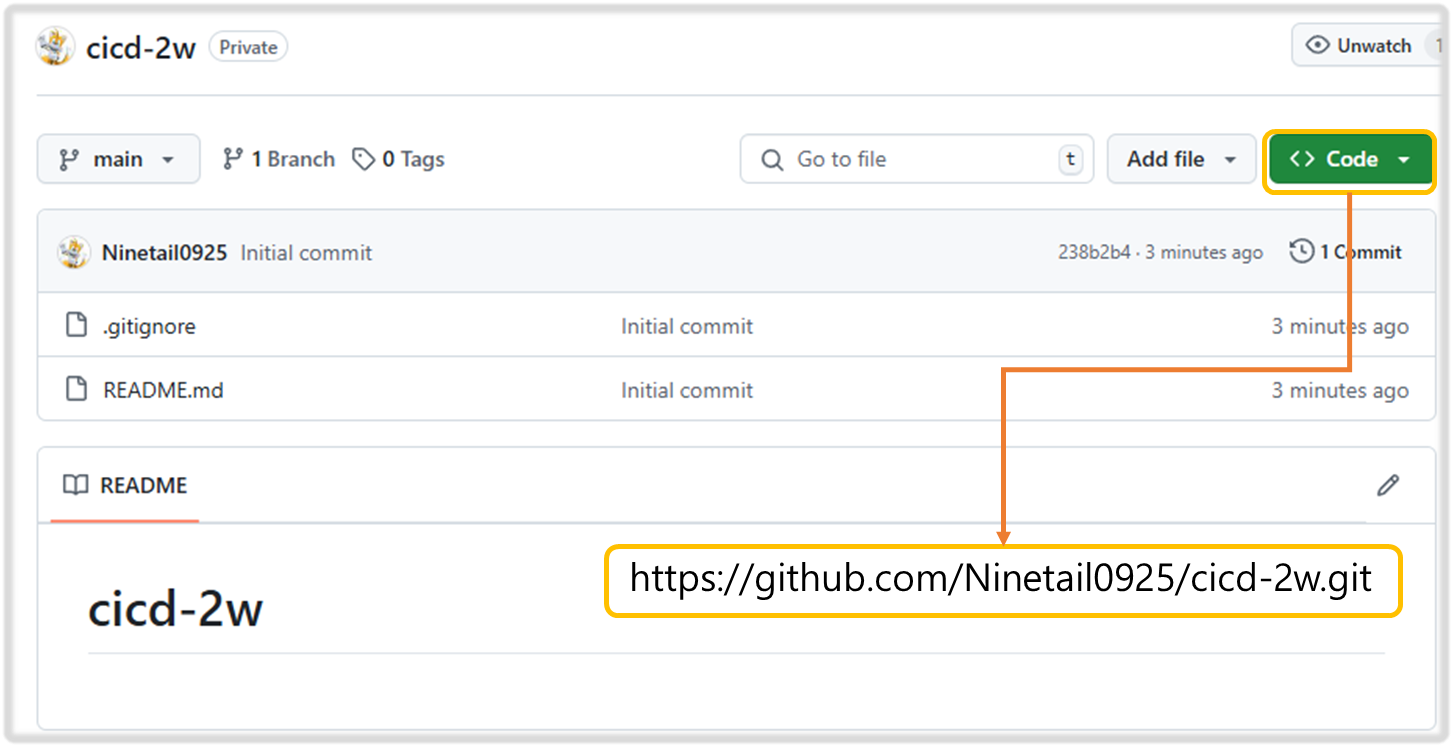
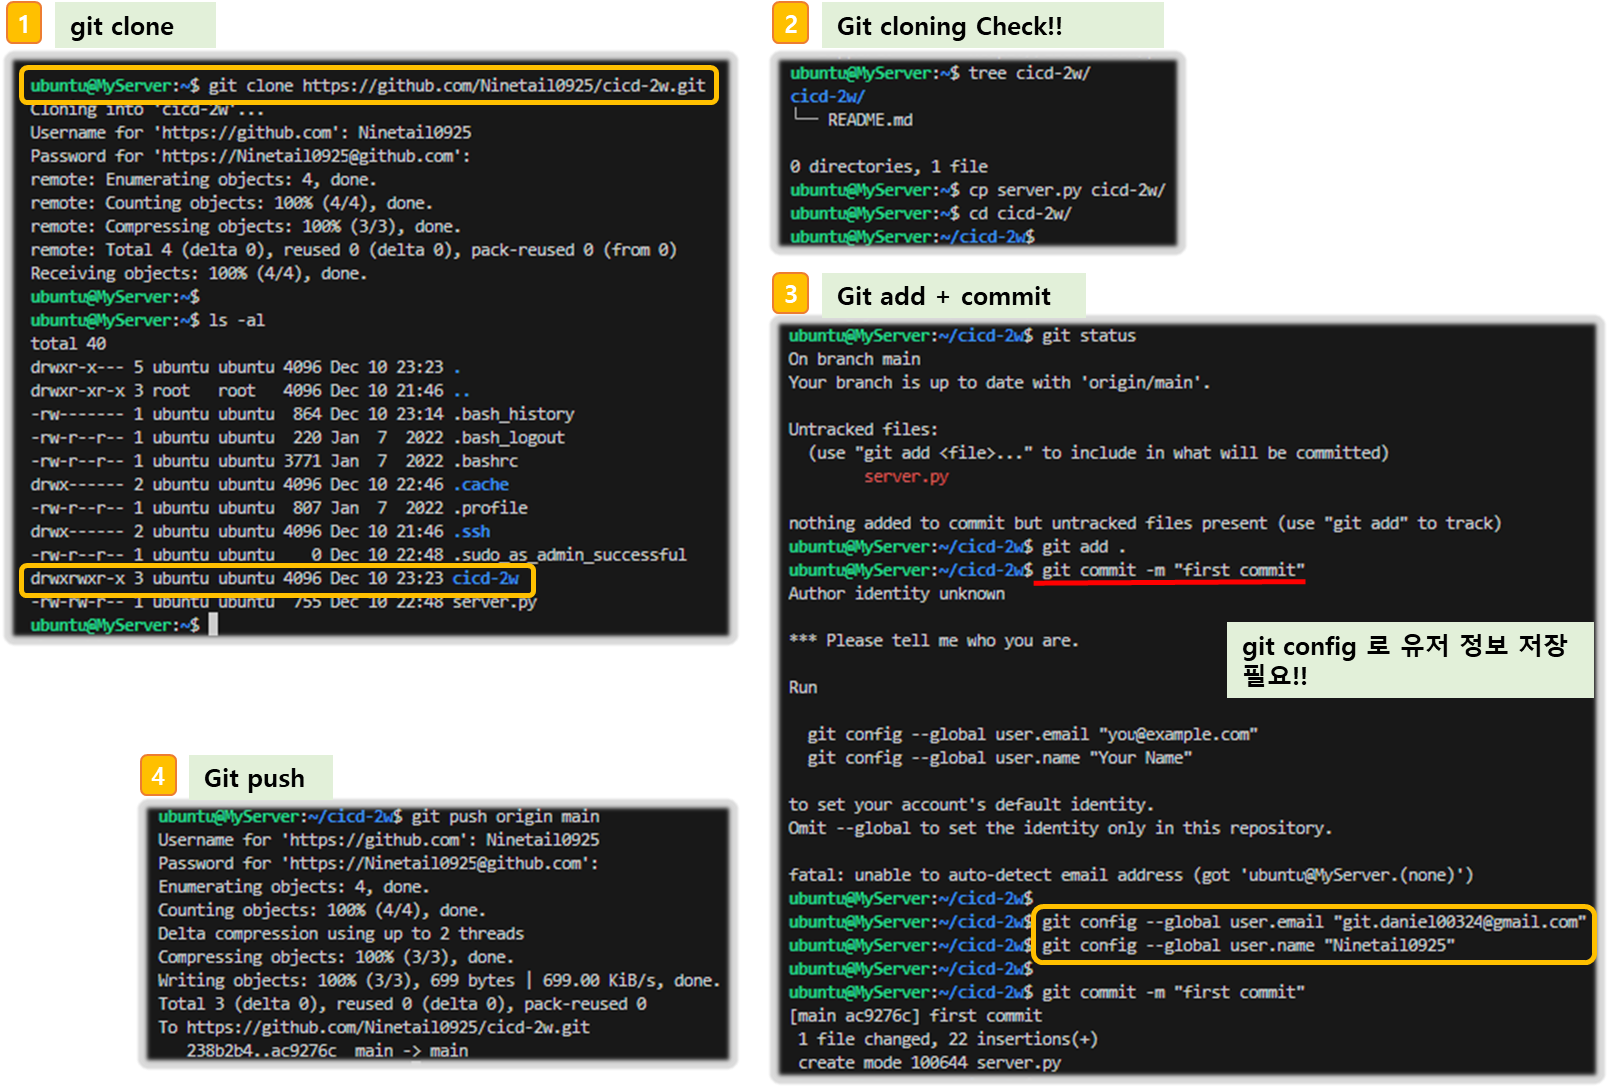
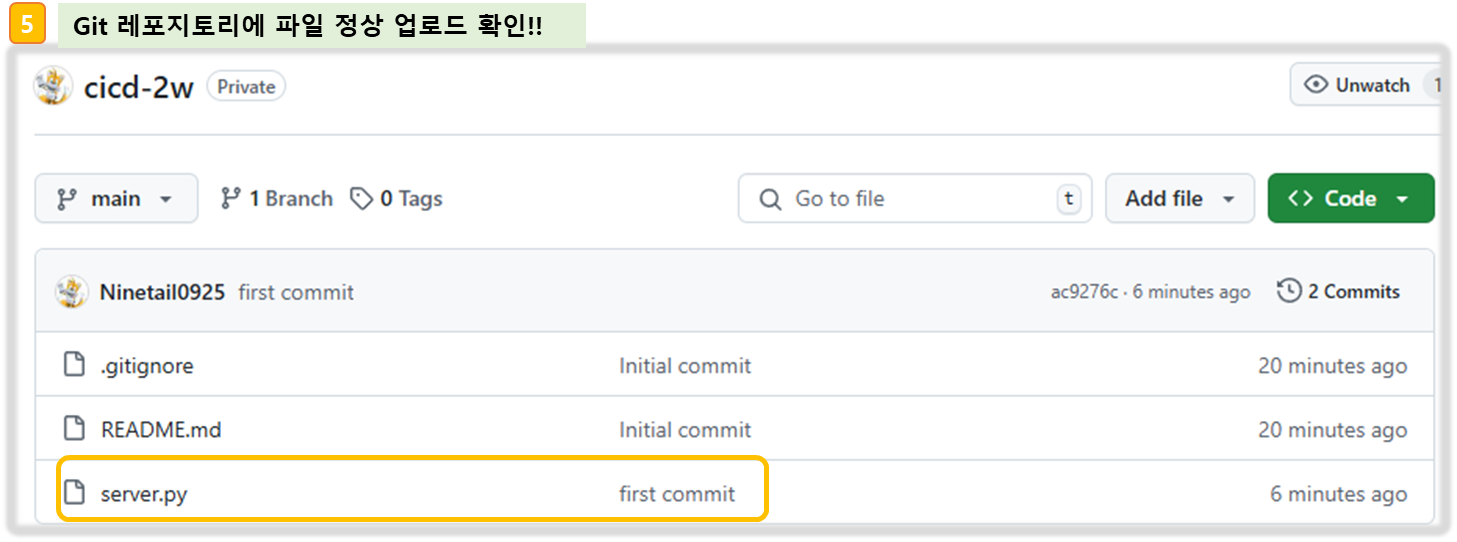
Step4. 서버 실행
#
nohup sudo python3 server.py > server.log 2>&1 &
cat server.log
curl localhost
cat server.log

#
grep log .gitignore
*.log

#
git add .
git commit -m "add log file"
git status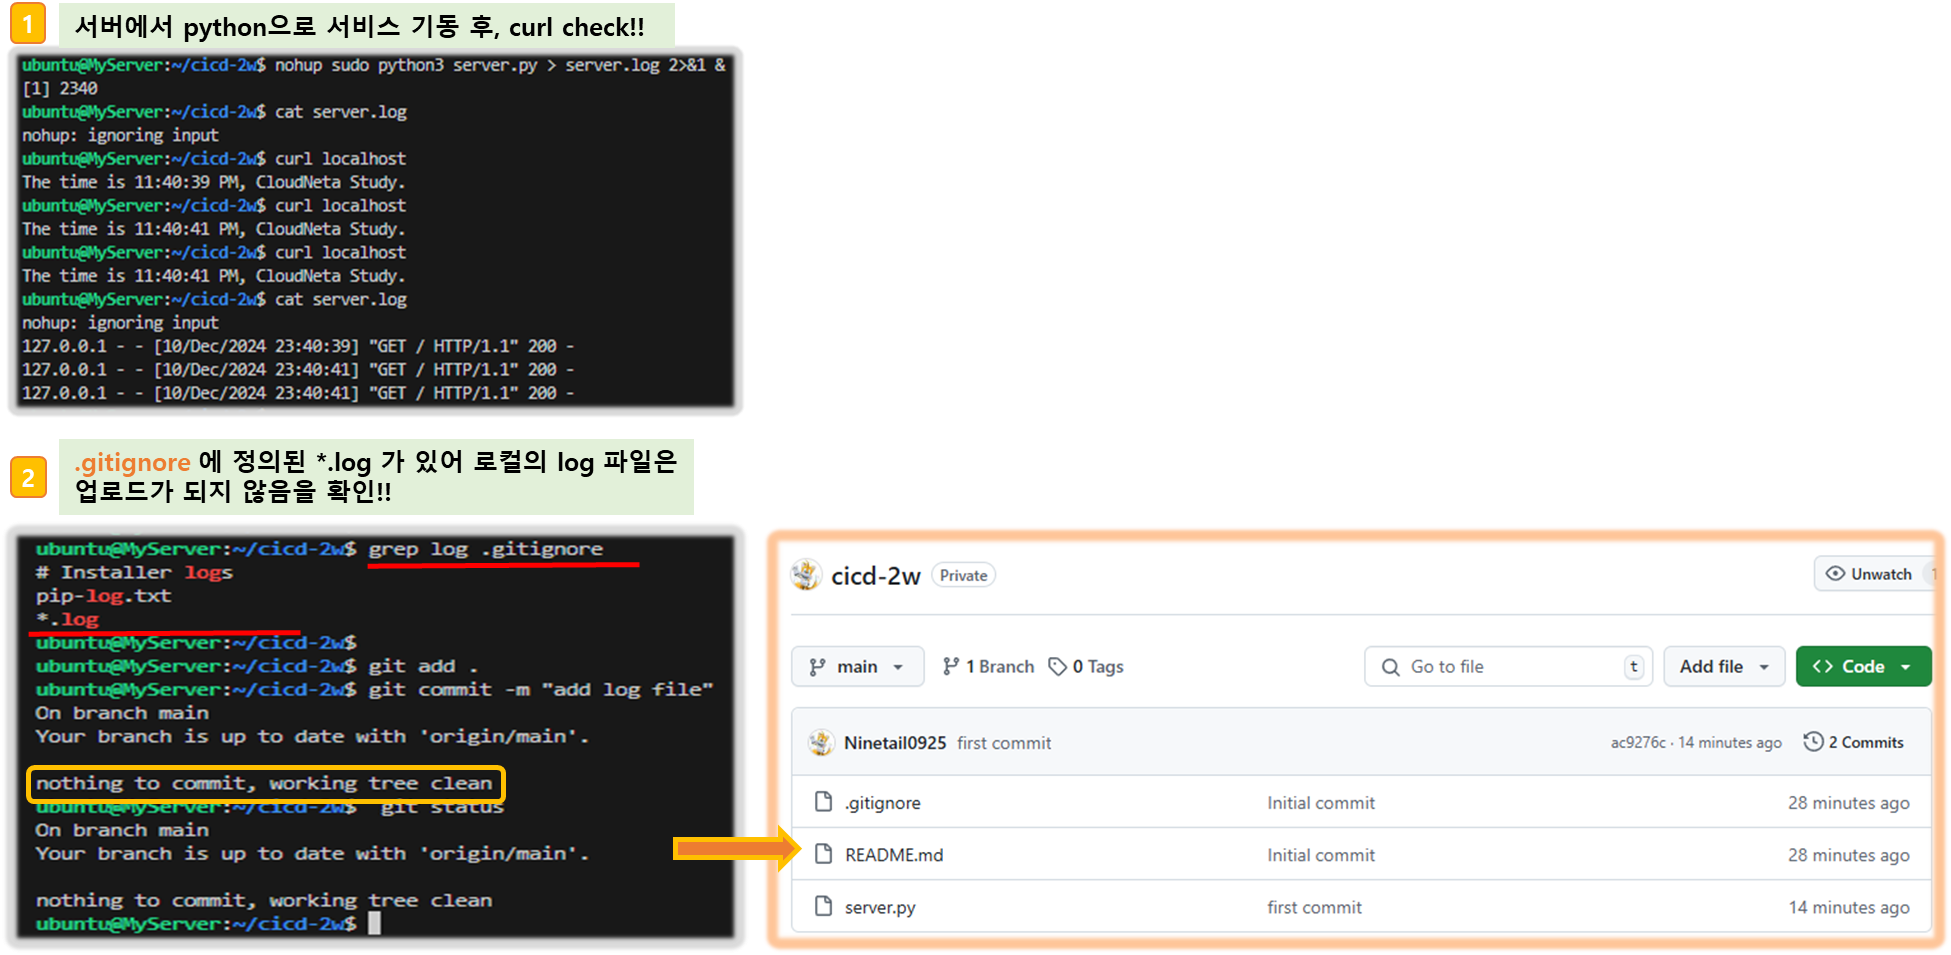
Step5. 코드 수정 후 재 실행
#
sed -i "s/CloudNeta/CICD/g" server.py

# 프로세스 종료
sudo ss -tnlp
sudo fuser -k -n tcp 80
sudo ss -tnlp

# 재실행
nohup sudo python3 server.py > server.log 2>&1 &
curl localhost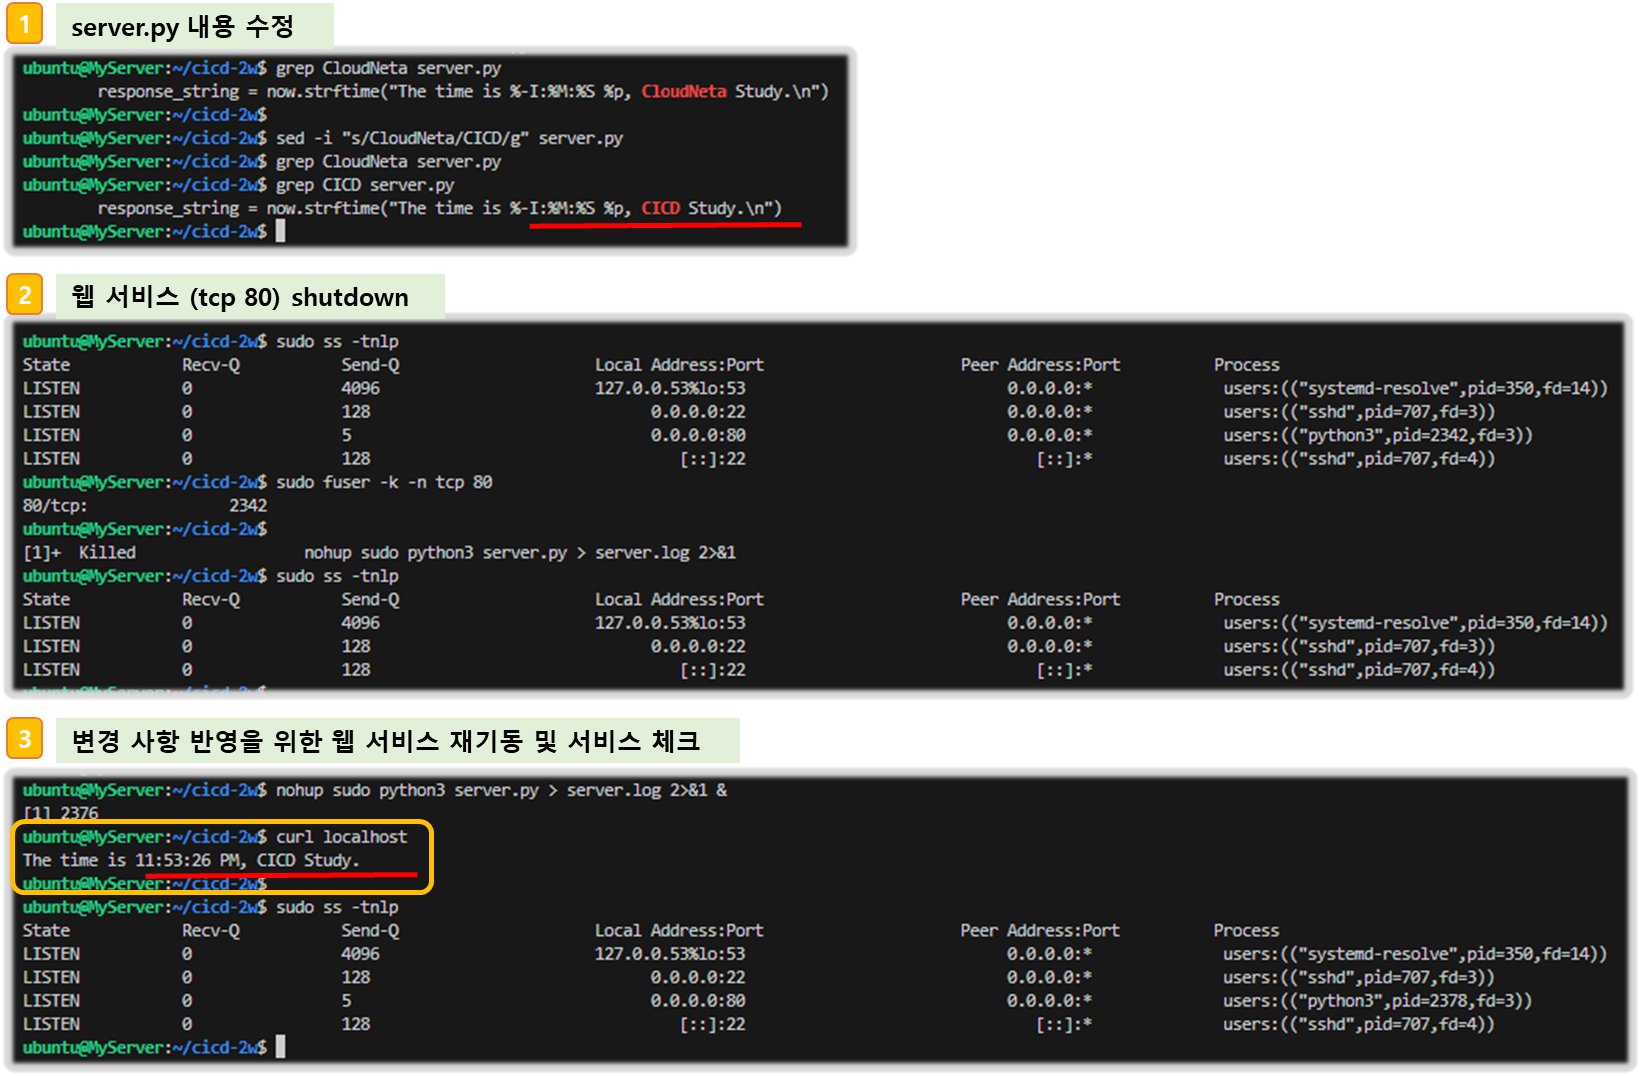
Step6. 수동 Code push
#  자신의 정보 입력!!
git config --global user.name Ninetail0925
git config --global user.email git.daniel00324@gmail.com
git config --global credential.helper store

#
git add . && git commit -m "version update" && git push origin main
Username for 'https://github.com': <>
Password for 'https://gasida@github.com': <>

#
git push origin main
3-2. Github Actions - Step1
☞ Github/Actions 에 myPC 정보 입력하여 CI/CD 자동화 작업 실행해 보자!!
1) Git : SSH_PRIVATE_KEY, EC2_PIP
- 보안을 위해 private key와 Public IP 는 secret 을 사용한다.
2) 코드 작업
- Local PC 에서 하기 작업을 진행한다.
- WSL 환경에서 수행
#
git clone https://github.com/gasida/cicd-2w.git
cd cicd-2w

#
mkdir -p .github/workflows/
touch .github/workflows/deploy.yaml

sed -i -e "s/CICD/CICD 2w/g" server.py
[ 실행 결과 - 한 눈에 보기 ]
☞ local PC 에서 git cloning을 수행 후, .github/workflow/deploy.yaml 명세파일을 만든다.


☞ /cicd-2w/server.py 파일 수정

▶ .github/workflows/deploy.yaml
☞ 코드 설명
1) runs-on : ubuntu-latest 버전으로 서버 하나 생성 후,
2) Step1 : ~./ssh/id_rsa 에 기존 github secret 에 저장해 둔 private key를 가져와 저장한다.
3) Step2 : ~/.ssh/id_rsa에 Host key check skip 옵션을 지정
4) Step3 : 해당 ubuntu로 github repository에 저장한 최신 내용을 가져와서
5) Step4 : 웹 서비스를 기동한다.
name: CICD1
on:
  workflow_dispatch:
  push:
    branches:
      - main

jobs:
  deploy:
    runs-on: ubuntu-latest
    steps:
      - name: Configure the SSH Private Key Secret
        run: |
          mkdir -p ~/.ssh/
          echo "${{ secrets.SSH_PRIVATE_KEY }}" > ~/.ssh/id_rsa
          chmod 600 ~/.ssh/id_rsa

      - name: Set Strict Host Key Checking
        run: echo "StrictHostKeyChecking=no" > ~/.ssh/config

      - name: Git Pull
        run: |
          export MY_HOST="${{ secrets.EC2_PIP }}"
          ssh ubuntu@$MY_HOST << EOF
            cd /home/ubuntu/cicd-2w || exit 1
            git pull origin main || exit 1
          EOF

      - name: Run service
        run: |
          export MY_HOST="${{ secrets.EC2_PIP }}"
          ssh ubuntu@$MY_HOST sudo fuser -k -n tcp 80 || true
          ssh ubuntu@$MY_HOST "nohup sudo -E python3 /home/ubuntu/cicd-2w/server.py > /home/ubuntu/cicd-2w/server.log 2>&1 &"
[ 실행 결과 - 한 눈에 보기 ]

3) Git Push
Local host
git add . && git commit -m "add workflow" && git push origin main
2) Server 에서 수행
# [서버1]
cd cicd-2w/
grep -i cicd server.py
sudo ps -ef |grep server.py
tail /home/ubuntu/cicd-2w/server.log
[ 실행 결과 - 한 눈에 보기 ]


4) 코드 수정 후, 동작 확인
Step1. Local PC 에서 server.py 수정
sed -i -e "s/CICD 2w/CICD1 End/g" server.py
Step2. workflow 파일 수정 ( .github/workflow/deploy.yaml )
name: CICD1 End
on:
  workflow_dispatch:
  push:
    branches:
      - main

jobs:
  deployfinal:
    runs-on: ubuntu-latest
    steps:
      - name: Configure the SSH Private Key Secret
        run: |
          mkdir -p ~/.ssh/
          echo "${{ secrets.SSH_PRIVATE_KEY }}" > ~/.ssh/id_rsa
          chmod 600 ~/.ssh/id_rsa

      - name: Set Strict Host Key Checking
        run: echo "StrictHostKeyChecking=no" > ~/.ssh/config

      - name: Git Pull
        run: |
          export MY_HOST="${{ secrets.EC2_PIP }}"
          ssh ubuntu@$MY_HOST << EOF
            cd /home/ubuntu/cicd-2w || exit 1
            git pull origin main || exit 1
          EOF

      - name: Run service
        run: |
          export MY_HOST="${{ secrets.EC2_PIP }}"
          ssh ubuntu@$MY_HOST sudo fuser -k -n tcp 80 || true
          ssh ubuntu@$MY_HOST "nohup sudo -E python3 /home/ubuntu/cicd-2w/server.py > /home/ubuntu/cicd-2w/server.log 2>&1 &"
Step3. Local PC 에서 수정된 파일 github Repository로 push 후, 결과 확인
#
git add . && git commit -m "edit workflow" && git push origin main

# [서버1]
grep -i cicd server.py
sudo ps -ef |grep server.py
tail /home/ubuntu/cicd-2w/server.log
[ 실행 결과 - 한 눈에 보기 ]


▶ 웹 접속하여 변경사항 반영 여부 확인한다.
3-3. Github Actions - Step2
☞ 로컬에서 개발-테스트 한 파일을 배포하여, 최종 상태 파일을 주입 시키게 되면 보안 측면에서 보완(개선) 할 수 있다.
( Github Action 에서 코드 빌드- 테스트 후, 대상 서버에 전달 )
[ 개선 Step에서의 실습 목표 ]
▶ Github Action에서 코드 가져오기
▶ GitHub Actions에서 .gitignore 제외된 민감 파일 내용을 을 안전하게 가져와서 사용하기
▶ scp로 대상 서버 ec2 에 py 파일 전송
▶ 대상 서버 ec2에 기존 서비스 중지하고 다시 실행
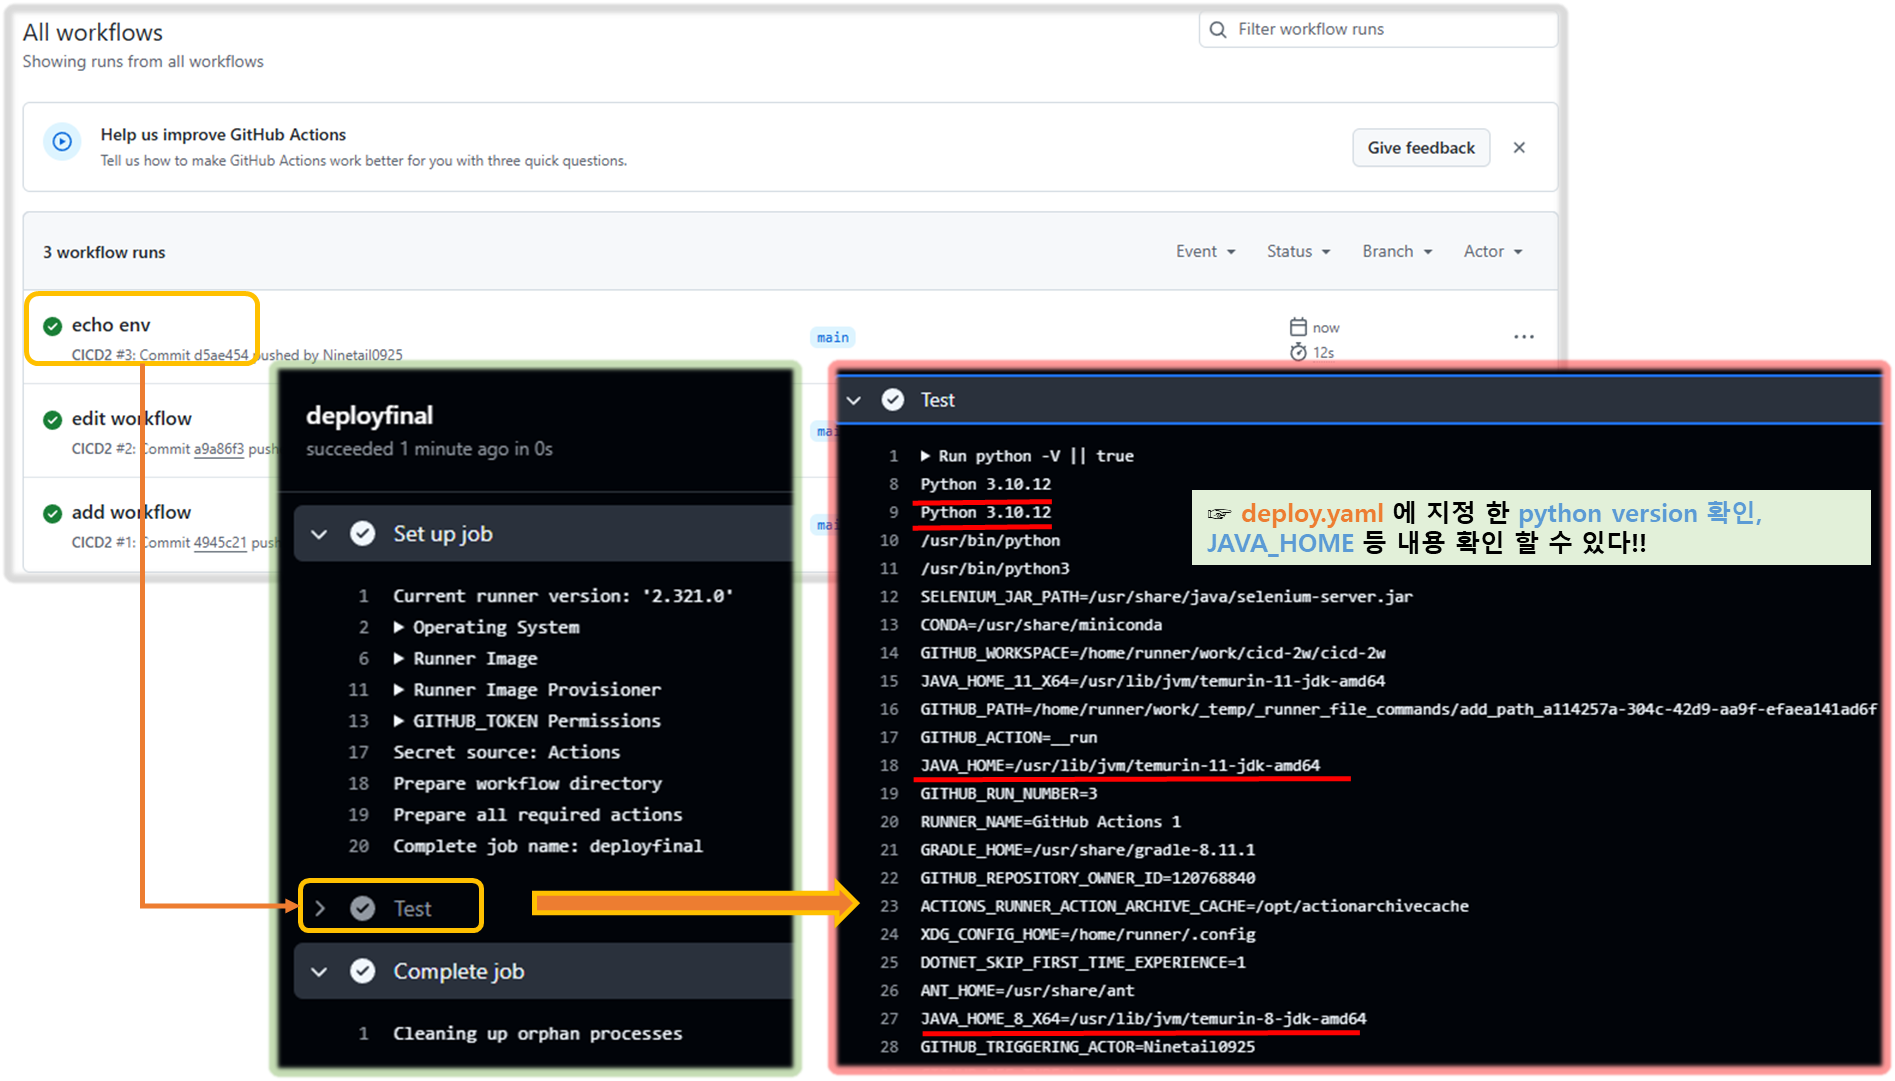
1) GitHub Actions 파이썬 버전 확인
Step1. (Local PC 에서) .github/workflow/deploy.yaml 업데이트
name: CICD2
on:
  workflow_dispatch:
  push:
    branches:
      - main

jobs:
  deployfinal:
    runs-on: ubuntu-latest
    steps:
      - name: Test
        run: |
          python -V || true
          python3 -V || true
          which python || true
          which python3 || true
          env
Step2. github Repository에 변경사항 push
git add . && git commit -m "echo env" && git push origin main
Step3. Actionflow 의 결과 확인
Python 3.10.12
Python 3.10.12
/usr/bin/python
/usr/bin/python3
[ 실행 결과 - 한 눈에 보기 ]
2) GitHub Actions에서 .gitignore 제외된 민감 파일 내용을 안전하게 가져와서 사용하기
Step1. .gitignore 제외된 민감 파일 내용 사용
#
grep env .gitignore

#
cat > .env <<EOF
ACCESSKEY : 1234
SECRETKEY : 5678
EOF

#
git add .env
git status
rm -f .env
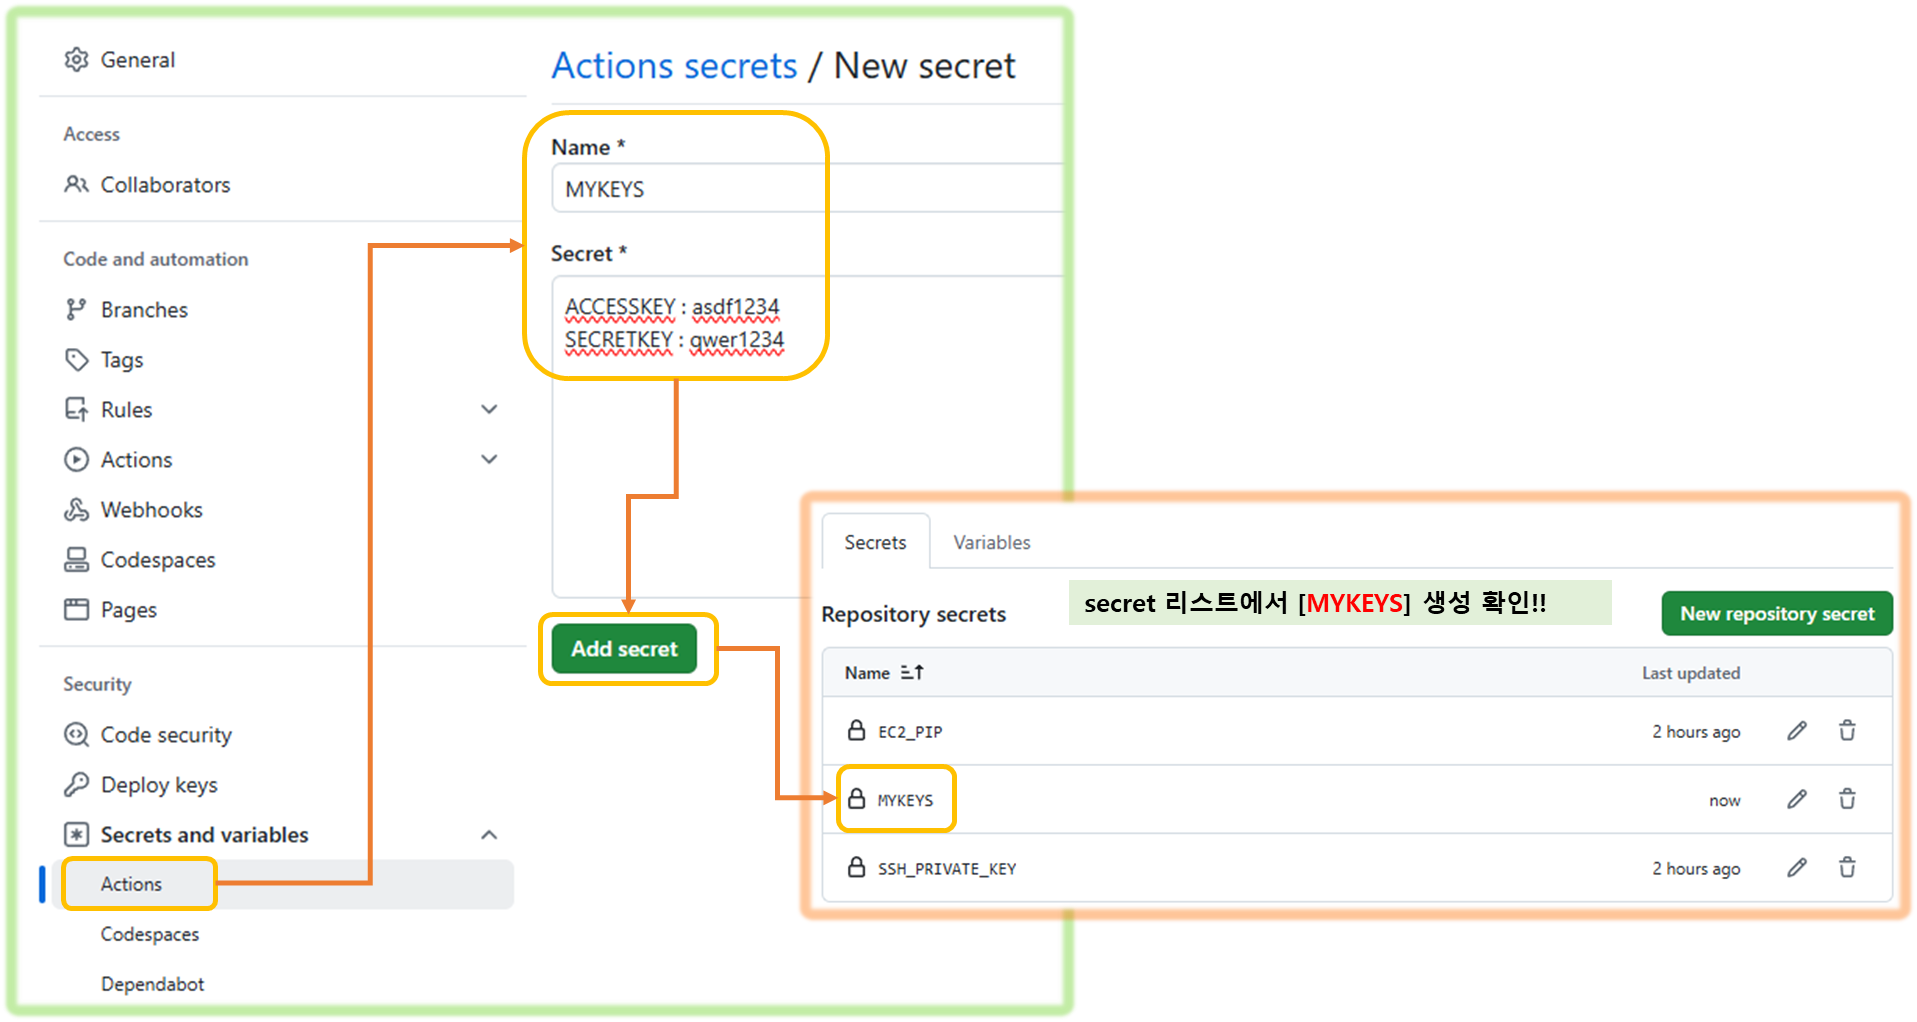
Step2. Secret 생성 : MYKEYS ⇒ 아래 SSH for GitHub Actions 에서 env 전달 방식 활용
ACCESSKEY : asdf1234
SECRETKEY : qwer1234
[ 실행 결과 - 한 눈에 보기 ]
추천 참고) GitHub Actions Marketplaces : Enhance your workflow with extensions - to simplify tasks and automate processes
- ssh, scp 검색 → AWS
3) Workflow 설정 후, 테스트 진행
Step1. .github/workflow/deploy.yaml 파일 수정
☞ Checkout V4 GitHub Actions의 Checkout V4는 리포지토리를 $GITHUB_WORKSPACE 아래에 체크아웃하여 워크플로우에서 접근할 수 있게 해줍니다.
☞ 코드 내려받기 Checkout 액션을 사용하면 CI 서버로부터 코드 저장소에서 코드를 손쉽게 내려받을 수 있어, 워크플로우 구성이 간편해집니다. source
[ 코드 설명 ]
- github actions/checkout@v4 를 사용하여 코드 자동 다운로드 받기를 수행
- secret 에 변수로 설정한 MYKEYS, EC2_PIP, SSH_PRIVATE_KEY 를 환경변수로 사용
- main Action 으로 script: 이하 규정된 내용 실행 ( cicd-2w 디렉토리 이하에 .env 파일에 민감정보 복사 )
name: CICD2
on:
  workflow_dispatch:
  push:
    branches:
      - main

jobs:
  ssh-deploy:
    runs-on: ubuntu-latest
    steps:
      - name: Github Repository Checkout
        uses: actions/checkout@v4

      - name: executing remote ssh commands
        uses: appleboy/ssh-action@v1.2.0
        env:
          AWS_KEYS: ${{ secrets.MYKEYS }}
        with:
          host: ${{ secrets.EC2_PIP }}
          username: ubuntu
          key: ${{ secrets.SSH_PRIVATE_KEY }}
          envs: AWS_KEYS
          script_stop: true
          script: |
             cd /home/ubuntu/cicd-2w
             echo "$AWS_KEYS" > .env
Step2. 변경사항 반영
git add . && git commit -m "ssh action test" && git push origin main
Step3. 실행 결과 확인
# 서버 1
ls -al ~/cicd-2w/
cat ~/cicd-2w/.env
[ 실행 결과 - 한 눈에 보기 ]


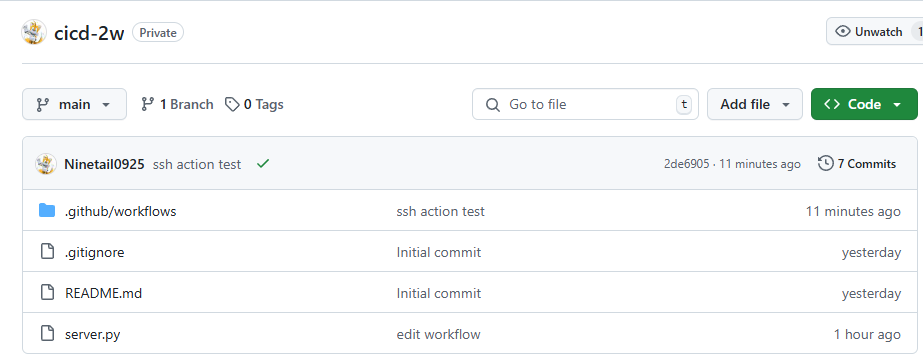
- Github Repo에는 없다!! ( Why? .gitignore 파일에 skip 대상으로 등록되어 있기 때문에 )
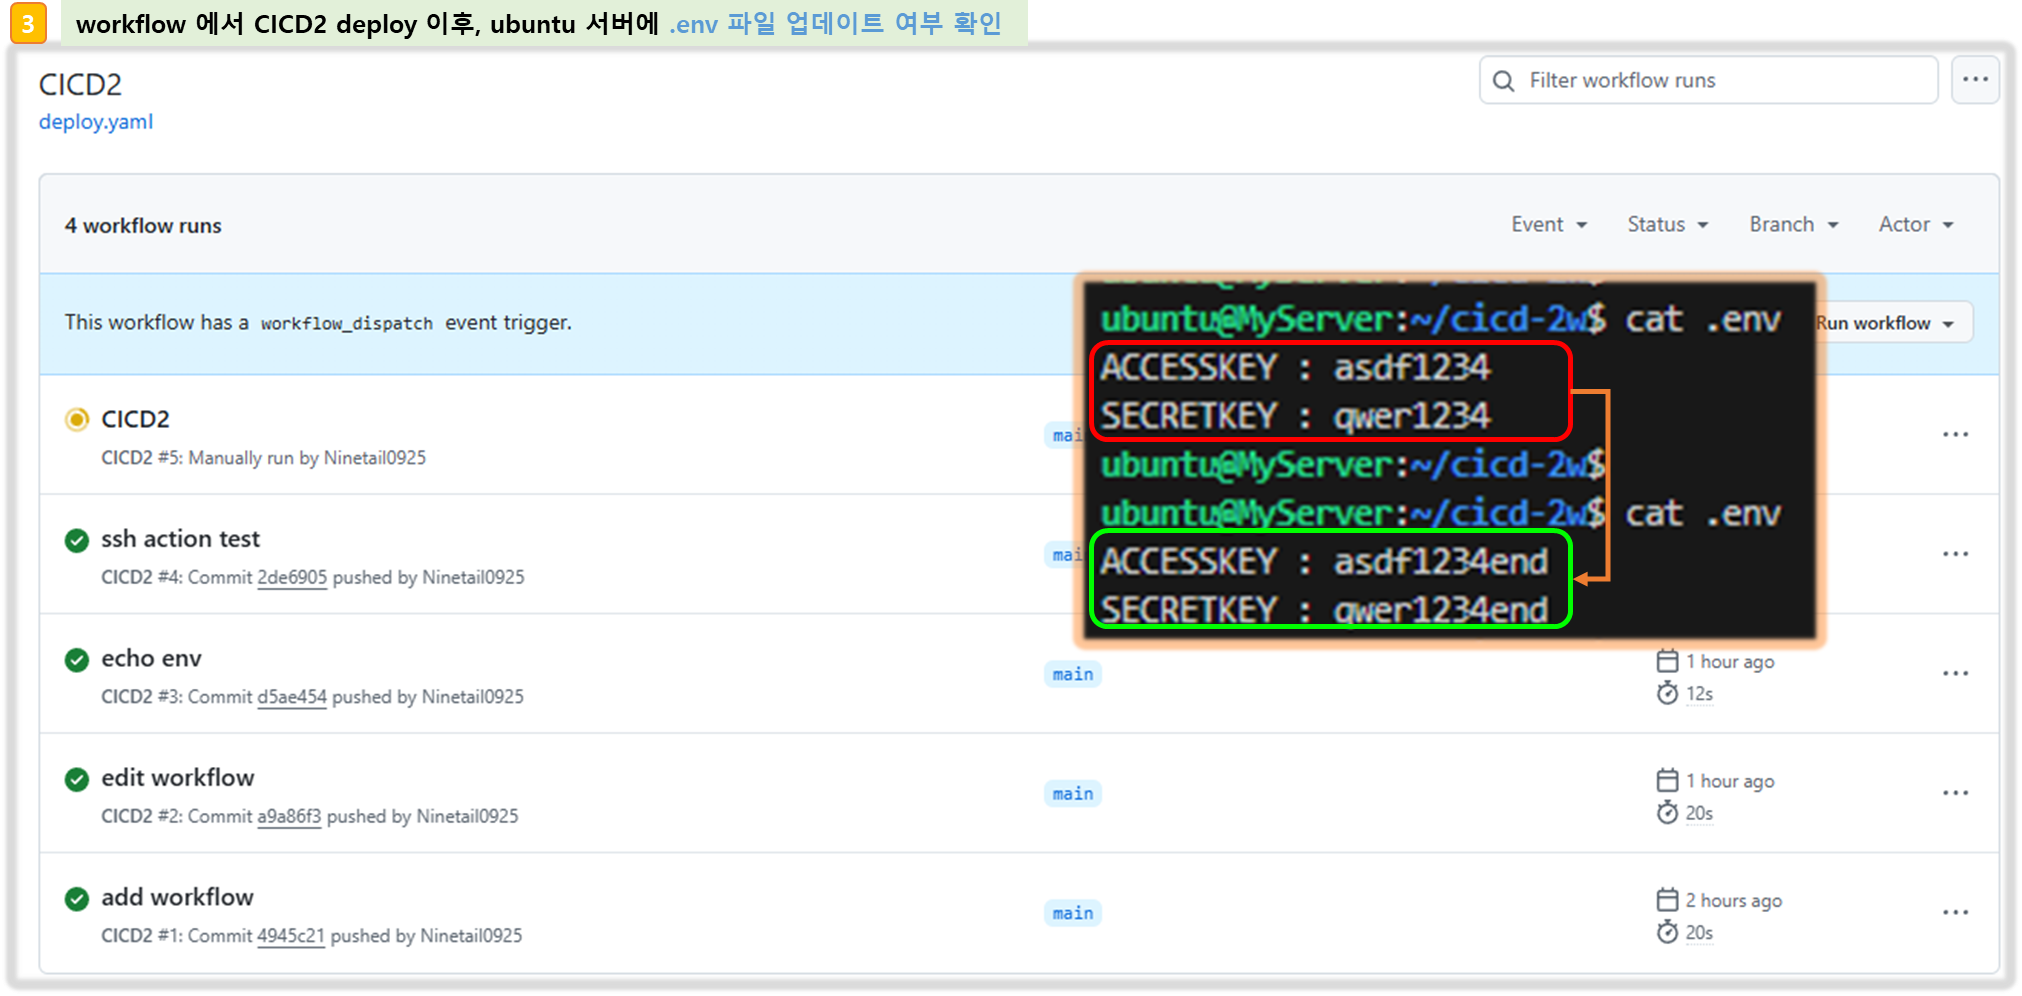
- .env 파일 내용 업데이트 방법 : 조금 불편하지만, Github Secret 를 직접 업데이트 후 트리거 하자


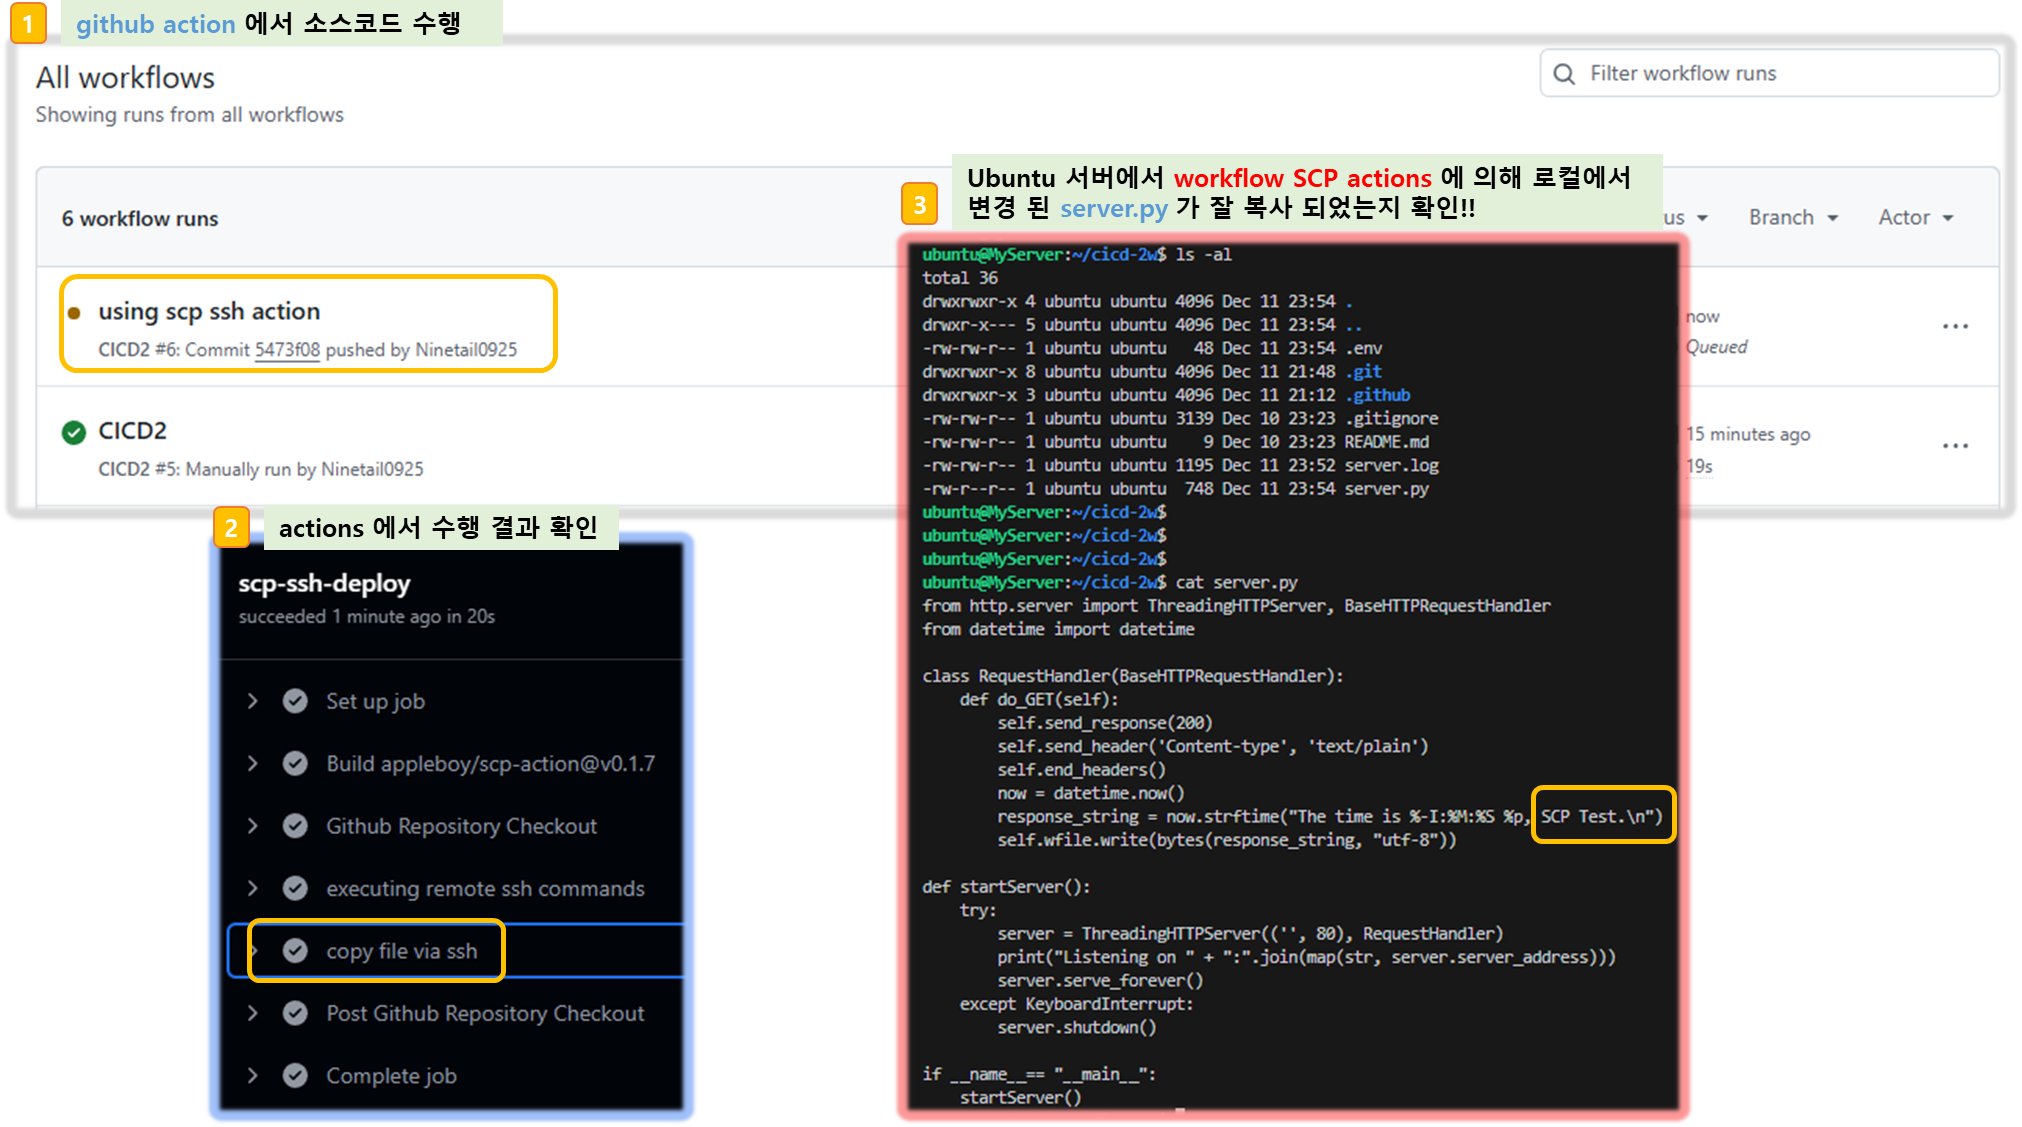
4) SCP Actions 를 사용하여 소스파일을 복사해 보자!!
▶ scp : GitHub Action that copy files and artifacts via SSH - Github , marketplace
Step1. Server.py 수정하기
response_string = now.strftime("The time is %-I:%M:%S %p, SCP Test\n")
Step2. deploy.yaml 수정하기 ( .github/workflow/deploy.yaml )
name: CICD2
on:
  workflow_dispatch:
  push:
    branches:
      - main

jobs:
  scp-ssh-deploy:
    runs-on: ubuntu-latest
    steps:
      - name: Github Repository Checkout
        uses: actions/checkout@v4

      - name: executing remote ssh commands
        uses: appleboy/ssh-action@v1.2.0
        env:
          AWS_KEYS: ${{ secrets.MYKEYS }}
        with:
          host: ${{ secrets.EC2_PIP }}
          username: ubuntu
          key: ${{ secrets.SSH_PRIVATE_KEY }}
          envs: AWS_KEYS
          script_stop: true
          script: |
             cd /home/ubuntu/cicd-2w
             echo "$AWS_KEYS" > .env
             sudo fuser -k -n tcp 80 || true

      - name: copy file via ssh
        uses: appleboy/scp-action@v0.1.7
        with:
          host: ${{ secrets.EC2_PIP }}
          username: ubuntu
          key: ${{ secrets.SSH_PRIVATE_KEY }}
          source: server.py
          target: /home/ubuntu/cicd-2w
Step3. 배포 및 확인
git add . && git commit -m "using scp ssh action" && git push origin main
# 서버 1
ls -al ~/cicd-2w/
cat ~/cicd-2w/server.py | grep SCP
[ 실행 결과 - 한 눈에 보기 ]
Step4. github action 에서 코드 가져오고 변경된 py 파일을 전송 후 기존 서비스 중지 후 재기동
1) server.py 수정
response_string = now.strftime("The time is %-I:%M:%S %p, CICD2 End\n")
2) deploy.yaml 파일 수정
[ 코드 설명 ]
- ssh 통한 파일 복사 ( /home/ubuntu 에 server.py 복사 )
- 기존 80 서비스 내리고
- 기존 server.py 를 삭제하고
- /home/ubuntu 에 넣어 둔 server.py를 /home/ubuntu/cicd-2w/ 이하에 복사
- nohub 옵션으로 server.py 서비스 기동 및 logging
- echo 로 test 문자 text.txt 에 저장
name: CICD2
on:
  workflow_dispatch:
  push:
    branches:
      - main

jobs:
  deploy:
    runs-on: ubuntu-latest
    steps:
      - name: Github Repository Checkout
        uses: actions/checkout@v4

      - name: copy file via ssh
        uses: appleboy/scp-action@v0.1.7
        with:
          host: ${{ secrets.EC2_PIP }}
          username: ubuntu
          key: ${{ secrets.SSH_PRIVATE_KEY }}
          source: server.py
          target: /home/ubuntu

      - name: executing remote ssh commands
        uses: appleboy/ssh-action@v1.2.0
        env:
          AWS_KEYS: ${{ secrets.MYKEYS }}
        with:
          host: ${{ secrets.EC2_PIP }}
          username: ubuntu
          key: ${{ secrets.SSH_PRIVATE_KEY }}
          envs: AWS_KEYS
          script_stop: true
          script: |
             cd /home/ubuntu/cicd-2w
             echo "$AWS_KEYS" > .env
             sudo fuser -k -n tcp 80 || true
             rm server.py
             cp /home/ubuntu/server.py ./
             nohup sudo -E python3 /home/ubuntu/cicd-2w/server.py > /home/ubuntu/cicd-2w/server.log 2>&1 &
             echo "test" >> /home/ubuntu/text.txt
3) 변경된 소스 배포
git add . && git commit -m "Deploy CICD2 Final" && git push origin main
4) 웹 접속 확인
[ 실행 결과 - 한 눈에 보기 ]

▶ 추가로 ec2 1대 신규 생성 후 해당 ec2에 배포 테스트를 해보자!!
( deploy.yaml 파일 만 수정하여 2단계에 걸쳐 배포 하면, 연동된 github Action 이 동작하여 새로운 웹서비스를 띄워준다!! )


< 고민해 봐야 할 점 >
☞ 동일한 workflow 를 N 번 수행하면, 원하지 않는 결과가 나오는 경우 ... ( ansible 등 툴을 사용하여 예외 상황에 대응 할 수 있다!! )
# 서버1
cat /home/ubuntu/text.txt

# 트러거 후 다시 확인
cat /home/ubuntu/text.txt
3-4. Github Actions with Ansible
☞ Ansible 이용하여 의도치 않은 중복 결과 처리등을 예방 할 수 있다!!
모듈 실행 자동화 등도 고려하여 접근해 보자.
▶ github workflow : deploy.yaml 수정
[ 코드 설명 ]
- Name 수정 : Run Ansible
- Run-playbook : 코드 가져오기
- python 3.8 다운로드
- pip 통해서 인스톨 할 수 있으므로, 해당 모듈 설치
- Ansible 수행하는 주체는 github Action의 가상 컴퓨터 이므로, inventory 파일을 만들어서
대상 서버 IP(Elastic Public IP) 기술한다!!
- Ansible의 default configuration File 작성
- Ansible로 adhoc ping test 수행 ( ansible all -m ping > 정상일 경우, pong 으로 응답온다!! )
name: Run Ansible
on:
  workflow_dispatch:
  push:
    branches:
      - main

jobs:
  run-playbooks:
    runs-on: ubuntu-latest
    steps:
      - name: Github Repository Checkout
        uses: actions/checkout@v4

      - name: Setup Python 3
        uses: actions/setup-python@v5
        with:
          python-version: "3.8"

      - name: Upgrade Pip & Install Ansible
        run: |
          python -m pip install --upgrade pip
          python -m pip install ansible

      - name: Implement the Private SSH Key
        run: |
          mkdir -p ~/.ssh/
          echo "${{ secrets.SSH_PRIVATE_KEY }}" > ~/.ssh/id_rsa
          chmod 600 ~/.ssh/id_rsa

      - name: Ansible Inventory File for Remote host
        run: |
          mkdir -p ./devops/ansible/
          export INVENTORY_FILE=./devops/ansible/inventory.ini
          echo "[my_host_group]" > $INVENTORY_FILE
          echo "${{ secrets.EC2_PIP }}" >> $INVENTORY_FILE

      - name: Ansible Default Configuration File
        run: |
          mkdir -p ./devops/ansible/
          cat <<EOF > ./devops/ansible/ansible.cfg
          [defaults]
          ansible_python_interpreter = '/usr/bin/python3'
          ansible_ssh_private_key_file = ~/.ssh/id_rsa
          remote_user = ubuntu
          inventory = ./inventory.ini
          host_key_checking = False
          EOF

      - name: Ping Ansible Hosts
        working-directory: ./devops/ansible/
        run: |
          ansible all -m ping

      # - name: Run Ansible Playbooks
      #   working-directory: ./devops/ansible/
      #   run: |
      #     ansible-playbook install-nginx.yaml

      # - name: Deploy Python via Ansible
      #   working-directory: ./devops/ansible/
      #   run: |
      #     ansible-playbook deploy-python.yaml
▶ 수정사항 반영을 위한 Git push
git add . && git commit -m "Deploy Ansible Test" && git push origin main
▶ 실행 결과 보기
[ 마무리 ]
☞ 이번 주는 Github Actions 기능을 통해서 별도의 Jenkins 등 배포 툴을 사용하지 않고 자체적으로 소스의 build 및 deploy 까지 자동화 해 보는 실습을 해 볼 수 있었다.
Github Actions 는 특히 Market 을 통해 다양한 component 기능모듈을 연계하여 보다 쉽고, 안전하게 CI/CD flow를 관리할 수 있어서 간단한 개발 환경등에 우선 적용하여 사용해 보면 좋을 것 같다.
[ 참고 - 링크 모음 ]
▶ https://docs.github.com/ko/actions : 공식 문서 , 개요 - Docs , 요금 - Docs
▶ GitHub Actions 의 다양한 기능 활용하기 - Blog
2. Github Action 관련
▶ 마켓플레이스 : https://github.com/marketplace
[ 추천 : ssh, scp, aws ]
https://github.com/marketplace/actions/ssh-action
https://github.com/marketplace?query=scp
https://github.com/marketplace?query=aws+credential
▶ SSH for GitHub Actions - Github , marketplace
▶ Github Checkout Actions - https://www.daleseo.com/github-actions-checkout/
[ 참고 - Actions Use-case ]
1) remote ssh command
name: remote ssh command
on: [push]
jobs:
  build:
    name: Build
    runs-on: ubuntu-latest
    steps:
      - name: executing remote ssh commands using password
        uses: appleboy/ssh-action@v1.2.0
        with:
          host: ${{ secrets.HOST }}
          username: linuxserver.io
          password: ${{ secrets.PASSWORD }}
          port: ${{ secrets.PORT }}
          script: whoami
2) Using Private key
# Using private key
- name: executing remote ssh commands using ssh key
  uses: appleboy/ssh-action@v1.2.0
  with:
    host: ${{ secrets.HOST }}
    username: ${{ secrets.USERNAME }}
    key: ${{ secrets.KEY }}
    port: ${{ secrets.PORT }}
    script: whoami
3) Multiple Commands
# Using private key
- name: executing remote ssh commands using ssh key
  uses: appleboy/ssh-action@v1.2.0
  with:
    host: ${{ secrets.HOST }}
    username: ${{ secrets.USERNAME }}
    key: ${{ secrets.KEY }}
    port: ${{ secrets.PORT }}
    script: whoami
4) copy password by using secret
# Pass environment variable to shell script
  - name: pass environment
    uses: appleboy/ssh-action@v1.2.0
+   env:
+     FOO: "BAR"
+     BAR: "FOO"
+     SHA: ${{ github.sha }}
    with:
      host: ${{ secrets.HOST }}
      username: ${{ secrets.USERNAME }}
      key: ${{ secrets.KEY }}
      port: ${{ secrets.PORT }}
+     envs: FOO,BAR,SHA
      script: |
        echo "I am $FOO"
        echo "I am $BAR"
        echo "sha: $SHA"
'CICD' 카테고리의 다른 글
| 3주차 - Jenkins CI/ArgoCD + K8S (2) | 2024.12.16 |
|---|---|
| 1주차 - Jenkins CI/CD + Docker (1) | 2024.12.01 |


