| 일 | 월 | 화 | 수 | 목 | 금 | 토 |
|---|---|---|---|---|---|---|
| 1 | 2 | 3 | 4 | 5 | 6 | 7 |
| 8 | 9 | 10 | 11 | 12 | 13 | 14 |
| 15 | 16 | 17 | 18 | 19 | 20 | 21 |
| 22 | 23 | 24 | 25 | 26 | 27 | 28 |
- Ambient
- vagrant
- aws eks
- 스트림릿 활용한 GPT
- CNI
- Jenkins
- Observability
- GPT 멀티챗
- kiali
- grafana
- loadbalancer
- Kubernetes
- argocd
- K8S
- Kind
- prometheus
- 멀티에이전트 RAG
- Streamlit 활용한 챗봇만들기
- Ingress
- docker
- PuMuPDF
- service mesh
- WSL
- Istio
- CICD
- GPT 역할 부여하기
- envoy
- 랭그래프 목차만들기
- vpc cni
- 타빌리
- Today
- Total
WellSpring
9주차 - AWS EKS : VPC CNI 본문
※ 본 게재 글은 gasida님의 KANS(Kubernetes Advanced Networking Study) 강의내용과 실습예제 및 kubernetes, AWS k8s 공식 가이드 문서, 관련 Blog 등을 참고하여 작성하였습니다.
0. 실습환경 생성
☞ 참고 : [KANS] Amazon EKS 원클릭 배포 가이드
1) 사전 준비
- AWS 계정, SSH 키 페어, IAM 계정 생성 후 키
2) 전체 구성 설명
- VPC 1개(퍼블릭 서브넷 3개, 프라이빗 서브넷 3개), EKS 클러스터(Control Plane), 관리형 노드 그룹(EC2 3대), Add-on

- CloudFormation 스택 실행 시 파라미터를 기입하면, 해당 정보가 반영되어 배포됩니다.
- 실습 환경을 위한 VPC 1개가 생성되고, 퍼블릭 서브넷 3개와 프라이빗 서브넷 3개가 생성됩니다.
- CloudFormation 에 EC2의 UserData 부분(Script 실행)으로 Amazon EKS **설치(with OIDC, Endpoint Public)**를 진행합니다
- 관리형 노드 그룹(워커 노드)는 AZ1~AZ3를 사용하여, 기본 3대로 구성됩니다
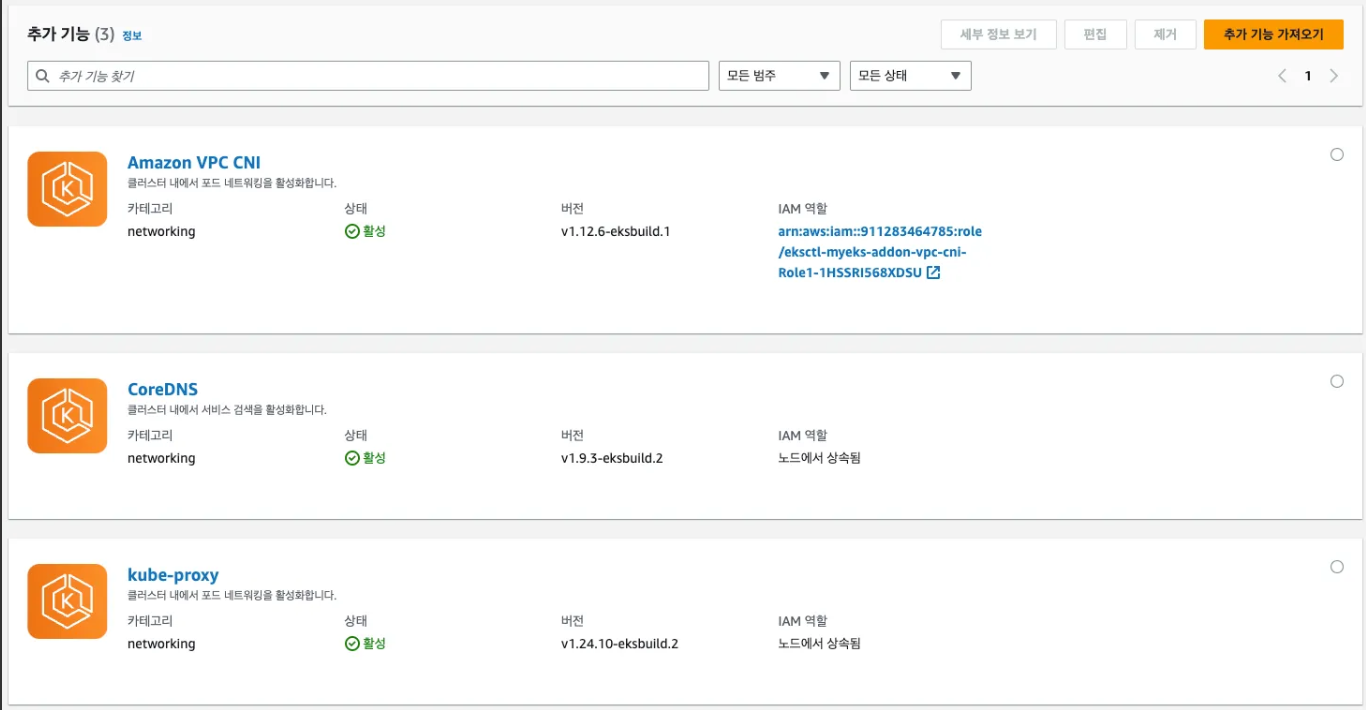
- Add-on 같이 설치 됨 : 최신 버전 - kube-proxy, coredns, aws vpc cni - 링크
- 노드에 EC2 IAM Profile 권한 추가 : external-dns-access, full-ecr-access, alb-ingress-access, awsLoadBalancerController
3) 배포
☞ CloudFormation 으로 자동 배포 - 서울리전 → 클릭 후 아래 파라미터 입력 후 스택 생성! 스택 이름은 기본 myeks가 입력됩니다!
- 파라미터 입력은 크게 3가지 종류로 구분됩니다

▶ eks-oneclick.yaml
- curl -O https://s3.ap-northeast-2.amazonaws.com/cloudformation.cloudneta.net/kans/eks-oneclick.yaml
AWSTemplateFormatVersion: '2010-09-09'

Metadata:
  AWS::CloudFormation::Interface:
    ParameterGroups:
      - Label:
          default: "<<<<< Deploy EC2 >>>>>"
        Parameters:
          - KeyName
          - MyIamUserAccessKeyID
          - MyIamUserSecretAccessKey
          - SgIngressSshCidr
          - MyInstanceType
          - LatestAmiId

      - Label:
          default: "<<<<< EKS Config >>>>>"
        Parameters:
          - ClusterBaseName
          - KubernetesVersion
          - WorkerNodeInstanceType
          - WorkerNodeCount
          - WorkerNodeVolumesize

      - Label:
          default: "<<<<< Region AZ >>>>>"
        Parameters:
          - TargetRegion
          - AvailabilityZone1
          - AvailabilityZone2
          - AvailabilityZone3

      - Label:
          default: "<<<<< VPC Subnet >>>>>"
        Parameters:
          - VpcBlock
          - PublicSubnet1Block
          - PublicSubnet2Block
          - PublicSubnet3Block
          - PrivateSubnet1Block
          - PrivateSubnet2Block
          - PrivateSubnet3Block

Parameters:
  KeyName:
    Description: Name of an existing EC2 KeyPair to enable SSH access to the instances. Linked to AWS Parameter
    Type: AWS::EC2::KeyPair::KeyName
    ConstraintDescription: must be the name of an existing EC2 KeyPair.
  MyIamUserAccessKeyID:
    Description: IAM User - AWS Access Key ID (won't be echoed)
    Type: String
    NoEcho: true
  MyIamUserSecretAccessKey:
    Description: IAM User - AWS Secret Access Key (won't be echoed)
    Type: String
    NoEcho: true
  SgIngressSshCidr:
    Description: The IP address range that can be used to communicate to the EC2 instances
    Type: String
    MinLength: '9'
    MaxLength: '18'
    Default: 0.0.0.0/0
    AllowedPattern: (\d{1,3})\.(\d{1,3})\.(\d{1,3})\.(\d{1,3})/(\d{1,2})
    ConstraintDescription: must be a valid IP CIDR range of the form x.x.x.x/x.
  MyInstanceType:
    Description: Enter t2.micro, t2.small, t2.medium, t3.micro, t3.small, t3.medium. Default is t2.micro.
    Type: String
    Default: t3.medium
    AllowedValues:
      - t2.micro
      - t2.small
      - t2.medium
      - t3.micro
      - t3.small
      - t3.medium
  LatestAmiId:
    Description: (DO NOT CHANGE)
    Type: 'AWS::SSM::Parameter::Value<AWS::EC2::Image::Id>'
    Default: '/aws/service/ami-amazon-linux-latest/amzn2-ami-hvm-x86_64-gp2'
    AllowedValues:
      - /aws/service/ami-amazon-linux-latest/amzn2-ami-hvm-x86_64-gp2

  ClusterBaseName:
    Type: String
    Default: myeks
    AllowedPattern: "[a-zA-Z][-a-zA-Z0-9]*"
    Description: must be a valid Allowed Pattern '[a-zA-Z][-a-zA-Z0-9]*'
    ConstraintDescription: ClusterBaseName - must be a valid Allowed Pattern
  KubernetesVersion:
    Description: Enter Kubernetes Version, 1.28 ~ 1.31
    Type: String
    Default: "1.30"
  WorkerNodeInstanceType:
    Description: Enter EC2 Instance Type. Default is t3.medium.
    Type: String
    Default: t3.medium
  WorkerNodeCount:
    Description: Worker Node Counts
    Type: String
    Default: 3
  WorkerNodeVolumesize:
    Description: Worker Node Volumes size
    Type: String
    Default: 30

  TargetRegion:
    Type: String
    Default: ap-northeast-2
  AvailabilityZone1:
    Type: String
    Default: ap-northeast-2a
  AvailabilityZone2:
    Type: String
    Default: ap-northeast-2b
  AvailabilityZone3:
    Type: String
    Default: ap-northeast-2c

  VpcBlock:
    Type: String
    Default: 192.168.0.0/16
  PublicSubnet1Block:
    Type: String
    Default: 192.168.1.0/24
  PublicSubnet2Block:
    Type: String
    Default: 192.168.2.0/24
  PublicSubnet3Block:
    Type: String
    Default: 192.168.3.0/24
  PrivateSubnet1Block:
    Type: String
    Default: 192.168.11.0/24
  PrivateSubnet2Block:
    Type: String
    Default: 192.168.12.0/24
  PrivateSubnet3Block:
    Type: String
    Default: 192.168.13.0/24

Resources:
# VPC
  EksVPC:
    Type: AWS::EC2::VPC
    Properties:
      CidrBlock: !Ref VpcBlock
      EnableDnsSupport: true
      EnableDnsHostnames: true
      Tags:
        - Key: Name
          Value: !Sub ${ClusterBaseName}-VPC

# PublicSubnets
  PublicSubnet1:
    Type: AWS::EC2::Subnet
    Properties:
      AvailabilityZone: !Ref AvailabilityZone1
      CidrBlock: !Ref PublicSubnet1Block
      VpcId: !Ref EksVPC
      MapPublicIpOnLaunch: true
      Tags:
        - Key: Name
          Value: !Sub ${ClusterBaseName}-PublicSubnet1
        - Key: kubernetes.io/role/elb
          Value: 1
  PublicSubnet2:
    Type: AWS::EC2::Subnet
    Properties:
      AvailabilityZone: !Ref AvailabilityZone2
      CidrBlock: !Ref PublicSubnet2Block
      VpcId: !Ref EksVPC
      MapPublicIpOnLaunch: true
      Tags:
        - Key: Name
          Value: !Sub ${ClusterBaseName}-PublicSubnet2
        - Key: kubernetes.io/role/elb
          Value: 1
  PublicSubnet3:
    Type: AWS::EC2::Subnet
    Properties:
      AvailabilityZone: !Ref AvailabilityZone3
      CidrBlock: !Ref PublicSubnet3Block
      VpcId: !Ref EksVPC
      MapPublicIpOnLaunch: true
      Tags:
        - Key: Name
          Value: !Sub ${ClusterBaseName}-PublicSubnet3
        - Key: kubernetes.io/role/elb
          Value: 1

  InternetGateway:
    Type: AWS::EC2::InternetGateway
  VPCGatewayAttachment:
    Type: AWS::EC2::VPCGatewayAttachment
    Properties:
      InternetGatewayId: !Ref InternetGateway
      VpcId: !Ref EksVPC

  PublicSubnetRouteTable:
    Type: AWS::EC2::RouteTable
    Properties:
      VpcId: !Ref EksVPC
      Tags:
        - Key: Name
          Value: !Sub ${ClusterBaseName}-PublicSubnetRouteTable
  PublicSubnetRoute:
    Type: AWS::EC2::Route
    Properties:
      RouteTableId: !Ref PublicSubnetRouteTable
      DestinationCidrBlock: 0.0.0.0/0
      GatewayId: !Ref InternetGateway

  PublicSubnet1RouteTableAssociation:
    Type: AWS::EC2::SubnetRouteTableAssociation
    Properties:
      SubnetId: !Ref PublicSubnet1
      RouteTableId: !Ref PublicSubnetRouteTable
  PublicSubnet2RouteTableAssociation:
    Type: AWS::EC2::SubnetRouteTableAssociation
    Properties:
      SubnetId: !Ref PublicSubnet2
      RouteTableId: !Ref PublicSubnetRouteTable
  PublicSubnet3RouteTableAssociation:
    Type: AWS::EC2::SubnetRouteTableAssociation
    Properties:
      SubnetId: !Ref PublicSubnet3
      RouteTableId: !Ref PublicSubnetRouteTable

# PrivateSubnets
  PrivateSubnet1:
    Type: AWS::EC2::Subnet
    Properties:
      AvailabilityZone: !Ref AvailabilityZone1
      CidrBlock: !Ref PrivateSubnet1Block
      VpcId: !Ref EksVPC
      Tags:
        - Key: Name
          Value: !Sub ${ClusterBaseName}-PrivateSubnet1
        - Key: kubernetes.io/role/internal-elb
          Value: 1
  PrivateSubnet2:
    Type: AWS::EC2::Subnet
    Properties:
      AvailabilityZone: !Ref AvailabilityZone2
      CidrBlock: !Ref PrivateSubnet2Block
      VpcId: !Ref EksVPC
      Tags:
        - Key: Name
          Value: !Sub ${ClusterBaseName}-PrivateSubnet2
        - Key: kubernetes.io/role/internal-elb
          Value: 1
  PrivateSubnet3:
    Type: AWS::EC2::Subnet
    Properties:
      AvailabilityZone: !Ref AvailabilityZone3
      CidrBlock: !Ref PrivateSubnet3Block
      VpcId: !Ref EksVPC
      Tags:
        - Key: Name
          Value: !Sub ${ClusterBaseName}-PrivateSubnet3
        - Key: kubernetes.io/role/internal-elb
          Value: 1

  PrivateSubnetRouteTable:
    Type: AWS::EC2::RouteTable
    Properties:
      VpcId: !Ref EksVPC
      Tags:
        - Key: Name
          Value: !Sub ${ClusterBaseName}-PrivateSubnetRouteTable

  PrivateSubnet1RouteTableAssociation:
    Type: AWS::EC2::SubnetRouteTableAssociation
    Properties:
      SubnetId: !Ref PrivateSubnet1
      RouteTableId: !Ref PrivateSubnetRouteTable
  PrivateSubnet2RouteTableAssociation:
    Type: AWS::EC2::SubnetRouteTableAssociation
    Properties:
      SubnetId: !Ref PrivateSubnet2
      RouteTableId: !Ref PrivateSubnetRouteTable
  PrivateSubnet3RouteTableAssociation:
    Type: AWS::EC2::SubnetRouteTableAssociation
    Properties:
      SubnetId: !Ref PrivateSubnet3
      RouteTableId: !Ref PrivateSubnetRouteTable

# EKSCTL-Host
  EKSEC2SG:
    Type: AWS::EC2::SecurityGroup
    Properties:
      GroupDescription: eksctl-host Security Group
      VpcId: !Ref EksVPC
      Tags:
        - Key: Name
          Value: !Sub ${ClusterBaseName}-HOST-SG
      SecurityGroupIngress:
      - IpProtocol: '-1'
        #FromPort: '22'
        #ToPort: '22'
        CidrIp: !Ref SgIngressSshCidr

  EKSEC2:
    Type: AWS::EC2::Instance
    Properties:
      InstanceType: !Ref MyInstanceType
      ImageId: !Ref LatestAmiId
      KeyName: !Ref KeyName
      Tags:
        - Key: Name
          Value: !Sub ${ClusterBaseName}-bastion
      NetworkInterfaces:
        - DeviceIndex: 0
          SubnetId: !Ref PublicSubnet1
          GroupSet:
          - !Ref EKSEC2SG
          AssociatePublicIpAddress: true
          PrivateIpAddress: 192.168.1.100
      BlockDeviceMappings:
        - DeviceName: /dev/xvda
          Ebs:
            VolumeType: gp3
            VolumeSize: 30
            DeleteOnTermination: true
      UserData:
        Fn::Base64:
          !Sub |
            #!/bin/bash
            hostnamectl --static set-hostname "${ClusterBaseName}-bastion"

            # Config Root account
            echo 'root:qwe123' | chpasswd
            sed -i "s/^#PermitRootLogin yes/PermitRootLogin yes/g" /etc/ssh/sshd_config
            sed -i "s/^PasswordAuthentication no/PasswordAuthentication yes/g" /etc/ssh/sshd_config
            rm -rf /root/.ssh/authorized_keys
            systemctl restart sshd

            # Config convenience
            echo 'alias vi=vim' >> /etc/profile
            echo "sudo su -" >> /home/ec2-user/.bashrc
            sed -i "s/UTC/Asia\/Seoul/g" /etc/sysconfig/clock
            ln -sf /usr/share/zoneinfo/Asia/Seoul /etc/localtime

            # Install Packages
            yum -y install tree jq git htop

            # Install kubectl & helm
            cd /root
            curl -O https://s3.us-west-2.amazonaws.com/amazon-eks/1.30.4/2024-09-11/bin/linux/amd64/kubectl
            install -o root -g root -m 0755 kubectl /usr/local/bin/kubectl
            curl -s https://raw.githubusercontent.com/helm/helm/master/scripts/get-helm-3 | bash

            # Install eksctl
            curl -sL "https://github.com/eksctl-io/eksctl/releases/latest/download/eksctl_Linux_amd64.tar.gz" | tar xz -C /tmp
            mv /tmp/eksctl /usr/local/bin

            # Install aws cli v2
            curl "https://awscli.amazonaws.com/awscli-exe-linux-x86_64.zip" -o "awscliv2.zip"
            unzip awscliv2.zip >/dev/null 2>&1
            ./aws/install
            complete -C '/usr/local/bin/aws_completer' aws
            echo 'export AWS_PAGER=""' >>/etc/profile
            export AWS_DEFAULT_REGION=${AWS::Region}
            echo "export AWS_DEFAULT_REGION=$AWS_DEFAULT_REGION" >> /etc/profile

            # Create SSH Keypair
            ssh-keygen -t rsa -N "" -f /root/.ssh/id_rsa

            # IAM User Credentials
            export AWS_ACCESS_KEY_ID=${MyIamUserAccessKeyID}
            export AWS_SECRET_ACCESS_KEY=${MyIamUserSecretAccessKey}
            export AWS_DEFAULT_REGION=${AWS::Region}
            export ACCOUNT_ID=$(aws sts get-caller-identity --query 'Account' --output text)
            echo "export AWS_ACCESS_KEY_ID=$AWS_ACCESS_KEY_ID" >> /etc/profile
            echo "export AWS_SECRET_ACCESS_KEY=$AWS_SECRET_ACCESS_KEY" >> /etc/profile
            echo "export AWS_REGION=$AWS_DEFAULT_REGION" >> /etc/profile
            echo "export AWS_DEFAULT_REGION=$AWS_DEFAULT_REGION" >> /etc/profile
            echo "export ACCOUNT_ID=$(aws sts get-caller-identity --query 'Account' --output text)" >> /etc/profile

            # CLUSTER_NAME
            export CLUSTER_NAME=${ClusterBaseName}
            echo "export CLUSTER_NAME=$CLUSTER_NAME" >> /etc/profile

            # K8S Version
            export KUBERNETES_VERSION=${KubernetesVersion}
            echo "export KUBERNETES_VERSION=$KUBERNETES_VERSION" >> /etc/profile

            # VPC & Subnet
            export VPCID=$(aws ec2 describe-vpcs --filters "Name=tag:Name,Values=$CLUSTER_NAME-VPC" | jq -r .Vpcs[].VpcId)
            echo "export VPCID=$VPCID" >> /etc/profile
            export PubSubnet1=$(aws ec2 describe-subnets --filters Name=tag:Name,Values="$CLUSTER_NAME-PublicSubnet1" --query "Subnets[0].[SubnetId]" --output text)
            export PubSubnet2=$(aws ec2 describe-subnets --filters Name=tag:Name,Values="$CLUSTER_NAME-PublicSubnet2" --query "Subnets[0].[SubnetId]" --output text)
            export PubSubnet3=$(aws ec2 describe-subnets --filters Name=tag:Name,Values="$CLUSTER_NAME-PublicSubnet3" --query "Subnets[0].[SubnetId]" --output text)
            echo "export PubSubnet1=$PubSubnet1" >> /etc/profile
            echo "export PubSubnet2=$PubSubnet2" >> /etc/profile
            echo "export PubSubnet3=$PubSubnet3" >> /etc/profile
            export PrivateSubnet1=$(aws ec2 describe-subnets --filters Name=tag:Name,Values="$CLUSTER_NAME-PrivateSubnet1" --query "Subnets[0].[SubnetId]" --output text)
            export PrivateSubnet2=$(aws ec2 describe-subnets --filters Name=tag:Name,Values="$CLUSTER_NAME-PrivateSubnet2" --query "Subnets[0].[SubnetId]" --output text)
            export PrivateSubnet3=$(aws ec2 describe-subnets --filters Name=tag:Name,Values="$CLUSTER_NAME-PrivateSubnet3" --query "Subnets[0].[SubnetId]" --output text)
            echo "export PrivateSubnet1=$PrivateSubnet1" >> /etc/profile
            echo "export PrivateSubnet2=$PrivateSubnet2" >> /etc/profile
            echo "export PrivateSubnet3=$PrivateSubnet3" >> /etc/profile

            # Create EKS Cluster & Nodegroup
            eksctl create cluster --name $CLUSTER_NAME --region=$AWS_DEFAULT_REGION --nodegroup-name=ng1 --node-type=${WorkerNodeInstanceType} --nodes ${WorkerNodeCount} --node-volume-size=${WorkerNodeVolumesize} --vpc-public-subnets "$PubSubnet1","$PubSubnet2","$PubSubnet3" --version ${KubernetesVersion} --ssh-access --ssh-public-key /root/.ssh/id_rsa.pub --with-oidc --external-dns-access --full-ecr-access --alb-ingress-access --dry-run > myeks.yaml
            sed -i 's/certManager: false/certManager: true/g' myeks.yaml
            sed -i 's/awsLoadBalancerController: false/awsLoadBalancerController: true/g' myeks.yaml
            cat <<EOT >> myeks.yaml
            addons:
              - name: vpc-cni # no version is specified so it deploys the default version
                version: latest # auto discovers the latest available
                attachPolicyARNs:
                  - arn:aws:iam::aws:policy/AmazonEKS_CNI_Policy
                configurationValues: |-
                  enableNetworkPolicy: "true"
              - name: kube-proxy
                version: latest
              - name: coredns
                version: latest
            EOT
            cat <<EOT > precmd.yaml
              preBootstrapCommands:
                - "yum install nvme-cli links tree tcpdump sysstat -y"
            EOT
            sed -i -n -e '/instanceType/r precmd.yaml' -e '1,$p' myeks.yaml
            nohup eksctl create cluster -f myeks.yaml --verbose 4 --kubeconfig "/root/.kube/config" 1> /root/create-eks.log 2>&1 &

            # Install krew
            curl -L https://github.com/kubernetes-sigs/krew/releases/download/v0.4.4/krew-linux_amd64.tar.gz -o /root/krew-linux_amd64.tar.gz
            tar zxvf krew-linux_amd64.tar.gz
            ./krew-linux_amd64 install krew
            export PATH="$PATH:/root/.krew/bin"
            echo 'export PATH="$PATH:/root/.krew/bin"' >> /etc/profile

            # Install kube-ps1
            echo 'source <(kubectl completion bash)' >> /root/.bashrc
            echo 'alias k=kubectl' >> /root/.bashrc
            echo 'complete -F __start_kubectl k' >> /root/.bashrc

            git clone https://github.com/jonmosco/kube-ps1.git /root/kube-ps1
            cat <<"EOT" >> /root/.bashrc
            source /root/kube-ps1/kube-ps1.sh
            KUBE_PS1_SYMBOL_ENABLE=false
            function get_cluster_short() {
              echo "$1" | cut -d . -f1
            }
            KUBE_PS1_CLUSTER_FUNCTION=get_cluster_short
            KUBE_PS1_SUFFIX=') '
            PS1='$(kube_ps1)'$PS1
            EOT

            # Install krew plugin
            kubectl krew install ctx ns get-all neat stern # ktop df-pv mtail tree

            # Install Docker
            amazon-linux-extras install docker -y
            systemctl start docker && systemctl enable docker

            echo 'cloudinit End!'

Outputs:
  eksctlhost:
    Value: !GetAtt EKSEC2.PublicIp
☞ 파라미터 : 아래 빨간색 부분은 설정해주는어야 할 것, 그외 부분은 기본값 사용을 권장
- <<<<< Deploy EC2 >>>>>
- KeyName : 작업용 bastion ec2에 SSH 접속을 위한 SSH 키페어 선택 ← 미리 SSH 키 생성 해두자!
- MyIamUserAccessKeyID : 관리자 수준의 권한을 가진 IAM User의 액세스 키ID 입력
- MyIamUserSecretAccessKey : 관리자 수준의 권한을 가진 IAM User의 시크릿 키ID 입력 ← 노출되지 않게 보안 주의
- SgIngressSshCidr : 작업용 bastion ec2에 SSH 접속 가능한 IP 입력 (집 공인IP/32 입력), 보안그룹 인바운드 규칙에 반영됨
- MyInstanceType: 작업용 bastion EC2 인스턴스의 타입 (기본 t3.medium) ⇒ 변경 가능
- LatestAmiId : 작업용 bastion EC2에 사용할 AMI는 아마존리눅스2 최신 버전 사용
- <<<<< EKS Config >>>>>
- ClusterBaseName : EKS 클러스터 이름이며, myeks 기본값 사용을 권장 → 이유: 실습 리소스 태그명과 실습 커멘드에서 사용
- KubernetesVersion : EKS 호환, 쿠버네티스 버전 (기본 v1.30, 실습은 1.30 버전 사용) ⇒
변경 가능 - WorkerNodeInstanceType: 워커 노드 EC2 인스턴스의 타입 (기본 t3.medium) ⇒ 변경 가능
- WorkerNodeCount : 워커노드의 갯수를 입력 (기본 3대) ⇒ 변경 가능
- WorkerNodeVolumesize : 워커노드의 EBS 볼륨 크기 (기본 80GiB) ⇒ 변경 가능
- <<<<< Region AZ >>>>> : 리전과 가용영역을 지정, 기본값 그대로 사용
▶ Tip. CloudFormation 스택 배포 한줄 실행! ← 실행하는 PC에 aws cli 설치되어 있고, aws configure 자격증명 설정 상태.
# YAML 파일 다운로드
curl -O https://s3.ap-northeast-2.amazonaws.com/cloudformation.cloudneta.net/kans/eks-oneclick.yaml

# CloudFormation 스택 배포
# aws cloudformation deploy --template-file eks-oneclick.yaml --stack-name myeks --parameter-overrides KeyName=<My SSH Keyname> SgIngressSshCidr=<My Home Public IP Address>/32 MyIamUserAccessKeyID=<IAM User의 액세스키> MyIamUserSecretAccessKey=<IAM User의 시크릿 키> ClusterBaseName='<eks 이름>' --region ap-northeast-2
예시) aws cloudformation deploy --template-file eks-oneclick.yaml --stack-name myeks --parameter-overrides KeyName=kp-gasida SgIngressSshCidr=$(curl -s ipinfo.io/ip)/32  MyIamUserAccessKeyID=AKIA5... MyIamUserSecretAccessKey='CVNa2...' ClusterBaseName=myeks --region ap-northeast-2

## Tip. 워커노드 인스턴스 타입 변경 : WorkerNodeInstanceType=t3.xlarge
예시) aws cloudformation deploy --template-file eks-oneclick.yaml --stack-name myeks --parameter-overrides KeyName=kp-gasida SgIngressSshCidr=$(curl -s ipinfo.io/ip)/32  MyIamUserAccessKeyID=AKIA5... MyIamUserSecretAccessKey='CVNa2...' ClusterBaseName=myeks --region ap-northeast-2 WorkerNodeInstanceType=t3.xlarge

# CloudFormation 스택 배포 완료 후 작업용 EC2 IP 출력
aws cloudformation describe-stacks --stack-name myeks --query 'Stacks[*].Outputs[0].OutputValue' --output text

# 작업용 EC2 SSH 접속
ssh -i ~/.ssh/kp-gasida.pem ec2-user@$(aws cloudformation describe-stacks --stack-name myeks --query 'Stacks[*].Outputs[0].OutputValue' --output text)- EC2 생성 수량 부족 실패 발생 시 : 해당 사용자 계정의 해당 리전에 EC2 최대 갯수 제한 일 경우, Service Quotas (EC2) 증설 요청으로 해결 가능 - 링크 EC2 요청
- Limit Type(EC2 Instances) ⇒ 서울 리전, All Standard (A, C, D, H, I, M, R, T, Z) Instances, New limit value(40 정도)
4) 배포 확인
▶ 작업용 EC2 에 SSH 접속 (SSH 키 파일 사용) : 쿠버네티스 정상 설치 확인 ← 스택 생성 시작 후 20분 후 접속 할 것
4-1. 접속 후 기본확인
# SSH 접속
ssh -i ~/.ssh/kp-gasida.pem ec2-user@$(aws cloudformation describe-stacks --stack-name myeks --query 'Stacks[*].Outputs[0].OutputValue' --output text)

# cloud-init 실행 과정 로그 확인
tail -f /var/log/cloud-init-output.log

# cloud-init 정상 완료 후 eksctl 실행 과정 로그 확인
tail -f /root/create-eks.log

# default 네임스페이스 적용
kubectl ns default

# 설치 확인
kubectl cluster-info
eksctl get cluster
eksctl get nodegroup --cluster $CLUSTER_NAME

# 환경변수 정보 확인
export | egrep 'ACCOUNT|AWS_|CLUSTER|KUBERNETES|VPC|Subnet'
export | egrep 'ACCOUNT|AWS_|CLUSTER|KUBERNETES|VPC|Subnet' | egrep -v 'SECRET|KEY'

# 인증 정보 확인
cat /root/.kube/config
kubectl config view
kubectl ctx

# 노드 정보 확인
kubectl get node --label-columns=node.kubernetes.io/instance-type,eks.amazonaws.com/capacityType,topology.kubernetes.io/zone
eksctl get iamidentitymapping --cluster myeks

# krew 플러그인 확인
kubectl krew list

# 모든 네임스페이스에서 모든 리소스 확인
kubectl get-all
[ 실행 결과 - 한 눈에 보기 ]

4-2. 노드 정보 확인 및 SSH 접속
# 노드 IP 확인 및 PrivateIP 변수 지정
aws ec2 describe-instances --query "Reservations[*].Instances[*].{PublicIPAdd:PublicIpAddress,PrivateIPAdd:PrivateIpAddress,InstanceName:Tags[?Key=='Name']|[0].Value,Status:State.Name}" --filters Name=instance-state-name,Values=running --output table
N1=$(kubectl get node --label-columns=topology.kubernetes.io/zone --selector=topology.kubernetes.io/zone=ap-northeast-2a -o jsonpath={.items[0].status.addresses[0].address})
N2=$(kubectl get node --label-columns=topology.kubernetes.io/zone --selector=topology.kubernetes.io/zone=ap-northeast-2b -o jsonpath={.items[0].status.addresses[0].address})
N3=$(kubectl get node --label-columns=topology.kubernetes.io/zone --selector=topology.kubernetes.io/zone=ap-northeast-2c -o jsonpath={.items[0].status.addresses[0].address})
echo "export N1=$N1" >> /etc/profile
echo "export N2=$N2" >> /etc/profile
echo "export N3=$N3" >> /etc/profile
echo $N1, $N2, $N3

# 보안그룹 ID와 보안그룹 이름(Name아님을 주의!) 확인
aws ec2 describe-security-groups --query 'SecurityGroups[*].[GroupId, GroupName]' --output text

# 노드 보안그룹 ID 확인
aws ec2 describe-security-groups --filters Name=group-name,Values=*ng1* --query "SecurityGroups[*].[GroupId]" --output text
NGSGID=$(aws ec2 describe-security-groups --filters Name=group-name,Values=*ng1* --query "SecurityGroups[*].[GroupId]" --output text)
echo $NGSGID
echo "export NGSGID=$NGSGID" >> /etc/profile

# 노드 보안그룹에 eksctl-host 에서 노드(파드)에 접속 가능하게 룰(Rule) 추가 설정
aws ec2 authorize-security-group-ingress --group-id $NGSGID --protocol '-1' --cidr 192.168.1.100/32

# eksctl-host 에서 노드의IP나 coredns 파드IP로 ping 테스트
ping -c 1 $N1
ping -c 1 $N2
ping -c 1 $N3

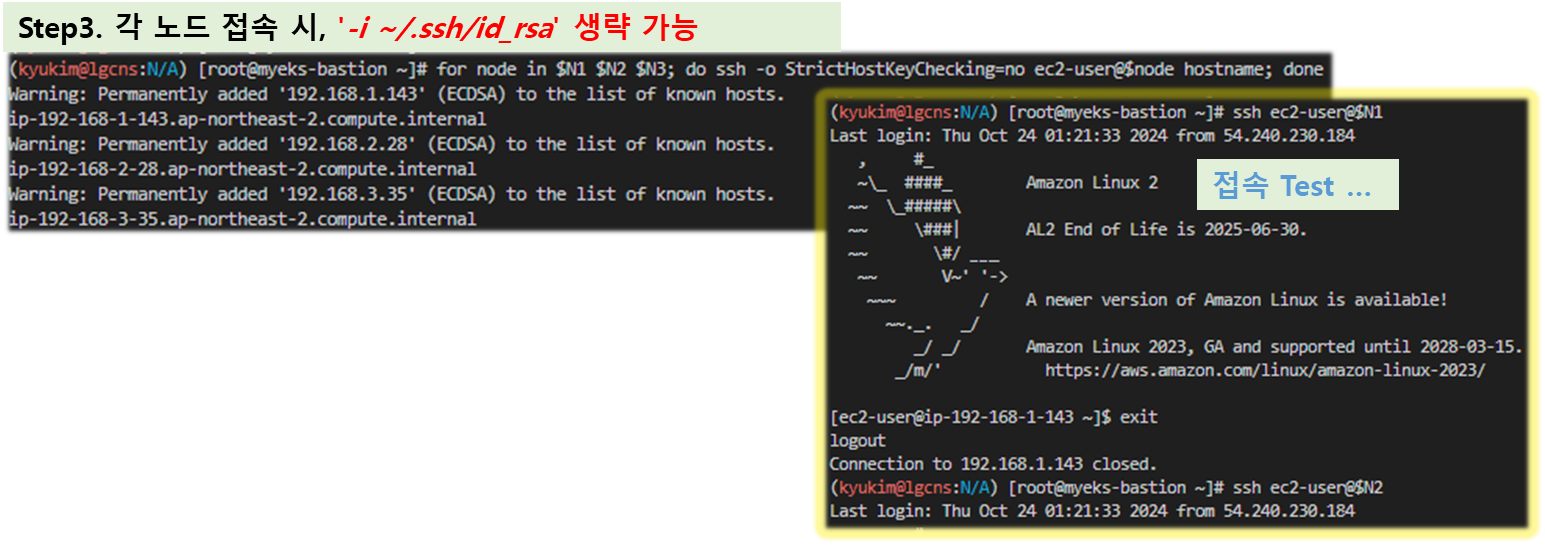
# 워커 노드 SSH 접속 : '-i ~/.ssh/id_rsa' 생략 가능
for node in $N1 $N2 $N3; do ssh -o StrictHostKeyChecking=no ec2-user@$node hostname; done
ssh ec2-user@$N1
exit
ssh ec2-user@$N2
exit
ssh ec2-user@$N3
exit
[ 실행 결과 - 한 눈에 보기 ]


▶ Add-on 정보확인 : 최신 버전 - kube-proxy, coredns, aws vpc cni - 링크 mgmt
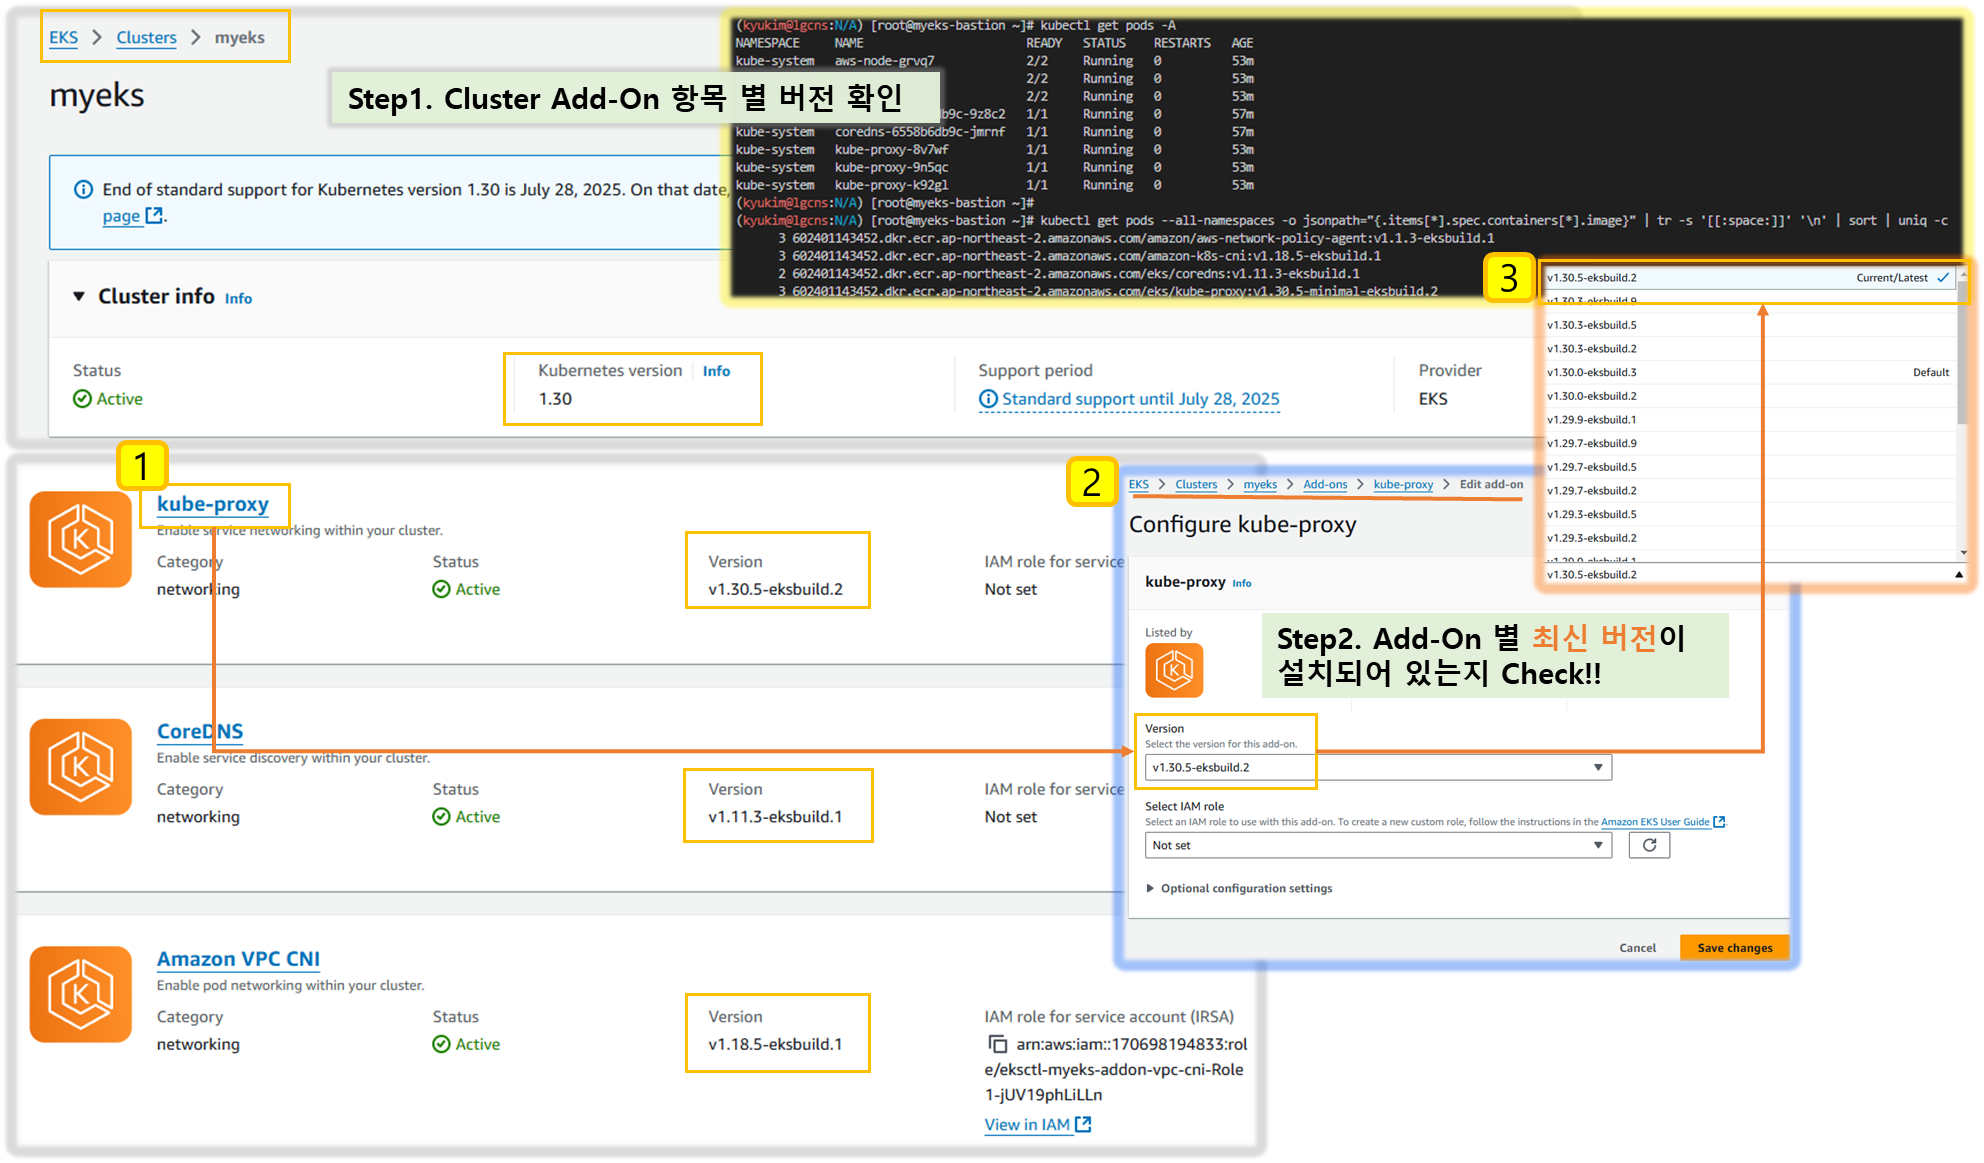
- 모든 파드의 컨테이너 이미지 정보 확인 : 기본설치 vs Add-on 으로 최신 버전 설치
# 모든 파드의 컨테이너 이미지 정보 확인
kubectl get pods --all-namespaces -o jsonpath="{.items[*].spec.containers[*].image}" | tr -s '[[:space:]]' '\n' | sort | uniq -c

# 위 버전은 Add-on 으로 최신 버전 설치
kubectl get pods -A
kubectl get pods --all-namespaces -o jsonpath="{.items[*].spec.containers[*].image}" | tr -s '[[:space:]]' '\n' | sort | uniq -c
      3 602401143452.dkr.ecr.ap-northeast-2.amazonaws.com/amazon/aws-network-policy-agent:v1.0.8-eksbuild.1
      3 602401143452.dkr.ecr.ap-northeast-2.amazonaws.com/amazon-k8s-cni:v1.16.4-eksbuild.2
      2 602401143452.dkr.ecr.ap-northeast-2.amazonaws.com/eks/coredns:v1.10.1-eksbuild.7
      3 602401143452.dkr.ecr.ap-northeast-2.amazonaws.com/eks/kube-proxy:v1.28.6-minimal-eksbuild.
      # 아래는 기본 설치 시 버전
      2 602401143452.dkr.ecr.ap-northeast-2.amazonaws.com/amazon-k8s-cni:v1.15.1-eksbuild.1
      2 602401143452.dkr.ecr.ap-northeast-2.amazonaws.com/eks/coredns:v1.10.1-eksbuild.4
      2 602401143452.dkr.ecr.ap-northeast-2.amazonaws.com/eks/kube-proxy:v1.28.2-minimal-eksbuild.2

# eksctl 설치/업데이트 addon 확인
eksctl get addon --cluster $CLUSTER_NAME
NAME            VERSION                 STATUS  ISSUES  IAMROLE                                                                      UPDATE AVAILABLE CONFIGURATION VALUES
coredns         v1.10.1-eksbuild.7      ACTIVE  0
kube-proxy      v1.28.6-eksbuild.2      ACTIVE  0
vpc-cni         v1.16.4-eksbuild.2      ACTIVE  0       arn:aws:iam::911283464785:role/eksctl-myeks-addon-vpc-cni-Role1-tGXXZMjRWrW3                  enableNetworkPolicy: "true"

# (참고) eks 설치 yaml 중 addon 내용
tail -n11 myeks.yaml
addons:
- name: vpc-cni # no version is specified so it deploys the default version
  version: latest # auto discovers the latest available
  attachPolicyARNs:
    - arn:aws:iam::aws:policy/AmazonEKS_CNI_Policy
  configurationValues: |-
    enableNetworkPolicy: "true"
- name: kube-proxy
  version: latest
- name: coredns
  version: latestㅍ
[ 실행 결과 - 한 눈에 보기 ]
▶ Tip. 자리 이동으로 인해 작업용EC2에 접속하는 공인IP가 변경 시 보안 그룹에 추가하는 방법
# 자신의 PC(맥 기준)에서 아래 명령어 실행 >> 윈도우 CMD 명령어 입력 아시는 분은 댓글 주세요. 업데이트하겠습니다.
MYSGID=$(aws ec2 describe-security-groups --filters "Name=tag:Name,Values=myeks-HOST-SG" --query "SecurityGroups[*].[GroupId]" --output text)
aws ec2 authorize-security-group-ingress --group-id $MYSGID --protocol '-1' --cidr $(curl -s ipinfo.io/ip)/32
▶ (옵션) Visual Studio Code 에 Remote-SSH 설치 후 root 계정으로 작업용 EC2 연결
보안상 권장하시는 않지만, 실습 편의를 위해 root 계정으로 실습을 진행합니다.
- Extension : ‘remote development’ 입력 후 Remote - SSH 설치
- 커맨드창(Ctrl + Shift + P) 입력 후 “Remote-SSH: Open Config…” 선택 후 자신의 SSH Config 파일을 열기: ls ~/.ssh/config
# Read more about SSH config files: https://linux.die.net/man/5/ssh_config
Host myeks-bastion
    HostName 50.1.1.1 <- 각자 자신의 myeks-bastion-EC2 의 유동 공인 IP
    User root
3. 커맨드창(Ctrl + Shift + P) 입력 후 “Remote-SSH: Connect…” 선택 후 자신의 myeks-bastion 선택 : 암호는 qwe123
4. 신규 창에서 좌측 Open Folder 버튼 누르고 /root 폴더에서 OK 로 열어주기
5. 터미널 - 신규 터미널 클릭해서 하단 뷰에 터미널 창 열기

- VSCDOE 터미널창에서 기본 정보 확인
# 계정 정보 등 확인
whoami
id
pwd
6. Visual Studio Code 에 자동 저장 설정 : 설정 → ‘auto save’ 검색 ⇒ afterDelay 선택, Auto Save Delay 1000ms(=1초)

5) 자원 정리 ( 실습 후, 필수 !! ) **
☞ 삭제 방안 : 장점(1줄 명령어로 완전 삭제), 단점(삭제 실행과 완료까지 SSH 세션 유지 필요)
eksctl delete cluster --name $CLUSTER_NAME && aws cloudformation delete-stack --stack-name $CLUSTER_NAME1. AWS VPC CNI 소개
1-1 CNI란?
- CNI는 리눅스 컨테이너 간의 네트워킹 제어를 가능케 해주는 플러그인을 만들기 위한 표준이다.
- 기본적으로 라우팅, 터널링과 같은 각종 네트워크 기능들을 사용하게 해 준다.
- CNI 플러그인은 K8S에 Overlay Network를 구성해주며, 이를 통해 다른 노드에 있는 파드와도 통신이 가능하다.
1-2. About AWS VPC CNI
- AWS VPC CNI는 워커 노드에 aws-node라는 Kubernetes Daemonset으로 배포된다.
☞ AWS에서는 EKS 를 설치하면, default로 VPC CNI가 설치된다. - Ref. Link
☞ AWS VPC CNI 구성요소 (2가지)
1) CNI binary
- Pod-to-Pod 통신을 활성화하기 위해 Pod 네트워크를 설정
- node root filesystem에서 실행
- Node에서 pod가 신규로 생성되거나, 기존 pod가 삭제될 경우 kubelet에서 호출됨
2) ipamd
- long-running node-local IP Address Management 의 daemon
- Node에서 ENI를 관리
- 사용 가능한 IP warm-pool 또는 prefix를 관리
※ EC2가 생성될 때 Primary subnet과 연결된 Primary ENI가 할당된다.
( Primary subnet = public or private )
Host Network mode에서 실행되는 POD는 Node Primary ENI에 할당된 주소를 사용하며,
host와 같은 network namespace를 사용한다.
[ AWS CNI 가 지원하는 통신 ]
- 노드 내부에 있는 파드 통신
- 다른 노드에 위치하는 파드와의 통신
- 파드 ~ AWS 서비스 통신
- 파드 ~ 온프레미스 통신
- 파드 ~ 인터넷 통신
1-3. AWS CNI 의 장단점
1) 장점
- POD에 VPC ENI가 직접 붙는다.
- 오버레이가 아닌 VPC 네트워크 직접 사용으로 오버헤드가 없다.
- 보안 그룹으로 파드 네트워크의 제어가 가능하다.
- ALB를 통해 파드의 IP로 직접 라우팅이 가능하다.
2) 단점
- VPC 설정이 파드의 네트워크 설정에 영향을 미친다.
- 인스턴스 별 제한된 IP 및 ENI 갯수가 존재하여, 사전 설계 시 매우 주의를 요한다.
- 네트워크 정책을 지원하지 않는다.
[ More ... ]
- CNI Plug-In(=VPC CNI)은 Node에서 ENI(Elastic Network Interfaces) 를 관리하며,
- 노드가 Provisioning 되면 기본 ENI로 slot의 Pool (IPs or Prefix's) 을 할당한다.
- 이 때 할당되는 Pool을 'Warm Pool' 이라 하며, 노드의 Type에 따라 붙일 수 있는 ENI 수가 제한되며
이에 따른 IP 갯수가 제한된다. ( Constraints : compute resources + Pod density ) - CNI는 더 빠른 POD 기동을 위해 "warm" ENI와 슬롯을 미리 할당할 수 있다.

네트워크 인터페이스의 최대 수와 사용할 수 있는 슬롯의 최대 수는 EC2 인스턴스의 유형에 따라 다릅니다. 각 Pod는 슬롯에서 IP 주소를 사용하므로 특정 EC2 인스턴스에서 실행할 수 있는 Pod 수는 연결할 수 있는 ENI 수와 각 ENI가 지원하는 슬롯 수에 따라 달라집니다. 인스턴스의 CPU 및 메모리 리소스가 고갈되는 것을 방지하기 위해 EKS 사용자 가이드당 최대 Pod 수를 설정하는 것이 좋습니다. 사용하는 Pod는 이 계산에서 제외됩니다.
max-pod-calculator.shhostNetwork 라는 스크립트를 사용하는 것을 고려할 수 있습니다.
warm ENI는 여전히 VPC의 CIDR에서 IP 주소를 사용합니다. IP 주소는 Pod와 같은 워크로드와 연결될 때까지 "사용되지 않음" 또는 "warm" 상태입니다.
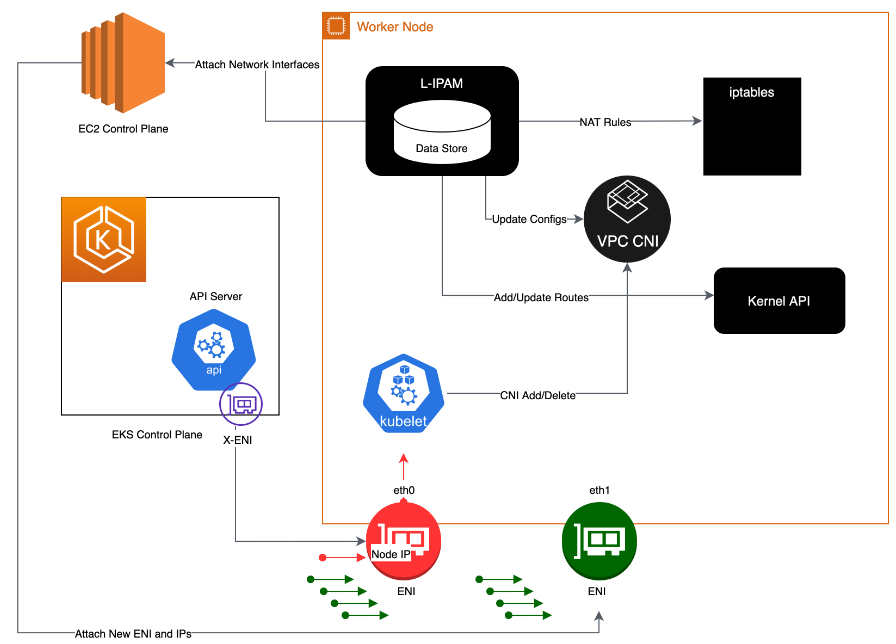
Kubelet이 Pod 추가 요청을 받으면 CNI 바이너리는 ipamd에 사용 가능한 IP 주소를 쿼리하고, ipamd는 이를 Pod에 제공합니다. CNI 바이너리는 호스트와 Pod 네트워크를 연결합니다.
노드에 배포된 Pod는 기본적으로 기본 ENI와 동일한 보안 그룹에 할당됩니다. 또는 Pod는 다른 보안 그룹으로 구성될 수 있습니다.
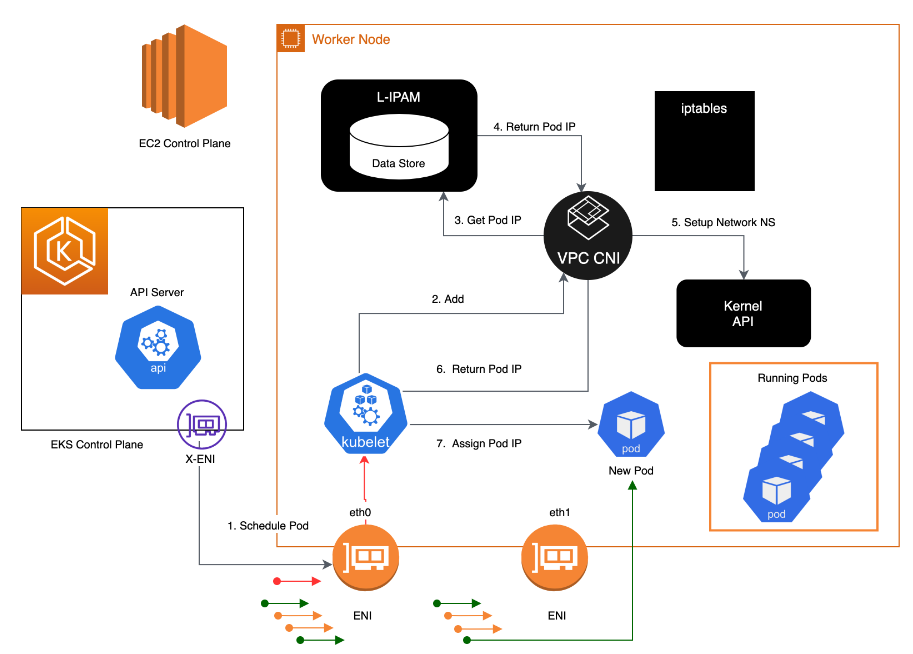
IP 주소 풀이 고갈되면 플러그인은 자동으로 다른 탄력적 네트워크 인터페이스(Elastic Network Interface)를 인스턴스에 연결하고 해당 인터페이스에 또 다른 보조 IP 주소 세트를 할당합니다. 이 프로세스는 노드가 더 이상 추가 탄력적 네트워크 인터페이스를 지원할 수 없을 때까지 계속됩니다.

Pod가 삭제되면 VPC CNI는 Pod의 IP 주소를 30초 쿨다운 캐시에 저장합니다. 쿨다운 캐시의 IP는 새 Pod에 할당되지 않습니다. 쿨링오프 기간이 끝나면 VPC CNI는 Pod IP를 다시 웜 풀로 옮깁니다. 쿨링오프 기간은 Pod IP 주소가 조기에 재활용되는 것을 방지하고 모든 클러스터 노드의 kube-proxy가 iptables 규칙 업데이트를 완료할 수 있도록 합니다. IP 또는 ENI 수가 웜 풀 설정 수를 초과하면 ipamd 플러그인은 IP와 ENI를 VPC로 반환합니다.
위에서 설명한 대로 보조 IP 모드에서 각 Pod는 인스턴스에 연결된 ENI 중 하나에서 보조 개인 IP 주소 하나를 받습니다. 각 Pod는 IP 주소를 사용하므로 특정 EC2 인스턴스에서 실행할 수 있는 Pod 수는 연결할 수 있는 ENI 수와 지원하는 IP 주소 수에 따라 달라집니다. VPC CNI는 제한을 확인합니다.
다음 공식을 사용하면 노드에 배포할 수 있는 최대 Pod 수를 결정할 수 있습니다.
(인스턴스 유형의 네트워크 인터페이스 수 * (네트워크 인터페이스당 IP 주소 수 - 1)) + 2
* +2는 kube-proxy 및 VPC CNI와 같은 호스트 네트워킹이 필요한 Pod를 나타냅니다. Amazon EKS는 각 노드에서 kube-proxy 및 VPC CNI가 작동해야 하며 이러한 요구 사항은 max-pods 값에 반영됩니다. 추가 호스트 네트워킹 Pod를 실행하려면 max-pods 값을 업데이트하는 것을 고려하세요.
♣ 추천사항
1. VPC CNI Managed Add-on 설치
- 클러스터를 프로비저닝하면 Amazon EKS가 VPC CNI를 자동으로 설치 , But ...
- VPC CNI를 포함한 관리형 애드온이 있는 클러스터를 배포를 권장함
- Amazon EKS 애드온에는 최신 보안 패치, 버그 수정이 포함되어 있으며
- AWS에서 Amazon EKS와 함께 작동하도록 검증 됨 ( More Stable than manual-management )
- Amazon EKS API, AWS Management Console, AWS CLI 및 eksctl을 통해 추가, 업데이트 또는 삭제
kubectl get daemonset aws-node --show-managed-fields -n kube-system -o yaml☞ 관리되는 애드온은 15분마다 구성을 자동으로 덮어써서 구성 드리프트를 방지합니다. 즉, 애드온 생성 후 Kubernetes API를 통해 관리되는 애드온에 대한 모든 변경 사항은 자동화된 드리프트 방지 프로세스에 의해 덮어쓰이고 애드온 업데이트 프로세스 중에 기본값으로 설정됩니다.
2. Migration to Managed Add-on
- 버전 호환성을 관리하고 자체 관리형 VPC CNI의 보안 패치를 업데이트합니다.
- 자체 관리형 애드온을 업데이트하려면 Kubernetes API와 EKS 사용자 가이드 에 설명된 지침을 사용해야 합니다.
- 기존 EKS 클러스터의 관리형 애드온으로 마이그레이션하는 것이 좋으며 마이그레이션 전에 현재 CNI 설정의 백업을 만드는 것이 좋습니다.
- 관리형 애드온을 구성하려면 Amazon EKS API, AWS Management Console 또는 AWS 명령줄 인터페이스를 활용할 수 있습니다.
kubectl apply view-last-applied 데몬셋 aws-node -n kube-system > aws-k8s-cni-old.yaml
3. Backup CNI Settings Before Update
- VPC CNI는 고객 데이터 플레인(노드)에서 실행되므로 Amazon EKS는 새 버전이 출시되거나 클러스터를 새 Kubernetes 마이너 버전으로 업데이트한 후에 애드온(관리형 및 자체 관리형)을 자동으로 업데이트하지 않습니다 .
- 기존 클러스터의 애드온을 업데이트하려면 update-addon API를 통해 업데이트를 트리거하거나 EKS 콘솔에서 애드온에 대한 지금 업데이트 링크를 클릭해야 합니다.
- 자체 관리형 애드온을 배포한 경우 자체 관리형 VPC CNI 애드온 업데이트에서 언급한 단계를 따를 것을 권장함
4. Understand Security Context
- VPC CNI는 CNI Binary 와 ipamd Daemon-set 으로 구성되어 있다.
- CNI는 노드에서 binary로 실행되며, node root filesystem을 사용하여 노드 수준에서 iptables를
처리하기 때문에 priviliged access 가 가능하다.
- aws-node Daemonset은 노드 수준에서 IP 주소 관리를 담당하는 Long-running process 입니다.
- aws-node는 hostNetwork모드에서 실행되며 루프백 디바이스에 대한 액세스와 동일한 노드에 있는
다른 포드의 네트워크 활동을 허용합니다. aws-node init-container는 권한 모드에서 실행되며
CRI 소켓을 마운트하여 Daemonset이 노드에서 실행 중인 포드의 IP 사용을 모니터링할 수 있도록 합니다.
- Amazon EKS는 aws-node init 컨테이너의 권한 요구 사항을 제거하기 위해 노력하고 있습니다.
또한 aws-node는 NAT 항목을 업데이트하고 iptables 모듈을 로드해야 하므로 NET_ADMIN 권한으로 실행됩니다.
☞ Amazon EKS는 Pod 및 네트워킹 설정에 대한 IP 관리를 위해 aws-node 매니페스트에서 정의한 대로 보안 정책을 배포할 것을 권장
5. Use separate IAM role for CNI
- AWS VPC CNI에는 AWS Identity and Access Management(IAM) 권한이 필요
- IAM 역할을 사용하려면 CNI 정책을 설정해야 한다.
- AmazonEKS CNI 관리 정책은 IPv4 클러스터에 대한 권한만 있어서, IPv6는 별도로 생성 필요함!!
{
    "Version": "2012-10-17",
    "Statement": [
        {
            "Sid": "AmazonEKSCNIPolicy",
            "Effect": "Allow",
            "Action": [
                "ec2:AssignPrivateIpAddresses",
                "ec2:AttachNetworkInterface",
                "ec2:CreateNetworkInterface",
                "ec2:DeleteNetworkInterface",
                "ec2:DescribeInstances",
                "ec2:DescribeTags",
                "ec2:DescribeNetworkInterfaces",
                "ec2:DescribeInstanceTypes",
                "ec2:DescribeSubnets",
                "ec2:DetachNetworkInterface",
                "ec2:ModifyNetworkInterfaceAttribute",
                "ec2:UnassignPrivateIpAddresses"
            ],
            "Resource": "*"
        },
        {
            "Sid": "AmazonEKSCNIPolicyENITag",
            "Effect": "Allow",
            "Action": [
                "ec2:CreateTags"
            ],
            "Resource": [
                "arn:aws:ec2:*:*:network-interface/*"
            ]
        }
    ]
}
- 기본적으로 VPC CNI는 Amazon EKS 노드 IAM 역할 (관리형 노드 그룹과 자체 관리형 노드 그룹 모두)을 상속받습니다.
Amazon VPC CNI에 대한 관련 정책으로 별도의 IAM 역할을 구성하는 것이 강력히 권장됩니다. 그렇지 않은 경우 Amazon VPC CNI의 포드는 노드 IAM 역할에 할당된 권한을 얻고 노드에 할당된 인스턴스 프로필에 액세스할 수 있습니다.
6. Handle Liveness/Readiness Probe failures
- EKS 1.20 이상 클러스터의 Liveness and Rediness-probe 시간 초과 값(기본값 timeoutSeconds: 10)을 늘려 프로브 실패로 인해 애플리케이션의 Pod가 containerCreating 상태에 갇히는 것을 방지하는 것이 좋다.
- Amazon EKS 지원을 사용하는 동안 노드에서 sudo bash /opt/cni/bin/aws-cni-support.sh 를 사용할 것을 적극 권장함.
7. Configure IPTables Forward Policy on non-EKS Optimized AMI Instances
- 사용자 지정 AMI를 사용하는 경우 kubelet.service 에서 iptables 전달 정책을 ACCEPT로 설정해야 함
(많은 시스템이 iptables 전달 정책을 DROP으로 설정)
8. Routinely Upgrade CNI Version
- VPC CNI는 이전 버전과 호환됨
- 최신 버전은 모든 Amazon EKS 지원 Kubernetes 버전과 호환되며
- 또한 VPC CNI는 EKS 추가 기능으로 제공됨
- CNI와 같은 추가 기능은 데이터 플레인에서 실행되므로 자동으로 업그레이드하지 않기 때문에
관리형 및 자체 관리형 작업자 노드 업그레이드 후 VPC CNI 추가 기능을 업그레이드 필요
▶ (참고) 노드에 할당 가능한 최대 파드 갯수 - 링크
1. Secondary IPv4 addresses : 인스턴스 유형에 최대 ENI 갯수와 할당 가능 IP 수를 조합하여 선정
2. IPv4 Prefix Delegation : IPv4 28bit 서브넷(prefix)를 위임하여 할당 가능 IP 수와 인스턴스 유형에 권장하는 최대 갯수로 선정

3. AWS VPC CNI Custom Networking : 노드와 파드 대역 분리, 파드에 별도 서브넷 부여 후 사용 - Docs
☞ EKS CNI Custom Network를 이용한 Pod 대역 분리 : Blog
☞ EKS CNI Custom Networking : Cloud Catalyst : https://ddii.dev/kubernetes/eks-cni-custom/
▶ [ 실습 ] Network 기본 정보 확인
# CNI 정보 확인
kubectl describe daemonset aws-node --namespace kube-system | grep Image | cut -d "/" -f 2

# kube-proxy config 확인 : 모드 iptables 사용 >> ipvs 모드 사용하지 않는 이유???
kubectl describe cm -n kube-system kube-proxy-config
...
mode: "iptables"
...

# 노드 IP 확인
aws ec2 describe-instances --query "Reservations[*].Instances[*].{PublicIPAdd:PublicIpAddress,PrivateIPAdd:PrivateIpAddress,InstanceName:Tags[?Key=='Name']|[0].Value,Status:State.Name}" --filters Name=instance-state-name,Values=running --output table

# 파드 IP 확인
kubectl get pod -n kube-system -o=custom-columns=NAME:.metadata.name,IP:.status.podIP,STATUS:.status.phase

# 파드 이름 확인
kubectl get pod -A -o name

# 파드 갯수 확인
kubectl get pod -A -o name | wc -l
[ 실행 결과 - 한 눈에 보기 ]

- 노드에 네트워크 정보 확인
# CNI 정보 확인
for i in $N1 $N2 $N3; do echo ">> node $i <<"; ssh ec2-user@$i tree /var/log/aws-routed-eni; echo; done
ssh ec2-user@$N1 sudo cat /var/log/aws-routed-eni/plugin.log | jq
ssh ec2-user@$N1 sudo cat /var/log/aws-routed-eni/ipamd.log | jq
ssh ec2-user@$N1 sudo cat /var/log/aws-routed-eni/egress-v6-plugin.log | jq
ssh ec2-user@$N1 sudo cat /var/log/aws-routed-eni/ebpf-sdk.log | jq
ssh ec2-user@$N1 sudo cat /var/log/aws-routed-eni/network-policy-agent.log | jq

# 네트워크 정보 확인 : eniY는 pod network 네임스페이스와 veth pair
for i in $N1 $N2 $N3; do echo ">> node $i <<"; ssh ec2-user@$i sudo ip -br -c addr; echo; done
for i in $N1 $N2 $N3; do echo ">> node $i <<"; ssh ec2-user@$i sudo ip -c addr; echo; done
for i in $N1 $N2 $N3; do echo ">> node $i <<"; ssh ec2-user@$i sudo ip -c route; echo; done
ssh ec2-user@$N1 sudo iptables -t nat -S
ssh ec2-user@$N1 sudo iptables -t nat -L -n -v
[ 실행 결과 - 한 눈에 보기 ]


2. 노드에서 기본 네트워크 정보 확인
▶ 워커 노드1 기본 네트워크 구성 : 워커 노드2 는 구성이 유사하여 생략
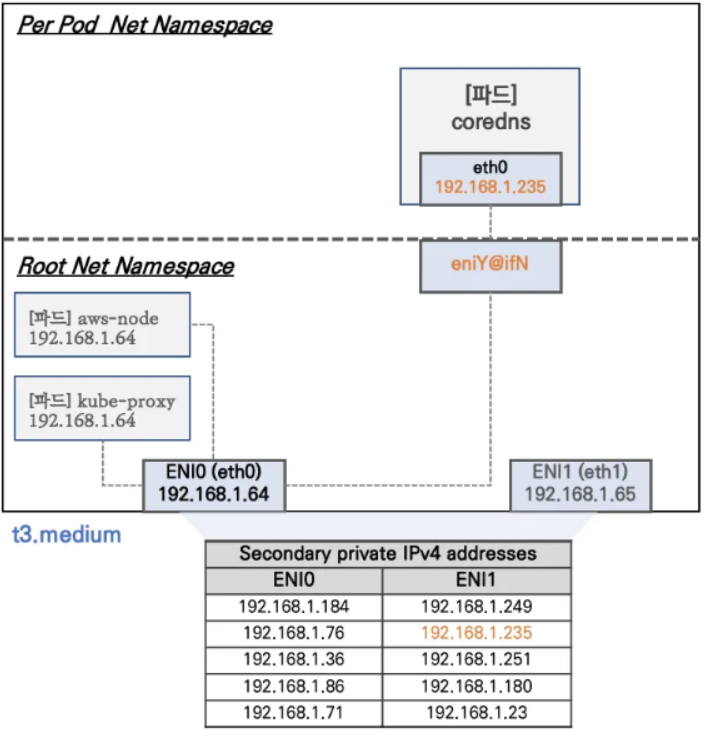
- Network 네임스페이스는 호스트(Root)와 파드 별(Per Pod)로 구분된다
- 특정한 파드(kube-proxy, aws-node)는 호스트(Root)의 IP를 그대로 사용한다 ⇒ 파드의 Host Network 옵션
- t3.medium 의 경우 ENI 마다 최대 6개의 IP를 가질 수 있다
- ENI0, ENI1 으로 2개의 ENI는 자신의 IP 이외에 추가적으로 5개의 보조 프라이빗 IP를 가질수 있다
- coredns 파드는 veth 으로 호스트에는 eniY@ifN 인터페이스와 파드에 eth0 과 연결되어 있다
> 워커노드1 인스턴스의 네트워크 정보 확인 : Private IP와 보조 Private IP 확인
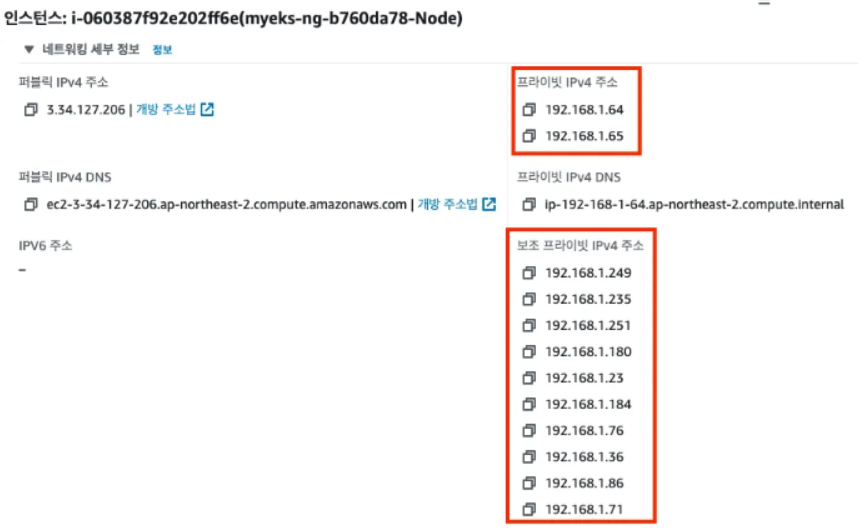
▶ [실습] 보조 IPv4 주소를 파드가 사용하는지 확인
# coredns 파드 IP 정보 확인
kubectl get pod -n kube-system -l k8s-app=kube-dns -owide
NAME                       READY   STATUS    RESTARTS   AGE   IP              NODE                                               NOMINATED NODE   READINESS GATES
coredns-6777fcd775-57k77   1/1     Running   0          70m   192.168.1.142   ip-192-168-1-251.ap-northeast-2.compute.internal   <none>           <none>
coredns-6777fcd775-cvqsb   1/1     Running   0          70m   192.168.2.75    ip-192-168-2-34.ap-northeast-2.compute.internal    <none>           <none>

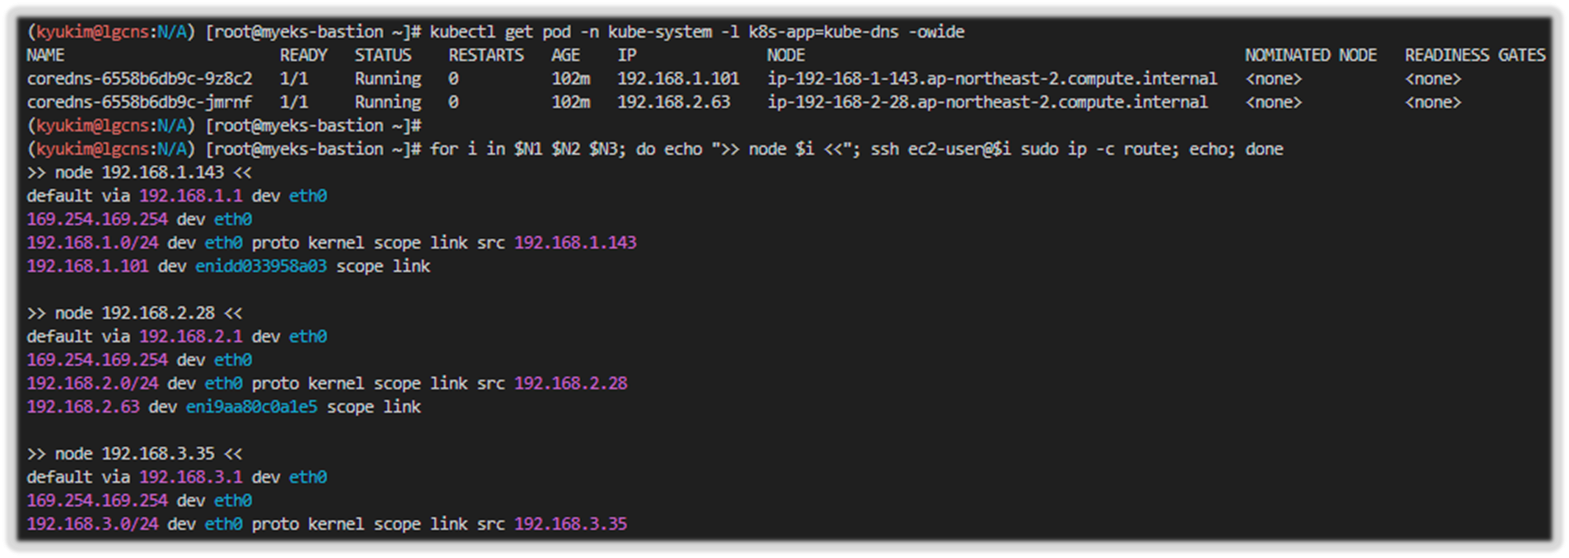
# 노드의 라우팅 정보 확인 >> EC2 네트워크 정보의 '보조 프라이빗 IPv4 주소'와 비교해보자
for i in $N1 $N2 $N3; do echo ">> node $i <<"; ssh ec2-user@$i sudo ip -c route; echo; done
▶ [실습] 테스트용 파드 생성 - nicolaka/netshoot
# [터미널1~3] 노드 모니터링
ssh ec2-user@$N1
watch -d "ip link | egrep 'eth|eni' ;echo;echo "[ROUTE TABLE]"; route -n | grep eni"

ssh ec2-user@$N2
watch -d "ip link | egrep 'eth|eni' ;echo;echo "[ROUTE TABLE]"; route -n | grep eni"

ssh ec2-user@$N3
watch -d "ip link | egrep 'eth|eni' ;echo;echo "[ROUTE TABLE]"; route -n | grep eni"

# 테스트용 파드 netshoot-pod 생성
cat <<EOF | kubectl apply -f -
apiVersion: apps/v1
kind: Deployment
metadata:
  name: netshoot-pod
spec:
  replicas: 3
  selector:
    matchLabels:
      app: netshoot-pod
  template:
    metadata:
      labels:
        app: netshoot-pod
    spec:
      containers:
      - name: netshoot-pod
        image: nicolaka/netshoot
        command: ["tail"]
        args: ["-f", "/dev/null"]
      terminationGracePeriodSeconds: 0
EOF

# 파드 이름 변수 지정
PODNAME1=$(kubectl get pod -l app=netshoot-pod -o jsonpath={.items[0].metadata.name})
PODNAME2=$(kubectl get pod -l app=netshoot-pod -o jsonpath={.items[1].metadata.name})
PODNAME3=$(kubectl get pod -l app=netshoot-pod -o jsonpath={.items[2].metadata.name})

# 파드 확인
kubectl get pod -o wide
kubectl get pod -o=custom-columns=NAME:.metadata.name,IP:.status.podIP

# 노드에 라우팅 정보 확인
for i in $N1 $N2 $N3; do echo ">> node $i <<"; ssh ec2-user@$i sudo ip -c route; echo; done
[ 실행 결과 - 한 눈에 보기 ]
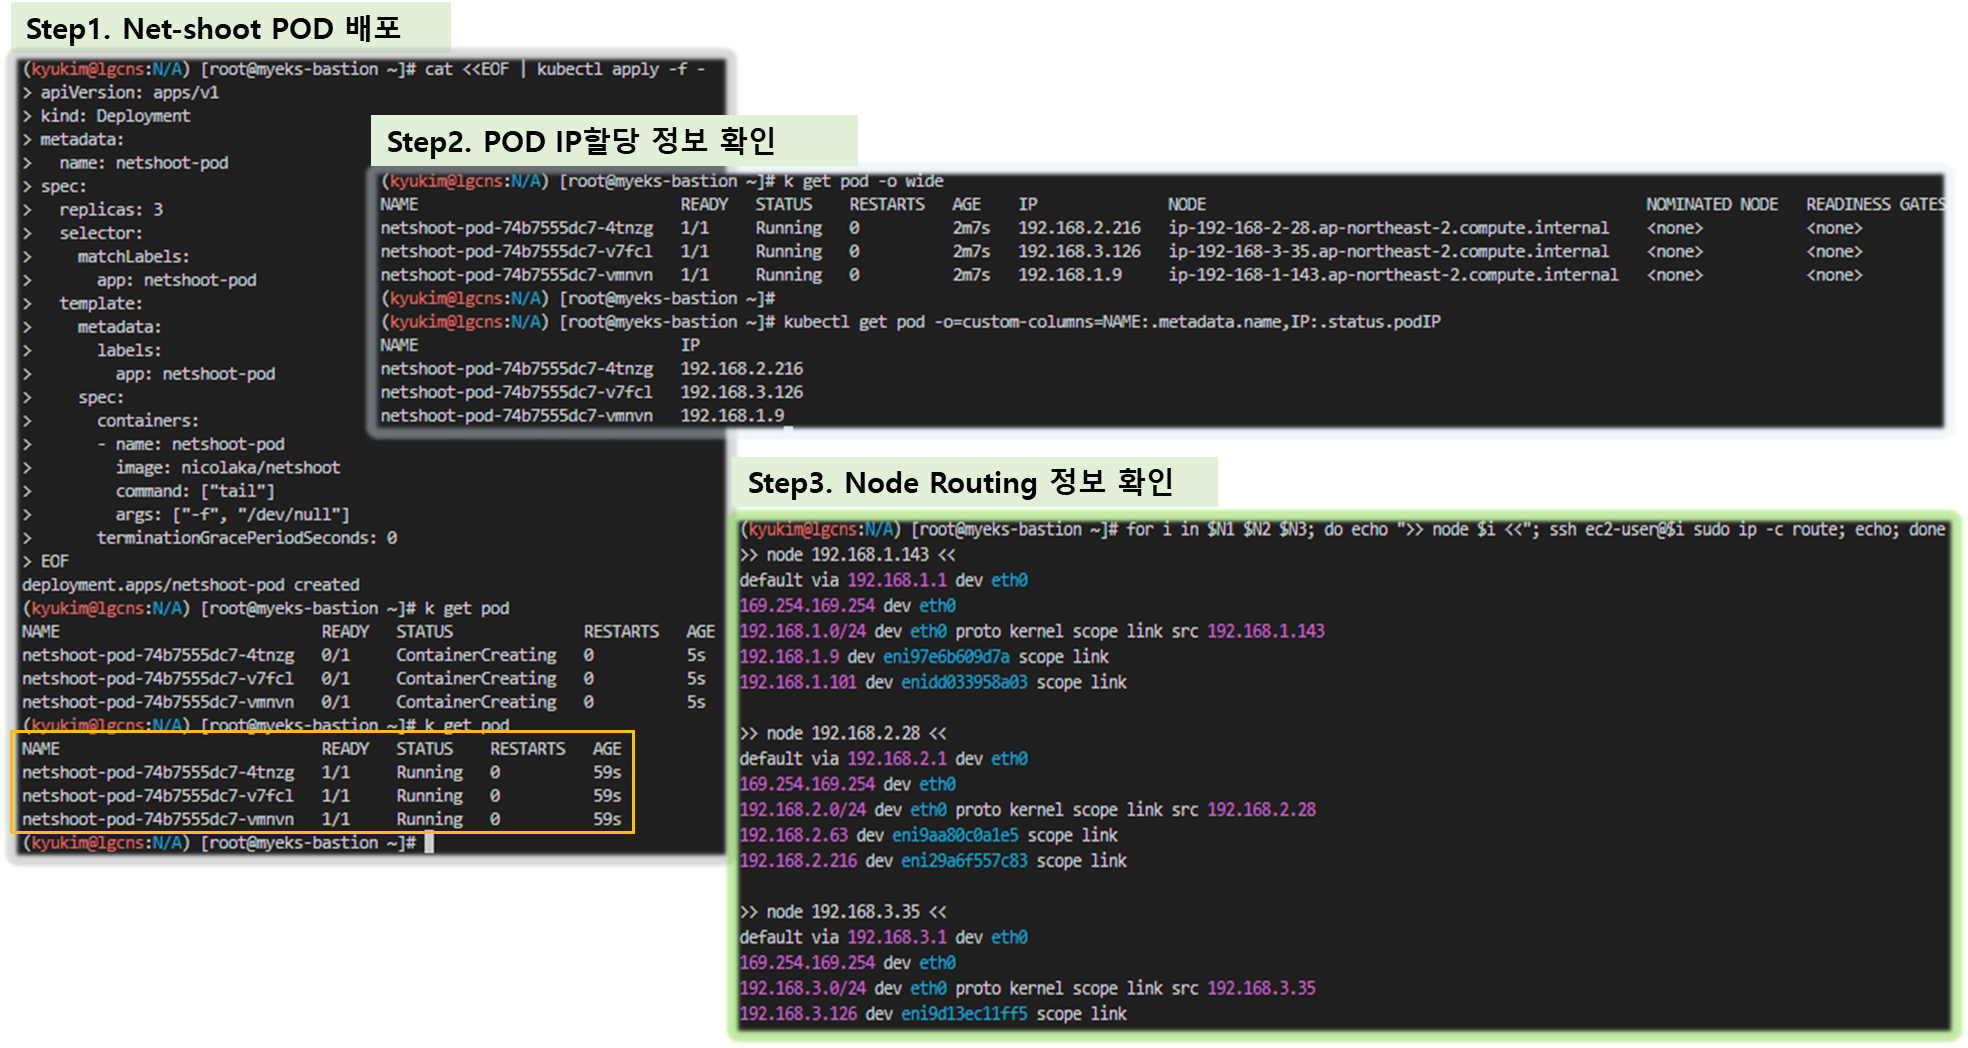

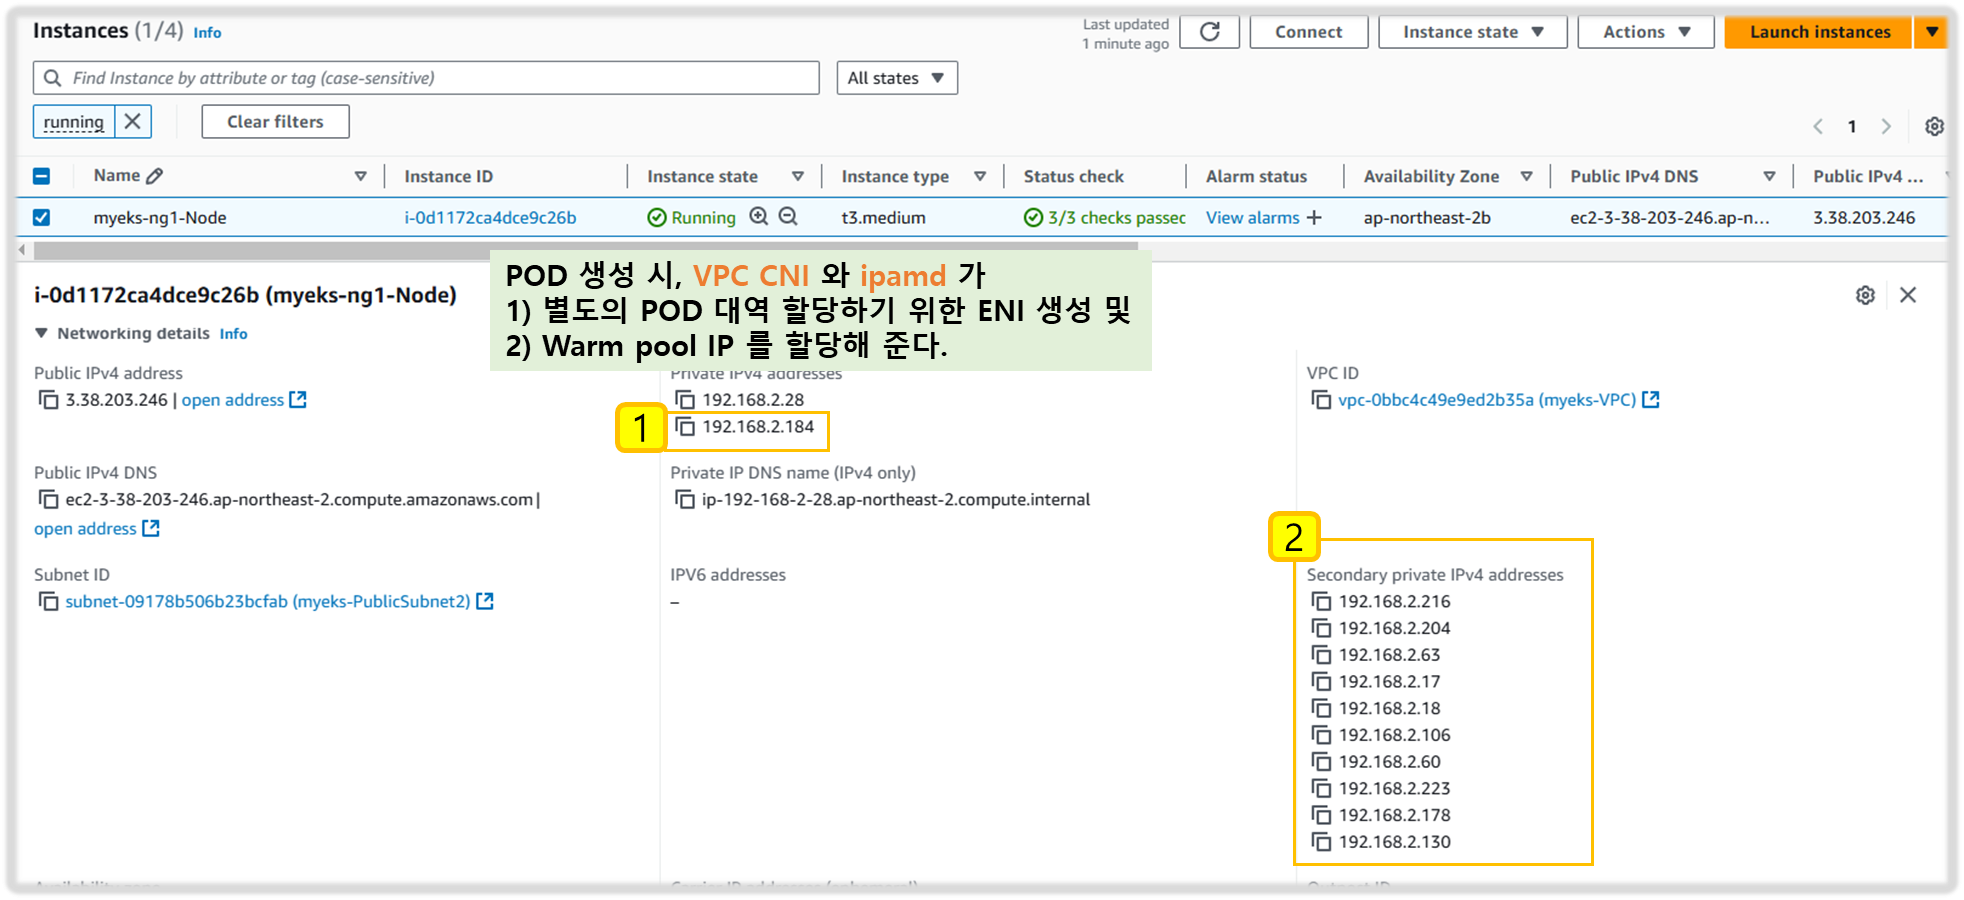
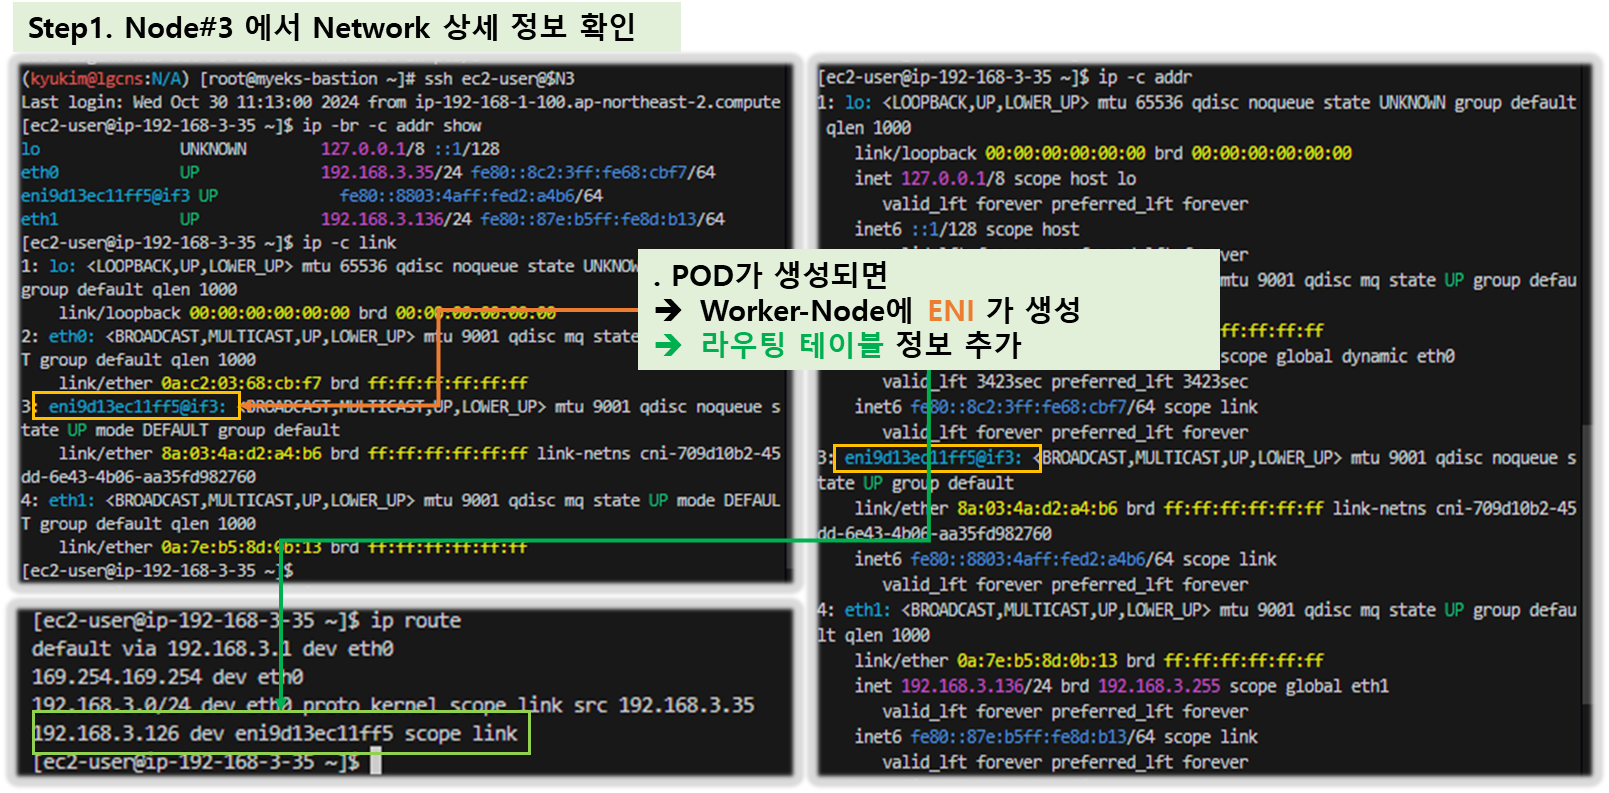
- 파드가 생성되면, 워커 노드에 eniY@ifN 추가되고 라우팅 테이블에도 정보가 추가된다
- 테스트용 파드 eniY 정보 확인 - 워커 노드 EC2
# 노드3에서 네트워크 인터페이스 정보 확인
ssh ec2-user@$N3
----------------
ip -br -c addr show
ip -c link
ip -c addr
ip route # 혹은 route -n

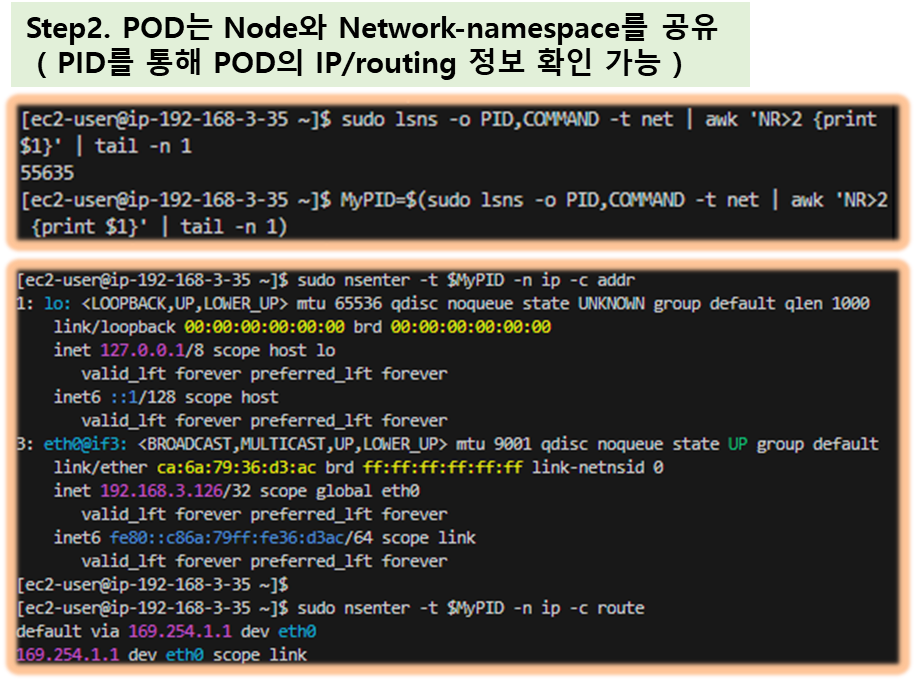
# 마지막 생성된 네임스페이스 정보 출력 -t net(네트워크 타입)
sudo lsns -o PID,COMMAND -t net | awk 'NR>2 {print $1}' | tail -n 1

# 마지막 생성된 네임스페이스 net PID 정보 출력 -t net(네트워크 타입)를 변수 지정
MyPID=$(sudo lsns -o PID,COMMAND -t net | awk 'NR>2 {print $1}' | tail -n 1)

# PID 정보로 파드 정보 확인
sudo nsenter -t $MyPID -n ip -c addr
sudo nsenter -t $MyPID -n ip -c route

exit
----------------- 테스트용 파드 접속(exec) 후 확인
# 테스트용 파드 접속(exec) 후 Shell 실행
kubectl exec -it $PODNAME1 -- zsh

# 아래부터는 pod-1 Shell 에서 실행 : 네트워크 정보 확인
----------------------------
ip -c addr
ip -c route
route -n
ping -c 1 <pod-2 IP>
ps
cat /etc/resolv.conf
exit
----------------------------

# 파드2 Shell 실행
kubectl exec -it $PODNAME2 -- ip -c addr

# 파드3 Shell 실행
kubectl exec -it $PODNAME3 -- ip -br -c addr
[ 실행 결과 - 한 눈에 보기 ]

3. 노드 간 파드 통신
★ 목표 : 파드간 통신 시 tcpdump 내용을 확인하고 통신 과정을 알아본다.
▶ 파드간 통신 흐름 : AWS VPC CNI 경우 별도의 오버레이(Overlay) 통신 기술 없이, VPC Native 하게 파드간 직접 통신이 가능하다.
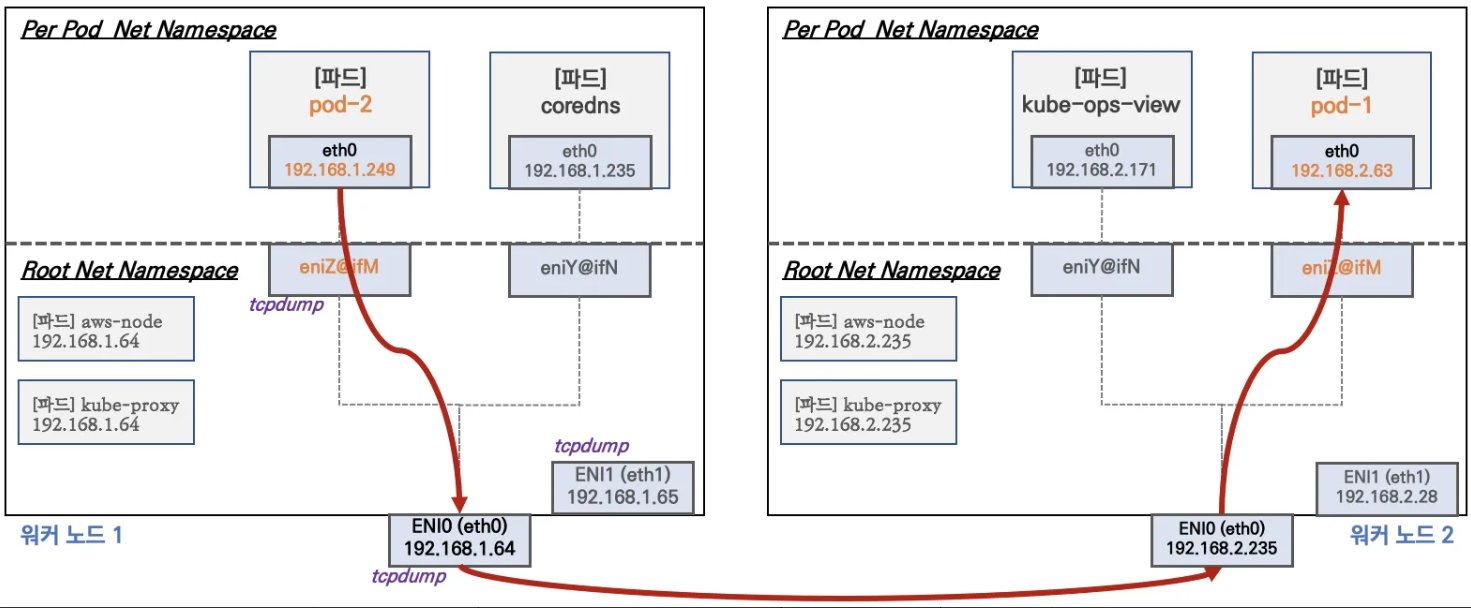
- 파드간 통신 시 과정 참고

▶ [실습] 파드간 통신 테스트 및 확인 : 별도의 NAT 동작 없이 통신 가능!
# 파드 IP 변수 지정
PODIP1=$(kubectl get pod -l app=netshoot-pod -o jsonpath={.items[0].status.podIP})
PODIP2=$(kubectl get pod -l app=netshoot-pod -o jsonpath={.items[1].status.podIP})
PODIP3=$(kubectl get pod -l app=netshoot-pod -o jsonpath={.items[2].status.podIP})

# 파드1 Shell 에서 파드2로 ping 테스트
kubectl exec -it $PODNAME1 -- ping -c 2 $PODIP2

# 파드2 Shell 에서 파드3로 ping 테스트
kubectl exec -it $PODNAME2 -- ping -c 2 $PODIP3

# 파드3 Shell 에서 파드1로 ping 테스트
kubectl exec -it $PODNAME3 -- ping -c 2 $PODIP1

# 워커 노드 EC2 : TCPDUMP 확인
## For Pod to external (outside VPC) traffic, we will program iptables to SNAT using Primary IP address on the Primary ENI.
sudo tcpdump -i any -nn icmp
sudo tcpdump -i eth1 -nn icmp
sudo tcpdump -i eth0 -nn icmp
sudo tcpdump -i eniYYYYYYYY -nn icmp

[워커 노드1]
# routing policy database management 확인
ip rule

# routing table management 확인
ip route show table local

# 디폴트 네트워크 정보를 eth0 을 통해서 빠져나간다
ip route show table main
default via 192.168.1.1 dev eth0
...
[ 실행 결과 - 한 눈에 보기 ]


4. POD에서 외부 통신
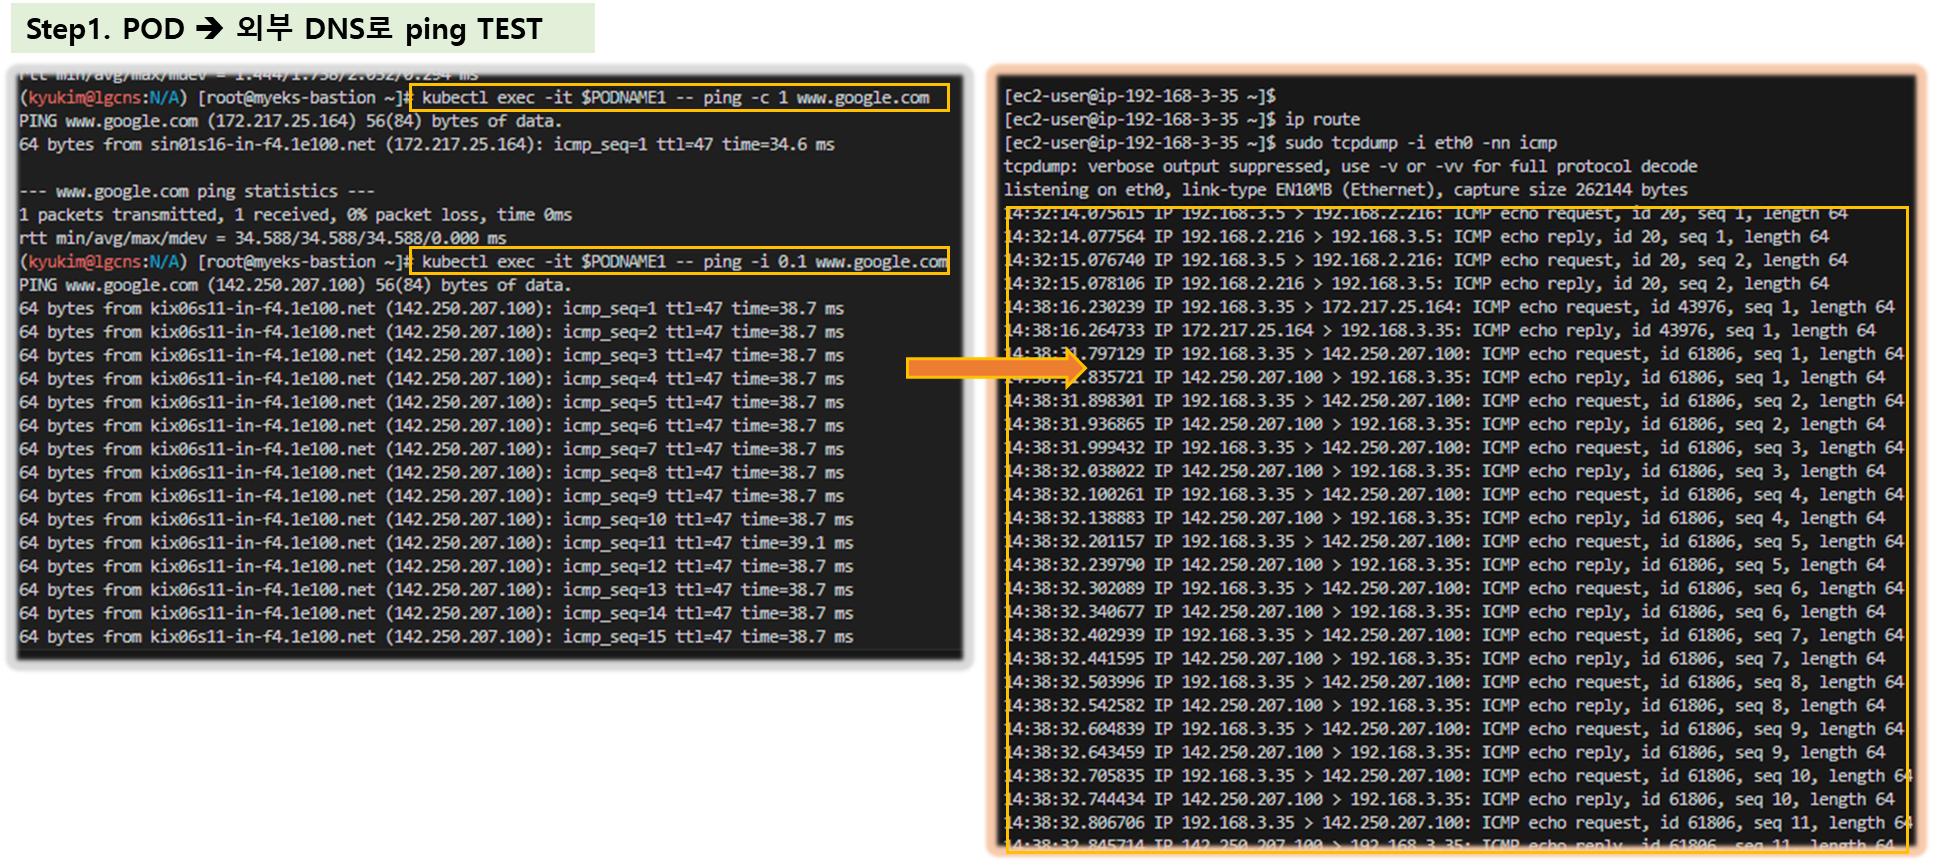
☞ 파드에서 외부 통신 흐름 : iptable 에 SNAT 을 통하여 노드의 eth0 IP로 변경되어서 외부와 통신됨

- VPC CNI 의 External source network address translation (SNAT) 설정에 따라, 외부(인터넷) 통신 시 SNAT 하거나 혹은 SNAT 없이 통신을 할 수 있다 - 링크
▶ [실습] 파드에서 외부 통신 테스트 및 확인
- 파드 shell 실행 후 외부로 ping 테스트 & 워커 노드에서 tcpdump 및 iptables 정보 확인
# 작업용 EC2 : pod-1 Shell 에서 외부로 ping
kubectl exec -it $PODNAME1 -- ping -c 1 www.google.com
kubectl exec -it $PODNAME1 -- ping -i 0.1 www.google.com

# 워커 노드 EC2 : TCPDUMP 확인
sudo tcpdump -i any -nn icmp
sudo tcpdump -i eth0 -nn icmp

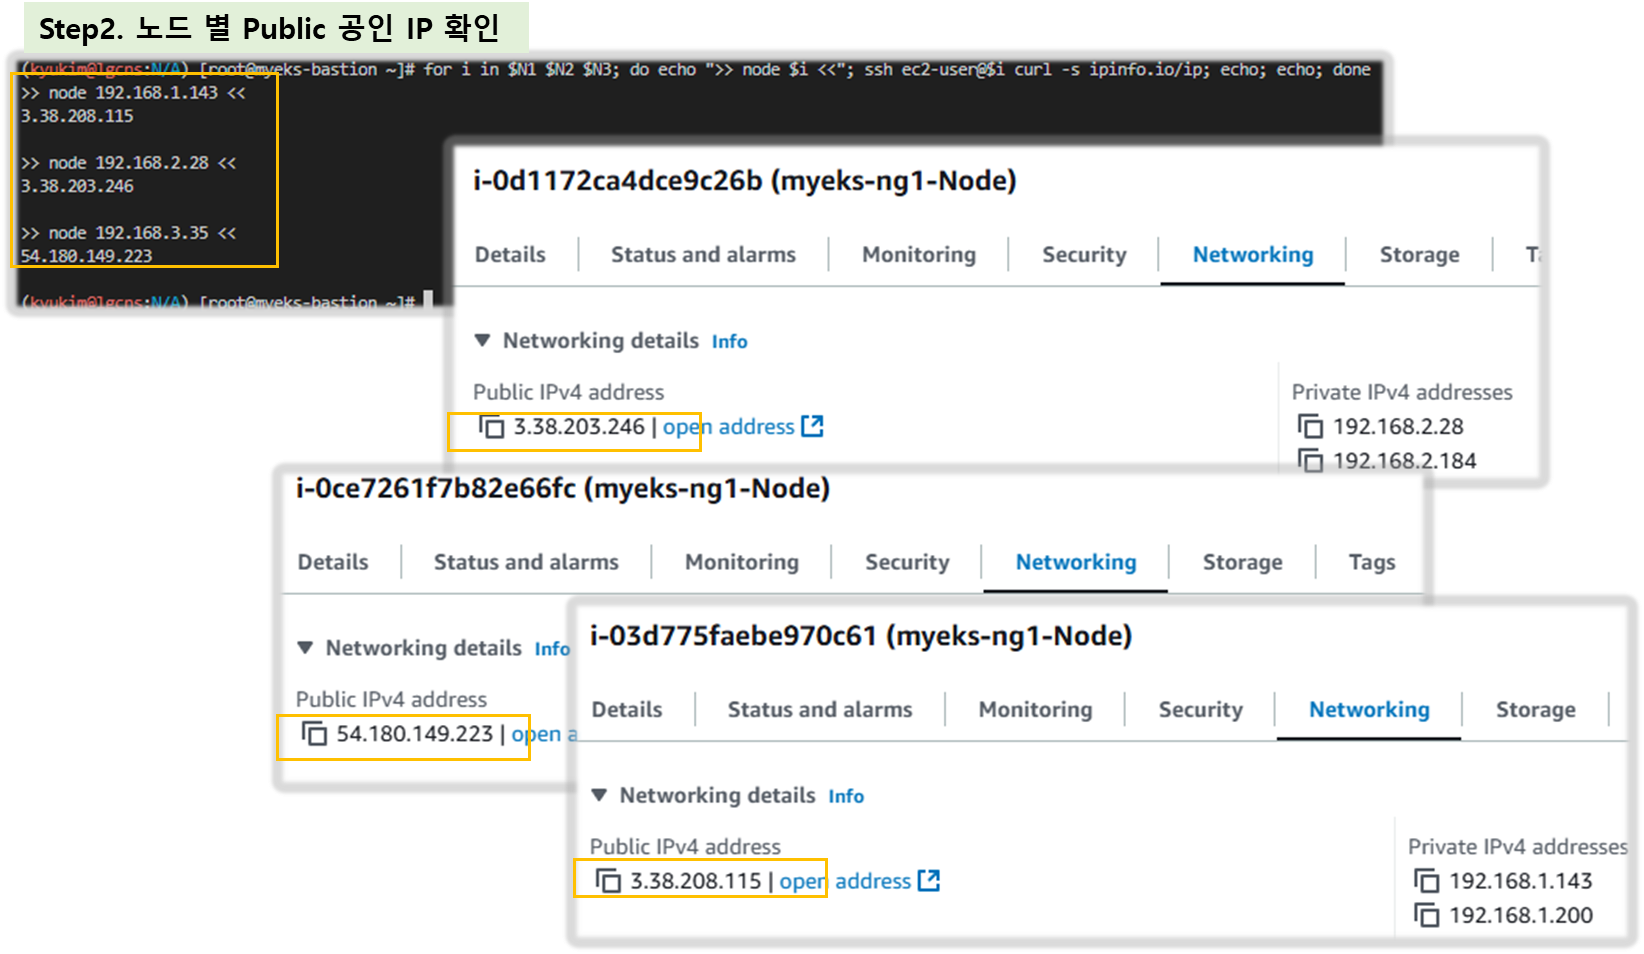
# 작업용 EC2 : 퍼블릭IP 확인
for i in $N1 $N2 $N3; do echo ">> node $i <<"; ssh ec2-user@$i curl -s ipinfo.io/ip; echo; echo; done

# 작업용 EC2 : pod-1 Shell 에서 외부 접속 확인 - 공인IP는 어떤 주소인가?
## The right way to check the weather - 링크
for i in $PODNAME1 $PODNAME2 $PODNAME3; do echo ">> Pod : $i <<"; kubectl exec -it $i -- curl -s ipinfo.io/ip; echo; echo; done
kubectl exec -it $PODNAME1 -- curl -s wttr.in/seoul
kubectl exec -it $PODNAME1 -- curl -s wttr.in/seoul?format=3
kubectl exec -it $PODNAME1 -- curl -s wttr.in/Moon
kubectl exec -it $PODNAME1 -- curl -s wttr.in/:help


# 워커 노드 EC2
## 출력된 결과를 보고 어떻게 빠져나가는지 고민해보자!
ip rule
ip route show table main
sudo iptables -L -n -v -t nat
sudo iptables -t nat -S

# 파드가 외부와 통신시에는 아래 처럼 'AWS-SNAT-CHAIN-0' 룰(rule)에 의해서 SNAT 되어서 외부와 통신!
# 참고로 뒤 IP는 eth0(ENI 첫번째)의 IP 주소이다
# --random-fully 동작 - 링크1  링크2
sudo iptables -t nat -S | grep 'A AWS-SNAT-CHAIN'
-A AWS-SNAT-CHAIN-0 ! -d 192.168.0.0/16 -m comment --comment "AWS SNAT CHAIN" -j RETURN
-A AWS-SNAT-CHAIN-0 ! -o vlan+ -m comment --comment "AWS, SNAT" -m addrtype ! --dst-type LOCAL -j SNAT --to-source 192.168.1.251 --random-fully

## 아래 'mark 0x4000/0x4000' 매칭되지 않아서 RETURN 됨!
-A KUBE-POSTROUTING -m mark ! --mark 0x4000/0x4000 -j RETURN
-A KUBE-POSTROUTING -j MARK --set-xmark 0x4000/0x0
-A KUBE-POSTROUTING -m comment --comment "kubernetes service traffic requiring SNAT" -j MASQUERADE --random-fully
...

# 카운트 확인 시 AWS-SNAT-CHAIN-0에 매칭되어, 목적지가 192.168.0.0/16 아니고 외부 빠져나갈때 SNAT 192.168.1.251(EC2 노드1 IP) 변경되어 나간다!
sudo iptables -t filter --zero; sudo iptables -t nat --zero; sudo iptables -t mangle --zero; sudo iptables -t raw --zero
watch -d 'sudo iptables -v --numeric --table nat --list AWS-SNAT-CHAIN-0; echo ; sudo iptables -v --numeric --table nat --list KUBE-POSTROUTING; echo ; sudo iptables -v --numeric --table nat --list POSTROUTING'

# conntrack 확인
for i in $N1 $N2 $N3; do echo ">> node $i <<"; ssh ec2-user@$i sudo conntrack -L -n |grep -v '169.254.169'; echo; done
conntrack v1.4.5 (conntrack-tools):
icmp     1 28 src=172.30.66.58 dst=8.8.8.8 type=8 code=0 id=34392 src=8.8.8.8 dst=172.30.85.242 type=0 code=0 id=50705 mark=128 use=1
tcp      6 23 TIME_WAIT src=172.30.66.58 dst=34.117.59.81 sport=58144 dport=80 src=34.117.59.81 dst=172.30.85.242 sport=80 dport=44768 [ASSURED] mark=128 use=1
[ 실행 결과 - 한 눈에 보기 ]


☆ 다음 실습을 위해서 파드 삭제: kubectl delete deploy netshoot-pod
- [도전과제4] AWS BP Guide - Running kube-proxy in IPVS Mode - Link
- Run Amazon EKS on RHEL Worker Nodes with IPVS Networking - Link
5. 노드에 POD 생성 갯수 제한
▶ 사전 준비 : kube-ops-view 설치
# kube-ops-view
helm repo add geek-cookbook https://geek-cookbook.github.io/charts/
helm install kube-ops-view geek-cookbook/kube-ops-view --version 1.2.2 --set service.main.type=LoadBalancer --set env.TZ="Asia/Seoul" --namespace kube-system

# kube-ops-view 접속 URL 확인 (1.5 배율)
kubectl get svc -n kube-system kube-ops-view -o jsonpath={.status.loadBalancer.ingress[0].hostname} | awk '{ print "KUBE-OPS-VIEW URL = http://"$1":8080/#scale=1.5"}'
[ 실행 결과 - 한 눈에 보기 ]

- Secondary IPv4 addresses (기본값) : 인스턴스 유형에 최대 ENI 갯수와 할당 가능 IP 수를 조합하여 선정
▶ 워커 노드의 인스턴스 타입 별 파드 생성 갯수 제한
- 인스턴스 타입 별 ENI 최대 갯수와 할당 가능한 최대 IP 갯수에 따라서 파드 배치 갯수가 결정됨
- 단, aws-node 와 kube-proxy 파드는 호스트의 IP를 사용함으로 최대 갯수에서 제외함

☞ 최대 파드 생성 갯수 : (Number of network interfaces for the instance type × (the number of IP addressess per network interface - 1)) + 2
▶ 워커 노드의 인스턴스 정보 확인 : t3.medium 사용 시
# t3 타입의 정보(필터) 확인
aws ec2 describe-instance-types --filters Name=instance-type,Values=t3.* \
 --query "InstanceTypes[].{Type: InstanceType, MaxENI: NetworkInfo.MaximumNetworkInterfaces, IPv4addr: NetworkInfo.Ipv4AddressesPerInterface}" \
 --output table
--------------------------------------
|        DescribeInstanceTypes       |
+----------+----------+--------------+
| IPv4addr | MaxENI   |    Type      |
+----------+----------+--------------+
|  15      |  4       |  t3.2xlarge  |
|  6       |  3       |  t3.medium   |
|  12      |  3       |  t3.large    |
|  15      |  4       |  t3.xlarge   |
|  2       |  2       |  t3.micro    |
|  2       |  2       |  t3.nano     |
|  4       |  3       |  t3.small    |
+----------+----------+--------------+

# c5 타입의 정보(필터) 확인
aws ec2 describe-instance-types --filters Name=instance-type,Values=c5*.* \
 --query "InstanceTypes[].{Type: InstanceType, MaxENI: NetworkInfo.MaximumNetworkInterfaces, IPv4addr: NetworkInfo.Ipv4AddressesPerInterface}" \
 --output table

# 파드 사용 가능 계산 예시 : aws-node 와 kube-proxy 파드는 host-networking 사용으로 IP 2개 남음
((MaxENI * (IPv4addr-1)) + 2)
t3.medium 경우 : ((3 * (6 - 1) + 2 ) = 17개 >> aws-node 와 kube-proxy 2개 제외하면 15개

# 워커노드 상세 정보 확인 : 노드 상세 정보의 Allocatable 에 pods 에 17개 정보 확인
kubectl describe node | grep Allocatable: -A6
Allocatable:
  cpu:                         1930m
  ephemeral-storage:           27905944324
  hugepages-1Gi:               0
  hugepages-2Mi:               0
  memory:                      3388360Ki
  pods:                        17
[ 실행 결과 - 한 눈에 보기 ]

▶ 최대 POD 생성 확인
# 워커 노드 EC2 - 모니터링
while true; do ip -br -c addr show && echo "--------------" ; date "+%Y-%m-%d %H:%M:%S" ; sleep 1; done

# 작업용 EC2 - 터미널1
watch -d 'kubectl get pods -o wide'

# 작업용 EC2 - 터미널2
# 디플로이먼트 생성
curl -s -O https://raw.githubusercontent.com/gasida/PKOS/main/2/nginx-dp.yaml
kubectl apply -f nginx-dp.yaml

# 파드 확인
kubectl get pod -o wide
kubectl get pod -o=custom-columns=NAME:.metadata.name,IP:.status.podIP

# 파드 증가 테스트 >> 파드 정상 생성 확인, 워커 노드에서 eth, eni 갯수 확인
kubectl scale deployment nginx-deployment --replicas=8

# 파드 증가 테스트 >> 파드 정상 생성 확인, 워커 노드에서 eth, eni 갯수 확인 >> 어떤일이 벌어졌는가?
kubectl scale deployment nginx-deployment --replicas=15

# 파드 증가 테스트 >> 파드 정상 생성 확인, 워커 노드에서 eth, eni 갯수 확인 >> 어떤일이 벌어졌는가?
kubectl scale deployment nginx-deployment --replicas=30

# 파드 증가 테스트 >> 파드 정상 생성 확인, 워커 노드에서 eth, eni 갯수 확인 >> 어떤일이 벌어졌는가?
kubectl scale deployment nginx-deployment --replicas=50

# 파드 생성 실패!
kubectl get pods | grep Pending
nginx-deployment-7fb7fd49b4-d4bk9   0/1     Pending   0          3m37s
nginx-deployment-7fb7fd49b4-qpqbm   0/1     Pending   0          3m37s
...

kubectl describe pod <Pending 파드> | grep Events: -A5
Events:
  Type     Reason            Age   From               Message
  ----     ------            ----  ----               -------
  Warning  FailedScheduling  45s   default-scheduler  0/3 nodes are available: 1 node(s) had untolerated taint {node-role.kubernetes.io/control-plane: }, 2 Too many pods. preemption: 0/3 nodes are available: 1 Preemption is not helpful for scheduling, 2 No preemption victims found for incoming pod.

# 디플로이먼트 삭제
kubectl delete deploy nginx-deployment
[ 실행 결과 - 한 눈에 보기 ]

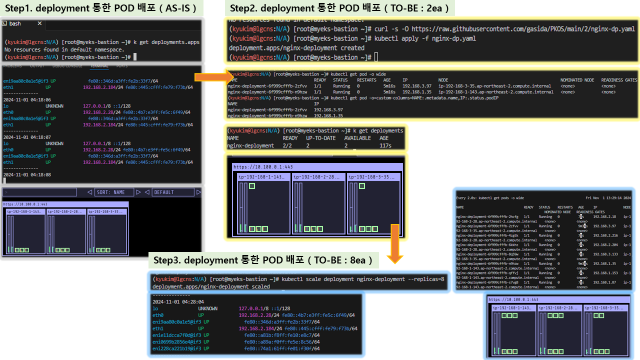
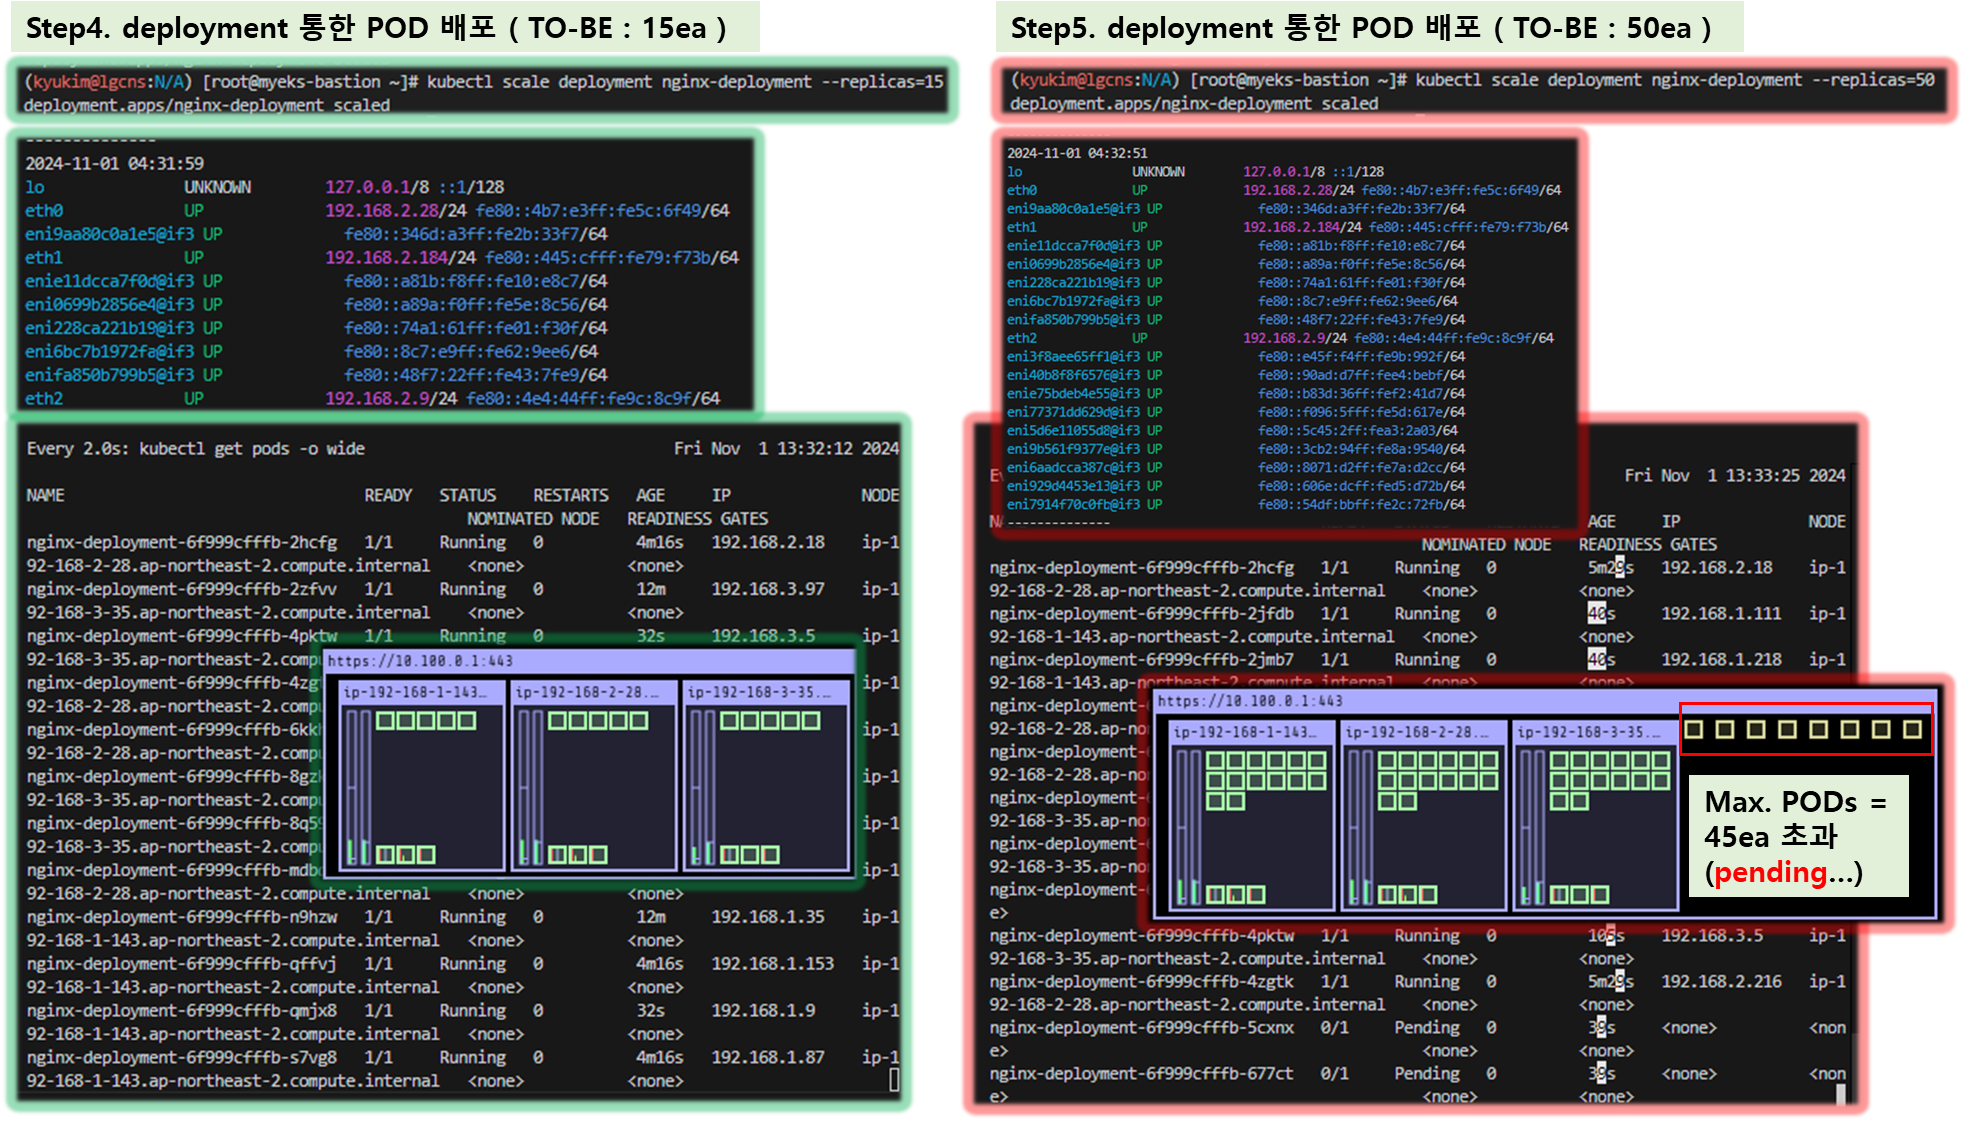
- 해결 방안 : Prefix Delegation, WARM & MIN IP/Prefix Targets, Custom Network

☞ K8S Node Size : Link
6. Service & AWS LoadBalancer Controller
6-1. 서비스 종류
- Cluster IP 타입

- NodePort 타입
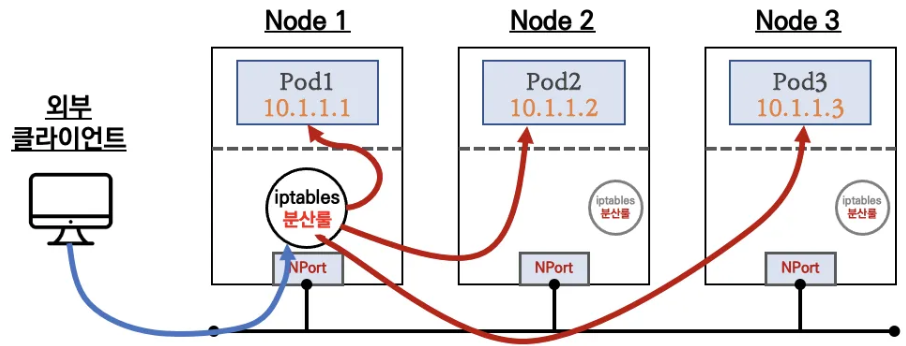
- 로드밸런서 타입 (기본 모드) : NLB 인스턴스 타입

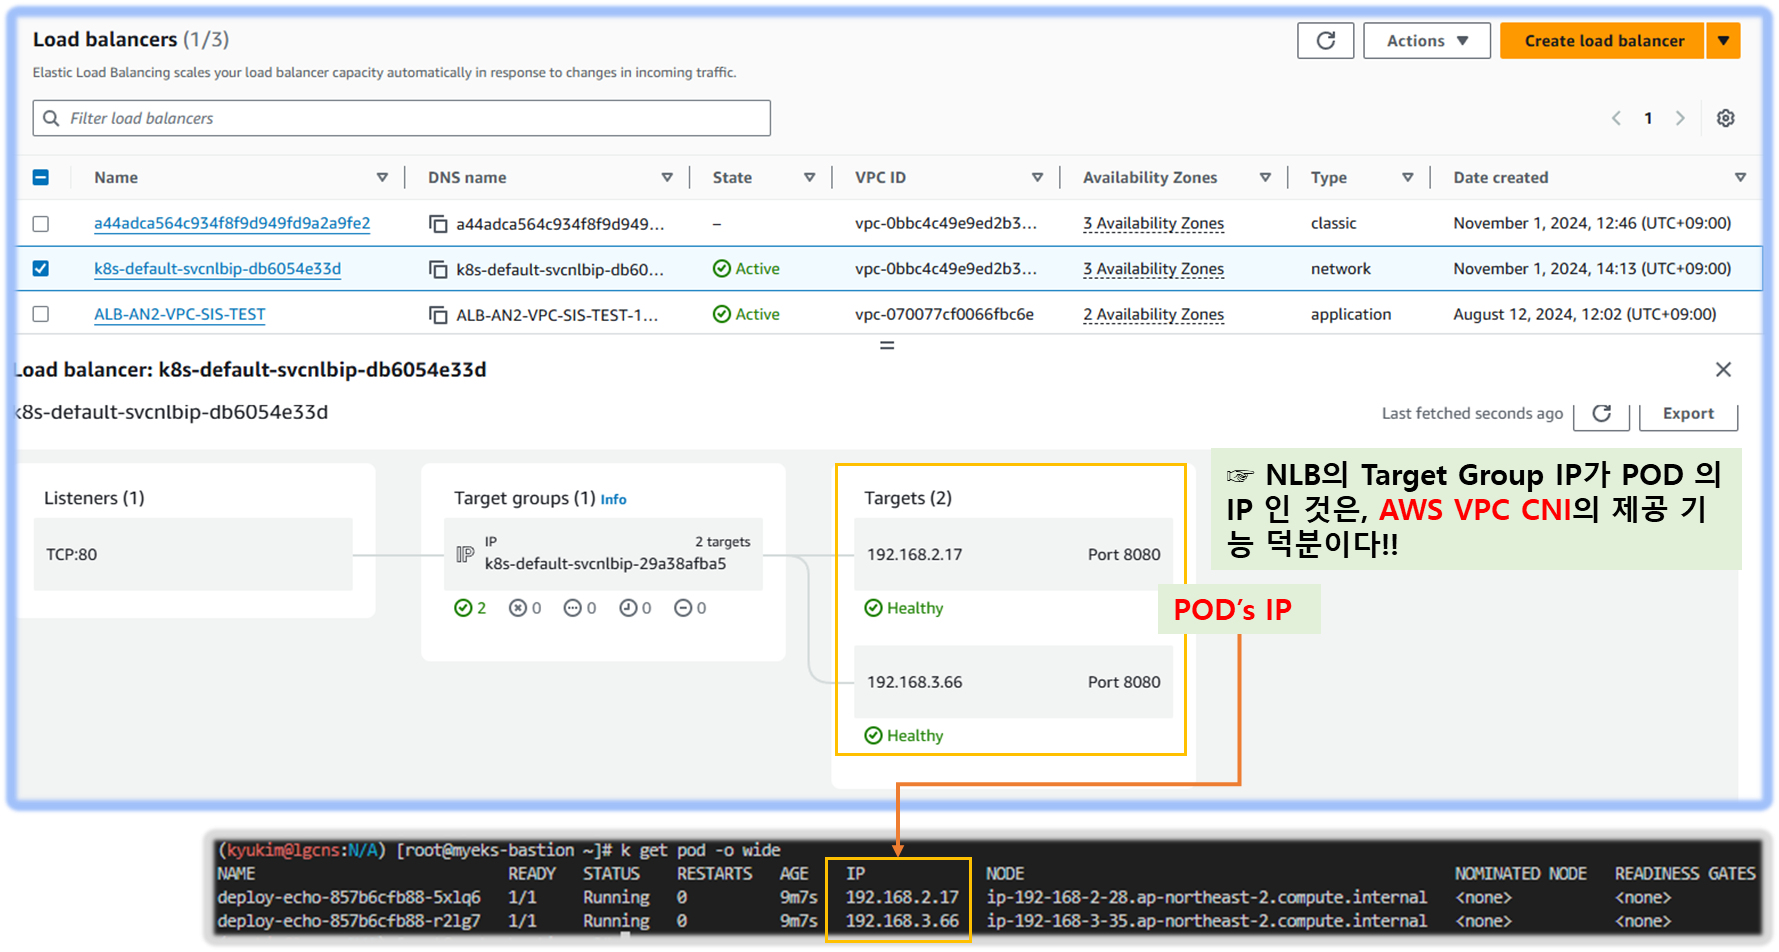
- 서비스 ( LoadBalancer Control ) : AWS Load Balancer Controller + NLB IP 모드 동작 with AWS VPC CNI

6-2. NLB 모드 전체 정리
1. 인스턴스 유형

- externalTrafficPolicy : ClusterIP ⇒ 2번 분산 및 SNAT으로 Client IP 확인 불가능 ← LoadBalancer 타입 (기본 모드) 동작
- externalTrafficPolicy : Local ⇒ 1번 분산 및 ClientIP 유지, 워커 노드의 iptables 사용함
2. IP 유형 ( 반드시 AWS LoadBalancer 컨트롤러 파드 및 정책 설정이 필요함! )

- Proxy Protocol v2 비활성화 ⇒ NLB에서 바로 파드로 인입, 단 ClientIP가 NLB로 SNAT 되어 Client IP 확인 불가능
- Proxy Protocol v2 활성화 ⇒ NLB에서 바로 파드로 인입 및 ClientIP 확인 가능(→ 단 PPv2 를 애플리케이션이 인지할 수 있게 설정 필요)
▶ AWS LoadBalancer Controller 배포 - Link
# Helm Chart 설치
helm repo add eks https://aws.github.io/eks-charts
helm repo update
helm install aws-load-balancer-controller eks/aws-load-balancer-controller -n kube-system --set clusterName=$CLUSTER_NAME


## 설치 확인
kubectl get crd
kubectl get deployment -n kube-system aws-load-balancer-controller
kubectl describe deploy -n kube-system aws-load-balancer-controller
kubectl describe deploy -n kube-system aws-load-balancer-controller | grep 'Service Account'
  Service Account:  aws-load-balancer-controller

# 클러스터롤, 롤 확인
kubectl describe clusterrolebindings.rbac.authorization.k8s.io aws-load-balancer-controller-rolebinding
kubectl describe clusterroles.rbac.authorization.k8s.io aws-load-balancer-controller-role
...
PolicyRule:
  Resources                                     Non-Resource URLs  Resource Names  Verbs
  ---------                                     -----------------  --------------  -----
  targetgroupbindings.elbv2.k8s.aws             []                 []              [create delete get list patch update watch]
  events                                        []                 []              [create patch]
  ingresses                                     []                 []              [get list patch update watch]
  services                                      []                 []              [get list patch update watch]
  ingresses.extensions                          []                 []              [get list patch update watch]
  services.extensions                           []                 []              [get list patch update watch]
  ingresses.networking.k8s.io                   []                 []              [get list patch update watch]
  services.networking.k8s.io                    []                 []              [get list patch update watch]
  endpoints                                     []                 []              [get list watch]
  namespaces                                    []                 []              [get list watch]
  nodes                                         []                 []              [get list watch]
  pods                                          []                 []              [get list watch]
  endpointslices.discovery.k8s.io               []                 []              [get list watch]
  ingressclassparams.elbv2.k8s.aws              []                 []              [get list watch]
  ingressclasses.networking.k8s.io              []                 []              [get list watch]
  ingresses/status                              []                 []              [update patch]
  pods/status                                   []                 []              [update patch]
  services/status                               []                 []              [update patch]
  targetgroupbindings/status                    []                 []              [update patch]
  ingresses.elbv2.k8s.aws/status                []                 []              [update patch]
  pods.elbv2.k8s.aws/status                     []                 []              [update patch]
  services.elbv2.k8s.aws/status                 []                 []              [update patch]
  targetgroupbindings.elbv2.k8s.aws/status      []                 []              [update patch]
  ingresses.extensions/status                   []                 []              [update patch]
  pods.extensions/status                        []                 []              [update patch]
  services.extensions/status                    []                 []              [update patch]
  targetgroupbindings.extensions/status         []                 []              [update patch]
  ingresses.networking.k8s.io/status            []                 []              [update patch]
  pods.networking.k8s.io/status                 []                 []              [update patch]
  services.networking.k8s.io/status             []                 []              [update patch]
  targetgroupbindings.networking.k8s.io/status  []                 []              [update patch]
[ 실행 결과 - 한 눈에 보기 ]


▶ 서비스/파드 배포 테스트 with NLB - 링크 NLB
# 모니터링
watch -d kubectl get pod,svc,ep

# 작업용 EC2 - 디플로이먼트 & 서비스 생성
curl -s -O https://raw.githubusercontent.com/gasida/PKOS/main/2/echo-service-nlb.yaml
cat echo-service-nlb.yaml
kubectl apply -f echo-service-nlb.yaml

# 확인
kubectl get deploy,pod
kubectl get svc,ep,ingressclassparams,targetgroupbindings
kubectl get targetgroupbindings -o json | jq

# (옵션) 빠른 실습을 위해서 등록 취소 지연(드레이닝 간격) 수정 : 기본값 300초
vi echo-service-nlb.yaml
..
apiVersion: v1
kind: Service
metadata:
  name: svc-nlb-ip-type
  annotations:
    service.beta.kubernetes.io/aws-load-balancer-nlb-target-type: ip
    service.beta.kubernetes.io/aws-load-balancer-scheme: internet-facing
    service.beta.kubernetes.io/aws-load-balancer-healthcheck-port: "8080"
    service.beta.kubernetes.io/aws-load-balancer-cross-zone-load-balancing-enabled: "true"
    service.beta.kubernetes.io/aws-load-balancer-target-group-attributes: deregistration_delay.timeout_seconds=60
...
:wq!
kubectl apply -f echo-service-nlb.yaml

# AWS ELB(NLB) 정보 확인
aws elbv2 describe-load-balancers | jq
aws elbv2 describe-load-balancers --query 'LoadBalancers[*].State.Code' --output text
ALB_ARN=$(aws elbv2 describe-load-balancers --query 'LoadBalancers[?contains(LoadBalancerName, `k8s-default-svcnlbip`) == `true`].LoadBalancerArn' | jq -r '.[0]')
aws elbv2 describe-target-groups --load-balancer-arn $ALB_ARN | jq
TARGET_GROUP_ARN=$(aws elbv2 describe-target-groups --load-balancer-arn $ALB_ARN | jq -r '.TargetGroups[0].TargetGroupArn')
aws elbv2 describe-target-health --target-group-arn $TARGET_GROUP_ARN | jq
{
  "TargetHealthDescriptions": [
    {
      "Target": {
        "Id": "192.168.2.153",
        "Port": 8080,
        "AvailabilityZone": "ap-northeast-2b"
      },
      "HealthCheckPort": "8080",
      "TargetHealth": {
        "State": "initial",
        "Reason": "Elb.RegistrationInProgress",
        "Description": "Target registration is in progress"
      }
    },
...

# 웹 접속 주소 확인
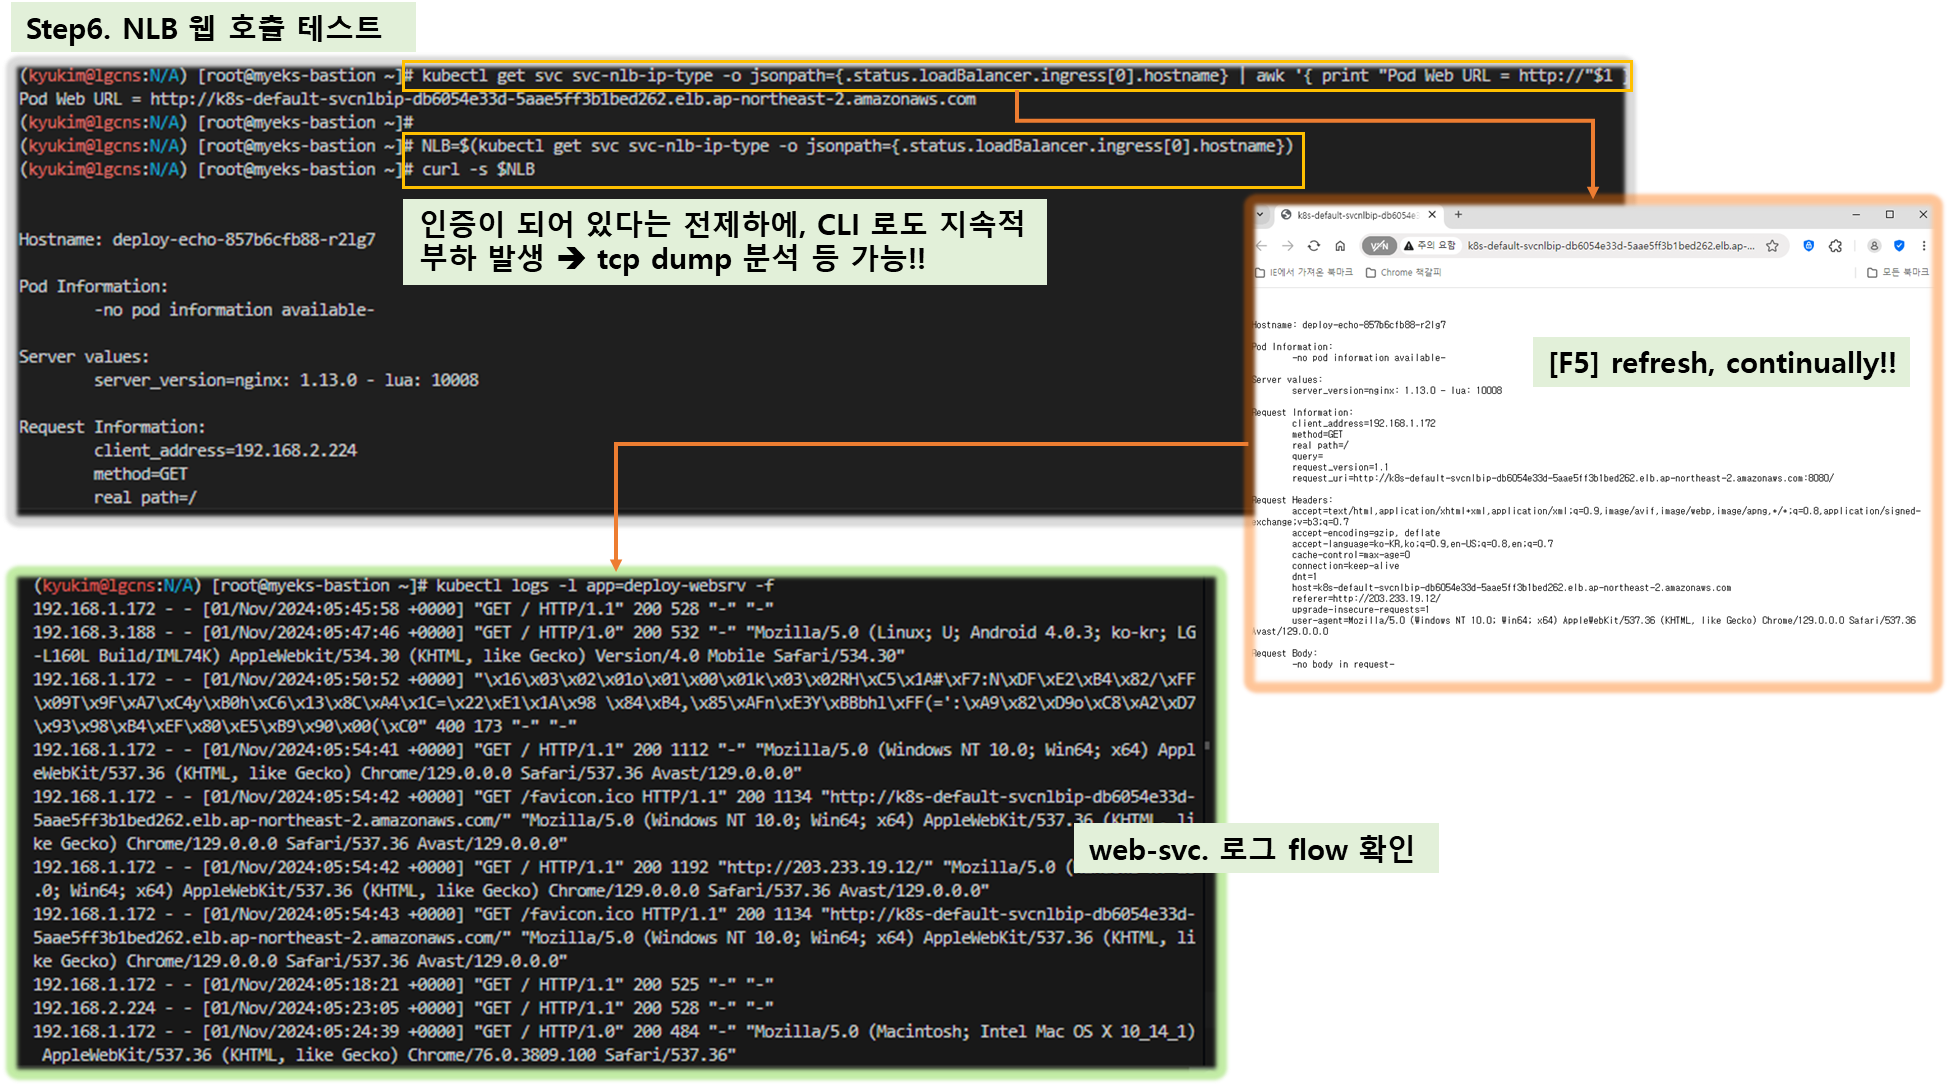
kubectl get svc svc-nlb-ip-type -o jsonpath={.status.loadBalancer.ingress[0].hostname} | awk '{ print "Pod Web URL = http://"$1 }'

# 파드 로깅 모니터링
kubectl logs -l app=deploy-websrv -f

# 분산 접속 확인
NLB=$(kubectl get svc svc-nlb-ip-type -o jsonpath={.status.loadBalancer.ingress[0].hostname})
curl -s $NLB
for i in {1..100}; do curl -s $NLB | grep Hostname ; done | sort | uniq -c | sort -nr
  52 Hostname: deploy-echo-55456fc798-2w65p
  48 Hostname: deploy-echo-55456fc798-cxl7z

# 지속적인 접속 시도 : 아래 상세 동작 확인 시 유용(패킷 덤프 등)
while true; do curl -s --connect-timeout 1 $NLB | egrep 'Hostname|client_address'; echo "----------" ; date "+%Y-%m-%d %H:%M:%S" ; sleep 1; done- 파드 2개 → 1개 → 3개 설정 시 동작 : auto discovery ← 어떻게 가능할까?
# (신규 터미널) 모니터링
while true; do aws elbv2 describe-target-health --target-group-arn $TARGET_GROUP_ARN --output text; echo; done

# 작업용 EC2 - 파드 1개 설정
kubectl scale deployment deploy-echo --replicas=1

# 확인
kubectl get deploy,pod,svc,ep
curl -s $NLB
for i in {1..100}; do curl -s --connect-timeout 1 $NLB | grep Hostname ; done | sort | uniq -c | sort -nr

# 작업용 EC2 - 파드 3개 설정
kubectl scale deployment deploy-echo --replicas=3

# 확인 : NLB 대상 타켓이 아직 initial 일 때 100번 반복 접속 시 어떻게 되는지 확인해보자!
kubectl get deploy,pod,svc,ep
curl -s $NLB
for i in {1..100}; do curl -s --connect-timeout 1 $NLB | grep Hostname ; done | sort | uniq -c | sort -nr

#
kubectl describe deploy -n kube-system aws-load-balancer-controller | grep -i 'Service Account'
  Service Account:  aws-load-balancer-controller

# [AWS LB Ctrl] 클러스터 롤 바인딩 정보 확인
kubectl describe clusterrolebindings.rbac.authorization.k8s.io aws-load-balancer-controller-rolebinding

# [AWS LB Ctrl] 클러스터롤 확인
kubectl describe clusterroles.rbac.authorization.k8s.io aws-load-balancer-controller-role
[ 실행 결과 - 한 눈에 보기 ]
♣ echo-service-nlb.yaml 내용
apiVersion: apps/v1
kind: Deployment
metadata:
  name: deploy-echo
spec:
  replicas: 2
  selector:
    matchLabels:
      app: deploy-websrv
  template:
    metadata:
      labels:
        app: deploy-websrv
    spec:
      terminationGracePeriodSeconds: 0
      containers:
      - name: akos-websrv
        image: k8s.gcr.io/echoserver:1.5
        ports:
        - containerPort: 8080
---
apiVersion: v1
kind: Service
metadata:
  name: svc-nlb-ip-type
  annotations:
    service.beta.kubernetes.io/aws-load-balancer-nlb-target-type: ip
    service.beta.kubernetes.io/aws-load-balancer-scheme: internet-facing
    service.beta.kubernetes.io/aws-load-balancer-healthcheck-port: "8080"
    service.beta.kubernetes.io/aws-load-balancer-cross-zone-load-balancing-enabled: "true"
spec:
  ports:
    - port: 80
      targetPort: 8080
      protocol: TCP
  type: LoadBalancer
  loadBalancerClass: service.k8s.aws/nlb
  selector:



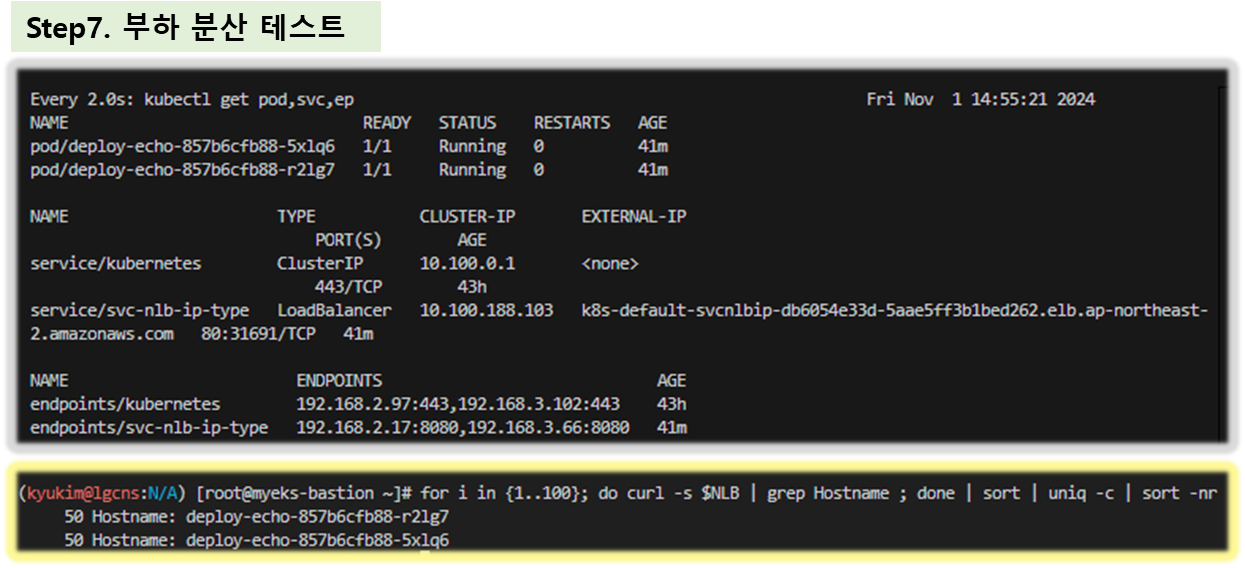


▶ 다음 실습을 위해 자원 삭제 : kubectl delete deploy deploy-echo; kubectl delete svc svc-nlb-ip-type
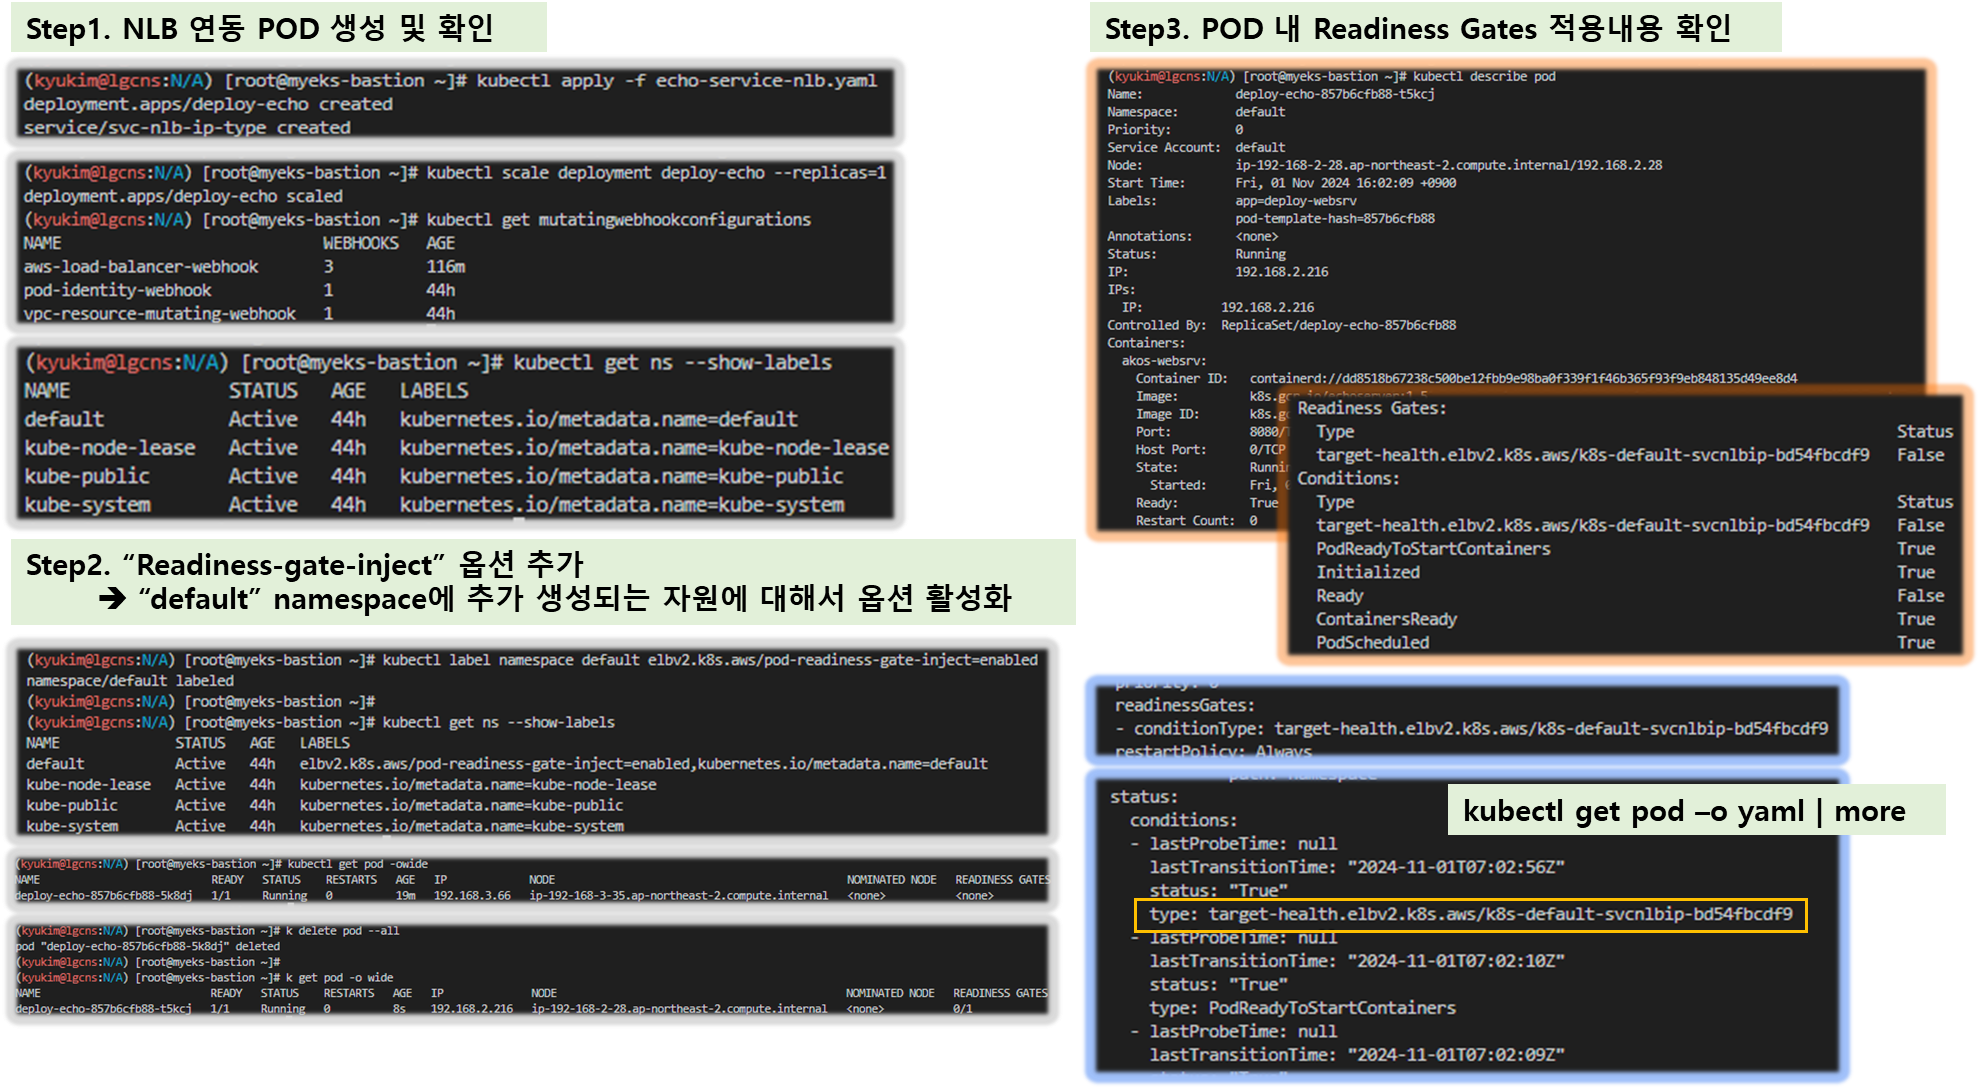
▶ (심화) Pod readiness gate : ALB/NLB 대상(ip mode)이 ALB/NLB의 헬스체크에 의해 정상일 경우 해당 파드로 전달할 수 있는 기능 - Link K8S
- 사전 준비
# 바로 위에서 실습 리소스 삭제했다면, 다시 생성 : deregistration_delay.timeout_seconds=60 확인
kubectl apply -f echo-service-nlb.yaml
kubectl scale deployment deploy-echo --replicas=1

#
kubectl get pod -owide
NAME                           READY   STATUS    RESTARTS   AGE   IP              NODE                                               NOMINATED NODE   READINESS GATES
deploy-echo-7f579ff9d7-gqdf5   1/1     Running   0          20m   192.168.2.153   ip-192-168-2-108.ap-northeast-2.compute.internal   <none>           <none>

# mutatingwebhookconfigurations 확인 : mutating 대상(네임스페이스에 아래 매칭 시)
kubectl get mutatingwebhookconfigurations
kubectl get mutatingwebhookconfigurations aws-load-balancer-webhook -o yaml | kubectl neat
...
  name: mpod.elbv2.k8s.aws
  namespaceSelector:
    matchExpressions:
    - key: elbv2.k8s.aws/pod-readiness-gate-inject
      operator: In
      values:
      - enabled
  objectSelector:
    matchExpressions:
    - key: app.kubernetes.io/name
      operator: NotIn
      values:
      - aws-load-balancer-controller
...

# 현재 확인
kubectl get ns --show-labels
NAME              STATUS   AGE   LABELS
default           Active   75m   kubernetes.io/metadata.name=default
kube-node-lease   Active   75m   kubernetes.io/metadata.name=kube-node-lease
kube-public       Active   75m   kubernetes.io/metadata.name=kube-public
kube-system       Active   75m   kubernetes.io/metadata.name=kube-system
- 설정 및 확인
# (터미널 각각 2개) 모니터링
watch -d kubectl get pod,svc,ep -owide
while true; do aws elbv2 describe-target-health --target-group-arn $TARGET_GROUP_ARN --output text; echo; done

#
kubectl label namespace default elbv2.k8s.aws/pod-readiness-gate-inject=enabled
kubectl get ns --show-labels

# READINESS GATES 항목 추가 확인
kubectl describe pod
kubectl get pod -owide
NAME                           READY   STATUS    RESTARTS   AGE   IP              NODE                                               NOMINATED NODE   READINESS GATES
deploy-echo-7f579ff9d7-gqdf5   1/1     Running   0          25m   192.168.2.153   ip-192-168-2-108.ap-northeast-2.compute.internal   <none>           <none>

#
kubectl delete pod --all
kubectl get pod -owide
NAME                           READY   STATUS    RESTARTS   AGE     IP              NODE                                               NOMINATED NODE   READINESS GATES
deploy-echo-6959b47ddf-h9vhc   1/1     Running   0          3m21s   192.168.1.127   ip-192-168-1-113.ap-northeast-2.compute.internal   <none>           1/1

kubectl describe pod
...
Readiness Gates:
  Type                                                          Status
  target-health.elbv2.k8s.aws/k8s-default-svcnlbip-5eff23b37f   True
Conditions:
  Type                                                          Status
  target-health.elbv2.k8s.aws/k8s-default-svcnlbip-5eff23b37f   True
  Initialized                                                   True
  Ready                                                         True
  ContainersReady                                               True
  PodScheduled                                                  True
...

kubectl get pod -o yaml | more
...
    readinessGates:
    - conditionType: target-health.elbv2.k8s.aws/k8s-default-svcnlbip-5eff23b37f
...
  status:
    conditions:
    - lastProbeTime: null
      lastTransitionTime: "2024-03-10T02:00:50Z"
      status: "True"
      type: target-health.elbv2.k8s.aws/k8s-default-svcnlbip-5eff23b37f
...

# 분산 접속 확인
NLB=$(kubectl get svc svc-nlb-ip-type -o jsonpath={.status.loadBalancer.ingress[0].hostname})
curl -s $NLB
for i in {1..100}; do curl -s $NLB | grep Hostname ; done | sort | uniq -c | sort -nr
[ 실행 결과 - 한 눈에 보기 ]

▶ NLB IP Target & Proxy Protocol v2 활성화 : NLB에서 바로 파드로 인입 및 ClientIP 확인 설정 - 링크 image 참고
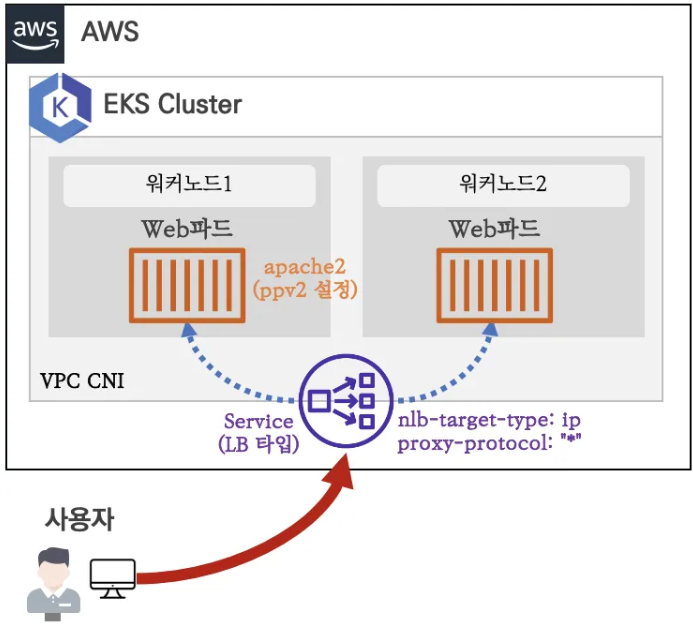
☞ NLB는 X-Forwared-For 서비스를 이용할 수 없는 Layer-4 에서 동작하는 Resource 이므로, source 의 IP 확인을 위해 "Proxy Protocol v2(PPv2)" 기능을 이용해야 한다!!
# 생성
cat <<EOF | kubectl apply -f -
apiVersion: apps/v1
kind: Deployment
metadata:
  name: gasida-web
spec:
  replicas: 1
  selector:
    matchLabels:
      app: gasida-web
  template:
    metadata:
      labels:
        app: gasida-web
    spec:
      terminationGracePeriodSeconds: 0
      containers:
      - name: gasida-web
        image: gasida/httpd:pp
        ports:
        - containerPort: 80
---
apiVersion: v1
kind: Service
metadata:
  name: svc-nlb-ip-type-pp
  annotations:
    service.beta.kubernetes.io/aws-load-balancer-nlb-target-type: ip
    service.beta.kubernetes.io/aws-load-balancer-scheme: internet-facing
    service.beta.kubernetes.io/aws-load-balancer-cross-zone-load-balancing-enabled: "true"
    service.beta.kubernetes.io/aws-load-balancer-proxy-protocol: "*"
spec:
  ports:
    - port: 80
      targetPort: 80
      protocol: TCP
  type: LoadBalancer
  loadBalancerClass: service.k8s.aws/nlb
  selector:
    app: gasida-web
EOF

# 확인
kubectl get svc,ep
kubectl describe svc svc-nlb-ip-type-pp
kubectl describe svc svc-nlb-ip-type-pp | grep Annotations: -A5

# apache에 proxy protocol 활성화 확인
kubectl exec deploy/gasida-web -- apachectl -t -D DUMP_MODULES
kubectl exec deploy/gasida-web -- cat /usr/local/apache2/conf/httpd.conf

# 접속 확인
NLB=$(kubectl get svc svc-nlb-ip-type-pp -o jsonpath={.status.loadBalancer.ingress[0].hostname})
curl -s $NLB

# 지속적인 접속 시도 : 아래 상세 동작 확인 시 유용(패킷 덤프 등)
while true; do curl -s --connect-timeout 1 $NLB; echo "----------" ; date "+%Y-%m-%d %H:%M:%S" ; sleep 1; done

# 로그 확인
kubectl logs -l app=gasida-web -f

# 삭제
kubectl delete deploy gasida-web; kubectl delete svc svc-nlb-ip-type-pp
★ 실습 리소스 삭제: kubectl delete deploy deploy-echo; kubectl delete svc svc-nlb-ip-type
▶ [Istio 도전과제 참고] Istio 내부망에서 클라이언트의 소스 IP 주소 확인을 위한 방법 중 Proxy Protocol 을 사용한 방법 실습 및 정리 - Docs
[도전과제7] Preserving client IP address with Proxy protocol v2 and Network Load Balancer -Link
▷ cfn-ppv2-nginx.yaml
---
AWSTemplateFormatVersion: "2010-09-09"
Description:  Blog post - Preserving Client IP Address with Proxy Protocol v2 and Network Load Balancer (NGINX)

Parameters:
  ClientCIDR:
    Description: Please enter the IP range (CIDR notation) from which you will access the web server
    Type: String
    Default: 0.0.0.0/0
    AllowedPattern: "(\\d{1,3})\\.(\\d{1,3})\\.(\\d{1,3})\\.(\\d{1,3})/(\\d{1,2})"
    ConstraintDescription: Must be a valid IP CIDR range of the form x.x.x.x/x.
    MaxLength: 18
    MinLength: 9

  LatestAmiId:
    Description: The ID of the AMI
    Type: AWS::SSM::Parameter::Value<AWS::EC2::Image::Id>
    Default: /aws/service/ami-amazon-linux-latest/al2023-ami-kernel-6.1-x86_64

  EnvironmentName:
    Description: An environment name that is prefixed to resource names
    Type: String
    Default: ppv2-demo

  VpcCIDR:
    Description: Please enter the IP range (CIDR notation) for this VPC
    Type: String
    Default: 10.0.0.0/16
    AllowedPattern: "(\\d{1,3})\\.(\\d{1,3})\\.(\\d{1,3})\\.(\\d{1,3})/(\\d{1,2})"
    ConstraintDescription: Must be a valid IP CIDR range of the form x.x.x.x/x.
    MaxLength: 18
    MinLength: 9

  PublicSubnet1CIDR:
    Description: Please enter the IP range (CIDR notation) for the public subnet in the first Availability Zone
    Type: String
    Default: 10.0.2.0/24
    AllowedPattern: "(\\d{1,3})\\.(\\d{1,3})\\.(\\d{1,3})\\.(\\d{1,3})/(\\d{1,2})"
    ConstraintDescription: Must be a valid IP CIDR range of the form x.x.x.x/x.
    MaxLength: 18
    MinLength: 9

  PrivateSubnet1CIDR:
    Description: Please enter the IP range (CIDR notation) for the private subnet in the first Availability Zone
    Type: String
    Default: 10.0.1.0/24
    AllowedPattern: "(\\d{1,3})\\.(\\d{1,3})\\.(\\d{1,3})\\.(\\d{1,3})/(\\d{1,2})"
    ConstraintDescription: Must be a valid IP CIDR range of the form x.x.x.x/x.
    MaxLength: 18
    MinLength: 9

Resources:
  VPC:
    Type: AWS::EC2::VPC
    Properties:
      CidrBlock: !Ref VpcCIDR
      EnableDnsSupport: true
      EnableDnsHostnames: true
      Tags:
        - Key: Name
          Value: !Sub ${EnvironmentName}-vpc

  InternetGateway:
    Type: AWS::EC2::InternetGateway
    Properties:
      Tags:
        - Key: Name
          Value: !Sub ${EnvironmentName}-igw

  InternetGatewayAttachment:
    Type: AWS::EC2::VPCGatewayAttachment
    Properties:
      InternetGatewayId: !Ref InternetGateway
      VpcId: !Ref VPC

  PublicSubnet1:
    Type: AWS::EC2::Subnet
    Properties:
      VpcId: !Ref VPC
      AvailabilityZone: !Select [ 0, !GetAZs '' ]
      CidrBlock: !Ref PublicSubnet1CIDR
      MapPublicIpOnLaunch: true
      Tags:
        - Key: Name
          Value: !Sub ${EnvironmentName} Public Subnet (AZ1)

  PrivateSubnet1:
    Type: AWS::EC2::Subnet
    Properties:
      VpcId: !Ref VPC
      AvailabilityZone: !Select [ 0, !GetAZs  '' ]
      CidrBlock: !Ref PrivateSubnet1CIDR
      MapPublicIpOnLaunch: false
      Tags:
        - Key: Name
          Value: !Sub ${EnvironmentName} Private Subnet (AZ1)

  NatGateway1EIP:
    Type: AWS::EC2::EIP
    DependsOn: InternetGatewayAttachment
    Properties:
      Domain: vpc

  NatGateway1:
    Type: AWS::EC2::NatGateway
    Properties:
      AllocationId: !GetAtt NatGateway1EIP.AllocationId
      SubnetId: !Ref PublicSubnet1

  PublicRouteTable:
    Type: AWS::EC2::RouteTable
    Properties:
      VpcId: !Ref VPC
      Tags:
        - Key: Name
          Value: !Sub ${EnvironmentName} Public Routes

  DefaultPublicRoute:
    Type: AWS::EC2::Route
    DependsOn: InternetGatewayAttachment
    Properties:
      RouteTableId: !Ref PublicRouteTable
      DestinationCidrBlock: 0.0.0.0/0
      GatewayId: !Ref InternetGateway

  PublicSubnet1RouteTableAssociation:
    Type: AWS::EC2::SubnetRouteTableAssociation
    Properties:
      RouteTableId: !Ref PublicRouteTable
      SubnetId: !Ref PublicSubnet1

  PrivateRouteTable1:
    Type: AWS::EC2::RouteTable
    Properties:
      VpcId: !Ref VPC
      Tags:
        - Key: Name
          Value: !Sub ${EnvironmentName} Private Routes (AZ1)

  DefaultPrivateRoute1:
    Type: AWS::EC2::Route
    Properties:
      RouteTableId: !Ref PrivateRouteTable1
      DestinationCidrBlock: 0.0.0.0/0
      NatGatewayId: !Ref NatGateway1

  PrivateSubnet1RouteTableAssociation:
    Type: AWS::EC2::SubnetRouteTableAssociation
    Properties:
      RouteTableId: !Ref PrivateRouteTable1
      SubnetId: !Ref PrivateSubnet1

  EC2SecurityGroup:
    Type: AWS::EC2::SecurityGroup
    Properties:
      GroupName: !Sub ${EnvironmentName}-ec2-sg
      GroupDescription: Security group for targets of the NLB
      VpcId: !Ref VPC
      SecurityGroupIngress:
      - IpProtocol: tcp
        FromPort: 80
        ToPort: 80
        SourceSecurityGroupId: !Ref NLBSecurityGroup
        Description: Allow HTTP from NLB
      SecurityGroupEgress:
      - IpProtocol: -1
        CidrIp: 0.0.0.0/0
        Description: Allow all outbound traffic by default

  InstanceRole:
    Type: AWS::IAM::Role
    Properties:
      AssumeRolePolicyDocument:
        Version: "2012-10-17"
        Statement:
          - Effect: Allow
            Principal:
              Service:
                - ec2.amazonaws.com
            Action:
              - sts:AssumeRole
      ManagedPolicyArns:
        - "arn:aws:iam::aws:policy/AmazonSSMManagedInstanceCore"
      RoleName: !Sub ${EnvironmentName}-ec2-role

  InstanceProfile:
    Type: AWS::IAM::InstanceProfile
    Properties:
      Roles: [!Ref InstanceRole]
      InstanceProfileName: !Sub ${EnvironmentName}-ec2-profile

  EC2Instance:
    Type: AWS::EC2::Instance
    DependsOn: NatGateway1
    Metadata:
      AWS::CloudFormation::Init:
        config:
          packages:
            yum:
              nginx: []
              php8.2-fpm: []
              wireshark-cli: []
          services:
            systemd:
              nginx:
                enabled: true
                ensureRunning: true
                files:
                  - "/etc/nginx/nginx.conf"
                  - "/usr/share/nginx/html/index.php"
              php-fpm:
                enabled: true
                ensureRunning: true
                files:
                  - "/etc/php-fpm.d/www.conf"
          files:
            /etc/nginx/nginx.conf:
              content: !Sub |
                user nginx;
                worker_processes auto;
                error_log /var/log/nginx/error.log notice;
                pid /run/nginx.pid;

                # Load dynamic modules. See /usr/share/doc/nginx/README.dynamic.
                include /usr/share/nginx/modules/*.conf;

                events {
                  worker_connections 1024;
                }

                http {
                  log_format  main  '$proxy_protocol_addr - $remote_user [$time_local] "$request" '
                                    '$status $body_bytes_sent "$http_referer" '
                                    '"$http_user_agent" "$http_x_forwarded_for"';
                  access_log  /var/log/nginx/access.log  main;
                  sendfile            on;
                  tcp_nopush          on;
                  keepalive_timeout   65;
                  types_hash_max_size 4096;
                  include             /etc/nginx/mime.types;
                  default_type        application/octet-stream;
                  include /etc/nginx/conf.d/*.conf;

                  server {
                    listen       80 proxy_protocol;
                    server_name  _;
                    root         /usr/share/nginx/html;

                    location / {
                    index index.php;
                    }

                    location ~ [^/]\.php(/|$) {
                    fastcgi_split_path_info ^(.+?\.php)(/.*)$;
                    if (!-f $document_root$fastcgi_script_name) {
                        return 404;
                    }
                    fastcgi_param HTTP_PROXY "";
                    fastcgi_param CLIENT_ADDR $proxy_protocol_addr;
                    fastcgi_param CLIENT_PORT $proxy_protocol_port;
                    fastcgi_pass 127.0.0.1:9000;
                    fastcgi_index index.php;
                    include fastcgi_params;
                    fastcgi_param  SCRIPT_FILENAME   $document_root$fastcgi_script_name;
                    }

                    error_page 404 /404.html;
                    location = /404.html {
                    }

                    error_page 500 502 503 504 /50x.html;
                    location = /50x.html {
                    }
                  }
                }
              mode: '000644'
              owner: 'nginx'
              group: 'nginx'
            /etc/php-fpm.d/www.conf:
              content: !Sub |
                [www]
                user = nginx
                group = nginx
                listen = 127.0.0.1:9000
                listen.allowed_clients = 127.0.0.1
                listen.owner = nginx
                listen.group = nginx
                pm = dynamic
                pm.max_children = 5
                pm.start_servers = 2
                pm.min_spare_servers = 1
                pm.max_spare_servers = 3
                pm.max_requests = 500
              mode: '000644'
              owner: 'nginx'
              group: 'nginx'
            /usr/share/nginx/html/index.php:
              content: !Sub |
                <!DOCTYPE html>
                <html>
                <head>
                  <style>
                  table {
                    border-collapse: collapse;
                  }

                  td, th {
                    border: 1px solid #ddd;
                    padding: 8px;
                  }

                  tr:nth-child(even) {
                    background-color: #f2f2f2;
                  }
                  </style>
                </head>
                <body>
                <table>
                <caption style="font-weight: bold;">Connection Details</caption>
                <?php
                  echo "<tr>";
                  echo "<td>Client Source IP (from PPv2 header)</td>";
                  echo "<td>" . $_SERVER['CLIENT_ADDR']. "</td>";
                  echo "</tr>";
                  echo "<tr>";
                  echo "<td>Client Source Port (from PPv2 header)</td>";
                  echo "<td>" . $_SERVER['CLIENT_PORT']. "</td>";
                  echo "</tr>";
                  echo "<tr>";
                  echo "<td>Client Software</td>";
                  echo "<td>" . $_SERVER['HTTP_USER_AGENT']. "</td>";
                  echo "</tr>";
                  echo "<tr>";
                  echo "<td>Server Software</td>";
                  echo "<td>" . $_SERVER['SERVER_SOFTWARE']. "</td>";
                  echo "</tr>";
                ?>
                </table>
                </body>
                </html>
              mode: '000644'
              owner: 'nginx'
              group: 'nginx'
    Properties:
      InstanceType: "t2.micro"
      ImageId: !Ref LatestAmiId
      IamInstanceProfile: !Ref InstanceProfile
      SecurityGroupIds:
        - !Ref EC2SecurityGroup
      SubnetId: !Ref PrivateSubnet1
      UserData:
        Fn::Base64:
          !Sub |
          #!/bin/bash -xe
          yum update -y
          yum install -y aws-cfn-bootstrap
          sleep 30
          /opt/aws/bin/cfn-init -v -s ${AWS::StackName} -r EC2Instance --region ${AWS::Region}
      Tags:
        - Key: Name
          Value: !Sub ${EnvironmentName}-ec2-instance

  NLB:
    Type: AWS::ElasticLoadBalancingV2::LoadBalancer
    Properties:
      Scheme: "internet-facing"
      Subnets:
        - !Ref PublicSubnet1
      SecurityGroups:
        - !Ref NLBSecurityGroup
      Type: "network"
      Tags:
        - Key: Name
          Value: !Sub ${EnvironmentName}-nlb

  NLBListener:
    Type: AWS::ElasticLoadBalancingV2::Listener
    Properties:
      DefaultActions:
        - Type: "forward"
          TargetGroupArn: !Ref NLBTargetGroup
      LoadBalancerArn: !Ref NLB
      Port: 80
      Protocol: "TCP"

  NLBTargetGroup:
    Type: AWS::ElasticLoadBalancingV2::TargetGroup
    Properties:
      Port: 80
      Protocol: "TCP"
      VpcId: !Ref VPC
      HealthCheckProtocol: "HTTP"
      TargetType: "ip"
      TargetGroupAttributes:
        - Key: proxy_protocol_v2.enabled
          Value: true
      Targets:
        - Id: !GetAtt EC2Instance.PrivateIp
          Port: 80
      Tags:
        - Key: Name
          Value: !Sub ${EnvironmentName}-nlb-tg

  NLBSecurityGroup:
    Type: AWS::EC2::SecurityGroup
    Properties:
      GroupName: !Sub ${EnvironmentName}-nlb-sg
      GroupDescription: Security group for NLB with ingress rule for HTTP from ClientCIDR
      VpcId: !Ref VPC
      SecurityGroupIngress:
      - IpProtocol: tcp
        FromPort: 80
        ToPort: 80
        CidrIp: !Ref ClientCIDR
        Description: Allow HTTP from ClientCIDR
      SecurityGroupEgress:
      - IpProtocol: -1
        CidrIp: 0.0.0.0/0
        Description: Allow all outbound traffic by default

Outputs:
  URL:
    Description: The URL of the website for testing
    Value: !Join ['', ['http://', !GetAtt NLB.DNSName, '/index.php']]
[ More ... ]
♣ Proxy protocol v2 및 Network Load Balancer를 사용하여 클라이언트 IP 주소 보존
- 로드 밸런서 또는 프록시가 클라이언트의 원래 IP 주소를 보존할 수 없는 경우 IP 주소를 다시 쓰거나 라우팅 목적으로 자체 IP 주소를 사용할 수 있습니다.
- 프록시 프로토콜은 프록시 헤더 내에 필수적인 클라이언트 세부 정보를 인코딩함으로써 네트워크 트래픽의 정확한 로깅, 모니터링 및 관리를 가능하게 하여 분산 환경에서 보안과 가시성을 향상시킵니다.
1. Proxy Protocol의 작동 방식

[ 프록시 프로토콜 v2 내 Client 세부 정보 ]
소스 주소 - 연결을 시작하는 클라이언트의 원래 IP 주소 대상
주소 - 연결을 수신하는 프록시 또는 부하 분산 장치의 IP 주소
소스 포트 - 연결이 시작되는 클라이언트 측의 포트 번호
대상 포트 - 연결이 지시되는 프록시 또는 부하 분산 장치 측의 포트 번호
프로토콜 - 연결에 사용되는 네트워크 프로토콜(예: TCP 또는 UDP)
버전 - 사용되는 프록시 프로토콜의 버전(예: v2)
패밀리 - 소스 및 대상 IP 주소의 주소 패밀리(예: IPv4 또는 IPv6)
길이 - 프록시 프로토콜 헤더의 길이
체크섬 - 헤더의 무결성을 보장하는 체크섬 값
유형-길이-값(TLV) - 사용자 정의 데이터(예: 가상 사설 클라우드(VPC) 엔드포인트 ID)
Source address – The original IP address of the client initiating the connection
Destination address – The IP address of the proxy or load balancer receiving the connection
Source port – The port number on the client side from which the connection originates
Destination port – The port number on the proxy or load balancer side to which the connection is directed
Protocol – The network protocol being used for the connection (for example, TCP or UDP)
Version – The version of the Proxy protocol being used (for example, v2)
Family – The address family of the source and destination IP addresses (for example, IPv4 or IPv6)
Length – The length of the Proxy protocol header
Checksum – A checksum value to ensure the integrity of the header
Type-length-value (TLV) – Custom data (for example, virtual private cloud (VPC) endpoint ID)
[ 프록시 프로토콜의 일반 사례 ]
1. 원격 대상 - 네트워크 로드 밸런서의 VPC 외부에 있는 대상으로 라우팅
☞ 클라이언트 IP 보존 기능을 자동으로 비활성화

2. PrivateLink – 서비스 소비자에서 서비스 제공자로의 개인 연결
☞ PrivateLink를 사용하면 클라이언트 연결 세부 정보가 가려져 트래픽을 추적하고 관리가 어려움
Proxy protocol v2를 사용하면 클라이언트 IP 주소가 보존될 뿐만 아니라 클라이언트에서 사용하는 VPC 엔드포인트 ID와 같은 추가 컨텍스트가 헤더에 인코딩됩니다.
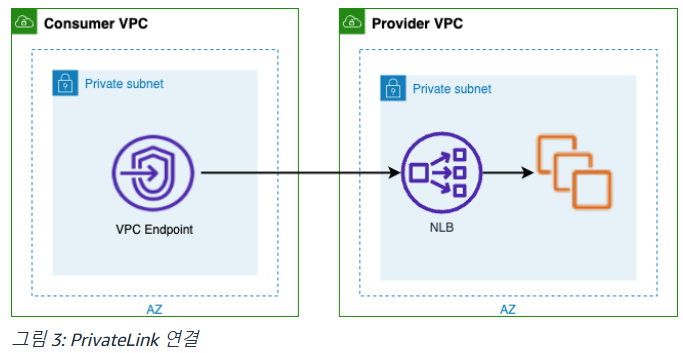
3. 헤어피닝 - 클라이언트와 서버가 동일한 호스트에 있으며 컨테이너화된 환경에서 가장 많이 발견됩니다.
☞ 대상 그룹에서 프록시 프로토콜을 활성화하기 전에 애플리케이션이 프록시 프로토콜 v2 헤더를 예상하고 구문 분석할 수 있는지 확인 필요함
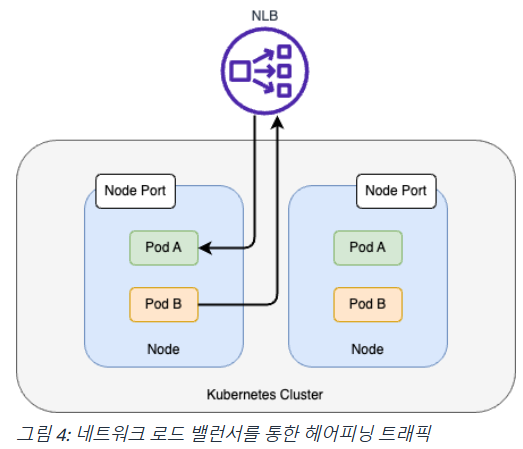
[ 실습 - 프록시 프로토콜 v2 데모 ] - ref. Link
## Action 요약
# 01. AWS CloudFormation 템플릿을 배포합니다 .
# 02. 네트워크 로드 밸런서 뒤에 있는 Amazon Elastic Compute Cloud (Amazon EC2) 웹 서버 에 연결합니다 .
# 03. 프록시 프로토콜 v2 헤더를 포함하는 네트워크 패킷을 캡처하고 표시합니다.
# 04. EC2 웹 서버 액세스 로그를 확인합니다.
Step1. Cloud Templete 배포 ( NGINX or HAPROXY )


Step2. 템플릿을 배포할 때 ClientCIDR 매개변수의 기본값(0.0.0.0/0)을 자신의 IP 주소로 변경
☞ https://checkip.amazonaws.com 클릭하여 확인!! ( 나의 경우는, 14.4.83.63 이다. )
※ 주의 : 운영 환경에서는 절대 하지 말것!!

이 템플릿은 모든 네트워킹을 설정하고 네트워크 로드 밸런서가 트래픽의 로드를 분산할 때 프록시 프로토콜 v2 헤더에서 클라이언트 세부 정보를 수신하는 방법을 보여주는 간단한 웹 애플리케이션을 배포합니다.

[ 템플릿의 주요 기능 ]
- VPC, 공용 및 개인 서브넷 , 인터넷 게이트웨이 , NAT 게이트웨이 , 관련 라우팅 테이블을 생성하여 개인 서브넷에서 인터넷에 액세스할 수 있도록 합니다.
- 네트워크 로드 밸런서에서 포트 80을 통한 유입을 허용하는 Amazon EC2 보안 그룹이 정의됩니다.
- AWS Identity and Access Management (IAM) 역할과 인스턴스 프로필이 생성되어 EC2 인스턴스가 원격으로 AWS Systems Manager 에 액세스할 수 있습니다.
- EC2 인스턴스는 NGINX 또는 HAProxy 및 PHP-FPM을 설치하고 구성하는 CloudFormation init 구성으로 프라이빗 서브넷에서 시작됩니다. 이 구성은 프록시 프로토콜 v2를 지원하고 PHP-FPM에 요청을 전달하는 포트 80의 리스너를 정의합니다.
- Index.php는 Network Load Balancer에서 전달된 Proxy protocol v2 헤더에서 발견된 클라이언트 소스 IP와 포트를 표시합니다. 연결을 설정하는 데 사용된 클라이언트와 서버 소프트웨어를 보여줍니다.
Step3. 네트워크 로드 밸런서 뒤에 있는 Amazon EC2 웹 서버에 연결
☞ 연결 후 tshark 명령을 실행하여 그림 7과 같이 프록시 프로토콜 v2 헤더를 캡처하고 표시합니다.

## 01. tshark 명령어로 덤프 준비
sudo tshark --disable-protocol http -VY proxy.v2.protocol==0x01

## 02. 별도의 웹 브라우저 띄워서, ELB arn으로 curl 테스트 수행
## curl <http://replace-me.elb.region.amazonaws.com/index.php>
curl ppv2-Ngi-NLB-VuRBheHiU6HI-463eff6fe1869ce3.elb.ap-northeast-2.amazonaws.com
or
http://ppv2-Ngi-NLB-VuRBheHiU6HI-463eff6fe1869ce3.elb.ap-northeast-2.amazonaws.com
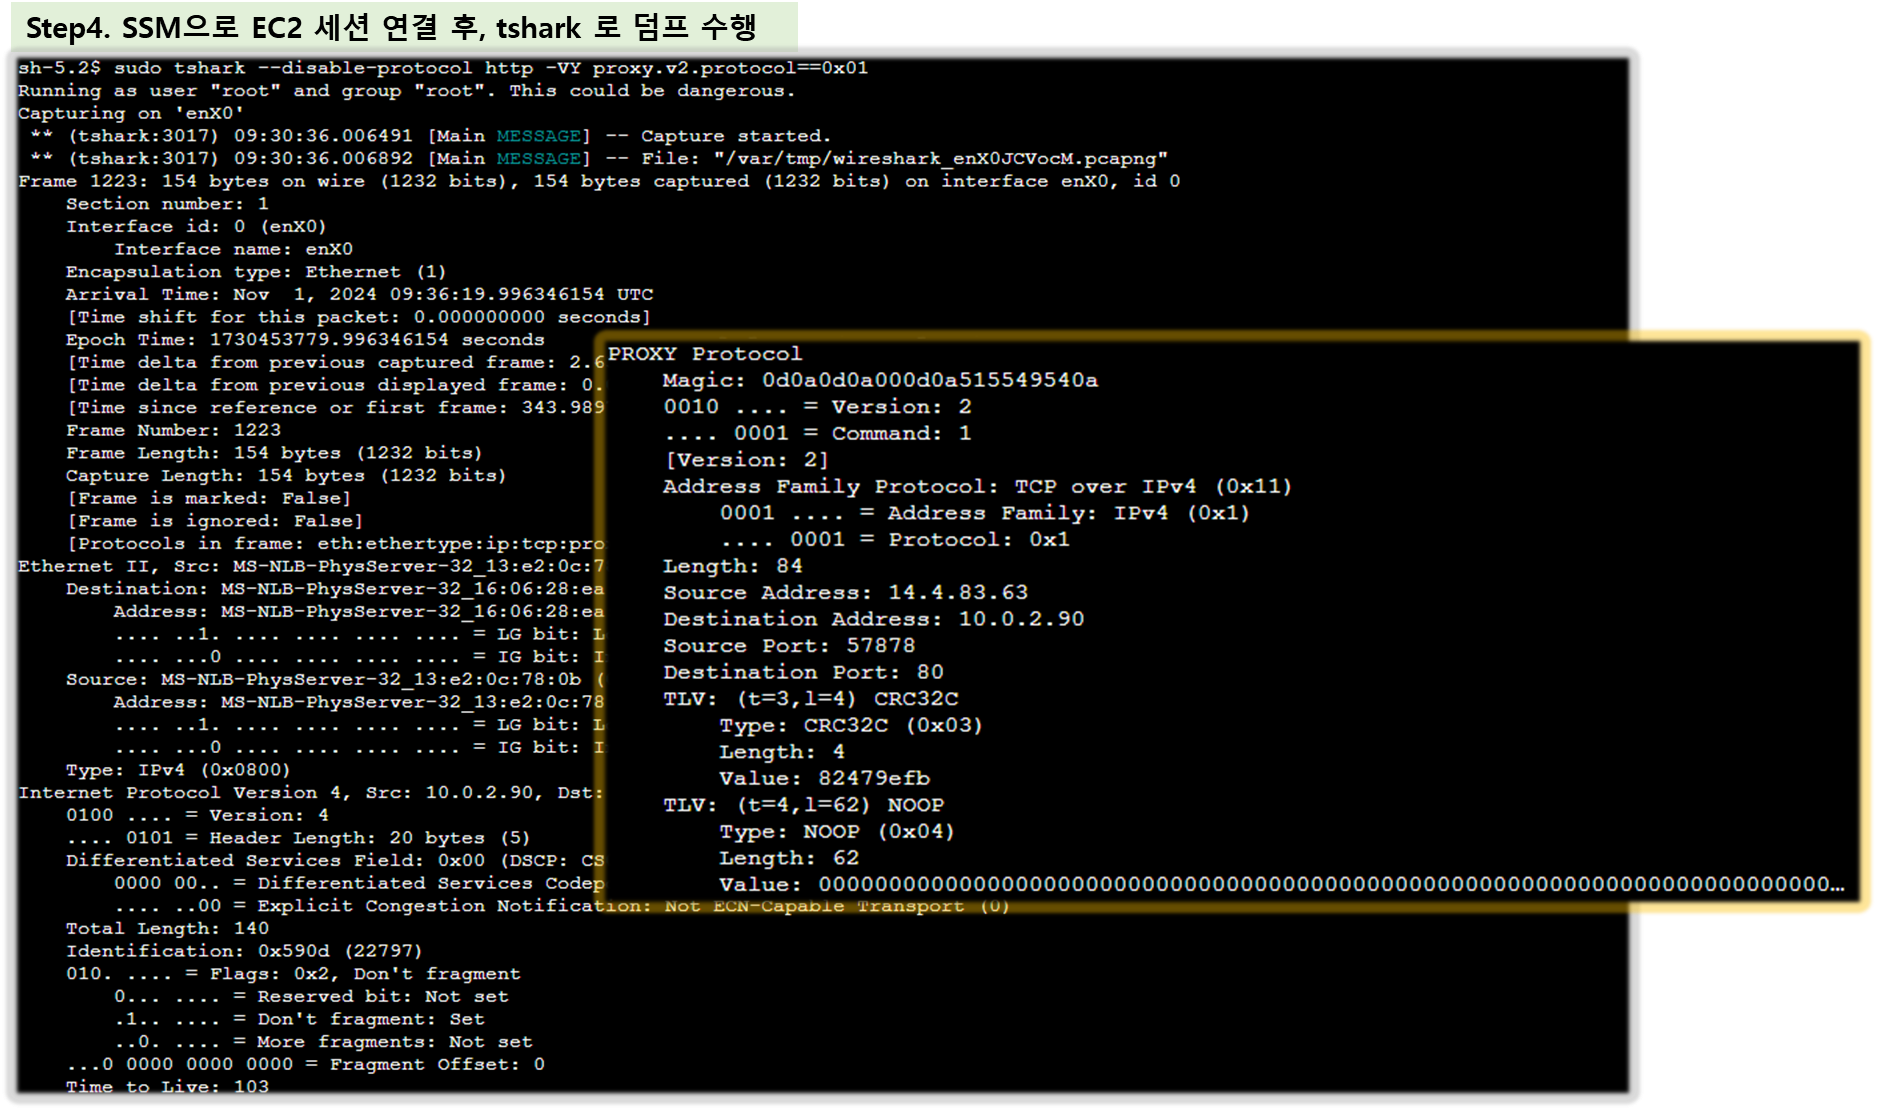
Step4. EC2 웹서버 access Log 보기 ( NginX 배포한 경우 수행 )
sudo tail -f /var/log/nginx/access.log
Step5. Clean-up ( 생성 자원 정리합시다 !! )
☞ AWS console > Cloud-Formation 에서 수행

[도전과제8] AWS VPC CNI 환경에서 Service(LoadBalancer Type)을 NLB(IP mode) 구성 시 NLB → Node(Pod, IPtbles) 구간에 Flow를 분석 정리
- 추후 정리 예정 ...
7. Ingress
☞ 클러스터 내부의 서비스(ClusterIP, NodePort, Loadbalancer)를 외부로 노출(HTTP/HTTPS) - Web Proxy 역할
▶ AWS Load Balancer Controller + Ingress (ALB) IP 모드 동작 with AWS VPC CNI
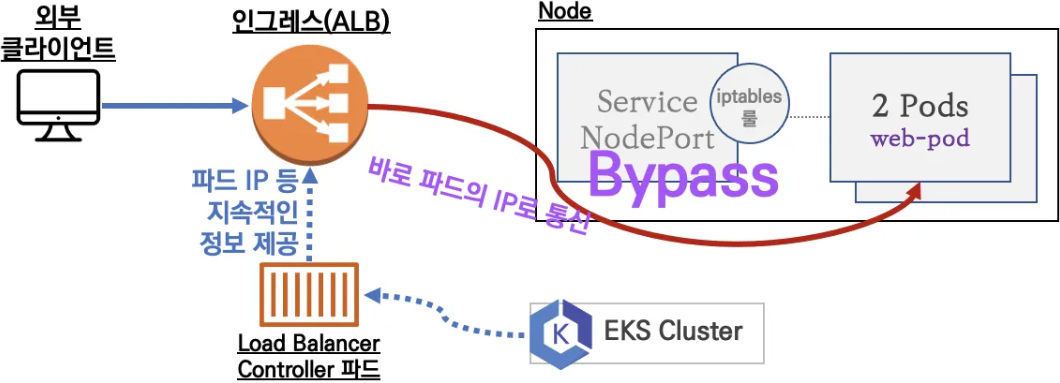
▶ 서비스/파드 배포 테스트 with Ingress(ALB) - ALB
# 게임 파드와 Service, Ingress 배포
curl -s -O https://raw.githubusercontent.com/gasida/PKOS/main/3/ingress1.yaml
cat ingress1.yaml
kubectl apply -f ingress1.yaml

# 모니터링
watch -d kubectl get pod,ingress,svc,ep -n game-2048

# 생성 확인
kubectl get-all -n game-2048
kubectl get ingress,svc,ep,pod -n game-2048
kubectl get targetgroupbindings -n game-2048

# ALB 생성 확인
aws elbv2 describe-load-balancers --query 'LoadBalancers[?contains(LoadBalancerName, `k8s-game2048`) == `true`]' | jq
ALB_ARN=$(aws elbv2 describe-load-balancers --query 'LoadBalancers[?contains(LoadBalancerName, `k8s-game2048`) == `true`].LoadBalancerArn' | jq -r '.[0]')
aws elbv2 describe-target-groups --load-balancer-arn $ALB_ARN
TARGET_GROUP_ARN=$(aws elbv2 describe-target-groups --load-balancer-arn $ALB_ARN | jq -r '.TargetGroups[0].TargetGroupArn')
aws elbv2 describe-target-health --target-group-arn $TARGET_GROUP_ARN | jq

# Ingress 확인
kubectl describe ingress -n game-2048 ingress-2048
kubectl get ingress -n game-2048 ingress-2048 -o jsonpath="{.status.loadBalancer.ingress[*].hostname}{'\n'}"

# 게임 접속 : ALB 주소로 웹 접속
kubectl get ingress -n game-2048 ingress-2048 -o jsonpath={.status.loadBalancer.ingress[0].hostname} | awk '{ print "Game URL = http://"$1 }'

# 파드 IP 확인
kubectl get pod -n game-2048 -owide
- ALB 대상 그룹에 등록된 대상 확인 : ALB에서 파드 IP로 직접 전달
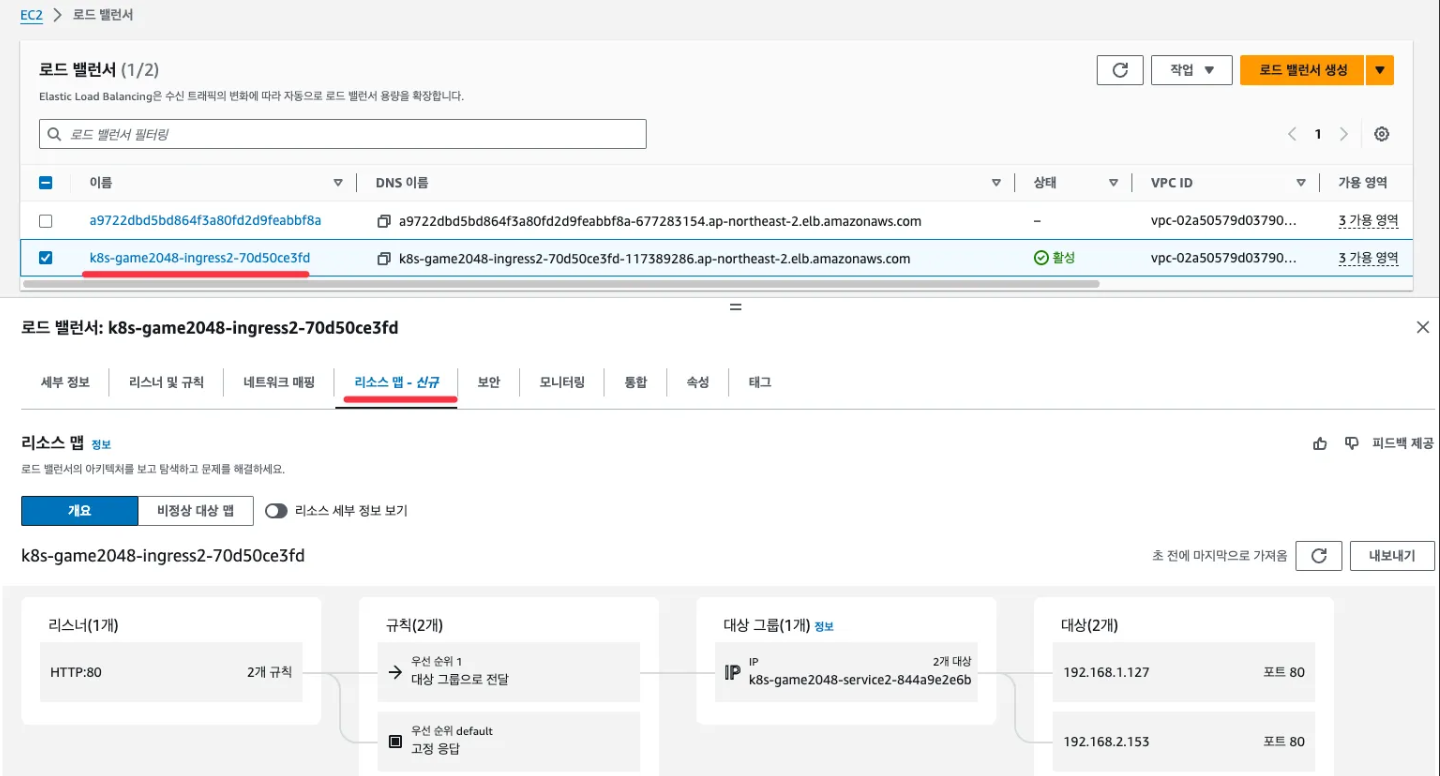
- 파드 3개로 증가
# 터미널1
watch kubectl get pod -n game-2048
while true; do aws elbv2 describe-target-health --target-group-arn $TARGET_GROUP_ARN --output text; echo; done

# 터미널2 : 파드 3개로 증가
kubectl scale deployment -n game-2048 deployment-2048 --replicas 3
- 파드 1개로 감소
# 터미널2 : 파드 1개로 감소
kubectl scale deployment -n game-2048 deployment-2048 --replicas 1
[ 실행 결과 - 한 눈에 보기 ]
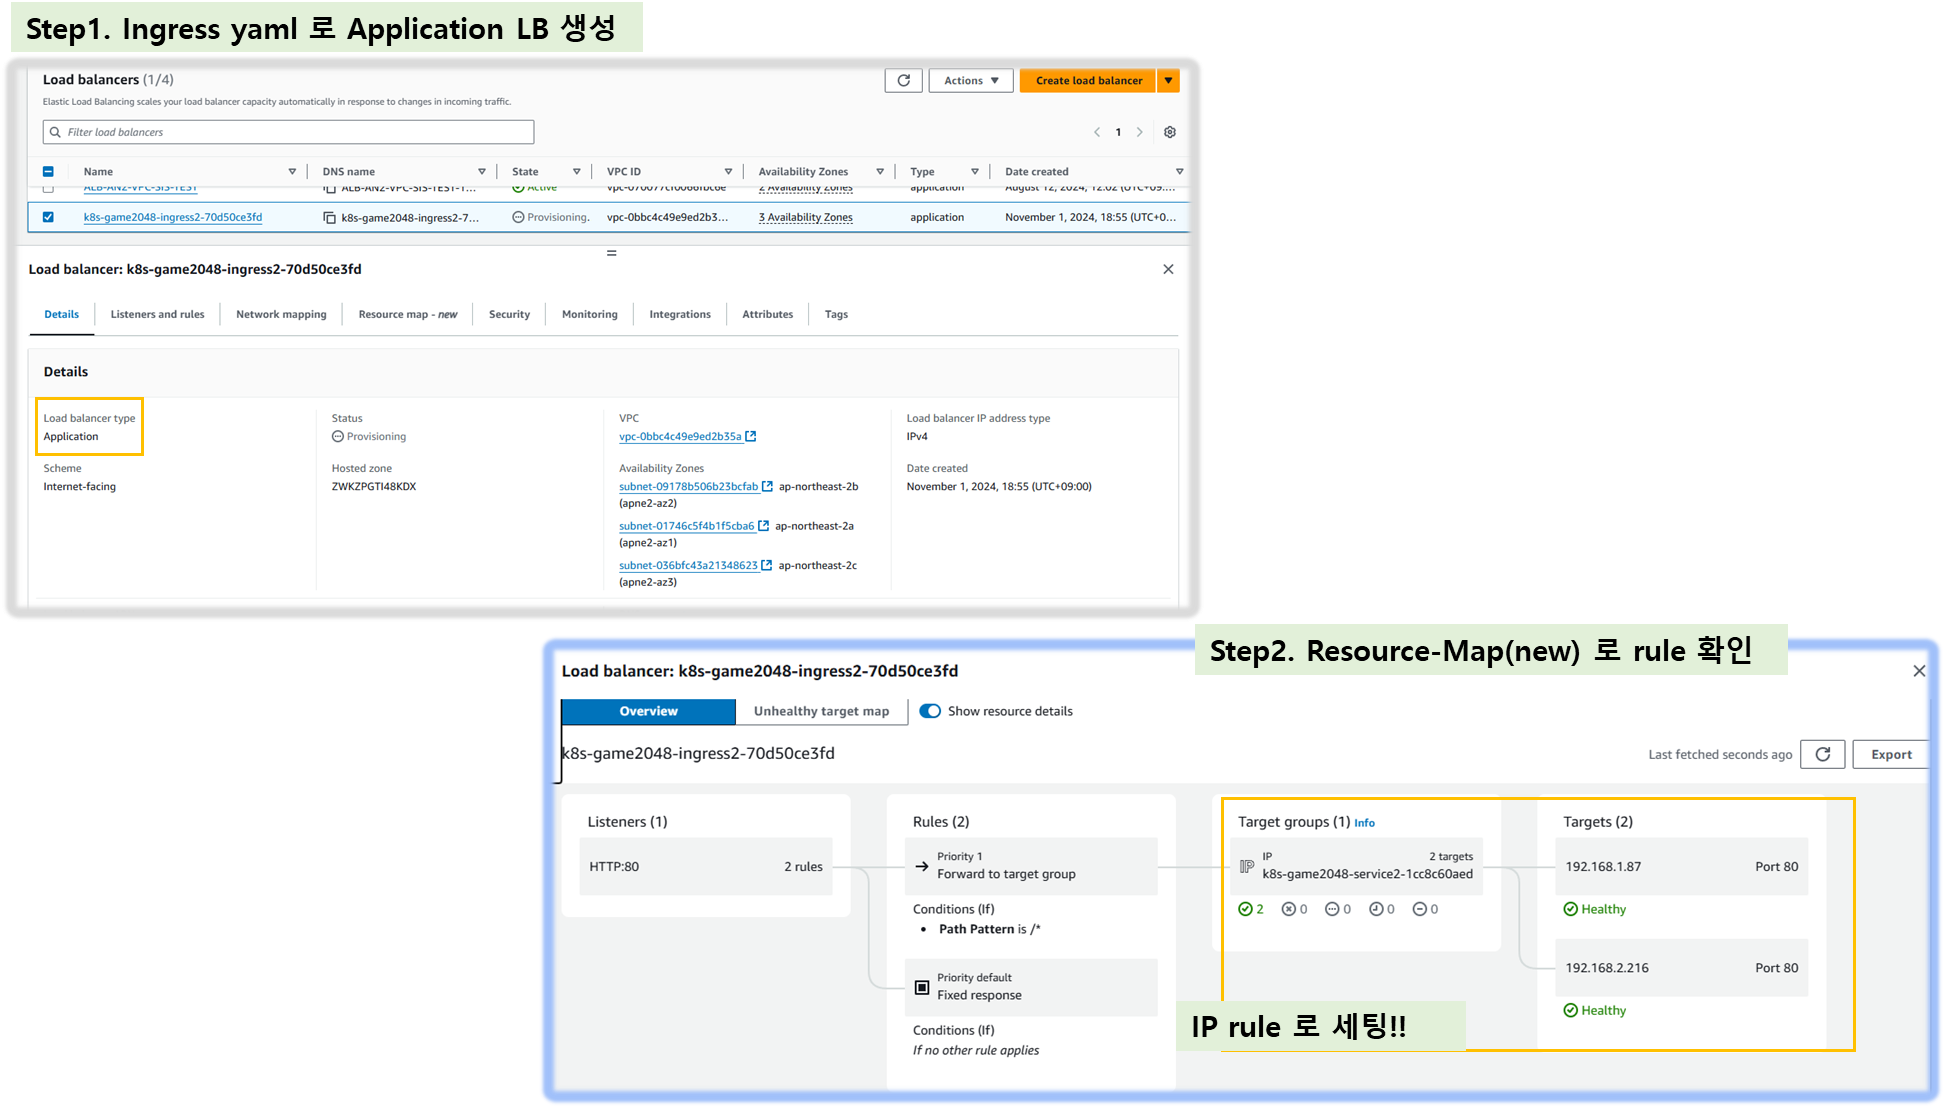


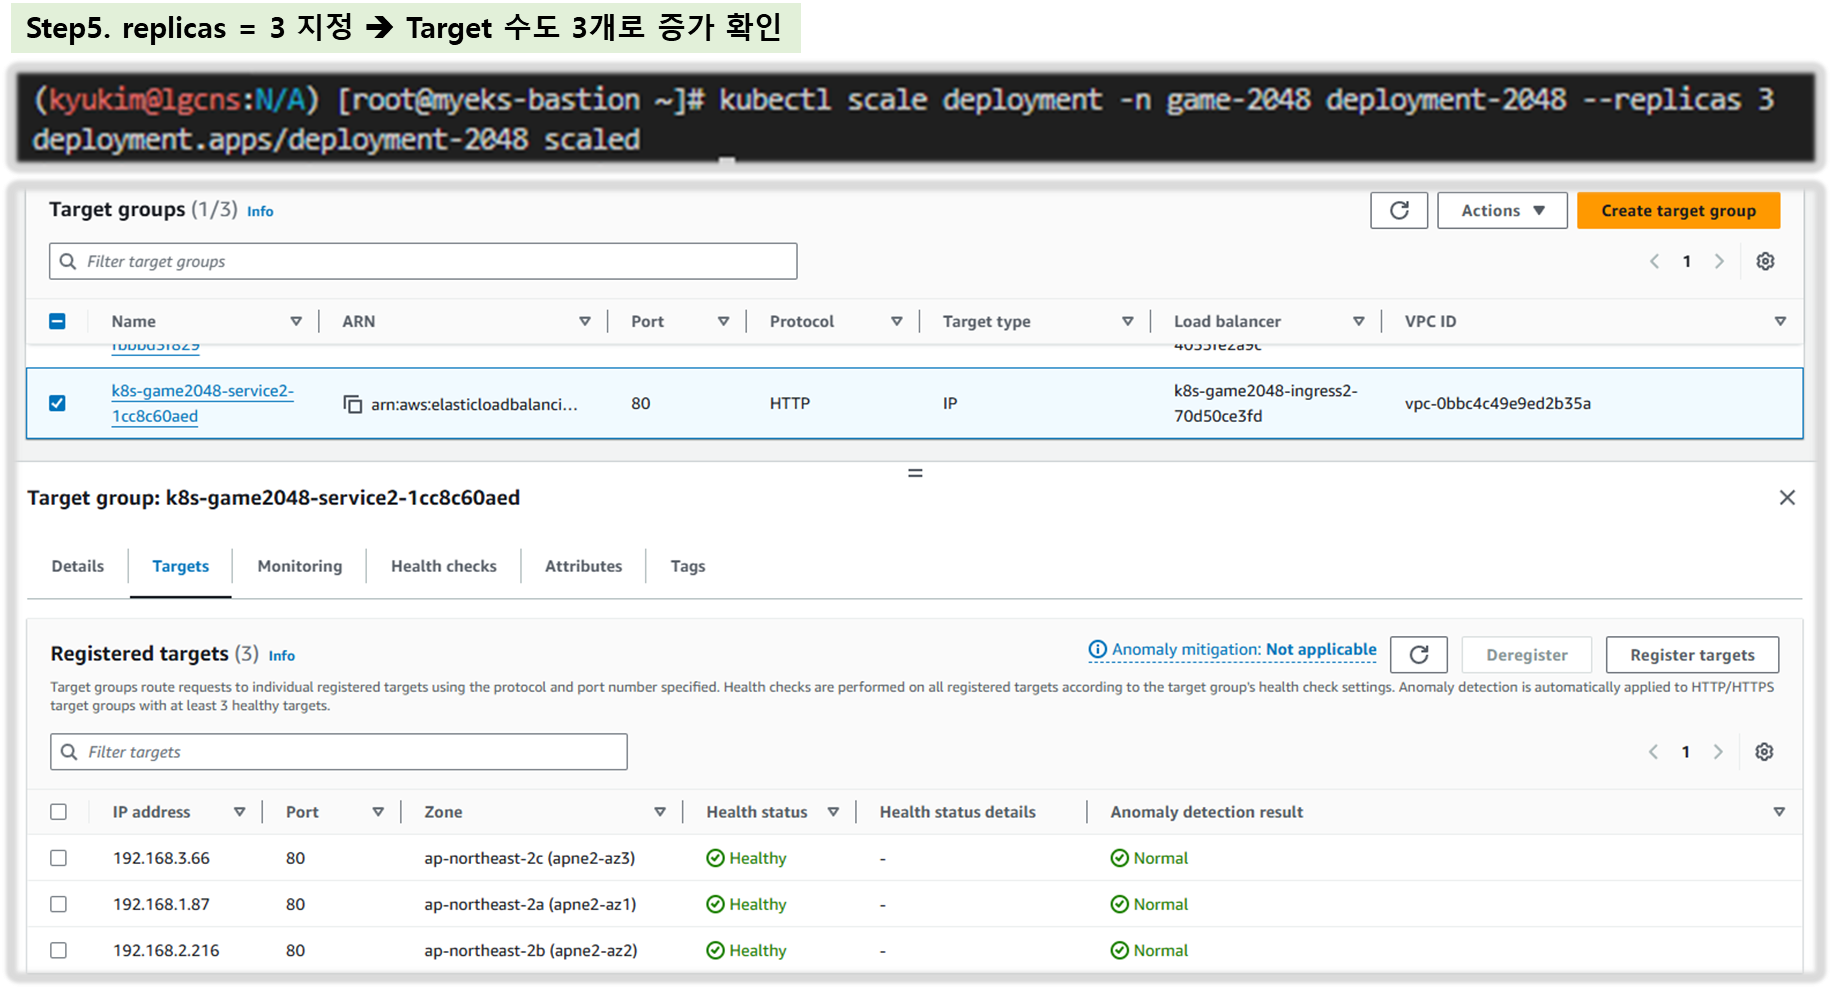
★ 실습 리소스 삭제:
kubectl delete ingress ingress-2048 -n game-2048
kubectl delete svc service-2048 -n game-2048 && kubectl delete deploy deployment-2048 -n game-2048 && kubectl delete ns game-2048
8. External DNS
[ 개요 ]
♠ K8S 서비스/인그레스 생성 시 도메인을 설정하면, AWS(Route 53), Azure(DNS), GCP(Cloud DNS) 에 A 레코드(TXT 레코드)로 자동 생성/삭제

☞ ExternalDNS CTRL 권한 주는 방법 3가지 : Node IAM Role, Static credentials, IRSA
▶ AWS Route 53 정보 확인 & 변수 지정 : Public 도메인 소유를 하고 계셔야 합니다!
# 자신의 도메인 변수 지정 : 소유하고 있는 자신의 도메인을 입력하시면 됩니다
MyDomain=<자신의 도메인>
MyDomain=gasida.link
echo "export MyDomain=gasida.link" >> /etc/profile

# 자신의 Route 53 도메인 ID 조회 및 변수 지정
aws route53 list-hosted-zones-by-name --dns-name "${MyDomain}." | jq
aws route53 list-hosted-zones-by-name --dns-name "${MyDomain}." --query "HostedZones[0].Name"
aws route53 list-hosted-zones-by-name --dns-name "${MyDomain}." --query "HostedZones[0].Id" --output text
MyDnzHostedZoneId=`aws route53 list-hosted-zones-by-name --dns-name "${MyDomain}." --query "HostedZones[0].Id" --output text`
echo $MyDnzHostedZoneId

# (옵션) NS 레코드 타입 첫번째 조회
aws route53 list-resource-record-sets --output json --hosted-zone-id "${MyDnzHostedZoneId}" --query "ResourceRecordSets[?Type == 'NS']" | jq -r '.[0].ResourceRecords[].Value'
# (옵션) A 레코드 타입 모두 조회
aws route53 list-resource-record-sets --output json --hosted-zone-id "${MyDnzHostedZoneId}" --query "ResourceRecordSets[?Type == 'A']"

# A 레코드 타입 조회
aws route53 list-resource-record-sets --hosted-zone-id "${MyDnzHostedZoneId}" --query "ResourceRecordSets[?Type == 'A']" | jq
aws route53 list-resource-record-sets --hosted-zone-id "${MyDnzHostedZoneId}" --query "ResourceRecordSets[?Type == 'A'].Name" | jq
aws route53 list-resource-record-sets --hosted-zone-id "${MyDnzHostedZoneId}" --query "ResourceRecordSets[?Type == 'A'].Name" --output text

# A 레코드 값 반복 조회
while true; do aws route53 list-resource-record-sets --hosted-zone-id "${MyDnzHostedZoneId}" --query "ResourceRecordSets[?Type == 'A']" | jq ; date ; echo ; sleep 1; done
▶ ExternalDNS 설치 - 링크
# EKS 배포 시 Node IAM Role 설정되어 있음
# eksctl create cluster ... --external-dns-access ...

#
MyDomain=<자신의 도메인>
MyDomain=gasida.link

# 자신의 Route 53 도메인 ID 조회 및 변수 지정
MyDnzHostedZoneId=$(aws route53 list-hosted-zones-by-name --dns-name "${MyDomain}." --query "HostedZones[0].Id" --output text)

# 변수 확인
echo $MyDomain, $MyDnzHostedZoneId

# ExternalDNS 배포
curl -s -O https://raw.githubusercontent.com/gasida/PKOS/main/aews/externaldns.yaml
cat externaldns.yaml
MyDomain=$MyDomain MyDnzHostedZoneId=$MyDnzHostedZoneId envsubst < externaldns.yaml | kubectl apply -f -

# 확인 및 로그 모니터링
kubectl get pod -l app.kubernetes.io/name=external-dns -n kube-system
kubectl logs deploy/external-dns -n kube-system -f
▶ Service(NLB) + 도메인 연동(ExternalDNS) - 도메인체크
# 터미널1 (모니터링)
watch -d 'kubectl get pod,svc'
kubectl logs deploy/external-dns -n kube-system -f

# 테트리스 디플로이먼트 배포
cat <<EOF | kubectl apply -f -
apiVersion: apps/v1
kind: Deployment
metadata:
  name: tetris
  labels:
    app: tetris
spec:
  replicas: 1
  selector:
    matchLabels:
      app: tetris
  template:
    metadata:
      labels:
        app: tetris
    spec:
      containers:
      - name: tetris
        image: bsord/tetris
---
apiVersion: v1
kind: Service
metadata:
  name: tetris
  annotations:
    service.beta.kubernetes.io/aws-load-balancer-nlb-target-type: ip
    service.beta.kubernetes.io/aws-load-balancer-scheme: internet-facing
    service.beta.kubernetes.io/aws-load-balancer-cross-zone-load-balancing-enabled: "true"
    service.beta.kubernetes.io/aws-load-balancer-backend-protocol: "http"
    #service.beta.kubernetes.io/aws-load-balancer-healthcheck-port: "80"
spec:
  selector:
    app: tetris
  ports:
  - port: 80
    protocol: TCP
    targetPort: 80
  type: LoadBalancer
  loadBalancerClass: service.k8s.aws/nlb
EOF

# 배포 확인
kubectl get deploy,svc,ep tetris

# NLB에 ExternanDNS 로 도메인 연결
kubectl annotate service tetris "external-dns.alpha.kubernetes.io/hostname=tetris.$MyDomain"
while true; do aws route53 list-resource-record-sets --hosted-zone-id "${MyDnzHostedZoneId}" --query "ResourceRecordSets[?Type == 'A']" | jq ; date ; echo ; sleep 1; done

# Route53에 A레코드 확인
aws route53 list-resource-record-sets --hosted-zone-id "${MyDnzHostedZoneId}" --query "ResourceRecordSets[?Type == 'A']" | jq
aws route53 list-resource-record-sets --hosted-zone-id "${MyDnzHostedZoneId}" --query "ResourceRecordSets[?Type == 'A'].Name" | jq .[]

# 확인
dig +short tetris.$MyDomain @8.8.8.8
dig +short tetris.$MyDomain

# 도메인 체크
echo -e "My Domain Checker = https://www.whatsmydns.net/#A/tetris.$MyDomain"

# 웹 접속 주소 확인 및 접속
echo -e "Tetris Game URL = http://tetris.$MyDomain"
[ 도전 과제 ] * 추후 업데이트
- Service(NLB + TLS) + 도메인 연동(ExternalDNS) ← 직접 실습해보시기바랍니다!
- Ingress(ALB + HTTPS) + 도메인 연동(ExternalDNS) ← 직접 실습해보시기바랍니다!
▶ (참고) ACM 퍼블릭 인증서 요청 및 해당 인증서에 대한 Route53 도메인 검증 설정 with AWS CLI
# 각자 자신의 도메인 변수 지정
MyDomain=<각자 자신의 도메인>

# ACM 퍼블릭 인증서 요청
CERT_ARN=$(aws acm request-certificate \
--domain-name $MyDomain \
--validation-method 'DNS' \
--key-algorithm 'RSA_2048' \
|jq --raw-output '.CertificateArn')

# 생성한 인증서 CNAME 이름 가져오기
CnameName=$(aws acm describe-certificate \
--certificate-arn $CERT_ARN \
--query 'Certificate.DomainValidationOptions[*].ResourceRecord.Name' \
--output text)

# 생성한 인증서 CNAME 값 가져오기
CnameValue=$(aws acm describe-certificate \
--certificate-arn $CERT_ARN \
--query 'Certificate.DomainValidationOptions[*].ResourceRecord.Value' \
--output text)

# 정상 출력 확인하기
echo $CERT_ARN, $CnameName, $CnameValue

# 레코드 파일
cat <<EOT > cname.json
{
  "Comment": "create a acm's CNAME record",
  "Changes": [
    {
      "Action": "CREATE",
      "ResourceRecordSet": {
        "Name": "CnameName",
        "Type": "CNAME",
        "TTL": 300,
        "ResourceRecords": [
          {
            "Value": "CnameValue"
          }
        ]
      }
    }
  ]
}
EOT

# CNAME 이름, 값 치환하기
sed -i "s/CnameName/$CnameName/g" cname.json
sed -i "s/CnameValue/$CnameValue/g" cname.json
cat cname.json

# 해당 인증서에 대한 Route53 도메인 검증 설정을 위한 Route53 레코드 생성
aws route53 change-resource-record-sets --hosted-zone-id $MyDnzHostedZoneId --change-batch file://cname.json
9. Core DNS - 이론 (추후 참조할 것!! )
- Kubernetes에서 DNS 다루는 방법 - 도메인을 찾아서 - Youtube Link
- Stop Leaking Kubernetes Service Information via DNS! - John Belamaric, Google & Yong Tang, Ivanti - Youtube Link
▶ 쿠버네티스 DNS 쿼리 Flow - 링크

▶ (심화) Recent changes to the CoreDNS add-on - Link
- EKS CoreDNS 애드온 구성 스키마에 topologySpreadConstraints 설정 추가
# CoreDNS 기본 정보 확인 : volumes - configMap - Corefile - coredns
kubectl get deploy coredns -n kube-system -o yaml | kubectl neat
kubectl get cm -n kube-system coredns -o yaml | kubectl neat
data:
  Corefile: |
    .:53 {
        errors
        health {
            lameduck 5s
          }
        ready
        kubernetes cluster.local in-addr.arpa ip6.arpa {
          pods insecure
          fallthrough in-addr.arpa ip6.arpa
        }
        prometheus :9153
        forward . /etc/resolv.conf
        cache 30
        loop
        reload
        loadbalance
    }

# JSON 구성 스키마에 topologySpreadConstraints 매개변수를 추가
aws eks describe-addon-configuration --addon-name coredns --addon-version v1.10.1-eksbuild.2 --query 'configurationSchema' --output text | jq .
aws eks describe-addon-configuration --addon-name coredns --addon-version v1.10.1-eksbuild.2 --query 'configurationSchema' --output text | jq . | grep -A3 topologySpreadConstraints

# check coredns deployment - it returns an empty output because it is not set by default
kubectl get deploy -n kube-system coredns -o yaml | grep topologySpreadConstraints -A8

#
aws eks describe-addon --cluster-name $CLUSTER_NAME --addon-name coredns | jq
{
  "addon": {
    "addonName": "coredns",
    "clusterName": "myeks",
    "status": "ACTIVE",
    "addonVersion": "v1.10.1-eksbuild.7",
    "health": {
      "issues": []
    },
    "addonArn": "arn:aws:eks:ap-northeast-2:911283464785:addon/myeks/coredns/4ec712ea-54eb-05df-5d57-7b52ef1efc6f",
    "createdAt": "2024-03-10T09:47:58.100000+09:00",
    "modifiedAt": "2024-03-10T09:48:06.073000+09:00",
    "tags": {}
  }
}

# add-on configuration YAML blob
cat << EOT > topologySpreadConstraints.yaml
"topologySpreadConstraints":
  - maxSkew: 1
    topologyKey: topology.kubernetes.io/zone
    whenUnsatisfiable: ScheduleAnyway
    labelSelector:
      matchLabels:
        k8s-app: kube-dns
EOT

# apply change to add-on
aws eks update-addon --cluster-name $CLUSTER_NAME --addon-name coredns --configuration-values 'file://topologySpreadConstraints.yaml'

# check add-on configuration to see if it is in ACTIVE status
aws eks describe-addon --cluster-name $CLUSTER_NAME --addon-name coredns | jq
kubectl get deploy coredns -n kube-system -o yaml | kubectl neat
...
    topologySpreadConstraints:
    - labelSelector:
        matchLabels:
          k8s-app: kube-dns
      maxSkew: 1
      topologyKey: topology.kubernetes.io/zone
      whenUnsatisfiable: ScheduleAnyway
...
- coredns 애드온에 PDB(Pod Disruption Budget) 추가
- PDB는 두 개의 복제본 Pod가 있는 coredns와 같이 노드 종료 중에 동시에 작동이 중지되는 복제된 애플리케이션의 Pod 수를 제한
# "coredns" add-on v1.9.3-eksbuid.5 and v1.9.3-eksbuid.6
kubectl get pdb -n kube-system coredns
NAME    MIN AVAILABLE   MAX UNAVAILABLE  ALLOWED DISRUPTIONS   AGE
coredns 1               N/A              1                    13h

# "coredns" add-on v1.10.1-eksbuild.2 and v1.10.1-eksbuild.3
kubectl get pdb -n kube-system coredns
NAME    MIN AVAILABLE   MAX UNAVAILABLE  ALLOWED DISRUPTIONS   AGE
coredns N/A             1                1                     27h
- DNS 확인 실패를 최소화하기 위해 기본적으로 coreDNS 플러그인에 lameduck 옵션을 추가
- lameduck은 상태 엔드포인트가 여전히 200으로 응답하는 동안 DURATION초 동안 종료를 지연합니다.
- 플러그인에 lameduck을 추가하면 CoreDNS 포드 다시 시작(예: 상태 문제, 노드 종료 등으로 인해) 또는 배포 롤아웃 중에 DNS 확인 실패가 최소화됨
# CoreDNS 기본 정보 확인
kubectl get cm -n kube-system coredns -o yaml | kubectl neat
data:
  Corefile: |
    .:53 {
        errors
        health {
            lameduck 5s
          }
        ready
        kubernetes cluster.local in-addr.arpa ip6.arpa {
          pods insecure
          fallthrough in-addr.arpa ip6.arpa
        }
        prometheus :9153
        forward . /etc/resolv.conf
        cache 30
        loop
        reload
        loadbalance
    }
- CoreDNS의 readinessProbe 에서 /health 대신 /ready를 사용
#
kubectl get deploy coredns -n kube-system -o yaml | kubectl neat
...
      readinessProbe:
        failureThreshold: 3
        httpGet:
          path: /ready
          port: 8181
          scheme: HTTP
        periodSeconds: 10
        successThreshold: 1
        timeoutSeconds: 1
...

# The “ready” plugin is already part of the “coredns” ConfigMap:
kubectl get cm -n kube-system coredns -o yaml | kubectl neat
data:
  Corefile: |
    .:53 {
        errors
        health {
            lameduck 5s
          }
        ready
        kubernetes cluster.local in-addr.arpa ip6.arpa {
          pods insecure
          fallthrough in-addr.arpa ip6.arpa
        }
        prometheus :9153
        forward . /etc/resolv.conf
        cache 30
        loop
        reload
        loadbalance
    }
- EKS 관리형 Add-On Pod에 대한 라벨 설정
# 파드 Labels 확인
kubectl get deploy coredns -n kube-system -o yaml | kubectl neat

# pod labels
aws eks describe-addon-configuration --addon-name coredns --addon-version v1.10.1-eksbuild.3 \
  --query 'configurationSchema' --output text | jq . | grep -A4 '\"podLabels\"'
        "podLabels": {
          "properties": {},
          "title": "The podLabels Schema",
          "type": "object"
        },

# YAML configuration blob
cat << EOT > podLabels.yaml
podLabels:
  foo: bar
EOT

# apply changes : 적용 시 coredns 파드 재시작됨
aws eks update-addon --cluster-name $CLUSTER_NAME --addon-name coredns --configuration-values 'file://podLabels.yaml'
watch -d kubectl get pod -n kube-system

# wait a while until the add-on is ACTIVE again
aws eks describe-addon --cluster-name $CLUSTER_NAME --addon-name coredns

# 파드 Labels 확인
kubectl get deploy coredns -n kube-system -o yaml | kubectl neat
kubectl get pod -n kube-system -l foo=bar
kubectl get po -n kube-system -l=k8s-app=kube-dns -o custom-columns="POD-NAME":.metadata.name,"POD-LABELS":.metadata.labels
10. Topology Aware Routing
☞ 네트워크 트래픽을 원래 발생한 영역 내에 유지하는 데 도움이 되는 메커니즘을 제공 - Ref. Link
( Kubernetes 1.27 이전에는 이 기능을 토폴로지 인식 힌트 라고 지칭함 )
☞ 토폴로지 인식 라우팅은 트래픽이 시작된 구역에 트래픽을 유지하는 것을 선호하도록 라우팅 동작을 조정합니다.
어떤 경우에는 비용을 절감하거나 네트워크 성능을 개선하는 데 도움이 될 수 있습니다.
▶ 테스트를 위한 디플로이먼트와 서비스 배포
# 현재 노드 AZ 배포 확인
kubectl get node --label-columns=topology.kubernetes.io/zone
NAME                                               STATUS   ROLES    AGE   VERSION                ZONE
ip-192-168-1-225.ap-northeast-2.compute.internal   Ready    <none>   70m   v1.24.11-eks-a59e1f0   ap-northeast-2a
ip-192-168-2-248.ap-northeast-2.compute.internal   Ready    <none>   70m   v1.24.11-eks-a59e1f0   ap-northeast-2b
ip-192-168-3-228.ap-northeast-2.compute.internal   Ready    <none>   70m   v1.24.11-eks-a59e1f0   ap-northeast-2c

# 테스트를 위한 디플로이먼트와 서비스 배포
cat <<EOF | kubectl apply -f -
apiVersion: apps/v1
kind: Deployment
metadata:
  name: deploy-echo
spec:
  replicas: 3
  selector:
    matchLabels:
      app: deploy-websrv
  template:
    metadata:
      labels:
        app: deploy-websrv
    spec:
      terminationGracePeriodSeconds: 0
      containers:
      - name: websrv
        image: registry.k8s.io/echoserver:1.5
        ports:
        - containerPort: 8080
---
apiVersion: v1
kind: Service
metadata:
  name: svc-clusterip
spec:
  ports:
    - name: svc-webport
      port: 80
      targetPort: 8080
  selector:
    app: deploy-websrv
  type: ClusterIP
EOF

# 확인
kubectl get deploy,svc,ep,endpointslices
kubectl get pod -owide
kubectl get svc,ep svc-clusterip
kubectl get endpointslices -l kubernetes.io/service-name=svc-clusterip
kubectl get endpointslices -l kubernetes.io/service-name=svc-clusterip -o yaml

# 접속 테스트를 수행할 클라이언트 파드 배포
cat <<EOF | kubectl apply -f -
apiVersion: v1
kind: Pod
metadata:
  name: netshoot-pod
spec:
  containers:
  - name: netshoot-pod
    image: nicolaka/netshoot
    command: ["tail"]
    args: ["-f", "/dev/null"]
  terminationGracePeriodSeconds: 0
EOF

# 확인
kubectl get pod -owide
[ 실행결과 - 한 눈에 보기 ]

▶ 테스트 파드(netshoot-pod)에서 ClusterIP 접속 시 부하분산 확인 : AZ(zone) 상관없이 랜덤 확률 부하분산 동작
# 디플로이먼트 파드가 배포된 AZ(zone) 확인
kubectl get pod -l app=deploy-websrv -owide

# 테스트 파드(netshoot-pod)에서 ClusterIP 접속 시 부하분산 확인
kubectl exec -it netshoot-pod -- curl svc-clusterip | grep Hostname
Hostname: deploy-echo-7f67d598dc-h9vst

kubectl exec -it netshoot-pod -- curl svc-clusterip | grep Hostname
Hostname: deploy-echo-7f67d598dc-45trg

# 100번 반복 접속 : 3개의 파드로 AZ(zone) 상관없이 랜덤 확률 부하분산 동작
kubectl exec -it netshoot-pod -- zsh -c "for i in {1..100}; do curl -s svc-clusterip | grep Hostname; done | sort | uniq -c | sort -nr"
  35 Hostname: deploy-echo-7f67d598dc-45trg
  33 Hostname: deploy-echo-7f67d598dc-hg995
  32 Hostname: deploy-echo-7f67d598dc-h9vst
[ 실행 결과 - 한 눈에 보기 ] * hints 설정 전 상황
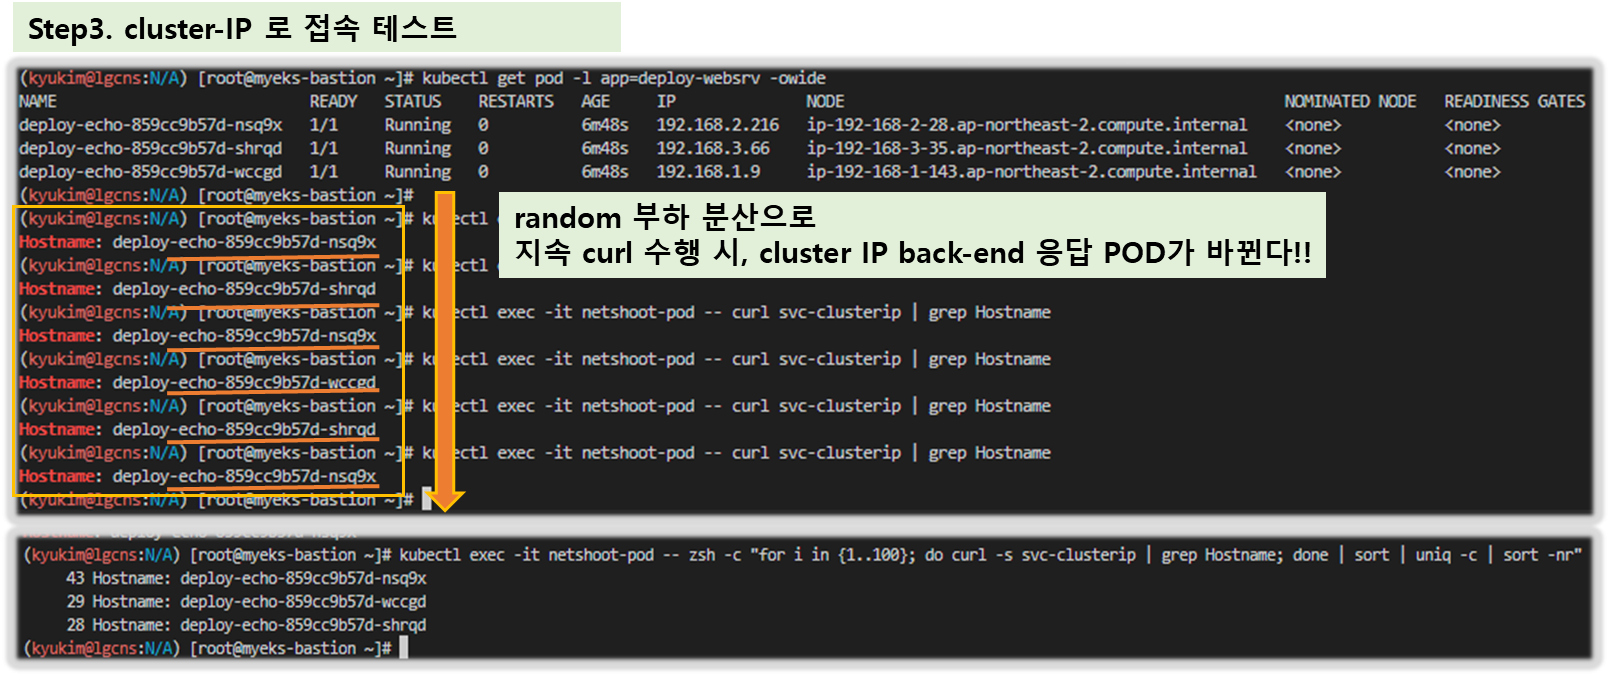


(심화) IPTables 정책 확인 : ClusterIP는 KUBE-SVC-Y → KUBE-SEP-Z… (3곳)
⇒ 즉, 3개의 파드로 랜덤 확률 부하분산 동작
#
ssh ec2-user@$N1 sudo iptables -t nat -nvL
ssh ec2-user@$N1 sudo iptables -v --numeric --table nat --list PREROUTING
ssh ec2-user@$N1 sudo iptables -v --numeric --table nat --list KUBE-SERVICES
  305 18300 KUBE-SVC-KBDEBIL6IU6WL7RF  tcp  --  *      *       0.0.0.0/0            10.100.155.216       /* default/svc-clusterip:svc-webport cluster IP */ tcp dpt:80
  ...

# 노드1에서 SVC 정책 확인 : SEP(Endpoint) 파드 3개 확인 >> 즉, 3개의 파드로 랜덤 확률 부하분산 동작
ssh ec2-user@$N1 sudo iptables -v --numeric --table nat --list KUBE-SVC-KBDEBIL6IU6WL7RF
Chain KUBE-SVC-KBDEBIL6IU6WL7RF (1 references)
 pkts bytes target     prot opt in     out     source               destination
  108  6480 KUBE-SEP-WC4ARU3RZJKCUD7M  all  --  *      *       0.0.0.0/0            0.0.0.0/0            /* default/svc-clusterip:svc-webport -> 192.168.1.240:8080 */ statistic mode random probability 0.33333333349
  115  6900 KUBE-SEP-3HFAJH523NG6SBCX  all  --  *      *       0.0.0.0/0            0.0.0.0/0            /* default/svc-clusterip:svc-webport -> 192.168.2.36:8080 */ statistic mode random probability 0.50000000000
   82  4920 KUBE-SEP-H37XIVQWZO52OMNP  all  --  *      *       0.0.0.0/0            0.0.0.0/0            /* default/svc-clusterip:svc-webport -> 192.168.3.13:8080 */

# 노드2에서 동일한 SVC 이름 정책 확인 : 상동
ssh ec2-user@$N2 sudo iptables -v --numeric --table nat --list KUBE-SVC-KBDEBIL6IU6WL7RF
(상동)

# 노드3에서 동일한 SVC 이름 정책 확인 : 상동
ssh ec2-user@$N3 sudo iptables -v --numeric --table nat --list KUBE-SVC-KBDEBIL6IU6WL7RF
(상동)

# 3개의 SEP는 각각 개별 파드 접속 정보
ssh ec2-user@$N1 sudo iptables -v --numeric --table nat --list KUBE-SEP-WC4ARU3RZJKCUD7M
Chain KUBE-SEP-WC4ARU3RZJKCUD7M (1 references)
 pkts bytes target     prot opt in     out     source               destination
    0     0 KUBE-MARK-MASQ  all  --  *      *       192.168.1.240        0.0.0.0/0            /* default/svc-clusterip:svc-webport */
  108  6480 DNAT       tcp  --  *      *       0.0.0.0/0            0.0.0.0/0            /* default/svc-clusterip:svc-webport */ tcp to:192.168.1.240:8080

ssh ec2-user@$N1 sudo iptables -v --numeric --table nat --list KUBE-SEP-3HFAJH523NG6SBCX
Chain KUBE-SEP-3HFAJH523NG6SBCX (1 references)
 pkts bytes target     prot opt in     out     source               destination
    0     0 KUBE-MARK-MASQ  all  --  *      *       192.168.2.36         0.0.0.0/0            /* default/svc-clusterip:svc-webport */
  115  6900 DNAT       tcp  --  *      *       0.0.0.0/0            0.0.0.0/0            /* default/svc-clusterip:svc-webport */ tcp to:192.168.2.36:8080

ssh ec2-user@$N1 sudo iptables -v --numeric --table nat --list KUBE-SEP-H37XIVQWZO52OMNP
Chain KUBE-SEP-H37XIVQWZO52OMNP (1 references)
 pkts bytes target     prot opt in     out     source               destination
    0     0 KUBE-MARK-MASQ  all  --  *      *       192.168.3.13         0.0.0.0/0            /* default/svc-clusterip:svc-webport */
   82  4920 DNAT       tcp  --  *      *       0.0.0.0/0            0.0.0.0/0            /* default/svc-clusterip:svc-webport */ tcp to:192.168.3.13:8080
▶ Topology Mode(구 Aware Hint) 설정 후 테스트 파드(netshoot-pod)에서 ClusterIP 접속 시 부하분산 확인
: 같은 AZ(zone)의 목적지 파드로만 접속
- 힌트는 엔드포인트가 트래픽을 제공해야 하는 영역을 설명합니다. 그런 다음 적용된 힌트kube-proxy 에 따라 영역에서 엔드포인트로 트래픽을 라우팅.
When topology aware routing is enabled and implemented on a Kubernetes Service, the EndpointSlice controller will proportionally allocate endpoints to the different zones that your cluster is spread across. For each of those endpoints, the EndpointSlice controller will also set a hint for the zone. Hints describe which zone an endpoint should serve traffic for. kube-proxy will then route traffic from a zone to an endpoint based on the hints that get applied.

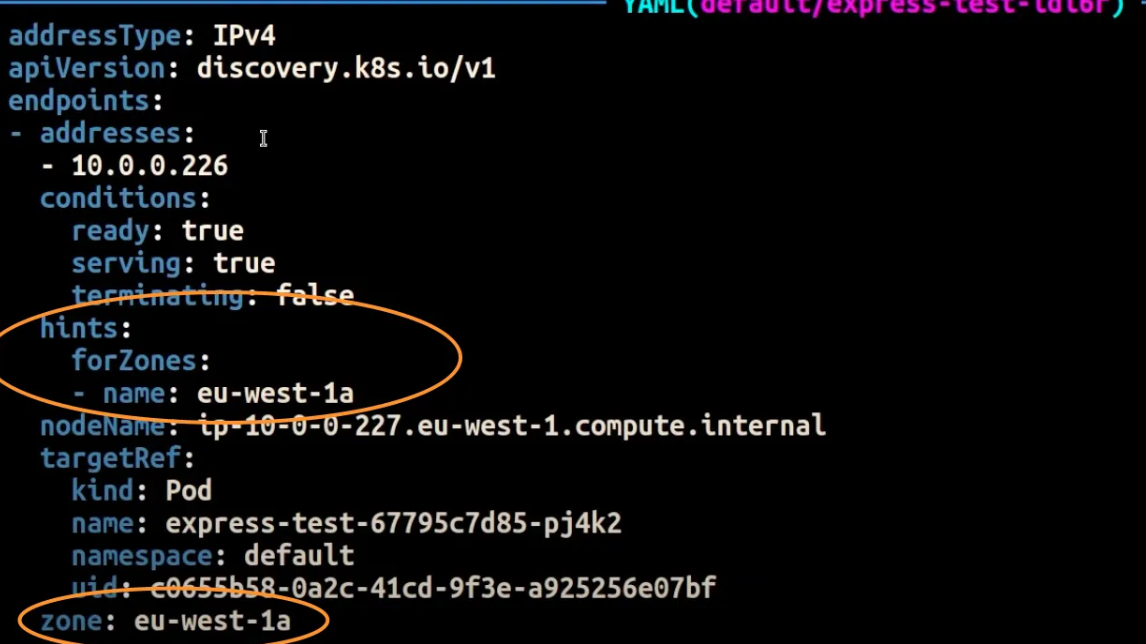
# Topology Aware Routing 설정 : 서비스에 annotate에 아래처럼 추가
kubectl annotate service svc-clusterip "service.kubernetes.io/topology-mode=auto"

# 100번 반복 접속 : 테스트 파드(netshoot-pod)와 같은 AZ(zone)의 목적지 파드로만 접속
kubectl exec -it netshoot-pod -- zsh -c "for i in {1..100}; do curl -s svc-clusterip | grep Hostname; done | sort | uniq -c | sort -nr"
  100 Hostname: deploy-echo-7f67d598dc-45trg

# endpointslices 확인 시, 기존에 없던 hints 가 추가되어 있음 >> 참고로 describe로는 hints 정보가 출력되지 않음
kubectl get endpointslices -l kubernetes.io/service-name=svc-clusterip -o yaml
apiVersion: v1
items:
- addressType: IPv4
  apiVersion: discovery.k8s.io/v1
  endpoints:
  - addresses:
    - 192.168.3.13
    conditions:
      ready: true
      serving: true
      terminating: false
    hints:
      forZones:
      - name: ap-northeast-2c
    nodeName: ip-192-168-3-228.ap-northeast-2.compute.internal
    targetRef:
      kind: Pod
      name: deploy-echo-7f67d598dc-hg995
      namespace: default
      uid: c1ce0e9c-14e7-417d-a1b9-2dfd54da8d4a
    zone: ap-northeast-2c
  - addresses:
    - 192.168.2.65
    conditions:
      ready: true
      serving: true
      terminating: false
    hints:
      forZones:
      - name: ap-northeast-2b
    nodeName: ip-192-168-2-248.ap-northeast-2.compute.internal
    targetRef:
      kind: Pod
      name: deploy-echo-7f67d598dc-h9vst
      namespace: default
      uid: 77af6a1b-c600-456c-96f3-e1af621be2af
    zone: ap-northeast-2b
  - addresses:
    - 192.168.1.240
    conditions:
      ready: true
      serving: true
      terminating: false
    hints:
      forZones:
      - name: ap-northeast-2a
    nodeName: ip-192-168-1-225.ap-northeast-2.compute.internal
    targetRef:
      kind: Pod
      name: deploy-echo-7f67d598dc-45trg
      namespace: default
      uid: 53ca3ac7-b9fb-4d98-a3f5-c312e60b1e67
    zone: ap-northeast-2a
  kind: EndpointSlice
...
[ 실행 결과 - 한 눈에 보기 ] * hints 설정 후 상황

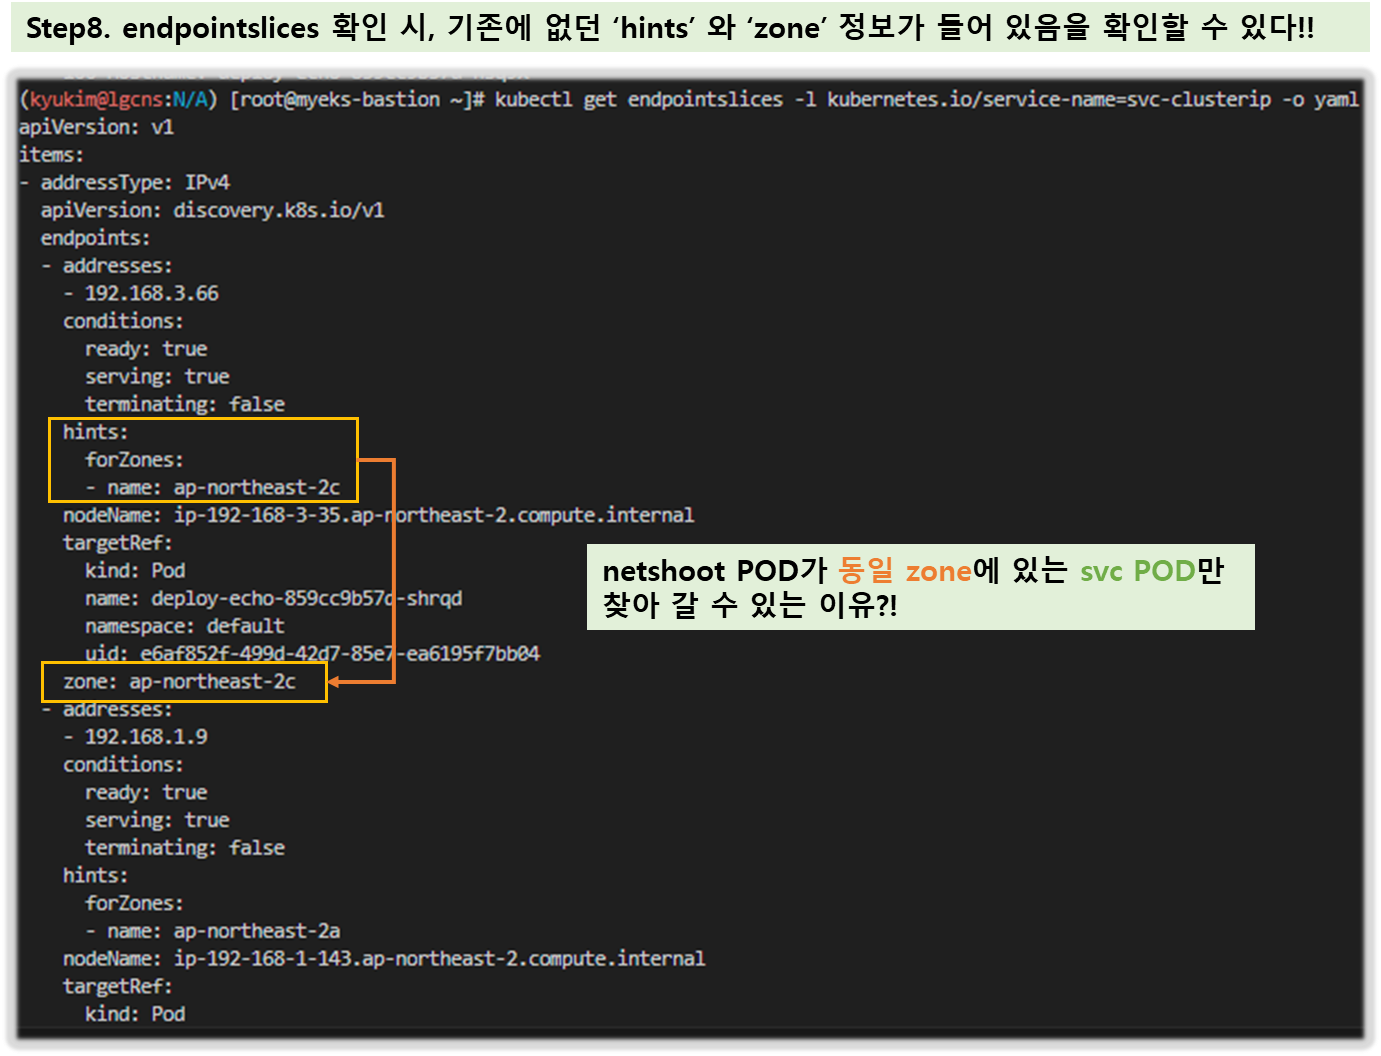
(심화) IPTables 정책 확인 : ClusterIP는 KUBE-SVC-Y → KUBE-SEP-Z… (1곳, 해당 노드와 같은 AZ에 배포된 파드만 출력) ⇒ 동일 AZ간 접속
ssh ec2-user@$N1 sudo iptables -v --numeric --table nat --list KUBE-SERVICES

# 노드1에서 SVC 정책 확인 : SEP(Endpoint) 파드 1개 확인(해당 노드와 같은 AZ에 배포된 파드만 출력) >> 동일 AZ간 접속
ssh ec2-user@$N1 sudo iptables -v --numeric --table nat --list KUBE-SVC-KBDEBIL6IU6WL7RF
Chain KUBE-SVC-KBDEBIL6IU6WL7RF (1 references)
 pkts bytes target     prot opt in     out     source               destination
    0     0 KUBE-SEP-WC4ARU3RZJKCUD7M  all  --  *      *       0.0.0.0/0            0.0.0.0/0            /* default/svc-clusterip:svc-webport -> 192.168.1.240:8080 */

# 노드2에서 SVC 정책 확인 : SEP(Endpoint) 파드 1개 확인(해당 노드와 같은 AZ에 배포된 파드만 출력) >> 동일 AZ간 접속
ssh ec2-user@$N2 sudo iptables -v --numeric --table nat --list KUBE-SVC-KBDEBIL6IU6WL7RF
Chain KUBE-SVC-KBDEBIL6IU6WL7RF (1 references)
 pkts bytes target     prot opt in     out     source               destination
    0     0 KUBE-SEP-3HFAJH523NG6SBCX  all  --  *      *       0.0.0.0/0            0.0.0.0/0            /* default/svc-clusterip:svc-webport -> 192.168.2.36:8080 */

# 노드3에서 SVC 정책 확인 : SEP(Endpoint) 파드 1개 확인(해당 노드와 같은 AZ에 배포된 파드만 출력) >> 동일 AZ간 접속
ssh ec2-user@$N3 sudo iptables -v --numeric --table nat --list KUBE-SVC-KBDEBIL6IU6WL7RF
Chain KUBE-SVC-KBDEBIL6IU6WL7RF (1 references)
 pkts bytes target     prot opt in     out     source               destination
    0     0 KUBE-SEP-H37XIVQWZO52OMNP  all  --  *      *       0.0.0.0/0            0.0.0.0/0            /* default/svc-clusterip:svc-webport -> 192.168.3.13:8080 */
[ 실행 결과 - 한 눈에 보기 ]
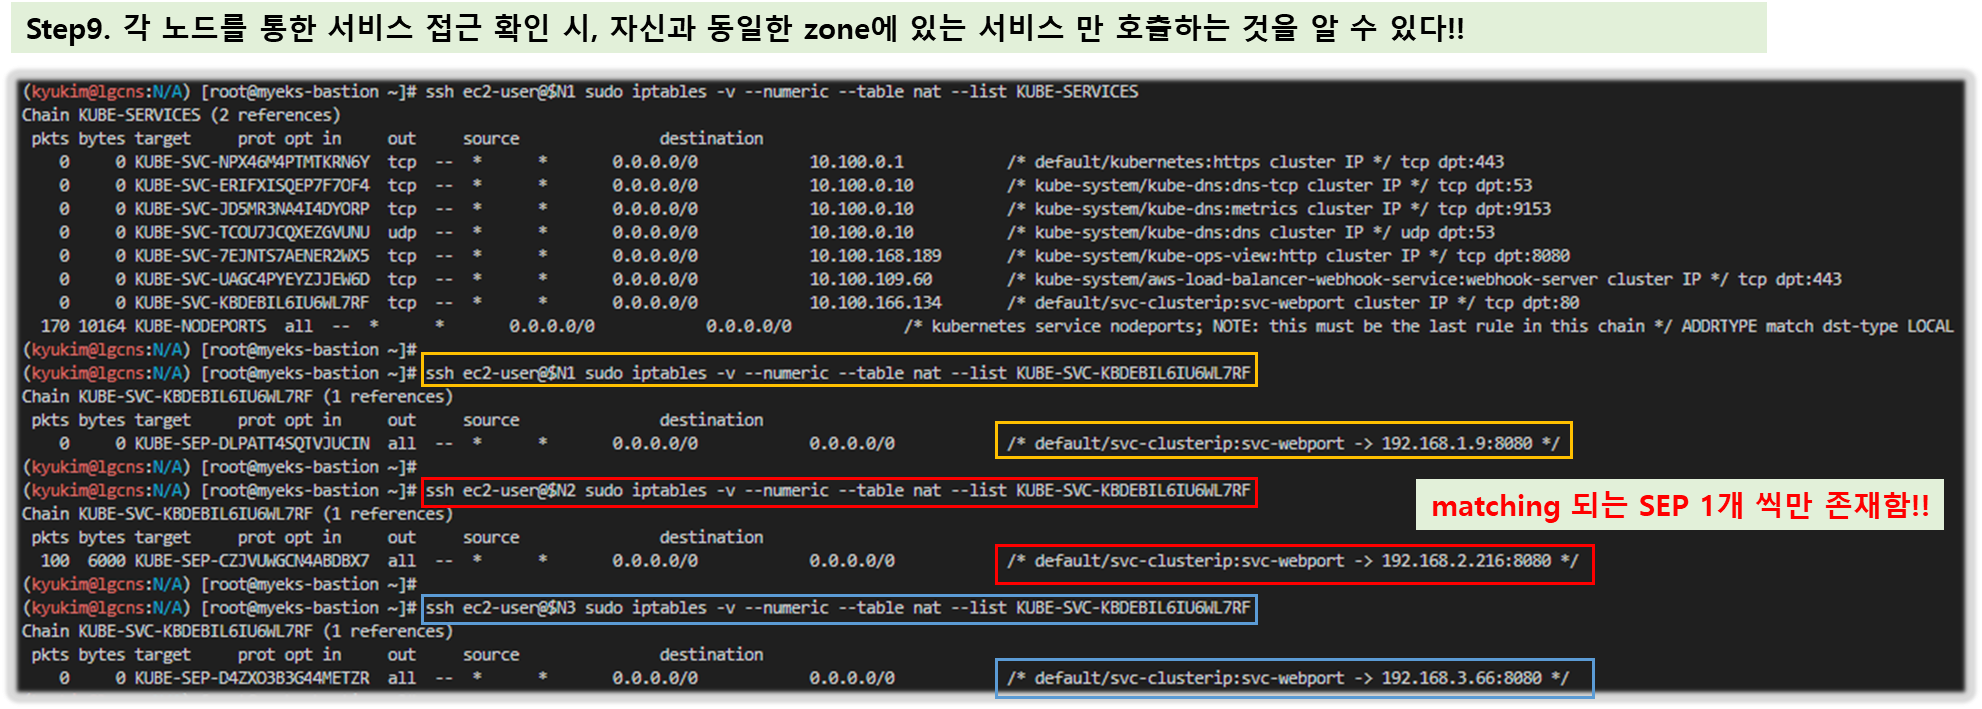
(추가 테스트) 만약 파드 갯수를 1개로 줄여서 같은 AZ에 목적지 파드가 없을 경우?
# 파드 갯수를 1개로 줄이기
kubectl scale deployment deploy-echo --replicas 1
# 동일 AZ일 경우 0 -> 1 시도
kubectl scale deployment deploy-echo --replicas 0
kubectl scale deployment deploy-echo --replicas 1

# 파드 AZ 확인 : 아래 처럼 현재 다른 AZ에 배포
kubectl get pod -owide
NAME                           READY   STATUS    RESTARTS   AGE   IP              NODE                                               NOMINATED NODE   READINESS GATES
deploy-echo-7f67d598dc-h9vst   1/1     Running   0          18m   192.168.2.65    ip-192-168-2-248.ap-northeast-2.compute.internal   <none>           <none>
netshoot-pod                   1/1     Running   0          66m   192.168.1.137   ip-192-168-1-225.ap-northeast-2.compute.internal   <none>           <none>

# 100번 반복 접속 : 다른 AZ이지만 목적지파드로 접속됨!
kubectl exec -it netshoot-pod -- zsh -c "for i in {1..100}; do curl -s svc-clusterip | grep Hostname; done | sort | uniq -c | sort -nr"
  100 Hostname: deploy-echo-7f67d598dc-h9vst


ssh ec2-user@$N1 sudo iptables -v --numeric --table nat --list KUBE-SERVICES

# 아래 3개 노드 모두 SVC에 1개의 SEP 정책 존재
ssh ec2-user@$N1 sudo iptables -v --numeric --table nat --list KUBE-SVC-KBDEBIL6IU6WL7RF
Chain KUBE-SVC-KBDEBIL6IU6WL7RF (1 references)
 pkts bytes target     prot opt in     out     source               destination
  100  6000 KUBE-SEP-XFCOE5ZRIDUONHHN  all  --  *      *       0.0.0.0/0            0.0.0.0/0            /* default/svc-clusterip:svc-webport -> 192.168.2.65:8080 */

ssh ec2-user@$N2 sudo iptables -v --numeric --table nat --list KUBE-SVC-KBDEBIL6IU6WL7RF
Chain KUBE-SVC-KBDEBIL6IU6WL7RF (1 references)
 pkts bytes target     prot opt in     out     source               destination
    0     0 KUBE-SEP-XFCOE5ZRIDUONHHN  all  --  *      *       0.0.0.0/0            0.0.0.0/0            /* default/svc-clusterip:svc-webport -> 192.168.2.65:8080 */

ssh ec2-user@$N3 sudo iptables -v --numeric --table nat --list KUBE-SVC-KBDEBIL6IU6WL7RF
Chain KUBE-SVC-KBDEBIL6IU6WL7RF (1 references)
 pkts bytes target     prot opt in     out     source               destination
    0     0 KUBE-SEP-XFCOE5ZRIDUONHHN  all  --  *      *       0.0.0.0/0            0.0.0.0/0            /* default/svc-clusterip:svc-webport -> 192.168.2.65:8080 */

# endpointslices 확인 : hint 정보 없음
kubectl get endpointslices -l kubernetes.io/service-name=svc-clusterip -o yaml
[ 실행 결과 - 한 눈에 보기 ]

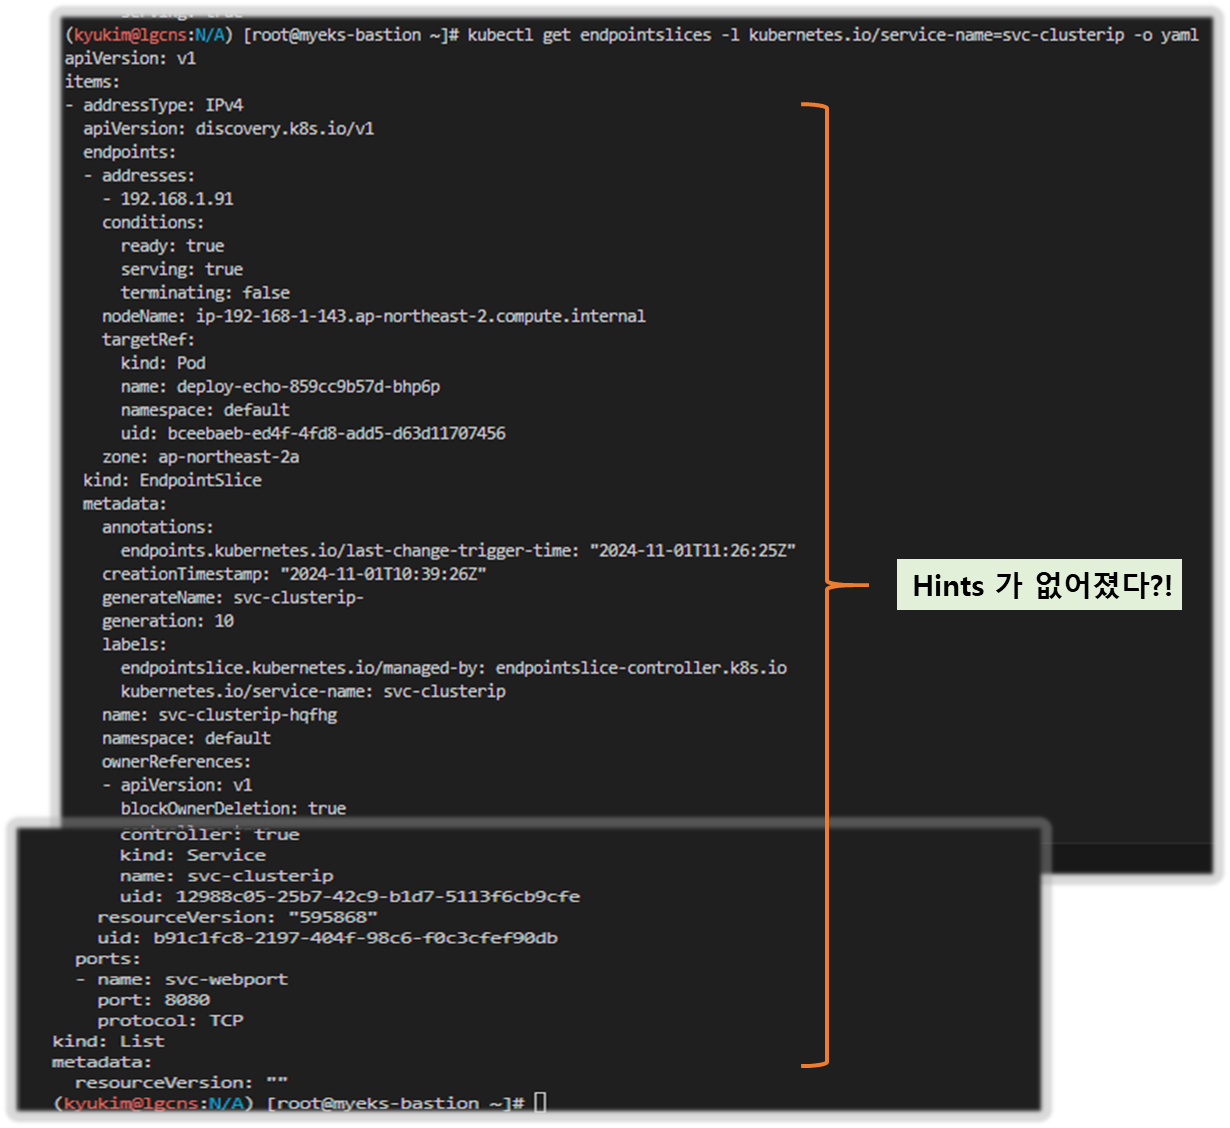
(참고) Topology Aware Hint 설정 제거
kubectl annotate service svc-clusterip "service.kubernetes.io/topology-mode-"
☆ 실습 리소스 삭제: kubectl delete deploy deploy-echo; kubectl delete svc svc-clusterip
11. Using AWS Load Balancer Controller for blue/green deployment, canary deployment and A/B testing
11-1. ALB 동작 소개
☞ Weighted target group 가중치가 적용된 대상 그룹
- AWS 고객이 블루/그린 및 카나리아 배포와 A/B 테스트 전략을 채택할 수 있도록 돕기 위해 AWS는 2019년 11월에 애플리케이션 로드 밸런서에 대한 가중 대상 그룹을 발표했습니다. 여러 대상 그룹을 리스너 규칙 의 동일한 전달 작업 에 연결 하고 각 그룹에 대한 가중치를 지정할 수 있습니다.
- 이를 통해 개발자는 트래픽을 여러 버전의 애플리케이션에 분산하는 방법을 제어할 수 있습니다. 예를 들어, 가중치가 8과 2인 두 개의 대상 그룹이 있는 규칙을 정의하면 로드 밸런서는 트래픽의 80%를 첫 번째 대상 그룹으로, 20%를 다른 대상 그룹으로 라우팅합니다.
☞ Advanced request routing 고급 요청 라우팅
- AWS는 가중치가 적용된 대상 그룹 외에도 2019년에 고급 요청 라우팅 기능을 발표했습니다 . 고급 요청 라우팅은 개발자에게 표준 및 사용자 지정 HTTP 헤더와 메서드, 요청 경로, 쿼리 문자열, 소스 IP 주소를 기반으로 규칙을 작성하고 트래픽을 라우팅할 수 있는 기능을 제공합니다.
- 이 새로운 기능은 라우팅을 위한 프록시 플릿의 필요성을 없애 애플리케이션 아키텍처를 간소화하고, 로드 밸런서에서 원치 않는 트래픽을 차단하며, A/B 테스트를 구현할 수 있도록 합니다.
☞ AWS Load Balancer Controller AWS 로드 밸런서 컨트롤러
- AWS Load Balancer Controller 는 Kubernetes 클러스터의 Elastic Load Balancer를 관리하는 데 도움이 되는 컨트롤러입니다. 애플리케이션 로드 밸런서를 프로비저닝하여 Kubernetes 인그레스 리소스를 충족합니다.
- Kubernetes 인그레스 객체에 주석을 추가하여 프로비저닝된 애플리케이션 로드 밸런서의 동작을 사용자 지정할 수 있습니다. 이를 통해 개발자는 애플리케이션 로드 밸런서를 구성하고 Kubernetes 기본 의미 체계를 사용하여 블루/그린, 카나리아 및 A/B 배포를 실현할 수 있습니다.
예를 들어, 다음 인그레스 주석은 애플리케이션 로드 밸런서를 구성하여 두 버전의 애플리케이션 간에 트래픽을 분할합니다.
annotations:
   ...
  alb.ingress.kubernetes.io/actions.blue-green: |
    {
      "type":"forward",
      "forwardConfig":{
        "targetGroups":[
          {
            "serviceName":"hello-kubernetes-v1",
            "servicePort":"80",
            "weight":50
          },
          {
            "serviceName":"hello-kubernetes-v2",
            "servicePort":"80",
            "weight":50
          }
        ]
      }
    }
11-2. 실습
▶ Deploy the sample application version 1 and version 2
- The sample application used here is hello-kubernetes. Deploy two versions of the applications with custom messages and set the service type to ClusterIP:
#
git clone https://github.com/paulbouwer/hello-kubernetes.git
tree hello-kubernetes/

# Install sample application version 1
helm install --create-namespace --namespace hello-kubernetes v1 \
  ./hello-kubernetes/deploy/helm/hello-kubernetes \
  --set message="You are reaching hello-kubernetes version 1" \
  --set ingress.configured=true \
  --set service.type="ClusterIP"

# Install sample application version 2
helm install --create-namespace --namespace hello-kubernetes v2 \
  ./hello-kubernetes/deploy/helm/hello-kubernetes \
  --set message="You are reaching hello-kubernetes version 2" \
  --set ingress.configured=true \
  --set service.type="ClusterIP"

# 확인
kubectl get-all -n hello-kubernetes
kubectl get pod,svc,ep -n hello-kubernetes
kubectl get pod -n hello-kubernetes --label-columns=app.kubernetes.io/instance,pod-template-hash
[ 실행 결과 - 한 눈에 보기 ]
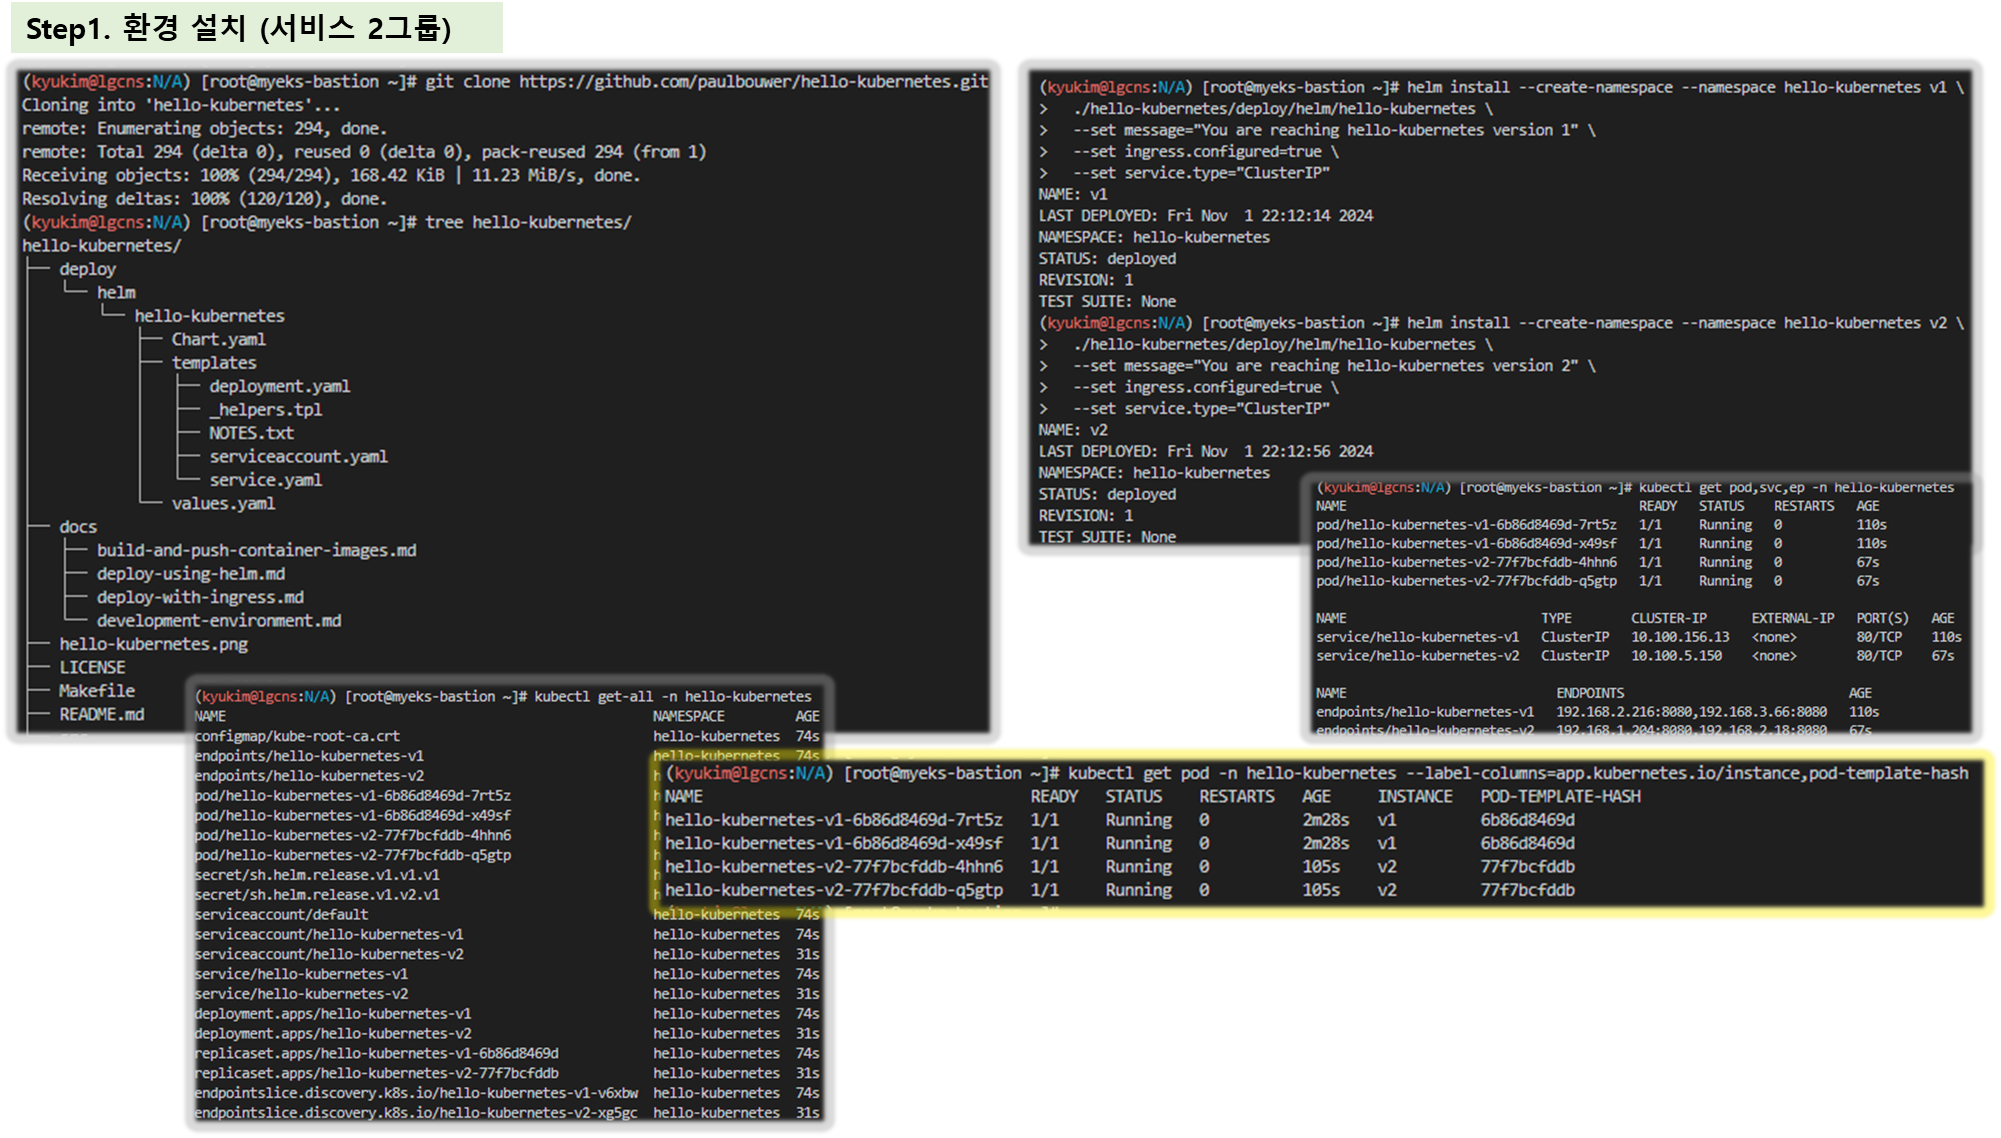
▶ Deploy ingress and test the blue/green deployment
- Ingress annotation alb.ingress.kubernetes.io/actions.${action-name} provides a method for configuring custom actions on the listener of an Application Load Balancer, such as redirect action, forward action. With forward action, multiple target groups with different weights can be defined in the annotation. AWS Load Balancer Controller provisions the target groups and configures the listener rules as per the annotation to direct the traffic. For example, the following ingress resource configures the Application Load Balancer to forward all traffic to hello-kubernetes-v1 service (weight: 100 vs. 0).
- Note, the action-name in the annotation must match the serviceName in the ingress rules, and servicePort must be use-annotation as in the previous code snippet.
#
cat <<EOF | kubectl apply -f -
apiVersion: networking.k8s.io/v1
kind: Ingress
metadata:
  name: "hello-kubernetes"
  namespace: "hello-kubernetes"
  annotations:
    alb.ingress.kubernetes.io/scheme: internet-facing
    alb.ingress.kubernetes.io/target-type: ip
    alb.ingress.kubernetes.io/actions.blue-green: |
      {
        "type":"forward",
        "forwardConfig":{
          "targetGroups":[
            {
              "serviceName":"hello-kubernetes-v1",
              "servicePort":"80",
              "weight":100
            },
            {
              "serviceName":"hello-kubernetes-v2",
              "servicePort":"80",
              "weight":0
            }
          ]
        }
      }
  labels:
    app: hello-kubernetes
spec:
  ingressClassName: alb
  rules:
    - http:
        paths:
          - path: /
            pathType: Prefix
            backend:
              service:
                name: blue-green
                port:
                  name: use-annotation
EOF

# 확인
kubectl get ingress -n hello-kubernetes
kubectl describe ingress -n hello-kubernetes
...
Rules:
  Host        Path  Backends
  ----        ----  --------
  *
              /     blue-green:use-annotation (<error: endpoints "blue-green" not found>)
Annotations:  alb.ingress.kubernetes.io/actions.blue-green:
                {
                  "type":"forward",
                  "forwardConfig":{
                    "targetGroups":[
                      {
                        "serviceName":"hello-kubernetes-v1",
                        "servicePort":"80",
                        "weight":100
                      },
                      {
                        "serviceName":"hello-kubernetes-v2",
                        "servicePort":"80",
                        "weight":0
...

# 반복 접속 확인
ELB_URL=$(kubectl get ingress -n hello-kubernetes -o=jsonpath='{.items[0].status.loadBalancer.ingress[0].hostname}')
while true; do curl -s $ELB_URL | grep version; sleep 1; done
  You are reaching hello-kubernetes version 1
  You are reaching hello-kubernetes version 1
  ...
[ 실행 결과 - 한 눈에 보기 ]
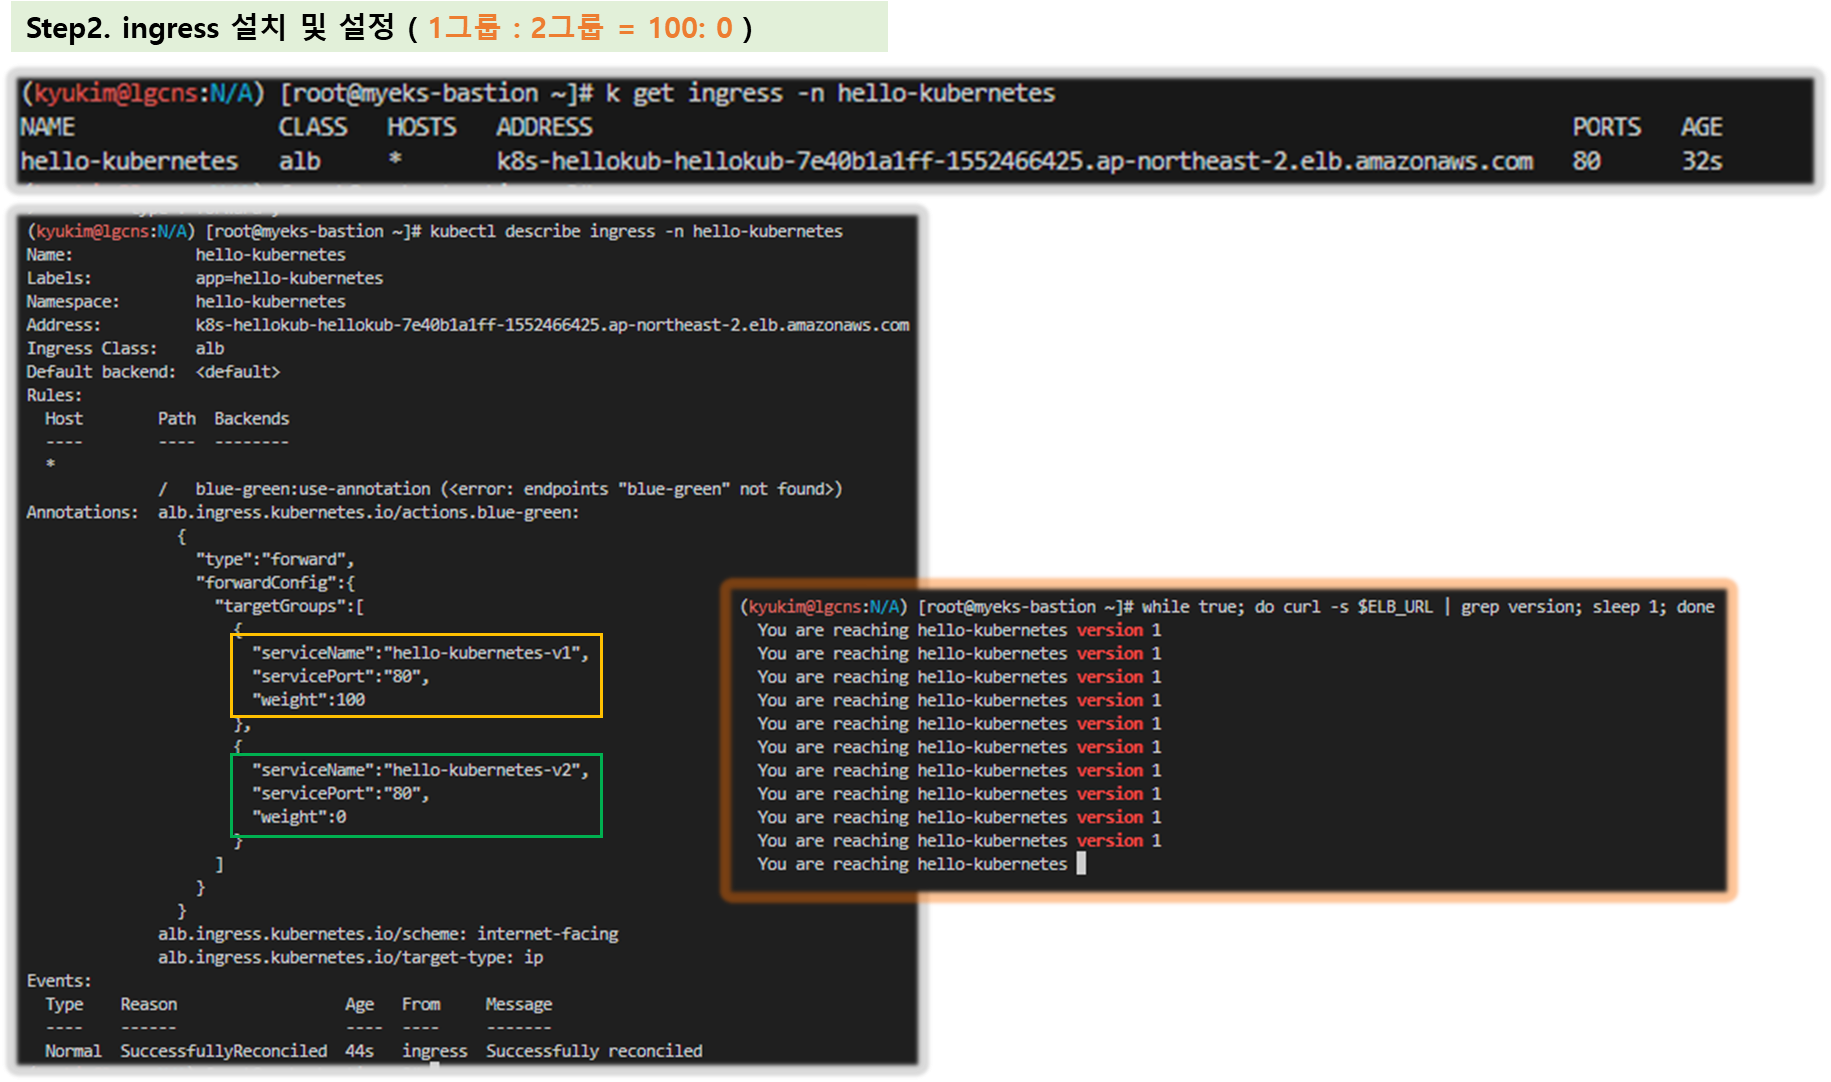
- ALB Listener rules 에서 2개의 Target group 확인(weight)
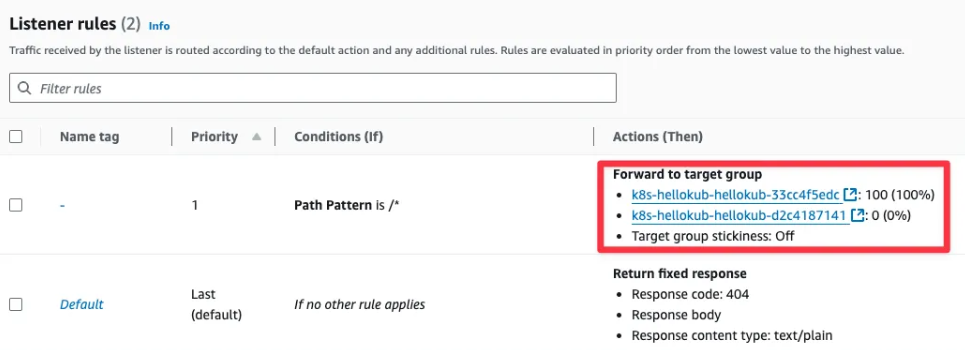
▶ Blue/green deployment
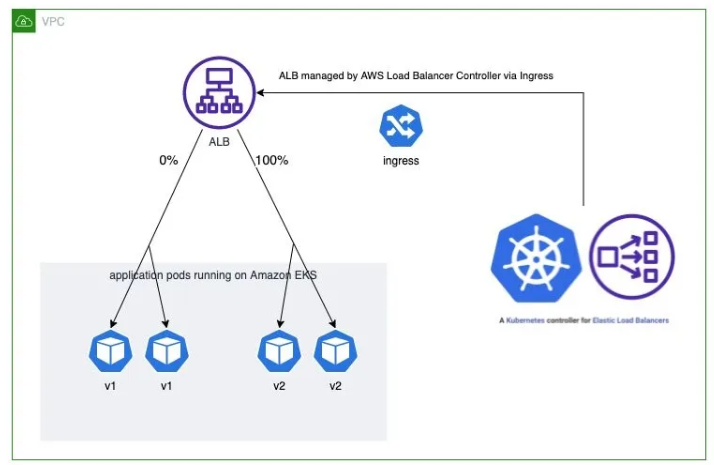
- To perform the blue/green deployment, update the ingress annotation to move all weight to version 2:
#
cat <<EOF | kubectl apply -f -
apiVersion: networking.k8s.io/v1
kind: Ingress
metadata:
  name: "hello-kubernetes"
  namespace: "hello-kubernetes"
  annotations:
    alb.ingress.kubernetes.io/scheme: internet-facing
    alb.ingress.kubernetes.io/target-type: ip
    alb.ingress.kubernetes.io/actions.blue-green: |
      {
        "type":"forward",
        "forwardConfig":{
          "targetGroups":[
            {
              "serviceName":"hello-kubernetes-v1",
              "servicePort":"80",
              "weight":0
            },
            {
              "serviceName":"hello-kubernetes-v2",
              "servicePort":"80",
              "weight":100
            }
          ]
        }
      }
  labels:
    app: hello-kubernetes
spec:
  ingressClassName: alb
  rules:
    - http:
        paths:
          - path: /
            pathType: Prefix
            backend:
              service:
                name: blue-green
                port:
                  name: use-annotation
EOF

# 확인
kubectl describe ingress -n hello-kubernetes

# 반복 접속 확인 : 적용에 약간의 시간 소요
ELB_URL=$(kubectl get ingress -n hello-kubernetes -o=jsonpath='{.items[0].status.loadBalancer.ingress[0].hostname}')
while true; do curl -s $ELB_URL | grep version; sleep 1; done
  You are reaching hello-kubernetes version 2
  You are reaching hello-kubernetes version 2
  ...
[ 실행 결과 - 한 눈에 보기 ]
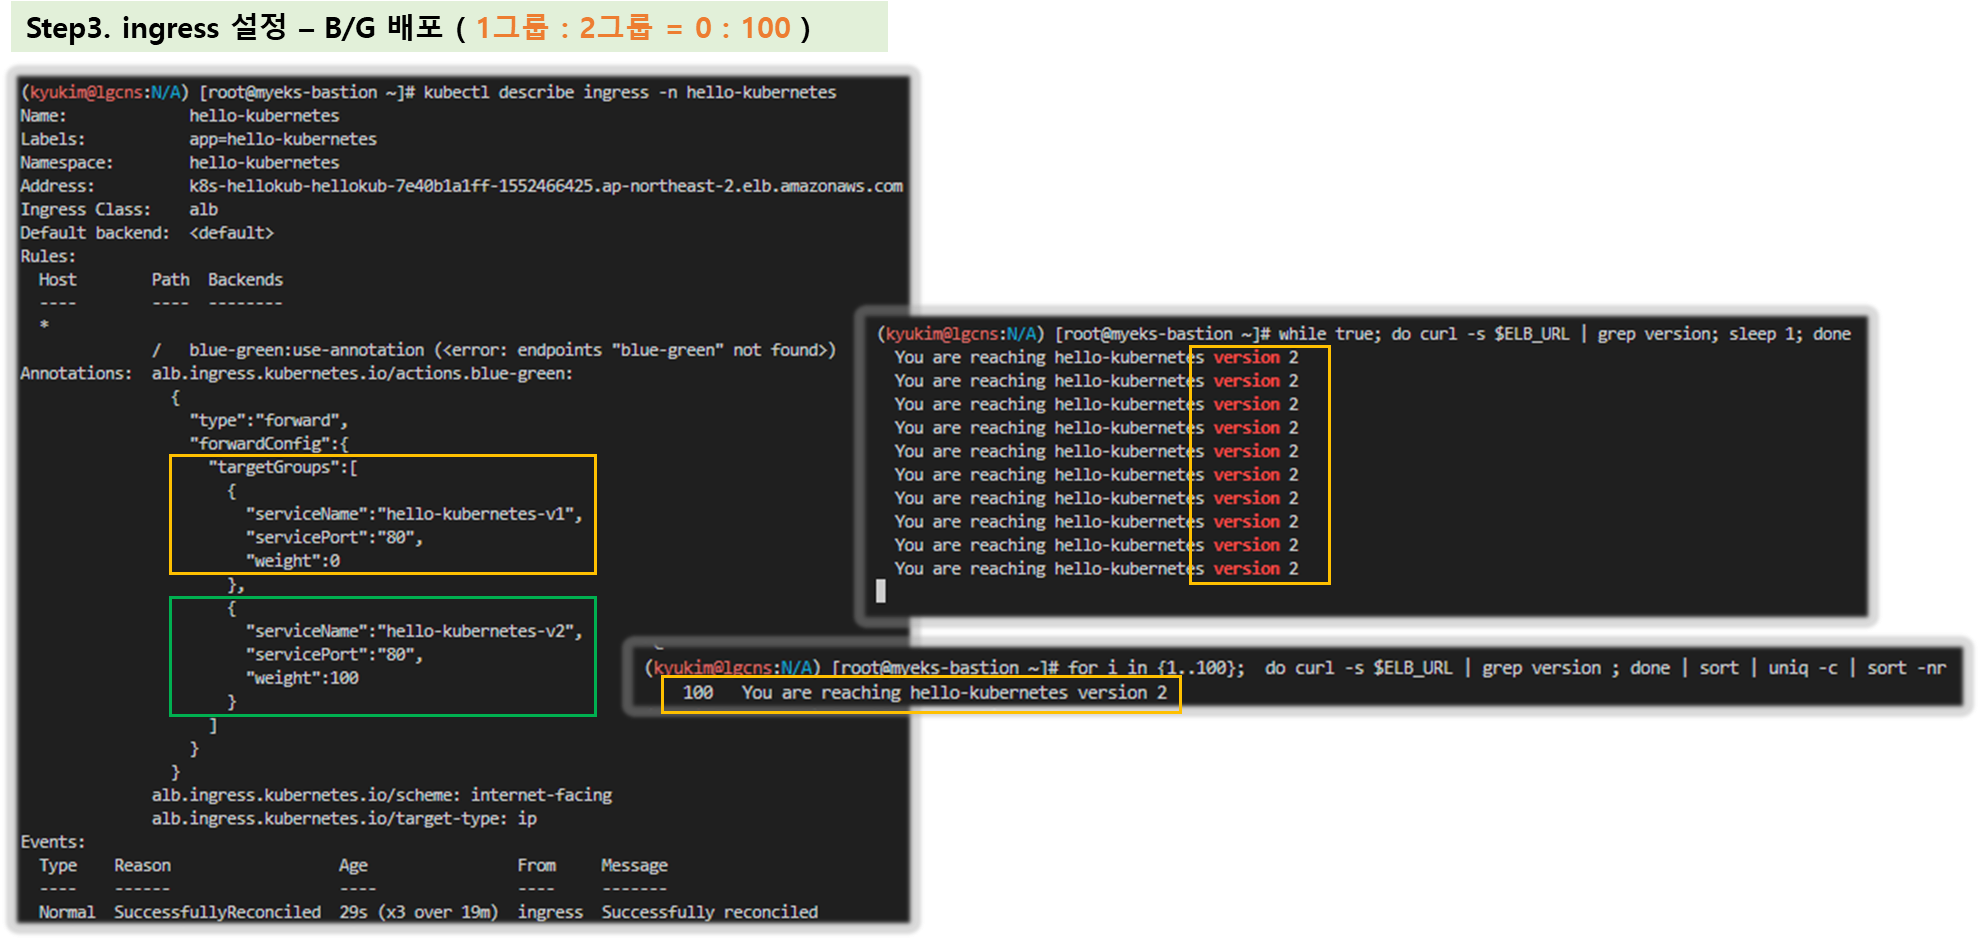
▶ Deploy Ingress and test the canary deployment
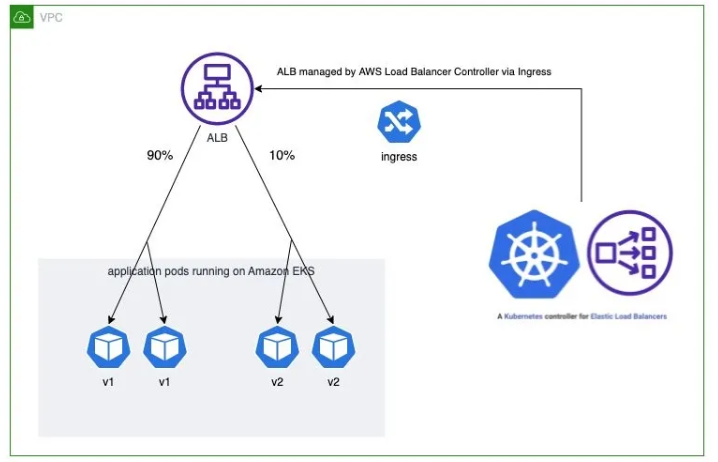
- Instead of moving all traffic to version 2, we can shift the traffic slowly towards version 2 by increasing the weight on version 2 step by step. This allows version 2 to be verified against a small portion of the production traffic before moving more traffic over. The following example shows that 10 percent of the traffic is shifted to version 2, while 90 percent of the traffic remains with version 1.
#
cat <<EOF | kubectl apply -f -
apiVersion: networking.k8s.io/v1
kind: Ingress
metadata:
  name: "hello-kubernetes"
  namespace: "hello-kubernetes"
  annotations:
    alb.ingress.kubernetes.io/scheme: internet-facing
    alb.ingress.kubernetes.io/target-type: ip
    alb.ingress.kubernetes.io/actions.blue-green: |
      {
        "type":"forward",
        "forwardConfig":{
          "targetGroups":[
            {
              "serviceName":"hello-kubernetes-v1",
              "servicePort":"80",
              "weight":90
            },
            {
              "serviceName":"hello-kubernetes-v2",
              "servicePort":"80",
              "weight":10
            }
          ]
        }
      }
  labels:
    app: hello-kubernetes
spec:
  ingressClassName: alb
  rules:
    - http:
        paths:
          - path: /
            pathType: Prefix
            backend:
              service:
                name: blue-green
                port:
                  name: use-annotation
EOF

# 확인
kubectl describe ingress -n hello-kubernetes

# 반복 접속 확인 : 적용에 약간의 시간 소요
ELB_URL=$(kubectl get ingress -n hello-kubernetes -o=jsonpath='{.items[0].status.loadBalancer.ingress[0].hostname}')
while true; do curl -s $ELB_URL | grep version; sleep 1; done

# 100번 접속
for i in {1..100};  do curl -s $ELB_URL | grep version ; done | sort | uniq -c | sort -nr
[ 실행 결과 - 한 눈에 보기 ]
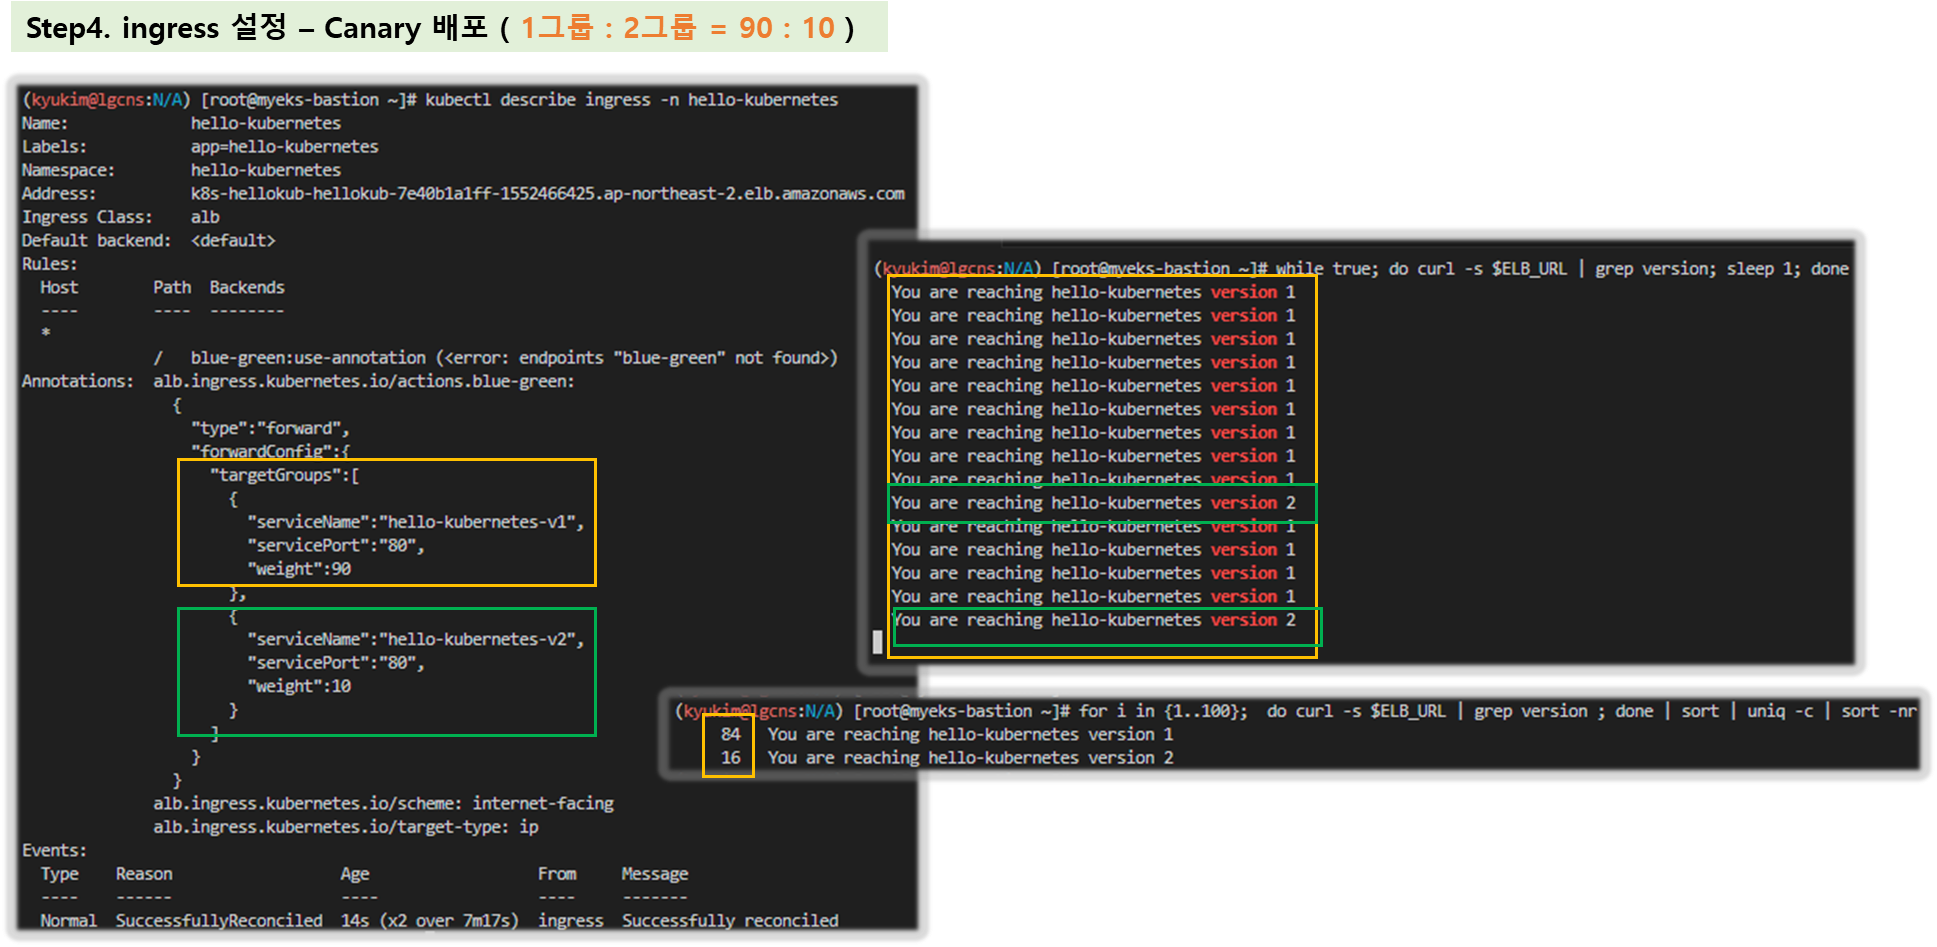
▶ Argo Rollouts
- When performing a canary deployment in a production environment, typically the traffic is shifted with small increments. Usually it is done with some level of automation behind it. Various performance monitoring systems can also be integrated into this process, making sure that every step of the way there are no errors, or the errors are below an acceptable threshold. This is where progressive delivery mechanisms such as Argo Rollouts are very beneficial.
- Argo Rollouts offers first class support for using the annotation-based traffic shaping abilities of AWS Load Balancer Controller to gradually shift traffic to the new version during an update. Additionally, Argo Rollouts can query and interpret metrics from various providers to verify key KPIs and drive automated promotion or rollback during an update. More information is available at Argo Rollouts integration with Application Load Balancer.
▶ Deploy ingress and test the A/B testing

- Ingress annotation alb.ingress.kubernetes.io/conditions.${conditions-name} provides a method for specifying routing conditions in addition to original host/path condition on ingress spec. The additional routing conditions can be based on http-header, http-request-method, query-string and source-ip. This provides developers multiple advanced routing options for their A/B testing implementation, without the need for setting up and managing a separate routing system, such as service mesh.
- AWS Load Balancer Controller configures the listener rules as per the annotation to direct a portion of incoming traffic to a specific backend. In the following example, all requests are directed to version 1 by default. The following ingress resource directs the traffic to version 2 when the request contains a custom HTTP header: HeaderName=HeaderValue1.
#
cat <<EOF | kubectl apply -f -
apiVersion: networking.k8s.io/v1
kind: Ingress
metadata:
  name: "hello-kubernetes"
  namespace: "hello-kubernetes"
  annotations:
    alb.ingress.kubernetes.io/scheme: internet-facing
    alb.ingress.kubernetes.io/target-type: ip
    alb.ingress.kubernetes.io/conditions.ab-testing: >
      [{"field":"http-header","httpHeaderConfig":{"httpHeaderName": "HeaderName", "values":["kans-study-end"]}}]
    alb.ingress.kubernetes.io/actions.ab-testing: >
      {"type":"forward","forwardConfig":{"targetGroups":[{"serviceName":"hello-kubernetes-v2","servicePort":80}]}}
  labels:
    app: hello-kubernetes
spec:
  ingressClassName: alb
  rules:
    - http:
        paths:
          - path: /
            pathType: Prefix
            backend:
              service:
                name: ab-testing
                port:
                  name: use-annotation
          - path: /
            pathType: Prefix
            backend:
              service:
                name: hello-kubernetes-v1
                port:
                  name: http
EOF

# 확인
kubectl describe ingress -n hello-kubernetes

# 반복 접속 확인 : 적용에 약간의 시간 소요
ELB_URL=$(kubectl get ingress -n hello-kubernetes -o=jsonpath='{.items[0].status.loadBalancer.ingress[0].hostname}')
while true; do curl -s $ELB_URL | grep version; sleep 1; done
...

while true; do curl -s -H "HeaderName: kans-study-end" $ELB_URL | grep version; sleep 1; done
...

# 100번 접속
for i in {1..100};  do curl -s $ELB_URL | grep version ; done | sort | uniq -c | sort -nr
for i in {1..100};  do curl -s -H "HeaderName: kans-study-end" $ELB_URL | grep version ; done | sort | uniq -c | sort -nr
[ 실행 결과 - 한 눈에 보기 ]


★ 자원 삭제
: kubectl delete ingress -n hello-kubernetes hello-kubernetes && kubectl delete ns hello-kubernetes
[ 자원정리 ]
▶ (실습 완료 후) 자원 삭제
☞ 한 줄 삭제 : 장점(1줄 명령어로 완전 삭제), 단점(삭제 실행과 완료까지 SSH 세션 유지 필요)
eksctl delete cluster --name $CLUSTER_NAME && aws cloudformation delete-stack --stack-name $CLUSTER_NAME[ 마무리 ]
드디어 KANS 마지막 수업이 끝났습니다. ^0^/
이번 과정을 통해 AWS 환경에서 Ingress 동작과 VPC CNI 의 역할에 대해 상세히 살펴보고 경험해 볼 수 있었습니다.
휘유.. 아직도 갈길이 멀다는 것이 느껴집니다. 다만.. 막연히 아무것도 안하고 걱정만 하는 단계를 벗어 날 수 있어서 무엇보다 뜻깊은 시간 이었던 것 같습니다.
과정 과정이 무척 숨가쁘게 돌아갔는데.. 돌아보니 '참 많은 것 들을 보고 배울 수 있었구나!!' 라는 생각이 듭니다. 업무하랴, 주말에 공부하랴, 숙제하랴... 다시 학창시절로 돌아가도 이처럼 빠듯하게 시간을 사용할 수 없을 것 같습니다. ㅎㅎ;;
처음으로 참여한 학습 모임이었는데, 가시다님 덕분에 시야가 많이 넓어 진듯하여 감사하다는 말씀 올립니다.
또한, 함께 달려온 학습 동기분들이 있어서 힘이 되었습니다.
혹시 이 글을 보시는 분 들도 눈팅만 하지 마시고 용기내서 학습에 도전해 보세요~
[ 도움이 되는 링크 모음 ]
[ AWS Docs & External-DNS ]
▷ AWS EKS Docs - Link
- Quickstart: Deploy a web app and store data - Link
- Configure networking - Link
- Workloads - Link
- Enable EKS Zonal Shift to avoid impaired Availability Zones - Link
- Learn about Amazon Application Recovery Controller’s (ARC) Zonal Shift in Amazon EKS - Link
▷ EKS Workshop - Link
- Amazon VPC CNI - Link
- Network Policies - Link
- Security Groups for Pods - Link
- Custom Networking - Link
- Prefix Delegation - Link
- Amazon VPC Lattice - Link
▷ AWS Load Balancer Controller - Link
- How it works - Link
- Deployment
- Guide
- Ingress
- Service
- TargetGroupBinding
- Tasks
- SSL Redirect - Link
- Use Cases
▷ External-DNS - Link
▷ AWS EKS Best Practices Guide - Link
- Network - Link**
- VPC and Subnet Considerations - Link
- Amazon VPC CNI - Link*
- Optimizing IP Address Utilization - Link
- Custom Networking - Link
- Prefix Mode for Linux - Link
- Security Groups Per Pod - Link
- Load Balancing - Link
- Monitoring EKS workloads for Network performance issues - Link
- Running kube-proxy in IPVS Mode - Link
- Scalability
- Cluster Upgrades - Link
- Cost Optimization - Link
- Cost Optimization Network - Link
[ About EKS Workshop ]
- Prefix Delegation : https://www.eksworkshop.com/docs/networking/vpc-cni/prefix/
- Custom Networking : https://www.eksworkshop.com/docs/networking/vpc-cni/custom-networking/
- Security Groups for Pods : https://www.eksworkshop.com/docs/networking/vpc-cni/security-groups-for-pods/
- Network Policies : https://www.eksworkshop.com/docs/networking/vpc-cni/network-policies/
- Amazon VPC Lattice : https://www.eksworkshop.com/docs/networking/vpc-lattice/
[ About AWS VPC CNI ] ***
▷ AWS VPC CNI 1편 - POD 편 : Notion Link
▷ L-IPAM 소개 - 링크
▷ AWS VPC CNI 플러그인으로 노드당 파드 수 제한 늘리기 : Link
▷
▷
[ AWS Blog ]
2024
- Preserving client IP address with Proxy protocol v2 and Network Load Balancer - Link
- Migrating from AWS App Mesh to Amazon VPC Lattice - Link
- Patterns for TargetGroupBinding with AWS Load Balancer Controller - Link
- Ensuring fair bandwidth allocation for Amazon EKS Workloads - Link
- Amazon VPC CNI introduces Enhanced Subnet Discovery - Link
- Enabling mTLS with ALB in Amazon EKS - Link
- Spark on Amazon EKS networking – Part 2 - Link
- Spark on Amazon EKS networking – Part 1 - Link
2023
- Empowering Kubernetes Observability with eBPF on Amazon EKS - Link , Caretta
- Deploying AWS Load Balancer Controller on Amazon EKS - Link
- Enhanced VPC flexibility: modify subnets and security groups in Amazon EKS - Link
- Improving availability with Application Load Balancer automatic target weights - Link
- Optimize AZ traffic costs using Amazon EKS, Karpenter, and Istio - Link
- Run Amazon EKS on RHEL Worker Nodes with IPVS Networking - Link
- On-premises egress design patterns for Amazon EKS - Link
- Recent changes to the CoreDNS add-on - Link
- Amazon VPC CNI now supports Kubernetes Network Policies - Link
- Network Load Balancers now support Security groups - Link
- Automating custom networking to solve IPv4 exhaustion in Amazon EKS - Link
- A deeper look at Ingress Sharing and Target Group Binding in AWS Load Balancer Controller - Link
- Scale from 100 to 10,000 pods on Amazon EKS - Link
- How to rapidly scale your application with ALB on EKS (without losing traffic) - Link
- Blue/Green or Canary Amazon EKS clusters migration for stateless ArgoCD workloads - Link
2022
- Expose Amazon EKS pods through cross-account load balancer - Link
- Exposing Kubernetes Applications, Part 3: Ingress-Nginx Controller - Link
- Exposing Kubernetes Applications, Part 2: AWS Load Balancer Controller - Link
- Exposing Kubernetes Applications, Part 1: Service and Ingress Resources - Link
- Troubleshooting Amazon EKS API servers with Prometheus - Link
- Using AWS Load Balancer Controller for blue/green deployment, canary deployment and A/B testing - Link
- Addressing latency and data transfer costs on EKS using Istio - Link
- How to route UDP traffic into Kubernetes - Link , supertuxkart
- How To Expose Multiple Applications on Amazon EKS Using a Single Application Load Balancer - Link
[ 참고 링크 ]
[ 도전 과제 모음 ]
- [도전과제1] Enable EKS Zonal Shift to avoid impaired Availability Zones - Link
- Learn about Amazon Application Recovery Controller’s (ARC) Zonal Shift in Amazon EKS - Link
- [도전과제2] AWS Load Balancer Controller Blue/Green Split Traffic - Link
- [도전과제3] AWS BP Guide - Monitoring EKS workloads for Network performance issues - Link
- [도전과제4] AWS BP Guide - Running kube-proxy in IPVS Mode - Link
- Run Amazon EKS on RHEL Worker Nodes with IPVS Networking - Link
- [도전과제5] AWS BP Guide - Cluster Services : Scale CoreDNS - Link
- [도전과제6] AWS BP Guide - Cost Optimization : Network - Link
- [도전과제7] Preserving client IP address with Proxy protocol v2 and Network Load Balancer - Link
- [도전과제8] AWS VPC CNI 환경에서 Service(LoadBalancer Type)을 NLB(IP mode) 구성 시 NLB → Node(Pod) 구간에 Flow를 분석 정리
- [도전과제9] AWS VPC CNI 환경에서 Ingress을 ALB(IP mode) 구성 시 ALB → Node(Pod) 구간에 Flow를 분석 정리 - Blog
- [도전과제10] A deeper look at Ingress Sharing and Target Group Binding in AWS Load Balancer Controller - Link
- EKS Workshop
- Prefix Delegation : https://www.eksworkshop.com/docs/networking/vpc-cni/prefix/
- Custom Networking : https://www.eksworkshop.com/docs/networking/vpc-cni/custom-networking/
- Security Groups for Pods : https://www.eksworkshop.com/docs/networking/vpc-cni/security-groups-for-pods/
- Network Policies : https://www.eksworkshop.com/docs/networking/vpc-cni/network-policies/
- Amazon VPC Lattice : https://www.eksworkshop.com/docs/networking/vpc-lattice/
Amazon VPC Lattice | EKS Workshop
Simplify service-to-service connectivity, security and monitoring on Amazon Elastic Kubernetes Service with Amazon VPC Lattice.
www.eksworkshop.com
- [도전과제1] EKS Max pod 개수 증가 - Prefix Delegation + WARM & MIN IP/Prefix Targets : EKS에 직접 설정 후 파드 150대 생성해보기 - 링크 Workshop
- Prefix Delegation | EKS Workshop
- [도전과제2] EKS Max pod 개수 증가 - Custom Network : EKS에 직접 설정 후 파드 150대 생성해보기 - 링크 Workshop
- [도전과제3] Security Group for Pod : 파드별 보안그룹 적용해보기 - 링크 Workshop
- [도전과제4] 게임서버의 트래픽(UDP)를 서비스(NLB)를 통해 인입 설정 - 링크
- [도전과제6] How to rapidly scale your application with ALB on EKS (without losing traffic) - 링크
- [도전과제7] Expose Amazon EKS pods through cross-account load balancer - 링크
- [도전과제10] EC2 ENA의 linklocal_allowance_exceeded 메트릭을 프로메테우스로 수집 - 링크
- [도전과제11] Leveraging CNI custom networking alongside security groups for pods in Amazon EKS - 링크
- [도전과제13] How to use Application Load Balancer and Amazon Cognito to authenticate users for your Kubernetes web apps - 링크
- [도전과제14] EKS에 NodeLocal DNS Cache 설정으로 클러스터의 DNS 성능 향상 - Docs 블로깅
- [도전과제15] Addressing latency and data transfer costs on EKS using Istio - 링크
- [도전과제16] Deploy a gRPC-based application on an Amazon EKS cluster and access it with an Application Load Balancer - 링크
- [도전과제17] Optimize webSocket applications scaling with API Gateway on Amazon EKS - Link
- [도전과제18] Use shared VPC subnets in Amazon EKS - Link
- [도전과제20] Automating custom networking to solve IPv4 exhaustion in Amazon EKS - Link
- [도전과제21] A deeper look at Ingress Sharing and Target Group Binding in AWS Load Balancer Controller - Link
- [도전과제22] Using Istio Traffic Management on Amazon EKS to Enhance User Experience - Link
- [도전과제23] Getting Started with Istio on Amazon EKS - Link
- [도전과제24] Avoiding Errors & Timeouts with Kubernetes Applications and AWS Load Balancers - Link
'KANS3 - k8s Advanced Networking Study' 카테고리의 다른 글
| 8주차 - Cilium CNI (2) | 2024.10.20 |
|---|---|
| 7주차 - Service Mesh : Istio-Mode (Sidecar, Ambient) (1) | 2024.10.15 |
| 6주차 - Ingress & Gateway API (4) | 2024.10.07 |
| 5주차 - LoadBalancer(MetalLB), IPVS + LoxiLB (0) | 2024.10.01 |
| 4주차 : Service : ClusterIP, NodePort (3) | 2024.09.26 |


